background image

11

 (FR)

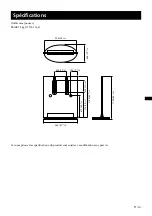
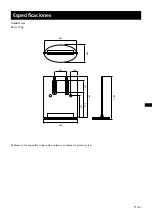
Spécifications

Unité: 

mm (pouces)

Poids: 

78 kg (171 lb 10 oz)

La conception et les spécifications du produit sont sujettes à modification sans préavis.

900 (35 

7

16

)

340 (13 

3

8

)

960 (37 

25

32

)

480 (18 

29

32

)

310 (12 

7

32

)

1 160 (45 

21

32

)

1 182 (46 

17

32

)

713 (28 

1

16

)

195 (7 

11

16

)

617 (24 

9

32

)

Содержание KDE-55XBR950 - 55" Xbr Plasma Wega™ Integrated Television

Страница 1: ... 2003 Sony Corporation 4 098 993 13 1 Floating Stand Instructions Mode d emploi Instrucciones SU PF1L US FR ES For Customers and Sony Dealers in North and Central America ...

Страница 2: ...of a plasma TV requires two people special care and technique When installing a plasma TV refer to this manual carefully Sony is not liable for any accidents or damages caused by incorrect installation or handling Please give this manual to the customer after installation On Safety Products by Sony are designed with safety in mind If the products are used incorrectly however it may result in a ser...

Страница 3: ...over If you fail to do so the Floating Stand may topple over and cause injury or property damage Anchor the stand to a wall etc to prevent it from toppling over Be sure to install the stand on a solid and flat floor Do not install the Floating Stand so that it leans in one direction If you do so the Floating Stand may topple over or the Display Unit may fall This may cause injury If you install th...

Страница 4: ...ock Do not step on the Power Cord or the Display Interface Cable when you carry the Display Stand The Power Cord or the Display Interface Cable may be damaged and this may result in a fire or an electric shock CAUTION If the following precautions are not observed injury or property damage may occur Do not install any equipment other than the specified product This stand is designed for use with th...

Страница 5: ...ratch or poke the glass with sharp edged objects Do not let hard objects such as a vacuum cleaner hit the edges of the glass Note on installation Install the stand on a solid and flat floor Do not allow the stand to be installed at an angle or incline To avoid this observe the following precautions If you install the stand on a soft surface such as a mat or a carpet lay a board over the designated...

Страница 6: ... Be sure that two or more persons install the Display Unit on the Floating Stand If one person does the installation work alone this may result in an accident or injury Be sure to keep small children away during the installation Be sure to install the Display Unit securely following the proper procedure If the Display Unit is not installed securely it may fall and cause injury Check the parts Name...

Страница 7: ...e stand may come off 1 Connect the Power Cord and the Display Interface Cable to the Display Unit z Tip See the instruction manual of Flat Panel Color Television KDE55XBR950 KDE61XBR950 for more details on connecting the Power Cord and the Display Interface Cable Notes If the weight of the Display Unit is placed on the speakers deformation or a loose connection of the speakers may result To avoid ...

Страница 8: ... the fixtures on the stand beforehand Fit the hooks on the rear of the Display Unit into the holes on the fixtures of the stand 3 Confirm that the hooks on the rear of the Display Unit are completely inserted into the four holes on the fixtures Then slide the Display Unit straight downward until it snaps on Front side of the stand Rear side of the Display Unit Hook 1 2 ...

Страница 9: ...on the stand and the hook on the Display Unit 2 Slide the fixing plate until the corner of the L figure hits against the screw Fixing plate 3 Take up the slack out of the Power Cord and Display Interface Cable already drawn through the hole on the stand Pull the ends of the Power Cord and Display Interface Cable already drawn through the hole on the stand and take up the slack out of the cord and ...

Страница 10: ...sing a rope or chain with fastening one end of it to the securing hook and the other end to the wall or pillar Prepare a commercially available rope or chain and wall anchor bracket beforehand 1 Secure the wall anchor bracket to a solid wall or pillar 2 Pass the rope or chain through both holes of the anchor attachments and then tighten the other end of the rope or chain to the wall anchor bracket...

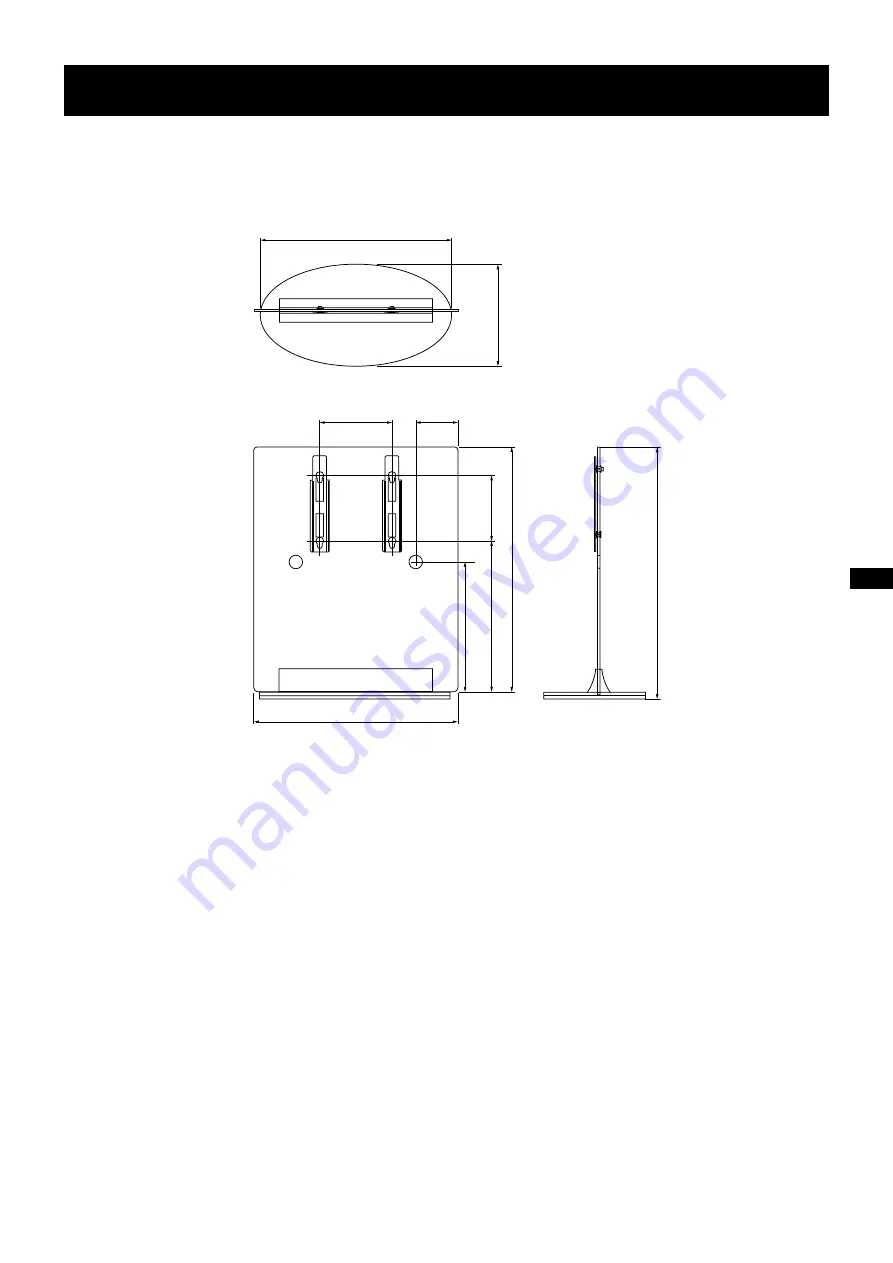
Страница 11: ... mm inches Weight 78 kg 171 lb 10 oz Design and specifications are subject to change without notice 340 13 3 8 900 35 7 16 480 18 29 32 195 7 11 16 960 37 25 32 617 24 9 32 1 160 45 21 32 1 182 46 17 32 310 12 7 32 713 28 1 16 ...

Страница 12: ...lasma doit être monté par deux personnes spécialisées Lors de l installation d un téléviseur à écran plasma reportez vous au présent mode d emploi Sony décline toute responsabilité en cas d accident ou de dommages provoqués par une installation ou une utilisation incorrecte Le présent mode d emploi doit être remis au client après installation À propos des mesures de sécurité Les produits Sony sont...

Страница 13: ...mbe Dans le cas contraire le support indépendant risque de basculer et provoquer des dommages corporels ou matériels Ancrez le support sur le mur etc afin d éviter qu il ne tombe Veillez à monter le support sur une surface plane et solide Ne montez pas le support indépendant s il penche d un côté Sinon le support risque de basculer ou l écran risque de tomber Ceci pourrait provoquer des blessures ...

Страница 14: ...z pas sur le cordon d alimentation ou le câble d interface vidéo lorsque vous transportez l écran Si le cordon d alimentation ou le câble d interface vidéo est endommagé ceci peut provoquer un incendie ou une électrocution ATTENTION Le non respect des précautions suivantes peut entraîner des dommages corporels ou matériels N installez pas d autre équipement que le produit spécifié Ce support est c...

Страница 15: ...es objets pointus Ne frappez pas les bords du verre avec un objet lourd tel un aspirateur Note à propos de l installation Montez le support sur une surface plane et solide Le support doit être installé à la verticale et jamais incliné Pour éviter cette situation respectez les précautions suivantes Si vous montez le support sur une surface moelleuse comme un tapis ou une moquette posez au préalable...

Страница 16: ...allation Assurez vous qu au moins deux personnes effectuent l installation de l écran sur le support indépendant L installation par une seule personne risque de provoquer un accident ou des blessures Eloignez les enfants en bas âge lors de l installation Assurez vous de monter l écran en respectant la procédure recommandée Si l écran n est pas correctement monté il risque de tomber et de provoquer...

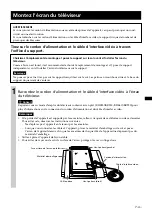
Страница 17: ...upport lorsqu il est sur le sol Les patins en caoutchouc situés à la base du support risqueraient de s enlever 1 Raccordez le cordon d alimentation et le câble d interface vidéo à l écran du téléviseur z Conseil Reportez vous au mode d emploi du téléviseur couleur à écran plat KDE55XBR950 KDE61XBR950 pour plus d informations sur la connexion du cordon d alimentation et du câble d interface vidéo R...

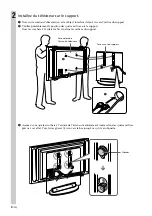
Страница 18: ...tion des quatre orifices sur le support Fixez les crochets à l arrière de l écran dans les orifices du support 3 Assurez vous que les crochets à l arrière de l écran sont entièrement insérés dans les quatre orifices prévus à cet effet Puis faites glisser l écran vers le bas jusqu à ce qu il s encliquette Face avant du support Face arrière de l écran du téléviseur Crochet 1 2 ...

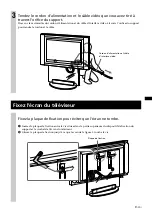
Страница 19: ...u dispositif de fixation du support et le crochet de l écran du téléviseur 2 Glissez la plaque de fixation jusqu à ce que le coin de la figure L touche la vis Plaque de fixation 3 Tendez le cordon d alimentation et le câble vidéo que vous avez tiré à travers l orifice du support Tirez sur les extrémités du cordon d alimentation et du câble d interface vidéo à travers l orifice du support pour tend...

Страница 20: ...orde ou d une chaîne en attachant l une des ses extrémités au crochet de fixation et l autre au mur ou au pilier Préparez préalablement une corde ou une chaîne ainsi qu un support d ancrage mural disponibles dans le commerce 1 Fixez solidement le support d ancrage mural sur un mur ou un pilier solide 2 Faites passer la corde ou la chaîne dans les deux orifices des dispositifs d ancrage et fixez le...

Страница 21: ...oids 78 kg 171 lb 10 oz La conception et les spécifications du produit sont sujettes à modification sans préavis 900 35 7 16 340 13 3 8 960 37 25 32 480 18 29 32 310 12 7 32 1 160 45 21 32 1 182 46 17 32 713 28 1 16 195 7 11 16 617 24 9 32 ...

Страница 22: ...levisor de plasma requiere al menos dos personas además de un cuidado y conocimientos técnicos especiales Al instalar un televisor de plasma consulte este manual cuidadosamente Sony no se responsabiliza de los accidentes o daños que se produzcan debido a la instalación o manejo incorrectos Proporcione este manual al cliente una vez finalizada la instalación Seguridad Los productos de Sony están di...

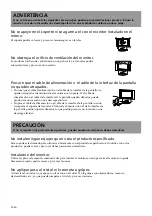
Страница 23: ...precauciones para evitar que el soporte se vuelque De lo contrario el soporte de suspensión puede volcar y provocar daños personales o materiales Fije el soporte a la pared etc para evitar que se vuelque Asegúrese de instalar el soporte en una superficie plana y sólida No instale el soporte de suspensión de forma que quede inclinado ya que podría volcarse dicho soporte o caerse el monitor y provoc...

Страница 24: ...producirse un incendio o una descarga eléctrica No pise el cable de alimentación o el cable de la interfaz de la pantalla cuando transporte el soporte del monitor El cable de alimentación o el de la interfaz de la pantalla podrían quedar dañados lo que podría provocar un incendio o una descarga eléctrica PRECAUCIÓN Si no se respetan las precauciones siguientes pueden producirse lesiones o daños ma...

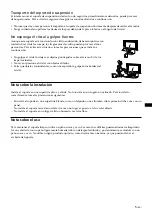
Страница 25: ... sobre el mismo Evite los impactos fuertes No raye ni presione el cristal con objetos afilados Evite que objetos contundentes como una aspiradora golpeen los bordes del cristal Nota sobre la instalación Instale el soporte en una superficie plana y sólida No lo instale en un ángulo ni inclinado Para instalarlo correctamente tome las precauciones siguientes Si instala el soporte en una superficie bl...

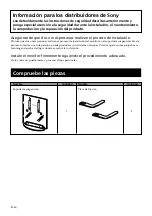
Страница 26: ...alación Procure que dos o más personas realicen el proceso de instalación del monitor en el soporte de suspensión Si este proceso lo realiza una sola persona puede producirse un accidente o lesiones Procure que los niños pequeños se mantengan alejados del lugar donde se realiza la instalación Instale el monitor firmemente siguiendo el procedimiento adecuado De lo contrario puede caerse y provocar ...

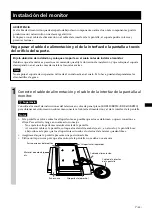
Страница 27: ...lo antes de instalar el monitor encima Nota No empuje el soporte de suspensión ni tire de él cuando esté en el suelo Si lo hace pueden desprenderse las almohadillas de goma 1 Conecte el cable de alimentación y el cable de la interfaz de la pantalla al monitor z Sugerencia Consulte el manual de instrucciones del televisor en color de panel plano KDE55XBR950 KDE61XBR950 para obtener más información ...

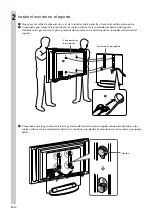
Страница 28: ...ebe previamente la posición de los cuatro orificios de las unidades de fijación del soporte Introduzca los ganchos de la parte posterior del monitor en los orificios de las unidades de fijación del soporte 3 Compruebe que los ganchos de la parte posterior del monitor estén completamente introducidos en los cuatro orificios de las unidades de fijación A continuación deslice el monitor hacia abajo h...

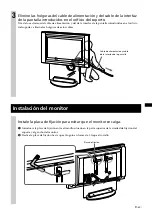
Страница 29: ... del de la interfaz de la pantalla introducidos en el orificio del soporte y elimine las holguras de estos cables Placa de fijación Instalación del monitor Instale la placa de fijación para evitar que el monitor se caiga 1 Introduzca la placa de fijación entre el tornillo situado en la parte superior de la unidad de fijación del soporte y el gancho del monitor 2 Deslice la placa de fijación hasta ...

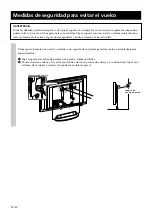
Страница 30: ...s extremos de la misma al gancho de seguridad y el otro extremo a la pared o pilar Prepare previamente una cuerda o cadena y un soporte de anclaje de pared de venta en establecimientos especializados 1 Fije el soporte de anclaje de pared a una pared o columna sólidas 2 Pase la cuerda o cadena a través de los orificios de los accesorios de anclaje y a continuación fije el otro extremo de la cuerda ...

Страница 31: ...11 ES Especificaciones Unidad mm Peso 78 kg El diseño y las especificaciones están sujetos a cambios sin previo aviso 900 340 960 480 310 713 195 617 1 160 1 182 ...

Страница 32: ......

Страница 33: ......

Страница 34: ......

Страница 35: ......

Страница 36: ...Printed on 100 recycled paper Printed in Japan ...

Отзывы: