background image

Making calls with speed dialing 

1

Press 

(LINE 1)

 or 

(LINE 2)

 to select the line.

2

Pick up the handset.

3

Press 

(SPEED DIAL)

.

4

Press the desired speed dialing number (

(0)

 to 

(9)

).

The phone number stored in the speed dialing number will be dialed.

Having a three-way conference call

You can talk on two lines at the same time.

Making another call while talking

1

Press 

(HOLD)

 while talking on one line.

The line in use is put on hold.

2

Press 

(LINE 1)

 or 

(LINE 2)

, whichever is not used.

3

Dial a phone number for the second party.

4

Press 

(CONF)

 (conference) after you’re connected to the second party.

Now you can talk to both parties.

Receiving a call while talking

1

Press 

(HOLD)

 while talking on one line.

The line in use is put on hold.

2

Press 

(LINE 1)

 or 

(LINE 2)

, in which another call is coming.

3

Press 

(CONF)

 (conference).

Now you can talk to both parties.

Note

If you do not press 

(HOLD)

 in step 1, the first line will be disconnected.

To disconnect the lines during a three-way conference

To disconnect both lines at the same time, replace the handset in the cradle.
To disconnect line 1 and continue talking on line 2 only:
Press 

(LINE 2)

.

To disconnect line 2 and continue talking on line 1 only:
Press 

(LINE 1)

.

To put the lines on hold during a three-way conference

Press 

(HOLD)

. Both lines are put on hold.

To resume the conversations on both lines, press 

(CONF)

.

To resume the conversation only on one line, press 

(LINE 1)

 or 

(LINE 2)

, for the line you 

want.

Note

During a three-way conference, do not press 

(FLASH)

 to use “call waiting” service. Otherwise, both 

lines will be disconnected.

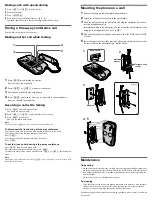
Mounting the phone on a wall

1

Remove the hang-up tab and replace it upside down.

2

Attach the telephone line cord(s) to the wall bracket.

3

Hook the wall bracket to the wall plate, and plug the telephone line cord(s) 
into the telephone outlet(s).

Instead of hooking to the wall plate, you can mount the wall bracket directly 
using the four supplied screws (see Fig. 

A

).

4

Plug the other end of the telephone line cord(s) into the LINE 1 and/or LINE 
2 jack(s).

5

Insert the upper tabs first, then press the phone into the wall bracket so that 
the lower tabs on the wall bracket go into the phone.

Maintenance

On handling

• Do not attempt to disassemble the casing. Refer servicing to qualified personnel only.
• Do not put foreign objects into the unit. Should any liquid or solid object fall into the 

unit, unplug the unit and have it checked by qualified personnel before operating the 
unit any further.

• Do not drop the unit as a malfunction may result.

On cleaning

• Clean the cabinets with a soft cloth slightly moistened with water or a mild detergent 

solution. Do not use any type of abrasive pad, scouring powder or solvent such as 
alcohol or benzine as they may damage the finish of the cabinet.

If you have any questions or problems concerning your phone, please consult your nearest 
Sony dealer.

1

2

4

3

1

2

3

4, 5

Fig. 

A

Hang-up tab

Telephone line 
cord(s)

Wall 
bracket

Wall plate

Содержание IT-M11

Страница 1: ...ice provides an indication of the maximum number of terminal allowed to be connected to a telephone interface The termination on an interface may consist of any combination of devices subject only to the requirement that the sum of the Ringer Equivalence Number of all the devices does not exceed 5 IMPORTANT INSTRUCTION TO USERS Your model IT M11 has been approved by the Industry Canada INFORMATION...

Страница 2: ...positifs n excéde pas 5 NOTICE IMPORTANTE POUR L UTILISATEUR Votre IT M11 a été approuvé par l Industrie Canada INFORMATIONS Cet appareil numérique de la class B est conforme à la norme NMB 003 du Canada Remarque L utilisation de cet appareil est soumise à deux conditions 1 cet appareil ne peut causer aucune interférence 2 cet appareil doit accepter toute les interférences y compris les interféren...

Страница 3: ...nces vocales Notez que la tonalité et la pause sont comptées chacune comme un chiffre 5 Appuyez sur SPEED DIAL 6 Appuyez sur une des touches de composition de 0 à 9 pour mémoriser le numéro de téléphone tapé 7 Replacez le combiné sur l appareil Conseils Si vous vous trompez en composant le numéro à l étape 4 appuyez sur PGM et recommencez au début Sur le répertoire fourni inscrivez les coordonnées...

Страница 4: ...gne à utiliser Remarque Pendant une téléréunion à trois n appuyez pas sur FLASH pour utiliser le service appel en attente car dans ce cas les deux lignes seraient déconnectées Fixation du téléphone sur un mur 1 Retirez l ergot de suspension et replacez le à l envers 2 Fixez la les ligne s de téléphone sur l applique murale 3 Accrochez l applique murale sur la plaque murale et branchez le s cordon ...

Страница 5: ...n à fréquences vocales ou impulsion est correct Le téléphone ne recompose pas correctement le numéro Assurez vous que le numéro y compris éventuellement les chiffres de tonalité et de pause composé en dernier lieu compte moins de 32 chiffres numérotation à fréquences vocales ou de 31 chiffres numérotation à impulsion Assurez vous que le dernier numéro composé est bien celui que vous voulez contact...

Страница 6: ...aling key Storing phone numbers 1 Press either LINE 1 or LINE 2 2 Pick up the handset 3 Press PGM program 4 Enter the phone number you want to store You can enter up to 16 digits for pulse dialing or 15 digits for tone dialing Note that tone and pause are each counted as one digit 5 Press SPEED DIAL 6 Press one of the dialing keys 0 to 9 to store a phone number on 7 Replace the handset in the crad...

Страница 7: ...only on one line press LINE 1 or LINE 2 for the line you want Note During a three way conference do not press FLASH to use call waiting service Otherwise both lines will be disconnected Mounting the phone on a wall 1 Remove the hang up tab and replace it upside down 2 Attach the telephone line cord s to the wall bracket 3 Hook the wall bracket to the wall plate and plug the telephone line cord s i...

Страница 8: ...ct at all even the number you dial is correct Make sure the dialing mode setting pulse or tone is correct The phone does not redial correctly Make sure the number including the tone and pause digits if used you last dialed is less than 32 digits for pulse dialing more or 31 digits for tone dialing mode Make sure the last dialed number is really the one you want to dial The phone does not make a sp...

Отзывы: