

Pairing the Camera Unit with the Remote Commander
1
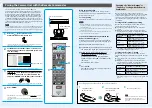
Press the
(power) switch on the
Communication System to turn it on.
The
(power) indicator on the Communication System flashes. The indicator
lights in green when the Communication System turns on.
2
Set “RF Remote Control Reception” to “Camera” in
the setup menu of the Communication System and
save the setting.
Set to “Camera.”
For the setting, refer to the Operating Instructions supplied with the System.
3
Within three minutes after the power of the System
is turned on, locate the Remote Commander closer
to the RF receiver at the rear of the Camera Unit,
and press “RETURN” and “TOOLS” at the same time.
The Remote Commander and the Camera Unit enter pairing mode, and the LED
indicator on the Remote Commander flashes rapidly.
4
Press “ENTER.”
If the LED indicator on the Remote Commander flashes more slowly, pairing the
units has succeeded.
The pairing between the Communication System and the Remote Commander is
disabled.
When pairing has failed
The LED indicator on the Remote Commander continues
flashing rapidly. In this case, press the ENTER button on the
Remote Commander again.
To cancel pairing
Press the
(power) switch on the Communication System.
Notes
When the LED indicator does not flash even if you press any button on
the Remote Commander, the batteries might be exhausted. Replace both
batteries with new ones.
Once pairing is established between the units, it will not be erased even if
the batteries are replaced.
Operable distance is 10 m (32.8 ft.). Depending on the circumstances, a
longer operable distance may be possible.
To pair the Communication System with the
Remote Commander again
Follow the procedure below to release the paring with the
Camera Unit, and to perform pairing with the System again.
Turn on the Communication System.
Set “RF Remote Control Reception” to “System” in
the setup menu of the Communication System.
Within three minutes after the power of
the System is turned on, locate the Remote
Commander closer to the Communication
System, and press “RETURN” and “TOOLS” at the
same time.
The LED indicator flashes rapidly.
Press “ENTER.”
If the LED indicator flashes more slowly, pairing between
the units has succeeded.
1
3
4
(power) indicator
LED
PCSA-CXG80 HD
Camera Unit
When you change the setting of “Monitor Output” or
“Frequency” on the Video setup menu to an incorrect setting,
no picture will be displayed on the screen. In such a case,
select the correct setting, using the
/
(power) switch on
the Communication System and the buttons on the Remote
Commander.
To change the “Monitor Output” setting
When the
/
(power) indicator on the Communication
System stays lit, perform the steps below.
Press the
/
(power) switch on the Communication
System.
Within five seconds after you pressed the
/
switch,
press the buttons on the Remote Commander described
below depending on the desired “Monitor Output.”
Desired “Monitor
Output”
On the Remote Commander,
press:
HDMI
VIDEO INPUT button (once)
Number button 3 (three times)
RGB
VIDEO INPUT button (once)
Number button 4 (three times)
HDMI+RGB
VIDEO INPUT button (once)
Number button 5 (three times)
The setting of “Monitor Output” is changed, and the
picture will be displayed on the screen.
To change the “Frequency” setting
When the
/
(power) indicator on the Communication
System blinks then stays lit after rebooting, perform the steps
below.
Press the
/
(power) switch on the Communication
System.
Within five seconds after you pressed the
/
switch,
press the buttons on the Remote Commander described
below depending on the desired “Frequency.”
Desired
“Frequency” On the Remote Commander, press:
60 Hz
VIDEO INPUT button (once)
Number
button 1 (three times)
50 Hz
VIDEO INPUT button (once)
Number
button 2 (three times)
The setting of “Frequency” is changed, and the system will
reboot.
The supplied Remote Commander controls the HD Visual
Communication System using the radio frequency of 2.4 GHz. The
Remote Commander and the Communication System are paired to
prevent interference from other Remote Commanders and Systems.
Pairing between the Remote Commander and the Communication
System is programmed at the factory. If the Communication System
is installed in shielded locations, such as under a desk or in a rack, it
may not be controlled by the Remote Commander, depending on the
conditions of radio-wave reception. In this case, pair the PCSA-CXG80
HD Camera Unit with the Remote Commander.
Note
When performing pairing procedure, be sure to turn off other HD Visual Communication
Systems or HD Camera Units located nearby that are not targets for pairing. If multiple
devices are turned on, the Remote Commander might pair device other than the target
one.
Changing the “Monitor Output” or
“Frequency” Setting with the Remote
Commander
Inserting batteries into the Remote Commander
1
2
3
Press the battery
compartment lid to
remove the cover.
Insert two size AA (R6)
batteries (supplied) with
correct polarities.
Press the battery compartment
lid to remove the cover.
Note
Be sure to insert the batteries
side first. Inserting
them forcibly
side first may damage the
insulated film covering the batteries and cause a
short circuit.