ILCE-5100/5100L/5100Y_L2
1-1
1. SERVICE NOTE
1-1. PRECAUTION ON REPLACING THE SY-1044 BOARD
Destination Data
When you replace to the repairing board, the written destination data of repairing board also might be changed to original setting.
Start the Adjust Manual in the Adjust Station and execute the “DESTINATION DATA WRITE”.
USB Serial No. and Product ID
The unit is shipped after an ID (USB Serial No.) unique to each unit and an ID (Product ID) unique to each model have been written.
These IDs have not been written in a new board for service, and therefore they must be entered after the board replacement.
After the board has been replaced with a board for service, start the Adjust Manual in the Adjust Station and execute the “PRODUCT ID & USB
SERIAL No. INPUT” and enter these IDs.
Note:
A newly entered Product ID is not always equal to the ID before board replacement. If the new ID differs from the previous ID, it may cause a difference
from the ID registered by the customer.
Imager DRA Data
• When the imager data is extracted from the set before the SY board replacement, extract the imager data from the set before the SY board replace-
ment using “Restore Data (Imager DRA Data Reference)” in the DATA tab of the Adjust manual.
After the SY board has been replaced, write the data extracted from the set before the SY board replacement in the set using “Imager DRA Data
Write” in the ADJUST tab of the Adjust manual.
• When the imager data is not extracted from the set before the SY board replacement, write the fixed data to the set using “Failed reading old board
data” of “Imager DRA Data Write” in the “ADJUST tab” of “Adjust manual”.
Update of MAC Address
When a board that contains Wi-Fi has been replaced or when replacing a board that contains the main IC (CPU), the IC’s unique number (MAC ad-
dress) must be reloaded.
Perform the following procedure to reload the IC’s unique number (MAC address).
Note:
Perform the following operations after all work has been done.
1. Download the latest-version Adjust Manual.
2. Install the downloaded Adjust Manual.
3. Start the Adjust Manual, and execute “Wireless LAN Setting (MAC Address)” on the ADJUST tab.
4. Perform the following operations for the unit to initialize.
MENU
→
→
[Reset Network Set.]
→
[OK]
→
●
5. Perform the following operations for the unit to display MAC address.
MENU
→
→
[Disp MAC Address]
→
●
6. Confirm that the displayed MAC address has been updated.
Applicable parts
• SY-1044 BOARD, COMPLETE (SERVICE)
Note:
The LOAD AND WRITE function in ADJUSTMENT DATA BACKUP on the DATA tab in the Adjust manual overwrites all data of the unit.
Therefore, the MAC address updated during the above procedure is also overwritten.
After the replacement and repair, the MAC address is changed, and thus the re-setting for connection devices is required. Accordingly, download the
Flyer of WLAN Reset (Flyer of WLAN Reset_9834752[][].pdf) and print out it, and attach it to the set when returning the set to customer.
1-2. PRECAUTION FOR REPLACEMENT OF IMAGER
Capture the data to PC from CD-ROM supplied with the imager unit when it is ordered.
Write the captured data in the set using “Imager DRA Data Write” in the ADJUST tab of the Adjust manual.
After all adjustment items have been completed, execute “Phase Difference AF Check” on the SERVICE tab of the Adjust manual.
– ENGLISH –
1-3. CHECKING THE Wi-Fi FUNCTION
Perform the following procedure to check the Wi-Fi function.
Required equipment: Windows personal computer with Wi-Fi interface
1. Turn on the power of the unit.
2. Perform the following operations for the unit.
MENU
→
→
[Send to Smartphone]
→
●
3. The Send to smartphone screen is displayed.
4. The image selected from the camera or smartphone is displayed, select the picture to be used.
5. Select “This image” on the view on smartphone screen and press the
●
of the center, the “Wi-Fi Standby…” screen is appeared.
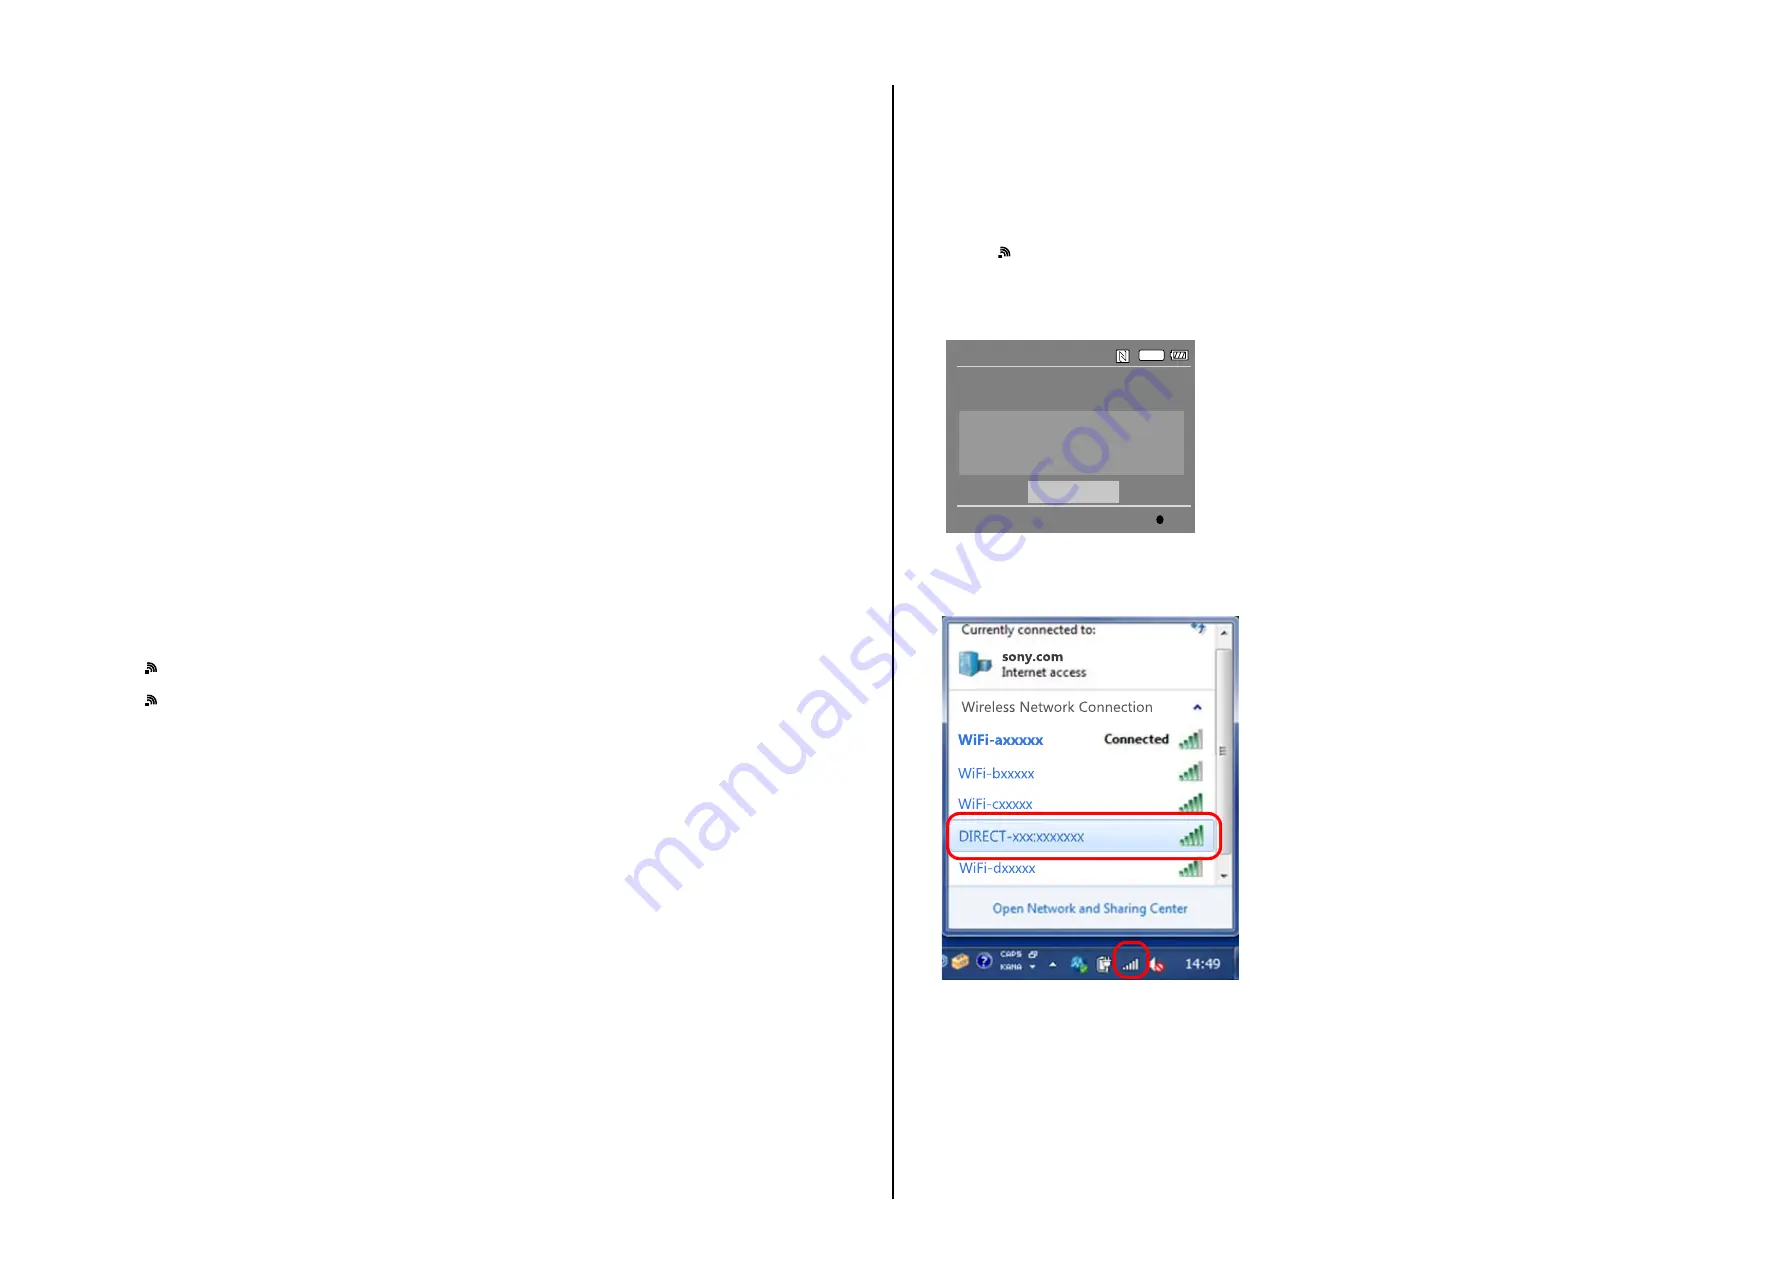
6. When preparation for Wi-Fi has been completed, the “Running as an access point.” screen opens and a password for Wi-Fi connection is displayed.
SSID
DIRECT-XXXX:MODEL-NAME
Password
XXXXXXXX
Device Name
ILCE-XX
Wi-Fi
Send to Smartphone
Operate smartphone to connect to
this device via Wi-Fi.
Cancel
Enter
7. Confirm on the personal computer that the unit is detected as a connectable wireless network.
8. To further confirm that the unit is connectable, connect the unit to the personal computer and double-click the “current connection” from the icon
displayed on the notice field, make sure that the unit is displayed in the Wireless internet access column.


