Sony HVR-A1E Скачать руководство пользователя страница 111

111

Additional Information

HVR-A1E/A1P 2-639-668-11(1)

•  Keep the Remote Commander and button-type 

battery out of children’s reach. If the battery 
is accidentally swallowed, consult a doctor 
immediately.

•  If the battery electrolytic liquid has leaked,

–  consult your local authorized Sony service 

facility.

–  wash off any liquid that may have contacted 

your skin

–  if any liquid gets in your eyes, wash with 

plenty of water and consult a doctor.

 When not using your camcorder for a 

long time

•  Occasionally turn it on and let it run such as by 

playing back tapes for about 3 minutes.

•  Use up the battery pack completely before 

storing it. 

Moisture condensation

If your camcorder is brought directly from 
a cold place to a warm place, moisture may 
condense inside your camcorder, on the 
surface of the tape, or on the lens. In this 
state, the tape may stick to the head drum 
and be damaged or your camcorder may 
not operate correctly. If there is moisture 
inside your camcorder, [



 Moisture 

condensation. Eject the cassette.] or [


Moisture condensation. Turn off for 1H.] 
appears. The indicator will not appear when 
the moisture condenses on the lens.

 If moisture condensation has occurred 

None of the functions except cassette 
ejection will work. Eject the cassette, turn 
off your camcorder, and leave it for about 
one hour with the cassette lid open. Your 
camcorder can be used again if 

 or 


does not appear when the power is turned 
on again.
If moisture starts to condense, your 
camcorder sometimes cannot detect 
condensation. If this happens, the cassette 
is sometimes not ejected for 10 seconds 
after the cassette lid is opened. This is not 
a malfunction. Do not close the cassette lid 
until the cassette is ejected.

 Note on moisture condensation

Moisture may condense when you bring 
your camcorder from a cold place into a 
warm place (or vice versa) or when you use 
your camcorder in a humid place as shown 
below.

•  When you bring your camcorder from a ski 

slope into a place warmed up by a heating 
device.

•  When you bring your camcorder from an 

air conditioned car or room into a hot place 
outside.

•  When you use your camcorder after a squall or 

a shower.

•  When you use your camcorder in a hot and 

humid place.

 How to prevent moisture condensation

When you bring your camcorder from a 
cold place into a warm place, put your 
camcorder in a plastic bag and seal it 
tightly. Remove the bag when the air 
temperature inside the plastic bag has 
reached the surrounding temperature (after 
about one hour).

Video head

•  When the video head becomes dirty, you cannot 

record pictures normally, or distorted picture or 
sound is played back.

•  If the following problem occurs, clean the video 

heads for 10 seconds with the Sony DVM-
12CLD cleaning cassette (optional).
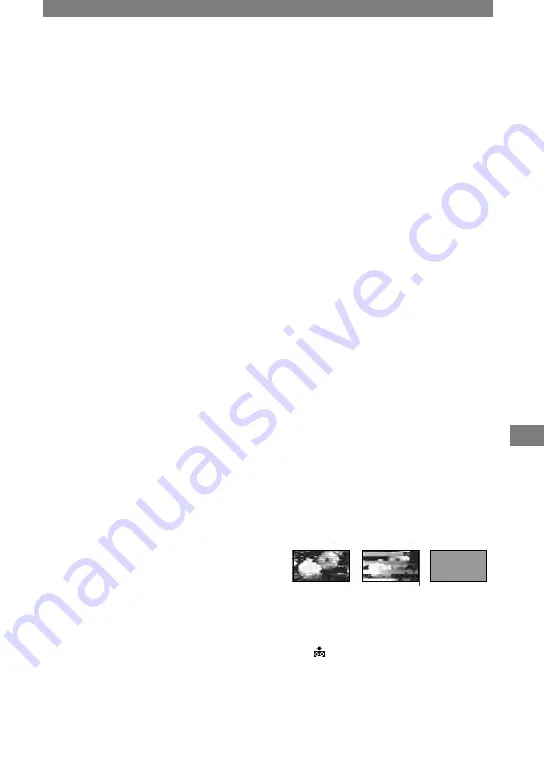
–  Mosaic-pattern noise appears on the playback 

picture or the screen is displayed in blue.

–  A part of playback pictures does not move.
–  Playback pictures do not move.
–  Playback pictures do not appear or the sound 

breaks off.

–  [

 Dirty video head. Use a cleaning 

cassette.] appears on the screen during 
recording.

•  The video head suffers from wear after long 

use. If you cannot obtain a clear image even 
after using a cleaning cassette, it might be 
because the video head is worn. Please contact 

Continued 

Содержание HVR-A1E

Страница 1: ... 2005 Sony Corporation Digital HDVideo Camera Recorder Operating Guide Before operating the unit please read this manual thoroughly and retain it for future reference HVR A1E A1P 2 639 668 11 1 ...

Страница 2: ...uct is intended for use in the following Electromagnetic Environment s E1 residential E2 commercial and light industrial E3 urban outdoors and E4 controlled EMC environment ex TV studio ATTENTION The electromagnetic fields at the specific frequencies may influence the picture and sound of this camcorder Memory Stick N50 Disposal of Waste Electrical and Electronic Equipment for business use Applicable...

Страница 3: ...l high definition HD video signals are recorded and played back on a DV format cassette HDV signals are compressed in MPEG2 format which is adopted in BS broadcast satellite digital and terrestrial digital HDTV broadcastings and in Blu ray disc recorders p 102 On the types of Memory Stick you can use in your camcorder There are two sizes of Memory Stick You can use Memory Stick Duo marked with or p...

Страница 4: ...tional for effective use However there may be some tiny black points and or bright points white red blue or green in color that appear constantly on the LCD screen and the viewfinder These points are normal results of the manufacturing process and do not affect the recording in any way White red blue or green point Black point Exposing the LCD screen the viewfinder or the lens to direct sunlight for...

Страница 5: ... are captured using a digital still camera and therefore may appear different The on screen displays in each local language are used for illustrating the operating procedures Change the screen language before using your camcorder if necessary About the Carl Zeiss lens Your camcorder is equipped with a Carl Zeiss lens which was developed jointly by Carl Zeiss in Germany and Sony Corporation and pro...

Страница 6: ...om To fix the brightness or the exposure of the picture manually EXPOSURE AE SHIFT To record in dark places NightShot To make the subject stand out clearer TELE MACRO To use the AUTO LOCK switch To adjust the focus manually To enlarge and focus on the image Expanded focus To adjust the exposure for backlit subjects To record in mirror mode To use a tripod Playback To use PB zoom To adjust the movie...

Страница 7: ...TY IMAGE SIZE ALL ERASE NEW FOLDER etc PICT APPLI menu 52 Special effects on pictures or additional functions on recording playback SLIDE SHOW PICT EFFECT etc EDIT PLAY menu 56 Settings for editing or playing back in various modes VAR SPD PB END SEARCH etc STANDARD SET menu 57 Settings while recording on a tape or other basic settings REC MODE MULTI SOUND LCD VF SET DISP OUTPUT etc TIME LANGU menu...

Страница 8: ... Troubleshooting 82 Warning indicators and messages 97 Additional Information Using your camcorder abroad 101 HDV format and recording playback 102 Compatibility of the DVCAM DV formats 104 About the Memory Stick 106 About the InfoLITHIUM battery pack 108 About i LINK 109 Maintenance and precautions 110 Specifications 113 Quick Reference Identifying parts and controls 116 Index 119 ...

Страница 9: ...7 AC Adaptor 1 p 10 Mains lead 1 p 10 Lens hood with lens cover 1 p 20 117 Use the lens hood to record under strong light such as under the sun Wireless Remote Commander 1 p 32 A button type lithium battery is already installed A V connecting cable 1 p 33 68 Component video cable 1 p 33 34 USB cable 1 p 77 Shoulder Strap 1 p 117 XLR adaptor 1 p 19 Wind Screen 1 Microphone 1 p 19 Rechargeable batte...

Страница 10: ...plug AC Adaptor To the wall socket Mains lead 1 Attach the battery pack by sliding it in the direction of the arrow until it clicks 2 Slide the POWER switch up to OFF CHG The default setting CHG charge lamp 3 Connect the AC Adaptor to the DC IN jack of your camcorder Be sure that the mark on the DC plug is facing up The mark faces up Open the DC IN jack cover ...

Страница 11: ...cket by making the same connections as you do when charging the battery pack The battery pack will not lose its charge in this case Charging time Approximate time min required when you fully charge a fully discharged battery pack Battery pack Charging time NP FM50 supplied 150 NP QM71D 260 NP QM91D 360 Recording time Approximate time min available when you use a fully charged battery pack Recordin...

Страница 12: ...N jack of your camcorder even when the mains lead is disconnected from the wall socket Use the supplied or optional Sony InfoLITHIUM battery pack M series You cannot use the battery pack NP FM30 with your camcorder When attaching an optional video light it is recommended that you use a NP QM71D or NP QM91D battery pack On the charging recording playback time Times measured with the camcorder at 25...

Страница 13: ... respective lamp If the POWER switch is set to OFF CHG slide it down while pressing the green button Lamps that light up CAMERA TAPE To record on a tape CAMERA MEMORY To record on a Memory Stick Duo PLAY EDIT To play or edit pictures When you slide the POWER switch from OFF CHG to CAMERA TAPE or CAMERA MEMORY the current date and time will be displayed on the LCD screen for about 5 seconds 2 Hold ...

Страница 14: ... seconds until appears This setting is practical when you use your camcorder in bright conditions or where you want to save battery power The recorded picture will not be affected by the setting To turn on the LCD backlight press and hold DISPLAY BATT INFO for a few seconds until disappears See LCD BRIGHT p 60 to adjust the brightness of the LCD screen The viewfinder You can view images using the v...

Страница 15: ...orm the same actions as explained above when you press the buttons on the LCD frame Be careful not to press buttons on the LCD frame accidentally while using the touch panel To hide the screen indicators Press DISPLAY BATT INFO to toggle the screen data such as time code etc When the POWER switch is set to CAMERA TAPE or CAMERA MEMORY the indicator changes from detailed display simple display no d...

Страница 16: ...om the memory In that case charge the rechargeable battery and then set the date and time again p 112 POWER switch Skip to step 4 when you set the clock for the first time 1 Touch MENU OK 60min PROGRAM AE CAMERA SET SPOT METER EXPOSURE 2 Select TIME LANGU menu with then touch OK 60min CLOCK SET ASSIGNBTN WORLD QUICK REC LANGUAGE DA TE REC PROGRAM AE 3 Select CLOCK SET with then touch OK CLOCK SET D...

Страница 17: ...assette compartment automatically slides back in Do not force the cassette into the compartment This may cause a malfunction 3 Close the lid To eject the cassette Open the lid following the same procedure as described in step 1 and remove the cassette Memory Stick Duo You can use only a Memory Stick Duo marked with or p 106 The number of recordable pictures varies depending on the image quality or...

Страница 18: ...ding writing data Do not shake or knock your camcorder turn the power off eject the Memory Stick Duo or remove the battery pack Otherwise image data may be damaged Make sure that the Memory Stick Duo does not pop up and drop off when inserting and removing it from your camcorder Step 7 Inserting a tape or a Memory Stick Duo Continued ...

Страница 19: ...Connect the plug of the XLR adaptor to the Active Interface Shoe of the camcorder 3 Attach the wind screen to the microphone 4 Loosen the microphone holder screw and open the cover 5 Place the microphone into the holder with the model name ECM NV1 facing upward close the cover and tighten the screw 6 Connect the plug of the microphone to the INPUT1 connector 7 Set the INPUT LEVEL selector to MIC o...

Страница 20: ...to ON Set INPUT2 to ON when the audio is input via the INPUT2 connector The sound of wind is reduced When you connect equipment other than a microphone set the 48V switch to OFF and the INPUT LEVEL selector to LINE When using an external microphone use a simple full screen or underscan monitor and make sure that the wind screen does not appear on the screen When detaching the XLR adaptor Unplug th...

Страница 21: ...rted To open and close the lens cover Move the lens cover lever up and down to open or close the lens cover Move the lens cover lever to OPEN to open the lens cover and move the lever to CLOSE to close the lens cover ...

Страница 22: ...ect a recording medium If the POWER switch is set to OFF CHG slide it down while pressing the green button Movies on tape The CAMERA TAPE lamp lights up Still images on Memory Stick Duo The CAMERA MEMORY lamp lights up The image size ratio is set by default to 4 3 2 Start recording Movies Press REC START STOP or 60min 60min REC STBY REC To stop the movie recording press REC START STOP again The pi...

Страница 23: ...Touch the picture you want to display in the single display mode To view pictures in other folders touch PB FOLDER select a folder with then touch p 52 Index display screen A B Previous Next 6 pictures The picture displayed before switching to the index screen 2 Start playing back Movies Touch then touch to start playback A B C Stop Play Pause toggles as you touch it Rewind Fast forward Playback a...

Страница 24: ... of the ring if it is rotated too fast To fix the brightness or the exposure of the picture manually EXPOSURE AE SHIFT EXPOSURE VOL lever EXPOSURE button You can adjust the brightness or exposure of a picture manually with the EXPOSURE VOL lever Set the AUTO LOCK switch to OFF beforehand p 25 Select the setting for the EXPOSURE VOL lever with EXPOSURE LEVER p 49 You can assign EXPOSURE p 44 or AE S...

Страница 25: ...djusted while the AUTO LOCK switch is OFF are retained when it is set to ON and will be restored when set to OFF again Set the AUTO LOCK switch to ON when using the external flash optional To adjust the focus manually Set the FOCUS ZOOM switch to MANUAL appears Rotate the focus ring to adjust the focus To adjust the focus automatically set the FOCUS ZOOM switch to AUTO You can also use this functio...

Страница 26: ... screw Remove the tripod when taking out the cassette Playback To use PB zoom You can magnify still pictures on the Memory Stick Duo from about 1 5 to 5 times the original size Magnification can be adjusted with the power zoom lever or the zoom buttons on the LCD frame Play back the picture you want to magnify Magnify the picture with T Telephoto Touch the screen at the point you want to display in...

Страница 27: ...emaining battery approx Recording capacity approx You can assign functions to the ASSIGN button Use ASSIGN BTN p 65 to assign functions To turn off the operation confirmation beep See BEEP p 65 to set the operation beep To initialize the settings Press RESET to initialize all the settings including the setting of the date and time Menu items customized on Personal Menu are not initialized Other par...

Страница 28: ...lay switch button 31 Personal Menu button 38 Recording still images 8 2 90 qa 7 qs 11 60min 11 60min FINE 1920 101 Recording folder 52 Image size 50 Quality FINE or STD 49 Memory Stick Duo indicator and the number of images that can be recorded approx Review button 22 Data code during playback The date time during recording and the camera setting data will be recorded automatically They do not app...

Страница 29: ...ck Time code and user bits are not displayed correctly unless time code and user bits are recorded on the tape or the recorded time code is compatible with your camcorder Viewing still images MEMORY PLAY 2 qg 9 qh qj qk ql 7 ws wdwf wa w Data file name Picture number Total number of recorded pictures in the current playback folder Playback folder 52 Previous Next folder icon The following indicator...

Страница 30: ...er 59 Upper right Indicator Meaning HDV input DV input 71 HDV output DV output 33 70 i LINK connection 33 70 71 Slide show 52 LCD backlight off 14 Center Indicator Meaning NightShot 24 Super NightShot 47 Color Slow Shutter 47 PictBridge connecting 74 Warning 97 Bottom Indicator Meaning AE SHIFT 45 WB SHIFT 46 Picture effect 53 Digital effect 53 Manual focus 25 PROGRAM AE 43 Sharpness 45 Backlight ...

Страница 31: ... seconds and the camcorder enters the standby mode at the point where the last recording has finished END SEARCH will not work correctly when there is a blank section between recorded sections on the tape You can also select END SEARCH from the menu When the PLAY EDIT lamp lights up select the END SEARCH short cut in Personal Menu p 38 Reviewing the most recently recorded scenes Rec review You can ...

Страница 32: ...SPLAY p 15 Memory control buttons Index Memory playback p 23 Aim the Remote Commander towards the remote sensor to operate your camcorder p 27 To change the battery see page 113 Searching for a scene by date of recording Date search You can locate the point where the recording date changes 1 Slide the POWER switch down to turn on the PLAY EDIT lamp 2 Press SEARCH M 3 Press previous next to select ...

Страница 33: ... LINK S VIDEO VIDEO AUDIO See page 34 for connecting methods See page 36 for notes on connection See page 34 for connecting method and 35 for connecting method and See page 36 for notes on connection high definition TV HD high definition image quality 16 9 TV or 4 3 TV SD standard definition image quality Set the menu on your camcorder before connection The TV may not recognize the video signal prope...

Страница 34: ...necting cable supplied Do not connect the S video plug and the video plug yellow Red White Yellow STANDARD SET VCR HDV DV AUTO p 57 COMPONENT p 60 Green Y Blue PB CB Red PR CR i LINK cable optional STANDARD SET VCR HDV DV AUTO p 57 i LINK CONV ON HDV DV p 61 DOWN CONVERT p 61 Change the settings depending on the TV connected Connecting to a TV for viewing Continued ...

Страница 35: ...ow STANDARD SET VCR HDV DV AUTO p 57 COMPONENT p 60 DOWN CONVERT p 61 Green Y Blue PB CB Red PR CR A V connecting cable supplied Do not connect the video plug yellow Red White Yellow STANDARD SET VCR HDV DV AUTO p 57 DOWN CONVERT p 61 A V connecting cable supplied Red White Yellow STANDARD SET VCR HDV DV AUTO p 57 DOWN CONVERT p 61 Do not connect the S video plug Change the settings depending on t...

Страница 36: ... V connecting cable supplied to the audio input jack of your TV This connection produces high resolution pictures compared with A V connecting cable Type If you connect your camcorder to your TV using more than one type of cable to output images from a jack other than the i LINK jack the order of priority of the output signals is as follows component video S video audio video See page 109 for the ...

Страница 37: ...37 Recording Playback ...

Страница 38: ...ems are added You can customize Personal Menu as you like p 66 Touch MENU TC UB DISP 1 3 00 00 00 00 60min 4 3 MARKER TC PRESET ALL SCAN STATUS CHECK STBY Touch the desired item If the desired item is not displayed on the screen touch until the item is displayed Select the desired setting then touch To use menu items You can customize menu items that are not added to Personal Menu OK 60min PROGRAM...

Страница 39: ...he desired item You can also touch the item directly to select it Customize the item After finishing the settings touch close to hide the menu screen If you decide not to change the setting touch to return to the previous screen ...

Страница 40: ...NEFRAME WB SHIFT ATW SENS BLACK STRTCH SPOT FOCUS PEAKING FLASH SET SUPER NS NS LIGHT COLOR SLOW S ZEBRA HISTOGRAM SELF TIMER DIGITAL ZOOM STEADYSHOT CONV LENS FULL SCAN EXPOSURE LEVER MEMORY SET menu p 49 STILL SET ALL ERASE FORMAT FILE NO NEW FOLDER REC FOLDER PB FOLDER The menu items available for the operation differ depending on where the lit lamp for the POWER switch is positioned ...

Страница 41: ...AR SPD PB REC CTRL END SEARCH STANDARD SET menu p 57 VCR HDV DV REC FORMAT DV SET VOLUME AUDIO CH SEL MIC NR MIC LEVEL EXT SUR MIC XLR SET LCD VF SET COMPONENT i LINK CONV DOWN CONVERT USB SELECT DISP GUIDE STATUS CHECK TC UB SET MARKER SET COLOR BAR DATA CODE REMAINING REMOTE CTRL REC LAMP Position of lamp TAPE MEMORY PLAY EDIT Continued ...

Страница 42: ...42 BEEP DISP OUTPUT MENU ROTATE CALIBRATION DATE REC QUICK REC ASSIGN BTN TIME LANGU menu p 66 CLOCK SET WORLD TIME LANGUAGE Position of lamp TAPE MEMORY PLAY EDIT Menu items Continued ...

Страница 43: ...ht or reflected light such as at a beach in midsummer or on a ski slope SUNSET MOON Select to maintain the atmosphere of situations such as sunsets general night views or fireworks LANDSCAPE Select to shoot distant subjects clearly This setting also prevents your camcorder from focusing on glass or metal mesh in windows that comes in between the camcorder and the subject Items with one asterisk are ...

Страница 44: ...ere the lighting conditions change quickly Under the video lamps of those at a studio or under sodium lamps or incandescent like color lamps ONE PUSH The white balance will be adjusted according to the ambient light Touch ONE PUSH Frame a white object such as a piece of paper to fill the screen under the same lighting conditions as you will shoot the subject Touch flashes quickly When the white bala...

Страница 45: ... depending on the shutter speed AUTO SHUTTER Automatically activates the electronic shutter to adjust the shutter speed when recording in bright conditions if you set it to ON the default setting AE SHIFT When the EXPOSURE p 44 is set to AUTO you can adjust the exposure using dark bright and the setting value appear when AE SHIFT is anything other than the default setting You can also adjust the e...

Страница 46: ... LOW Reddishness or blueishness is increased ATW SENS is not effective under a clear sky or the sun BLACK STRTCH When you set BLACK STRTCH to ON raise the ϒ curve characteristics of the dark part so that the gradation of the dark part is reproduced better SPOT FOCUS You can select and adjust the focal point to aim it at a subject not located in the center of the screen 2 3 Set the FOCUS ZOOM switc...

Страница 47: ...t When using either the NightShot p 24 or SUPER NS p 47 function to record you can record clearer pictures by setting NS LIGHT which emits infrared light invisible to ON the default setting Do not cover the infrared port with your fingers or other objects Remove the lens cover with hood supplied or the conversion lens optional The maximum shooting distance using NS LIGHT is about 3 m 10 ft COLOR SL...

Страница 48: ...lf timer with the Remote Commander p 32 There is a short cut in p 38 when the POWER switch is set to CAMERA MEMORY DIGITAL ZOOM You can select the maximum zoom level in case you want to zoom to a level greater than 10 the default setting while recording on a tape Note that the image quality decreases when you are using the digital zoom The right side of the bar shows the digital zooming factor The...

Страница 49: ...ected See page 38 for details on selecting menu items STILL SET BURST You can record several still images one after another by pressing PHOTO OFF Select this when not recording continuously NORMAL Records from 3 1920 1440 image size 5 1440 1080 image size to 25 640 480 image size images continuously at about 0 5 second intervals The maximum number of images are recorded when you press and hold PHO...

Страница 50: ... set to CAMERA TAPE or PLAY EDIT 1440 810 1080 810 640 480 640 360 16MB supplied 25 60 34 80 96 240 115 240 32MB 51 120 69 160 190 485 240 485 64MB 100 240 135 325 390 980 490 980 128MB 205 490 280 650 780 1970 980 1970 256MB 370 890 500 1150 1400 3550 1750 3550 512MB 760 1800 1000 2400 2850 7200 3600 7200 1GB 1550 3650 2100 4900 5900 14500 7300 14500 2GB 3150 7500 4300 10000 12000 30000 15000 300...

Страница 51: ...y Stick Duo FORMAT Memory Stick Duo has been formatted at the factory and does not require formatting To execute formatting touch YES twice Formatting is completed and all the images will be deleted Do not do any of the following while Formatting is displayed Operate the POWER switch operation buttons Eject the Memory Stick Duo Formatting erases everything on the Memory Stick Duo including protect...

Страница 52: ...ors in parentheses appear when the items are selected See page 38 for details on selecting menu items FADER You can add the following effects to currently recording pictures Select the desired effect then touch Press REC START STOP The fader indicator stops flashing and disappears when the fade is complete To cancel the operation touch OFF in step STBY REC Fading out Fading in WHITE FADER BLACK FAD...

Страница 53: ...ental image OLD MOVIE No adjustment necessary Available during recording only Continued Touch appears To cancel D EFFECT touch OFF in step STILL Records a movie while superimposing it on a previously recorded still image FLASH flash motion Records a movie with a serial still image effect strobe effect TRAIL Records a picture so that an incidental image like a trail is left OLD MOVIE Adds an old mov...

Страница 54: ... pictures edited using special effects on another tape p 68 PICT APPLI menu Continued INT REC STL Interval photo recording You can record still images on the Memory Stick Duo at a selected interval This function is useful to observe the movement of clouds or the changes in daylight etc a Recording b Interval Touch a desired interval time 1 5 or 10 minutes ON Press PHOTO fully stops flashing and the...

Страница 55: ... transition slowly at the end 1 2 SOFT TRANS Make the transition slowly at the beginning and end and linearly in between 1 2 START TIMER Set the timer to start the shot transition OFF The timer is not used 5 sec Start the shot transition after 5 seconds 10 sec Start the shot transition after 10 seconds 20 sec Start the shot transition after 20 seconds REC LINK OFF Not change when the recording sta...

Страница 56: ...appear at the top bottom or in the center of the screen This is not a malfunction Pictures output from the HDV DV Interface i LINK jack cannot be played back smoothly in slow mode Touch To return to the normal playback mode touch Play Pause twice once from frame playback You will not hear the recorded sound You may see mosaic like images of the previously played picture Pictures in the HDV format ...

Страница 57: ...e STANDARD SET menu Settings while recording on a tape or other basic settings REC MODE MULTI SOUND LCD VF SET DISP OUTPUT etc The default settings are marked with The indicators in parentheses appear when the items are selected See page 38 for details on selecting menu items VCR HDV DV Select the playback signal Normally select AUTO When the camcorder is connected to another device using an i LIN...

Страница 58: ...stereo sounds FS48K Records in the 16 bit mode 2 stereo sounds with high quality FS48K is selected automatically in the HDV format does not appear when the DVCAM standard is met p 104 AUDIO MIX You can monitor the sound recorded on the tape using another device with audio dubbing during playback AUDIO MIX 00 00 00 00 00 60min CH1 CH2 CH3 CH4 Touch CH1 CH2 CH3 CH4 to adjust the balance of the origi...

Страница 59: ... same setting OFF Deactivate this function MIC LEVEL You can adjust the recording sound level manually AUTO Adjust the recording sound level automatically MANUAL Touch to adjust the recording sound level during recording or standby The recording sound level adjustment bars appear on the screen The recording sound level increases as the bar goes to the right The recording level meter appears when t...

Страница 60: ...ng VF POWER AUTO The picture is not displayed in viewfinder when the LCD panel is open ON The picture is displayed in viewfinder when the LCD panel is open When you select ON the battery life is slightly reduced during recording VF COLOR ON Display pictures in the viewfinder in color OFF Display pictures in the viewfinder in black and white ALLSCAN MODE When you set ALLSCAN MODE to ON you can check th...

Страница 61: ... LINK CONV is set to ON HDV DV and 576p 576i is selected during component video output i LINK CONV When the POWER switch is set to CAMERA TAPE this setting is effective only when HDV1080i is selected in REC FORMAT When the POWER switch is set to PLAY EDIT this setting is effective only when AUTO or HDV is selected in VCR HDV DV OFF Select to output the pictures from the HDV DV Interface i LINK jac...

Страница 62: ...rotation in 10 hour increments TAPE RUN Displays the total hours of tape running in 10 hour increments THREADING Displays the total number of tape unthreading operations in 10 operation increments TC UB SET The time code of this camcorder can be preset You can reset or preset the time code even during recording TC UB DISP You can change the time value between the time code and user bits TC 00 00 0...

Страница 63: ...ure at the backspace editing When recording in the HDV format discrepancy of 3 frames at the maximum may occur User bit values appear at every 3 frames for the tape recorded in the HDV format When you input HDV format signal via i LINK connection the user bits are copied however they are not regenerated MARKER SET You can select the type of marker to be displayed on the screen Select whether each ...

Страница 64: ... 100 9dB F1 8 AUTO 1 2 3 4 5 6 SteadyShot off Exposure White balance Gain Shutter speed Aperture value Appears only during tape playback The exposure adjustment value 0EV a shutter speed and the aperture value appear when still images on a Memory Stick Duo are played back appears for a picture recorded using a flash In the DATE TIME data display the date and time are displayed in the same area If y...

Страница 65: ...ded without influenced by zebra or peaking QUICK REC OFF It takes some time to restart recording from the state that the drum has stopped rotating but the transition from the last recorded scene is smooth ON The time shortens slightly until recording restarts from the state that the drum has stopped rotating but the transition from the last recorded scene may not be smooth Select this when you do n...

Страница 66: ...ai Your camcorder offers ENG SIMP simplified English for when you cannot find your native tongue among the options Customizing Personal Menu You can add desired menu items to Personal Menu and customize Personal Menu settings for each POWER switch position This is convenient if you add frequently used menu items to Personal Menu Adding a menu item You can add up to 28 menu items for each POWER switc...

Страница 67: ... YES NO 00 00 00 00 60min STBY 3 Touch YES You cannot delete MENU and P MENU SET UP Arranging the order of menu items displayed on Personal Menu 1 Touch P MENU SET UP SORT If the desired menu item is not displayed touch 2 Touch the menu item you want to move 3 Touch to move the menu item to the desired place 4 Touch To sort more items repeat steps 2 to 4 5 Touch END You cannot move P MENU SET UP I...

Страница 68: ...nnecting cable supplied A V connecting cable supplied Red White Yellow Red White Yellow Do not connect the video plug yellow HDV1080i compatible device HD quality 1 AV device with i LINK jack SD quality 1 AV device with S VIDEO jack SD quality 1 AV device with audio video jacks 2 SD quality 1 Do not connect the S video plug 1 Pictures recorded in the DVCAM DV format is played back as SD standard d...

Страница 69: ...nly portions recorded in HDV format HDV HDV 3 HDV OFF DVCAM DV 2 3 Copy only portions recorded in DVCAM DV format HDV 2 2 DV OFF DVCAM DV DVCAM DV DVCAM DV 1 Equipment compliant with the HDV1080i specification 2 Results in a copy without an image video nor sound is copied 3 Picture is not recognized no recording is made When VCR HDV DV is set to AUTO and the signal switches between HDV and DVCAM DV...

Страница 70: ...g high quality pictures When i LINK cable optional is connected the format of the output signal or will be indicated on the LCD screen of your camcorder Dubbing to another device 1 Prepare your camcorder for playback Insert the recorded cassette Slide the POWER switch down to turn on the PLAY EDIT lamp Set DOWN CONVERT according to the playback device TV etc p 61 2 Prepare your VCR for recording W...

Страница 71: ...080i compatible device AV device with i LINK jack HD quality SD quality i LINK jack which is compatible with HDV1080i specification is required Recording movies 1 Slide the POWER switch down to turn on the PLAY EDIT lamp 2 Set the input signal of your camcorder Set VCR HDV DV to AUTO when recording from an HDV1080i format compatible device Set VCR HDV DV to DVCAM DV or AUTO when recording from a DV...

Страница 72: ...deo you want to record The pictures on the VCR appear on the screen of your camcorder 3 Press PHOTO lightly at the scene you want to record Check the image and press it fully Dubbing pictures from a tape to a Memory Stick Duo You can record still images on a Memory Stick Duo Make sure you have a recorded tape and a Memory Stick Duo inserted into your camcorder 1 Slide the POWER switch down to turn...

Страница 73: ...ion touch the image again to cancel image protection in step 3 Deleting recorded pictures from the Memory Stick Duo 1 Slide the POWER switch down to turn on the PLAY EDIT lamp 2 Touch 101 2 10 101 0001 60min P MENU MEMORY PLAY MEMORY PLAY 1920 60min 101 0001 3 Select a picture you want to delete with To delete all pictures at once select ALL ERASE p 51 4 Touch YES The pictures cannot be restored o...

Страница 74: ...n using the other device Printing recorded images PictBridge compliant printer You can print out pictures using a PictBridge compliant printer without connecting the camcorder to a computer Connect your camcorder to the AC Adaptor to supply power from the wall socket Insert the Memory Stick Duo on which still images are stored into your camcorder and turn on the power of the printer Connect your c...

Страница 75: ...PictBridge compatible Printing 1 Select the image to be printed with 2 Touch COPIES 3 Select the number of copies to be printed with You can set a maximum of 20 copies of one image to be printed 4 Touch END To print the date on the image touch DATE TIME DATE or DAY TIME 5 Touch EXEC YES When printing is finished Printing disappears and the image selection screen appears again Touch END when printin...

Страница 76: ...rew and then press down and pull out the accessory Connecting with an external device wears out the battery pack faster When an external microphone optional is connected it takes precedence over the internal microphone p 27 Accessory shoe p 19 headphones jack green When you use headphones the speaker on your camcorder is silent MIC PLUG IN POWER jack red This jack works as an input jack for an ext...

Страница 77: ...h an i LINK cable optional Remove the USB cable according to the correct procedure when disconnecting it from the computer p 79 Copying still images to a computer System requirements For Windows users OS Windows 2000 Professional Windows Millennium Edition Windows XP Home Edition Windows XP Professional Standard installation is required Operation is not assured if the above OS has been upgraded CP...

Страница 78: ...Prepare the power source for your camcorder Use the supplied AC Adaptor as the power source p 10 4 Slide the POWER switch down to turn on the PLAY EDIT lamp 5 Touch MENU STANDARD SET USB SELECT MEMORY STICK 6 Connect the USB cable supplied to the USB jack on your camcorder 7 Connect the other end of the USB cable to the USB jack on your computer USB CONNECT appears on the LCD screen of your camcor...

Страница 79: ...ick the drive icon then drag and drop the desired picture file onto the hard disk of your computer Disconnecting the USB cable supplied For Windows users If USB CONNECT appears on the LCD screen follow the procedure below to disconnect the USB cable Click the Unplug or eject hardware icon on the task tray Click this icon task tray Click Safely remove USB Mass Storage Device Drive Click here Click O...

Страница 80: ... if you connect the USB cable to the USB jack on a keyboard or USB hub Make sure to connect the cable to the USB jack on the computer Operation is not guaranteed on all the recommended environments Copying movies on a tape to the computer Connect your camcorder to the computer with an i LINK cable optional The computer needs to be provided with an i LINK connector and be installed with editing sof...

Страница 81: ...the POWER switch position while connecting with an i LINK cable optional The format HDV or DVCAM DV of input output signal appears on the LCD screen of your camcorder while connecting with an i LINK cable optional When setting up your camcorder The menu settings required depend on the format of the recorded pictures and the format for copying Copied format to the computer Menu setting 1 Recorded f...

Страница 82: ...m The camcorder may get warmer while you use it This is not a malfunction Batteries Power sources The power abruptly turns off Turn on the power again p 13 or use the AC Adaptor Charge the battery pack p 10 The CHG charge lamp does not light while the battery pack is being charged Slide the POWER switch up to OFF CHG p 10 Attach the battery pack to the camcorder correctly p 10 No power is supplied...

Страница 83: ...ne It may be damaged p 10 108 A problem occurs when the camcorder is connected to the AC Adaptor Turn off the power and disconnect the AC Adaptor from the wall socket Then connect it again LCD screen viewfinder An unknown indicator appears on the screen Refer to the indicator list p 97 The picture remains on the LCD screen This occurs if you disconnect the AC Adaptor from the wall socket or remove ...

Страница 84: ...displayed Set REMAINING to ON to always display the remaining tape indicator p 64 The cassette is noisier during rewinding or fast forwarding When using the AC Adaptor rewind fast forward speed increases compared with battery operation and therefore increases noise Memory Stick Duo You cannot operate functions using the Memory Stick Duo Slide the POWER switch down to turn on the CAMERA MEMORY or P...

Страница 85: ...orted on your camcorder p 106 The data file name flashes The file is damaged The file format is not supported on your camcorder p 106 Recording Refer also to Adjusting the image during recording p 87 and Memory Stick Duo section p 84 The tape does not start when you press REC START STOP Slide the POWER switch down to turn on the CAMERA TAPE lamp p 22 The tape has reached the end Rewind it or insert a ...

Страница 86: ...1 Do not remove the cassette The picture will be recorded continuously without a break even when you turn the power off Do not record pictures in the HDV and DVCAM DV formats on the same tape You may not be able to record a smooth transition on a tape when QUICK REC is turned on The shutter sound is not heard when you record a still image Set BEEP to ON p 65 The external flash optional does not wor...

Страница 87: ...ng SHOT TRANS STEADYSHOT does not function Set STEADYSHOT to ON You cannot use STEADYSHOT while using SHOT TRANS The BACK LIGHT function does not function The BACK LIGHT function is canceled when you select SPOT METER p 43 You cannot use the BACK LIGHT function when the exposure is anything other than the automatic mode DIGITAL ZOOM does not function You cannot use DIGITAL ZOOM together with TELE ...

Страница 88: ... or computer screen Set STEADYSHOT to OFF p 48 Tiny spots in white appear on the screen The spots appear at a slower shutter speed This is not a malfunction Picture appears too bright on the screen and the subject does not appear on the screen Cancel the BACK LIGHT function p 25 Playback If you are playing back the pictures stored on a Memory Stick Duo refer also to the Memory Stick Duo section p ...

Страница 89: ...he volume p 23 Adjust AUDIO MIX from the CH3 CH4 additional sound side until the sound is heard appropriately p 58 When you are using an S VIDEO plug or component video cable supplied make sure the red and white plugs of the A V connecting cable are connected as well p 33 The time code does not return to 00 00 00 00 even if the tape was rewound to the beginning of recording The time code at the be...

Страница 90: ...annot view the picture in the HD high definition quality on the TV which is not compatible with the HDV1080i specification p 33 Refer to the instruction manuals supplied with your TV Cannot view the picture or hear the sound on the TV connected with the component video cable supplied Set COMPONENT on the STANDARD SET menu according to the requirements of the connected device p 60 When you are using ...

Страница 91: ...ns when you use the supplied Remote Commander Select a commander mode other than VTR 2 for your VCR or cover the sensor of your VCR with black paper Menu Menu items are grayed out You cannot select grayed items in the current recording playback situation You cannot use PROGRAM AE You cannot use PROGRAM AE together with NightShot COLOR BAR OLD MOVIE of D EFFECT TELE MACRO COLOR SLOW S When the AUTO...

Страница 92: ...RY When the AUTO LOCK switch is set to ON p 25 When CINEFRAME is set the shutter speed cannot be adjusted to 1 25 second or less When PROGRAM AE is set SHUTTR SPEED returns to AUTO AE SHIFT cannot be operated You cannot use AE SHIFT together with COLOR BAR When EXPOSURE is anything other than AUTO You cannot use SPOT FOCUS You cannot use SPOT FOCUS together with PROGRAM AE COLOR BAR When the FOCUS...

Страница 93: ...cannot use SUPER NS You cannot use SUPER NS when you set CINEFRAME You cannot use FULL SCAN Set STEADYSHOT to OFF You cannot use D EFFECT You cannot use D EFFECT together with COLOR SLOW S FADER When SHUTTR SPEED is set to less than 1 25 COLOR BAR SUPER NS CINEFRAME You cannot use OLD MOVIE together with PICT EFFECT When SHUTTR SPEED is set to MANUAL PROGRAM AE When WIDE SELECT of DV SET is set to...

Страница 94: ...nnecting cable p 65 You cannot dub correctly using the A V connecting cable You cannot input externally from a device connected with the A V connecting cable The A V connecting cable is not connected properly Make sure that the A V connecting cable is connected to the input jack of another device for dubbing a picture from your camcorder When connected using an i LINK cable optional no picture app...

Страница 95: ...ot view the video recorded on a tape on the computer Disconnect the cable from the computer then connect it again Connect the i LINK cable optional because you cannot copy pictures with the USB cable supplied You cannot view the video and still images recorded on a Memory Stick Duo on the computer Insert a Memory Stick Duo in the correct direction then push it all the way in You cannot use an i LI...

Страница 96: ...emory Stick Duo with the following procedures for the Windows computer 1 Double click My Computer 2 Double click the icon for the newly recognized drive Removable Disk It may take some time until the drive is recognized 3 Double click the desired image file The file copied from the computer is not copied to the Memory Stick Duo The USB cable supplied is not removed with the right procedure Connect y...

Страница 97: ...in and operate your camcorder again Change the cassette Press RESET p 27 and operate your camcorder again E 61 E 62 E 91 Contact your Sony dealer or local authorized Sony service facility Inform them of the 5 digit code which starts from E 101 1001 Warning indicator pertaining to files The file is damaged The file is unreadable p 106 Battery level warning The battery pack is nearly used up Depending ...

Страница 98: ...The camcorder is unsteady so camera shake easily occurs Hold the camcorder steady with both hands and shoot the image However note that the camera shake warning indicator does not disappear You hear a melody when the warning indicators appear on the screen BEEP p 65 Description of warning messages If messages appear on the screen follow the instructions Battery Use the InfoLITHIUM battery pack p 1...

Страница 99: ...emory Stick p 17 Cannot record Reinsert the Memory Stick p 17 No file No file is recorded or there is no readable file on the Memory Stick Duo Memory Stick folders are full You cannot create folders exceeding 999MSDCF You cannot delete created folders using your camcorder You will have to format the Memory Stick Duo p 51 or delete them using your computer Cannot record still images on Memory Stick p ...

Страница 100: ...ht protection p 102 Change to correct tape format The pictures cannot be played back because of an incompatible format No output image in VCR HDV DV Change format Stop the playback or signal input or change the VCR HDV DV setting p 57 Dirty video head Use a cleaning cassette p 111 Invalid in AUTO LOCK mode p 25 Warning indicators and messages Continued ...

Страница 101: ...n Sweden Switzerland Thailand United Kingdom etc PAL M Brazil PAL N Argentina Paraguay Uruguay SECAM Bulgaria France Guiana Iran Iraq Monaco Russia Ukraine etc NTSC Bahama Islands Bolivia Canada Central America Chile Colombia Ecuador Guyana Jamaica Japan Korea Mexico Peru Surinam Taiwan the Philippines the U S A Venezuela etc Viewing HDV format pictures recorded in HDV format You need an HDV1080i ...

Страница 102: ...ape Go to the end of the recorded section using END SEARCH p 31 before you begin the next recording when you have played back the tape Copyright signal When you play back If the cassette you play back on your camcorder contains copyright signals you cannot copy it to a tape in another video camera connected to your camcorder When you record You cannot record software on your camcorder that contain...

Страница 103: ...V1080i specification compliant TVs An HDV format compatible TV with the component input jack is required to view playback pictures recorded in the HDV format See the table below for the main 2004 05 models Sony TV models KDL L42MRX1 KLV L42MRX1 KDL L32MRX1 KLV L32MRX1 KLV L32M1 KLV L32M1 KDE P42MRX1 KE P42MRX1 KDE P42XS1 KE P42XS1 KDE P37XS1 KE P37XS1 KE P42M1 KE P37M1 KDS R60A10 KDS R50A10 KDF E50...

Страница 104: ...t adopts the 2 sampling frequencies are independent Therefore lock mode is more effective than unlock mode in digital processing and smooth transition during audio editing Mini DVCAM and mini DV cassettes The recording format of the picture is defined according to the recorder s format as described below Recorder s format Cassette s format Recording format DVCAM DVCAM DV DVCAM DV DVCAM DV DV This c...

Страница 105: ...format will be partly misadjusted There will be no effect on the recorded picture except in certain cases 2 If the tape that is to be dubbed is in the DVCAM format as in 1 the tape produced will be in the DVCAM format and the time code format will be partly misadjusted 3 Some mini DV video equipment may be able to play back a DVCAM formatted tape Even if the tape is played back quality of the play...

Страница 106: ...bility with your camcorder Data read write speed may vary depending on the combination of the Memory Stick and Memory Stick compliant product you use On a Memory Stick Duo with a write protect tab You can prevent accidental erasure of images when you slide the write protect tab on the Memory Stick Duo with a small tapered object to the write protect position The Memory Stick Duo supplied with your...

Страница 107: ...than a Memory Stick Duo into the Memory Stick Duo slot Doing so may cause a malfunction Do not insert a Memory Stick Duo Adaptor without a Memory Stick Duo attached Doing so may result in malfunctions of the unit On a Memory Stick PRO Duo The maximum memory capacity of a Memory Stick PRO Duo that can be used on your camcorder is 2 GB This unit does not support high speed data transfer On image dat...

Страница 108: ...ght before you start taking shots Use a large capacity battery pack NP QM71D QM91D optional Frequent use of the LCD screen or a frequent playback fast forward or rewind operation wears out the battery pack faster We recommend using a large capacity battery pack NP QM71D QM91D optional Be sure to set the POWER switch to OFF CHG when not recording or playing back on your camcorder The battery pack i...

Страница 109: ...V devices When two or more i LINK compatible devices are connected to this unit in a daisy chain operations and data transactions are possible with not only the device that this unit is connected to but also with other devices via the directly connected device Note however that the method of operation sometimes varies according to the characteristics and specifications of the device to be connected...

Страница 110: ...ns Anywhere extremely hot or cold Never leave them exposed to temperatures above 60 C 140 F such as under direct sunlight near heaters or in a car parked in the sun They may malfunction or become deformed Near strong magnetic fields or mechanical vibration The camcorder may malfunction Near strong radio waves or radiation The camcorder may not be able to record properly Near AM receivers and video ...

Страница 111: ...the cassette is sometimes not ejected for 10 seconds after the cassette lid is opened This is not a malfunction Do not close the cassette lid until the cassette is ejected Note on moisture condensation Moisture may condense when you bring your camcorder from a cold place into a warm place or vice versa or when you use your camcorder in a humid place as shown below When you bring your camcorder fro...

Страница 112: ...s If you did not press the right spot start from step again You cannot calibrate the LCD screen if it is rotated On handling the casing If the casing is soiled clean the camcorder body with a soft cloth lightly moistened with water and then wipe the casing with a dry soft cloth Avoid the following to avoid damage to the finish Using chemicals such as thinner benzine alcohol chemical cloths repellen...

Страница 113: ...e Commander may not function properly In this case replace the battery with a Sony CR2025 lithium battery Use of another battery may present a risk of fire or explosion Specifications System Video recording system HDV Video recording system DVCAM DV 2 rotary heads Helical scanning system 2 rotary heads Helical scanning system Still image recording system Exif Ver 2 2 1 Audio recording system HDV Rot...

Страница 114: ... Technology Industries Association Files in this format can have additional information such as your camcorder s setting information at the time of recording 2 The focal length figures are actual figures resulting from wide angle pixel read out 3 Objects unable to be seen due to the dark can be shot with infrared lighting Output connectors Audio Video output 10 pin connector Video signal 1 Vp p 75 Ω...

Страница 115: ...0 g 1 lb 7 oz main unit only 1 1 kg 2 lb 8 oz including the NP FM50 rechargeable battery pack PHDVM 63DM cassette lens hood with lens cover XLR adaptor and microphone Supplied accessories See page 9 AC Adaptor AC L15A Power requirements AC 100 240 V 50 60 Hz Current consumption 0 35 0 18 A Power consumption 18 W Output voltage DC 8 4 V Operating temperature 0 C to 40 C 32 F to 104 F Storage temper...

Страница 116: ...24 PHOTO button 22 CAMERA TAPE CAMERA MEMORY PLAY EDIT mode lamps 13 POWER switch 13 Memory Stick Duo slot 17 Access lamp 17 106 Active Interface Shoe 76 Accessory shoe 19 ASSIGN button 27 NIGHTSHOT switch 24 MIC PLUG IN POWER jack 76 headphones jack 76 ...

Страница 117: ... USB jack 76 DISPLAY BATT INFO button 27 COMPONENT OUT jack 76 A V OUT jack 76 INPUT1 LOW CUT switch 20 INPUT2 LOW CUT switch 20 RESET button 27 Eyecup Viewfinder 14 Viewfinder lens adjustment lever 14 LANC jack 76 CHG charge lamp 10 Speaker 27 AUTO LOCK switch 25 Battery pack 10 DC IN jack 76 Attaching the shoulder strap Attach the shoulder strap supplied with your camcorder to the hooks for the sh...

Страница 118: ...4 Hooks for the shoulder strap 117 INPUT2 INPUT LEVEL Selector 19 INPUT2 48V switch 19 INPUT1 REC CH SELECT switch 19 INPUT1 INPUT LEVEL Selector 19 INPUT1 48V switch 19 BATT battery release lever 11 INPUT2 connector 19 INPUT1 connector 19 Grip belt 13 Cassette compartment lid 17 OPEN EJECT lever 17 Tripod receptacle 26 Identifying parts and controls Continued CH1 CH2 REC CH SELECT INPUT LEVEL 48V...

Страница 119: ...ack 10 Pre installed rechargeable battery 112 Charging time 11 CHG charge lamp 10 CINEFRAME 45 CINEMATONE ϒ 45 CLOCK SET 16 COLOR BAR 64 COLOR SLOW S Color Slow Shutter 47 92 COMPONENT 60 COMPONENT OUT jack 33 76 Component video cable 34 35 Connect computer 77 TV 33 VCR equipment 68 CONV LENS 48 D DATA CODE 64 DATE REC 65 Date search 32 DATE TIME 64 DC IN jack 10 DC plug 10 Delete pictures 73 DIGI...

Страница 120: ...i LINK 109 i LINK cable 68 i LINK CONV 33 61 J Jack 76 Jack cover 76 JPEG 106 L Label 103 LANC jack 76 LANDSCAPE 43 LANGUAGE 66 LCD VF SET 60 LCD backlight 14 LCD BL LEVEL LCD back light 60 LCD BRIGHT 60 LCD COLOR 60 LCD PANEL 65 LCD panel 14 LCD BL LEVEL 60 LCD BRIGHT 60 LCD COLOR 60 LCD screen 4 Lens hood with lens cover 9 20 Lid 17 M Macintosh 77 79 80 Mains lead 10 Maintenance 110 Manual focus...

Страница 121: ...ry pack See Battery Recording 22 Recording capacity 28 Recording time 11 REC CTRL Recording control 71 REC FOLDER Recording folder 52 REC FORMAT 57 REC LAMP 65 REC Lamp Recording lamp 27 REC MODE Recording mode 57 Rec review 31 REC START STOP 22 REMAINING 64 Remaining battery 28 Remote Commander 32 REMOTE CTRL Remote control 64 Remote sensor 27 RESET button 27 Reversal Playback 56 Review button 28...

Страница 122: ...R HDV DV 57 VF B LIGHT Viewfinder brightness 60 Video head 111 Video operation buttons 29 Viewfinder 14 Brightness 60 Color VF COLOR 60 Power VF POWER 60 Viewfinder lens adjustment lever 14 VOLUME 58 Volume 23 V OUT PANEL 65 W Warning indicators 97 Warning messages 97 WB SHIFT White Balance Shift 46 WHITE BAL White balance 44 WHITE FADER 52 Wide angle 24 WIDE SELECT 58 WIDE STEREO 59 Windows 77 78 Wi...

Страница 123: ...dows Media are trademarks or registered trademarks of U S Microsoft Corporation in the U S and other countries Macintosh and Mac OS are trademarks of Apple Computer Inc in the U S and other countries HDV and the HDV logo are trademarks of Sony Corporation and Victor Company of Japan Ltd Pentium is a trademark or registered trademark of Intel Corporation All other product names mentioned herein may...

Страница 124: ...Printed in Japan Printed on 100 recycled paper using VOC Volatile Organic Compound free vegetable oil based ink http www sony net GB ...

Отзывы: