background image

Gettin

g

 Star

ted

masterpage:Right

lename[D:\SONY SEM 2005\Revision Data\HT-

DDW870\J9050000_2549734151DDW870UCA\2549734151\GB03CON_HT-DDW870-UCA.fm]

 model name1[HT-DDW870]

[2-549-734-

15

(1)]

19

GB

SPEAKER SET UP menu 
parameters

The initial setting is underlined.

x


DIST. X.X m

*

(Front speaker distance)

Initial setting: 3.0 m (10 ft.)

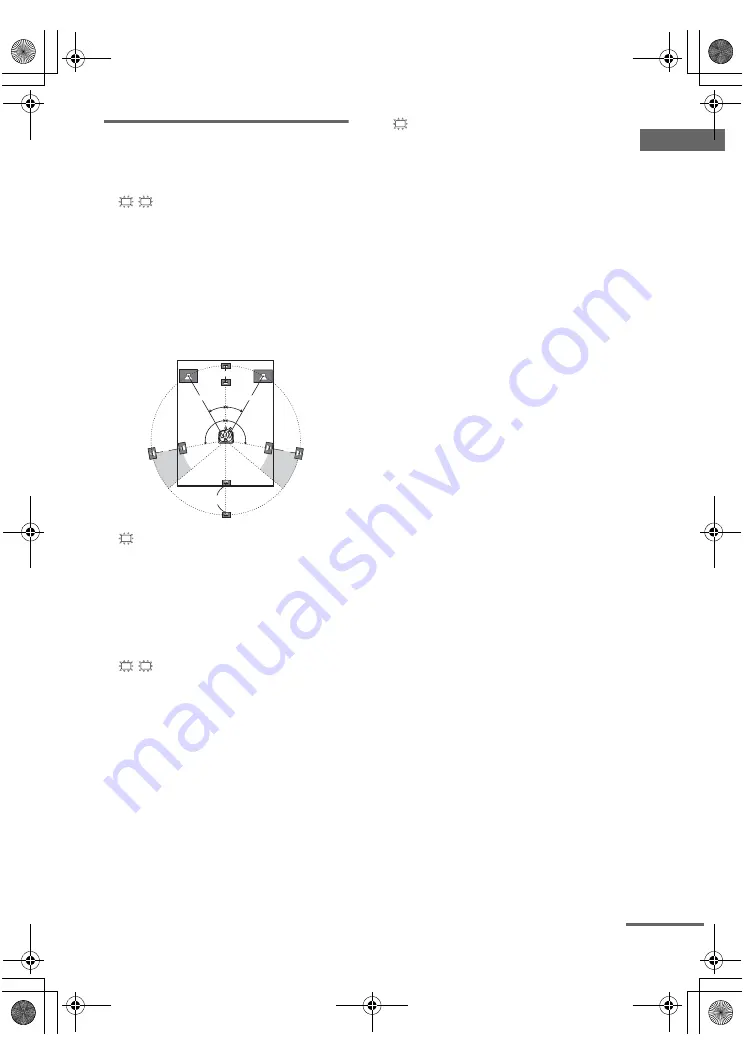
Lets you set the distance from your listening position 
to the front speakers (

A

). You can adjust from 1.0 

meter to 7.0 meters (3 to 23 feet) in 0.1 meter (1 foot) 
steps.

If both front speakers are not placed an equal distance 
from your listening position, set the distance to the 
closest speaker.

x


DIST. X.X m

*

(Center speaker distance)

Initial setting: 3.0 m (10 ft.)

Lets you set the distance from your listening position 
to the center speaker. Center speaker distance should 
be set from a distance equal to the front speaker 
distance (

A

) to a distance 1.5 meters (5 feet) closer to 

your listening position (

B

).

x


DIST. X.X m

*

(Surround speaker distance)

Initial setting: 3.0 m (10 ft.)

Lets you set the distance from your listening position 
to the surround speakers. Surround speaker distance 
should be set from a distance equal to the front speaker 
distance (

A

) to a distance 4.5 meters (15 feet) closer to 

your listening position (

C

).

If both surround speakers are not placed an equal 
distance from your listening position, set the distance 
to the closest speaker.

x


DIST. X.X m

*

(Surround back speaker distance)

Initial setting: 3.0 m (10 ft.)

Lets you set the distance from your listening position 
to the surround back speaker. Surround back speaker 
distance should be set from a distance equal to the front 
speaker distance (

A

) to a distance 4.5 meters (15 feet) 

closer to your listening position (

D

).

* For models of area code U and CA, “XX ft.” is 

displayed.

Tip

The receiver lets you to input the speaker position in 
terms of distance. However, it is not possible to set the 
center speaker further than the front speakers. Also, the 
center speaker cannot be set more than 1.5 meters 
(5 feet) closer than the front speakers.

Likewise, the surround speakers cannot be set further 
away from the listening position than the front 
speakers. And they can be no more than 4.5 meters 
(15 feet) closer.

This is because incorrect speaker placement is not 
conducive to the enjoyment of surround sound.

Please note that, setting the speaker distance closer than 
the actual location of the speakers will cause a delay in 
the output of the sound from that speaker. In other 
words, the speaker will sound like it is further away.

For example, setting the center speaker distance 1–2 
meters (3–6 feet) closer than the actual speaker 
position will create a fairly realistic sensation of being 
“inside” the screen. If you cannot obtain a satisfactory 
surround effect because the surround speakers are too 
close, setting the surround speaker distance closer 
(shorter) than the actual distance will create a larger 
sound stage.

Adjusting these parameter while listening to the sound 
often results in much better surround sound. Give it a 
try!

L

R

D

30˚

30˚

100˚-120˚

100˚-120˚

A

C

C

A

B

C

SL

SR

SB

continued

GB01COV_HT-DDW870-UCA.book  Page 19  Monday, June 20, 2005  4:43 PM

Содержание HT-DDW870

Страница 1: ...ony Corporation 2 549 734 15 1 Home Theatre System Operating Instructions Owner s Record The model and serial numbers are located on the rear of the unit Record the serial number in the space provided below Refer to them whenever you call upon your Sony dealer regarding this product Model No Serial No HT DDW870 GB01COV_HT DDW870 UCA book Page 1 Monday June 20 2005 4 43 PM ...

Страница 2: ...se harmful interference to radio communications However there is no guarantee that interference will not occur in a particular installation If this equipment does cause harmful interference to radio or television reception which can be determined by turning the equipment off and on the user is encouraged to try to correct the interference by one or more of the following measures Reorient or reloca...

Страница 3: ...mote see pages 42 50 The HT DDW870 consists of Models of area code U CA Receiver STR K870P Speaker system Front speaker left SS MSP67L Front speaker right SS MSP67R Center speaker SS CNP67 Surround speaker left SS MSP67SL Surround speaker right SS MSP67SR Surround back speaker SS MSP67SB Sub woofer SA WMSP87 Models of area code CEL CEK Receiver STR K870P Speaker system Front speaker left SS MSP87L...

Страница 4: ... code CEL CEK only Changing the display 27 About the indications in the display 28 Enjoying Surround Sound Using only the front speakers and sub woofer 30 2CH STEREO Enjoying higher fidelity sound 30 AUTO FORMAT DIRECT Selecting a sound field 32 Selecting the surround back decoding mode 33 SURR BACK DECODING Advanced Adjustments and Settings Switching the audio input mode for digital components 35...

Страница 5: ...Connectable components a Model with a DIGITAL OPTICAL OUTPUT or DIGITAL COAXIAL OUTPUT jack etc b Model equipped only with AUDIO OUT L R jacks etc Getting Started 1 Check how to hookup your components Component to be connected Page DVD player With digital audio outputa 7 8 With analog audio output onlyb 7 8 TV monitor With composite video input only 8 or 11 Satellite tuner With digital audio outpu...

Страница 6: ... C Video cord Yellow D Optical digital cord E Coaxial digital cord supplied Orange Notes Turn off the power to all components before making any connections Be sure to make connections firmly to avoid hum and noise When connecting an audio video cord be sure to match the color coded pins to the appropriate jacks on the components yellow video to yellow white left audio to white and red right audio ...

Страница 7: ...AUDIO IN jacks on the receiver In this case do not connect the TV s video output jack to the VIDEO 2 VIDEO IN jack on the receiver 1a Connecting components with digital audio output jacks VIDEO 1 VIDEO IN AUDIO IN AUDIO OUT VIDEO IN VIDEO OUT VIDEO 2 AUDIO IN DVD IN MD TAPE SA CD CD L R L R OUT IN IN VIDEO IN DVD AM AUDIO IN AUDIO OUT VIDEO OUT L R L R DIGITAL ANTENNA OPTICAL MONITOR SUB WOOFER DI...

Страница 8: ...jacks VIDEO 1 VIDEO IN AUDIO IN AUDIO OUT VIDEO IN VIDEO OUT VIDEO 2 AUDIO IN SA CD CD IN DVD IN COAXIAL MD TAPE SA CD CD L R L R OUT IN IN VIDEO IN DVD AM AUDIO IN AUDIO OUT VIDEO OUT L R L R DIGITAL ANTENNA OPTICAL VIDEO 2 IN MONITOR SUB WOOFER C VIDEO OUTPUT C VIDEO INPUT C VIDEO OUTPUT Satellite tuner DVD player TV monitor GB01COV_HT DDW870 UCA book Page 8 Monday June 20 2005 4 43 PM ...

Страница 9: ...ay a Super Audio CD disc on a Super Audio CD player connected to the SA CD CD OPTICAL IN jack on this receiver Connect the player to the analog input jacks SA CD CD IN jacks Refer to the operating instructions supplied with the Super Audio CD player VIDEO 1 VIDEO IN AUDIO IN AUDIO OUT VIDEO IN VIDEO OUT VIDEO 2 AUDIO IN DVD IN COAXIAL MD TAPE SA CD CD L R L R OUT IN IN VIDEO IN DVD AM AUDIO IN AUD...

Страница 10: ...Connecting components with only analog audio jacks VIDEO 1 VIDEO IN AUDIO IN AUDIO OUT VIDEO IN VIDEO OUT VIDEO 2 AUDIO IN SA CD CD IN DVD IN COAXIAL SA CD CD L R L R OUT IN IN VIDEO IN DVD AM AUDIO IN AUDIO OUT VIDEO OUT L R L DIGITAL ANTENNA OPTICAL VIDEO 2 IN MONITOR SUB WOOFER A LINE L R OUTPUT LINE L R LINE INPUT OUTPUT A l IN A l OUT MD TAPE R Super Audio CD CD player MD Tape deck GB01COV_HT...

Страница 11: ...equired cords A E see page 6 VIDEO IN AUDIO IN AUDIO OUT VIDEO IN VIDEO OUT VIDEO 2 AUDIO IN SA CD CD IN DVD IN COAXIAL MD TAPE SA CD CD L R OUT IN IN VIDEO IN DVD AM AUDIO IN AUDIO OUT VIDEO OUT R L R DIGITAL ANTENNA OPTICAL VIDEO 2 IN SUB WOOFER IN VIDEO OUT AUDIO OUT VIDEO IN AUDIO IN OUTPUT INPUT L B VIDEO OUT R AUDIO OUT OUTPUT L B C VIDEO INPUT R L OUT L B VIDEO 1 L L B R MONITOR TV monitor ...

Страница 12: ...na away from the receiver and other components Be sure to fully extend the FM wire antenna After connecting the FM wire antenna keep it as horizontal as possible 2 Connecting the antennas VIDEO 1 VIDEO IN AUDIO IN AUDIO OUT VIDEO IN VIDEO OUT VIDEO 2 AUDIO IN SA CD CD IN DVD IN COAXIAL MD TAPE SA CD CD L R L R OUT IN IN VIDEO IN DVD AM AUDIO IN AUDIO OUT VIDEO OUT L R L R DIGITAL ANTENNA OPTICAL V...

Страница 13: ...nel speaker system configuration Tips When you connect 6 1 channel speaker system place the surround back speaker behind the listening position page 19 Since the sub woofer does not emit highly directional signals you can place it wherever you want For greater flexibility in the positioning of the speakers use the optional WS FV11 or WS FV10D floor stand available only in certain countries You can...

Страница 14: ...CA fm model name1 HT DDW870 2 549 734 15 1 14GB Attaching foot pads To prevent speaker vibration or movement attach the supplied foot pads to the speaker as shown in the illustration below Note Be sure to attach the supplied foot pads to the sub woofer as well GB01COV_HT DDW870 UCA book Page 14 Monday June 20 2005 4 43 PM ...

Страница 15: ...SPEAKERS FRONT B terminals You can select the front speakers you want to use with the SPEAKERS OFF A B A B button For details see Selecting the speaker system page 40 AUDIO OUT FRONT A CENTER FRONT B L R L R L R SPEAKERS SUB WOOFER A E e A E e A E e E e A INPUT B E e A SPEAKERS FRONT B E e A SPEAKERS SURROUND L R SURROUND BACK Sub woofer Center speaker Surround back speaker Front speaker left Fron...

Страница 16: ...suitable for the wall material and strength As a plaster board wall is especially fragile attach the screws securely to a beam and fasten them to the wall Install the speakers on a vertical and flat wall where reinforcement is applied Contact a screw shop or installer regarding the wall material or screws to be used Sony is not responsible for accident or damage caused by improper installation ins...

Страница 17: ...on the rear panel check that the voltage selector is set to the local power supply voltage If not use a screwdriver to set the selector to the correct position before connecting the AC power cord to a wall outlet Receiver Sub woofer Connecting the AC power cord Connect the AC power cord to a wall outlet 4 Connecting the AC power cord VOLTAGE SELECTOR 120V 220V 240V 120V 240V 220V FRONT B L R L R b...

Страница 18: ...ONE and CUSTOMIZE menus The sound field memorized for each input and preset station All sound field parameters All preset stations All index names for inputs and preset stations MASTER VOLUME is set to VOL MIN You can use the SPEAKER SET UP menu to set the distance and location of the speakers connected to this receiver 1 Press 1 to turn on the receiver 2 Press MAIN MENU repeatedly to select SET U...

Страница 19: ...nce from your listening position to the surround back speaker Surround back speaker distance should be set from a distance equal to the front speaker distance A to a distance 4 5 meters 15 feet closer to your listening position D For models of area code U and CA XX ft is displayed Tip The receiver lets you to input the speaker position in terms of distance However it is not possible to set the cen...

Страница 20: ...tening position but presentation remains fairly consistent even with the surround speakers positioned at a rather wide angle However if the speakers are pointing toward the listener from the immediate left and right of the listening position the surround effects becomes unclear unless set to SIDE LO or SIDE HI Nevertheless each listening environment has many variables such as wall reflections and ...

Страница 21: ...y centered at 800 Hz 1 Press 1 to turn on the receiver 2 Press TEST TONE T TONE appears in the display and the test tone is output from each speaker in sequence Front left t Center t Front right t Surround right t Surround back t Surround left t Sub woofer 3 Adjust the speaker levels and balance using the LEVEL menu so that the level of the test tone sounds the same from each speaker For details o...

Страница 22: ...te The muting function will be canceled when you do the following Press MUTING on the remote again Turn the power off Increase the volume To use the headphones Connect the headphones to the PHONES jack When the headphones are connected speaker output is automatically canceled and the SP A and SP B indications in the display turn off When the headphones are connected you can select only the followi...

Страница 23: ...reception is poor press FM MODE to change to monaural MONO You will not be able to enjoy the stereo effect but the sound will be less distorted To return to stereo mode press FM MODE again Direct tuning You can enter the frequency of the station you want directly Use the remote for the operation 1 Press TUNER repeatedly to select the FM or AM band The last received station is tuned in Tip You can ...

Страница 24: ...is procedure to store stations in your new area For details on tuning the stored stations see Tuning to preset stations page 25 If you move the antenna after storing stations with this procedure the stored settings may no longer be valid If this happens repeat this procedure to store the stations again You can preset up to 30 FM or AM stations Then you can easily tune in the stations you often lis...

Страница 25: ...splay RDS information Notes RDS is operable only for FM stations Not all FM stations provide RDS service nor do they provide the same types of services If you are not familiar with the RDS services in your area check with your local radio stations for details Receiving RDS broadcasts Simply select a station on the FM band using automatic tuning page 23 direct tuning page 23 or preset tuning page 2...

Страница 26: ... VARIED Other types of programs such as celebrity interviews panel games and comedy POP M Popular music programs ROCK M Rock music programs EASY M Easy Listening LIGHT M Instrumental vocal and choral music CLASSICS Performances of major orchestras chamber music opera etc OTHER M Music that does not fit into any categories above such as Rhythm Blues and Reggae WEATHER Weather information FINANCE St...

Страница 27: ...ied When the tuner is selected Program Service name or preset station name t Frequency t Program Type indication t Radio Text indication t Current Time indication in 24 hour system t Sound field currently applied Index name appears only when you have assigned one to the input or preset station page 39 Index name does not appear when only blank spaces have been entered or it is the same as the inpu...

Страница 28: ...te Dolby Pro Logic IIx decoding does not function for DTS format signals or for signals with a sampling frequency of more than 48 kHz F DTS ES 96 24 DTS lights up when DTS signals are input DTS ES lights up when DTS ES signals are input DTS 96 24 lights up when the receiver is decoding DTS 96 kHz 24 bit signals Note When playing a DTS format disc be sure that you have made digital connections and ...

Страница 29: ...yed back The boxes around the letters vary to show how the receiver downmixes the source sound L Front Left R Front Right C Center monaural SL Surround Left SR Surround Right S Surround monaural or the surround components obtained by Pro Logic processing SB Surround Back the surround back components obtained by 6 1 channel decoding Example Recording format Front Surround 3 2 Sound Field A F D AUTO...

Страница 30: ...ub woofer Press 2CH 2CH ST appears in the display and the receiver switches to the 2CH STEREO mode The Auto Format Direct A F D mode allows you to select the decoding mode you want for your audio sound Enjoying Surround Sound Using only the front speakers and sub woofer 2CH STEREO Enjoying higher fidelity sound AUTO FORMAT DIRECT A F D mode Display Decoding mode A F D AUTO A F D AUTO As encoded PR...

Страница 31: ...ding mode The selected type of decoding appears in the display x DOLBY PL PRO LOGIC Performs Dolby Pro Logic decoding The source recorded in 2 channel is decoded into 4 1 channels x PLII MV PRO LOGIC II MOVIE Performs Dolby Pro Logic II Movie mode decoding This setting is ideal for movies encoded in Dolby Surround In addition this mode can reproduce sound in 5 1 channel when watching videos of ove...

Страница 32: ...O EX C DC S Reproduces the sound characteristics of the Sony Pictures Entertainment scoring stage This mode is ideal for watching musicals or films where orchestra music is featured in the soundtrack About CINEMA STUDIO EX modes CINEMA STUDIO EX modes are suitable for watching motion picture DVDs etc with multi channel surround effects You can reproduce the sound characteristics of Sony Pictures E...

Страница 33: ...it is selected Sound Field Link For example if you select HALL for the SA CD CD input then change to a different input and then return to SA CD CD HALL will automatically be applied again You can identify the encoding format of DVD software etc by looking at the logo on the package Dolby Digital discs Dolby Surround encoded programs DTS Digital Surround encoded programs Note Sound fields do not fu...

Страница 34: ...EX and 5 1 channel signals d Software encoded with both 5 1 channel signals and an extension stream designed for returning those signals to 6 1 discrete channels Discrete 6 1 channel signals are DVD specific signals not used in movie theaters e This decoder can be used for all 6 1 formats Dolby Digital EX DTS ES Matrix 6 1 DTS ES Discrete 6 1 Note There may be no sound from the surround back speak...

Страница 35: ...cular listening situation Note on the displayed items The setup items you can adjust in each menu vary depending on the sound field Certain setup parameters may be dimmed in the display This means that the selected parameter is either unavailable or fixed and unchangeable Adjusting the LEVEL menu You can adjust the balance and level of each speaker These settings are applied to all sound fields ex...

Страница 36: ...track based on the dynamic range information included in the Dolby Digital signal STD is the standard setting but it only enacts light compression Therefore we recommend using the MAX setting This greatly compresses the dynamic range and lets you view movies late at night at low volumes Unlike analog limiters the levels are predetermined and provide a very natural compression Note Dynamic range co...

Страница 37: ...Using the CUSTOMIZE menu to adjust the receiver You can adjust various receiver settings using the CUSTOMIZE menu 1 Press MAIN MENU repeatedly to select CUSTOM 2 Press or repeatedly to select the parameter you want to adjust For details see CUSTOMIZE menu parameters below 3 Press or repeatedly to select the setting you want The setting is entered automatically 4 Repeat steps 2 and 3 to adjust the ...

Страница 38: ...the input mode between DTS Dolby Digital or PCM PCM PCM signals are given priority to prevent the interruption when playback starts Even when other signals are input the sound is output However this receiver cannot decode DTS CD when set to DEC PCM Note When set to DEC AUTO and the sound from the digital audio jacks for CD etc is interrupted when playback starts set to DEC PCM x DUAL XXX Digital b...

Страница 39: ...haracter 5 Use or and or to create an index name Press or repeatedly to select a character then press to move the cursor to the next position Tips You can select the character type as follows by pressing or repeatedly Alphabet upper case t Numbers t Symbols To enter a blank space press or repeatedly until a blank space appears in the display If you made a mistake press or repeatedly until the char...

Страница 40: ... remote by pressing ALT to light up the button then press SLEEP The remaining time appears in the display If you press SLEEP again the sleep timer will be canceled You can select the front speaker system you want to use Press SPEAKERS OFF A B A B repeatedly to select the front speaker system you want to use The selected speaker system appears in the display To turn off the speaker output press SPE...

Страница 41: ...when editing a video tape See the operating instructions of your VCR or DVD player if you need help 1 Select the program source to be recorded 2 Prepare the component for playing For example insert a video tape you want to record into VCR 3 Insert a blank video tape into the VCR VIDEO 1 for recording 4 Start recording on the recording VCR then start playing the video tape or DVD you want to record...

Страница 42: ... cause a malfunction If you don t use the remote for an extended period of time remove the batteries to avoid possible damage from battery leakage and corrosion The H TV VOL TV CH and MASTER VOL buttons have a tactile dot Use the tactile dot as a reference when operating the receiver and other audio video components Operations Using the Remote RM AAP001 Before you use your remote Remote button des...

Страница 43: ...corder Hard disc recorder PSX Satellite tuner Turns the audio and video components onor off Remote Button Operations Function CLEAR 9 CD player DVD player Blu ray disc recorder PSX Satellite tuner Clears a mistake when youpressthe incorrect numeric buttons or returns to continuos playback etc DISC ws CD player VCD player Selects a disc directly multi disc changer only DISPLAY qa TV VCR VCD player ...

Страница 44: ...rround back decoding modes SEARCH MODE ws DVD player Selects searching mode Press to select the unit for search track index etc SHIFT 9 Receiver Selects a memory page for presetting radio stations or tuning to preset stations Remote Button Operations Function SLEEP ef Receiver Activates the sleep function and the duration which the receiver turns off automatically SUBTITLE 8 DVD player Changes the...

Страница 45: ...te tuner Selects the channel entrymode either one or two digit 1 ef Receiver Turns the receiver on or off 8 VCR CD player VCD player LD player DVD player MD deck DAT deck Tape deck Blu ray disc recorder Hard disc recorder PSX Skips tracks Remote Button Operations Function m M 9 CD player VCD player DVD player LD player MD deck Blu ray disc recorder Hard disc recorder PSX Searches tracks in the for...

Страница 46: ...ns Selecting the command mode You can switch the command mode AV1 and AV2 of the remote If the command mode of the receiver and the remote is different you cannot use the remote to operate the receiver To change the command mode of the receiver see page 53 Press AV1 or AV2 while holding down RM SET UP The indicator flashes once twice for AV2 then the command mode switches To check the command mode...

Страница 47: ...spectively 4 Press ENTER Once the numeric code has been verified the indicator slowly flashes twice and the remote automatically exits the programming mode 5 Repeat steps 1 to 4 to control other components To cancel programming Press RM SET UP during any step The remote automatically exits the programming mode To activate the input after programming Press the programmed button to activate the inpu...

Страница 48: ...h brand There is a chance however that your component will not respond to some or all of the codes All of the input buttons on this remote may not be available when used with your particular component To control a CD player To control a DAT deck To control an MD deck To control a tape deck To control an LD player To control a video CD player Maker Code s SONY 101 102 103 DENON 104 123 JVC 105 106 ...

Страница 49: ...38 739 740 PHILIPS 729 730 731 PIONEER 729 RCA PROSCAN 722 729 730 731 741 747 SAMSUNG 742 743 744 745 SANYO 717 720 746 SHARP 748 749 TELEFUNKEN 751 752 TOSHIBA 747 755 756 ZENITH 754 Maker Code s SONY 401 402 403 PANASONIC 406 408 PHILIPS 407 PIONEER 409 TOSHIBA 404 DENON 405 Maker Code s SONY 501 502 DAEWOO 504 505 506 507 515 544 FISHER 508 GOLDSTAR 503 511 512 515 534 544 GRUNDIG 517 534 HITA...

Страница 50: ... GB08REM_HT DDW870 UCA fm 50GB model name1 HT DDW870 2 549 734 15 1 To control a hard disc recorder To control a blu ray disc recorder To control a PSX Maker Code s SONY 307 308 309 Maker Code s SONY 310 311 312 Maker Code s SONY 313 314 315 GB01COV_HT DDW870 UCA book Page 50 Monday June 20 2005 4 43 PM ...

Страница 51: ... receiver in a location with adequate ventilation to prevent heat buildup and prolong the life of the receiver Do not place the receiver near heat sources or in a place subject to direct sunlight excessive dust or mechanical shock Do not place anything on top of the cabinet that might block the ventilation holes and cause malfunctions Use caution when placing the receiver or speakers on surfaces t...

Страница 52: ...g 2 channel sources Check that the INPUT MODE is not set to COAX IN or OPT IN page 35 There is no sound from digital sources from COAXIAL or OPTICAL input jack Check that the INPUT MODE is not set to ANALOG page 35 Check that the INPUT MODE is not set to COAX IN for the sources from OPTICAL input jack or set to OPT IN for the sources from COAXIAL input jack The left and right sounds are unbalanced...

Страница 53: ...t whether they actually provide the service in question If so the service may be temporarily out of order There is no picture or an unclear picture appears on the TV screen or monitor Select the appropriate input on the receiver Set your TV to the appropriate input mode Move your TV away from the audio components Models of area code CEL CEK only Remote control The remote does not function The AUX ...

Страница 54: ... all memorized settings will be reset to their factory settings and you will have to readjust all settings on the receiver If the problem persist Consult your nearest Sony dealer Reference sections for clearing the receiver s memory AUDIO POWER SPECIFICATIONS POWER OUTPUT AND TOTAL HARMONIC DISTORTION Models of area code U only With 6 ohm loads both channels driven from 120 20 000 Hz rated 60 watt...

Страница 55: ...Models of area code E51 With 10 kHz tuning scale 530 1 610 kHz3 With 9 kHz tuning scale 531 1 602 kHz3 Models of area code MX With 10 kHz tuning scale 530 1 610 kHz Antenna Loop antenna Intermediate frequency 450 kHz 3 You can change the AM tuning scale to 9 kHz or 10 kHz After tuning in any AM station turn off the receiver While holding down PRESET TUNING or TUNING press 1 All preset stations wil...

Страница 56: ... speakers 0 6 kg 1 lb 6 oz Models of other area codes Front speakers SS MSP87L SS MSP87R Center speaker SS CNP87 Surround speakers SS MSP87SL SS MSP87SR Surround back speaker SS MSP87SB Front center speakers Full range magnetically shielded Surround surround back speakers Full range Speaker units 80 mm cone type Enclosure type Bass reflex Rated Impedance 6 ohms Dimension w h d Approx Front surroun...

Страница 57: ...ntenna 1 AM loop antenna 1 Speaker connecting cord long 3 Speaker connecting cord short 3 Monaural connecting cord 1 Coaxial digital cord 1 Foot pads speakers 24 Foot pads subwoofer 4 Remote commander RM AAP001 1 R6 size AA batteries 2 Speakers Front speakers 2 Center speaker 1 Surround speakers 2 Surround back speaker 1 Sub woofer 1 Design and specifications are subject to change without notice A...

Страница 58: ...or qf 32 33 52 PHONES jack ed 22 52 PRESET TUNING e 24 SA CD CD wf 22 SLEEP q 40 SPEAKERS OFF A B A B 4 15 40 52 SURR BACK DECODING qg 33 TUNING ea 23 VIDEO 1 wl 22 VIDEO 2 wk 22 VIDEO 3 wj 22 VIDEO 3 IN PORTABLE AV IN jacks es 11 2CH button indicator qa 30 33 36 1 power 1 18 24 36 53 w 18 35 37 39 ql 18 35 37 39 List of button locations and reference pages How to use this page Use this page to fi...

Страница 59: ...ual Mono 38 Dubbing See Recording E Editing See Recording I Indexing See Naming L Labeling See Naming LEVEL menu 35 N Naming 39 P Preset stations how to 24 how to tune 25 R RDS 25 Recording on a video tape 41 on an audio tape or MD 41 S Selecting component 22 sound field 32 33 speaker system 40 Sleep Timer 40 Sound field customizing 35 pre programmed 32 33 resetting 36 selecting 32 33 SPEAKER SET ...

Страница 60: ...EM 2005 Revision Data HT DDW870 J9050000_2549734151DDW870UCA 2549734151 GB10BKC_HT DDW870 UCA fm Sony Corporation Printed in Malaysia model name1 HT DDW870 2 549 734 15 1 GB01COV_HT DDW870 UCA book Page 60 Monday June 20 2005 4 43 PM ...

Отзывы: