background image

25

GB

Getting Star

ted

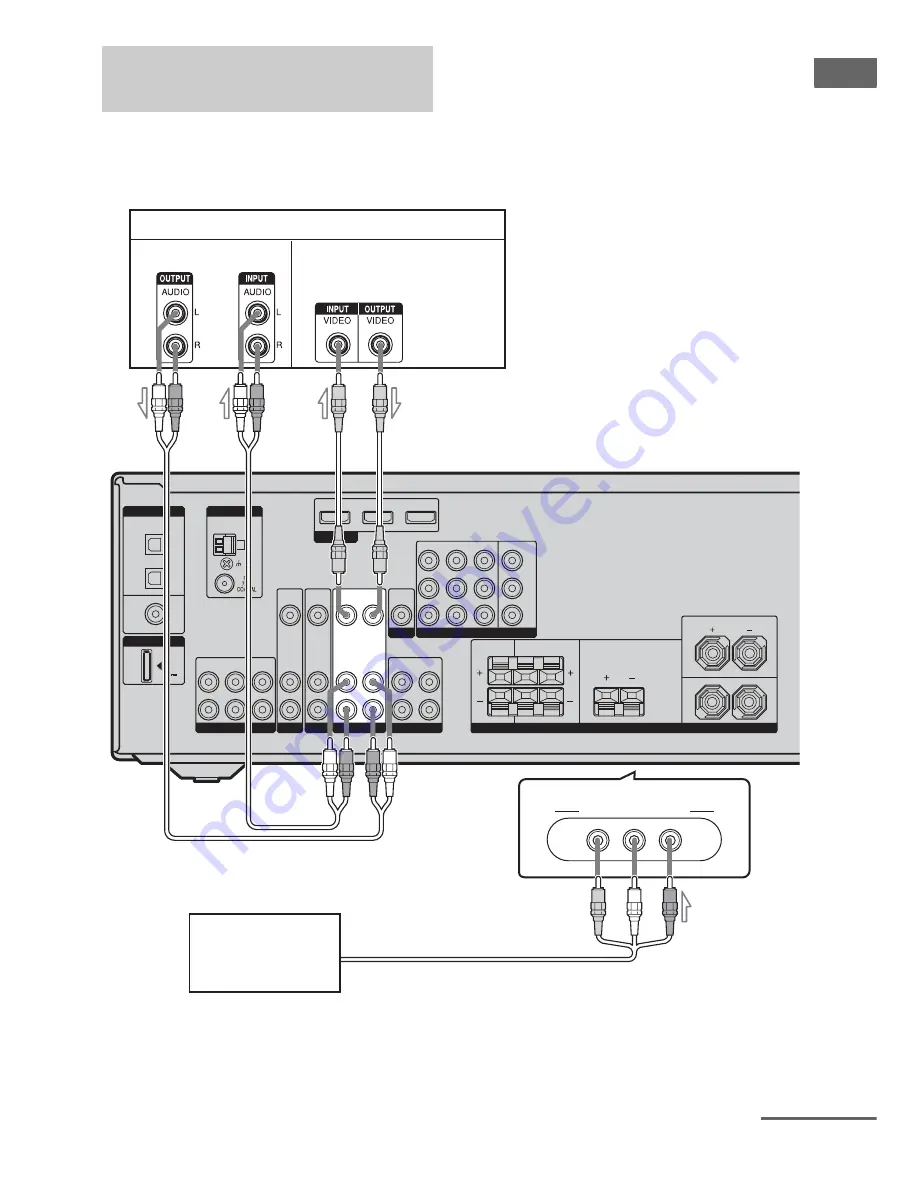
The following illustration shows how to 
connect a component which has analog jacks 
such as a DVD recorder, VCR, etc. 

It is not necessary to connect all the cords. 
Connect audio and video cords according to 
the jacks of your components.

Connecting components with 
analog video and audio jacks

DVD IN

BD IN

OUT

OPTICAL

COAXIAL

BD

IN

SAT

IN

DVD

IN

HDMI

VIDEO

IN

AUDIO

IN

VIDEO

IN

AUDIO

IN

AUDIO

OUT

SURROUND

FRONT: ONLY FOR SS-MSP5000
CENTER: ONLY FOR SS-CNP5000
SURROUND: ONLY FOR SS-SRP5000

SURROUND

BACK

CENTER

L

R

FRONT

L

R

SPEAKERS

DMPORT

DIGITAL

AM

ANTENNA

L

R

L

R

SA-CD/CD/CD-R

IN

IN

OUT

TV

SAT

DVD

VIDEO

OUT

MONITOR

DC5V

0.7A MAX

AUDIO

OUT

AUDIO

IN

SAT IN

Y

P

B

/

C

B

P

R

/

C

R

COMPONENT VIDEO

DVD IN

BD IN

MONITOR OUT

VIDEO 2 IN/PORTABLE AV IN

VIDEO

L  AUDIO   R

VIDEO

OUT

VIDEO

IN

VIDEO 1

SUBWOOFER

DVD recorder, VCR

A

(On the front panel)

Camcorder/
video game

C

Audio signals

Video signals

B

A

Audio cord (not supplied)

B

Video cord (not supplied)

C

Audio/video cord (not supplied)

A

B

continued

Содержание HT-DDW5000

Страница 1: ... 2008 Sony Corporation 3 285 513 11 1 Home Theatre System Operating Instructions HT DDW5000 ...

Страница 2: ...ot expose this apparatus to dripping or splashing and do not place objects filled with liquids such as vases on the apparatus Do not install the appliance in a confined space such as a bookcase or built in cabinet As the main plug is used to disconnect the unit from the mains connect the unit to an easily accessible AC outlet Should you notice an abnormality in the unit disconnect the main plug fr...

Страница 3: ...c and the double D symbol are trademarks of Dolby Laboratories Manufactured under license under U S Patent s 5 451 942 5 956 674 5 974 380 5 978 762 6 226 616 6 487 535 7 003 467 7 212 872 other U S and worldwide patents issued pending DTS DTS Digital Surround ES and Neo 6 are registered trademarks and the DTS logos Symbol and DTS 96 24 are trademarks of DTS Inc 1996 2007 DTS Inc All Rights Reserv...

Страница 4: ...gs for the audio AUDIO menu 44 Settings for the video VIDEO menu 45 Settings for the system SYSTEM menu 46 Calibrating the appropriate settings automatically A CAL menu 48 Enjoying Surround Sound Enjoying Dolby Digital and DTS Surround sound AUTO FORMAT DIRECT 49 Selecting a pre programmed sound field 51 Using only the front speakers and subwoofers 2CH STEREO SUBWOOFER 53 Resetting sound fields to...

Страница 5: ...E Press or turn to operate the tuner FM AM page 54 TUNING D Display The current status of the selected component or a list of selectable items appears here page 7 E MULTICHANNEL DECODING lamp Lights up when multi channel audio signals are decoded page 37 F Remote sensor Receives signals from remote commander Name Function G DISPLAY Press to select information displayed on the display page 61 62 H ...

Страница 6: ...and the duration which the receiver turns off automatically page 63 O DIMMER Press to change the brightness of the display page 48 P MEMORY ENTER Press to store a station or enter the selection when selecting the settings page 29 Q VIDEO 2 IN PORTABLE AV IN jacks Connect to a portable audio video component such as a camcorder or video game page 25 34 R AUTO CAL MIC jack Connects to the supplied op...

Страница 7: ...ights up when the Pro Logic IIx Movie Music Game decoder is activated Note Dolby Pro Logic IIx decoding does not function for DTS format signals or for signals with a sampling frequency of more than 48 kHz Name Function E OPT Lights up when INPUT MODE is set to AUTO and the source signal is a digital signal being input through the OPTICAL jack page 58 F DTS DTS ES DTS 96 24 DTS lights up when the ...

Страница 8: ...jack page 21 N Playback channel indicators L R C SL SR S SB The letters L C R etc indicate the channels being played back The boxes around the letters vary to show how the receiver downmixes the source sound Front Left Front Right Center monaural Surround Left Surround Right Surround monaural or the surround components obtained by Pro Logic processing Surround back the surround back components obt...

Страница 9: ...T VIDEO DC5V 0 7A MAX A DIGITAL INPUT OUTPUT section OPTICAL IN jacks Connects to a DVD player etc The COAXIAL jack provides a better sound quality page 23 24 COAXIAL IN jack HDMI IN OUT jacks Connects to a DVD player etc The image and the sound are output to a TV page 21 B ANTENNA section FM ANTENNA jack Connects to the supplied FM wire antenna page 27 AM ANTENNA terminals Connects to the supplie...

Страница 10: ... page 16 F VIDEO AUDIO INPUT OUTPUT section AUDIO IN OUT jacks Connects to a VCR DVD player etc page 18 23 24 25 VIDEO IN OUT jacks G DMPORT DMPORT jack Connects to a DIGITAL MEDIA PORT adapter page 59 White L Red R Black White L Red R Yellow Remote commander 1 2 3 4 6 7 8 0 10 ENTER 9 SYSTEM STANDBY TV INPUT SLEEP DMPORT VIDEO1 VIDEO2 BD DVD 2CH A F D TV CH PRESET TV CH PRESET TUNING TV TUNING FM...

Страница 11: ...g mode D SKIP Press to skip a disc when using a multi disc changer Name Function H AMP MENU Press to display the menu of the receiver Then use V v B b and P to perform menu operations I ENTER Press to enter the value after selecting a channel disc or track using the numeric buttons of the TV VCR or satellite tuner MEMORY Press to store a station J MUTING Press to turn off the sound temporarily Pre...

Страница 12: ... satellite tuner CD player DVD player or Blu ray disc player Name Function Q DISPLAY Press to select information displayed on the TV screen of the VCR satellite tuner CD player DVD player or Blu ray disc player Press DISPLAY and TV N at the same time to display TV s information on the TV screen R TOOLS OPTIONS Press to display and select the options of the DVD player or Blu ray disc player Press T...

Страница 13: ...RT adapter operation For details on the function of the button see the operating instructions supplied with the DIGITAL MEDIA PORT adapter Notes Some functions explained in this section may not work depending on the model The above explanation is intended to serve as an example only Therefore depending on the component the above operation may not be possible or may operate differently than describ...

Страница 14: ...nect one additional surround back speaker 6 1 channel see Using the surround back decoding mode SUR BACK DECODING on page 43 Example of a 6 channel speaker with 2 subwoofer system configuration AFront speaker left BFront speaker right CCenter speaker DSurround speaker left ESurround speaker right FSurround back speaker GSubwoofer HSubwoofer Before you install the center speaker surround speakers s...

Страница 15: ... As a plaster board wall is especially fragile attach the screws securely to a beam and fasten them to the wall Install the speakers on a vertical and flat wall where reinforcement is applied Contact a screw shop or installer regarding the wall material or screws to be used Sony is not responsible for accident or damage caused by improper installation insufficient wall strength or improper screw i...

Страница 16: ...ave additional subwoofers connect them to the SUBWOOFER jacks c Use the long speaker cords to connect the surround and surround back speakers and the short speaker cords to connect the front and center speakers DVD IN BD IN OUT HDMI VIDEO OUT SAT IN DVD IN BD IN MONITOR OUT VIDEO IN AUDIO OUT AUDIO IN VIDEO IN AUDIO IN Y PB CB PR CR DVD VIDEO 1 VIDEO OUT MONITOR COMPONENT VIDEO SUBWOOFER L R L R S...

Страница 17: ... labels to the supplied monaural audio cord as shown below Repeat the procedure above for the other supplied monaural audio cord using the SW R labels 2 Connect the monaural audio cord attached with the SW L labels and SW R labels to the subwoofer placed at left and right and to the SUBWOOFER L jack and SUBWOOFER R jack on the receiver Tip Use the supplied speakers to optimize the system s perform...

Страница 18: ...N AUDIO IN VIDEO IN AUDIO IN AUDIO OUT SUBWOOFER SURROUND FRONT ONLY FOR SS MSP5000 CENTER ONLY FOR SS CNP5000 SURROUND ONLY FOR SS SRP5000 SURROUND BACK CENTER L R FRONT L R SPEAKERS DMPORT DIGITAL AM ANTENNA L R L R SA CD CD CD R IN OUT SAT DVD VIDEO 1 DC5V 0 7A MAX DVD IN BD IN OUT HDMI SAT IN DVD IN BD IN Y COMPONENT VIDEO TV VIDEO OUT MONITOR OUT PB CB PR CR IN MONITOR TV B A AAudio cord not ...

Страница 19: ...lowing illustration shows how to connect a Super Audio CD player CD player or CD recorder Before connecting the cords be sure to disconnect the AC power cord After connecting your Super Audio CD player CD player or CD recorder proceed to 4b Connecting the video components page 20 or 5 Connecting the antennas page 27 Connecting a Super Audio CD CD player or CD recorder DVD IN BD IN OUT OPTICAL COAX...

Страница 20: ...ends on the connecting jack Refer to the illustration that follows Select the connection according to the jacks on your components Note Be sure to turn on the receiver when the video and audio signals of a playback component are being output to a TV via the receiver Unless the power is turned on neither video nor audio signals will be transmitted How to hook up your components Component Page TV 18...

Страница 21: ... Connecting components with HDMI jacks VIDEO OUT SAT IN DVD IN BD IN MONITOR OUT VIDEO IN AUDIO OUT AUDIO IN VIDEO IN AUDIO IN VIDEO IN AUDIO IN AUDIO OUT SUBWOOFER Y PB CB PR CR SURROUND FRONT ONLY FOR SS MSP5000 CENTER ONLY FOR SS CNP5000 SURROUND ONLY FOR SS SRP5000 SURROUND BACK CENTER L R FRONT L R SPEAKERS DMPORT AM ANTENNA L R L R SA CD CD CD R IN IN OUT TV SAT DVD VIDEO 1 VIDEO OUT MONITOR...

Страница 22: ...connected component if the image is poor or the sound does not come out of a component connected via the HDMI cable Video signals input to the HDMI IN jack can only be output from the HDMI OUT jack The video input signals cannot be output from the VIDEO OUT jacks or MONITOR OUT jacks Refer to the operating instructions of each component connected for details Notes on digital audio connection When ...

Страница 23: ...z sampling frequencies Connecting a DVD player DVD IN BD IN OUT HDMI VIDEO OUT VIDEO IN AUDIO OUT AUDIO IN VIDEO IN AUDIO OUT SUBWOOFER SURROUND FRONT ONLY FOR SS MSP5000 CENTER ONLY FOR SS CNP5000 SURROUND ONLY FOR SS SRP5000 SURROUND BACK CENTER L R FRONT L R SPEAKERS DMPORT AM ANTENNA L R L R SA CD CD CD R IN IN OUT TV SAT VIDEO 1 VIDEO OUT MONITOR DC5V 0 7A MAX OPTICAL COAXIAL BD IN SAT IN DVD...

Страница 24: ...atellite tuner set top box DVD IN BD IN OUT HDMI VIDEO OUT VIDEO IN AUDIO OUT AUDIO IN VIDEO IN AUDIO IN AUDIO OUT SUBWOOFER SURROUND FRONT ONLY FOR SS MSP5000 CENTER ONLY FOR SS CNP5000 SURROUND ONLY FOR SS SRP5000 SURROUND BACK CENTER L R FRONT L R SPEAKERS DMPORT AM ANTENNA L R L R SA CD CD CD R IN IN OUT TV DVD VIDEO 1 VIDEO OUT MONITOR DC5V 0 7A MAX AUDIO IN MONITOR OUT Y PB CB PR CR COMPONEN...

Страница 25: ...IO IN AUDIO OUT SURROUND FRONT ONLY FOR SS MSP5000 CENTER ONLY FOR SS CNP5000 SURROUND ONLY FOR SS SRP5000 SURROUND BACK CENTER L R FRONT L R SPEAKERS DMPORT DIGITAL AM ANTENNA L R L R SA CD CD CD R IN IN OUT TV SAT DVD VIDEO OUT MONITOR DC5V 0 7A MAX AUDIO OUT AUDIO IN SAT IN Y PB CB PR CR COMPONENT VIDEO DVD IN BD IN MONITOR OUT VIDEO 2 IN PORTABLE AV IN VIDEO L AUDIO R VIDEO OUT VIDEO IN VIDEO ...

Страница 26: ...nput button on the remote so that you can use the button to control your DVD recorder For details see Changing button assignments page 64 You can also rename the VIDEO 1 input so that it can be displayed on the receiver s display For details see Naming inputs page 62 ...

Страница 27: ...e antenna After connecting the FM wire antenna keep it as horizontal as possible DVD IN BD IN OUT OPTICAL COAXIAL BD IN SAT IN DVD IN HDMI VIDEO OUT SAT IN DVD IN BD IN MONITOR OUT VIDEO IN AUDIO OUT AUDIO IN VIDEO IN AUDIO IN VIDEO IN AUDIO IN AUDIO OUT SUBWOOFER Y PB CB PR CR SURROUND FRONT ONLY FOR SS MSP5000 CENTER ONLY FOR SS CNP5000 SURROUND ONLY FOR SS SRP5000 SURROUND BACK CENTER L R FRONT...

Страница 28: ... power supply voltage If not use a screwdriver to set the selector to the correct position before connecting the AC power cord to a wall outlet Receiver Subwoofer Connect the AC power cord to a wall outlet Setting the voltage selector VOLTAGE SELECTOR 240V 220V 120V VOLTAGE SELECTOR 220V 240V 120V Connecting the AC power cord FRONT L R AC power cord To the wall outlet ...

Страница 29: ...attery with old ones Do not mix manganese batteries and other kinds of batteries Do not expose the remote sensor to direct sunlight or lighting apparatuses Doing so may cause a malfunction If you do not intend to use the remote for an extended period of time remove the batteries to avoid possible damage from battery leakage and corrosion When you replace the batteries the remote buttons may be res...

Страница 30: ...d Perform Auto Calibration in a quiet environment to avoid the effect of noise and to get a more accurate measurement If there are any obstacles in the path between the optimizer microphone and the speakers the calibration cannot be performed correctly Remove any obstacles from the measurement area to avoid measurement error Notes The Auto Calibration function does not work when headphones are con...

Страница 31: ...are connected Tips When Auto Calibration starts Stand some distance away from the speakers and the listening position to avoid measurement failure This is because test signals are output from the speakers during measurement Avoid making noise to get a more accurate measurement The Auto Calibration function will be canceled when you do the following during the measurement process Press 1 or MUTING ...

Страница 32: ...ns below 5 Turn on the receiver and perform Auto Calibration again page 31 Warning codes and solutions Error and warning codes Error code Cause and remedy ERROR 10 The environment is too noisy Make sure the environment is quiet during Auto Calibration ERROR 11 The speakers are placed too near the optimizer microphone Place your speakers further away from the optimizer microphone ERROR 12 None of t...

Страница 33: ...evel is out of range Reposition your surround back speaker d WARN 70 The front speakers distance are out of range Reposition your front speakers c WARN 72 The center speaker distance is out of range Reposition your center speaker d WARN 73 The surround left speaker distance is out of range Reposition your surround left speaker d WARN 74 The surround right speaker distance is out of range Repositio...

Страница 34: ...aker cords may not be connected securely The speaker cords may have the short circuit problem Selecting a component 1 Press the input button to select a component You can also use INPUT SELECTOR on the receiver The selected input appears on the display Playback Selected input Display Components that can be played back DMPORT DMPORT DIGITAL MEDIA PORT adapter connected to DMPORT jack VIDEO 1 VIDEO ...

Страница 35: ... Be sure to use the controls on the rear panel of the subwoofer for this operation 1 Press POWER The POWER indicator on the front panel of the subwoofer lights up 2 Turn LEVEL to adjust the volume Set the volume level to suit your preference according to the selected input as slight adjustments may enhance the sound Note If you set the subwoofer volume to maximum extraneous noise may be heard depe...

Страница 36: ...AV IN VIDEO L AUDIO R 5 5 3 2 3 Notes The operation is described for a Sony Super Audio CD player Refer to the operating instructions supplied with the Super Audio CD player or CD player Tips You can select the sound field to suit the music Refer to page 51 for details Recommended sound fields Classical HALL Jazz JAZZ Live concert CONCERT You can listen to the sound that was recorded in the 2 chan...

Страница 37: ...lti channel sound Be sure the sound source corresponds to the multi channel format the MULTI CHANNEL DECODING lamp on the front panel lights up during playback Be sure this receiver is connected to the DVD player Blu ray disc player via a digital connection Be sure the digital audio output of the DVD player Blu ray disc player is set up properly Tips Select the sound format of the disc to be playe...

Страница 38: ...r b to enter the parameter 6 Press V v repeatedly to select the setting you want The setting is entered automatically To return to the previous display Press B To exit the menu Press AMP MENU Note Some parameters and settings may appear dimmed on the display This means that they are either unavailable or fixed and unchangeable Amplifier Operations 7 8 0 10 ENTER 9 TV CH PRESET TV CH PRESET AMP MEN...

Страница 39: ... 0 dB Surround back speaker level SB LVL SB 10 dB to SB 10 dB 1 dB step SB 0 dB Subwoofer levelb SW LVL SW 10 dB to SW 10 dB 1 dB step SW 0 dB Dynamic range compressora D RANGE COMP OFF COMP STD COMP MAX COMP OFF TONE 2 TONE page 42 Front speaker bass levelc d BASS LVL BASS 6 dB to BASS 6 dB 1 dB step BASS 0 dB Front speaker treble levelc d TRE LVL TRE 6 dB to TRE 6 dB 1 dB step TRE 0 dB SUR 3 SUR...

Страница 40: ...page 62 VIDEO 6 VIDEO page 45 DIGITAL MEDIA PORT video assigna DMPORT V NONE VIDEO 1 VIDEO 2 DVD SAT NONE Naming inputsa NAME IN For details see Naming inputs page 62 SYSTEM 7 SYSTEM page 46 Front speaker distancea FRT DIST DIST 1 0 m to DIST 7 0 m 0 1 m step DIST 3 0 m Center speaker distancea CNT DIST DIST 1 0 m to DIST 7 0 m 0 1 m step DIST 3 0 m Surround left speaker distancea SL DIST DIST 1 0...

Страница 41: ...aker level x SW LVL Subwoofer level This parameter is not available when the sound field is set to 2CH ST x D RANGE Dynamic range compressor Lets you compress the dynamic range of the sound track This may be useful when you want to watch movies at low volumes late at night Dynamic range compression is possible with Dolby Digital sources only COMP OFF The dynamic range is not compressed COMP STD Th...

Страница 42: ...justing the parameters see Navigating through menus page 38 and Overview of the menus page 39 SUR menu parameters x S F SELCT Sound field selection Lets you select the sound field you want For details see Enjoying Surround Sound page 49 Note The receiver lets you apply the last selected sound field to an input whenever it is selected Sound Field Link For example if you select HALL for the DVD inpu...

Страница 43: ...gnals and an extension stream designed for returning those signals to 6 1 discrete channels Discrete 6 1 channel signals are DVD specific signals not used in movie theaters Notes There may be no sound from the surround back speaker in Dolby Digital EX mode Some discs have no Dolby Digital Surround EX flag even though the packages have Dolby Digital EX logos In this case select SB ON You can select...

Страница 44: ... stations page 57 Settings for the audio AUDIO menu You can use the AUDIO menu to make settings for the audio to suit your preference Select 5 AUDIO in the amplifier menus For details on adjusting the parameters see Navigating through menus page 38 and Overview of the menus page 39 AUDIO menu parameters x DEC PRI Digital audio input decoding priority Lets you specify the input mode for the digital...

Страница 45: ...mized Notes This parameter is useful when you use a large LCD or plasma monitor or a projector This parameter is valid only when you use a sound field selected with the 2CH or A F D buttons This parameter is not valid when signals with a sampling frequency of more than 48 kHz are input x NAME IN Naming inputs Lets you set the name of inputs For details see Naming inputs page 62 Settings for the vi...

Страница 46: ...tion B cannot be more than 1 5 meters closer than the one between the listening position and the front speaker A Place the speakers so that the difference in the length of B in the following diagram is no more than 1 5 meters closer than the length of A Example Adjust the distance B to 4 5 meters or more when the distance A is 6 meters Also the distance between the surround speakers surround back ...

Страница 47: ...lect the setting that best suits your environment This parameter is not available when the sound field is set to 2CH ST x SUR POS Surround speaker position Lets you specify the location of your surround speakers for proper implementation of the surround effects in the Cinema Studio EX modes page 52 BEHD HI Select if the location of your surround speakers corresponds to sections B and D BEHD LO Sel...

Страница 48: ...r results using BEHD HI if your speakers are located high above the listening position even if they are located to the immediate left and right Therefore although it may result in a setting contrary to the above explanation we recommend that you playback multi channel surround encoded software and select the setting that provides a good sense of spaciousness and that best succeeds in forming a coh...

Страница 49: ...ty sound and select the decoding mode for listening to a 2 channel stereo sound as multi channel sound Press A F D repeatedly to select the sound field you want You can also use A F D on the receiver For details see Types of A F D mode page 50 Enjoying Surround Sound 1 2 3 VIDEO1 VIDEO2 BD DVD 2CH A F D MOVIE MUSIC DVD BD MENU SAT TV SA CD CD TUNER A F D continued ...

Страница 50: ...ding This setting is ideal for movies encoded in Dolby Surround In addition this mode can reproduce sound in 5 1 channel for watching videos of overdubbed or old movies PRO LOGIC II MUSIC PLII MS 5 channel Performs Dolby Pro Logic II Music mode decoding This setting is ideal for normal stereo sources such as CDs PRO LOGIC II GAME PLII GM 5 channel Performs Dolby Pro Logic II Game mode decoding Thi...

Страница 51: ...ds They bring the exciting and powerful sound of movie theaters and concert halls into your home Press MOVIE repeatedly to select a sound field for movies or press MUSIC repeatedly to select a sound field for music For details see Types of sound field available page 52 1 2 3 4 6 2CH A F D MOVIE MUSIC DVD BD MENU AUTO CAL SAT TV SA CD CD TUNER 5 MUSIC MOVIE 2CH A F D continued ...

Страница 52: ...STUDIO EX B DCS C ST EX B Reproduces the sound characteristics of the Sony Pictures Entertainment Kim Novak Theater cinema production studio This mode is ideal for watching science fiction or action movies with lots of sound effects CINEMA STUDIO EX C DCS C ST EX C Reproduces the sound characteristics of the Sony Pictures Entertainment scoring stage This mode is ideal for watching musicals or film...

Страница 53: ...oss the display then 2CH ST appears Note When you select a sound field other than 2CH ST you can only hear the monaural bass sound from the subwoofers Resetting sound fields to the initial settings Be sure to use the buttons on the receiver for this operation 1 Press 1 to turn off the power 2 While holding down 2CH press 1 S F CLR appears on the display and all sound fields are reset to their init...

Страница 54: ...e FM or AM band 2 Press TUNING MODE repeatedly to select AUTO T 3 Turn TUNING In case of poor FM stereo reception If the FM stereo reception is poor and ST flashes on the display select monaural audio so that the sound will be less distorted Press FM MODE repeatedly until the MONO indicator lights up on the display To return to stereo mode press FM MODE repeatedly until the MONO indicator on the d...

Страница 55: ...ting radio stations You can preset up to 30 FM stations and 30 AM stations Then you can easily tune in the stations you often listen to 1 Press TUNER repeatedly to select the FM or AM band You can also use INPUT SELECTOR on the receiver 2 Tune in the station that you want to preset using Automatic Tuning page 54 or Direct Tuning page 55 Switch the FM reception mode if necessary page 54 Direct tuni...

Страница 56: ...6 Repeat steps 1 to 5 to preset another station 1 Press TUNER repeatedly to select the FM or AM band 2 Press PRESET or PRESET repeatedly to select the preset station you want Each time you press the button you can select a preset station as follows You can also press the numeric buttons to select the preset station you want Then press ENTER to enter the selection Tuning to preset stations 1 2 3 4 ...

Страница 57: ...e given in To create an index name below To create an index name 1 Use V v B b to create an index name Press V v to select a character then press B b to move the cursor to the next position If you made a mistake Press B b until the character you want to change flashes then press V v to select the correct character Tips You can select the character type as follows by pressing V v Alphabet upper cas...

Страница 58: ...pecifies the analog audio signals input to the AUDIO IN L R jacks Note Some audio input modes may not be set up depending on the input Enjoying the DIGITAL MEDIA PORT DMPORT The DIGITAL MEDIA PORT DMPORT allows you to enjoy sound from a network system such as a portable audio source or computer When you connect a DIGITAL MEDIA PORT adapter not supplied you can enjoy sound from the connected compon...

Страница 59: ...n the DMPORT jack Be sure to make DMPORT connections firmly insert the connector straight in As the connector of the DIGITAL MEDIA PORT adapter is fragile be sure to handle with care when placing or moving the receiver Connecting the DIGITAL MEDIA PORT adapter VIDEO 2 IN PORTABLE AV IN VIDEO L AUDIO R DVD IN BD IN OPTICAL COAXIAL BD IN SAT IN DVD IN HDMI VIDEO OUT AUDIO OUT AUDIO IN AUD OU SUBWO D...

Страница 60: ...2 DVD and SAT inputs For example select VIDEO 1 When you press DMPORT the images from the component connected to the VIDEO 1 VIDEO IN jack through DIGITAL MEDIA PORT adapter will appear on the TV screen To return to the previous display Press B Notes Depending on the type of DIGITAL MEDIA PORT adapter you can operate the connected component by using the remote For details on remote button operatio...

Страница 61: ...speed of the selected X ROUND effect Each time you press the button the display changes cyclically as follows SPEED 1 t SPEED 2 t t SPEED 19 t SPEED 20 Note When you select X OFF you cannot adjust the speed Press DISPLAY repeatedly Each time you press the button the display changes cyclically as follows Index name of the input t Selected input t Selected X ROUND mode Select To X WAVE Output sound ...

Страница 62: ...character Follow the procedure given in To create an index name page 57 Changing the display You can check the sound field etc by changing the information on the display Be sure to use the button on the receiver for this operation Press DISPLAY repeatedly Each time you press the button the display changes cyclically as follows All inputs except the FM and AM band Index name of the input t Selected...

Страница 63: ...p timer will be canceled Recording using the receiver You can record from an audio video component using the receiver For details refer to the operating instructions supplied with your recording component You can record onto a CD R using the receiver Refer to the operating instructions supplied with your CD recorder 1 Press one of the input buttons to select the playback component You can also use...

Страница 64: ...the source When DMPORT input is selected and you have assigned VIDEO 1 input to DMPORT input no video signals are output from the VIDEO 1 VIDEO OUT jack Changing button assignments You can change the factory settings of the input buttons to suit the components in your system For example if you connect a DVD recorder to the VIDEO 1 jacks on the receiver you can set the VIDEO 1 button on this remote...

Страница 65: ... Depth Matching reproduces treble attenuation fullness and depth of sound usually created in a theater using sound emission from behind the screen This is then added to the front and center channels Cinema Studio Reverberation reproduces the sound characteristics of state of the art dubbing theaters and recording studios including Sony Pictures Entertainment s dubbing studios There are three modes...

Страница 66: ...stereo sources such as music Old movies encoded in the traditional stereo format can be enhanced with 5 1 channel surround sound x Dolby Pro Logic IIx Technology for 7 1 channel or 6 1 channel playback Along with audio encoded in Dolby Digital Surround EX 5 1 channel Dolby Digital encoded audio can be reproduced in 7 1 channel or 6 1 channel Furthermore existing stereo recorded content can also be...

Страница 67: ... data quantified at 44 100 times per second which is expressed as a sampling frequency of 44 1 kHz Generally speaking a higher sampling frequency means better sound quality Precautions On safety Should any solid object or liquid fall into the cabinet unplug the receiver and have it checked by qualified personnel before operating it any further On power sources Before operating the receiver check t...

Страница 68: ...result On operation Before connecting other components be sure to turn off and unplug the receiver If you encounter color irregularity on a nearby TV screen The front speakers center speaker and the subwoofers are magnetically shielded to allow it to be installed near a TV set However color irregularities may still be observed on certain types of TV sets As the surround and surround back speakers ...

Страница 69: ...nt speakers Connect a pair of headphones to the PHONES jack to verify that sound is output from the headphones If only one channel is output from the headphones the component may not be connected to the receiver correctly Check that all the cords are fully inserted into the jacks on both the receiver and the component If both channels are output from the headphones the front speaker may not be con...

Страница 70: ...tput of the connected component There is no sound from the component connected to the DIGITAL MEDIA PORT adapter Adjust the volume of this receiver The DIGITAL MEDIA PORT adapter and or component is not connected correctly Turn off the receiver then reconnect the DIGITAL MEDIA PORT adapter and or component Check the DIGITAL MEDIA PORT adapter and or component device to make sure it supports this r...

Страница 71: ...e component Refer to the operating instructions supplied with the each component Tuner The FM reception is poor Use a 75 ohm coaxial cable not supplied to connect the receiver to an outdoor FM antenna as shown below If you connect the receiver to an outdoor antenna ground it against lightning To prevent a gas explosion do not connect the ground wire to a gas pipe Radio stations cannot be tuned in ...

Страница 72: ...bration see Error and warning codes page 32 to solve the problem PROTECT Irregular current is output from the speakers The receiver will automatically turn off after a few seconds Check the speaker connection and turn on the power again If you are unable to remedy the problem using the troubleshooting guide Clearing the receiver s memory may remedy the problem page 29 However note that all memoriz...

Страница 73: ...kohm SUBWOOFER Voltage 2 V 1 kohm Tone Gain levels 6 dB 1 dB step Reproduction frequency range 28 20 000 Hz FM tuner section Tuning range 87 5 108 0 MHz Antenna FM wire antenna Antenna terminals 75 ohm unbalanced Intermediate frequency 10 7 MHz AM tuner section Tuning range Models of area code SP TH1 With 9 kHz tuning scale 531 1 602 kHz Models of area code E51 With 10 kHz tuning scale 530 1 610 k...

Страница 74: ...ass reflex Magnetically shielded Speaker unit Woofer 100 mm cone type 2 Tweeter 25 mm horn type Rated Impedance 4 ohm Dimensions width height depth Approx 515 175 225 mm with foot Mass Approx 4 8 kg Surround Surround back speaker SS SRP5000 Speaker system Full range Bass reflex Speaker unit Woofer 100 mm cone type Rated Impedance 4 ohm Dimensions width height depth Approx 174 220 166 mm with foot ...

Страница 75: ...re antenna 1 AM loop antenna 1 Monaural audio cord 2 Coaxial digital cord 1 Speaker cords Long 3 Short 3 Foot pads Speakers 16 Subwoofer 8 Monaural audio cord label SW L 2 SW R 2 Optimizer microphone ECM AC2 or ECM AC2a 1 Remote commander RM AAU027 1 R6 size AA batteries 2 Design and specifications are subject to change without notice Area code Power requirements SP 230 240 V AC 50 60 Hz MX 127 V ...

Страница 76: ... 21 I Initial setup 29 INPUT MODE 58 M Menu A CAL 48 AUDIO 44 LEVEL 41 SUR 42 SYSTEM 46 TONE 42 TUNER 44 VIDEO 45 Muting 35 N Naming 57 62 R Recording onto a CD R 63 onto a recording media 64 S Satellite tuner connecting 24 Selecting component 34 sound field 51 Set top box connecting 24 Sleep Timer 63 Sound fields resetting 53 selecting 51 Speakers connecting 16 installing 14 Subwoofer phase polar...

Отзывы: