background image

31

 Controlling the On-board Functions

Controlling the On-board 
Functions

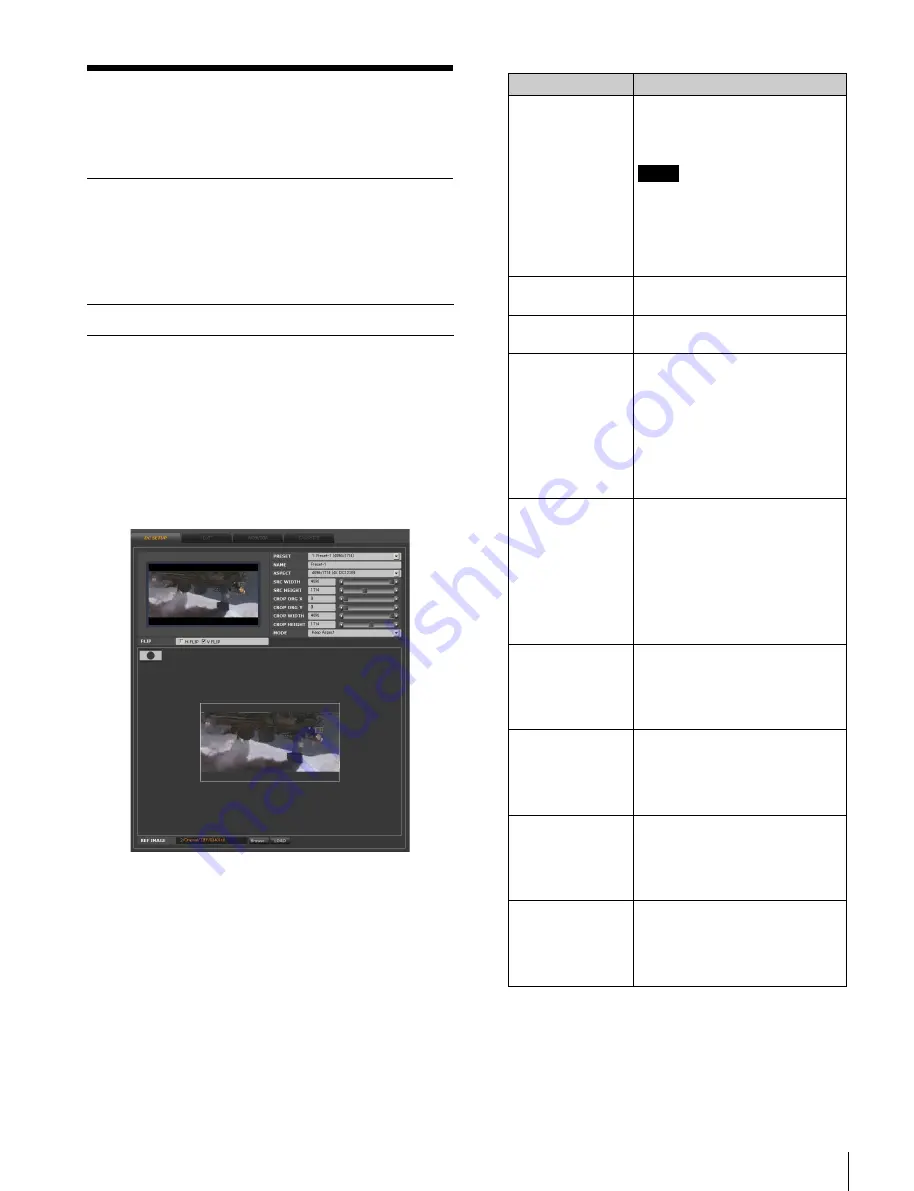
Downconverter Settings

The downconverter settings can be made through the web 
application. Downconverter settings can be preset and 
applied to the monitor output signal when the system is 
operated in uncompressed data format.

When 4K/2K picture files are downconverted to HD 
format for recording, the settings that are preset in the 
procedure below are used. Preset1 to preset 8 can be 
selected during the export of files.

1

Access the VTR from the web client to display the web 
application, click the VTR SETUP menu select button, 
and then click the DC SETUP tab.

The DC SETUP tag display opens.

2

Set the following items.

In the table below, the default setting is indicated by an 
asterisk (*).

For compressed data

Item

Function/settings

PRESET

Up to eight downconverter 
settings can be stored as presets 
(Preset1 to Preset 8).

Note

Unlike the lookup table banks, 
downconverter settings are stored 
on cookies. You can use the 
COOKIE tag display in the 
PROXY SETUP menu to store the 
settings.

NAME

Enter a name for a preset setting 
here.

ASPECT

Specifies the size of the source 
picture.

SRC WIDTH

When ASPECT is specified, the 
width of the source picture is 
displayed here automatically. 
When you change the width, 
ASPECT changes to “User 
Defined.” 

For details on how to change the 
setting, see “To enter a new value” 
on page 32.

SRC HEIGHT

When ASPECT is specified, the 
height of the source picture is 
displayed here automatically. 
When you change the height, 
ASPECT changes to “User 
Defined.” 

For details on how to change the 
setting, see “To enter a new value” 
on page 32.

CROP ORG X

Specifies the horizontal position of 
the cropped picture.

For details on how to change the 
setting, see “To enter a new value” 
on page 32.

CROP ORG Y

Specifies the vertical position of 
the cropped picture.

For details on how to change the 
setting, see “To enter a new value” 
on page 32.

CROP WIDTH

Specifies the width of the cropped 
picture.

For details on how to change the 
setting, see “To enter a new value” 
on page 32.

CROP HEIGHT

Specifies the height of the 
cropped picture.

For details on how to change the 
setting, see “To enter a new value” 
on page 32.

Содержание HKSR-5804

Страница 1: ...y trained service technicians Refer to the SRW 5800 s Operation Manual for instructions on how to operate the SRW 5800 after installing this board To the technician installing the board Please refer to the Installation Manual supplied with this product for installation instructions Before installing the board be sure to turn off the SRW 5800 and wait until the internal temperature drops OPERATION ...

Страница 2: ...in Europe Australia and New Zealand WARNING This is a Class A product In a domestic environment this product may cause radio interference in which case the user may be required to take adequate measures For the customers in Europe The manufacturer of this product is Sony Corporation 1 7 1 Konan Minato ku Tokyo Japan The Authorized Representative for EMC and product safety is Sony Deutschland GmbH ...

Страница 3: ...stem 7 Overview of the Setup Procedure 7 Preparations 7 Network Settings 8 NFS Server Setup 8 VTR Format Settings 9 VTR Remote Mode Setup 9 Accessing the VTR From the Web Client 9 Mounting the NFS Server From the Web Application Through the Web Browser 10 Proxy and GUI Settings 11 Proxy Setup 11 Saving and Recalling the GUI Setup Data 13 Importing Files 14 Overview of the Import Procedure 14 File ...

Страница 4: ...ork Functions of This Board 36 Displaying the IP Address of the Web Client 36 Log File Management 36 Using the Export Log Files 36 Automatic Execution Using a Job File 38 Dubbing Uncompressed Data 38 Specifications 40 Appendix 41 LUT File Formats Applicable to This Board 41 Job File Samples 42 ...

Страница 5: ...nt The file transfer can simply be controlled by using the general web browser on the PC workstation It is easy to make a correction to the material on the tape retrieve the relevant tape material over the network manipulate it and then rewrite the corrected image back to tape File conversion on the VTR The HKSR 5804 provides conversion between video and file on the VTR which allows direct file tr...

Страница 6: ...k 2 connector For transferring files between the shared server and VTR and for controlling the VTR from the web client For safety do not connect the connector for peripheral device wiring that might have excessive voltage to this port Follow the instructions for this port When you connect the NETWORK cable of the unit to peripheral device use a shielded type cable to prevent malfunction due to rad...

Страница 7: ...arations Connect the shared file server web client and VTR within the same segment of the LAN Gigabit Ethernet as illustrated below Connect the shared file server web client and VTR into the LAN see page 7 Set the network profile from the control panel of the VTR see page 8 Set up the shared file server see page 8 Set the format for the VTR see page 9 Set the remote mode for the VTR see page 9 Acc...

Страница 8: ...he ALT button to open the NETWORK2 SETUP menu 2 Open the NET2 IP menu from the NETWORK2 SETUP menu 3 Set the following menu items IP Address IP address of the VTR example 192 168 1 251 Subnet Mask subnet mask of the VTR example 255 255 255 0 Default Gateway default gateway of the VTR example 192 168 1 254 Host Name host name of the VTR example srw MTU maximum transmission volume in bytes example 9...

Страница 9: ... table above To specify the type of signal output from the AUX OUTPUT connectors Perform the procedure below to specify the type of SDI signal output from the AUX OUTPUT A B connectors 1 On the VTR open the 3G DUAL menu from the SYSTEM MENU and then open the AUX OUTPUT menu from the 3G DUAL menu 2 Select the appropriate signal type DUAL Dual link conventional 1 5G dual mode 3G 3G output The monito...

Страница 10: ...r is mounted the MOUNT button changes to the UMOUNT button 4 Set the LIST TYPE column to select how picture clips on the shared directory are displayed Main Only Only main picture clips are displayed Main Proxy Both main picture clips and proxies are displayed Others Shows the files other than pictures Even when Main Proxy is selected only the main picture clips are always displayed on the DISK CO...

Страница 11: ...should be even longer to prevent the SRW 5800 from entering tape protection mode while in stop STILL status Proxy and GUI Settings Proxy Setup 1 Access the VTR from the web client to display the web application click the PROXY SETUP menu select button and then click the PROXY SETUP tab The PROXY SETUP tag display appears 2 Set the following items In the table below the default setting is indicated...

Страница 12: ...aveform blue Vector Displays the vector scope Vector 2 Displays the vector scope at 2 fold magnification WF TYPE Selects the drawing method of the waveform Dot Dots Line Lines WF OVERLAY Selects the display method of the waveform s off Does not display the picture Only the waveform s is are displayed on Waveform s is are displayed over the picture on Mix Waveform s and the picture are mixed and di...

Страница 13: ...ed in the same directory as the main picture files Proxy Directory proxy directory is automatically created right under the directory where the main picture files are stored Proxies are stored in the proxy directory Resolution directory When the main picture files are stored in directories labeled according to size e g 1920 1080 a directory for storing small size picture files e g 320 180 is creat...

Страница 14: ...ay opens 2 Set the following items In the table below the default setting is indicated by an asterisk Set the file format see page 14 Set the file name and directory see page 17 Specify the IN OUT points on the tape see page 19 Import the clips see page 21 For compressed data Item Function settings FILE TYPE Selects the file type of the main picture files to be imported from the VTR to the NFS ser...

Страница 15: ...are flipped horizontally V FLIP Main picture files are flipped vertically TRANSFER for DPX files From the options below select the information to be recorded to the TRANSFER field of the header of imported DPX files User Defined Printing density Linear Logarithmic Unspecified Video SMPTE 274M ITU R 709 4 Item Function settings COLOR for DPX or CIN files Selects the information to be recorded to th...

Страница 16: ... to the CREATOR field INPUT DEVICE NAME field The information is recorded to the INPUT DEVICE NAME field TV Reserved Field The information is recorded to the TV reserved field PROXY TYPE for DPX CIN TIFF or MXF files Selects the file type of imported proxies BMP Bitmap JPG JPEG None Proxies are not imported Temporary Proxies are imported for display in the GUI Imported proxies however are not stor...

Страница 17: ...rom the system and entered as a new directory name The character strings and information obtained are as follows casid cassette ID date date year month day time time hour minute second The following is an example of the directory name when the cassette ID is 0123456789 and test casid _ date time is entered at 17 42 35 on February 16 2009 test0123456789_20090216174235 To change a directory name Cli...

Страница 18: ... is created when picture files are imported The imported picture files are stored in the created directory START Sets the starting serial number of the file name Note A number exceeding 2147483647 0x7fffffff cannot be specified END Shows the highest last serial number of the file name TC check box When checked the value of the IN point timecode converted into frame count is set as the starting ser...

Страница 19: ...uncompressed data Serial number that is added to each DPX file in the clip The default starting number is 000000 The starting number can be changed Sub ID for identifying clips that is added only when the SID box is checked The default starting number is 000 File name entered in the BASE NAME box Delimiter Sub ID for identifying clips that is added only when the SID box is checked The default star...

Страница 20: ...he original positions of the IN OUT points in the EDL Loading a clip sequence from the export log display For details see To load a clip sequence from the export log display on page 28 Loading a clip sequence from Tele File By selecting the clip from the clip list stored in the Tele File label on the cassette tape the clip sequence can be loaded directly to the clip list Click the Tele File button...

Страница 21: ...g display and specify the import list file stored on the disk of the web client or external media and then click the LOAD button The following example shows the contents of an import list file XXXX XXX Checking the clip list and transposing clips The procedure is the same as Checking the clip list and transposing clips on page 20 in Setting IN OUT Points on a Tape Importing the Clips The importing...

Страница 22: ...CH COND RED The playback error rate of the tape is high and the channel condition has turned to red LOST LOCK The servo has become unlocked during the playing of the tape TAPE END The end of the tape has been detected PB FORMAT MISMATCH The tape format does not match the system setting DF NDF MISMATCH The drop frame non drop frame setting of the tape does not match the system setting CANNOT SV LOC...

Страница 23: ...oom Head t Head Video signals with headroom are exported as is Full t Full Full range 0 1023 picture data are exported as is LUT Selects the lookup table to be applied to exported main picture data off No lookup table is applied BANK1 to BANK8 Select lookup table bank 1 to 8 By using the LUT tag display of the VTR SETUP menu it is possible to store the lookup tables in the respective banks Stored ...

Страница 24: ...tape efficiently select Ignore For compressed data Item Function settings IN TC insert Specifies how the recording start position IN point on the tape is determined Preset In the VTR CONTROL tag display in the EXPORT menu use the MarkIn button or enter the timecode to specify the IN point File Name Acquires the timecode of the IN point from the file name of the clip For details see About the File ...

Страница 25: ...n page 36 3 Move to the directory where the clip to be exported is stored and select the clip For details on clip file names see Example of file name on page 18 To specify the clips to be exported by loading an export list You can specify the clip files to be exported by loading an export list created using an external editor Click the Browse button to the right of the EXPORT LIST box in the DISK ...

Страница 26: ...ic clip double click the clip Clip selection The DISK CONTROL tag display opens as shown below 1 Set the following items in the DISK CONTROL tag display Uncompressed DATA 29PsF and uncompressed DATA 25PsF are different formats For this reason if the frame rate setting of the VTR as of export and as of import differs the files cannot be imported 2 Do steps 3 and 4 of Clip selection on page 24 in Se...

Страница 27: ...rt procedure is the same for both compressed data and uncompressed data 1 Set the following items in the EXPORT area of the VTR CONTROL tag display In the table below the default setting is indicated by an asterisk 2 Click the START button to export the clips in the clip list While picture files are being exported the transfer progress is shown as a progress bar and in percentage figure in the DIS...

Страница 28: ...splay Open the VTR CONTROL tag display of the IMPORT menu and click the IMP button in the Sequence Info column to load the selected IN OUT points to the import clip list For uncompressed data it is difficult to specify IN OUT points while monitoring the picture By using this function instead specifying IN OUT points can be done easily Note Message Meaning CH COND RED The recording error rate of th...

Страница 29: ...lay picture IDs on the control panel of the VTR for uncompressed data only Set 635 PICTURE ID DISPLAY in the VTR SETUP menu to on To display the file information on the VTR control panel for uncompressed data only Set 604 TC2 MODE SEL in the VTR SETUP menu to off to display the file information under the timecode indication on the control panel of the VTR For details on the VTR SETUP menu of the S...

Страница 30: ...t T Moves to the next tag display Moves to the previous tag display Importing operations I a Registers the current timecode as an IN point O a Registers the current timecode as an OUT point Ctrl I Goes to an IN point Ctrl O Goes to an OUT point Ctrl Previews the selected clip Ctrl A Adds the selected sequence to the import list Ctrl C Starts importing ESC Cancels importing Exporting operations I a...

Страница 31: ...e COOKIE tag display in the PROXY SETUP menu to store the settings NAME Enter a name for a preset setting here ASPECT Specifies the size of the source picture SRC WIDTH When ASPECT is specified the width of the source picture is displayed here automatically When you change the width ASPECT changes to User Defined For details on how to change the setting see To enter a new value on page 32 SRC HEIG...

Страница 32: ...ugh the AUX OUTPUT connectors LUT files stored in the banks are maintained even after the VTR is turned off The bit depth of LUT files can be applied 8 10 12 and 16 bit data Note however that the lower four of 16 bits are ignored because of the hardware s 12 bit process On the contrary when the bit depth of the input data is 8 or 10 the signal is linearly interpolated into 12 bit data For details ...

Страница 33: ...table below the default setting is indicated by an asterisk Settings on the control panel of the VTR Color control function for the monitor output can be set with the NW CTRL MENU from the VTR SETUP menu in the SETUP menu provided on the VTR For details on the SETUP menu of the VTR refer to the Operation Manual supplied with the SRW 5800 1 On the VTR display the NW MON CTRL menu from the VTR SETUP...

Страница 34: ...To load the clip list from the cassette tape currently inserted in the SWR 5800 Click the UPDATE button at the right of the CASSETTE box Then the clip list from the cassette tape is displayed 3 On the clip list click to select the line that you want to output The selected clip is highlighted To deselect the clip click it again To select all the clips on the clip list Double click anywhere on the l...

Страница 35: ...h the timecode displayed in the TAPE IN box and the value in the PREROLL box described below END The value obtained with the timecode displayed in the TAPE OUT box and the value in the POSTROLL box described below Item Explanation PREFIX Enter the prefix for the clip ID e g ID here TRACK Enter recorded tracks such as V video A1 audio channel 1 A2 audio channel 2 and so on PREROLL Enter the preroll...

Страница 36: ...ox in the DISK CONTROL tag display of the EXPORT menu is set to Copy to Log Directory For details see About the Copy to Log Directory setting in LOG PROXY on page 25 DELETE Deletes the specified export log file LOG ARCHIVE Click the Browse button to specify an export log file on a disk or removable media of the web client and then click the LOAD button to write the log file to the directory for lo...

Страница 37: ...or each cassette ID Cassette ID A Cassette ID A Cassette ID A VTR installed with the HKSR 5804 Export log file for the cassette A E mail or removable media Web client NFS server DPX files VTR installed with the HKSR 5804 Export log file for the cassette A Export log files for each cassette ID ...

Страница 38: ...execution Log files for job files that have been automatically executed are stored in the JOB LOG area each indicated by the name of job file appended by the date and time of execution A log file of a successfully executed job file can be selected by clicking the SUCCEEDED box while a log file of a job file that failed can be selected by clicking the FAILED box After selecting the log file that yo...

Страница 39: ...SDI mode in B01 NW I O mode is set to DUB a 4 2 2 YUV monitor signal is output from the AUX OUTPUT B connector 2 Insert the original cassette into the player and insert a recordable cassette into the recorder 3 Start playback on the player and then start recording on the recorder In the case of uncompressed data import or export cannot be carried out when sub item SDI mode in B01 NW I O mode in th...

Страница 40: ...ard such as HKSR 58UK SRW Upgrade Kit installed The optional HKSR 5802 board is required for the VTR to play the HDCAM tapes On board functions 1D LUT downconverter color space conversion Confirmed operational environment Browser Firefox Internet Explorer Safari NFS server Redhat Linux E5 Mac OS v10 6 CIFS server Windows XP Windows 7 Supplied accessories Operation Manual CD ROM 1 Installation Guid...

Страница 41: ...rate output data blocks for R G and B corresponding with the 10 bit 1024 input data The bit depth of the output is determined by the maximum output value The output values on lines L1 to L1024 are R values the values on lines L1025 to L2048 are G values and the values on lines L2049 to L3072 are B values This is an example of 10 bit input and 10 bit output LUT file type 3 R G and B have individual...

Страница 42: ...an copy these samples and edit them as necessary on an external editor to create your own job files A comment xxxxx is indicated below each element as an explanation of the element Example of a comment mode 1 mode 1 Codec Import 2 Codec Export 3 UC Import 4 UC Export Errors in description in a job file may result in unforeseen operations during automatic execution For details on actual operations ...

Страница 43: ...of frame e g 00 00 00 00 00000040 out out HHMMSSFF For dropframe set DF bit bit6 of frame e g 00 00 00 00 00000040 tc proc range range 0 Head Full 1 Head Head 2 Full Full lut lut 0 off 1 8 Bank n hflip hflip 0 disable 1 enable vflip vflip 0 disable 1 enable proc main type type 1 DPX RGB 3 CIN 4 TIFF 5 DPX YCbCr 422 8 MXF SR 9 MXF SR Lite 255 NONE depth depth Bit Depth 8 10 16 name dir dir 128 char...

Страница 44: ... ITU R 709 4 CIN 1 Printing Density 4 CCIR XA 11 Rec 709 meta meta 0 Off 1 All Data 2 Keykode Only reel mode mode 0 Auto 1 Manual 2 Cassette ID name name 30 characters tfid Telefile ID field field 0 Creator Field DPX Only 1 Input Device Name Field 2 TV Reserved Field DPX Only reel tc tc 0 LTC 1 VITC 2 Recounted TC for MXF only header proxy type type 0 BMP 1 JPG 2 none 3 Temporarily size size 0 160...

Страница 45: ...1 enable edit mode mode 0 Insert 1 Assemble 2 First Rec tcmode tcmode 0 Preset 1 File Number 2 File Header DPX Only sg sg 10 Black 1 100 Color Bar 3 SMPTE Color Bar tc Edit TC Info in in HHMMSSFF For dropframe set DF bit bit6 of frame e g 00 00 00 00 00000040 tc edit general sequence You can add up to 1000 sequences proc range range 1 Head Head 2 Full Full 3 Full Head lut lut 0 off 1 8 Bank n hfli...

Страница 46: ...e TC in in HHMMSSFF tc min min Minimum filesize in this sequence byte max max Maximum filesize in this sequence byte pack pack 0 Align each line 1 No padding depth depth Bit Depth 8 10 16 color color 0 RGB 2 CBYCRY proxy Existing proxy informatins for this sequence type type 0 BMP 1 JPG 2 NONE size size 0 160 2 320 3 640 dirmode dirmode 0 Same as Main Files 1 Proxy Directory 2 Resolution Directory...

Страница 47: ...y gen gen 0 disable 1 enable 5 enable as Temporarily proxy abort abort 0 disable 1 enable general sequence You can add up to 1000 sequences pid in in 000000 999999 out out 000000 999999 pid main dir dir 128 characters depends on full pathname e g import_clip type type 128 Same as Original 255 NONE Proxy Only dirmode dirmode 0 Org Structure 1 Org Structure Under Selected Dir 2 All Files into Select...

Страница 48: ...roxy abort abort 0 disable 1 enable edit mode mode 0 Insert 1 Assemble 2 First Rec sg sg 10 Black 1 100 Color Bar 3 SMPTE Color Bar pid Edit PID Info in in 000000 999999 pid edit general sequence You can add up to 1000 sequences dc srcwidth srcwidth 1280 4096 srcheight srcheight 720 3112 dc file name dir dir 128 characters depends on full pathname e g export_clip base base base name of clip 32 cha...

Страница 49: ... non Image proxy Existing proxy informatins for this sequence type type 0 BMP 1 JPG 2 NONE size size 0 160 2 320 3 640 dirmode dirmode 0 Same as Main Files 1 Proxy Directory 2 Resolution Directory proxy file sequence jobinfo ...

Страница 50: ... and or other countries Mac OS Safari and Final Cut Pro are trademarks of Apple Inc registered in the U S and other countries Firefox is a registered trademark of the Mozilla Foundation in the United States and or other countries Linux is a registered trademark of Linus Torvalds in the U S and other countries Red Hat is a trademark of Red Hat Inc in the U S and other countries Cineon is a register...

Страница 51: ...Sony Corporation HKSR 5804 SY 4 115 947 03 1 2008 ...

Отзывы: