background image

ES

Personalización de la 

videocámara a través 

de los menús

Los elementos de menú se describen 
detalladamente con fotografías en color en la 
“Guía práctica de Handycam” (pág. 48).

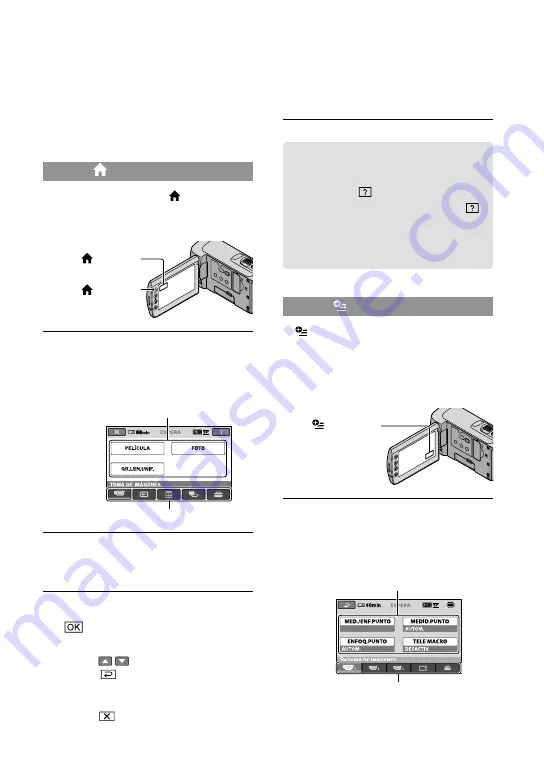
Uso del   HOME MENU

Cuando presiona el botón   (HOME), 
aparece el HOME MENU. Puede cambiar 
los ajustes de la videocámara.


Toque la categoría deseada 


el elemento de menú que desea 
cambiar.


Siga las instrucciones que 
aparecen en la pantalla.


Cuando finalice el ajuste, toque 

.

Si el elemento no aparece en la pantalla, 
toque  / .
Toque 

 para volver a la pantalla 

anterior.
Para ocultar la pantalla HOME MENU, 
toque 

.

No puede seleccionar los elementos o 
ajustes que aparecen atenuados.

Uso de la función HELP

Para ver las descripciones del HOME 
MENU, toque   (HELP) en la pantalla 
HOME MENU. (La parte inferior del   
se ilumina en naranja). Luego, toque el 
elemento de menú del que desea obtener 
información.

Uso del   OPTION MENU

El   OPTION MENU se abre igual que las 
ventanas emergentes que aparecen al hacer 
clic con el botón derecho del mouse de una 
computadora. Aparecen los elementos de 
menú que puede cambiar en el contexto.


Toque la ficha deseada 

 el 

elemento cuyo ajuste desea 
cambiar.

Elemento de menú

Ficha

 (OPTION)

Elemento de menú

Categoría

 (HOME)

Botón   (HOME)

Содержание HDR-CX100/B

Страница 1: ...4 129 506 11 1 Digital HD Video Camera Recorder 2009 Sony Corporation Operating Guide US Guía de operaciones ES HDR CX100 ...

Страница 2: ...zard do not expose the unit to rain or moisture Do not expose the batteries to excessive heat such as sunshine fire or the like This symbol is intended to alert the user to the presence of uninsulated dangerous voltage within the product s enclosure that may be of sufficient magnitude to constitute a risk of electric shock to persons This symbol is intended to alert the user to the presence of imp...

Страница 3: ...et consult an electrician for replacement of the obsolete outlet Protect the power cord from being walked on or pinched particularly at plugs convenience receptacles and the point where they exit from the apparatus Only use attachments accessories specified by the manufacturer Use only with the cart stand tripod bracket or table specified by the manufacturer or sold with the apparatus When a cart ...

Страница 4: ... 1 15P plug rated for 125 V 15 A Europe Countries regions Voltage Frequency Hz Plug type Austria 230 50 C Belgium 230 50 C Czech 220 50 C Denmark 230 50 C Finland 230 50 C France 230 50 C Germany 230 50 C Greece 220 50 C Hungary 220 50 C Iceland 230 50 C Ireland 230 50 C BF Italy 220 50 C Luxemburg 230 50 C Netherlands 230 50 C Norway 230 50 C Poland 220 50 C Portugal 230 50 C Romania 220 50 C Rus...

Страница 5: ...60 A Jamaica 110 50 A Mexico 120 127 60 A Nicaragua 120 240 60 A Panama 110 220 60 A South America Countries regions Voltage Frequency Hz Plug type Argentina 220 50 C BF O Brazil 127 220 60 A C Chile 220 50 C Colombia 120 60 A Peru 220 60 A C Venezuela 120 60 A Middle East Countries regions Voltage Frequency Hz Plug type Iran 220 50 C BF Iraq 220 50 C BF Israel 230 50 C Saudi Arabia 127 220 50 A C...

Страница 6: ...daptor Do not use the AC Adaptor placed in a narrow space such as between a wall and furniture Use the nearby wall outlet wall socket when using the AC Adaptor Disconnect the AC Adaptor from the wall outlet wall socket immediately if any malfunction occurs while using your camcorder Even if your camcorder is turned off AC power source mains is still supplied to it while connected to the wall outle...

Страница 7: ... frequency energy and if not installed and used in accordance with the instructions may cause harmful interference to radio communications However there is no guarantee that interference will not occur in a particular installation If this equipment does cause harmful interference to radio or television reception which can be determined by turning the equipment off and on the user is encouraged to ...

Страница 8: ...ure the image and sound are recorded without any problems Compensation for the contents of recordings cannot be provided even if recording or playback is not possible due to a malfunction of the camcorder recording media etc TV color systems differ depending on the country region To view your recordings on a TV you need an NTSC system based TV Television programs films video tapes and other materi...

Страница 9: ...s Operating Guide the internal memory of the camcorder and Memory Stick PRO Duo media are called recording media In this Operating Guide both Memory Stick PRO Duo media and Memory Stick PRO HG Duo media are referred as Memory Stick PRO Duo media You will find the Handycam Handbook PDF on the supplied CD ROM p 51 The screenshots are from Windows Vista The scenes may vary depending on the operating ...

Страница 10: ...photos on a connected TV p 24 Saving movies and photos on a disc Saving movies and photos with a computer p 26 You can create a disc with either high definition image quality HD or standard definition image quality SD from high definition image quality HD movies imported to the computer See page 29 on the characteristics of each type of disc Creating a disc with a DVD writer or a recorder p 38 Del...

Страница 11: ...nd photos with a computer Preparing a computer Windows 26 When using a Macintosh 27 Selecting the method for creating a disc computer 29 Creating a disc with one touch One Touch Disc Burn 31 Importing movies and photos to a computer Easy PC Back up 32 Changing the destination drive or folder for movies and photos 32 Starting PMB Picture Motion Browser 33 Creating a high definition image quality HD...

Страница 12: ... connection 40 Making good use of your camcorder Deleting movies and photos 42 Changing the recording media 43 To check the recording media settings 43 Dubbing or copying movies and photos from the internal memory to Memory Stick PRO Duo media 44 Customizing your camcorder with menus 45 Using the HELP function 45 Getting detailed information from the Handycam Handbook 51 Additional information Tro...

Страница 13: ... sliding it in the direction of the arrow until it clicks 3 Connect the AC Adaptor and the power cord mains lead to your camcorder and the wall outlet wall socket Be sure that the mark on the DC plug is facing right The CHG charge lamp lights up and charging starts The CHG charge lamp turns off when the battery pack is fully charged 4 When the battery is charged disconnect the AC Adaptor from the ...

Страница 14: ...d the AC Adaptor When you remove the battery pack or disconnect the AC Adaptor close the LCD screen and make sure that the Movie Photo lamps p 15 are turned off Do not short circuit the DC plug of the AC Adaptor or battery terminal with any metallic objects This may cause a malfunction In the default setting the power turns off automatically if you leave your camcorder without any operation for ab...

Страница 15: ...en touch until the item appears 3 Set DST SET or SUMMERTIME date and time then touch The clock starts If you set DST SET or SUMMERTIME to ON the clock advances 1 hour The date and time does not appear during recording but they are automatically recorded on the recording media and can be displayed during playback To display the date and time touch HOME SETTINGS VIEW IMAGES SET DATA CODE DATE TIME Y...

Страница 16: ...ou can turn off your camcorder also by pressing POWER When POWER ON BY LCD is set to OFF turn off your camcorder by pressing POWER p 49 Changing the language setting You can change the on screen displays to show messages in a specified language Touch HOME SETTINGS CLOCK LANG LANGUAGE SET a desired language POWER button ...

Страница 17: ...s are recorded with high definition image quality HD on the internal memory p 43 48 Fasten the grip belt Open the lens cover Open the LCD screen of your camcorder Your camcorder is turned on To turn on your camcorder when the LCD screen is already open press POWER p 15 POWER button ...

Страница 18: ...to ON in the default setting To adjust the angle of the LCD panel first open the LCD panel 90 degrees to the camcorder and then adjust the angle If you rotate the LCD panel 180 degrees to the lens side you can record movies photos in mirror mode When you open or close the LCD screen or adjust the angle be careful not to press the buttons on the side of the LCD screen by mistake In the default sett...

Страница 19: ...OME SETTINGS MOVIE SETTINGS X V COLOR ON Some settings may be required on a TV to view the movies Refer to the instruction manuals of the TV Shooting photos In the default setting photos are recorded on the internal memory p 43 Open the lens cover Open the LCD screen of your camcorder Your camcorder is turned on To turn on your camcorder when the LCD screen is already open press POWER p 15 Press M...

Страница 20: ...ou cannot record photos while is displayed Recording and playing movies and photos easily Easy Handycam operation Simply press EASY To cancel Easy Handycam operation press EASY again after you finish recording or menu operations During Easy Handycam operation you can set basic options such as changing the image size or deleting images among the setting and adjustment items Other items are set auto...

Страница 21: ... the VISUAL INDEX screen by pressing VIEW IMAGES on the LCD screen as well Touch or tab a desired movie appears with the movie or photo that was most recently played or recorded If you touch the movie or photo with you can continue playback from the previous time appears on the photo recorded on the Memory Stick PRO Duo media To the index screen of scenes by a certain interval Film Roll Index Prev...

Страница 22: ...ed on the panel behind the LCD panel The recording date time and shooting conditions are recorded automatically during recording This information is not displayed during recording but you can display it during playback by touching HOME SETTINGS VIEW IMAGES SET DATA CODE a desired setting To adjust the sound volume of movies While playing back movies touch adjust with You can adjust the sound volum...

Страница 23: ...er zoom lever while viewing photos PB ZOOM If you touch a point in the PB ZOOM frame the point comes to the center in the frame When viewing photos recorded on Memory Stick PRO Duo media playback folder appears on the screen Previous To start stop slide show To the VISUAL INDEX screen Next OPTION MENU ...

Страница 24: ...ur camcorder and touch HOME OTHERS TV CONNECT Guide on the LCD screen When an item is not on the screen touch until the item appears Use the supplied AC Adaptor as the power source p 14 Connect your camcorder and TV referring to TV CONNECT Guide When the A V connecting cable is used to output movies movies are output with standard definition image quality SD Play back movies and photos on your cam...

Страница 25: ... compatible with the Photo TV HD standard Photo TV HD allows for highly detailed photo like depiction of subtle textures and colors By connecting Sony s Photo TV HD compatible devices using an HDMI cable or the component A V cable a whole new world of photos can be enjoyed in breathtaking full HD quality The TV will automatically switch to the appropriate mode when displaying photos Setup of the T...

Страница 26: ...he following operations Importing the movies and photos to the computer One Touch Disc Burn Creating an Blu ray disc AVCHD format disc DVD video Intel Pentium 4 2 8 GHz or faster is required when creating a DVD video by converting high definition image quality HD to standard definition image quality SD Copying a disc Application DirectX 9 0c or later This product is based on DirectX technology It ...

Страница 27: ...of the PMB of your camcorder uninstall PMB from the computer and then re install it in order from lower to higher If you install a higher version of PMB first some functions may not work correctly See page 51 on the Handycam Handbook Confirm that your camcorder is not connected to the computer Turn on the computer Log on as an Administrator for installation Close all applications running on the co...

Страница 28: ...ed to complete the installation When the installation is completed following icons will appear Remove the CD ROM from your computer Other icons may appear No icon may appear depending on the installation procedure The Handycam Handbook is not installed in this procedure p 51 To disconnect your camcorder from the computer Click the icon at the bottom right of the desktop of the computer Safely remo...

Страница 29: ... p 31 HD Importing movies and photos to a computer Easy PC Back up p 32 Creating a AVCHD format disc with high definition image quality HD p 34 HD Ordinary DVD playback devices a DVD player a computer that can play DVDs etc Importing movies and photos to a computer Easy PC Back up p 32 Creating a standard definition image quality SD disc p 36 SD To create a Blu ray disc the BD Add on Software for ...

Страница 30: ...ith PMB For Blu ray disc see page 35 Disc type Features DVD R DVD R DVD R DL Unrewritable DVD RW DVD RW Rewritable Always maintain your PLAYSTATION 3 to use the latest version of the PLAYSTATION 3 system software The PLAYSTATION 3 may not be available in some countries regions ...

Страница 31: ...ard definition image quality SD disc from high definition image quality HD movies import movies to a computer first p 32 and then create a standard definition image quality SD disc p 36 Install PMB beforehand p 27 however do not start PMB Connect your camcorder to the wall outlet wall socket using the AC Adaptor supplied for this operation p 14 With DISC BURN on your camcorder you can save movies ...

Страница 32: ... to your computer When the operation is completed the PMB screen appears When the operation is completed a screen to indicate that movies are being analyzed may appear It may take a long time to analyze movies In the meantime you can operate PMB You can create either high definition image quality HD discs Blu ray disc AVCHD format disc p 34 or standard definition image quality SD discs p 36 from i...

Страница 33: ... Sony Picture Utility PMB to start PMB You can view edit or create discs of movies and photos using PMB Reading PMB Guide For details on how to use PMB read the PMB Guide Double click the PMB Guide short cut icon on the computer screen to open the PMB Guide If the icon is not displayed on the computer screen click Start All Programs Sony Picture Utility Help PMB Guide You can also open the PMB Gui...

Страница 34: ...e Utility PMB 3 Click Folders or Calendar on the left side in the window and select the folder or date then select the high definition image quality HD movies High definition image quality HD movies are marked with You cannot save photos on a disc To select plural movies hold the Ctrl key down and click thumbnails 4 At the top of the window click Manipulate AVCHD HD Creation The window used to sel...

Страница 35: ... on screen instructions Connect your computer to the internet when you install BD Add on Software Place an empty Blu ray disc in the disc drive and click Manipulate Blu ray Disc HD Creation in step 4 of Creating a high definition image quality HD disc p 34 Other procedures are the same as that for creating a high definition image quality HD disc Your computer must support the creation of Blu ray d...

Страница 36: ...ty PMB 3 Click Folders or Calendar on the left side in the window and select the folder or date then select the movies and photos High definition image quality HD movies are marked with To select plural movies and photos hold the Ctrl key down and click thumbnails 4 At the top of the window click Manipulate DVD Video SD Creation The window used to select movies and photos appears To add movies and...

Страница 37: ...B select the movie you want to edit then click Manipulate Video Trimming on the menu to display the Video Trimming window See PMB Guide on the operation p 33 Capturing photos from a movie You can save a frame of a movie as a photo file On the movie playback window of PMB click to display Save Frame windows See PMB Guide on the operation p 33 Click ...

Страница 38: ...ng a disc See page 35 to create a Blu ray disc Player Choosing a method and disc type AVCHD format playback devices a Sony Blu ray disc player PLAYSTATION 3 etc Creating a high definition image quality HD disc with a DVD writer etc USB cable connection p 39 HD Ordinary DVD playback devices a DVD player a computer that can play DVDs etc Creating a standard definition image quality SD disc with a di...

Страница 39: ...er and connect a DVD writer etc to the USB jack of your camcorder with the USB cable supplied The USB SELECT screen appears on the camcorder screen 2 Touch USB CONNECT when movies are recorded on the internal memory or USB CONNECT when movies are recorded on a Memory Stick PRO Duo media on the camcorder screen 3 Record movies on the connected device For details refer to the instruction manuals sup...

Страница 40: ...ecting cable supplied Connect the A V connecting cable to the input jacks of another device A V connecting cable with S VIDEO sold separately When connecting to another device via the S VIDEO jack by using an A V connecting cable with an S VIDEO cable sold separately higher quality images can be produced than with an A V connecting cable Connect the white and red plug left right audio and the S VI...

Страница 41: ...he screen indicators such as a counter etc on the screen of the monitor device connected touch HOME SETTINGS OUTPUT SETTINGS DISP OUTPUT LCD PANEL the default setting To record the date time or camera settings data touch HOME SETTINGS VIEW IMAGES SET DATA CODE a desired setting In addidion touch HOME SETTINGS OUTPUT SETTINGS DISP OUTPUT V OUT PANEL When the screen size of display devices TV etc is...

Страница 42: ...ll photos at one time In step 2 touch DELETE DELETE ALL YES YES Formatting the recording media Formatting deletes all the movies and photos to recover recordable free space Connect your camcorder to the wall outlet wall socket using the AC Adaptor supplied for this operation p 14 To avoid the loss of important images you should save them p 26 before formatting the recording media Protected movies ...

Страница 43: ...number of recordable photos Selecting the recording media for movies Touch HOME MANAGE MEDIA MOVIE MEDIA SET The MOVIE MEDIA SET screen appears Touch the desired medium Touch YES The recording medium is changed Selecting the recording media for photos Touch HOME MANAGE MEDIA PHOTO MEDIA SET The PHOTO MEDIA SET screen appears Touch the desired recording medium Touch YES The recording medium is chan...

Страница 44: ...mage data may be damaged Close the Memory Stick Duo media cover after inserting the Memory Stick PRO Duo media The Create a new Image Database File screen appears when you insert new Memory Stick PRO Duo media while the Movie lamp is lit Touch YES To record only photos on Memory Stick PRO Duo media touch NO If Failed to create a new Image Database File It may be possible that there is not enough f...

Страница 45: ... screen touch To hide the HOME MENU screen touch You cannot select the grayed items or settings Using the HELP function To see the descriptions on the HOME MENU touch HELP on the HOME MENU screen The bottom of turns orange Then touch the menu item you want to know about Using the OPTION MENU The OPTION MENU appears just like the pop up window that appears when you right click the mouse on a comput...

Страница 46: ...46 US You cannot use the OPTION MENU during Easy Handycam operation ...

Страница 47: ...TO COPY COPY by select p 44 COPY by date p 44 EDIT DELETE p 42 DELETE p 42 PROTECT Sets the protection to avoid deleting movies PROTECT Sets the protection to avoid deleting photos DIVIDE Divides movies PLAYLIST EDIT ADD ADD Adds movies in a playlist ADD by date ADD by date Adds movies recorded on a same day at one time in a playlist ERASE ERASE Erases movies from a playlist ERASE ALL ERASE ALL Er...

Страница 48: ...rtical REMAINING SET Sets how the remaining recording time of the media is to be displayed CONVERSION LENS Optimizes the Steadyshot function and focus according to the attached lens AUTO BACK LIGHT Adjusts the exposure for backlit subjects automatically PHOTO SETTINGS IMAGE SIZE Sets the photo size FILE NO Sets how to assign the file number AUTO SLW SHUTTR Adjusts the shutter speed automatically G...

Страница 49: ...HDMI RESOLUTION Sets the output image resolution when connecting your camcoder to a TV with an HDMI cable CLOCK LANG CLOCK SET p 15 AREA SET p 15 DST SET SUMMERTIMEp 15 LANGUAGE SET p 16 GENERAL SET DEMO MODE Sets whether the demonstration appears or not CALIBRATION Calibrates the touch panel A SHUT OFF Changes the A SHUT OFF setting p 14 POWER ON BY LCD Sets whether the camcoder is turned on and ...

Страница 50: ...ightness of movies and photos FOCUS Focuses manually SCENE SELECTION Selects an appropriate recording setting according to the type of scene such as night view or beach WHITE BAL Adjusts the white balance tab FADER Fades scenes in or out tab BLT IN ZOOM MIC Records movies with directional sound relative to the zoom setting MICREF LEVEL Sets the microphone level SELF TIMER Used during photo recordi...

Страница 51: ...the installation screen displayed click Handycam Handbook 3 Select the desired language and the model name of your camcorder then click Handycam Handbook PDF The model name of your camcorder is printed on its bottom surface 4 Click Exit Exit then remove the CD ROM from your computer To view the Handycam Handbook double click the short cut icon on the computer screen When using a Macintosh open the...

Страница 52: ...y to shoot after the power is turned on This is not a malfunction Disconnect the AC Adaptor from the wall outlet wall socket or remove the battery pack then reconnect it after about 1 minute If your camcorder still does not work press RESET p 60 using a pointed object If you press RESET all settings including the clock setting are reset Your camcorder gets warm Your camcorder may become warm durin...

Страница 53: ...e indicator flashes slowly the file is damaged or unreadable Battery power is low No Memory Stick PRO Duo media is inserted p 44 When the indicator flashes there is not enough free space for recording images Delete unnecessary images p 42 or format the Memory Stick PRO Duo media p 42 after storing the images on other media The Image Database File is damaged Check the Image Database File by touchin...

Страница 54: ...r Do not wrap your camcorder with a towel for example and operate it Doing so might cause heat to build up inside When disconnecting the power cord mains lead pull it by the plug and not the cord lead Do not damage the power cord mains lead such as by placing anything heavy on it Do not use a deformed or damaged battery pack Keep metal contacts clean If the battery electrolytic liquid has leaked C...

Страница 55: ...nstalled rechargeable battery is not charged the camcorder operation will not be affected as long as you are not recording the date Procedures Connect your camcorder to a wall outlet wall socket using the supplied AC Adaptor and leave it with the LCD screen closed for more than 24 hours Note on disposal transfer of the camcorder Even if you perform DELETE ALL DELETE ALL DELETE ALL or MEDIA FORMAT ...

Страница 56: ...rocessing system BIONZ allow still image resolution equivalent to the sizes described The focal length figures are actual figures from wide angle pixel readout Input Output connectors A V Remote Connector Component video and audio output jack HDMI OUT jack HDMI mini connector USB jack mini B LCD screen Picture 6 7 cm 2 7 type aspect ratio 16 9 Total number of pixels 211 200 960 220 General Power r...

Страница 57: ...et the recording mode touch HOME SETTINGS MOVIE SETTINGS REC MODE In the default setting the recording mode is HD SP p 48 High definition image quality HD in h hour m minute Recording mode Recording time HD FH 55 m 55 m HD HQ 1 h 55 m 1 h 20 m HD SP 2 h 25 m 1 h 40 m HD LP 3 h 15 m 2 h 30 m Standard definition image quality SD in h hour m minute Recording mode Recording time SD HQ 2 h 1 h 45 m SD ...

Страница 58: ...ltimedia Interface are trademarks or registered trademarks of HDMI Licencing LLC Microsoft Windows Windows Media Windows Vista and DirectX are either registered trademarks or trademarks of Microsoft Corporation in the United States and or other countries Macintosh and Mac OS are registered trademarks of Apple Inc in the U S and other countries Intel Intel Core and Pentium are trademarks or registe...

Страница 59: ...nute second 00min Estimated recording remaining time FADER Indicator Meaning LCD backlight off 9999 9999 Approximate number of recordable photos and recording media Playback folder 100 112 Current playing movie or photo Number of total recorded movies or photos Bottom Indicator Meaning FACE DETECTION DETECTION SET Manual focus SCENE SELECTION White balance SteadyShot off SPOT MTR FCS SPOT METER EX...

Страница 60: ... zoom in or out START STOP button 18 DISC BURN button 31 POWER button 15 DISP display button 22 To turn off the backlight of the LCD screen press and hold DISP down To turn it on press and hold DISP down again EASY button 20 HDMI OUT mini jack 24 USB jack 27 31 32 39 VIEW IMAGES button 21 Access lamp Internal memory Memory Stick PRO Duo media 44 While the lamp is lit or flashing the camcorder is r...

Страница 61: ...CHG Charge lamp 13 Speaker DC IN jack 13 A V Remote Connector 24 40 START STOP button 18 Grip belt 17 Hook for a shoulder belt Tripod receptacle Attach a tripod sold separately to the tripod receptacle using a tripod screw sold separately the length of the screw must be less than 5 5 mm 7 32 in BATT battery release lever 14 ...

Страница 62: ...items 7 T Troubleshooting 52 Turning the power on 15 TV 24 TV CONNECT Guide 24 U USB 26 39 Using a wall outlet wall socket as a power source 14 V VISUAL INDEX 21 Volume 22 W Warning indicators 53 Windows 26 Z Zoom 18 20 23 A AVCHD 29 38 A V connecting cable 40 B Battery 13 Blu ray disc 35 C Capturing photos from a movie 37 Charging the battery abroad 14 Charging the battery pack 13 Computer 26 Com...

Страница 63: ......

Страница 64: ...e al fuego No manipule baterías de iones de litio dañadas o que presenten fugas Asegúrese de cargar la batería con un cargador de baterías original de Sony o con un dispositivo que pueda cargarla Mantenga la batería fuera del alcance de niños pequeños Mantenga la batería seca Sustitúyala únicamente por otra del mismo tipo o equivalente recomendada por Sony Deshágase de la baterías usada lo antes p...

Страница 65: ...la clavija del conector en la dirección correcta Si inserta la clavija a la fuerza en el terminal dañará el terminal lo que podría ocasionar una falla de funcionamiento en la videocámara Si graba o elimina imágenes repetidamente durante mucho tiempo los datos del soporte de grabación se fragmentarán Las imágenes no se pueden guardar ni grabar En tal caso guarde las imágenes en algún tipo de soport...

Страница 66: ...ados en DVD ya que es posible que los reproductores grabadoras de DVD no puedan expulsar el soporte y borren su contenido sin previo aviso Los soportes DVD que contengan imágenes en formato AVCHD se pueden reproducir en un reproductor o grabadora de Blu ray Disc u otro dispositivo compatible Acerca del ajuste de idioma Para ilustrar los procedimientos operativos se utilizan indicaciones en pantall...

Страница 67: ...evisor conectado pág 20 Almacenamiento de películas y fotografías en un disco Almacenamiento de películas y fotografías con una computadora pág 22 Es posible crear un disco con calidad de imagen de alta definición HD o de definición estándar SD a partir de películas con calidad de imagen de alta definición HD importadas en la computadora Consulte las características de cada tipo de disco en la pág...

Страница 68: ...Si se utiliza una computadora Macintosh 23 Selección del método de creación de un disco computadora 26 Creación de un disco con un solo toque One Touch Disc Burn 28 Importación de películas y fotografías a una computadora Easy PC Back up 29 Modificación de la unidad o la carpeta de destino de películas y fotografías 30 Inicio de PMB Picture Motion Browser 30 Creación de un disco con calidad de ima...

Страница 69: ...A V 37 Utilización óptima de la videocámara Eliminación de películas y fotografías 39 Cambio del soporte de grabación 40 Para comprobar los ajustes del soporte de grabación 40 Copia de películas y fotografías de la memoria interna en un Memory Stick PRO Duo 41 Personalización de la videocámara a través de los menús 42 Uso de la función HELP 42 Obtención de información detallada de la Guía práctica...

Страница 70: ...lavija de cc esté orientada hacia la derecha El indicador CHG carga se enciende y se inicia el proceso de carga El indicador CHG carga se apaga cuando la batería está totalmente cargada 4 Una vez cargada la batería desconecte el adaptador de alimentación de ca de la toma de entrada de cc de la videocámara Consulte el tiempo de carga grabación y reproducción en la página 55 Cuando la videocámara es...

Страница 71: ...s película fotografía pág 10 estén apagados No provoque un cortocircuito en la clavija de cc del adaptador de alimentación de ca ni en el terminal de la batería con ningún objeto metálico Si lo hace puede ocasionar una falla de funcionamiento De manera predeterminada la alimentación se desconecta automáticamente para ahorrar batería si no lleva a cabo ninguna operación en la videocámara durante ap...

Страница 72: ...elemento no aparece en la pantalla toque hasta que aparezca 3 Ajuste HORA VERANO la fecha y la hora y a continuación toque El reloj empezará a funcionar Si ajusta HORA VERANO en ACTIVADO el reloj se adelanta 1 hora La fecha y la hora no aparecen durante la grabación aunque se graban automáticamente en el soporte de grabación y se pueden mostrar durante la reproducción Para mostrar la fecha y la ho...

Страница 73: ... parpadea durante varios segundo y se apaga la videocámara También puede presionar POWER para apagar la videocámara Si ENCEND CON LCD está ajustado en DESACTIV presione POWER para apagar la videocámara pág 46 Cambio del ajuste de idioma Puede modificar las indicaciones en pantalla para que muestren los mensajes en un idioma determinado Toque HOME AJUSTES AJ REL IDIOM AJUSTE IDIOMA el idioma desead...

Страница 74: ...idad de imagen de alta definición HD en la memoria interna pág 40 45 Ajuste la correa de sujeción Abra la tapa del objetivo Abra la pantalla de cristal líquido de la videocámara Se enciende la videocámara Para encender la videocámara con la pantalla de cristal líquido abierta presione POWER pág 10 Botón POWER ...

Страница 75: ...e cristal líquido primero abra el panel de cristal líquido 90 grados con respecto a la videocámara y ajuste el ángulo Puede girar el panel de cristal líquido 180 hacia el lado del objetivo para grabar películas o capturar fotos en modo de espejo Al abrir o cerrar la pantalla de cristal líquido o ajustar el ángulo procure no presionar los botones del lateral de la pantalla por error En el ajuste pr...

Страница 76: ...s películas Consulte los manuales de instrucciones del televisor Captura de fotografías En el ajuste predeterminado las fotos se graban en la memoria interna pág 40 Abra la tapa del objetivo Abra la pantalla de cristal líquido de la videocámara Se enciende la videocámara Para encender la videocámara con la pantalla de cristal líquido abierta presione POWER pág 10 Presione MODE para encender el ind...

Страница 77: ...número de fotografías que se pueden grabar en la pantalla de cristal líquido pág 57 Para cambiar el tamaño de la imagen toque HOME AJUSTES AJUST FOTO CÁM TAM IMAGEN el ajuste deseado Para capturar fotos durante la grabación de una película presione PHOTO El tamaño del archivo de imagen es de 2 3M cuando se graban películas con calidad de imagen de alta definición HD No se pueden grabar fotografías...

Страница 78: ...andycam puede ajustar opciones básicas como cambiar el tamaño de la imagen o eliminar imágenes entre los elementos de configuración y ajuste Otros elementos se ajustan automáticamente Cuando se inicia el funcionamiento en modo Easy Handycam prácticamente todos los elementos de menú se restablecen automáticamente a sus ajustes predeterminados Algunos elementos de menú conservan los ajustes que tení...

Страница 79: ...antalla VISUAL INDEX también puede presionar VISUALIZAR IMÁGENES en la pantalla de cristal líquido Toque la ficha o la película deseada aparece junto con la película o foto que se reprodujo o se grabó más recientemente Si toca la película o foto con puede continuar la reproducción desde el momento anterior aparece en la foto grabada en el Memory Stick PRO Duo A la pantalla del índice de escenas en...

Страница 80: ... encuentra detrás del panel de cristal líquido La fecha y hora de grabación así como las condiciones de filmación se guardan automáticamente durante la grabación Esta información no se muestra durante la grabación pero puede verla durante la reproducción si toca HOME AJUSTES VIS AJUSTES IMÁG CÓDIGO DATOS el ajuste deseado Para ajustar el volumen del sonido de las películas Durante la reproducción ...

Страница 81: ...ras las visualiza PB ZOOM Si toca un punto en el marco PB ZOOM el punto se colocará en el centro del marco Durante la visualización de las fotografías grabadas en un Memory Stick PRO Duo aparece carpeta de reproducción en la pantalla Anterior Inicio detención de presentación de diapositivas Ir a la pantalla VISUAL INDEX Siguiente OPTION MENU ...

Страница 82: ...ÍA CONEXIÓN TV en la pantalla de cristal líquido Si un elemento no aparece en la pantalla toque hasta que aparezca Utilice el adaptador de alimentación de ca suministrado como fuente de alimentación pág 9 Consulte GUÍA CONEXIÓN TV para conectar la videocámara y el televisor Cuando el cable de conexión de A V se utiliza para emitir películas estas se emiten con calidad de imagen de definición están...

Страница 83: ... TV HD es un formato que permite la reproducción de imágenes con un alto nivel de detalle con una sutil representación de las texturas y los colores que hace que parezcan fotografías Al conectar dispositivos Sony compatibles con Photo TV HD mediante un cable HDMI o un cable de A V de componente es posible disfrutar de todo un mundo nuevo con fotografías que disponen de una calidad HD impresionante...

Страница 84: ... Windows XP SP3 2 Windows Vista SP1 3 CPU Intel Pentium 4 a 2 8 GHz o superior se recomienda Intel Pentium 4 a 3 6 GHz o superior Intel Pentium D a 2 8 GHz o superior Intel Core Duo a 1 66 GHz o superior o Intel Core 2 Duo a 1 66 GHz o superior Sin embargo una CPU Intel Pentium III a 1 GHz o superior es suficiente para las siguientes operaciones Importación de películas y fotografías a la computad...

Страница 85: ... en la computadora de una versión de PMB suministrada con otro dispositivo compruebe la versión El número de la versión se muestra al hacer clic en Ayuda Acerca de PMB Compare el número de la versión del CD ROM suministrado con la versión de PMB que tiene instalada en la computadora para asegurarse de que las versiones se instalaron en el orden correcto de menor a mayor Si la versión de PMB que te...

Страница 86: ...icencia Si está de acuerdo con las condiciones cambie a y a continuación haga clic en Siguiente Instalar Siga las instrucciones en pantalla para instalar el software En función de la computadora es posible que deba instalar software de terceros Si aparece la pantalla de instalación siga las instrucciones para instalar el software necesario Reinicie la computadora si es necesario para completar la ...

Страница 87: ... en la parte inferior derecha del escritorio de la computadora Extracción segura de Dispositivo de almacenamiento masivo USB Toque FIN SÍ en la pantalla de la videocámara Desconecte el cable USB Es posible crear un disco Blu ray disc mediante una computadora con una grabadora de Blu ray disc Instale el Software Complementario de BD para PMB pág 32 ...

Страница 88: ...c Creación de un disco con un solo toque One Touch Disc Burn pág 28 HD Importación de películas y fotografías a una computadora Easy PC Back up pág 29 Creación de un disco de formato AVCHD con calidad de imagen de alta definición HD pág 31 HD Dispositivos de reproducción de DVD normales un reproductor de DVD una computadora capaz de reproducir DVD etc Importación de películas y fotografías a una c...

Страница 89: ...agen de calidad estándar SD Discos que se pueden utilizar con PMB Es posible utilizar discos de 12 cm del siguiente tipo con PMB Para obtener información sobre los discos Blu ray disc consulte la página 32 Tipo de disco Características DVD R DVD R DVD R DL No regrabable DVD RW DVD RW Regrabable Mantenga siempre su PLAYSTATION 3 actualizada con la última versión del software del sistema PLAYSTATION...

Страница 90: ... partir de películas con calidad de imagen de alta definición HD importe primero las películas a una computadora pág 29 y a continuación cree un disco con calidad de imagen de definición estándar SD pág 33 Instale PMB de antemano pág 23 pero no lo inicie Para esta operación utilice el adaptador de alimentación de ca suministrado para conectar la videocámara a un tomacorriente de pared pág 9 La fun...

Страница 91: ...ntalla de la computadora haga clic en Easy PC Back up Importar Las películas y fotografías se importan a la computadora Al finalizar la operación aparece la pantalla PMB Cuando finalice la operación es posible que aparezca una pantalla que indica que las películas se están analizando El análisis de las películas puede tardar bastante Mientras tanto se puede utilizar PMB Se pueden crear discos tant...

Страница 92: ... aparece en la pantalla de la computadora haga clic en Inicio Todos los programas Sony Picture Utility PMB para iniciar PMB Es posible visualizar editar o crear discos de películas y fotografías mediante PMB Lectura de la Guía de PMB Para obtener más información acerca del uso de PMB consulte la Guía de PMB Haga doble clic en el ícono de acceso directo de Guía de PMB en la pantalla de la computado...

Страница 93: ...na 27 Si algún programa que no sea PMB se inicia automáticamente ciérrelo 2 Haga doble clic en el ícono de acceso directo de PMB en la pantalla de la computadora para iniciar PMB Para iniciar PMB también puede hacer clic en Inicio Todos los programas Sony Picture Utility PMB 3 Haga clic en Carpetas o Calendario en el lado izquierdo de la ventana y seleccione la carpeta o la fecha y a continuación ...

Страница 94: ...a crear un disco Blu ray disc debe tener instalado Software Complementario de BD para PMB Haga clic en Software Complementario de BD en la pantalla de instalación de PMB e instale este complemento de acuerdo con las instrucciones en pantalla Conecte la computadora a Internet cuando instale Software Complementario de BD Coloque un disco Blu ray disc vacío en la unidad de disco y haga clic en Manipu...

Страница 95: ... programa que no sea PMB se inicia automáticamente ciérrelo 2 Haga doble clic en el ícono de acceso directo de PMB en la pantalla de la computadora para iniciar PMB Para iniciar PMB también puede hacer clic en Inicio Todos los programas Sony Picture Utility PMB 3 Haga clic en Carpetas o Calendario en el lado izquierdo de la ventana y seleccione la carpeta o la fecha y a continuación seleccione las...

Страница 96: ...y disc Edición de películas Es posible cortar las partes de una película que se consideran necesarias y guardarlas como un archivo separado Utilice PMB para seleccionar la película que desea editar y a continuación haga clic en Manipular Video Trimming en el menú para visualizar la ventana Video Trimming Para obtener más información sobre el funcionamiento consulte la Guía de PMB pág 30 Captura de...

Страница 97: ...para crear un disco Blu ray disc Reproductor Selección del método y el tipo de disco Dispositivos de reproducción en formato AVCHD un reproductor de discos Blu ray disc de Sony PLAYSTATION 3 etc Creación de un disco con calidad de imagen de alta definición HD con una grabadora de DVD etc conexión del cable USB pág 36 HD Dispositivos de reproducción de DVD normales un reproductor de DVD una computa...

Страница 98: ...c a la toma USB de la videocámara mediante el cable USB suministrado La pantalla SELEC USB aparece en la pantalla de la videocámara 2 En la pantalla de la videocámara toque CONEXIÓN USB si las películas están grabadas en la memoria interna o CONEXIÓN USB si las películas están grabadas en un Memory Stick PRO Duo 3 Grabe las películas en el dispositivo conectado Para obtener más detalles consulte e...

Страница 99: ... alta definición HD se copian con calidad de imagen de definición estándar SD Cable de conexión de A V suministrado Conecte el cable de conexión de A V a las tomas de entrada de otro dispositivo Cable de conexión de A V con S VIDEO se vende por separado Al establecer la conexión a otro dispositivo a través de la toma S VIDEO mediante un cable de conexión de A V con un cable de S VIDEO se vende por...

Страница 100: ...zar copias de imágenes en grabadoras conectadas con un cable HDMI Para ocultar los indicadores de la pantalla como un contador etc en la pantalla del dispositivo de visualización conectado toque HOME AJUSTES AJUSTES SALIDA SALIDA PANT LCD ajuste predeterminado Para grabar la fecha la hora y los datos de ajuste de la cámara toque HOME AJUSTES VIS AJUSTES IMÁG CÓDIGO DATOS el ajuste deseado Además t...

Страница 101: ...rrar todas las fotografías a la vez En el paso 2 toque BORRAR BORRAR TODO SÍ SÍ Formateo del soporte de grabación El formateo borra todas las películas y fotografías para recuperar espacio libre grabable Para esta operación utilice el adaptador de alimentación de ca suministrado para conectar la videocámara a un tomacorriente de pared pág 9 Para evitar la pérdida de imágenes importantes guárdelas ...

Страница 102: ...OME GESTIONAR SOPORTE AJ SOPORTE PEL Aparece la pantalla AJ SOPORTE PEL Toque el soporte deseado Toque SÍ El soporte de grabación se cambia Selección del soporte de grabación para las fotos Toque HOME GESTIONAR SOPORTE AJ SOPORTE FOTO Aparece la pantalla AJ SOPORTE FOTO Toque el soporte de grabación deseado Toque SÍ El soporte de grabación se cambia Para comprobar los ajustes del soporte de grabac...

Страница 103: ...pa del Memory Stick Duo después de insertar el Memory Stick PRO Duo Aparecerá la pantalla Crear nuevo arch base de datos de imágenes cuando inserte un Memory Stick PRO Duo nuevo con el indicador película encendido Toque SÍ Para grabar solamente fotografías en un Memory Stick PRO Duo toque NO Si aparece Error al crear un nuevo archivo de base de datos de imágenes Es posible que no exista suficiente...

Страница 104: ...lver a la pantalla anterior Para ocultar la pantalla HOME MENU toque No puede seleccionar los elementos o ajustes que aparecen atenuados Uso de la función HELP Para ver las descripciones del HOME MENU toque HELP en la pantalla HOME MENU La parte inferior del se ilumina en naranja Luego toque el elemento de menú del que desea obtener información Uso del OPTION MENU El OPTION MENU se abre igual que ...

Страница 105: ...ideocámara ES Cuando finalice el ajuste toque Si el elemento que desea no se muestra en la pantalla toque otra ficha Es posible que no haya fichas No se puede utilizar el OPTION MENU durante el funcionamiento en modo Easy Handycam ...

Страница 106: ...1 COPIAR por fecha pág 41 EDIT BORRAR pág 39 BORRAR pág 39 PROTEGER Permite ajustar la protección para evitar la eliminación de películas PROTEGER Permite ajustar la protección para evitar la eliminación de fotografías DIVIDIR Permite dividir películas EDICIÓN PLAYLIST AÑADIR AÑADIR Permite añadir películas a una playlist AÑAD p fecha AÑAD p fecha Permite añadir de una vez todas las películas grab...

Страница 107: ...ajustar automáticamente la velocidad de obturación X V COLOR pág 14 GUÍA FOTOG Permite visualizar un marco para asegurarse de que el sujeto está en posición horizontal o vertical RESTANTE AJ Permite ajustar el modo de visualización del tiempo de grabación restante del soporte OBJETIVO CONVER Permite optimizar la función Steadyshot y el enfoque en función del objetivo instalado CONTRALUZ AUTO Permi...

Страница 108: ...establecer si deben mostrarse las indicaciones en pantalla en la pantalla del televisor COMPONENTE pág 20 RESOLUCIÓN HDMI Permite ajustar la resolución de salida de la imagen cuando se conecta la videocámara a un televisor con un cable HDMI AJ REL IDIOM AJUS RELOJ pág 10 AJUS ZONA pág 10 HORA VERANO pág 10 AJUSTE IDIOMA pág 11 AJUST GENERALES MODO DEMO Permite establecer si debe mostrarse la demos...

Страница 109: ...nfocar de forma manual SELEC ESCENA Permite seleccionar el ajuste de grabación adecuado en función del tipo de escena como por ejemplo una escena nocturna o una playa BAL BLANCOS Permite ajustar el balance de blancos Ficha DESVANECEDOR Permite aumentar o desvanecer las escenas Ficha MIC ZOOM INCOR Permite grabar películas con sonido direccional relativo al ajuste del zoom NIVEL REFMIC Permite ajus...

Страница 110: ...3 Seleccione el idioma que desee y el nombre del modelo de la videocámara y a continuación haga clic en Guía práctica de Handycam PDF El modelo de la videocámara se encuentra impreso en la superficie inferior 4 Haga clic en Exit Exit y a continuación retire el CD ROM de la computadora Para ver la Guía práctica de Handycam haga doble clic en el ícono de acceso directo en la pantalla de la computado...

Страница 111: ...e de pared pág 9 La videocámara no opera aun cuando la alimentación está encendida Después de encender la videocámara tarda unos cuantos segundo en estar lista para tomar imágenes No se trata de una falla de funcionamiento Desconecte el adaptador de alimentación de ca del tomacorriente de pared o extraiga la batería y vuelva a realizar la conexión transcurrido aproximadamente 1 minuto Si la videoc...

Страница 112: ...E 91 E 94 La videocámara requiere una reparación Póngase en contacto con su distribuidor de Sony o con un centro de servicio técnico local autorizado de Sony Indíqueles el código de 5 dígitos que comienza con la letra E 101 0001 Si el indicador parpadea lentamente el archivo está dañado o no se puede leer La batería dispone de poca energía No se insertó ningún Memory Stick PRO Duo pág 40 Si el ind...

Страница 113: ...51 Información complementaria ES El soporte de grabación está lleno Elimine las imágenes innecesarias pág 39 No es posible grabar fotos durante el procesamiento Espere un momento y a continuación grabe ...

Страница 114: ...Si dentro de la videocámara entra algún objeto sólido o líquido desconéctela y haga que la revise un distribuidor de Sony antes de volver a utilizarla Evite manipular desmontar o modificar la videocámara bruscamente y exponerla a golpes o impactos como martillazos caídas o pisotones Sea especialmente cuidadoso con el objetivo Cuando no utilice la videocámara manténgala apagada No utilice la videoc...

Страница 115: ...ideocámara esté apagada La pila recargable preinstalada siempre se carga mientras la videocámara está conectada al tomacorriente de pared a través del adaptador de alimentación de ca o cuando tiene la batería insertada La batería recargable se descargará completamente transcurridos aproximadamente 3 meses si no utiliza la videocámara en absoluto Utilice la videocámara después de cargar la batería ...

Страница 116: ...segundo La exclusiva matriz de píxeles de ClearVid de Sony y el sistema de procesamiento de imágenes BIONZ permiten obtener una resolución para las fotografías equivalente a los tamaños descritos Las cifras de distancia focal son cifras reales derivadas de una lectura de píxeles de gran angular Conectores de entrada salida Conector remoto de A V toma de salida de audio y video componente Toma HDMI...

Страница 117: ...o de la pantalla de cristal líquido ajustada en ACTIVADO El tiempo de grabación normal muestra el tiempo cuando se repiten las operaciones de inicio y parada de la grabación conexión y desconexión de la alimentación y utilización del zoom Tiempo de grabación previsto para películas en la memoria interna minuto Para ajustar el modo de grabación toque HOME AJUSTES AJUSTES PEL CÁM MODO GRAB El modo d...

Страница 118: ...indows Windows Media Windows Vista y DirectX son marcas comerciales registradas o marcas comerciales de Microsoft Corporation en los Estados Unidos o en otros países Macintosh y Mac OS son marcas comerciales registradas de Apple Inc en los EE UU y en otros países Intel Intel Core y Pentium son marcas comerciales o marcas comerciales registradas de Intel Corporation o de sus subsidiarias en los Est...

Страница 119: ...HOME Grabación con disparador automático MIC ZOOM INCOR NIVEL REFMIC bajo SELEC PANOR 60 min Batería restante Botón de regreso Parte central Indicador Significado ESPERA GRAB Estado de grabación Tamaño de la imagen Presentación de diapositivas ajustada Advertencia Modo de reproducción Parte superior derecha Indicador Significado Calidad de grabación HD SD y modo de grabación FH HQ SP LP Soporte de...

Страница 120: ... soporte de grabación Carpeta de reproducción 100 112 Película o fotografía actual en reproducción número total de películas o fotografías grabadas Parte inferior Indicador Significado DETECCIÓN CARA AJUSTE DETEC Enfoque manual SELEC ESCENA Balance de blancos SteadyShot desactivado MED ENF PUNTO MEDID PUNTO EXPOSICIÓN TELE MACRO X V COLOR OBJETIVO CONVER Botón OPTION Botón VISUALIZAR IMÁGENES Botó...

Страница 121: ...ones del zoom 13 15 19 Permiten acercar o alejar la imagen Botón START STOP 13 Botón DISC BURN 28 Botón POWER 10 Botón DISP pantalla 18 Para desactivar la luz de fondo de la pantalla de cristal líquido mantenga presionado DISP Para encenderla mantenga presionado DISP de nuevo Botón EASY 16 Toma HDMI OUT mini 20 Toma USB 23 28 29 36 Botón VISUALIZAR IMÁGENES 17 Indicador de acceso memoria interna M...

Страница 122: ...ntrada de cc 8 Conector remoto de A V 20 37 Botón START STOP 13 Correa de sujeción 12 Gancho para la bandolera Receptáculo del trípode Coloque un trípode se vende por separado en el receptáculo correspondiente mediante un tornillo para trípode se vende por separado la longitud del tornillo debe ser inferior a 5 5 mm Palanca BATT liberación de la batería 9 ...

Страница 123: ...0 Tiempo de grabación y reproducción 55 U Unidad o carpeta de destino 30 USB 23 36 Utilización de un tomacorriente de pared como fuente de alimentación 9 V VISUAL INDEX 17 Visualización de autodiagnóstico 50 Volumen 18 W Windows 22 Z Zoom 13 15 19 A Ajuste de la fecha y la hora 10 AVCHD 26 35 B Batería 8 Blu ray disc 32 BORRAR 39 C Cable de conexión de A V 37 Calidad de imagen 40 Captura de fotogr...

Страница 124: ...n 70 or more recycled paper using VOC Volatile Organic Compound free vegetable oil based ink Printed in Japan Additional information on this product and answers to frequently asked questions can be found at our Customer Support Website ...

Отзывы: