background image

16

GB

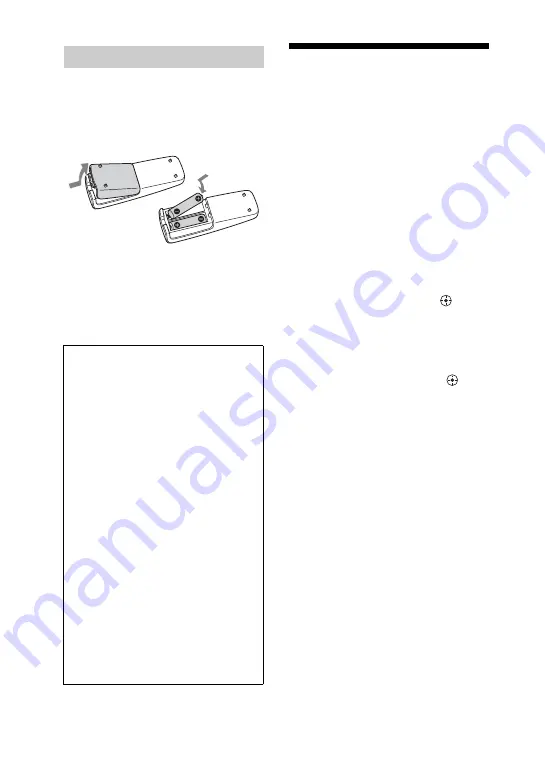
Slide and remove the battery 
compartment lid, then, insert the two 
supplied R6 (size AA) batteries, 

E

 side 

first, matching the polarities shown 
below.

Notes

• Do not mix an old battery with a new one or 

mix different types of batteries.

• If you do not use the remote for a long period 

of time, remove the batteries to avoid damage 
from battery leakage and corrosion.

Setting the clock

You cannot set the clock in Power Saving 
Mode.
Use the buttons on the remote for this 
operation.

1

Press 

"/1

 to turn on the system.

2

Press CLOCK/TIMER SET 
(RM-AMU053) or TIMER MENU 
(RM-AMU054).

If “PLAY SET” appears on the 
display, press 

.

/

(RM-AMU053) or 

V

/

v


(RM-AMU054) repeatedly to select 
“CLOCK SET” and then press 
ENTER (RM-AMU053) or 


(RM-AMU054).

3

Press 

.

/

>

 (RM-AMU053) or 

V

/

v

 (RM-AMU054)


repeatedly to 

set the hour, and then press 
ENTER (RM-AMU053) or 


(RM-AMU054).

4

Use the same procedure to set 
the minutes.

The clock settings are lost when you 
disconnect the power cord or if a 
power failure occurs. 

To display the clock when the 
system is turned off

Press DISPLAY repeatedly until the clock 
is displayed. The clock is displayed for a 
few seconds.

Using the remote

When carrying the unit

Do the following procedure to protect 
the disc mechanism.
Use the buttons on the unit for the 
operation.

1

Press 

"/1

 to turn on the system.

2

Press CD.

3

Press 

Z

 OPEN/CLOSE to open 

the disc tray and remove the 
disc.

4

Press 

Z

 OPEN/CLOSE again to 

close the disc tray. Wait until 
“CD NO DISC” appears in the 
display.

5

Hold down DISC SKIP/
EX-CHANGE and then press 

"/1

 until “STANDBY” appears 

in the display. Then, “MECHA 
LOCK” appears in the display.

6

Unplug the AC power cord.

Содержание HCD-GTZ4i - Compact Disc Receiver Component

Страница 1: ... 2009 Sony Corporation 4 130 433 13 2 Mini HI FI Component System Operating Instructions MHC GTZ5 MHC GTZ4 GTZ4i MHC GTZ3 GTZ3i MHC GTZ2 GTZ2i LBT GTZ4i ...

Страница 2: ...nit is not disconnected from the mains as long as it is connected to the AC outlet even if the unit itself has been turned off CAUTION The use of optical instruments with this product will increase eye hazard Except for the customers in the United States This appliance is classified as a CLASS 1 LASER product This marking is located on the rear exterior Notice for the customers in the United State...

Страница 3: ...not use this apparatus near water 6 Clean only with dry cloth 7 Do not block any ventilation openings Install in accordance with the manufacturer s instructions 8 Do not install near any heat sources such as radiators heat registers stoves or other apparatus including amplifiers that produce heat 9 Do not defeat the safety purpose of the polarized or grounding type plug A polarized plug has two bl...

Страница 4: ...duct Disposal of waste batteries applicable in the European Union and other European countries with separate collection systems This symbol on the battery or on the packaging indicates that the battery provided with this product shall not be treated as household waste On certain batteries this symbol might be used in combination with a chemical symbol The chemical symbols for mercury Hg or lead Pb...

Страница 5: ...ayback discs that conform to the Compact Disc CD standard Recently various music discs encoded with copyright protection technologies are marketed by some record companies Please be aware that among those discs there are some that do not conform to the CD standard and may not be playable by this product WALKMAN and WALKMAN logo are registered trademarks of Sony Corporation MICROVAULT is a trademar...

Страница 6: ...ont speakers SS GTZ4M Subwoofer SS WGZ4M Other models Front speakers SS GTZ4 Subwoofer SS WGZ4 The MHC GTZ3 GTZ3i consists of Unit HCD GTZ3 GTZ3i Speaker System Asian models Front speakers SS GTZ3 Subwoofer SS WGZ4 European model only Except United Kingdom model only Front speakers SS GTZ3M Subwoofer SS WGZ3M Other models Front speakers SS GTZ3 Subwoofer SS WGZ3 The MHC GTZ2 GTZ2i consists of Unit...

Страница 7: ...TZ4i only Using optional audio components 30 Adjusting the sound 30 Changing the display 31 Creating your own program 33 Program Play Presetting radio stations 34 Using the Radio Data System RDS 35 European model only Creating your own sound effect 35 Singing along 36 Using the Timers 36 Troubleshooting 39 Messages 45 Precautions 47 Specifications 48 Compatible USB devices with this system 52 Comp...

Страница 8: ...using the unit but the same operations can also be performed using the buttons on the remote having the same or similar names Unit Front view MHC GTZ5 MHC GTZ4 GTZ4i MHC GTZ3 GTZ3i and LBT GTZ4i only 1 2 3 6 6 8 5 4 wf wd wg ws wa w ql qj qh qg qg qf qd qs 9 qa 7 7 qk 9 q ...

Страница 9: ... 17 22 26 Press to stop playback TUNING page 19 Press to tune in the station you want go back go forward pages 17 26 33 Press to select a track or file G CD pages 16 17 33 Press to select the CD function TUNER BAND page 19 Press to select the TUNER function Press to select the FM or AM band pages 22 23 25 26 33 Press to select the USB function PC pages 22 30 Press to select the PC function H OPERA...

Страница 10: ... a disc during CD tray open Press to exchange other discs during playback R MHC GTZ5 MHC GTZ4 GTZ4i MHC GTZ3 GTZ3i and LBT GTZ4i only SUBWOOFER page 30 Press to turn on and off the subwoofer The SUBWOOFER indicator lights up when the subwoofer is turned on S ENTER pages 21 31 33 34 35 45 Press to enter the settings T RETURN pages 18 26 Press to return to the parent folder Press to exit search mode...

Страница 11: ...m and iPod pages 16 33 37 Press to enter the setting and select the content F TOOL MENU Press to return to previous menu of the iPod G go back go forward pages 17 26 33 Press to select a track or file select folder pages 17 26 Press to select a folder tuning page 19 Press to tune in the station you want m M rewind fast forward pages 17 26 Press to find a point in a track or file N play pages 17 25...

Страница 12: ...optional USB device Press to select the tuning mode M REPEAT FM MODE pages 17 20 26 Press to listen to a disc an USB device a single track or file repeatedly Press to select the FM reception mode monaural or stereo N SLEEP page 36 Press to set the Sleep Timer O DISPLAY pages 16 31 35 39 Press to change the information on the display Remote RM AMU053 Other models 1 1 on standby pages 16 37 Press to...

Страница 13: ... F ENTER pages 16 33 37 Press to enter the settings G DISC SKIP USB SELECT pages 17 27 33 Press to select a disc Press to select the USB device connected to the USB A or B port H select folder pages 17 26 Press to select a folder I VOLUME pages 17 19 25 28 30 37 Press to adjust the volume The VOLUME button has a tactile dot Use the tactile dot as a reference when operating the system J EQ page 30 ...

Страница 14: ...nt speaker left 5 To front speaker right a The FM 75 Ω COAXIAL jack varies according to models b MHC GTZ5 MHC GTZ4 GTZ4i MHC GTZ3 GTZ3i and LBT GTZ4i only c The VOLTAGE SELECTOR varies according to models Getting Started a c b 1 3 4 5 A B C D E ANTENNA PC IN SUBWOOFER VOLTAGE SELECTOR FRONT SPEAKER 2 F ...

Страница 15: ... D Front speakers Be sure to insert the connector straight into the terminals E VOLTAGE SELECTOR For models with a voltage selector set VOLTAGE SELECTOR to the local power line voltage F Power Connect the power cord to a wall socket The demonstration appears in the display If the plug does not fit the wall socket detach the supplied plug adaptor only for models equipped with an adaptor Attach the ...

Страница 16: ...r RM AMU054 3 Press RM AMU053 or V v RM AMU054 repeatedly to set the hour and then press ENTER RM AMU053 or RM AMU054 4 Use the same procedure to set the minutes The clock settings are lost when you disconnect the power cord or if a power failure occurs To display the clock when the system is turned off Press DISPLAY repeatedly until the clock is displayed The clock is displayed for a few seconds ...

Страница 17: ...esume play press the button again Stop playback Press x Select a folder on an MP3 disc Press repeatedly Select a track or file Press m or M or on the remote repeatedly during playback For AUDIO CD you can also turn OPERATION DIAL then press ENTER TRACK SEARCH Find a point in a track or file1 Hold down m or M orm Mon the remote during playback and release the button at the point you want Playback a...

Страница 18: ...t playback the MP3 file TRACK SEARCH 1 Turn OPERATION DIAL to select the folder you want then press ENTER 2 Turn OPERATION DIAL to select the file you want then press ENTER To return to the parent folder press RETURN Switch to CD function from another source and start playback automatically Press one of the DISC 1 3 buttons Automatically Source Selection Exchange other discs while playing Press DI...

Страница 19: ...MP3 files recorded in later sessions can also be played back If the first session is recorded in AUDIO CD format only the first session will be played back Listening to the radio Use buttons on the remote for the operation 1 Select FM or AM Press TUNER BAND RM AMU053 or press FUNCTION RM AMU054 repeatedly 2 Press TUNING MODE repeatedly until AUTO lights up in the display 3 Tune in the station you ...

Страница 20: ... USB device by connecting it to the B port on the unit The audio format of files transferred by this system is MP3 For transferring from USB A to USB B you can also transfer WMA and AAC file When transferring from audio files the file size is the same as the original file See Compatible USB devices with this system page 52 for a list of USB devices that can be connected to this system MHC GTZ4i GT...

Страница 21: ...ily transfer the track or MP3 file that is currently being played back onto an USB device 1 Connect a transferable USB device to the B port on the unit page 20 2 Press CD then load the disc you want to transfer 3 Select the track or MP3 file you want to transfer then start play 4 Press REC TO while the selected track or MP3 file is being played back REC flashes in the display PUSH ENTER appears in...

Страница 22: ...er approximately 1 hour of transferring Transferring stops automatically when you change the function or tuner band You can easily transfer the audio files from an USB device to another USB device 1 Connect a transferable USB device to the B port as shown below then connect the USB device you want to transfer to A port 2 Press Press USB RM AMU053 or press FUNCTION RM AMU054 repeatedly on the remot...

Страница 23: ...en DON T REMOVE appears in the display When the transferring is completed the audio file continues to play Note MHC GTZ4i GTZ3i GTZ2i and LBT GTZ4i only You cannot transfer the audio files from the iPod which is connected to the A port When listening to music from a Sony Ericsson mobile phone or when transferring music from this system to the mobile phone you can select the playback source or tran...

Страница 24: ...acks are transferred as 128 kbps MP3 files When transferring from an MP3 disc MP3 files are transferred with the same bit rate as the original MP3 files When transferring from a USB device the audio files are transferred with the same bit rate as the original audio files When transferring from TUNER and PC function the music are transferred as 128 kbps MP3 files The approximate size of transferred...

Страница 25: ... is played back Depending on the transferring method the transferring progress shown on the display may vary 1 track file folder Listening to music of an USB device You can listen to music stored in the USB device The audio formats that can be played back by this system are MP3 AAC and WMA only See Compatible USB devices with this system page 52 for a list of USB devices that can be connected to t...

Страница 26: ... resume playback press N 1 To cancel resume play press x twice and check that RESUME disappears from the display Select a folder Press repeatedly USB To Do this Select a file Press m or M or on the remote repeatedly Search for an audio file by its folder name and file name and start playback the audio file TRACK SEARCH 1 Turn OPERATION DIAL to select the folder you want then press ENTER 2 Turn OPE...

Страница 27: ...ack order for the system may differ from the playback order of the connected digital music player Be sure to turn off the system before removing the USB device Removing the USB device while the system is turned on may corrupt the data on the USB device To Do this Select USB device Press USB A to select the USB device which is connected to the A port Press USB B to select the USB device which is co...

Страница 28: ...le play mode or program play mode If the folder to be erased does not contain MP3 AAC WMA files or contains sub folders these are not erased Playing the iPod MHC GTZ4i GTZ3i GTZ2i and LBT GTZ4i only You can listen to audio contents stored in the iPod on this system 1 Connect the iPod to A or B port 2 Press USB A or USB B iPod lights up in the display 3 Press N 4 Turn MASTER VOLUME or press VOLUME ...

Страница 29: ...he iPod Remove the iPod When the system is turned off the charging is stopped To Do this Pause playback Press X during playback Scroll up down the iPod menus Press V v repeatedly on the remote Choose the select item Press ENTER or bor on the remote Select a track or chapter of audiobook podcast Press m or M or on the remote repeatedly Fast forward or fast rewind Play Hold down m or M or m M on the...

Страница 30: ...ofer MHC GTZ5 MHC GTZ4 GTZ4i MHC GTZ3 GTZ3i and LBT GTZ4i only Press SUBWOOFER repeatedly until the SUBWOOFER indicator on the unit lights up If you later disconnect the subwoofer repeat the procedure until the SUBWOOFER indicator on the unit lights off The volume of the subwoofer is linked to the front speakers To Do this Reinforce the bass and create a more powerful sound Press GROOVE repeatedly...

Страница 31: ... system is turned off Demonstration The display changes and the indicator flashes even when the system is turned off No display Power Saving mode The display is turned off to conserve power The timer and clock continue to operate You cannot turn on the system by pressing the function buttons Clock The clock is display The clock display automatically turns to Power Save Mode after a few seconds Pre...

Страница 32: ...iles is displayed when ID3 Version 1 1 0 1 1 and Version 2 2 2 2 3 tags are used ID3 version 2 tag information display has priority when both ID3 version 1 and version 2 tags are used for a single MP3 file You can easily view the information through the meter display such as the music source level Press METER MODE repeatedly to select a preset display pattern The power illuminator meter backlight ...

Страница 33: ...rt 4 For audio files Press FOLDER repeatedly until the folder you want appears in the display To program all the audio files in the selected folder process to step 6 5 Select a track or file to program Press m or M or on the remote repeatedly until the track or file number you want appears in the display 6 Press ENTER or RM AMU054 on the remote The track s file s or folder s is are programmed The ...

Страница 34: ... your favorite radio stations and tune them in instantly by selecting the corresponding preset number Use the buttons on the remote for this operation 1 Tune in the station you want see Listening to the radio page 19 2 Press TUNER MEMORY A preset number flashes in the display The stations are stored from preset number 1 3 Press repeatedly to select the preset number you want If another station is ...

Страница 35: ...tation from the FM band When you tune in a station that provides RDS services the station name appears in the display To check the RDS information While receiving an RDS station press DISPLAY repeatedly RDS information appears on the display Creating your own sound effect You can raise or lower the levels of specific frequency ranges and then store up to the user equalizer in the memory 1 Press EQ...

Страница 36: ... unit Using the Timers The system offers three timer functions You cannot activate both the Play Timer and the Recording Timer at the same time If you use either with the Sleep Timer the Sleep Timer has priority You can fall asleep to music This function works even if the clock is not set Press SLEEP on the remote repeatedly Each time you press the button the minute display the turn off time chang...

Страница 37: ...ect PLAY SET or REC SET and then press ENTER RM AMU053 or RM AMU054 ON appears and the hour indication flashes 4 Set the time to start playing or transferring Press RM AMU053 or v V RM AMU054 repeatedly to set the hour and then press ENTER RM AMU053 or RM AMU054 The minute indication flashes Use the procedure above to set the minutes 5 Use the same procedure as in step 4 to set the time to stop pl...

Страница 38: ...ears and then press ENTER RM AMU054 Press TIMER MENU to select TIMER SELECT then press Press v V repeatedly until PLAY SELECT or REC SELECT appears and then press To cancel the timer Repeat the same procedure as above until TIMER OFF appears and then press ENTER RM AMU053 or on the unit or RM AMU054 To change the setting Start over from step 1 Tips The system turns on before the preset time If the...

Страница 39: ...no sound Turn MASTER VOLUME clockwise or press VOLUME repeatedly on the remote The headphones are connected to the PHONES jack Check the speaker connections page 15 There is no audio output during Recording Timer There is no sound from the subwoofer Check that the subwoofer is connected securely and correctly to the unit There is no microphone sound Turn MASTER VOLUME clockwise or press VOLUME rep...

Страница 40: ... The disc tray does not open and LOCKED appears in the display Consult your nearest Sony dealer or local authorized Sony service facility The disc tray does not close Load the disc correctly Always close the disc tray by pressing Z OPEN CLOSE Do not forcibly push the disc tray to close it as this may cause a malfunction The disc does not eject You cannot eject the disc during CD USB Synchronized T...

Страница 41: ...o ISO9660 Level 1 Level 2 or Joliet expansion format The ID3 tag is not Version 1 1 0 1 1 and Version 2 2 2 2 3 The character code that can be displayed by this system are as follows Upper cases A to Z Numbers 0 to 9 Symbols _ Other characters may not be displayed correctly USB device You cannot start transferring to an USB device The following problems may have occurred The USB device is full The...

Страница 42: ...nsupported USB device the following problems may occur See Compatible USB devices with this system page 52 for the supported device types The USB device is not recognized File or folder names are not displayed on this system Playback is not possible The sound skips There is noise A distorted sound is output Transferring stops before it is finished OVER CURRENT appears A problem has been detected w...

Страница 43: ...urn on the system Connect the supported USB device page 52 Press N to start play Play does not start from the first file Set the play mode to normal play mode Audio file cannot be played back MP3 files in MP3 PRO format cannot be played back Some AAC files may not be played back correctly WMA files in Windows Media Audio Lossless and Professional format cannot be played back USB device formatted w...

Страница 44: ...R is set to OFF in the OPTIONS menu Select other settings Meter mode is set to METER OFF Press METER MODE on the unit repeatedly to select other modes The headphones are connected to the PHONES jack Disconnect the headphones Meter display is turned off MTR POINTER and M BACKLIGHT are set to OFF in the OPTIONS menu Select other settings Meter mode is set to METER OFF Press METER MODE on the unit re...

Страница 45: ...stations timer and the clock are reset to factory setting Messages One of the following messages may appear or flash in the display during operation Disc Timer LOCKED The disc tray does not open Contact your nearest Sony dealer NO DISC There is no disc on the disc tray or you have loaded a disc that cannot be played back on this system NO STEP All of the programmed steps have been erased NOT IN US...

Страница 46: ...CK No playable file is loaded in the system NOT IN USE You tried to perform a specific operation under conditions where that operation is prohibited NOT SUPPORTED An unsupported USB device is connected or the USB device is connected to this system through a hub OVER CURRENT An over current was detected PROTECTED The USB device is write protected PUSH STOP You tried to perform an operation that can...

Страница 47: ...period of time When unplugging the unit always grip the plug Never pull the cord itself Should any solid object or liquid get into the system unplug the system and have it checked by qualified personnel before operating it again AC power cord must be changed only at the qualified service shop On placement Do not place the system in an inclined position or in locations that are extremely hot cold d...

Страница 48: ...l at 6 Ω 1 kHz 10 THD Subwoofer RMS output power reference 150 W at 6 Ω 100 Hz 10 THD Other models The following are measured at Mexican model AC 127 V 60 Hz European model AC 230 V 50 Hz Other models AC 120 220 240 V 50 60 Hz Front speaker Power output rated 90 W 90 W at 6 Ω 1 kHz 1 THD RMS output power reference 155 W 155 W per channel at 6 Ω 1 kHz 10 THD Subwoofer RMS output power reference 150...

Страница 49: ...ms MIC sensitivity 1 mV impedance 10 kilohms USB port Type A Outputs PHONES accepts headphones of 8 Ω or more FRONT SPEAKER accepts impedance of 6 Ω SUBWOOFER MHC GTZ5 MHC GTZ4 GTZ4i MHC GTZ3 GTZ3i and LBT GTZ4i only accepts impedance of 6 Ω USB section Supported bit rate MP3 MPEG 1 Audio Layer 3 32 320 kbps VBR WMA 48 192 kbps AAC 48 320 kbps Sampling frequencies MP3 MPEG 1 Audio Layer 3 32 44 1 ...

Страница 50: ...system 3 way 3 unit bass reflex Speaker unit Subwoofer 150 mm cone type Woofer 150 mm cone type Tweeter 40 mm horn type Rated impedance 6 ohms Dimensions w h d Approx 250 391 285 mm Mass Approx 4 9 kg per speaker Subwoofer SS WGZ5M Speaker system 1 unit bass reflex Speaker unit Woofer 250 mm cone type Rated impedance 6 ohms Dimensions w h d Approx 318 391 340 mm Mass Approx 7 9 kg MHC GTZ4 GTZ4i F...

Страница 51: ...ne type Tweeter 40 mm horn type Rated impedance 6 ohms Dimensions w h d Approx 237 361 210 mm Mass Approx 2 9 kg per speaker LBT GTZ4i Front speaker SS GTZ4A Speaker system 3 way 3 unit bass reflex Speaker unit Subwoofer 5 inch 130 mm cone type Woofer 5 inch 130 mm cone type Tweeter 1 1 2 inch 40 mm horn type Rated impedance 6 ohms Dimensions w h d Approx 9 3 8 14 1 4 9 1 2 inch 237 361 240 mm Mas...

Страница 52: ...specifications are subject to change without notice Compatible USB devices with this system You can use the following Sony USB devices and Sony Ericsson mobile phone on this system Verified Sony USB device Standby power consumption 0 5 W Halogenated flame retardants are not used in the certain printed wiring boards Product name Model name Walkman NWD B103 B105 B103F B105F NWD E023F E025F NWZ A815 ...

Страница 53: ...this system with the mobile phone turned on While the mobile phone is connected to this system do not insert or detach the memory card When connecting to this system set the data transfer mode of your mobile phone to File Transfer Mass Storage For details refer to the operating instruction supplied with the mobile phone Use the USB cable supplied with the mobile phone when connecting to the system...

Страница 54: ...he event that data recorded to iPod is lost or damaged when using an iPod connected to this unit This product has been designed specifically to work with iPod and has been certified to meet Apple performance standards This unit is not compatible with iPhone iPod touch iPod nano 3rd generation video iPod classic iPod nano 2nd generation aluminum iPod touch 2nd generation iPod nano 4th generation vi...

Страница 55: ......

Страница 56: ...Printed in Malaysia 2 ...

Отзывы: