background image

1

GB

Step 2: Attaching the 

supplied accessories

Attaching the lens

See page 16 for information on attaching 

the lens. The NEX-VG20E does not 

come with the E 18-200mm F3.5-6.3 OSS 

lens. Please use appropriate lenses (sold 

separately).

For NEX-VG20EH models, the lens is 

attached to the camcorder at the time of 

purchase.

Attaching the Wind Screen

Use the Wind Screen when you want to 

reduce the wind noise recorded by the 

microphone. Attach the Wind Screen with 

the Sony logo facing down.

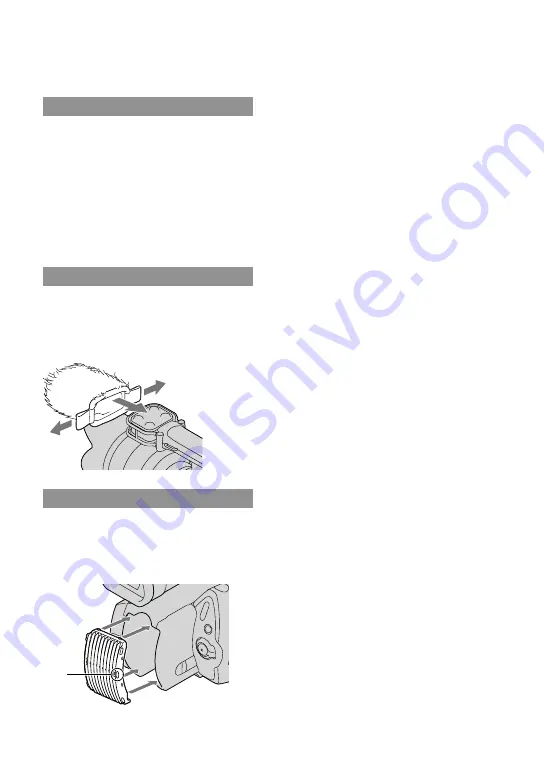
Attaching the battery cover

Attach the battery cover after attaching the 

battery pack.

Attach the battery cover with the projecting 

part (

) facing as shown in the illustration.

Содержание Handycam NEX-VG20E

Страница 1: ...ecorder Operating Guide 4 291 371 11 2 Table of contents Getting Started Recording Playback Advanced operations Saving movies and photos with a computer Saving images with an external device Customizing your camcorder Additional information Quick reference E mount ...

Страница 2: ... battery packs promptly as described in the instructions Replace the battery with the specified type only Otherwise fire or injury may result AC Adaptor Do not use the AC Adaptor placed in a narrow space such as between a wall and furniture Use the nearby wall outlet wall socket when using the AC Adaptor Disconnect the AC Adaptor from the wall outlet wall socket immediately if any malfunction occu...

Страница 3: ...h can be determined by turning the equipment off and on the user is encouraged to try to correct the interference by one or more of the following measures Reorient or relocate the receiving antenna Increase the separation between the equipment and receiver Connect the equipment into an outlet on a circuit different from that to which the receiver is connected Consult the dealer or an experienced r...

Страница 4: ...u will help prevent potentially negative consequences for the environment and human health which could otherwise be caused by inappropriate waste handling of the battery The recycling of the materials will help to conserve natural resources In case of products that for safety performance or data integrity reasons require a permanent connection with an incorporated battery this battery should be re...

Страница 5: ...ay cause a fire When you must place the camcorder under direct sunlight attach the lens cap Exposing the LCD screen the viewfinder or the lens to direct sunlight for long periods of time may cause malfunctions Do not aim at the sun Doing so might cause your camcorder to malfunction Take images of the sun only in low light conditions such as at dusk Do not look at the sun or a strong light through ...

Страница 6: ...media on which the images can be saved depend on the REC Mode selected when the images were recorded Movies recorded in 50p Quality or Highest Quality can be saved on external media or on Blu ray discs p 50 Notes on battery pack AC Adaptor Be sure to remove the battery pack or the AC Adaptor after turning off the camcorder Disconnect the AC Adaptor from the camcorder holding both the camcorder and...

Страница 7: ... HD is called AVCHD recording disc Design and specifications of your camcorder and accessories are subject to change without notice Notes on use Do not do any of the following Otherwise the memory card may be damaged recorded images may be impossible to play back or may be lost or other malfunctions could occur ejecting the memory card when the access lamp p 27 is lit or flashing removing the batt...

Страница 8: ...djusting for shooting conditions 33 Playback on the camcorder 34 Playing images on a TV 38 Advanced operations Deleting movies and photos 41 Saving movies and photos with a computer Useful functions available if you connect the camcorder to a computer 42 Preparing a computer 43 When using a Macintosh 43 Starting PMB Picture Motion Browser 46 Using Image Data Converter 47 Saving images with an exte...

Страница 9: ... 56 Getting detailed information from the Handycam Handbook 60 Additional information Troubleshooting 61 Recording time of movies number of recordable photos 63 Precautions 65 Specifications 67 Quick reference Screen indicators 70 Parts and controls 72 Index 75 ...

Страница 10: ...dy cap attached to camcorder NEX VG20E supplied but not attached to other models 1 p 16 AC Adaptor 1 p 13 Power cord mains lead 1 p 13 Component A V Cable 1 p 38 A V connecting cable 1 p 38 USB cable 1 p 50 Wireless Remote Commander RMT 835 1 A button type lithium battery is already installed Rechargeable battery pack NP FV70 1 p 13 Battery Cover 1 p 12 Wind Screen 1 p 12 Large eyecup 1 p 26 ...

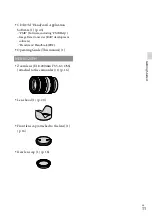
Страница 11: ...re including PMB Help Image Data Converter RAW development software Handycam Handbook PDF Operating Guide This manual 1 NEX VG20EH Zoom lens E 18 200mm F3 5 6 3 OSS attached to the camcorder 1 p 16 Lens hood 1 p 20 Front lens cap attached to the lens 1 p 16 Rear lens cap 1 p 16 ...

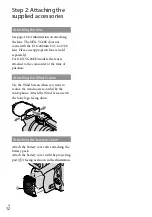
Страница 12: ...tely For NEX VG20EH models the lens is attached to the camcorder at the time of purchase Attaching the Wind Screen Use the Wind Screen when you want to reduce the wind noise recorded by the microphone Attach the Wind Screen with the Sony logo facing down Attaching the battery cover Attach the battery cover after attaching the battery pack Attach the battery cover with the projecting part facing as...

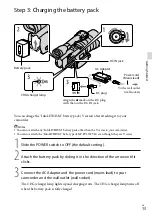
Страница 13: ...1 Slide the POWER switch to OFF the default setting 2 Attach the battery pack by sliding it in the direction of the arrow until it clicks 3 Connect the AC Adaptor and the power cord mains lead to your camcorder and the wall outlet wall socket The CHG charge lamp lights up and charging starts The CHG charge lamp turns off when the battery pack is fully charged Battery pack CHG charge lamp DC IN jac...

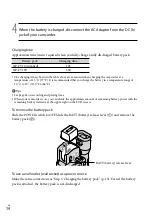
Страница 14: ...e battery in a temperature range of 10 C to 30 C 50 F to 86 F Tips See page 63 on recording and playing time When your camcorder is on you can check the approximate amount of remaining battery power with the remaining battery indicator at the upper right on the LCD screen To remove the battery pack Slide the POWER switch to OFF Slide the BATT battery release lever and remove the battery pack To us...

Страница 15: ...peration for about 5 minutes to save battery power A Shut Off Notes on the AC Adaptor Use the nearby wall outlet wall socket when using the AC Adaptor Disconnect the AC Adaptor from the wall outlet wall socket immediately if any malfunction occurs while using your camcorder Do not use the AC Adaptor placed in a narrow space such as between a wall and furniture Do not short circuit the DC plug of t...

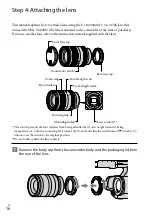
Страница 16: ...s the lens cylinder from being extended by its own weight when it is being transported etc Turn the zoom ring back toward the W end and slide the switch toward to lock it To unlock it set the switch to the original position Do not touch or dirty the lens contacts Remove the body cap from the camcorder body and the packaging lid from the rear of the lens Zoom ring Focal length scale Hood index Foca...

Страница 17: ... lens do not press the lens release button Do not use force when attaching a lens Mounting the lens forcibly may result in a malfunction or damage of the lens mount There may be some slight movement of the lens in the locked position depending on the lens used This is not a malfunction Hold the camcorder body with the front end downward and quickly change the lens somewhere away from dusty locatio...

Страница 18: ... cap clockwise Before you attach caps remove dust from them Notes When changing the lens if dust or debris gets inside the camcorder body and adheres to the surface of the image sensor the part that acts as the film it may appear on the image depending on the shooting conditions The image sensor is applied with the anti dust coating to prevent dust from adhering to the image sensor However attach ...

Страница 19: ...vity beyond the mount so that the tip of the blower does not touch the image sensor Hold the camcorder s face downward to prevent the dust from resettling in the camcorder Do not apply a mechanical shock to the camcorder during cleaning If you cannot clean the image sensor by the above procedure consult your Sony dealer or local authorized Sony service facility Mount Adaptor Using a Mount Adaptor ...

Страница 20: ... depending on the subject ambient light etc Notes Some lenses may not be usable or may have limited functionality Check the dedicated support web site or consult your local authorized Sony service facility on compatible lenses The sound of the lens and the camera in operation may be recorded during movie recording You can avoid this by setting Audio Rec Level to minimum Touch MENU Camera Mic Micro...

Страница 21: ...g the green button 2 Select the desired language then touch Next 3 Select the desired geographical area with then touch Next To set the date and time again touch MENU Setup Clock Settings Date Time Setting Date Time When an item is not on the screen touch until the item appears Touch the button on the LCD screen POWER switch ...

Страница 22: ... clock starts Notes The date and time does not appear during recording but they are automatically recorded on the memory card and can be displayed during playback To display the date and time touch MENU Setup Playback Settings Data Code Date Time You can turn off the operation beeps by touching MENU Setup General Settings Beep Off If the button you touch does not react correctly calibrate the touc...

Страница 23: ...itch to OFF The Movie lamp flashes for a few seconds and the camcorder is turned off Changing the language setting You can change the on screen displays to show messages in a specified language Touch MENU Setup General Settings Language Setting a desired language ...

Страница 24: ...ocations by opening or closing the LCD screen FINDER LCD enables you to use the viewfinder without closing the LCD panel so you can operate buttons which are hidden when the LCD screen is closed You can adjust the brightness of the LCD screen with LCD Brightness Changing the display on the LCD screen Press DISPLAY to cycle the screen display in the following order Recording Detailed display simple...

Страница 25: ... record while viewing through the viewfinder close the LCD panel or press FINDER LCD p 73 If the indications in the viewfinder appear blurred adjust the viewfinder lens adjustment lever located beneath the viewfinder Notes You may see colors red blue green shimmering in the viewfinder when you move your line of sight This is not a malfunction The shimmering colors will not be recorded on the memor...

Страница 26: ...t circumstances use the supplied large eyecup To attach the large eyecup stretch it slightly and align it with the eyecup groove in the viewfinder You can attach the large eyecup facing either the right or left side Notes Do not remove the pre attached eyecup Large eyecup supplied Attach the projection to be straight ...

Страница 27: ...age Database File It may be possible that there is not enough free space is displayed format the memory card Confirm the direction of the memory card If you forcibly insert the memory card in the wrong direction the memory card memory card slot or image data may be damaged Do not open the cover during recording When inserting or ejecting the memory card be careful so that the memory card does not ...

Страница 28: ...ng so may cause a malfunction Memory Stick PRO Duo media of up to 32 GB and SD cards of up to 64 GB have been verified to operate with your camcorder Notes A MultiMediaCard cannot be used with this camcorder Movies recorded on SDXC memory cards cannot be imported to or played back on computers or AV devices not supporting the exFAT file system by connecting the camcorder to these devices with the ...

Страница 29: ...the default setting movies are recorded with high definition image quality HD 1 Fasten the grip belt 2 To remove the lens cap push the sliders on both sides of the cap 3 Slide the POWER switch to ON while pressing the green button Your camcorder is turned on ...

Страница 30: ...ill being written onto the recording media after recording has finished During this time do not apply shock or vibration to the camcorder or remove the battery or AC Adaptor Access lamp p 27 is lit or flashing The media icon in the upper right of the LCD screen is flashing The camcorder does not have a power zoom function Hold the lens with your left hand to support the camera during recording whe...

Страница 31: ...a TV which is not compatible with full pixel display In this case set Guide Frame to On and record images using the outer frame displayed on the screen as a guide Data code during recording The recording date time and condition are recorded automatically on the memory card They are not displayed during recording However you can check them as Data Code during playback To display them touch MENU Set...

Страница 32: ...ch MENU Image Quality Size Image Size a desired setting You cannot record photos while is displayed Selecting the recording mode You can change the quality of the image that you record by touching MENU Image Quality Size REC Mode The types of media that images can be saved on will depend on the recording mode selected For details on a save operation using the external devices see page 50 Types of ...

Страница 33: ... to make the adjustment also when pressing IRIS or SHUTTER SPEED To assign a menu item Press and hold MANUAL for a few seconds to display the MANUAL Button screen Rotate the MANUAL dial to assign an item You can assign Exposure Gain ISO IRIS Shutter Speed AE Shift or White Balance Shift Using a tripod Attach a tripod sold separately to the tripod receptacle using a tripod screw sold separately the...

Страница 34: ... select the desired event To the MENU screen Events To the previous next event Event name Change to the movie photo recording mode Time line bar Change Event Scale button The Event Index screen appears when you touch the event that is displayed on the center Touch Change Event Scale on the bottom right of the screen so that you can change the time range of the time line bar from one and a half yea...

Страница 35: ...s the previous next page Touching and holding the button scrolls the index screen Change to the movie photo recording mode Event title Total time of movies in the Event The total number of still images is displayed when there are still images only Switch Image Type button Movie Photo appears with the movie or photo that was most recently played or recorded If you touch the movie or photo with you ...

Страница 36: ...d allows you to use those functions easily When playback from the selected image reaches the last image the screen returns to the INDEX screen Touch during pause to play back movies slowly As you repeat touching during playback movies are played as fast as about 5 times about 10 times about 30 times about 60 times The recording date time and shooting conditions are recorded automatically during re...

Страница 37: ... in the figure below while you are viewing photos The figure below will be displayed when you select PHOTO by touching the Switch Image Type button on the Event Index screen Tips To repeat Slideshow touch Slideshow Set To start stop slide show Next Previous Delete Context ...

Страница 38: ...er p 34 List of connection Connecting to a high definition TV When the recording quality is high definition image quality HD the movies are played back in high definition image quality HD When the recording quality is standard image quality STD the movies are played back in standard definition image quality STD Connecting to a non high definition 16 9 wide or 4 3 TV When movies are recorded with h...

Страница 39: ...aspect ratio according to the connected TV 16 9 4 3 Set TV Type to 16 9 or 4 3 according to your TV When you connect with A V connecting cable with S VIDEO When the S VIDEO plug S VIDEO channel is connected audio signals are not output To output audio signals connect the white and red plugs to the audio input jack of your TV This connection produces higher resolution images compared with the A V c...

Страница 40: ...face is an interface to send both video audio signals The HDMI OUT jack outputs high quality images and digital audio On Photo TV HD This camcorder is compatible with the Photo TV HD standard Photo TV HD allows for highly detailed photo like depiction of subtle textures and colors By connecting Sony s Photo TV HD compatible devices using an HDMI cable or the component AV cable a whole new world of...

Страница 41: ...ete all images recorded in the memory card and recover all the recordable space of the media format the media Reduced size images which enable you to view many images at the same time on an index screen are called thumbnails 1 Press View Images button p 34 2 Touch MENU Edit Copy Delete 3 To select and delete movies touch Multiple Images MOVIE PHOTO MOVIE PHOTO When Setting is set to STD Quality ap...

Страница 42: ... stored in the CD ROM supplied includes functions that enable you to do more with the images recorded with the camcorder A movie that is divided and recorded in a series of one or more 2 GB files will be automatically combined in series into a single file by importing it to your computer using PMB View Edit Save on a disc Upload Calendar DVD Blu ray Joining image files Network services ...

Страница 43: ...sta Windows 7 1 GB or more Image Data Converter 1GB or more Hard disk Disk volume required for installation Approximately 500 MB 10 GB or more may be necessary when creating AVCHD recording discs 50 GB maximum may be necessary when creating Blu ray discs Display Minimum 1 024 768 dots Others USB port this must be provided as standard Hi Speed USB USB 2 0 compatible Blu ray disc DVD burner CD ROM d...

Страница 44: ...r click Start Computer in Windows XP My Computer then double click SONYPMB E CD ROM Drive names such as E may vary depending on the computer Click Install Check that PMB and Image Data Converter are selected then follow the instructions on the computer screen to continue the installation Select the country or region Select the language for the application to be installed then proceed to the next s...

Страница 45: ...Device Touch Cancel Yes on the camcorder screen Disconnect the USB cable If you are using Windows 7 the icon may not appear on the desktop of the computer In this case you can disconnect the camcorder from your computer without following the procedures described above Notes Do not format the memory card of the camcorder using a computer If you do this the camcorder will not operate correctly Do no...

Страница 46: ...s allows you to start the desired function application by selecting one from a list of PMB functions shown as separate files on a computer however the files will be handled properly by the import function of the camcorder or the PMB software Use the supplied PMB software when you import long movies or edited images from the camcorder to a computer If you use other software the images may not be im...

Страница 47: ...creative style etc To save the images displayed and edited on a computer You can either save the image as RAW format or save it in the general file format To display and compare RAW JPEG images recorded with this camera To rate the images on a scale of five To set color labels To use Image Data Converter refer to Help Click Start All Programs Image Data Converter Help Image Data Converter Ver 4 Im...

Страница 48: ...tion image quality STD USB cable supplied 53 Hard disk recorder etc Saving images on a DVD disc with standard definition image quality STD A V connecting cable supplied 54 Movies that are recorded with standard definition image quality STD Use the A V connecting cable to connect the camcorder to an external device in which images are saved Notes The AVCHD recording disc can be played back only on ...

Страница 49: ...HD format playback devices such as a Sony Blu ray disc player or a PlayStation 3 DVD disc with standard definition image quality STD Ordinary DVD playback devices such as a DVD player Notes Always maintain your PlayStation 3 to use the latest version of the PlayStation 3 system software The PlayStation 3 may not be available in some countries regions ...

Страница 50: ...ilt in USB hub card reader Notes You may not be able to use external media devices with a code function The FAT file system is available for your camcorder If the storage medium of the external device was formatted for the NTFS file system etc format the external media device using the camcorder before use The format screen appears when an external media device is connected to your camcorder Make ...

Страница 51: ...le the camcorder is in the playback standby mode Event View or Event Index is displayed of the external media device Disconnect the USB Adaptor Cable Notes The number of scenes you can save on the external media device are as follows However even if the external media device has free space you cannot save scenes exceeding the following number High definition image quality HD movies Max 3 999 Stand...

Страница 52: ...lso view images on a TV connected to your camcorder p 38 You can play back the high definition image quality HD movies on your computer using Player for AVCHD Start Player for AVCHD and select the drive where the external media device is connected with Settings To perform Direct Copy manually You can perform Direct Copy manually while the camcorder is connected to an external media device Touch ME...

Страница 53: ...ons Your camcorder is not compatible with DVDirect Express 1 Connect the AC Adaptor and the power cord mains lead to the DC IN jack of your camcorder and the wall outlet wall socket p 14 2 Turn on your camcorder and connect a DVD writer etc to your camcorder with the USB cable supplied The USB Select screen appears on the camcorder screen If the USB Select screen does not appear touch MENU Setup C...

Страница 54: ...aptor for this operation p 14 Sony DVD writer may not be available in some countries regions High definition image quality HD movies will be copied with standard definition image quality STD A V connecting cable supplied A V connecting cable with S VIDEO sold separately By using this cable higher quality images can be produced than with an A V connecting cable Connect the white and red plug left r...

Страница 55: ...manuals supplied with your recording device for details 4 When dubbing is finished stop the recording device and then your camcorder Notes Since copying is performed via analog data transfer the image quality may deteriorate You cannot copy images to recorders connected with an HDMI cable To copy date time information and camera data touch MENU Setup Playback Settings Data Code a desired setting W...

Страница 56: ... or size p 58 Playback Function Items for playback p 34 Edit Copy Items for editing p 58 Setup Other setup items p 58 Operating menus Follow the procedures explained below to set the menu items The Camera Mic and Setup menus have sub categories Touch the sub category icon and the screen changes to other sub category menus Grayed out menu items or settings are not available Notes You may not be abl...

Страница 57: ...Timer Sets the self timer when your camcorder is in photo recording mode Drive Mode Sets continuous or bracket shooting etc AF Mode Selects the focus method SteadyShot Sets the SteadyShot function when recording movies SteadyShot Sets the SteadyShot function when shooting photos Auto Back Light Adjusts the exposure for backlit subjects automatically MANUAL Button Assigns a function to the MANUAL b...

Страница 58: ...etup Media Settings Media Info Displays information on the recording media such as free space Format Deletes all data on the recording media Repair Img DB F Repairs the image database file on the recording media p 62 File Number Sets how to assign the file number Playback Settings Data Code Sets the date and time Volume Adjusts the volume of playback sound p 36 Connection TV Type Converts the sign...

Страница 59: ...hooting w o Lens Sets whether or not the recording can be started when no lens is attached Remote Ctrl Sets whether the Wireless Remote Commander is to be used or not A Shut Off Sets your camcorder to turn off automatically p 15 Language Setting Sets the display language p 23 Calibration Calibrates the touch panel Battery Info Displays the battery information Version Displays the version of your c...

Страница 60: ... E CD ROM install exe Drive names such as E may vary depending on the computer 2 Click Handbook 3 Click the desired language and the model name of your camcorder Install and follow the on screen instructions to install Handycam Handbook The model name of your camcorder is printed on the bottom surface To view the Handycam Handbook double click the short cut icon on the computer screen When using a...

Страница 61: ... 73 using a pointed object If you press RESET all settings including the clock setting are reset The temperature of your camcorder is extremely high Turn off the camcorder and leave it for a while in a cool place The temperature of your camcorder is extremely low Leave the camcorder with the power turned on If you still cannot operate your camcorder turn off the camcorder and take it to a warm pla...

Страница 62: ...igh Change the battery pack or place it in a cool place C 13 C 32 Remove the power source Reconnect it and operate your camcorder again E Follow the steps from on page 61 Battery power is low The battery pack temperature is high Change the battery pack or place it in a cool place No memory card is inserted p 27 When the indicator flashes there is not enough free space for recording images Delete u...

Страница 63: ...attery pack Continuous recording time Typical recording time Image quality HD STD HD STD NP FV70 supplied 175 190 185 205 95 105 100 110 NP FV100 350 385 370 405 190 210 205 220 Top When recording with the LCD screen Bottom When recording with viewfinder Each recording time is measured under the following conditions REC Mode Standard default setting Using E 18 200mm F3 5 6 3 OSS lens Typical recor...

Страница 64: ...e size of your camcorder The actual number of recordable photos is displayed on the LCD screen during recording p 70 The number of recordable photos of memory card may vary depending on the recording conditions Tips You can also use memory card with a capacity of under 1 GB for recording photos The following list shows the bit rate pixels and aspect ratio of each recording mode movie Playing time ...

Страница 65: ...properly Near AM receivers and video equipment Noise may occur On a sandy beach or anywhere dusty If sand or dust gets in your camcorder it may malfunction Sometimes this malfunction cannot be repaired Near windows or outdoors where the LCD screen the viewfinder or the lens may be exposed to direct sunlight This damages the inside of the viewfinder or the LCD screen Operate your camcorder on DC 6 ...

Страница 66: ...y card to somebody it is recommended that you delete data completely using data deletion software on a computer Also when you dispose of the memory card it is recommended that you destroy the actual body of the memory card Do not use a deformed or damaged battery pack Keep metal contacts clean If the battery electrolytic liquid has leaked Consult your local authorized Sony service facility Wash of...

Страница 67: ...m Dolby Digital 2ch 5 1ch Dolby Digital 5 1 Creator Photo file format DCF Ver 2 0 Compatible Exif Ver 2 3 Compatible MPF Baseline Compatible Recording media Movie Photo Memory Stick PRO Duo media SD card Class 4 or faster Viewfinder Electric viewfinder Color Screen size 1 1 cm 0 43 type Effective pixel number 1 152 000 dots 800 3 RGB 480 Image device 23 5 mm 15 6 mm APS C type CMOS sensor Recordin...

Страница 68: ...DC 6 8 V 7 2 V battery pack DC 8 4 V AC Adaptor Average power consumption During camera recording using viewfinder at normal brightness During camera recording using E 18 200mm F3 5 6 3 OSS lens HD 4 0 W STD 3 8 W During camera recording using LCD screen at normal brightness During camera recording using E 18 200mm F3 5 6 3 OSS lens HD 4 4 W STD 4 2 W Supplied with NEX VG20EH Operating temperature...

Страница 69: ...ks or trademarks of Microsoft Corporation in the United States and or other countries Macintosh and Mac OS are registered trademarks of Apple Inc in the U S and other countries Intel Intel Core and Pentium are trademarks or registered trademarks of Intel Corporation or its subsidiaries in the United States and other countries and PlayStation are registered trademarks of Sony Computer Entertainment...

Страница 70: ...lity HD STD frame rate 50p 50i 25p and recording mode PS FX FH HQ LP 60 Remaining battery Zoom bar Drive Mode RAW JPEG Recording playback editing media 0 00 00 Counter hour minute second 00Min Estimated recording remaining time Photo size 9999 Approximate number of recordable photos and photo size Playback folder 100 112 Current playing movie or photo Number of total recorded movies or photos An e...

Страница 71: ...Gain ISO 200 ISO 4000 Shutter Speed Slide show button 101 0005 Data file name Protected image Flash Flash Level Red Eye Reduction Indicators and their positions are approximate and may differ from what you actually see Some indicators may not appear depending on your camcorder model ...

Страница 72: ... damaged Auto lock accessory shoe Attach a Sony external flash sold separately etc The flash does not work when Drive Mode is set to Bracket 0 3 EV or Bracket 0 7 EV There are certain Sony flashes or functions that cannot be used with your camcorder For the compatibility of a particular flash unit visit the Sony web site in your area or consult your Sony dealer or local authorized Sony service fac...

Страница 73: ...nient during playback operations RESET button Press RESET using a pointed object Press RESET to initialize all the settings including the clock setting Speaker IRIS button View Images button 34 DISPLAY button 24 SHUTTER SPEED button FINDER LCD button 24 PROGRAM AE button Memory card access lamp 27 While the lamp is lit or flashing the camcorder is reading or writing data Memory card slot 27 FOCUS ...

Страница 74: ...vies and sound to a connected TV or control your camcorder when it is mounted on a remote control video tripod Grip belt 29 Tripod receptacle 33 Mount Image sensor Do not touch or dirty the image sensor Lens contacts Do not touch or dirty the lens contacts Lens lock pin Lens release button Zoom lock switch Lens hood Lens Zoom ring Focusing ring Camera recording lamp Remote sensor 59 ...

Страница 75: ... time 21 Software 44 Specifications 67 T Thumbnail 41 Tripod 33 74 Troubleshooting 61 Turning the power on 21 TV 38 U USB cable 53 V VBR 64 W Wall outlet wall socket 13 Warning indicators 62 Windows 43 A A V connecting cable 39 54 B Battery pack 13 C Care 65 Charging the battery pack 13 Charging the battery pack abroad 15 Clock Set 21 Computer 43 Computer system 43 Connection 38 D Data Code 22 Dat...

Страница 76: ...GB Printed in Japan 2011 Sony Corporation Additional information on this product and answers to frequently asked questions can be found at our Customer Support Website http www sony net ...

Отзывы: