background image

18 

US

Preparing the battery

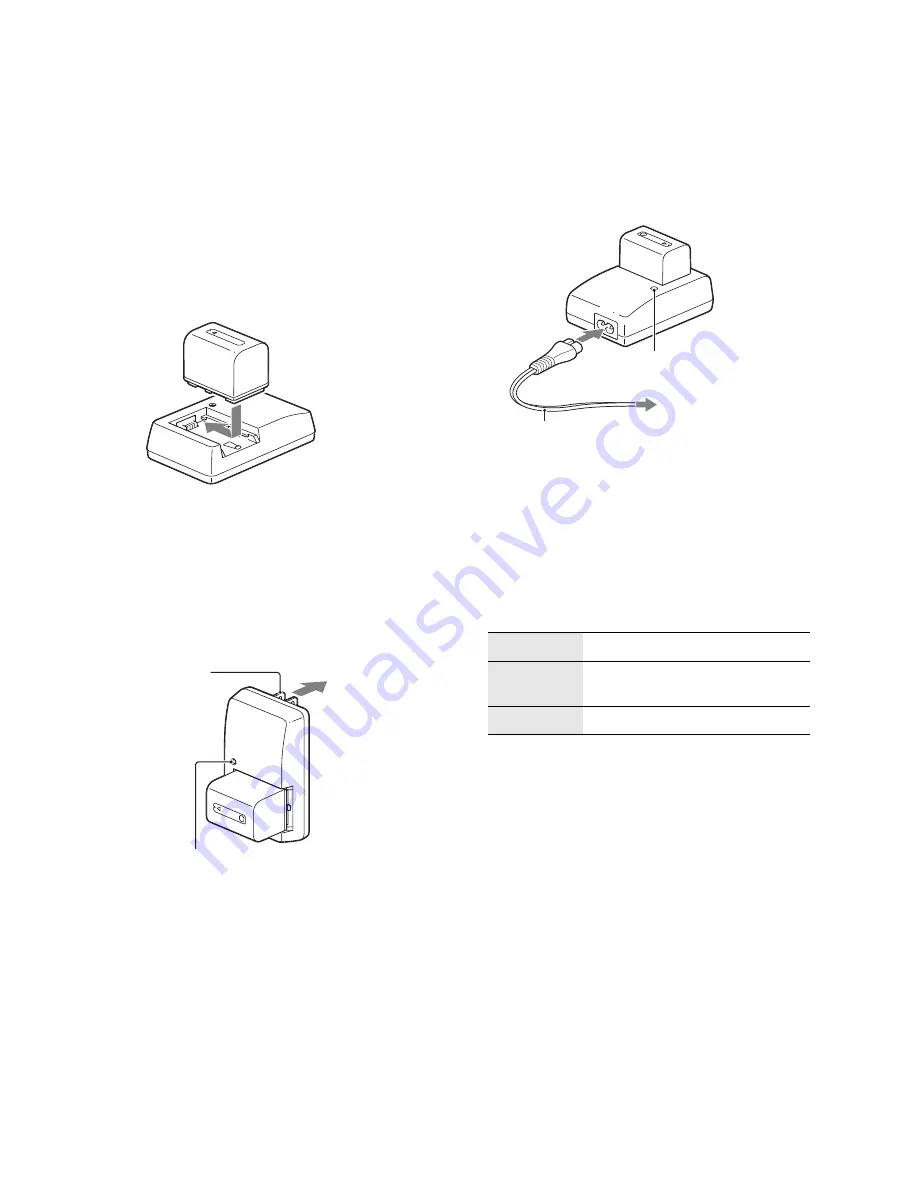
Charging the battery pack

Charge the battery pack using the supplied battery 
charger. You cannot charge the battery pack 
attached on the camcorder.

1

Insert the battery pack into the battery charger.

2

Connect the battery charger to the wall outlet 
(wall socket).
The CHARGE lamp lights up.
Lit: The battery is being charged.
Off: Normal charge is completed.
An hour after off: Full charge is completed.

For the USA and Canada

For other countries/regions

Charging time

The following table shows the charging time in 
minute required to charge a fully depleted battery 
pack at a temperature of 25 °C (77 °F). The 
charging time varies depending on the operating 
conditions. See page 40 on the recording time 
available.

• We recommend charging the battery pack in an ambient 

temperature of between 10 °C and 30 °C (50 °F and 86 °F). 
You may not be able to efficiently charge the battery pack 
outside of this temperature range.

Plug

CHARGE lamp

to the wall outlet 
(wall socket)

Battery pack

Full charge

Normal charge

NP-FV70 
(supplied)

550

490

NP-FV100

960

900

to the wall outlet (wall 
socket)

CHARGE lamp

Power cord (mains lead)

Содержание Handycam NEX-VG10

Страница 1: ...4 258 761 1 Interchangeable Lens Digital HD Video Camera Recorder NEX VG10 E mount Operating Guide US Mode d emploi FR Guía de operaciones ES ...

Страница 2: ... ...

Страница 3: ...Interchangeable Lens Digital HD Video Camera Recorder NEX VG10 ...

Страница 4: ...4 US ...

Страница 5: ...nd a third grounding prong The wide blade or the third prong are provided for your safety If the provided plug does not fit into your outlet consult an electrician for replacement of the obsolete outlet Protect the power cord from being walked on or pinched particularly at plugs convenience receptacles and the point where they exit from the apparatus Only use attachments accessories specified by t...

Страница 6: ... AC Adaptor placed in a narrow space such as between a wall and furniture Even if your camcorder is turned off AC power source mains is still supplied to it while connected to the wall outlet wall socket via the AC Adaptor Battery charger Even if the CHARGE lamp is not lit the battery charger is not disconnected from the AC power source mains as long as it is connected to the wall outlet wall sock...

Страница 7: ...ed by turning the equipment off and on the user is encouraged to try to correct the interference by one or more of the following measures Reorient or relocate the receiving antenna Increase the separation between the equipment and receiver Connect the equipment into an outlet on a circuit different from that to which the receiver is connected Consult the dealer or an experienced radio TV technicia...

Страница 8: ... SE Type CEE Type O Type Ocean Type Countries regions Voltage Frequency Hz Plug type Austria Belgium Czech Denmark Finland France Germany Greece Hungary Iceland Ireland Italy Luxemburg Netherlands Norway Poland Portugal Romania Russia Slovak Spain Sweden Switzerland UK 230 230 220 230 230 230 230 220 220 230 230 220 230 230 230 220 230 220 220 220 127 230 230 230 240 50 50 50 50 50 50 50 50 50 50 ...

Страница 9: ...10 120 127 120 240 110 220 60 60 60 60 60 60 60 50 60 60 60 A A A C A A A A A A A A Countries regions Voltage Frequency Hz Plug type Argentina Brazil Chile Colombia Peru Venezuela 220 127 220 220 120 220 120 50 60 50 60 60 60 C BF O A C C A A C A Countries regions Voltage Frequency Hz Plug type Iran Iraq Israel Saudi Arabia Turkey UAE 220 220 230 127 220 220 240 50 50 50 50 50 50 C BF C BF C A C B...

Страница 10: ...cket as a power source 19 Attaching a lens 21 Removing the lens 22 Turning on the camcorder and setting the date and time 23 Changing the language setting 23 Using the operating buttons 24 Adjusting the viewfinder and the LCD monitor 25 Viewfinder 25 LCD monitor 25 Inserting a memory card 26 Recording 27 Movies 27 Still images 28 Recording functions 29 Adjustments using the lens 29 Settings using ...

Страница 11: ...36 Importing images to the computer 37 Troubleshooting 38 Recording time number of images 40 Recording playback time of movies of a battery pack 40 Estimated recording time of movies 40 Estimated number of recordable still images 41 Precautions 41 Specifications 44 Menu list 47 Shoot Mode 48 Camera 48 Rec Mode Image Size 48 Brightness Color 49 Playback 49 Setup 50 Identifying parts 51 List of icon...

Страница 12: ...n recording playback When you use a memory card with this camcorder for the first time it is recommended to format the memory card using the camcorder for stable performance of the memory card before shooting Note that formatting permanently erases all data on the memory card and is unrecoverable Save precious data on a computer etc Before you record one time events make a trial recording to make ...

Страница 13: ...re of the camcorder and battery pack The camcorder has a protective function that disables recording or playback if the temperature of the camcorder or battery pack is beyond the safely operable range In this case a message appears on the LCD monitor or in the viewfinder Operating instructions The camcorder comes with 2 manuals Operating Guide this manual which explains the basic operations and Ha...

Страница 14: ...14 US The visual world seen by your NEX VG10 ...

Страница 15: ...you to use D lenses A mount lenses as well You can choose the right lens for the recording conditions or subjects A wide variety of characteristic lenses will widen visual expression Manual operability The camcorder allows you to use aperture priority shutter speed priority full manual exposure compensation and adjust gain white balance etc for recording movies A control dial and exclusive buttons...

Страница 16: ...1 for the USA and Canada 2 for other countries regions Battery charger BC VH1 1 Rechargeable battery pack NP FV70 1 USB cable 1 Wind Screen 1 Body cap 1 Rear lens cap 1 Telephoto zoom lens E18 200 mm F3 5 6 3 OSS 1 Front lens cap included attached to the camcorder Lens hood 1 CD ROM Handycam Application Software 1 PMB Handycam Handbook Operating Guide 1 ...

Страница 17: ... the red line of the lens hood to that of the lens and mount the lens hood on the lens Turn the lens hood clockwise until the red dot of the lens hood and that of the lens align with a click When shooting still images using a flash sold separately remove the lens hood to prevent the flash light from being blocked When storing the lens hood after recording attach the lens hood facing the other way ...

Страница 18: ...tries regions Charging time The following table shows the charging time in minute required to charge a fully depleted battery pack at a temperature of 25 C 77 F The charging time varies depending on the operating conditions See page 40 on the recording time available We recommend charging the battery pack in an ambient temperature of between 10 C and 30 C 50 F and 86 F You may not be able to effic...

Страница 19: ...ances Removing the battery pack Turn off the camcorder While pressing the BATT lever 1 remove the battery pack 2 Using the wall outlet wall socket as a power source Connect the power cord mains lead to the AC Adaptor and connect the AC Adaptor to the camcorder and the wall outlet wall socket Align the v mark on the DC plug with that on the DC IN jack Battery level High Low Battery exhausted You ca...

Страница 20: ...The battery pack is damaged The battery pack is too cold Remove the battery pack and keep it in a warm place The battery pack is too warm Remove the battery pack and keep it in a cool place You cannot use NP FV30 FV50 battery packs with this camcorder Notes on the battery charger and the AC Adaptor Do not short circuit the battery terminal of the battery charger or the DC plug of the AC Adaptor wi...

Страница 21: ...om the camcorder body and the packaging lid from the rear of the lens 2 Mount the lens by aligning the mounting indexes white on the lens and the camcorder body While pushing the lens lightly toward the camcorder body turn the lens clockwise until it clicks into the locked position Be sure to put the lens on straight Mounting indexes white Front lens cap Rear lens cap Zoom lock switch Hood index L...

Страница 22: ...he lens quickly somewhere away from dusty locations Do not leave the camcorder body with the lens and lens cap removed If dust or debris adheres on the image sensor Clean the image sensor using Cleaning Mode on the Setup menu Then turn off the camcorder and detach the lens Clean the image sensor and the surrounding area using a blower sold separately and then reattach the lens Notes Cleaning can b...

Страница 23: ...rn the control dial to select the numeric value You can also use v V for the selection Daylight Svg Turns on or off the daytime saving time setting Date Format Selects the format to display date Midnight is indicated as 12 00 AM and noon as 12 00 PM 6 Repeat steps 4 and 5 to set other items and then press the control dial To turn off the camcorder Set the power switch to OFF To reset the date and ...

Страница 24: ...them by turning the control dial or pressing the v V b B buttons Press the control dial to make your choice The MENU and FOCUS buttons and the control dial have different roles depending on the screen display The assigned role function of each button is shown on the screen To use the function shown at the upper right corner of the screen press the MENU button To use the function shown at the cente...

Страница 25: ...olors shimmering in the viewfinder when you move your line of sight This is not a malfunction The shimmering colors will not be recorded on the memory card Tip You can adjust the brightness of viewfinder with Viewfinder Bright on the menu LCD monitor Open the LCD monitor 1 then rotate it to your preference 2 Note The LCD monitor rotates up to 90 degrees in the vertical direction Do not try to rota...

Страница 26: ... camcorder Memory Stick PRO Duo Mark2 media Memory Stick PRO HG Duo media SD memory card Class 4 or more SDHC memory card Class 4 or more SDXC memory card Class 4 or more It is confirmed that up to 32 GB of Memory Stick PRO Duo media and up to 64 GB of SD card can be used with this camcorder Memory Stick PRO Duo media and Memory Stick PRO HG Duo media are both called as Memory Stick PRO Duo media ...

Страница 27: ...k your camcorder or remove the battery pack or the AC Adaptor When the access lamp is lit or flashing When the recording icon is displayed The camcorder does not have the power zoom function Hold the lens with your left hand during recording when you do not use a tripod Make sure that your fingers are not touching the microphone Tips If you do not want the sound of the camcorder and the lens in op...

Страница 28: ...on digital SLR cameras Focusing may be difficult in the following situations It is dark and the subject is distant The contrast between the subject and the background is poor The subject is seen through glass The subject is moving quickly The subject reflects light such as mirror or has shiny surfaces The subject is flashing The subject is backlit Tip To change the image size of still images press...

Страница 29: ...events the lens cylinder from being extended by its own weight when it is being transported etc Turn the zoom ring back toward the W end and slide the switch toward V to lock it To unlock it set the switch to the original position Settings using the operation panel The menu allows you to set various functions Functions that will be used frequently are assigned to the following buttons MENU This bu...

Страница 30: ...etting Auto 0dB to 27dB The camcorder sets a Gain between 0 dB and 21 dB atutomatically with Auto Still image mode Sets the ISO sensitivity This button allows you to set the luminous sensitivity for recording still images ISO AUTO 200 to 12800 The camcorder sets an ISO between ISO 200 and ISO 1600 automatically with ISO AUTO This button allows you to compensate for the brightness of the entire ima...

Страница 31: ...rol dial 2 Turn the control dial to select a desired mode then press it Program Auto P This mode adjusts the aperture and shutter speed automatically and allows you to set Gain ISO Creative Style White Balance etc to meet your needs Aperture Priority A This mode allows you to adjust the aperture value by turning the control dial The shutter speed is adjusted automatically Opening the aperture allo...

Страница 32: ...When an A mount lens is attached you cannot use the auto focus function You may not be able to use certain A mount lenses For the compatibility of a particular A mount lens visit the Sony web site in your area or consult your Sony dealer or local authorized Sony service facility Manual setting Exposure mode A S M P Aperture Shutter speed Gain ISO sensitivity Exposure compensation ...

Страница 33: ...mage you want to play back Press the control dial to enlarge the image Press V to display the index screen Deleting an image Select the image you want to delete Press FOCUS and the control dial Tip You can select images to be deleted Press MENU then select Playback t Delete t Multiple Movies Multiple Still Images Pause Press the control dial Fast forward Press B or turn the control dial down Fast ...

Страница 34: ...No image is displayed on the viewfinder and LCD monitor when signals are output via the HDMI terminal Some devices may not work properly Use an HDMI cable with the HDMI logo Do not connect the output connector of the device with the HDMI terminal on the camcorder This may cause a malfunction Signals can be output from the camcorder to a TV only via the HDMI terminal This camcorder is not compatibl...

Страница 35: ... required to use the function for creating discs 2 Starter Edition is not supported OS pre installed Microsoft Windows XP1 SP3 Windows Vista2 SP2 Windows 7 CPU Intel Core Duo 1 66 GHz or faster or Intel Core 2 Duo 1 66 GHz or faster Intel Core 2 Duo 2 26 GHz or faster to process FX 24M FH 17M movies However Intel Pentium III 1 GHz or faster is sufficient for the following operations Importing the ...

Страница 36: ...e computer screen 11Follow the on screen instructions to install the software If the installation screen of other software appears follow the on screen instructions Restart the computer if required to complete the installation When the installation is completed the icons of following installed software will appear PMB PMB Launcher PMB Help Other icons may also appear Icons may not appear depending...

Страница 37: ...ed When the camcorder is connected to a computer nothing appears on the LCD monitor and viewfinder This is not a malfunction 2 Press Playback on the camcorder The import screen appears on the computer 3 Click Import Movies and still images are imported to the computer When completed the PMB screen appears For details refer to PMB Help Tip You can export high definition image quality HD movies from...

Страница 38: ...out 0 15 second intervals Remove the battery pack and reattach the same battery pack securely If it flashes fast again it suggests that there is something wrong with the battery pack If the CHARGE lamp is flashing slowly about 1 5 second intervals The ambient temperature is outside the suitable range for charging the battery pack Charge the battery pack under the suitable temperatures between 10 C...

Страница 39: ... too dark Take off the filter or hood Depending on the thickness of the filter and improper attachment of the hood the filter or the hood may partially appear in the image The optical properties of some lenses may cause the periphery of the image to appear too dark insufficient light Dots appear and remain on the LCD monitor This is not a malfunction These dots are not recorded page 12 The exposur...

Страница 40: ...d Recording time number of images Recording playback time of movies of a battery pack The table shows approximate time available using a fully charged battery pack Rec Mode is set to FH 17M Typical recording time shows the time when you repeat recording start stop switching the mode lamp etc At an ambient temperature of 25 C 77 F Using the battery pack in an ambient temperature of between 10 C and...

Страница 41: ...5000 Precautions The LCD monitor Images may trail across on the LCD monitor in a cold location This is not a malfunction When turning on the camcorder in a cold location the LCD monitor may become temporarily dark Do not press against the LCD monitor The monitor may be discolored and that may cause a malfunction While using your camcorder the back of the LCD panel may heat up This is not a malfunc...

Страница 42: ... spring etc How to prevent moisture condensation When bringing the camcorder from a cold place to a warm place seal the camcorder in a plastic bag and allow it to adapt to conditions at the new location over about an hour If recording playback is not done correctly If you repeatedly record delete images fragmentation of data may occur on the memory card Movies may not be able to be saved or record...

Страница 43: ... the camcorder resets the settings to the defaults each time you charge the battery the internal rechargeable battery may be dead Consult your Sony dealer or local authorized Sony service facility Charging method of the internal rechargeable battery Attach a charged battery pack into the camcorder or connect the camcorder to a wall outlet wall socket using the AC Adaptor and leave the camcorder fo...

Страница 44: ...uto F3 5 Shutter Type Electronically controlled vertical traverse focal plane type Shutter speed range 1 4000 second to 30 seconds 1 3 EV step Available in still image recording mode only Output terminals HDMI OUT terminal HDMI mini connector Headphone jack Stereo minijack 3 5 mm Input terminal MIC input jack Stereo minijack 3 5 mm Input output terminal USB mini B LCD monitor Screen size 7 5 cm 3 ...

Страница 45: ...0 Hz 4 W Output rating DC 8 4 V 0 28 A Operating temperature 0 C to 40 C 32 F to 104 F Storage temperature 20 C to 60 C 4 F to 140 F Maximum dimensions Approx 60 mm 25 mm 95 mm Approx 2 3 8 in 1 in 3 3 4 in w h d Mass Approx 75 g Approx 2 oz AC Adaptor AC PW10AM Power requirements AC 100 V 240 V 50 Hz 60 Hz Output voltage DC 7 6 V3 Operating temperature 0 C to 40 C 32 F to 104 F Storage temperatur...

Страница 46: ...rporation Memory Stick Memory Stick PRO Memory Stick Duo Memory Stick PRO Duo Memory Stick PRO HG Duo MagicGate and are trademarks of Sony Corporation Blu ray Disc and the logo are trademarks Dolby and the double D symbol are trademarks of Dolby Laboratories Microsoft Windows Windows Vista and DirectX are either registered trademarks or trademarks of Microsoft Corporation in the United States and ...

Страница 47: ... you to set various functions and customize your camcorder To use the menu press MENU to display the menu and select items using the control dial and the v V b B buttons on the operation panel then press the control dial to make your choice Items that cannot be set in the context are displayed in gray Operation panel Control dial Continued ...

Страница 48: ...ts the shutter speed to express the movement of the subject Aperture Priority Adjusts the range in focus or defocuses the background AF MF Select Selects auto focusing or manual focusing Autofocus DMF Manualfocus Autofocus Area Selects the area to be focused on Multi Center Flexible Spot Autofocus Mode Selects the autofocus method Single shot AF Continuous AF SteadyShot Sets camera shake compensat...

Страница 49: ...he image processing method Standard Vivid Portrait Landscape Sunset Black White Metering Mode Selects the method used for measuring the brightness Multi Center Spot Flash Compensation Adjusts the light amount of the attached flash sold separately 2 to 2 DRO Auto HDR Corrects the brightness or contrast automatically Off D Range Opt Auto HDR Delete Deletes images Multiple Movies Multiple Still Image...

Страница 50: ...produced when you operate the camcorder On Off Language Selects the language used on the screen Date Time Setup Sets the date and time year month day Date Format Daylight Svg Area Setting Selects the area where you are using the camcorder Power Save Turns the camcorder to the power save mode 5 Min Off LCD Brightness Sets the brightness of the LCD monitor 2 to 2 Viewfinder Bright Sets the brightnes...

Страница 51: ... damaged K Auto lock accessory shoe Attach a Sony external flash sold separately etc The flash does not fire when Anti Motion Blur Hand held Twilight Continuous Adv or Bracket Cont is set There are certain Sony flashes or functions that cannot be used with your camcorder For the compatibility of a particular flash unit visit the Sony web site in your area or consult your Sony dealer or local autho...

Страница 52: ...n 30 47 G FOCUS button 30 H DISP v button 29 47 I Playback button 33 J Control dial 31 47 K GAIN B button 30 47 L FINDER LCD button 25 M Exposure Comp Image Index V button 30 47 N Access lamp 26 O Memory card slot 26 P Battery terminal 19 To attach a shoulder strap Attach a shoulder strap sold separately to the hooks for shoulder strap ...

Страница 53: ...belt as shown below D Tripod receptacle Attach a tripod with the screw length of less than 5 5 mm 7 32 in sold separately E Mount 21 F Image sensor G Lens contacts Do not touch or dirty the lens contacts H Lens lock pin I Lens release button 22 J Zoom lock switch 29 K Lens hood 16 L Lens 21 M Zoom ring 29 N Focusing ring 29 ...

Страница 54: ... file error Histogram 101 0012 Playback folder file number Protect STBY REC Recording status 00 00 00 Counter hour minute second Upper part Right part Left part Lower part Flash mode Red Eye Reduction Drive mode Focus mode 0 0 Flash compensation Metering mode Gain ISO AWB 7500K White Balance Creative Style DRO Auto HDR Flash charge in progress z Focus status 1 125 Shutter speed F3 5 Aperture value...

Страница 55: ...55 US Additional information Right part Indicators and their positions are approximate and may differ from what you actually see Soft key See page 24 ...

Страница 56: ...ifying parts 51 L LCD monitor 25 Lens Attaching 21 M Manual Exposure 31 Memory card 26 Menu 29 Menu list 47 Brightness Color 49 Camera 48 Playback 49 Rec Mode Image Size 48 Setup 50 Shoot Mode 48 P Playback 33 Playback on a TV 34 PMB 36 Program Auto 31 R Recording 27 Movies 27 Recording functions 29 Still images 28 S Setting the date and time 23 Shutter Priority 31 T Troubleshooting 38 Turning on ...

Страница 57: ...ssistance à la clientèle Puede encontrar más información sobre este producto y respuestas a las preguntas más frecuentes en nuestro sitio Web de atención al cliente Printed on 70 or more recycled paper using VOC Volatile Organic Compound free vegetable oil based ink Imprimé sur papier recyclé à 70 ou plus avec de l encre à base d huile végétale sans COV composés organiques volatils Impreso en pape...

Страница 58: ...4 257 862 11 1 GB 2010 Sony Corporation NEX VG10 VG10E Interchangeable Lens Digital HD Video Camera Recorder Handycam Handbook Table of contents Sample images Menu Index ...

Страница 59: ... numbers mentioned in the book Search for information by function Search for information by sample images Search for information in a listing of menu items Search for information by keyword Marks and notations used in this handbook In this handbook the sequence of operations is shown by arrows t Operate the camcorder in the order indicated The default setting is indicated by Indicates cautions and...

Страница 60: ...erations Using the operating buttons 8 Menu 10 Using functions with the buttons on the control panel DISP Display Contents 14 FOCUS AF MF Select 16 GAIN Gain 18 ISO 19 Exposure Comp 20 WB White Balance 21 Image Index 23 Using functions in the menu Shoot Mode 10 Camera 11 Rec Mode Image Size 11 Brightness Color 11 Playback 12 Setup 12 Continued r ...

Страница 61: ...eating a disc using a computer 72 Creating a disc using a DVD writer recorder 75 Troubleshooting Troubleshooting 76 Warning messages 82 Others Using the camcorder abroad 85 AVCHD format 86 Memory card 87 Battery pack 89 Battery charger 90 Mount Adaptor 91 Cleaning 92 Index Index 93 ...

Страница 62: ...h the sample images listed here Click the desired sample image Shooting movies as clear as still images page 6 Shooting when holding the camcorder by hand page 6 Shooting landscapes page 6 Shooting clear still images page 7 If you click on an image the screen will jump to the page describing the function recommended for shooting that kind of image Click Continued r ...

Страница 63: ...usting the color 21 Focusing manually 16 In better brightness 20 Shooting when holding the camcorder by hand Preventing camera shake 32 Following a moving subject 31 Shooting landscapes The sky in vivid colors 20 Colored leaves 41 Vivid green colors 41 Keeping your shot level 53 25 21 16 20 32 31 20 41 41 53 Continued r ...

Страница 64: ...oting clear still images In candle light 29 Holding the camera by hand 28 The same scene with different brightness 36 Scenery with a wide range of brightness 44 Light outdoors shot from a dark interior 44 Capturing the best moment 34 29 28 36 44 44 34 ...

Страница 65: ...tings Your selection is determined when you press the control dial The control dial and v V b B buttons allow you to use various functions of the camcorder v V b B Control dial MENU FOCUS The arrow means you can turn the control dial When options are displayed on the screen you can browse through them by turning the control dial or press the v V b B buttons Press the control dial to make your choi...

Страница 66: ... dial To use the function shown at the lower right corner of the screen press the FOCUS button In this manual the buttons are indicated by the icon or the function shown on the screen The v V b B buttons are assigned with the functions that will be used frequently v DISP Display Contents page 14 V Exposure Comp during recording page 20 Image Index during playback page 48 b WB White Balance page 21...

Страница 67: ...tions on the screen select the desired item and press the control dial to make your choice Shoot Mode Program Auto Allows you to customize settings except for the exposure shutter speed and aperture Hand held Twilight Shoots night scenes with less noise and blur without using a tripod Anti Motion Blur Reduces the camera shake when shooting a slightly dark indoor scene or a telephoto Manual Exposur...

Страница 68: ... the method used to fire the attached flash sold separately DISP Display Contents Switches the information to be displayed on the shooting screen Rec Mode Image Size Movie Rec Mode Selects the image quality Still Image Size Selects the image size Aspect Ratio Selects the aspect ratio Brightness Color Exposure Comp Compensates for the brightness of the entire image Gain Sets the luminous sensitivit...

Страница 69: ...t the composition of images Shoot w o Lens Sets whether or not to record images when there is no lens Red Eye Reduction When using a flash sold separately prevents eyes from being shot in red Auto Review Shows the image right after shooting Main Settings Volume Settings Sets the sound volume of movies Beep Sets the sound produced when you operate the camcorder Language Selects the language used on...

Страница 70: ...Menu Index Still image only Memory Card Tool Format Formats the memory card Recover Image DB Repairs the image database file of movies when inconsistencies are found File Number Selects the method used for assigning file numbers to images ...

Страница 71: ...e Using the menu 1 During shooting MENU button t Camera t Display Contents During playback MENU button t Playback t Display Contents 2 Select the desired mode by turning the control dial During shooting Display Info Shows basic shooting information Histogram Displays the luminance distribution graphically in addition to recording condition No Disp Info Does not show recording information Continued...

Страница 72: ...ows recording information Disp Detail Info Shows detailed recording information No Disp Info Does not show recording information Note z What is histogram The histogram displays the luminance distribution that shows how many pixels of a particular brightness exist in the picture Brighter image will make the entire histogram shift to the right side and darker image to the left side Dark Bright A Num...

Страница 73: ...mporarily This will make focusing easier z Using manual focusing effectively Use manual focusing to record the following subjects A subject behind a window covered with raindrops A subject behind a glass window with horizontal stripes A subject with little contrast between the subject and its background When an object in the foreground is in focus but you want to shift to focus on a subject in the...

Страница 74: ...s the location of the image sensor1 When you measure the exact distance between the camcorder and the subject refer to the position of the line The distance from the lens contact surface to the image sensor is about 18 mm 23 32 in 1 The image sensor is the part of the camcorder that acts as the film If the subject is closer than the minimum shooting distance2 of the attached lens the focus cannot ...

Страница 75: ...g conditions Auto Sets the gain automatically 0dB 3dB 6dB 9dB 12dB 15dB 18dB 21dB 24dB 27dB You can set a larger number and reduce image blur in dark locations or of moving subjects by increasing gain Notes GAIN AUTO z Adjusting Gain ISO Sensitivity Recommended Exposure Index Gain ISO setting is the sensitivity to light of recording media that incorporates an image sensor that receives light Even ...

Страница 76: ...tions ISO AUTO Sets the ISO sensitivity automatically 200 400 800 1600 3200 6400 12800 You can set a faster shutter speed and reduce image blur in dark locations or of moving subjects by increasing ISO sensitivity select a larger number Notes z Adjusting Gain ISO Sensitivity Recommended Exposure Index Gain ISO setting is the sensitivity to light of recording media that incorporates an image sensor...

Страница 77: ...sh sold separately you may not be able to get a satisfactory effect Notes z Adjusting the exposure for better looking images To shoot subjects in brighter tones set a side exposure compensation To make photos of food look more appealing shoot the food a little brighter than usual and try to use a white background When shooting a blue sky setting a side exposure compensation will allow you to captu...

Страница 78: ... option to suit a specific light source the color tones are adjusted for the light source preset white balance Shade Cloudy Incandescent Fluorescent Flash C Temp Filter Adjusts the white balance depending on the light source color temperature Achieves the effect of CC Color Compensation filters for photography Custom Allows to use the white balance setting retained by Custom Setup Custom Setup Mem...

Страница 79: ...ated values color temperature and color filter are displayed 3 To call the custom white balance setting MENU button t Brightness Color t White Balance t Custom If a flash sold separately is used when the PHOTO button is pressed a custom white balance is registered with the flash light taken into account Take pictures with flash in later still image shootings Preset white balance C Temp Filter Colo...

Страница 80: ...button to switch to the playback mode 2 Press the Image Index button 6 image index appears You can switch to 12 image index MENU button t Playback t Image Index 3 To return to the single image playback select the desired image and press the control dial z Switching between the movie and still image On the image index screen you can switch the image type by selecting movie or still image on the lef...

Страница 81: ...amcorder automatically you can set shooting functions such as Gain ISO sensitivity Creative Style White Balance 1 Press the control dial and select Program Auto Or MENU button t Shoot Mode t Program Auto 2 Set the shooting functions to your desired settings 3 Adjust the focus and shoot the subject ...

Страница 82: ...he wide side to the telephoto side 1 Press the control dial and select Aperture Priority Or MENU button t Shoot Mode t Aperture Priority 2 Turn the control dial and select a desired value Smaller F value The subject is in focus but things in front of and beyond the subject is blurred Larger F value The subject and its foreground and background are all in focus 3 Adjust the focus and shoot the subj...

Страница 83: ... on the LCD monitor may differ from the actual image being shot It is difficult to focus automatically at a lower shutter speed Manual focusing with your camcorder attached to a tripod is recommended When recording under fluorescent lamps sodium lamps or mercury lamps the image may flicker or change colors or may have horizontal bands of noise You may be able to improve the situation by adjusting ...

Страница 84: ... of the image on the LCD monitor may differ from the actual image being shot 1 Press the control dial and select Manual Exposure Or MENU button t Shoot Mode t Manual Exposure 2 Press the V botton repeatedly to select shutter speed or aperture Shutter speed and aperture adjustment screens appear alternately Shutter speed Aperture F value 3 Turn the control dial to select the desired value Check the...

Страница 85: ...ts with erratic movement Subjects that are too close to the camcorder Subjects with a repeating pattern such as tiles and subjects with little contrast such as sky sandy beach or lawn Subjects with constant change such as waves or water falls Block noise may occur when using a light source that flickers such as fluorescent lighting Shoot Mode becomes Program Auto when movie recording mode is selec...

Страница 86: ... into 1 still image so camera shake is reduced while preventing noise The shutter clicks 7 times and an image is recorded Reducing blur is less effective when shooting Subjects with erratic movement Subjects that are too close to the camcorder Subjects with a repeating pattern such as tiles and subjects with little contrast such as sky sandy beach or lawn Subjects with constant change such as wave...

Страница 87: ...i Motion Blur Movie recording Multi The camcorder determines which of the 25 AF areas is used for focusing When you press the PHOTO button halfway down in still image recording mode a green frame is displayed around the area that is in focus AF range finder frame Center The camcorder uses the AF area located in the center area exclusively AF range finder frame Flexible Spot Moves the focusing area...

Страница 88: ...HOTO halfway down to activate Single shot AF temporarily This will make focusing easier Single shot AF is selected when using the following functions Self timer Hand held Twilight Anti Motion Blur In Continuous AF mode the audio signals will not sound when the subject is in focus Single shot AF The camcorder focuses and the focus is locked when you press the PHOTO button halfway down Use this when...

Страница 89: ...tions Hand held Twilight Anti Motion Blur Active can be selected when recording movies using a lens with optical SteadyShot complying with Active SteadyShot You cannot set SteadyShot when an E16 mm F2 8 lens sold separately or an A mount lens sold separately is attached Active Uses SteadyShot with more powerful effect Standard Uses SteadyShot Off Does not use SteadyShot This setting is recommended...

Страница 90: ... using the following functions Hand held Twilight Anti Motion Blur Auto HDR Movie recording Single shot Adv Shoots 1 still image Normal shooting mode Continuous Adv Shoots images continuously at high speed while you press and hold down the PHOTO button page 34 Focus and brightness settings of the first shot are used for the following shots Self timer Shoots an image after 10 or 2 seconds page 35 B...

Страница 91: ... while you press and hold down the PHOTO button 1 MENU button t Camera t Drive Mode t Continuous Adv You cannot use Continuous Adv with the following functions Hand held Twilight Anti Motion Blur Auto HDR Focus and brightness settings of the first shot are used for the following shots Notes ...

Страница 92: ... t desired mode You cannot use Self timer with the following functions Hand held Twilight Anti Motion Blur Auto HDR Self timer 10 Sec Sets the 10 second delay self timer When you press the PHOTO button the audio signal sounds until the shutter operates Self timer 2 Sec Sets the 2 second delay self timer This reduces the camera shake caused by pressing the PHOTO button Note ...

Страница 93: ...de only 1 MENU button t Camera t Drive Mode t Bracket Cont 2 Option t desired mode You cannot use Bracket Cont with the following functions Hand held Twilight Anti Motion Blur Auto HDR The last shot is shown on the auto review In Manual Exposure the exposure is shifted by adjusting the shutter speed When you adjust the exposure the exposure is shifted based on the compensated value The noise reduc...

Страница 94: ... slowing the shutter speed Rear Sync Allows you to shoot a natural image of the trail of a moving subject such as a moving car or a walking person The flash fires right before the exposure is completed Note z Using an external flash Make sure that you use a Sony external flash sold separately There are certain Sony flashes or functions that cannot be used with your camcorder For the compatibility ...

Страница 95: ...on t Rec Mode Image Size t Rec Mode t desired mode You cannot create an AVCHD disc from a movie recorded with FX 24M mode Save a movie recorded with FX 24M mode onto a Blu ray Disc page 73 Mode Image size Average bit rate FX 24M 1920 1080 24 Mbps max FH 17M 1920 1080 17 Mbps HQ 9M 1440 1080 9 Mbps Note ...

Страница 96: ...recorded 1 MENU button t Rec Mode Image Size t Image Size t desired mode When you print still images recorded with 16 9 aspect ratio both edges may be cut off Image size when Aspect Ratio is 3 2 Usage guidelines L 14M 4592 3056 pixels For prints up to A3 size M 7 4M 3344 2224 pixels For prints up to A4 size S 3 5M 2288 1520 pixels For prints L 2L size Image size when Aspect Ratio is 16 9 Usage gui...

Страница 97: ...mple images Menu Index Aspect Ratio Sets the aspect ratio of still images 1 MENU button t Rec Mode Image Size t Aspect Ratio t desired mode 3 2 Standard aspect ratio Suitable for prints 16 9 For viewing on a high definition TV ...

Страница 98: ...nd subjects such as flowers spring greenery blue sky or ocean views Portrait For shooting the skin color in a soft tone ideally suited for shooting portraits Landscape The saturation contrast and sharpness are heightened for shooting vivid and crisp scenery Distant landscapes also stand out more Sunset For shooting the beautiful red of the setting sun Black White For shooting images in black and w...

Страница 99: ...vie recording Multi Measures light on each area after dividing the total area into multiple areas and determines the proper exposure of the entire screen Multi pattern metering Center Measures the average brightness of the entire screen while emphasizing the central area of the screen Center weighted metering Spot Measures only the central area Spot metering This function is useful when the subjec...

Страница 100: ...er and images darker You cannot use Flash Compensation with the following functions Hand held Twilight Anti Motion Blur when no flash is attached Movie recording The higher flash effect may not be visible due to the limited amount of flash light available if the subject is outside the maximum range of the flash If the subject is very close the lower flash effect may not be visible Notes z Tips to ...

Страница 101: ...by checking the recorded image especially when you enhance the effect Off Does not use DRO Auto HDR D Range Opt By dividing the image into small areas the camcorder analyzes the contrast of light and shadow between the subject and the background producing the image with the optimal brightness and gradation Auto HDR Shoots 3 images with different exposures and then overlays the bright area of the u...

Страница 102: ...ss or does not blink Do not recompose You may not obtain a desired effect depending on the luminance difference of a subject and the shooting conditions When a flash is used this function has little effect When the contrast of the scene is low or when significant camera shake or subject blur has occurred you may not obtain good HDR images If the camcorder detects such situation is indicated on the...

Страница 103: ...red mode You can select up to 100 images Multiple Movies Deletes the selected movies Press the control dial to confirm Select and OK Multiple Still Images Deletes the selected still images Press the control dial to confirm Select and OK Note z To delete an image It is easier to delete an image displayed on the screen by pressing the FOCUS button ...

Страница 104: ...ayback t Movie Still Select t desired mode You cannot display movies and still images on the same index screen Movie Displays the movie Still Displays the still image Note z Switching between the movie and the still image You can switch the image type on the image index easily Select movie or still image on the left of the screen ...

Страница 105: ...utton t Playback t Image Index t desired mode 6 Images Displays 6 images 12 Images Displays 12 images z Switching between the movie and the still image You can switch the image type on the image index easily Select movie or still image on the left of the screen You cannot display movie and still image on the same index screen ...

Страница 106: ... protect up to 100 images at a time Multiple Movies Applies or cancels the protection of the selected movies Press the control dial to confirm Select and OK Cancel All Movies Cancels the protection of all movies Multiple Still Images Applies or cancels the protection of the selected still images Press the control dial to confirm Select and OK Cancel All Images Cancels the protection of all still i...

Страница 107: ...layback t Still Slide Show t desired mode t OK You cannot pause the slide show To stop the slide show press the control dial Repeat On Plays back images in a continuous loop Off After all the images have been played back the slide show ends Interval 1 Sec Sets the display interval of images 3 Sec 5 Sec 10 Sec 30 Sec Note ...

Страница 108: ...n t Playback t Enlarge Still image 2 Adjust the scaling by turning the control dial 3 Select the portion you want to enlarge by pressing the v V b B button 4 To cancel the operation press Exit You cannot enlarge the movies Note z Scaling range The scaling range depends on the image size Image size Scaling range L Approx 1 1 13 M Approx 1 1 10 S Approx 1 1 6 7 ...

Страница 109: ... you record the sound during movie recording 1 MENU button t Setup t Movie Audio Rec t desired setting When Off is selected the camcorder does not record sound from either the built in microphone or an external microphone sold separately On Records sound Off Does not record sound Note ...

Страница 110: ...u Index Grid Line Sets whether the grid line is displayed or not The grid line will help you to adjust the composition of images 1 MENU button t Setup t Grid Line t desired setting On Displays the grid line Off Does not display the grid line ...

Страница 111: ... Lens Sets whether or not the recording can be started when no lens is attached 1 MENU button t Setup t Shoot w o Lens t desired setting Enable Allows you to use non Sony E mount lenses and mount adaptors Disable Recording starts only when a lens is attached ...

Страница 112: ...ends on individual differences and conditions such as distance to the subject or if the subject looked away from the pre strobe There are certain flash units that you cannot use with Red Eye Reduction For the compatibility of a particular flash unit consult your Sony dealer or local authorized Sony service facility On A flash always strobes to reduce the red eye phenomenon Off Does not use Red Eye...

Страница 113: ...nu Index Auto Review You can check the recorded image right after the shooting This item is available in still image recording mode only 1 MENU button t Setup t Auto Review t desired setting 2 Sec Displays for 2 seconds Off Does not display ...

Страница 114: ... movies in 16 steps You can check the sound that is actually recorded using headphones etc 1 MENU button t Setup t Volume Settings t desired value Or press MENU while recording or playing back movies t desired value This adjustment does not change the volume of the actual recorded sound Note ...

Страница 115: ...ample images Menu Index Beep Sets whether or not the beep sounds 1 MENU button t Setup t Beep t desired setting On The beep sounds when the subject comes into focus during countdown of the self timer etc Off Turns off the beep ...

Страница 116: ...59GB Table of contents Sample images Menu Index Language Selects the language to be used in the menu items warnings and messages 1 MENU button t Setup t Language t desired language ...

Страница 117: ...der does not have a feature for superimposing dates on still images By using PMB in the CD ROM supplied you can print or save still images with the date 1 MENU button t Setup t Date Time Setup 2 Set the date time etc Daylight Svg Selects ON or OFF Date Format Selects the date and time display format Note ...

Страница 118: ...enu Index Area Setting Sets the area where you are using the camcorder This allows you to set the local area when you use the camcorder abroad 1 MENU button t Setup t Area Setting t desired setting 2 Press the b B buttons to select an area ...

Страница 119: ...urns the camcorder to the shooting mode 1 MENU button t Setup t Power Save t desired setting Turn off the camcorder when you do not use it for a long time When the camcorder is connected to a wall outlet wall socket the power save mode is set to Off 5 Min Switches to power save mode after about 5 minutes Off Does not switch to power save mode Notes ...

Страница 120: ...e images Menu Index LCD Brightness Sets the brightness of the LCD monitor in 5 steps between 2 and 2 1 MENU button t Setup t LCD Brightness t desired value You can adjust LCD Brightness only when the LCD monitor is turned on Note ...

Страница 121: ...mages Menu Index Viewfinder Bright Sets the brightness of the viewfinder in 3 steps between 1 and 1 1 MENU button t Setup t Viewfinder Bright t desired value You can adjust Viewfinder Bright only when the viewfinder is turned on Note ...

Страница 122: ...er into the cavity beyond the mount so that the tip of the blower does not touch the image sensor Hold the camcorder s face downward to prevent the dust from resettling in the camcorder Do not apply a mechanical shock to the camcorder during cleaning 1 MENU button t Setup t Cleaning Mode t OK The message After cleaning turn camera off Continue appears 2 Confirm OK The anti dust is activated automa...

Страница 123: ...n of your camcorder and lens Confirm the version when a firmware update is released 1 MENU button t Setup t Version An update can be performed only when the battery level is 3 remaining battery icons or more We recommend that you use a sufficient battery or the AC Adaptor Note ...

Страница 124: ...here is only one movie on the memory card Select Off when you do not want to see the demonstration 1 MENU button t Setup t Demo Mode t desired setting On If there is only one movie on the memory card the demonstration begins automatically when the camcorder is not operated for about 1 minute Off Does not show the demonstration ...

Страница 125: ...ializes the setting to the default setting Even if you activate Reset Default the images are retained 1 MENU button t Setup t Reset Default t OK Be sure not to turn off the camcorder while resetting The settings of Date Time Setup and Area Setting are not reset Notes ...

Страница 126: ...matting permanently erases all data on the memory card and is unrecoverable Save precious data on a computer etc 1 MENU button t Setup t Format t OK Formatting permanently erases all data including even protected images During the format the access lamp lights up Do not eject the memory card while the lamp is lit Format the memory card using the camcorder If you format it on a computer the memory ...

Страница 127: ...omputers etc movies will not be recorded or played back If this happens the camcorder repairs the file 1 MENU button t Setup t Recover Image DB t OK The Recover Image DB screen is displayed and the camcorder repairs the file Wait as it is until repairing is completed Use a sufficiently charged battery Low battery power during repairing can cause damage to data Note ...

Страница 128: ...ill image files and assigns numbers to files in sequence until the number reaches 9999 Reset Resets numbers of still image files in the following cases and assigns numbers to files from 0001 When the recording folder contains a file a number incremented one higher than the largest number is assigned When all the images in the folder are deleted When the memory card is replaced When the memory card...

Страница 129: ...efinition image quality HD on a Blu ray Disc Blu ray Disc playback devices Blu ray Disc player PlayStation 3 etc to save movies in high definition image quality HD on a DVD AVCHD format playback devices Sony Blu ray Disc player PlayStation 3 etc to save movies in standard definition image quality STD on a DVD for distribution Ordinary DVD playback devices DVD player DVD playable computer etc Notes...

Страница 130: ...rt the creation of a Blu ray Disc Connect your computer to the Internet when you install BD Add on Software BD R non rewritable and BD RE rewritable media can be used to create a Blu ray Disc You cannot add contents to either type of disc once it has been created It may take a long time to create a Blu ray Disc You can create an AVCHD disc from AVCHD format movies imported to a computer using the ...

Страница 131: ...en to create the disc Install PMB beforehand It will take a longer time to create a disc because AVCHD format movies are converted to standard definition image quality STD movies An Internet connection environment is required when creating a DVD Video STD disc for the first time Creating a standard definition image quality STD DVD Notes z Playing an AVCHD disc on a computer You can play back an AV...

Страница 132: ...Save a movie recorded with FX 24M mode onto a Blu ray Disc page 73 Use the USB cable to connect the camcorder to a disc creation device which is compatible with high definition image quality HD movies Refer also to the instruction manuals supplied with the device to be connected Connect your camcorder to the wall outlet wall socket using the AC Adaptor for this operation Do not disconnect the USB ...

Страница 133: ... battery pack is too warm the camcorder displays a warning message and turns off automatically to protect the camcorder If you do not operate the camcorder for 5 minutes or more the camcorder turns to power save mode To cancel the power save mode operate the camcorder such as opening closing the LCD panel page 62 The CHARGE lamp flashes when charging the battery pack on the supplied battery charge...

Страница 134: ...recordable capacity of the camcorder Delete unnecessary images page 46 The lens is not attached correctly Reattach the lens The access lamp remains lit even after recording was stopped The camcorder is recording the image you have just shot on the memory card The actual recording time for movies is less than the estimated recording time of the memory card Depending on the recording conditions the ...

Страница 135: ... Adjust the setting again The image is whitish Flare Blurring of light appears on the image Ghosting The picture was taken under a strong light source and excessive light has entered the lens When using the zoom lens attach a lens hood The corners of the picture are too dark Take off the filter or hood Depending on the thickness of the filter and improper attachment of the hood the filter or the h...

Страница 136: ...y images that are stored on a computer on your camcorder copy the images to your camcorder first using PMB Images recorded on other devices may not be played back or displayed in incorrect size This is not a malfunction Images cannot be played back on the TV The camcorder outputs signals to a TV via the HDMI terminal only Connect the camcorder to the TV using an HDMI cable sold separately Cannot d...

Страница 137: ... Moisture condensation has occurred Turn off the camcorder and leave it for about an hour before using it The image in the viewfinder is not clear Move the viewfinder lens adjustment lever until the image appears clearly No image is displayed on the LCD monitor or the viewfinder The camcorder displays images on the LCD monitor or the viewfinder not both of them Select the LCD monitor or the viewfi...

Страница 138: ... indicated on the screen Remove the memory card and insert it again If this procedure does not turn off the indication format the memory card page 69 Recovering data Please wait is indicated on the screen and recording stops Recording and deleting data has been repeated too many times on the memory card or the memory card was formatted on another device Save the data on the hard disk of a computer...

Страница 139: ... inserted or the format has failed Reinsert memory card The inserted memory card cannot be used in your camcorder The memory card is damaged The terminal section of the memory card is dirty This memory card may not be capable of recording and playing normally The inserted memory card cannot be used in the camcorder Processing Long exposure noise reduction will be done for the same amount of time t...

Страница 140: ... while The SteadyShot function does not work You can continue recording but the SteadyShot function will not work Turn the camcorder off and on If this icon does not disappear consult your Sony dealer or local authorized Sony service facility Total number of movie scenes exceeds the recordable capacity of the camcorder Unable to register to the database file Import all the images to a computer usi...

Страница 141: ...images Menu Index No images selected You attempted to delete without specifying images Cannot create more folders The folder with a name beginning with 999 exists on the memory card You cannot create any folders if this is the case ...

Страница 142: ...put signal system of the camcorder Countries regions that use each television system are as follows 1080 60i NTSC Bahama Islands Bolivia Canada Central America Chile Colombia Ecuador Jamaica Japan Korea Mexico Peru Surinam Taiwan the Philippines the U S A Venezuela etc 1080 50i PAL Australia Austria Belgium China Croatia Czech Republic Denmark Finland Germany Holland Hong Kong Hungary Indonesia It...

Страница 143: ...ot on a digital video camera recorder to be recorded on 8 cm DVD discs hard disk drive flash memory memory card etc Recording and playback on your camcorder Based on the AVCHD format your camcorder records with the high definition image quality HD mentioned below Video signal3 1080 60i compatible device MPEG 4 AVC H 264 1920 1080 60i 1440 1080 60i 1080 50i compatible device MPEG 4 AVC H 264 1920 1...

Страница 144: ...o not attach a label on the memory card itself nor on a memory card adaptor Do not touch the terminal section of the memory card with your hand or a metal object Do not strike bend or drop the memory card Do not disassemble or modify the memory card Do not expose the memory card to water Do not leave the memory card within the reach of small children They might accidentally swallow it The memory c...

Страница 145: ... encryption technology Data recording playback that requires MagicGate functions cannot be performed with this camcorder 2 Supports high speed data transfer using a parallel interface 3 When using Memory Stick PRO Duo media to record movies only those marked with Mark2 can be used Memory Stick media Memory Stick PRO Duo media1 2 3 Available with your camcorder Memory Stick PRO HG Duo media1 2 Memo...

Страница 146: ...ots before taking the actual shots Do not expose the battery pack to water The battery pack is not water tight Do not leave the battery pack in extremely hot places such as in a car or under direct sunlight How to store the battery pack Fully discharge the battery pack before storing and store it in a cool dry place To maintain the battery pack s function charge the battery pack and then fully dis...

Страница 147: ... When the CHARGE lamp flashes fast again this may indicate a battery error or that a battery pack other than the specified type has been inserted Check that the battery pack is the specified type If the battery pack is the specified type remove the battery pack replace it with a new one or another one and check if the battery charger operates correctly If the battery charger operates correctly a b...

Страница 148: ...g instructions supplied with the Mount Adaptor When an A mount lens is attached you cannot use the auto focus function You may not be able to use certain A mount lenses For the compatibility of a particular A mount lens visit the Sony web site in your area or consult your Sony dealer or local authorized Sony service facility The continuous shooting speed of still images will be slower Notes ...

Страница 149: ... products such as thinner benzine alcohol disposable cloths insect repellent sunscreen or insecticide etc Do not touch the camcorder with the above on your hand Do not leave the camcorder in contact with rubber or vinyl for a long time Do not use a cleaning solution containing organic solvents such as thinner or benzine When cleaning the lens surface remove dust using a commercially available blow...

Страница 150: ... Creative Style 41 Custom white balance 22 D Date Format 60 Date Time Setup 60 Daylight Svg 60 Delete 46 Demo Mode 67 Direct Manual Focus 16 Disc creation 72 DISP 14 Display Contents 14 DMF 16 D Range Opt 44 Drive Mode 33 DRO Auto HDR 44 E Enlarge Still image 51 Exposure Comp 20 F FH 38 File Number 71 Fill flash 37 Flash 37 Flash Compensation 43 Flash Mode 37 Flexible Spot 30 Format 69 FX 38 G Gai...

Страница 151: ...e 62 Preset white balance 22 Program Auto 24 Protect 49 R Rear Sync 37 Rec Mode 38 Recover Image DB 70 Red Eye Reduction 55 Reset Default 68 S Saturation 41 Self timer 35 Setup 12 Sharpness 41 Shoot w o Lens 54 Shutter Priority 26 Shutter speed 26 Single shot AF 31 Slow Sync 37 Spot 42 SteadyShot 32 Still Slide Show 50 T Troubleshooting 76 V Version 66 Viewfinder Bright 64 Volume Settings 57 W War...

Страница 152: ...BTAINED FROM A VIDEO PROVIDER LICENSED TO PROVIDE AVC VIDEO NO LICENSE IS GRANTED OR SHALL BE IMPLIED FOR ANY OTHER USE ADDITIONAL INFORMATION MAY BE OBTAINED FROM MPEG LA L L C SEE HTTP WWW MPEGLA COM On GNU GPL LGPL applied software The software that is eligible for the following GNU General Public License hereinafter referred to as GPL or GNU Lesser General Public License hereinafter referred t...

Страница 153: ...seur Lorsqu il est difficile de voir l image dans le viseur utilisez le grand œilleton de viseur Pour fixer le grand œilleton de viseur alignez le avec la rainure de l œilleton de viseur du viseur avec la protubérance a vers le haut Español Accesorios suministrados El siguiente accesorio se suministra además de los que se indican en Accesorios suministrados en el Guía de operaciones Semiesfera del...

Страница 154: ... wiedergegeben werden 2009 Sony Corporation Printed in Japan 4 156 305 01 1 111111 III II 4156305010 SONY AVCHD7 A O iij O BJ I J L DVD7LJ tJ DVDLJ J 7 lct AVCHDm f L J Go ic6b rPMBJ j1iG 1it1 J CfFPX GicAVCH DO T A71it C ttfvo AVCHDO T A71ctDVD7LJ tJ DVDu J 7 ILAtlteJ UC iC 2 l lo T A70 O G C teJ C O 90 AVCHDO T A71ct AVCHDm f IL J G Gic 7 JIJ U 1T A77u tJ LJ J 7 td cC C 9 0 English Notes on comp...

Страница 155: ...r le capteur d image nettoyez le en utilisant la fonction Mode nettoyage dans le menu Réglage Ensuite éteignez le caméscope et retirez l objectif Nettoyez le capteur d image et les parties autour avec un pinceau soufflant disponible dans le commerce puis fixez de nouveau l objectif Chargeur de batterie Utilisez la batterie après la fin d une charge normale ou d une charge complète Si vous utilisez...

Страница 156: ...1ll 1 a 1ft 8i P n ed kn Jopon Imprlr t ben IOpon J np esoenJop6n C201 oSonv Co POfQ lon 4 263 090 01 IUllfJ FIi URlI T IJU r il iAi 1il 1 1 J A r o llIl Cfeote stykll T O ll e wtth special effecls orod IfOl lhorlll FO f IITIpIe OI ld FREE lor Sony NEX YGIO CUSIOlT 8fS C oor des Iilrm HollywooOlllf 5 cvec effeu x el Irol Slllon oMgonokn Srnpre oplde el offllfl pour roul oeMI du ope NEX YG10 Creo p...

Страница 157: ......

Страница 158: ......

Страница 159: ...RS ONLY CLIENTS DU CANADA SEUlEMENT Recefye your next purchase of select Digital Imaging accessories SONY CANADIAN CUSTOMERS ONLY CLIENTS DU CANADA SEUlEMENT Recefye your next purchase of select Digital Imaging accessories ...

Страница 160: ...SONY make believe SONY make believe ...

Страница 161: ...2 I IUt b u r Mar MaIJl 071 Aoerln f22 Dore 1CIl u 211 2 29f l2 162 0 22 5Imij Wf9It WOl 2 W III 167 Foc IIWl 0U III 10 25 AiJad T II U 0 3 Ouwer n an F22 f12 Dwta lDIl l J 211 2 2318110 162 60_ PIldI 6 111 orlll94 01 E18 S5mm F3 S S 6 OSS Min IOCUll 082 n O 25m Max Mag llllClltlOn 0 3 M n e F22 F32 llwner ons I U 2 1 2 2 3J8 it 62 0QIMl W Ight Approl 61180 1 194 1 SEL1855 SEL16F28 FlaM _ o aIII 2...

Страница 162: ... 44 mm f OIlI5 lWOIl 5 3 on 115O J 1lWlS les 1 iIlllJC 1OOS1 61 8 t II l II 66X 4 Yn I I J l i til 03 VCL ECFl MiIgi 0 62 OMT 1Qa U AQpoI 2518 1104 II 166 441D111 We9tt AlJprox 5 3 Cll115Ogl eadudng caps a r 0 62 0Imel 10IJ U d envwtI1 2518 1314 pG 66 44 mm f OIlI5 lWOIl 5 3 on 115O J 1lWlS les 1 iIlllJC 1OOS1 61 8 t II l II 66X 4 Yn I I J l i til 03 ...

Страница 163: ... 11 161 0 165 2156 f lldI _3 9Gl11110Illgl clell pu I fP l I O I 5 3 an I1SO IIliMIC ane peg Wl J lI LA EA1 DI IO LJ tqml 2 1 U1611L 1li6 215 mo Y 390l1110 ll a alIa Iil 530l 15Oa1 alIa I_f I llIl lQI U __ 2 s t 11 161 0 165 2156 f lldI _3 9Gl11110Illgl clell pu I fP l I O I 5 3 an I1SO IIliMIC ane peg Wl J lI ...

Страница 164: ...ttt Eus 0 CtJl Fundas 1 1 _1 _ O I VF 49MPAM 67MPAM wePlCMtb YC SdWlilIl r Pr MdlOiI Me Pml C1tIr Me 05 _ _ It_ _ II II II I VF 49CPAM 67CPAM C1nu PI FtIIer MuIaref IliMer f llle PI clrt1llaue f Ira PI CIrClU I VF 49NDAM 67NDAM NO Filler NO Fil ef Fdlre NO MIlIa NO NOt I lCl 140AM 90AM 60AM lei ll e otlttt Eus 0 CtJl Fundas 1 1 _1 _ O I VF 49MPAM 67MPAM wePlCMtb YC SdWlilIl r Pr MdlOiI Me Pml C1tI...

Страница 165: ...3KA GI S UM Kit MOPS Kit de Umdild GI S u GPS Emplaoger til 1t g I VCT R640 Tripod SlaW TrI 9led Trl Accessories Accessoires Accesorios Zubehtir lie1 Soft CSmng case tlousse de Ifanspolt souple lloIsa de TlilfIS lOrte FIe lllle LCS VCD 1 W i2Om 1IVl iIJIal ll23llIra IlIOg JllI iFii III IMOHO I ECM CG50 Shotgun MII rophooe MICf llhooe canon MiCf6looo de pistola Nelztelll1 adegeral If J Ii aIRII IIo...

Страница 166: ...to lock Accessory Shoe __1DCIc IaoslIolryShoo _ _ _1 _ _ z _ lo _ _ _ ILJllll oltscl o g Il JI1ill 07 10 _ I BLT l10 _ BarKloullere SCilollergurt U Gi il i1ll I I HVL F58AM Flash f1j11l I HVL F58AM I FA EB1AM ExtemaI8alleryAo IapIa fly Rasll apies extemeIlCU Ililsl1 train tll mil pn ftIsh Ext nlI8atlti U Ii IlIlI IJIt ti oBlu tooth MOHO I ECM AW3 WifeleSS Micfopllooe Mltrop looe sans hi MK nll0n0 ...

Страница 167: ...style ca fr Printed in Japan Imprime en Japon Impreso en Jap6n 201 0Sony Corporation 4 260 168 01 2l All rights reserved Reproduction in whole or part is prohibited Not all models are available in all countries regions Some models are only available at SonyStyle Store in some regions Some pictures used in this leaflet are image photos Features and specifications in this leaflet are subject to chan...

Страница 168: ...her rights which vary from state to state 4 557 156 14 11111111111111111111111111111 Printed in Japan ICamcorder LIMITED WARRANTV usOn y Sony Electronics Inc Sony warrants this product against defects in material or workmanship for the time periods and as set forth below when purchased directly from Sony or a Sony Retailer Pursuant to this Limited Warranty Sony will at its option i repair the prod...

Отзывы: