background image

6

GB

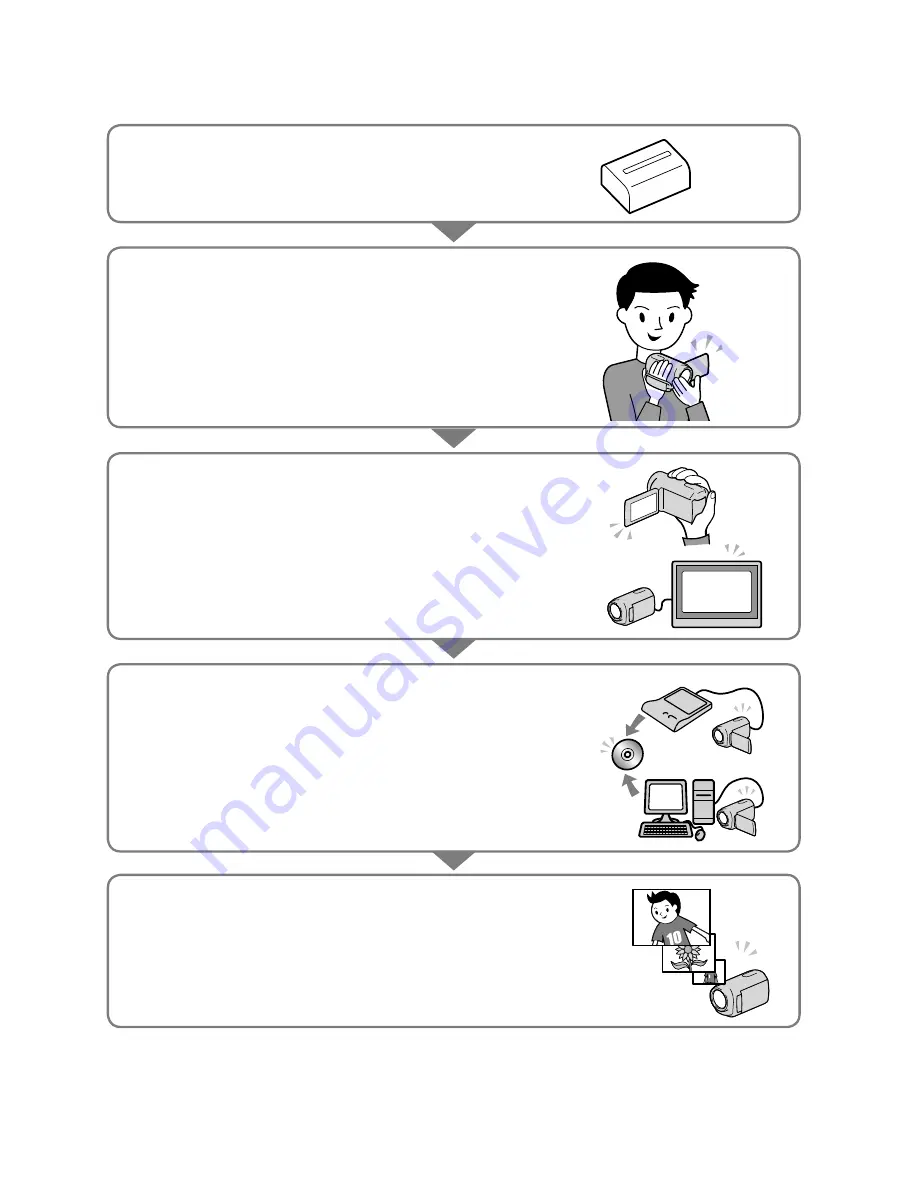
Operation flow

Getting started (p. 12)

Prepare the power source and memory card.

Recording movies and photos (p. 20)

Recording movies 

 

p. 20

 Changing the recording mode (p. 25)

 Expected recording time (MEDIA INFO, p. 79)

Shooting photos 

 

p. 22

Playing movies and photos

Playback on the camcorder 

 

p. 28

Playing images on a TV 

 

p. 36

Saving images

Saving movies and photos with a computer

Saving movies and photos in external media 

 

p. 52

Saving images with a DVD writer/recorder 

 

p. 54

Deleting movies and photos (p. 39)

If you delete the image data that has been saved on your 

computer or a disc, you can record new images on the free 

media space again.

Содержание Handycam HDR-CX300

Страница 1: ...4 171 504 12 1 Digital HD Video Camera Recorder ˏ 2010 Sony Corporation Operating Guide US Guía de operaciones ES HDR CX300 CX350 CX350V CX370 XR350 XR350V ...

Страница 2: ...d do not expose the unit to rain or moisture Do not expose the batteries to excessive heat such as sunshine fire or the like This symbol is intended to alert the user to the presence of uninsulated dangerous voltage within the product s enclosure that may be of sufficient magnitude to constitute a risk of electric shock to persons This symbol is intended to alert the user to the presence of import...

Страница 3: ...et consult an electrician for replacement of the obsolete outlet Protect the power cord from being walked on or pinched particularly at plugs convenience receptacles and the point where they exit from the apparatus Only use attachments accessories specified by the manufacturer Use only with the cart stand tripod bracket or table specified by the manufacturer or sold with the apparatus When a cart ...

Страница 4: ...A 1 15P plug rated for 125 V 15 A Europe Countries regions Voltage Frequency Hz Plug type Austria 230 50 C Belgium 230 50 C Czech 220 50 C Denmark 230 50 C Finland 230 50 C France 230 50 C Germany 230 50 C Greece 220 50 C Hungary 220 50 C Iceland 230 50 C Ireland 230 50 C BF Italy 220 50 C Luxemburg 230 50 C Netherlands 230 50 C Norway 230 50 C Poland 220 50 C Portugal 230 50 C Romania 220 50 C Ru...

Страница 5: ...60 A Jamaica 110 50 A Mexico 120 127 60 A Nicaragua 120 240 60 A Panama 110 220 60 A South America Countries regions Voltage Frequency Hz Plug type Argentina 220 50 C BF O Brazil 127 220 60 A C Chile 220 50 C Colombia 120 60 A Peru 220 60 A C Venezuela 120 60 A Middle East Countries regions Voltage Frequency Hz Plug type Iran 220 50 C BF Iraq 220 50 C BF Israel 230 50 C Saudi Arabia 127 220 50 A C...

Страница 6: ...he specified type only Otherwise fire or injury may result AC Adaptor Do not use the AC Adaptor placed in a narrow space such as between a wall and furniture Use the nearby wall outlet wall socket when using the AC Adaptor Disconnect the AC Adaptor from the wall outlet wall socket immediately if any malfunction occurs while using your camcorder Even if your camcorder is turned off AC power source ...

Страница 7: ...ion Declaration of Conformity Trade Name SONY Model No HDR XR350V Responsible Party Sony Electronics Inc Address 16530 Via Esprillo San Diego CA 92127 U S A Telephone No 858 942 2230 This device complies with Part 15 of the FCC Rules Operation is subject to the following two conditions 1 This device may not cause harmful interference and 2 this device must accept any interference received includin...

Страница 8: ... Commander Rechargeable battery pack NP FV50 1 CD ROM Handycam Application Software 1 p 37 PMB software including PMB Help Handycam Handbook PDF Operating Guide This manual 1 See page 21 for the memory card you can use with this camcorder Using the camcorder Do not hold the camcorder by the following parts and also do not hold the camcorder by the jack covers Shoe cover LCD Screen Battery pack The...

Страница 9: ...trary to the copyright laws Notes on playing back The camcorder is compatible with MPEG 4 AVC H 264 High Profile for high definition image quality HD recording Therefore you cannot play back images recorded with high definition image quality HD on the camcorder with the following devices Other AVCHD format compatible devices which are not compatible with High Profile Devices which are not compatib...

Страница 10: ...ng MENU Show others MEDIA FORMAT under MANAGE MEDIA category the desired medium YES YES Notes on optional accessories We recommend using genuine Sony accessories Genuine Sony accessories may not be available in some countries regions About this manual illustrations and on screen displays The example images used in this manual for illustration purposes are captured using a digital still camera and ...

Страница 11: ...arately do not crash the camcorder against an object Do not use your camcorder in very loud areas On the drop sensor HDR XR350 XR350V To protect the internal hard disk from shock by dropping the camcorder has a drop sensor function When a drop occurs or under a non gravity condition the block noise made when this function is activated by the camcorder may also be recorded If the drop sensor catche...

Страница 12: ...hotos p 26 Playing movies and photos Playback on the camcorder p 28 Playing images on a TV p 31 Saving images Saving movies and photos with a computer p 36 Saving movies and photos in external media p 47 Saving images with a DVD writer recorder p 49 Deleting movies and photos p 34 If you delete the image data that has been saved on your computer or a disc you can record new images on the free medi...

Страница 13: ...nformation using the GPS HDR CX350V XR350V 27 Playback on the camcorder 28 Playing images on a TV 31 Making good use of your camcorder Deleting movies and photos 34 Saving movies and photos with a computer Preparing a computer Windows 36 When using a Macintosh 37 Starting PMB Picture Motion Browser 39 Selecting the method for creating a disc computer 40 Creating a disc with one touch One Touch Dis...

Страница 14: ...7 Creating a disc with a DVD writer recorder 49 Customizing your camcorder Using menus 56 Getting detailed information from the Handycam Handbook 63 Additional information Troubleshooting 64 Precautions 66 Specifications 68 Quick reference Screen indicators 73 Parts and controls 74 Index 77 ...

Страница 15: ...CX300 CX350 CX350V CX370 HDR XR350 XR350V Battery pack CHG flash charge lamp AC Adaptor To the wall outlet wall socket Power cord Mains lead DC plug DC IN jack Battery pack DC IN jack DC plug Power cord Mains lead To the wall outlet wall socket AC Adaptor CHG flash charge lamp ...

Страница 16: ...ll socket Align the mark on the DC plug with that on the DC IN jack The CHG flash charge lamp lights up and charging starts The CHG flash charge lamp turns off when the battery pack is fully charged 4When the battery is charged disconnect the AC Adaptor from the DC IN jack of your camcorder Tips See page 70 on recording and playing time When your camcorder is on you can check the approximate amoun...

Страница 17: ... sold separately it is recommended that you use an NP FV70 or NP FV100 battery pack We do not recommend using an NP FV30 which only allows short recording and playback times with your camcorder In the default setting the power turns off automatically if you leave your camcorder without any operation for about 5 minutes to save battery power A SHUT OFF Notes on the AC Adaptor Use the nearby wall ou...

Страница 18: ...POWER 2Select the desired geographical area with then touch NEXT To set the date and time again touch MENU Show others CLOCK LANG under GENERAL SET category CLOCK SET When an item is not on the screen touch until the item appears 3Set DST SET or SUMMERTIME date and time then touch The clock starts If you set DST SET or SUMMERTIME to ON the clock advances 1 hour Touch the button on the LCD screen M...

Страница 19: ...utomatically adjusted with AUTO CLOCK ADJ and AUTO AREA ADJ set to ON The clock may not be adjusted to the correct time automatically depending on the country region selected for your camcorder In this case set AUTO CLOCK ADJ and AUTO AREA ADJ to OFF HDR CX350V XR350V To turn off the power Close the LCD screen The Movie lamp flashes for a few seconds and the power is turned off Tips You can turn o...

Страница 20: ... media You can perform recording playback and editing operations on the selected medium Tips See page 70 for the recordable time of movies Selecting the recording media for movies Touch MENU Show others MEDIA SETTINGS under MANAGE MEDIA category MOVIE MEDIA SET The MOVIE MEDIA SET screen appears Touch the desired recording media Touch YES The recording medium is changed Selecting the recording med...

Страница 21: ...ark2 media Memory Stick PRO HG Duo media SD memory cards Class 4 or faster and SDHC memory cards Class 4 or faster can be used with this camcorder A MultiMediaCard cannot be used with this camcorder In this manual Memory Stick PRO Duo Mark2 media and Memory Stick PRO HG Duo media are called Memory Stick PRO Duo media Memory cards of up to 32 GB have been verified to operate with your camcorder Mem...

Страница 22: ...ged Notes If Failed to create a new Image Database File It may be possible that there is not enough free space is displayed format the memory card by touching MENU Show others MEDIA FORMAT under MANAGE MEDIA category MEMORY CARD YES YES To eject the memory card Open the cover and lightly push the memory card in once Do not open the cover during recording When inserting or ejecting the memory card ...

Страница 23: ...l hard disk Tips To change the recording media see page 20 1Fasten the grip belt 2Open the LCD screen of your camcorder Your camcorder is turned on and the lens cover is opened To turn on your camcorder when the LCD screen is already open press POWER p 18 You can switch recording modes by pressing MODE Press MODE to light up the desired recording mode lamp MODE button Movie When recording a movie ...

Страница 24: ...r after turning on your camcorder or switching the recording movie photo playback modes To display the icons and indicators again touch anywhere on the screen except the rec zoom buttons on the LCD Notes If you close the LCD screen while recording movies the camcorder stops recording The maximum continuous recordable time of movies is about 13 hours When a movie file exceeds 2 GB the next movie fi...

Страница 25: ...utter You can capture photos from recorded movies You can check the recordable time estimated remaining capacity etc by touching MENU Show others MEDIA INFO under MANAGE MEDIA category The LCD screen of your camcorder can display recording images across the entire screen full pixel display However this may cause slight trimming of the top bottom right and left edges of images when played back on a...

Страница 26: ...ouching on the LCD screen When disappears the photo is recorded Tips You can check the recordable number of photos on the LCD p 73 To change the image size touch MENU Show others IMAGE SIZE under PHOTO SETTINGS category a desired setting You cannot record photos while is displayed Your camcorder flashes automatically when there is insufficient ambient light The flash does not work in the movie rec...

Страница 27: ... changes according to the strength of GPS signal reception Make sure that the GPS switch is set to OFF during take off and landing of an airplane Processing time can be shortened when you load the GPS assist data into the camcorder using the supplied software PMB Install PMB on your computer P 37 and connect the computer to the internet Then connect the camcorder to the computer and the GPS assist...

Страница 28: ...n on your camcorder when the LCD screen is already open press POWER p 18 2Press VIEW IMAGES The VISUAL INDEX screen appears after some seconds You can display the VISUAL INDEX screen also by touching VIEW IMAGES on the LCD screen 3Touch or a desired movie to playback a movie Touch the Photo a desired photo to view a photo Movies are displayed and sorted by recording date Switches operating button ...

Страница 29: ...ovie reaches the last movie the screen returns to the INDEX screen Touch during pause to play back movies slowly As you repeat touching during playback movies are played as fast as about 5 times about 10 times about 30 times about 60 times You can also display the VISUAL INDEX by touching MENU Show others VISUAL INDEX under PLAYBACK category The recording date time and shooting conditions and coor...

Страница 30: ...ou can also adjust the sound volume by using in the OPTION MENU Viewing photos Your camcorder displays the selected photo Tips When viewing photos recorded on the memory card playback folder appears on the screen To start stop slide show Next OPTION MENU Previous To the VISUAL INDEX screen ...

Страница 31: ...the instruction manuals of the TV Turn on your camcorder and touch MENU Show others TV CONNECT Guide under OTHERS category on the LCD screen Use the supplied AC Adaptor as the power source p 17 Touch High Definition TV Touch to select the input jack of your TV then touch The connection medhod is displayed If you touch HINT you can see tips for the connection or change the settings of your camcorde...

Страница 32: ...input jack Connect the yellow plug of the A V connecting cable to the video input jack and connect the white left channel or red right channel plug to the audio input jack of your TV or VCR When you connect with component A V cable If you connect only component video plugs audio signals are not output Connect the white and red plugs to output audio signals When you connect with HDMI cable Use an H...

Страница 33: ...he TV using more than one type of cable to output images the order of priority of the TV input jacks is as follows HDMI component S VIDEO video HDMI High Definition Multimedia Interface is an interface to send both video audio signals The HDMI OUT jack outputs high quality images and digital audio On Photo TV HD This camcorder is compatible with the Photo TV HD standard Photo TV HD allows for high...

Страница 34: ...list is deleted also from the Playlist If the deleted movie is included in the saved Highlight Playback scenario the movie is also deleted from the scenario Tips You can delete an image on the playback screen from OPTION MENU To delete all images recorded in the recording media and recover all the recordable space of the media format the media Reduced size images which enable you to view many imag...

Страница 35: ...on memory card by recording date In step 2 touch DELETE DELETE by date DELETE by date To delete all photos on the same day at one time touch DELETE DELETE by date Touch to select the recording date of the desired movies photos then touch Touch the image on the LCD screen to confirm the image Touch to return to the previous screen Touch YES ...

Страница 36: ...essing HD FX HD FH movies However Intel Pentium III 1 GHz or faster is sufficient for the following operations Importing the movies and photos to the computer One Touch Disc Burn Creating an Blu ray disc AVCHD disc DVD video Intel Core Duo 1 66 GHz or faster is required when creating a DVD video by converting high definition image quality HD to standard definition image quality STD Copying a disc ...

Страница 37: ... on your computer you may be unable to use some functions of those PMB when installing the PMB from the supplied CD ROM Also PMB Launcher is installed from the supplied CD ROM and you can start PMB or other software by using the PMB Launcher Double click the PMB Launcher short cut icon on the computer screen to start PMB Launcher Confirm that your camcorder is not connected to the computer Turn on...

Страница 38: ...T under OTHERS category Click Continue on the computer screen Follow the on screen instructions to install the software Connect the camcorder to the computer during the installation of PMB Depending on the computer you may need to install third party software If the installation screen appears follow the instructions to install the required software Restart the computer if required to complete the...

Страница 39: ...rs on the camcorder from the computer The image files may be destroyed or may not be played back Operation is not guaranteed if you perform the above operation When you delete image files follow the steps on page 34 Do not delete the image files on the camcorder directly from the computer Do not copy the files on the recording media from the computer Operation is not guaranteed You can create a Bl...

Страница 40: ...n image quality HD p 44 Ordinary DVD playback devices a DVD player a computer that can play DVDs etc Importing movies and photos to a computer p 43 Creating a standard definition image quality STD disc p 45 To create a Blu ray disc the BD Add on Software for PMB must be installed p 45 Characteristics of each type of disc Using a Blu ray disc enables you to record high definition image quality HD m...

Страница 41: ...f following type with PMB For Blu ray disc see page 45 Disc type Features DVD R DVD R DVD R DL Unrewritable DVD RW DVD RW Rewritable Notes Always maintain your PlayStation 3 to use the latest version of the PlayStation 3 system software The PlayStation 3 may not be available in some countries regions ...

Страница 42: ...ovies to a computer first p 43 and then create a standard definition image quality STD disc p 45 Install PMB beforehand p 37 however do not start PMB Connect your camcorder to the wall outlet wall socket using the AC Adaptor supplied for this operation p 17 With One Touch Disc Burn function on your camcorder you can save movies and photos recorded on the internal recording media only 1 Turn on you...

Страница 43: ...Touch the recording media that contains the images you want to save on the camcorder screen USB CONNECT Internal memory USB CONNECT Internal hard disk USB CONNECT Memory card The displayed recording media differ depending on the model If the USB SELECT screen does not appear touch MENU Show others USB CONNECT under OTHERS category The window for import appears on the computer screen 3 Click Import...

Страница 44: ...nition image quality HD movies are marked with You cannot save photos on a disc To select plural movies hold the Ctrl key down and click thumbnails 4 At the top of the window click Create AVCHD Format Discs HD The window used to select movies appears To add movies to the previously selected ones select the movies in the main window and drag and drop onto the window for selecting movies 5 Follow th...

Страница 45: ...u cannot add contents to either type of disc after creating the disc Creating a standard definition image quality STD disc that can be played on ordinary DVD players You can create a standard definition image quality STD disc by selecting movies previously imported to your computer p 43 Notes You may select high definition image quality HD movies as sources However image quality is converted from ...

Страница 46: ...rt the software See Video Disc Copier help on the operation You cannot copy high definition image quality HD movies by converting them to standard definition image quality STD You cannot copy to a Blu ray disc Editing movies You can cut out only necessary parts from a movie and save it as another file Double click the movie to be edited on PMB then click Show Edit Palette on the right side of the ...

Страница 47: ...before use The format screen appears when the external media is connected to your camcorder Operation is not assured with every device satisfying requirements for operating Connect your camcorder to the wall outlet wall socket using the supplied AC adaptor p 17 Refer to the instruction manual supplied with the external media For details on available external media go to the Sony support website in...

Страница 48: ...of the external media such as deleting images Touch MENU Show others on the VISUAL INDEX screen To save desired movies and photos Notes You cannot copy or search photos by date which are recorded on the memory card Touch Play without copying in step 5 above The VISUAL INDEX screen of the external media is displayed Touch MENU Show others MOVIE DUB when selecting movies PHOTO COPY when selecting ph...

Страница 49: ...r If the external media has the AC power cable connect it to the wall outlet wall socket To finish the external media connection Touch on the VISUAL INDEX screen of the external media Disconnect the USB Adaptor Cable Creating a disc with a DVD writer recorder Selecting the method for creating a disc Several methods for creating an AVCHD disc or a standard definition image quality STD disc from hig...

Страница 50: ...y DVD device Player DVD player Computer that can play DVDs etc Creating device DVD writer DVDirect Express p 50 DVD writer other than DVDirect Express p 53 Disc recorder etc p 54 Disc type Standard definition image quality STD disc Notes Always maintain your PlayStation 3 to use the latest version of the PlayStation 3 system software The PlayStation 3 may not be available in some countries regions...

Страница 51: ... in the following cases When dubbing a desired image When creating multiple copies of the same disc When converting high definition HD movies to standard definition STD movies and creating a disc When dubbing images in the memory card Touch DISC BURN OPTION in step 4 Select the recording media containing the movie s you want to save When you select movies with high definition image quality HD the ...

Страница 52: ...touch EXIT END on the camcorder screen Disconnect the USB cable from your camcorder Notes Do not do any of the following when creating a disc Turn off the camcorder Disconnect the USB cable or the AC adaptor Subject the camcorder to mechanical shock or vibration Eject the memory card from the camcorder Play the created disc to make sure dubbing was performed correctly before deleting the movies on...

Страница 53: ...et using the supplied AC Adaptor for this operation p 17 Sony DVD writer may not be available in some countries regions Always maintain the firmware of the Sony DVDirect DVD writer to its latest version For details see the following website http sony storagesupport com Connect the AC Adaptor and the power cord mains lead to the DC IN jack of your camcorder and the wall outlet wall socket p 17 Turn...

Страница 54: ... writer etc other than DVDirect Express with the A V connecting cable Connect the device in either way of or Refer also to the instruction manuals supplied with the devices to be connected Notes Connect your camcorder to the wall outlet wall socket using the supplied AC Adaptor for this operation p 17 Sony DVD writer may not be available in some countries regions High definition image quality HD m...

Страница 55: ...ted with an HDMI cable To hide the screen indicators such as a counter etc on the screen of the monitor device connected touch MENU Show others OUTPUT SETTINGS under GENERAL SET category DISP OUTPUT LCD PANEL the default setting To record the date time coordinates HDR CX350V XR350V or camera settings data touch MENU Show others PLAYBACK SET under PLAYBACK category DATA CODE a desired setting In ad...

Страница 56: ...g media p 61 GENERAL SET Other setup items p 62 Menu items are described in more details in the Handycam Handbook Setting menus Touch MENU Touch Show others on the MY MENU screen See the next page for details on MY MENU Touch the central part in the left side of screen to change the display Touch the menu item to be changed After changing the setting touch To finish setting the menu touch To retur...

Страница 57: ... the menu items more easily by registering the menu items you use most often on MY MENU You can register 6 menu items on each MY MENU of the MOVIE PHOTO and PLAYBACK Example deleting SPOT MTR FCS and registering FADER Touch MENU Touch MY MENU SETTING Touch MOVIE Touch SPOT MTR FCS Touch Touch FADER under MANUAL SETTINGS category When MY MENU is displayed touch Repeat the same steps above to regist...

Страница 58: ...and the menu items you can change in the context appear Touch OPTION Touch the desired tab the item to change the setting After completing the setting touch Notes Grayed out menu items or settings are not available When the item you want is not on the screen touch another tab There may be no tab The tabs and items that appear on the screen depend on the recording playback status of your camcorder ...

Страница 59: ... a high image quality is recommended GUIDEFRAME Displays the frame to make sure the subject is horizontal or vertical STEADYSHOT Sets the SteadyShot function when recording movies CONVERSION LENS Sets the type of an attached conversion lens sold separately Optimizes the SteadyShot function and focus according to the attached lens LOW LUX Records bright color images in the dim FACE DETECTION Adjust...

Страница 60: ...ace scenes PLAYLIST Displays and plays the playlist of movies HIGHLIGHT Selects a number of short scenes and plays them back together as a digest of your movies with music and visual effects SCENARIO Plays the favorite scenario saved in Highlight Playback PLAYBACK SET SET Sets image quality for recording playback or editing movies DATA CODE Displays the detailed recording data during playback EDIT...

Страница 61: ...ssing the DISC BURN button p 42 TV CONNECT Guide Introduces the connection method depending on the TV type connected p 31 MUSIC TOOL EMPTY MUSIC Deletes music files DOWNLOAD MUSIC Download music files that can be played with Highlight Playback BATTERY INFO Displays the battery information MANAGE MEDIA category MEDIA SETTINGS MOVIE MEDIA SET Sets the media for recording movies p 20 PHOTO MEDIA SET ...

Страница 62: ...topping the clock p 18 AUTO CLOCK ADJ 1 Sets whether the camcorder adjusts the clock automatically by acquiring the time from GPS or not AUTO AREA ADJ 1 Sets whether the camcorder compensates for a time differences automatically by acquiring the current location information from GPS or not DST SET SUMMERTIME Sets the DST SET p 18 LANGUAGE SET Sets the display language p 19 POWER SETTINGS A SHUT OF...

Страница 63: ...ndycam Handbook 3 Select the desired language and the model name of your camcorder then click Handycam Handbook PDF The model name of your camcorder is printed on its bottom surface 4 Click Exit Exit then remove the CD ROM from your computer To view the Handycam Handbook double click the short cut icon on the computer screen When using a Macintosh open the Handbook US folder in the CD ROM then cop...

Страница 64: ...e plug of the AC Adaptor to the wall outlet wall socket p 17 The camcorder does not operate even when the power is set to on It takes a few seconds for your camcorder to be ready to shoot after the power is turned on This is not a malfunction Disconnect the AC Adaptor from the wall outlet wall socket or remove the battery pack then reconnect it after about 1 minute If your camcorder still does not...

Страница 65: ...hem give them all the numbers of the error code beginning with C or E C 04 The battery pack is not an InfoLITHIUM battery pack V series Use an InfoLITHIUM battery pack V series p 15 Connect the DC plug of the AC Adaptor to your camcorder securely p 15 C 06 The battery pack temperature is high Change the battery pack or place it in a cool place C 13 C 32 Remove the power source Reconnect it and ope...

Страница 66: ...der may malfunction Near strong radio waves or radiation The camcorder may not be able to record properly Near AM receivers and video equipment Noise may occur On a sandy beach or anywhere dusty If sand or dust gets in your camcorder it may malfunction Sometimes this malfunction cannot be repaired Near windows or outdoors where the LCD screen or the lens may be exposed to direct sunlight This dama...

Страница 67: ... delete all movies and still images or perform MEDIA FORMAT data on the internal recording media may not be completely erased When you transfer the camcorder it is recommended that you perform EMPTY such as by placing anything heavy on it Do not use a deformed or damaged battery pack Keep metal contacts clean If the battery electrolytic liquid has leaked Consult your local authorized Sony service ...

Страница 68: ...ote Commander may not function properly In this case replace the battery with a Sony CR2025 lithium battery Use of another battery may present a risk of fire or explosion Specifications System Signal format NTSC color EIA standards HDTV 1080 60i specification Movie recording format HD MPEG 4 AVC H 264 AVCHD format compatible STD MPEG 2 PS Audio recording system Dolby Digital 2ch Dolby Digital Ster...

Страница 69: ... 16 4 3 1 4 in w h d excluding the projecting parts Mass approx 170 g 6 0 oz excluding the power cord mains lead See the label on the AC Adaptor for other specifications Lens G lens 12 4 Optical 2 17 4 3 160 4 Digital Filter diameter 30 mm 1 3 16 in F1 8 3 4 Focal length f 2 9 34 8 mm 1 8 1 3 8 in When converted to a 35 mm still camera For movies 2 29 8 357 6 mm 1 3 16 14 1 8 in 16 9 For photos 27...

Страница 70: ...ack High definition image quality HD Standard definition image quality STD Recording condition REC MODE is set to HQ Typical recording time shows the time when you repeat recording start stop turning the power on off and zooming Expected recording time of movies in the internal recording media To set the recording mode touch MENU Show others REC MODE under SHOOTING SET category In the default sett...

Страница 71: ...you want to record up to the maximum recording time indicated in the table you need to delete the demonstration movie on your camcorder HDR CX350 CX350V CX370 XR350 XR350V HDR CX370 High definition image quality HD in h hour and m minute Recording mode Recording time HD FX 6 h 5 m HD FH 7 h 55 m HD HQ 15 h 50 m HD LP 26 h 55 m Standard definition image quality STD in h hour and m minute Recording ...

Страница 72: ...Licencing LLC Microsoft Windows Windows Vista and DirectX are either registered trademarks or trademarks of Microsoft Corporation in the United States and or other countries Macintosh and Mac OS are registered trademarks of Apple Inc in the U S and other countries Intel Intel Core and Pentium are trademarks or registered trademarks of Intel Corporation or its subsidiaries in the United States and ...

Страница 73: ...ng image quality HD STD and recording mode FX FH HQ LP Recording playback editing media 0 00 00 Counter hour minute second 00min Estimated recording remaining time FADER 9999 9999 9999 Approximate number of recordable photos and recording media Playback folder 100 112 Current playing movie or photo Number of total recorded movies or photos Bottom Indicator Meaning FACE DETECTION set to OFF SMILE D...

Страница 74: ...o light a flash or a microphone The accessory can be turned on or off as you operate the POWER switch on your camcorder Lens G lens 9Flash Indicator Meaning Slide show button YOUR LOCATION button 101 0005 Data file name 2 Protected image Index button Indicators and their positions are approximate and may differ from what you actually see Some indicators may not appear depending on your camcorder m...

Страница 75: ...u rotate the LCD panel 180 degrees you can close the LCD panel with the LCD screen facing out This is convenient during playback operations HDR CX300 CX350 CX350V CX370 HDR XR350 XR350V VIEW IMAGES button 28 DISC BURN button 42 9 INTELLIGENT AUTO button POWER button 18 HDMI OUT jack 31 USB jack 38 42 43 47 50 Speaker GPS switch HDR CX350V XR350V RESET button Press RESET using a pointed object Pres...

Страница 76: ...ely the length of the screw must be less than 5 5 mm 7 32 in CMemory card slot 22 DMemory card Access lamp 22 While the lamp is lit or flashing the camcorder is reading or writing data EPUSH battery release button 16 HDR CX300 CX350 CX350V CX370 HDR XR350 XR350V Power zoom lever PHOTO button 26 9MODE button 23 movie Photo lamps 23 CHG flash charge lamp 15 Battery pack 15 START STOP button 24 ...

Страница 77: ...ernal media 47 Screen indicators 73 Self diagnosis display 65 Setting the date and time 18 Software 37 Specifications 68 Supplied items 8 T Thumbnail 34 Tripod 76 Troubleshooting 64 Turning the power on 18 TV 31 TV CONNECT Guide 31 U USB cable 50 53 USB CONNECT 43 53 V VISUAL INDEX 28 Volume 30 W Wall outlet wall socket 15 Warning indicators 65 Windows 36 A A V connecting cable 32 54 AVCHD 40 B Ba...

Страница 78: ... este producto y respuestas a las preguntas más frecuentes en nuestro sitio Web de atención al cliente http www sony net Printed on 70 or more recycled paper using VOC Volatile Organic Compound free vegetable oil based ink Impreso en papel reciclado en un 70 o más utilizando tinta hecha con aceite vegetal exento de compuesto orgánico volátil COV Printed in Japan ...

Страница 79: ...rporation HDR CX300E CX305E CX350E CX350VE CX370E XR350E XR350VE Table of contents 9 Getting started 12 Recording Playback 20 Making good use of your camcorder 39 Saving images with an external device 52 Customizing your camcorder 61 Additional information 85 Quick reference 112 ...

Страница 80: ...if the camcorder is turned off the GPS function is working as long as the GPS switch is set to ON Make sure that the GPS switch is set to OFF during take off and landing of an airplane HDR CX350VE XR350VE Menu items LCD panel and lens A menu item that is grayed out is not available under the current recording or playback conditions The LCD screen is manufactured using extremely high precision tech...

Страница 81: ... may not be able to play back normally images recorded on your camcorder with other devices Also you may not be able to play back images recorded on other devices with your camcorder Discs recorded with HD image quality high definition This camcorder captures high definition footage in the AVCHD format DVD media containing AVCHD footage should not be used with DVD based players or recorders as the...

Страница 82: ...ons of your camcorder and its screen indication are exaggerated or simplified for understandability In this manual the internal memory HDR CX300E CX305E CX350E CX350VE CX370E and the hard disk HDR XR350E XR350VE of the camcorder and the memory card are called recording media In this manual the DVD disc recorded with high definition image quality HD is called AVCHD disc Design and specifications of...

Страница 83: ...ion p 84 When a drop occurs or under a non gravity condition the block noise made when this function is activated by the camcorder may also be recorded If the drop sensor catches a drop repeatedly recording playback may be stopped Note on using the camcorder at high altitudes HDR XR350E XR350VE Do not turn on the camcorder in a low pressure area where the altitude is more than 5 000 meters 16 000 ...

Страница 84: ...ting photos p 22 Playing movies and photos Playback on the camcorder p 28 Playing images on a TV p 36 Saving images Saving movies and photos with a computer Saving movies and photos in external media p 52 Saving images with a DVD writer recorder p 54 Deleting movies and photos p 39 If you delete the image data that has been saved on your computer or a disc you can record new images on the free med...

Страница 85: ...que Stabilize yourself move your camcorder horizontally as you turn your upper body slowly Stay still at the end of panning for a while to make the scene look stable Accentuating movies with narration Consider the sound to be recorded with your movies Narrate the subject or talk to the subject during shooting Aim for a balanced volume of voices since the recording person is closer to the microphon...

Страница 86: ... child on the left side of the screen Prioritizing the subject 26 SPOT FOCUS 68 Capturing photos during movie recording Dual Rec 27 Smile Shutter 27 Recording in a dimly lit room LOW LUX 72 Capturing fireworks or a sunset in all its splendor FIREWORKS 66 SUNRISE SUNSET 66 Checking your golf swing GOLF SHOT 69 SMTH SLW REC 70 ...

Страница 87: ...mages automatically INTELLIGENT AUTO 24 Selecting high definition image quality HD or standard image quality STD 25 Selecting the recording mode 25 Prioritizing the subject 26 Capturing smiles automatically Smile Shutter 27 Recording high quality photos during movie recording Dual Rec 27 Recording in mirror mode 27 Playback on the camcorder 28 Useful functions for playing movies and photos 31 Sear...

Страница 88: ...RDINATES 50 Adjusting the clock and the area automatically AUTO CLOCK ADJ AUTO AREA ADJ 51 Saving images with an external device Saving images in external media DIRECT COPY 52 Creating a disc with a DVD writer recorder 54 Selecting the method for creating a disc 54 Creating a disc with the dedicated DVD writer DVDirect Express 55 Creating a high definition image quality HD disc with a DVD writer e...

Страница 89: ...cordable photos 96 Expected time of recording and playback with each battery pack 96 Expected recording time of movies 96 Expected number of recordable photos 98 Using your camcorder abroad 100 Maintenance and precautions 102 About the AVCHD format 102 About GPS HDR CX350VE XR350VE 102 About the Memory Stick media 104 About the InfoLITHIUM battery pack 105 About x v Color 107 About handling of you...

Страница 90: ...X350E CX350VE CX370E HDR XR350E XR350VE Battery pack DC IN jack DC plug Power cord Mains lead To the wall outlet wall socket AC Adaptor CHG flash charge lamp Battery pack CHG flash charge lamp AC Adaptor To the wall outlet wall socket Power cord Mains lead DC plug DC IN jack ...

Страница 91: ...d charging starts The CHG flash charge lamp turns off when the battery pack is fully charged 4 When the battery is charged disconnect the AC Adaptor from the DC IN jack of your camcorder Tips See page 96 on recording and playing time When your camcorder is on you can check the approximate amount of remaining battery power with the remaining battery indicator at the upper left on the LCD screen Cha...

Страница 92: ...the battery pack from your camcorder and put it in a warm place The temperature of the battery pack is high Remove the battery pack from your camcorder and put it in a cool place When attaching a video light sold separately it is recommended that you use an NP FV70 or NP FV100 battery pack We do not recommend using an NP FV30 which only allows short recording and playback times with your camcorder...

Страница 93: ...reen is open press POWER 2 Select the desired geographical area with then touch NEXT To set the date and time again touch MENU Show others CLOCK LANG under GENERAL SET category CLOCK SET When an item is not on the screen touch until the item appears 3 Set SUMMERTIME date and time then touch The clock starts If you set SUMMERTIME to ON the clock advances 1 hour MODE lamp POWER button Touch the butt...

Страница 94: ...y adjusted with AUTO CLOCK ADJ and AUTO AREA ADJ set to ON p 82 The clock may not be adjusted to the correct time automatically depending on the country region selected for your camcorder In this case set AUTO CLOCK ADJ and AUTO AREA ADJ to OFF HDR CX350VE XR350VE To turn off the power Close the LCD screen The Movie lamp flashes for a few seconds and the power is turned off Tips You can turn off y...

Страница 95: ...u can perform recording playback and editing operations on the selected medium Tips See page 96 for the recordable time of movies See page 98 for the number of recordable photos Selecting the recording media for movies Touch MENU Show others MEDIA SETTINGS under MANAGE MEDIA category MOVIE MEDIA SET The MOVIE MEDIA SET screen appears Touch the desired recording media Touch YES The recording medium...

Страница 96: ...ia Memory Stick PRO HG Duo media SD memory cards Class 4 or faster and SDHC memory cards Class 4 or faster can be used with this camcorder A MultiMediaCard cannot be used with this camcorder In this manual Memory Stick PRO Duo Mark2 media and Memory Stick PRO HG Duo media are called Memory Stick PRO Duo media Memory cards of up to 32 GB have been verified to operate with your camcorder Memory Stic...

Страница 97: ...sert the memory card in the wrong direction the memory card memory card slot or image data may be damaged Notes If Failed to create a new Image Database File It may be possible that there is not enough free space is displayed format the memory card by touching MENU Show others MEDIA FORMAT under MANAGE MEDIA category MEMORY CARD YES YES To eject the memory card Open the cover and lightly push the ...

Страница 98: ... the grip belt 2 Open the LCD screen of your camcorder Your camcorder is turned on and the lens cover is opened To turn on your camcorder when the LCD screen is already open press POWER p 15 You can switch recording modes by pressing MODE Press MODE to light up the desired recording mode lamp Recording movies Press START STOP to start recording You can start recording also by touching in the botto...

Страница 99: ...um continuous recordable time of movies is about 13 hours When a movie file exceeds 2 GB the next movie file is created automatically It will take several seconds until you can start recording after you turn on the camcorder You cannot operate your camcorder during this time The following states will be indicated if data is still being written onto the recording media after recording has finished ...

Страница 100: ...ompatible with full pixel display In this case set GUIDEFRAME to ON p 71 and record images using the outer frame displayed on the screen as a guide To adjust the angle of the LCD panel first open the LCD panel 90 degrees to the camcorder and then adjust the angle STEADYSHOT is set to ACTIVE in the default setting Data code during recording The recording date time and condition and coordinates HDR ...

Страница 101: ...ient ambient light The flash does not work in the movie recording mode You can change how your camcorder flashes by MENU Show others FLASH MODE under PHOTO SETTINGS category a desired setting If you record photos using a flash with a conversion lens sold separately the shadow may be reflected If white circular spots appear on photos This is caused by particles dust pollen etc floating close to the...

Страница 102: ...s up to 12 times using optical zooming unless STEADYSHOT is set to ACTIVE Tips You can set DIGITAL ZOOM p 73 if you want to zoom to a greater level Recording better images automatically INTELLIGENT AUTO By pressing you can record images using the INTELLIGENT AUTO function When you turn the camcorder toward the subject the camcorder records using the optimum combination of the three detection modes...

Страница 103: ...hen INTELLIGENT AUTO is set to ON Selecting high definition image quality HD or standard image quality STD You can select the desired image quality from the high definition image quality HD that enables you to record fine images or the standard definition image quality STD that has more compatibility with various playback devices Change the image quality according to the recording situation or the...

Страница 104: ... STD is selected You can select the following high definition image quality HD recording mode 24M of HD FX is the maximum bit rate and the value other than of HD FX such as 17M is an average bit rate HD FX AVC HD 24M FX HD FH AVC HD 17M FH HD HQ AVC HD 9M HQ the default setting HD LP AVC HD 5M LP The recording mode of the standard image quality STD is limited to the following value 9M is an averag...

Страница 105: ...r function Tips You can select the subject that has priority for face detection and smile detection with PRIORITY SETTING p 72 When you specify the priority subject by touching the detection frame on the LCD screen the face with a double lined frame has priority If a smile is not detected set the SMILE SENSITIVITY p 73 Recording high quality photos during movie recording Dual Rec You can record ph...

Страница 106: ...on your camcorder when the LCD screen is already open press POWER p 15 2 Press VIEW IMAGES The VISUAL INDEX screen appears after some seconds You can display the VISUAL INDEX screen also by touching VIEW IMAGES on the LCD screen 3 Touch or a desired movie to playback a movie Touch the Photo a desired photo to view a photo Movies are displayed and sorted by recording date Switches operating button ...

Страница 107: ...vie reaches the last movie the screen returns to the INDEX screen Touch during pause to play back movies slowly As you repeat touching during playback movies are played as fast as about 5 times about 10 times about 30 times about 60 times You can also display the VISUAL INDEX by touching MENU Show others VISUAL INDEX under PLAYBACK category The recording date time and shooting conditions and coord...

Страница 108: ...ou can also adjust the sound volume by using in the OPTION MENU Viewing photos Your camcorder displays the selected photo Tips When viewing photos recorded on the memory card playback folder appears on the screen To start stop slide show Next OPTION MENU Previous To the VISUAL INDEX screen ...

Страница 109: ...K category DATE INDEX On the Film Roll Index Face Index screen you can display the Date Index by touching the date in the upper right corner of the screen Searching for desired scene by pinpoint Film Roll Index Movies can be divided by a set time and the first scene of each division is displayed on the INDEX screen You can start playing back a movie from the selected thumbnail Press VIEW IMAGES Th...

Страница 110: ...lasses or hats or who do not face towards the camera Make sure that you set FACE DETECTION to ON p 72 the default setting prior to recording to search movies on the Face Index Tips You can also display the Face Index by touching MENU Show others VIEW IMAGES under PLAYBACK category FACE Playing back a digest of your movies Highlight Playback Your camcorder selects Highlight Playback scenes at rando...

Страница 111: ...e balance between the original sound and the music SHUFFLE To play back movies in random order select ON Notes The PLAYBACK RANGE setting is cleared when the Highlight Playback stops Tips You can change the settings for Highlight Playback during Highlight Playback by touching OPTION If you change the settings for Highlight Playback Highlight Playback scenes are re selected If you change MUSIC afte...

Страница 112: ...USIC After the music file is transferred to the camcorder if you cannot play the music the music file may be damaged Delete the music file by touching MENU Show others MUSIC TOOL under OTHERS category EMPTY MUSIC then transfer the music file again If you delete music files using EMPTY MUSIC the music data recorded on your camcorder at the factory will be deleted too In this case you can restore th...

Страница 113: ... show begins from the selected photo To stop the slide show Touch To restart the slide show Touch again Notes You cannot operate playback zoom during slide show Tips You can set continuous slide show playback by selecting OPTION tab SLIDE SHOW SET while playing photos The default setting is ON continuous playback ...

Страница 114: ...urn on your camcorder and touch MENU Show others TV CONNECT Guide under OTHERS category on the LCD screen Use the supplied AC Adaptor as the power source p 14 Touch High Definition TV Touch to select the input jack of your TV then touch The connection medhod is displayed If you touch HINT you can see tips for the connection or change the settings of your camcorder Connect your camcorder to the TV ...

Страница 115: ... of your TV or VCR When you connect with component A V cable If you connect only component video plugs audio signals are not output Connect the white and red plugs to output audio signals When you connect with HDMI cable Use an HDMI cable with the HDMI logo Use an HDMI mini connector on one end for the camcorder and a plug suitable for connecting your TV on the other end Copyright protected images...

Страница 116: ... operate your camcorder with the remote commander of your TV by connecting your camcorder to a BRAVIA Sync compatible TV launched in 2008 or later with the HDMI cable You can operate the menu of your camcorder by pressing the SYNC MENU button of the remote commander of your TV You can display index screens such as VISUAL INDEX play selected movies or display selected photos by pressing up down lef...

Страница 117: ... p 34 the movie is also deleted from the scenario Tips You can delete an image on the playback screen from OPTION MENU To delete all images recorded in the recording media and recover all the recordable space of the media format the media p 79 Reduced size images which enable you to view many images at the same time on an index screen are called thumbnails 1 Touch MENU Show others DELETE under EDI...

Страница 118: ... movies touch PROTECT PROTECT PROTECT To protect photos touch PROTECT PROTECT 3 Touch the movies and photos to be protected is displayed on the selected images Press and hold the image down on the LCD screen to confirm the image Touch to return to the previous screen 4 Touch YES Touch to select the recording date of the desired movies photos then touch Touch the image on the LCD screen to confirm ...

Страница 119: ...and photos recorded on the same day at one time In step above select the recording date of the desired movies photos then touch UNPROTECT Dividing a movie 1 Touch MENU Show others DIVIDE under EDIT category 2 Touch the movie to be divided The selected movie starts playback 3 Touch at the point where you want to divide the movie into scenes The movie pauses Play and pause toggles as you press 4 Tou...

Страница 120: ...from step 2 Also do not eject the memory card while dividing movies on the memory card A slight difference may occur from the point where you touch and the actual dividing point as your camcorder selects the dividing point based on about half second increments If you divide the original movie the movie added to the Playlist will also be divided If the divided movie is included in the saved Highlig...

Страница 121: ...d HDR CX305E Dubbing copying movies and photos from the internal recording media to memory card Dubbing movies You can dub movies recorded on the internal recording media of your camcorder to memory card Insert memory card into your camcorder before the operation Notes When you record a movie on the memory card for the first time create the image database file by touching MENU Show others REPAIR I...

Страница 122: ...elected photos COPY by date To copy all photos of a specified date Touch the type of dubbing DUB by select To select movies and dub DUB by date To dub all movies of a specified date DUB ALL To dub the high definition image quality HD Playlist DUB ALL To dub the standard definition image quality STD Playlist When you select the Playlist as the source of dubbing follow the on screen instructions to ...

Страница 123: ...HOTO MEDIA SET and play them back p 17 Using the Playlist of movies The Playlist is a list showing thumbnails of the movies that you have selected The original movies are not changed even if you edit or erase the movies added to the Playlist Creating the Playlist Notes High definition image quality HD movies and standard definition image quality STD movies are added to an individual Playlist Touch...

Страница 124: ...t one time In step 2 touch ADD by date ADD by date The recording dates of movies are displayed on the screen Touch to select the recording date of the desired movie then touch Touch the image on the LCD screen to confirm the image Touch to return to the previous screen Touch YES Notes Do not remove the battery pack or the AC Adaptor from your camcorder while adding movies to the Playlist It may da...

Страница 125: ...your exact location on the earth The following function is available if you use the GPS function Your location You can display the current location on a map Map Index You can find a movie or photo on a map by its recording location COORDINATES You can display the coordinate information during playback AUTO CLOCK ADJ AUTO AREA ADJ Your camcorder adjusts the clock and the time difference on each are...

Страница 126: ...nto the camcorder using the supplied software PMB Install PMB on your computer and connect the computer to the internet Then connect the camcorder to the computer and the GPS assist data will be automatically updated The GPS assist data may not function in the following cases When the GPS assist data are not updated for about 30 days or more When the date and time of the camcorder are not correctl...

Страница 127: ...ch the on the screen during triangulation When triangulation is unsuccessful the map shows the default setting location or a location acquired previously If you hold a certain point the map keeps scrolling You can also display the current location by touching MENU Show others YOUR LOCATION under OTHERS category Searching for a desired scene by recording location Map Index Where movies and photos w...

Страница 128: ...oordinates information recorded on movies and photos Touch MENU Show others DATA CODE under PLAYBACK category COORDINATES Latitude Longitude Touch the image marker where you recorded the movies and photos to be played back The image marker turns red The movies or photos recorded at that location are displayed on the left of the screen Touch the desired movie or photo Playback starts from the selec...

Страница 129: ...f a few seconds even if AUTO CLOCK ADJ is activated The clock is adjusted automatically by AUTO CLOCK ADJ when you turn off your camcorder if the camcorder is receiving a GPS signal while it is being used The clock is not adjusted until the camcorder is turned off Also the clock is not adjusted unless the camcorder is receiving a GPS signal even if the GPS switch is set to ON The AUTO AREA ADJ fun...

Страница 130: ...at screen appears when the external media is connected to your camcorder Operation is not assured with every device satisfying requirements for operating Connect your camcorder to the wall outlet wall socket using the supplied AC adaptor p 14 Refer to the instruction manual supplied with the external media For details on available external media go to the Sony support website in your country regio...

Страница 131: ...ch are recorded on the memory card Touch Play without copying in step 5 above The VISUAL INDEX screen of the external media is displayed Touch MENU Show others MOVIE DUB when selecting movies PHOTO COPY when selecting photos Follow the on screen instructions to select the recording media and image selection methods When you selected DUB by select touch the image to be saved appears When you select...

Страница 132: ...B Adaptor Cable Creating a disc with a DVD writer recorder Selecting the method for creating a disc Several methods for creating an AVCHD disc or a standard definition image quality STD disc from high definition image quality HD movies or photos recorded on your camcorder are described here Select the method that suits your disc player Notes Prepare a DVD disc such as a DVD R for creating a disc S...

Страница 133: ...AVCHD format DVD players recorders may fail to eject the disc You cannot create an AVCHD disc from a movie recorded with HD FX mode of REC MODE Save a movie recorded with HD FX mode onto Blu ray discs or external storage devices p 52 Creating a disc with the dedicated DVD writer DVDirect Express You can create a disc or play back the images on a created disc by using the dedicated DVD writer DVDir...

Страница 134: ...ases When dubbing a desired image When creating multiple copies of the same disc When converting high definition HD movies to standard definition STD movies and creating a disc When dubbing images in the memory card Touch DISC BURN OPTION in step 4 Select the recording media containing the movie s you want to save When you select movies with high definition image quality HD the screen to select th...

Страница 135: ...the limit is reached The last movie on the disc may be cut off Disc creation time to dub movies to the limit of the disc is about 20 to 60 minutes It may take more time depending on the recording mode or the number of scenes Also if high definition image quality HD is converted to standard definition image quality STD image quality conversion takes longer than the actual recording To play back a d...

Страница 136: ...wall outlet wall socket using the supplied AC Adaptor for this operation p 14 Sony DVD writer may not be available in some countries regions Connect the AC Adaptor and the power cord mains lead to the DC IN jack of your camcorder and the wall outlet wall socket p 14 Turn on your camcorder and connect a DVD writer etc to the USB jack of your camcorder with the USB cable supplied The USB SELECT scre...

Страница 137: ... A V connecting cable to the input jack of another device A V connecting cable with S VIDEO sold separately When connecting to another device via the S VIDEO jack by using an A V connecting cable with an S VIDEO cable sold separately higher quality images can be produced than with an A V connecting cable Connect the white and red plug left right audio and the S VIDEO plug S VIDEO channel of the A ...

Страница 138: ...ow others OUTPUT SETTINGS under GENERAL SET category DISP OUTPUT LCD PANEL the default setting To record the date time coordinates HDR CX350VE XR350VE or camera settings data touch MENU Show others PLAYBACK SET under PLAYBACK category DATA CODE a desired setting In addition touch MENU Show others OUTPUT SETTINGS under GENERAL SET category DISP OUTPUT V OUT PANEL When the screen size of display dev...

Страница 139: ... settings p 78 MANAGE MEDIA Items for recording media p 79 GENERAL SET Other setup items p 80 Operating menus Touch MENU Touch Show others on the MY MENU screen See the next page for details on MY MENU Touch the central part of the left side of screen to change the display Touch the menu item to be changed After changing the setting touch To finish setting the menu touch To return to the previous ...

Страница 140: ...ms more easily by registering the menu items you use most often on MY MENU You can register 6 menu items on each MY MENU of the MOVIE PHOTO and PLAYBACK Example deleting SPOT MTR FCS and registering FADER Touch MENU Touch MY MENU SETTING Touch MOVIE Touch SPOT MTR FCS Touch Touch FADER under MANUAL SETTINGS category When MY MENU is displayed touch Repeat the same steps above to register menu items...

Страница 141: ...ENU You touch and the menu items you can change in the context appear Touch OPTION Touch the desired tab the item to change the setting After completing the setting touch Notes Grayed out menu items or settings are not available When the item you want is not on the screen touch another tab There may be no tab The tabs and items that appear on the screen depend on the recording playback status of y...

Страница 142: ...GHT 73 X V COLOR 74 WIDE SELECT 74 PHOTO SETTINGS category SELF TIMER 74 IMAGE SIZE 74 STEADYSHOT 75 FLASH MODE 75 FLASH LEVEL 75 REDEYE REDUC 75 FILE NO 76 PLAYBACK category VISUAL INDEX 28 VIEW IMAGES DATE INDEX 31 MAP 1 49 FILM ROLL 31 FACE 32 PLAYLIST 46 HIGHLIGHT 32 SCENARIO 33 PLAYBACK SET SET 25 DATA CODE 76 EDIT category DELETE DELETE 39 DELETE 39 SCENARIO ERASE ERASE 34 ERASE ALL 34 PROTE...

Страница 143: ...4 HDD 3 89 94 MEMORY CARD 89 94 GENERAL SET category SOUND DISP SET VOLUME 30 80 BEEP 80 LCD BRIGHT 80 LCD BL LEVEL 80 LCD COLOR 81 DISPLAY SET 81 OUTPUT SETTINGS TV TYPE 81 COMPONENT 82 HDMI RESOLUTION 82 DISP OUTPUT 82 CLOCK LANG CLOCK SET 15 AREA SET 82 AUTO CLOCK ADJ 1 51 AUTO AREA ADJ 1 51 SUMMERTIME 83 LANGUAGE SET 83 POWER SETTINGS A SHUT OFF 83 POWER ON BY LCD 83 OTHER SETTINGS DEMO MODE 8...

Страница 144: ...r camcorder from focusing on glass or metal mesh in windows between the camcorder and the subject PORTRAIT Soft portrait Brings out the subject such as people or flowers while creating a soft background SPOTLIGHT Prevents people s faces from appearing excessively white when subjects are lit by strong light BEACH Takes the vivid blue of the ocean or a lake SNOW Takes bright pictures of a white land...

Страница 145: ...odium lamps or incandescent like color lamps ONE PUSH The white balance will be adjusted according to the ambient light Touch ONE PUSH Frame a white object such as a piece of paper to fill the screen under the same lighting conditions as you will shoot the subject Touch flashes quickly When the white balance has been adjusted and stored in the memory the indicator stops flashing Notes Set WHITE BA...

Страница 146: ...t is recorded in suitable brightness even when there is strong contrast between the subject and the background such as subjects in the spotlight on stage Touch the subject in the frame of which you want to adjust the exposure To return the setting to automatic exposure touch AUTO Notes EXPOSURE is automatically set to MANUAL SPOT FOCUS You can select and adjust the focal point to aim it at a subje...

Страница 147: ...distance at which the subject is focused on used as a guide if it is dark and focus adjustment is difficult appears for a few seconds in the following cases This information will not display correctly if a conversion lens sold separately is being used When the focus mode is switched from automatic to manual When you set focus manually TELE MACRO This is useful to shoot small subjects such as flowe...

Страница 148: ...ake is excessive or there are moving objects in the background during recording image analysis will not be performed effectively and images may contain noise as a result It is recommended that you record images under stable conditions for example using a tripod Impact sound may be detected by the internal microphone even when an external microphone is attached SMTH SLW REC Smooth slow rec Fast mov...

Страница 149: ...sate for camera shake Set STEADYSHOT to OFF when using a tripod sold separately then the image becomes natural ACTIVE Provides a more powerful SteadyShot effect STANDARD Provides the SteadyShot effect under relatively stable recording conditions OFF The SteadyShot function is not used Notes If you change the setting of STEADYSHOT the imaging field will also change accordingly You can magnify image...

Страница 150: ...t wear glasses a hat or mask The subject s faces directly towards the camera The detected faces are recorded in Face Index however some faces may not be Also there is a limit to the number of faces that can be recorded in Face Index To play back from the Face Index see page 32 PRIORITY SETTING Selects the priority subject for the face detection or the smile shutter Adjusts focus color exposure aut...

Страница 151: ...or out MICREF LEVEL Microphone reference level You can select the microphone level for recording sound NORMAL Records various ambient sounds converting them into the appropriate level LOW Records ambient sound faithfully Select LOW when you want to record an exciting and powerful sound in a concert hall etc This setting is not suitable for recording conversations OTHER REC SET DIGITAL ZOOM You can...

Страница 152: ...OR You can capture wider range of colors Various colors such as the brilliant color of flowers and turquoise blue of the sea can be more faithfully reproduced Refer to the instruction manuals of the TV OFF Records in ordinary color range ON Records in x v Color Notes Set X V COLOR to ON when the recorded movie will be played back on an x v Color compliant TV If the movie recorded with this functio...

Страница 153: ...obscures the lamp The CHG flash charge lamp p 12 flickers while charging the flash and remains lit when the battery charge is complete If you use the flash in bright places such as when shooting a backlit subject the flash may not be effective The built in flash is not flashed when CONVERSION LENS p 71 is set to other than OFF you cannot also set FLASH MODE The flash is not flashed in movie record...

Страница 154: ...deye reduction may not produce the desired effect due to individual differences and other conditions The redeye function does not work with automatic recording by SMILE DETECTION FILE NO File number You can select the way to assign file number of photos SERIES Assigns file numbers of photos in sequence The file number becomes larger each time you record a photo Even if the memory card is replaced ...

Страница 155: ...tness White balance Gain Shutter speed Aperture value Exposure Flash COORDINATES HDR CX350VE XR350VE See page 50 Tips The data code is displayed on the TV screen if you connect your camcorder to a TV The indicator toggles through the following sequences as you press DATA CODE on the Wireless Remote Commander DATE TIME CAMERA DATA COORDINATES HDR CX350VE XR350VE OFF no indication Depending on the r...

Страница 156: ... PLAYLIST EDIT See page 45 OTHERS Items for other settings See Using menus p 61 on the operation The default settings are marked with YOUR LOCATION HDR CX350VE XR350VE See page 47 USB CONNECT See page 58 TV CONNECT Guide See page 36 MUSIC TOOL HDR CX300E CX350E CX350VE CX370E XR350E XR350VE See page 34 BATTERY INFO You can check the estimated remaining capacity of the battery To close the battery ...

Страница 157: ...der disconnect the AC Adaptor or eject the memory card from your camcorder The access lamp is lit or flashing while formatting memory card To prevent data on the internal recording media from being recovered EMPTY allows you to write unintelligible data onto the internal recording media of the camcorder In this way it may become more difficult to recover any original data When you dispose of or tr...

Страница 158: ... panel OFF Cancels the melody LCD BRIGHT You can adjust the brightness of the LCD screen by touching Tips This adjustment does not affect the recorded images in any way LCD BL LEVEL LCD backlight level You can select the brightness of the LCD screen s backlight NORMAL Standard brightness BRIGHT Brightens the LCD screen Notes When you connect your camcorder to the wall outlet wall socket using the ...

Страница 159: ...s or indicators are displayed in the following cases When you turn on your camcorder The LCD screen is touched Except rec zoom buttons on LCD When you switch your camcorder to the movie recording photo recording or playback modes OUTPUT SETTINGS TV TYPE You need to convert the signal depending on the TV connected when playing back movies and photos The recorded movies and photos are played back as...

Страница 160: ...ignal 720p Outputs the 720p signal 576p Outputs the 576p signal STD CONTENTS Set the output image resolution recorded with standard definition image quality STD AUTO Normal setting outputs the signal according to the TV automatically 576p Outputs the 576p signal 576i Outputs the 576i signal DISP OUTPUT Display output You can set where the screen displays are to be output LCD PANEL Shows displays s...

Страница 161: ... set your camcorder to turn on and off when you open and close the LCD screen ON The camcorder turns on and off when the LCD screen opens and closes OFF The camcorder does not turn on and off when the LCD screen opens and closes OTHER SETTINGS DEMO MODE When your camcorder is connected to a wall outlet wall socket a demonstration movie appear about 10 minutes after you turn on the Movie lamp by pr...

Страница 162: ...non gravity situation the drop sensor activates When you record images during an activity such as roller coasting or skydiving you can set DROP SENSOR to OFF so as not to activate the drop sensor CTRL FOR HDMI Control for HDMI When connecting your camcorder to a BRAVIA Sync compatible TV with the HDMI cable sold separately you can play back movies on your camcorder by aiming the TV s Remote Comman...

Страница 163: ...n p 87 Memory card p 87 Recording p 87 Playback p 89 Playing back images stored on memory card on other devices p 90 Editing movies photos on your camcorder p 90 Playback on the TV p 90 Dubbing Connecting to other devices p 91 GPS HDR CX350VE XR350VE p 91 Connecting to a Computer p 91 Examples of functions that cannot be used simultaneously p 91 Overall operations Wireless Remote Commander The pow...

Страница 164: ...y not function properly Another DVD device malfunctions when you use the supplied Wireless Remote Commander Select a commander mode other than DVD 2 for your DVD device or cover the sensor of your DVD device with black paper Batteries power sources The power abruptly turns off Use the AC Adaptor In the default setting when about 5 minutes have elapsed while you do not operate your camcorder the ca...

Страница 165: ...ork correctly or do not work at all Adjust the touch panel CALIBRATION p 108 The buttons on the touch panel quickly disappear Set DISPLAY SET to ON p 81 Memory card Operations using the memory card cannot be performed If you use the memory card formatted on a computer format it again on your camcorder p 79 Images stored on the memory card cannot be deleted The maximum number of images that you can...

Страница 166: ...W in SCENE SELECTION The actual recording time for movies is less than the expected recording time of the recording media Depending on the recording conditions the time available for recording may be shorter for example when recording a fast moving object etc p 96 The camcorder stops operating The temperature of your camcorder is extremely high Turn off your camcorder and leave it for a while in a...

Страница 167: ... is not recorded correctly If you disconnect an external microphone etc during recording movies sound may not be recorded correctly Connect the microphone again in the same way as when you start recording movies Playback Images cannot be played back Select the type of recording media you want to play back p 17 Select the image quality of the movie you want to play back p 25 Images recorded on othe...

Страница 168: ...standard definition image quality STD movies to a Playlist Erase unnecessary movies from the Playlist p 46 You cannot add photos in the Playlist A movie cannot be divided A movie that is too short cannot be divided A protected movie cannot be divided A photo cannot be captured from a movie The recording media where you want to save photos is full Playback on the TV Neither image nor sound is playe...

Страница 169: ...urrent location on the map of the camcorder is different from the actual current location The margin of error of the radio signal from GPS satellites is large The margin of error can be as wide as several hundred meters at the maximum Connecting to a Computer PMB cannot be installed Check the computer environment or installation procedure required to install PMB PMB does not work correctly Quit PM...

Страница 170: ...he battery pack temperature is high Change the battery pack or place it in a cool place C 13 C 32 Remove the power source Reconnect it and operate your camcorder again E Follow the steps from to on page 85 Warning on the internal hard disk of the camcorder Fast flashing The internal hard disk of the camcorder is full An error may have occurred with the internal hard disk of the camcorder Battery l...

Страница 171: ... There is something wrong with the flash Warning indicator pertaining to camera shake warning The amount of lights is not sufficient so camera shake easily occurs Use the flash The camcorder is unsteady so camera shake easily occurs Hold the camcorder steady with both hands and record the image However note that the camera shake warning indicator does not disappear Warning indicator pertaining to ...

Страница 172: ... it does not work copy the image using the supplied software There is no HD movie management information Create new information You cannot record or play back movies because no high definition image quality HD movie management information exists If you touch YES new management information is created and you can record or play back movies with high definition image quality HD You can record standar...

Страница 173: ...r delete folders using your computer This memory card may not be able to record or play movies Use a memory card recommended for your camcorder p 18 This memory card may not be able to record or play images correctly Use a memory card recommended for your camcorder p 18 Do not eject the memory card during writing Data may be damaged Reinsert the memory card and follow the instructions on the LCD s...

Страница 174: ...HQ Typical recording time shows the time when you repeat recording start stop switching the MODE lamp and zooming Times measured when using the camcorder at 25 C 77 F 10 C to 30 C 50 F to 86 F is recommended The recording and playback time will be shorter when you use your camcorder in low temperatures The recording and playback time will be shorter depending on the conditions under which you use ...

Страница 175: ...and m minute Recording mode Recording time HDR XR350E HDR XR350VE HD FX 15 h 20 m 15 h 10 m HD FH 19 h 50 m 19 h 40 m HD HQ 39 h 40 m 39 h 30 m HD LP 67 h 30 m 67 h 10 m Standard definition image quality STD in h hour and m minute Recording mode Recording time HDR XR350E HDR XR350VE STD HQ 40 h 50 m 40 h 40 m Tips You can record movies of a maximum of 3 999 scenes with high definition image qualit...

Страница 176: ...5 2GB 520 4GB 1000 8GB 2100 16GB 4250 32GB 8500 The selected image size is effective when the Photo lamp is lit The number of recordable photos of memory card shown is for the maximum image size of your camcorder The actual number of recordable photos is displayed on the LCD screen during recording p 112 The number of recordable photos of memory card may vary depending on the recording conditions ...

Страница 177: ...ps average 720 576 pixels 16 9 4 3 The photo recording pixels and the aspect ratio Photo recording mode 3 072 2 304 dots 4 3 3 072 1 728 dots 16 9 1 600 1 200 dots 4 3 640 480 dots 4 3 Dual recording 3 072 1 728 dots 16 9 2 304 1 728 dots 4 3 Capturing a photo from a movie 1 920 1 080 dots 16 9 640 360 dots 16 9 640 480 dots 4 3 ...

Страница 178: ...rd definition image quality STD movies you need a PAL system based TV with AUDIO VIDEO input jacks An A V connecting cable must be connected On TV color systems Your camcorder is a PAL system based camcorder If you want to view the playback image on a TV it must be a PAL system based TV with an AUDIO VIDEO input jack System Used in PAL Australia Austria Belgium China Czech Republic Denmark Finland...

Страница 179: ...isbon London 01 00 Berlin Paris 02 00 Helsinki Cairo Istanbul 03 00 Moscow Nairobi 03 30 Tehran 04 00 Abu Dhabi Baku 04 30 Kabul 05 00 Karachi Islamabad 05 30 Calcutta New Delhi 06 00 Almaty Dhaka 06 30 Yangon 07 00 Bangkok Jakarta 08 00 Hong Kong Singapore Beijing 09 00 Seoul Tokyo 09 30 Adelaide Darwin Time zone differences Area setting 10 00 Melbourne Sydney 11 00 Solomon Is 12 00 Fiji Wellingt...

Страница 180: ...d HDR XR350E XR350VE Internal hard disk memory card 1 1080i specification A high definition specification which utilizes 1 080 effective scanning lines and the interlace system 2 720p specification A high definition specification which utilizes 720 effective scanning lines and the progressive system 3 Data recorded in AVCHD format other than the above mentioned cannot be played on your camcorder A...

Страница 181: ...e and the degree of accuracy may be changed intentionally Error during the triangulating process The camcorder acquires location information periodically during triangulating There is a slight time difference between when the location information is acquired and when the location information is recorded on an image therefore the actual recording location may not match exactly the location on the m...

Страница 182: ...mory Stick media with your camcorder However we do not guarantee the operation of all types of Memory Stick Duo media on your camcorder Types of Memory Stick media Recording Playback Memory Stick Duo media with MagicGate Memory Stick PRO Duo Mark2 media Memory Stick PRO HG Duo media This product does not support 8 bit parallel data transfer but it supports 4 bit parallel data transfer the same as ...

Страница 183: ...e a malfunction When using Memory Stick PRO Duo media inserted into Memory Stick Duo media adaptor on Memory Stick media compliant device make sure the Memory Stick PRO Duo media adaptor is inserted into the device in the correct direction If inserted in the wrong direction the device may be damaged Do not insert Memory Stick Duo media adaptor without Memory Stick PRO Duo media attached into Memor...

Страница 184: ...ry pack is also consumed when your camcorder is in recording standby or playback pause Have spare battery packs ready for 2 or 3 times the expected recording time and make trial recordings before making the actual recording Do not expose the battery pack to water The battery pack is not water resistant About the remaining battery time indicator When the power goes off even though the remaining bat...

Страница 185: ...rder and have it checked by a Sony dealer before operating it any further Avoid rough handling disassembling modifying physical shock or impact such as hammering dropping or stepping on the product Be particularly careful of the lens Keep the LCD screen closed when you are not using your camcorder Do not wrap your camcorder with a towel for example and operate it Doing so might cause heat to build...

Страница 186: ...ended that you connect your camcorder to the wall outlet wall socket using the supplied AC Adaptor during the operation MENU Show others OTHER SETTINGS under GENERAL SET category CALIBRATION Touch displayed on the screen with the corner of memory card or the like 3 times Touch CANCEL to cancel calibration Notes If you did not press the right spot try the calibration again Do not use a sharp pointe...

Страница 187: ...ard to somebody it is recommended that you delete date completely using data deletion software on a computer Also when you dispose of the memory card it is recommended that you destroy the actual body of the memory card On trademarks Handycam and are registered trademarks of Sony Corporation AVCHD and AVCHD logotype are trademarks of Panasonic Corporation and Sony Corporation Memory Stick Memory S...

Страница 188: ...SE FOR THE PERSONAL AND NON COMMERCIAL USE OF A CONSUMER TO i ENCODE VIDEO IN COMPLIANCE WITH THE AVC STANDARD AVC VIDEO AND OR ii DECODE AVC VIDEO THAT WAS ENCODED BY A CONSUMER ENGAGED IN A PERSONAL AND NON COMMERCIAL ACTIVITY AND OR WAS OBTAINED FROM A VIDEO PROVIDER LICENSED TO PROVIDE AVC VIDEO NO LICENSE IS GRANTED OR SHALL BE IMPLIED FOR ANY OTHER USE ADDITIONAL INFORMATION MAY BE OBTAINED ...

Страница 189: ...re programs under the conditions of the supplied GPL LGPL Source code is provided on the web Use the following URL to download it When downloading the source code select DCR SX43 as the model for your camcorder http www sony net Products Linux We would prefer you do not contact us about the contents of source code Read license2 pdf in the License folder on the CD ROM You will find licenses in Engl...

Страница 190: ...ing image quality HD STD and recording mode FX FH HQ LP 25 Recording playback editing media 17 0 00 00 Counter hour minute second 29 00min Estimated recording remaining time 20 FADER 66 9999 9999 9999 Approximate number of recordable photos and recording media 23 Playback folder 30 100 112 Current playing movie or photo Number of total recorded movies or photos 29 Bottom Indicator Meaning FACE DET...

Страница 191: ...er to the operating instructions supplied with your accessory for details The Active Interface Shoe has a safety device for fixing the installed accessory securely To connect an accessory press down and push it to the end and then tighten the screw To Indicator Meaning OPTION button 63 VIEW IMAGES button 28 Slide show button 35 YOUR LOCATION button 49 101 0005 Data file name 30 Protected image 40 ...

Страница 192: ... lights up in red during recording The lamp flashes when the remaining recording media capacity or battery power is low Remote sensor Infrared port Point the Wireless Remote Commander p 115 towards the remote sensor to operate your camcorder Built in microphone LCD screen Touch panel 15 27 If you rotate the LCD panel 180 degrees you can close the LCD panel with the LCD screen facing out This is co...

Страница 193: ... lit or flashing the camcorder is reading or writing data PUSH battery release button 13 Wireless Remote Commander DATA CODE button 76 Displays the date and time camera setting data or coordinates HDR CX350VE XR350VE of the recorded images when you press this button during playback PHOTO button 23 The on screen image when you press this button will be recorded as a still image HDR CX300E CX305E CX...

Страница 194: ...orange frame disappears When you press any of or ENTER again the frame appears at the position where it was displayed last You cannot select some buttons on the LCD screen using To change the battery of the Wireless Remote Commander While pressing on the tab inset your fingernail into the slit to pull out the battery case Place a new battery with the side facing up Insert the battery case back int...

Страница 195: ... LOW LUX 72 LP 25 M Maintenance 102 MANAGE MEDIA 17 79 MANUAL SETTINGS 66 Map Index 49 MEDIA FORMAT 79 MEDIA INFO 79 MEDIA SETTINGS 17 Memory card 18 Memory Stick media 18 104 Memory Stick PRO HG Duo media 18 104 Memory Stick PRO Duo media 18 104 Menus 61 64 MICREF LEVEL 73 Mirror mode 27 Moisture condensation 107 MOVIE DUB 43 MOVIE MEDIA SET 17 Movies 20 29 MPEG 4 AVC H 264 102 Symbols 1080i 576i...

Страница 196: ...89 94 RESET 114 S Saving images in external media 52 SCENARIO 33 SCENARIO ERASE 34 SCENE SELECTION 66 92 Screen indicators 112 Self diagnosis display Warning indicators 92 SELF TIMER 74 SHOOTING SET 71 Slide show 35 SLIDE SHOW SET 35 SMILE DETECTION 72 92 SMILE SENSITIVITY 73 92 Smile Shutter 27 SMTH SLW REC 70 SNOW 66 SOUND DISP SET 80 SPOT FOCUS 68 SPOTLIGHT 66 SPOT METER 68 SPOT MTR FCS 68 STEA...

Страница 197: ...Additional information on this product and answers to frequently asked questions can be found at our Customer Support Website http www sony net ...

Страница 198: ......

Страница 199: ...ge Haute Définition HD correspond au réglage par défaut Deutsch Hinweise zur Verwendung von SD Speicherkarten Verwenden Sie SD Speicherkarten Class 4 oder schneller Filme die mit Standardbildqualität STD auf SD Speicherkarten aufgezeichnet wurden können nicht auf AV Geräten anderer Hersteller abgespielt werden Die Standardeinstellung ist High Definition Bildqualität HD Nederlands Opmerkingen over ...

Страница 200: ...iees sur support DVD Toutefois un support DVD contenant des videos AVCHD ne doit pas etre utilise sur des lecteurs ou graveurs de DVD Ie lecteur graveur de DVD risquerait de ne pas pouvoir ejecter Ie support et pourrait effacer Ie contenu de ce dernier sans avertissement Un support DVD contenant des videos AVCHD peut etre lu sur un lecteur graveur de Biu Ray Disc compatible ou sur tout autre appar...

Страница 201: ...vigation or communication systems air traffic control direct life support machines or weapons systems in which the failure of the SOFTWARE could lead to death personal injury or severe physical or environmental damage High Risk Activities SONY its affiliates their respective suppliers and SONY s Licensors specifically disclaim any ellpress or implied warranty offitness for High Risk Activities EXC...

Страница 202: ......

Страница 203: ......

Страница 204: ...nic coupon good for a 15 discount on the purchase of select Sony accessories at the online Sony Style store Our automalic registration process below makes it easy to register your Sony Digital Imaging Product METHOD I Automatic USB Reg shot on F r Wlndu Pt 1 Tum on your PC 2 PIoce he CD IlOM suppll With your pro J n 0 your PC s CD dmIe 3 en the Inslo lotio menu oppco cI Product Reg lratlOl l 4 Con...

Страница 205: ... With 15 discount the more you buy the more you save Power Tripods Shooting Grip Kits Cases Water Housing Microphones Lenses Filters Lights Cables Media DVDirect Recorders 04 05 06 07 08 09 10 11 12 13 14 15 16 17 18 19 ...

Страница 206: ...FV50 55999 Typ 68 26 5 3Q Ah Typ 68 1 70 WI 1030 rrAh NP FV70 599 99 Typ 6 8 1 1 0 It 2060 mAh Off r ong r bolr fe compo 0 I pI O Fa I I re harg ng whet u eel t 1 the Sony AC V 0 AC dop rIc 0 r ActiFORCE 1 O1toUTlltUM l J ...

Страница 207: ...9 99 SUpplies power when VIeWing Imoges on your compohble TV or tronslernng Imoges 10 your PC AC lOO 240V SO 60Hz fltoUTHIUAI l J lnloUTHJU AC VQV10 5149 99 Compatible WIth H P ond V 5eroes InloUTHIUM bollenes Duol battery slots for consecutove chorglng 5electoble vieWIng 01 remolnlng baHery life 11th LCD ActiFORCE InIoUTHIU Ii Register online now at hftps producfreglsfraflon sony com to save 15 o...

Страница 208: ...461 8 II f nd d o ontro bu It nto I VCT 60AV S9Q 9Q df r r 1 hI PO Register online now at hffps productregisfration sony com to save 15 on these eligible items at SonyStyle com ...

Страница 209: ... ght yef sturdy Iravel tnpod Extends up to a generous 39 3 8 Folds down to a compact 14 VCT MTK 19 99 Compoct deSign for easy porfability Extendable legs allow for a maXimum heoght of 7 1 8 Comes 11th Its own carrying pouch and cleaning cloth mono rol Unit RM AV2 49 99 Provides remo control over baSIC camcorder functions Including Record Start Stop Power Photo Capture and Zoom Two step zoom featur...

Страница 210: ...Shooting Grip 8 6 669 GP AVT1 S99 99 Register online now at httpS productregistrotion sony com to save 15 on these eligible items at SonyStyle com ...

Страница 211: ... HOR XR35QV CX35QV CX300 AdiFORCEN Accessory Kit ACC FV70 SI14 99 Includes Sony LCS X30 corrymg case and NNV70 lon 1 e InfoUTHIUM rechorgeab e be ery Soves you S25 hen boughl ogether as a II AdiFORCE Accessory Ace HOV7 SI29 99 A greal combtno on a a greal volue Includes Sony LCS X21 corfYlng case P FV70 ong bfe InfollTHIUM rechorgea Ie bollery and VMC 15MHO HOMI cobl Saves you S50 when bought loge...

Страница 212: ...Register online now at https j producfregisfrafion sony com to save 15 on these eligible items at SonyStyle com ...

Страница 213: ...Cases lC5 MX100 49 9Q HOI 1 55O XR3flJVlC 5f1JV Modular InterFace Case o rop a or y1 on on r ot1n hlr VJ IISl lr slly1e co LCS X30 LCS BBA 34 9Q ...

Страница 214: ...rds underwater sounds Hord ploshc housIng shields comcorder Irom rOln snow ond other mOIsture Offers wolerprool proleclron up 10 17 feet deep Built n Stereo microphor1e ollows ror recording of oudIO Obove and under water Compotlble with HDR eX350V CX300 ...

Страница 215: ...999 Act l 0 n InterfaceS loe ECM HW2 5229 99 T B ECM AW3 522999 ECM HGZI b999 Pn d 0 d co lroll d Ac n In er eSholl ECM HST1 599 99 Register online now at hHps producfreg sfrotion sonycom to save 15 on these eligible items at SonyStyle com ...

Страница 216: ...9 S lor Iluslro purposes COMPARISON T1 l W th Wide Angie Lens With Bull In Lens HVl HGI730A 30 mm 5199 99 o 1 7X telephoto converter lens lor 30 mm dIameter camcorders oHelps ma e dlstan subjects appear closer oAluminum hOUSing for superb durobillty Compohble wJlh HDl Xl 35OV CX350V CX300 Slmuloled Images lor Slrol purposes With Tele Conversion Lens With Buill In Lens rw l l COMPARISON VCl HG1737C...

Страница 217: ...O ord 350VIC 350VICX300 Vf 30 KB 3999 VF 30CP B 69 99 WU Polo F eff glo anti we F ps proecl d or d ole Hard carrying case ler pro ec or F 30 d 0rT er co corde mpO ble Ilh DR 350V C 350VICX300 NC 1 v VF 37NKB 53999 ...

Страница 218: ...ique Active Interface Shoe FlOsh range IS 16 teet Active n leflateShoe Infrared light 3 Wott Video light AclJVe n InlerlateSl10e Video light HVl Hll S39 99 Powered dlreclly from ond controlled by HonClycom comcOfder through unique Actrve Inlerfoce Shoe 3W Irght Turns on outomofocolly Color grophlte Silver HVl HIRl S99 99 Powered directly from and con rolled by Honclycom comcorder through unIque Ac...

Страница 219: ...s MT32G S249 99 16 GB 14 9 GB 011011 Memory Slick PRO Duo Ms MT16G SB999 B GB 135 GB ovoll Memory Slick POO Duo Ms MTBG S49 99 M orv SIC a pt ov des a con WOV 10 ore 0 9 or vid os ono rna es C r lfi or 1 1 WI I AVOiD record ng 1920 Available storage capacity may vary and a portion of the memory is l I ed lor dalo management funeftons 1 Memory Slick PRO Duo medIa compatibility capoclty lron e sP4te...

Страница 220: ...ss DVD Recorder VIlD Pl 5149 99 One touch video transfer to OVO VIO USB from Sony Hondycom camcorder Records up to 6x speed 30 minutes of SO video In 5 minutes Creotes movie chapters on DVD No AC power requtred Runs off USB power from Sony Hondycom camcorder ...

Страница 221: ...sh 10 10 tronster your dlgllol photos to DVD as a slid show pho 0 storage 2 color LCD widescreen for photo Vldoo OfljMOW VRo MC10 529999 Tronsfer SO hom vidP O from rtue Iy any sourc 10 DVD vrlhOut a PC Trans er HD home Ideo Irom SOny AVCHD Hondycom comcold s and AVCHD compot Cyber hoI c ro oDVD Tronsf r drgllol plCtur to DVD Irom co 10 s lT1Cn1ory cord Connec 0 compot ble TV ond VRo MC10 doubles ...

Страница 222: ...II11111111111111111111111111 ...

Страница 223: ...ded for in any enclosed software Limited Warranty Please refer to the End User License Agreements included with the Productfor your rights and obligations with respect to the software Instructions To obtain warranty service you must deliverthe product freight prepaid in either its original packaging or packaging affording an equal degree of protection to the Sony authorized service facility specif...

Отзывы: