background image

56

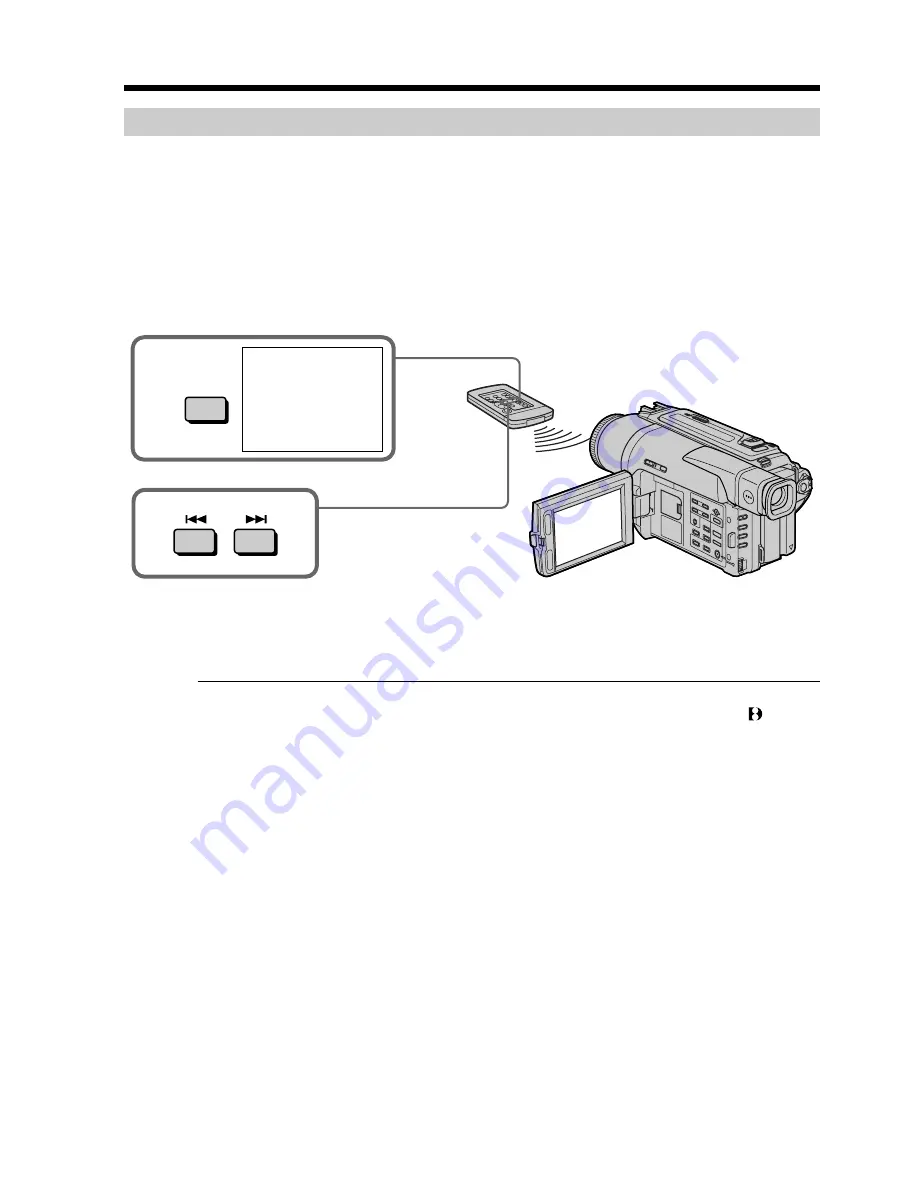
Searching for a photo – Photo search/Photo scan

Scanning photo

(

1

)

Set the POWER switch to VTR.

(

2

)

Press SEARCH MODE on the Remote Commander repeatedly, until the photo scan
indicator appears.
The indicator changes as follows:
DATE SEARCH 

t

 PHOTO SEARCH 

t

 PHOTO SCAN

(

3

)

Press 

.

 or 

>

.

Each photo is played back for about 5 seconds automatically.

To stop scanning

Press 

x

.

Note

The photo search and photo scan work only for tapes recorded in the Digital8   system.

If a tape has a blank portion in the recorded portions

The photo search and photo scan functions may not work correctly.

3

2

SEARCH

MODE

PHOTO    00

SCAN

Содержание Handycam DCR-TRV525

Страница 1: ...s manual thoroughly and retain it for future reference Owner s Record The model and serial numbers are located on the bottom Record the serial number in the space provided below Refer to these numbers whenever you call upon your Sony dealer regarding this product 3 059 561 11 2 DCR TRV520 TRV525 Digital Video Camera Recorder DCR TRV520 ...

Страница 2: ...ed operation Declaration of Conformity Trade Name SONY Model No DCR TRV525 Responsible Party Sony Electronics lnc Address 1 Sony Drive Park Ridge NJ 07656 USA Telephone No 201 930 6972 This device complies with Part15 of the FCC Rules Operation is subject to the following two conditions 1 This device may not cause harmful interference and 2 this device must accept any interference received includi...

Страница 3: ...nd on the user is encouraged to try to correct the interference by one or more of the following measures Reorient or relocate the receiving antenna Increase the separation between the equipment and receiver Connect the equipment into an outlet on a circuit different from that to which the receiver is connected Consult the dealer or an experienced radio TV technician for help For customers in CANAD...

Страница 4: ...e with picture effects 49 Playing back a tape with digital effects 50 Enlarging recorded images PB ZOOM 51 Quickly locating a scene using the zero set memory function 52 Searching a recording by date Date search 53 Searching for a photo Photo search Photo scan 55 Editing Dubbing a tape 57 Using with analog video unit and PC Signal convert function 59 Recording video or TV programs 60 Inserting a s...

Страница 5: ... battery 1 p 106 The lithium battery is already installed in your camcorder 5 Size AA R6 battery for Remote Commander 2 p 128 Contents of the recording cannot be compensated if recording or playback is not made due to a malfunction of the camcorder video tape etc 6 A V connecting cable 1 p 27 7 Shoulder strap 1 p 125 8 Lens cap 1 p 16 9 PC serial cable 1 p 91 0 Memory Stick 1 p 72 qa Application s...

Страница 6: ...4 Use the battery pack when using your camcorder outdoors p 10 3Close the cassette compartment by pressing the mark on the cassette compartment The cassette compartment automatically goes down Close the lid of the cassette compartment 1Open the lid of the cassette compartment and press EJECT The compartment opens automatically 2Insert a cassette into the cassette compartment with its window facing...

Страница 7: ... Do not pick up your camcorder by holding the viewfinder the LCD panel or the battery pack 3Open the LCD panel while pressing OPEN The picture appears on the LCD screen 2Set the POWER switch to CAMERA while pressing the small green button 4Press the red button Your camcorder starts recording To stop recording press the red button again 1Remove the lens cap 1Set the POWER switch to VTR while pressi...

Страница 8: ... Type of difference DCR TRV520 TRV525 viewfinder B W Color Before using your camcorder With your digital camcorder you can use Hi8 Digital8 video cassettes Your camcorder records and plays back pictures in the Digital8 system Also your camcorder plays back tapes recorded in the Hi8 standard 8 analog system You however cannot use the functions in Advanced Playback Operations on page 49 to 56 for pl...

Страница 9: ... the recorded picture in any way Effective ratio of pixels and or screen are 99 99 or more Do not let your camcorder get wet Keep your camcorder away from rain and sea water Letting your camcorder get wet may cause your camcorder to malfunction Sometimes this malfunction cannot be repaired a Never leave your camcorder exposed to temperatures above 140 F 60 C such as in a car parked in the sun or u...

Страница 10: ...e the battery pack Slide the battery pack out in the direction of the arrow while pressing BATT RELEASE down Afterinstallingthebatterypack Do not carry your camcorder by holding the battery pack If you do so the battery pack may slide off your camcorder unintentionally damaging your camcorder Step 1 Preparing the power supply BATT RELEASE ...

Страница 11: ...rge is completed until FULL appears in the display window Fully charging the battery allows you to use the battery longer than usual After charging the battery pack Disconnect the AC power adaptor from the DC IN jack on your camcorder Notes Prevent metallic objects from coming into contact with the metal parts of the DC plug of the AC power adaptor This may cause a short circuit damaging the AC po...

Страница 12: ... 290 185 165 265 240 150 135 NP F730H F750 395 355 225 200 305 270 175 155 NP F930 515 465 295 265 415 375 235 215 NP F950 610 550 345 315 475 430 270 245 NP F960 720 645 410 365 565 505 320 285 DCR TRV525 Recording with Recording with Battery pack the viewfinder the LCD screen Continuous Typical Continuous Typical NP F330 supplied 105 95 60 55 75 65 40 35 NP F530 175 160 100 90 120 105 70 60 NP F...

Страница 13: ... The battery life will be shorter if you use your camcorder in a cold environment Theremainingbatterytimeindicator The indicator may not be correct depending on the conditions in which you are recording When you close the LCD panel and open it again it takes about 1 minute for the correct remaining battery time to be displayed Ift hepowermaygooffalthoughthebatteryremainingindicatorindicatesthat th...

Страница 14: ...utlet PRECAUTION The set is not disconnected from the AC power source house current as long as it is connected to the wall outlet even if the set itself has been turned off Notes The AC power adaptor can supply power even if the battery pack is attached to your camcorder The DC IN jack has source priority This means that the battery pack cannot supply any power if the power cord is connected to th...

Страница 15: ...tte compartment down Doing so may cause malfunction Your camcorder records pictures in the Digital8 system The recording time when you use your camcorder is half of indicated time on Hi8 tape If you select the LP mode in the menu settings 3 4 of indicated time on Hi8 tape If you use standard 8 tape be sure to play back the tape on this camcorder Mosaic pattern noise may appear when you play back s...

Страница 16: ...turns off 5 Press START STOP Your camcorder starts recording The REC indicator appears The camera recording lamp located on the front of your camcorder lights up To stop recording press START STOP again The recording lamp lights up in the viewfinder when you record with the viewfinder DCR TRV520 only Camera recording lamp Microphone Notes Fasten the grip strap firmly Do not touch the built in micr...

Страница 17: ...HT The LCD panel moves about 90 degrees to the viewfinder side and about 180 degrees to the lens side If you turn the LCD panel over so that it faces the other way the indicator appears on the LCD screen and in the viewfinder Mirror mode When closing the LCD panel set it vertically until it clicks and swing it into the camcorder body Note When using the LCD screen except in the mirror mode the vie...

Страница 18: ...he picture quality deteriorates as the picture is processed digitally Notesondigitalzoom Digital zoom starts to function when zoom exceeds 25 The picture quality deteriorates as you go toward the T side Whenyoushootclosetoasubject If you cannot get a sharp focus move the power zoom lever to the W side until the focus is sharp You can shoot a subject that is at least about 2 feet 5 8 inch about 80 ...

Страница 19: ...ndicates the recording or playback time 0 00 00 hours minutes seconds in CAMERA mode and 0 00 00 00 hours minutes seconds frames in VTR mode You cannot rewrite only the time code When you play back tapes recorded in the Hi8 standard 8 system the tape counter appears You cannot reset the time code or the tape counter Recording a picture STBY REC indicator Remaining tape indicator This appears after...

Страница 20: ...essEXPOSUREwhenshootingbacklitsubjects The backlight function will be canceled Shooting in the dark NightShot Super NightShot The NightShot function enables you to shoot a subject in a dark place For example you can satisfactorily record the environment of nocturnal animals for observation when you use this function While your camcorder is in CAMERA or MEMORY mode slide NIGHTSHOT to ON and NIGHTSH...

Страница 21: ...unction in bright places ex outdoors in the daytime This may cause your camcorder to malfunction When you keep NIGHTSHOT set to ON in normal recording the picture may be recorded in incorrect or unnatural colors If focusing is difficult with the autofocus mode when using the NightShot function focus manually WhileusingtheNightShotfunction youcannotusethefollowingfunctions Exposure PROGRAM AE While...

Страница 22: ...he countdown the beep sound gets faster then recording starts automatically To stop the self timer recording Press START STOP Use the Remote Commander for convenience To record still images using the self timer Press PHOTO in step 2 P 30 To cancel self timer recording Press self timer so that the indicator disappears from the LCD or viewfinder screen while your camcorder is in the standby mode Not...

Страница 23: ...If you press START STOP re recording begins from the point you released EDITSEARCH You cannot monitor the sound Rec Review You can check the section which you have stopped most recently Press the 7 side of EDITSEARCH momentarily in the standby mode The section you have stopped most recently will be played back for a few seconds and then your camcorder will return to the standby mode You can monito...

Страница 24: ... switch to VTR while pressing the small green button The video control buttons light up 3 Open the LCD panel while pressing OPEN 4 Press m to rewind the tape 5 Press N to start playback 6 To adjust the volume press either of the two buttons on VOLUME The speaker on your camcorder is silent when the LCD panel is closed To stop playback Press x When monitoring on the LCD screen You can turn the LCD ...

Страница 25: ...alue t no indicator Not to display recording date Set DATA CODE to DATE in the menu settings p 64 The display changes as follows date time t no indicator Notes on the data code function The data code function works only for tapes recorded in the Digital8 system Various settings of the recording data are not recorded when recording images on Memory Stick Recording data Recording data is your camcor...

Страница 26: ... on the Remote Commander during playback For double speed playback in the reverse direction press then press 2 on the Remote Commander To resume normal playback press N To view the picture frame by frame Press C on the Remote Commander in the playback pause mode For frame by frame playback in the reverse direction press c To resume normal playback press N To search the last scene recorded END SEAR...

Страница 27: ...tures With this connection you do not need to connect the yellow video plug of the A V connecting cable Connect an S video cable not supplied to the S video jacks on both your camcorder and the TV or the VCR Connect your camcorder to your TV or VCR with the A V connecting cable supplied with your camcorder to watch the playback picture on the TV screen You can operate the playback control buttons ...

Страница 28: ...unction Press S LASER LINK The lamp on the S LASER LINK button goes out If you use a Sony TV You can turn on the TV automatically when you press S LASER LINK on your camcorder To do so do as follow in advance Turn the TV s main switch on Set AUTO TV ON to ON in the menu settings Point the super laser link emitter of your camcorder at the TV s remote sensor You can switch the video input of the TV ...

Страница 29: ...another still image You can record a still image like a photograph This mode is useful when you want to record an image such as a photograph or when you print a picture using a video printer not supplied You can record about 510 images in the SP mode and about 765 images in the LP mode on a tape which can record for 60 minutes in the SP mode Besides the operation described here your camcorder can ...

Страница 30: ...ess PHOTO firmly Self timer starts counting down from 10 with a beep sound In the last two seconds of the countdown the beep sound gets faster then recording starts automatically To cancel self timer recording Press self timer so that the indicator disappears from the LCD or viewfinder screen while your camcorder is in the standby mode You cannot cancel self timer recording with the Remote Command...

Страница 31: ...DIO VIDEO jack and connect the yellow plug of the cable to the video input of the video printer Refer to the operating instructions of the video printer as well If the video printer is equipped with S video input Use the S video connecting cable not supplied Connect it to the S VIDEO jack and the S video input of the video printer LINE IN VIDEO S VIDEO S VIDEO AUDIO VIDEO Recording a still image o...

Страница 32: ... You cannot select or cancel the wide mode When you cancel the wide mode set your camcorder to the standby mode and then set 16 9WIDE to OFF in the menu setting Connection for a TV Pictures recorded in the 16 9WIDE mode automatically appear on the TV screen at full size when you connect your camcorder to a TV that is compatible with the video ID ID 1 ID 2 system you connect your camcorder to the S...

Страница 33: ...ction MONOTONE When fading in the picture gradually changes from black and white to color When fading out the picture gradually changes from color to black and white 1 You can use this function when D ZOOM is set to OFF in the menu setting 2 Fade in only FADER M FADER mosaic BOUNCE1 2 OVERLAP2 WIPE2 DOT2 ramdom dot a REC STBY REC STBY b ...

Страница 34: ...shes The indicator changes as follows FADER t M FADER t BOUNCE t MONOTONE t OVERLAP t WIPE t DOT The last selected fader mode is indicated first of all 2 Press START STOP The fader indicator stops flashing After the fade in out is carried out your camcorder automatically returns to the normal mode To cancel the fader function Before pressing START STOP press FADER until the indicator disappears 1 ...

Страница 35: ... operating the overlap wipe or dot function Your camcorder stores the image on the tape As the image is being stored the indicator flashes quickly and the image you are shooting disappears from the LCD or viewfinder screen Depending on the tape condition the image may not be recorded clearly While using the bounce function you cannot use the following functions Focus Zoom Picture effect Note on th...

Страница 36: ...phasized and the image looks like an animated cartoon MOSAIC f The image is mosaic 1 Press PICTURE EFFECT in CAMERA mode The picture effect indicator appears 2 Turn the SEL PUSH EXEC dial to select the desired picture effect mode The indicator changes as follows NEG ART y SEPIA y B W y SOLARIZE y SLIM y STRETCH y PASTEL y MOSAIC To turn the picture effect function off Press PICTURE EFFECT While us...

Страница 37: ...INANCEKEY You can swap a brighter area in a still image with a moving image TRAIL You can record the image so that an incidental image like a trail is left SLOW SHTR SLOW SHUTTER You can slow down the shutter speed The slow shutter mode is good for recording dark images more brightly However the image may be less clear OLD MOVIE You can add an old movie type atmosphere to images Your camcorder aut...

Страница 38: ...ws STILL The rate of the still image you want to superimpose on the moving image FLASH The interval of flash motion LUMI The color scheme of the area in the still image which is to be swapped with a moving image TRAIL The vanishing time of the incidental image SLOW SHTR Shutter speed The larger the shutter speed number the slower the shutter speed OLD MOVIE No adjustment necessary The more bars th...

Страница 39: ...k in the slow shutter mode Exposure PROGRAM AE The following functions do not work in the old movie mode Exposure Wide mode Picture effect PROGRAM AE When you turn the power off The digital effect is automatically canceled When recording in the slow shutter mode Auto focus may not be effective Focus manually using a tripod Shutter speed Shutter speed number Shutter speed SLOW SHTR 1 1 30 SLOW SHTR...

Страница 40: ... on fast moving subjects such as in tennis or golf Beach ski mode This mode prevents people s faces from appearing dark in strong light or reflected light such as at a beach in midsummer or on a ski slope Sunset moon mode This mode allows you to maintain atmosphere when you are recording sunsets general night views fireworks displays and neon signs Landscape mode This mode is for when you are reco...

Страница 41: ... to focus only on distant subjects The following functions do not work in the PROGRAM AE mode Slow shutter Old movie Bounce The following functions do not work in the low lux mode Digital effect Overlap Wipe Dot Exposure While setting the NIGHTSHOT to ON the PROGRAM AE function does not work The indicator flashes While shooting in MEMORY mode the low lux mode does not work The indicator flashes If...

Страница 42: ...iewfinder 2 Turn the SEL PUSH EXEC dial to adjust the brightness To return to the automatic exposure mode Press EXPOSURE Notes When you adjust the exposure manually the following function and modes do not work in CAMERA mode Backlight Old movie Slow shutter When you adjust the exposure manually the backlight function does not work in MEMORY mode Your camcorder automatically returns to the automati...

Страница 43: ... 2 Turn the focus ring to sharpen focus To return to the autofocus mode Set FOCUS to AUTO To record distant subjects When you press FOCUS down to INFINITY The lens focuses on infinity and indicator appears When you release FOCUS your camcorder returns to the manual focus mode Use this mode when your camcorder focuses on near objects even though you are trying to shoot a distant object To focus pre...

Страница 44: ...item then press the dial 3 Repeat steps 1 and 2 until the title is laid out as desired 5 Press the SEL PUSH EXEC dial again to complete the setting 6 Press START STOP to start recording 7 When you want to stop recording the title press TITLE VACATION 1 2 TITLE VACATION SIZE SMALL VACATION 3 4 TITLE TITLE END TITLE TITLE END PRESET TITLE HELLO HAPPY BIRTHDAY HAPPY HOLIDAYS CONGRATULATIONS OUR SWEET...

Страница 45: ...follows WHITE y YELLOW y VIOLET y RED y CYAN y GREEN y BLUE The title size changes as follows SMALL y LARGE You cannot input more than 12 characters in LARGE size The title position changes as follows 1y 2y 3y 4y 5y 6y 7y 8y 9 The larger the position number the lower the title is positioned When you select the title size LARGE you cannot choose position 9 When you are selecting and setting the tit...

Страница 46: ...TLE to make the title menu disappear 1 2 3 4 6 TITLE PRESET TITLE HELLO HAPPY BIRTHDAY HAPPY HOLIDAYS CONGRATULATIONS OUR SWEET BABY WEDDING VACATION THE END TITLE END TITLE SET CUSTOM1 CUSTOM2 TITLE END TITLE SET RETURN TITLE END TITLE SET RETURN TITLE END TITLE SET TITLE END P1 A B C D E 12345 F DM F GH I J 67890 K L MNO À È Ì ÒÙ P QR S T Á É Í ÓÚ P U VWX Y Â Ê ÔÆŒ SE T Z à ÕÑ çß Ä Ï ÖÜ Å TITLE ...

Страница 47: ...in your camcorder The power automatically goes off The characters you have entered remain stored in memory Set the POWER switch to OFF CHARGE once and turn it to CAMERA again then proceed from step 1 We recommend setting the POWER switch to VTR or removing the cassette so that your camcorder does not automatically turn off while you are entering title characters If you select The menu for selectin...

Страница 48: ...ter resets to zero 3 Keep pressing the 7 side of EDITSEARCH and release the button at the insert start point a 4 Press START STOP to start recording The scene is inserted Recording stops automatically near the counter zero point Your camcorder returns to the standby mode Notes The zero set memory function works only for tapes recorded in the Digital8 system The picture and the sound may be distort...

Страница 49: ... system You cannot process externally input scenes using the picture effect function You cannot record pictures that you have processed using the picture effect function with this camcorder To record pictures that you have processed using the picture effect function record the pictures on the VCR using your camcorder as a player Pictures processed by the picture effect function Pictures processed ...

Страница 50: ...tal effect function Press DIGITAL EFFECT Notes The digital effect function works only for tapes recorded in the Digital8 system You cannot process externally input scenes using the digital effect function You cannot record images that you have processed using the digital effect function with this camcorder To record images that you have processed using the digital effect function record the images...

Страница 51: ...d Turn the dial downwards t The image moves leftward Turn the dial upwards To cancel PB ZOOM function Press PB ZOOM Notes PB ZOOM works only for tapes recorded in the Digital8 system You cannot process externally input scenes using PB ZOOM function You cannot record pictures that you have processed using PB ZOOM function with this camcorder To record pictures that you have processed using PB ZOOM ...

Страница 52: ...he ZERO SET MEMORY indicator disappears and the time code appears 5 Press N Playback starts from the counter s zero point Notes The zero set memory function works only for tapes recorded in the Digital8 system When you press ZERO SET MEMORY before rewinding the tape the zero set memory function is canceled There may be a discrepancy of several seconds from the time code If a tape has a blank porti...

Страница 53: ...E on the Remote Commander repeatedly until the date search indicator appears The indicator changes as follows DATE SEARCH t PHOTO SEARCH t PHOTO SCAN 3 When the current position is b press to search towards a or press to search towards c Your camcorder automatically starts playback at the point where the date changes Each time you press or the camcorder searches for the previous or next date To st...

Страница 54: ...ly for tapes recorded in the Digital8 system If one day s recording is less than two minutes your camcorder may not accurately find the point where the recording date changes If a tape has a blank portion in the recorded portions The date search function may not work correctly ...

Страница 55: ...Set the POWER switch to VTR 2 Press SEARCH MODE on the Remote Commander repeatedly until the photo search indicator appears The indicator changes as follows DATE SEARCH t PHOTO SEARCH t PHOTO SCAN 3 Press or to select the photo for playback Each time you press or the camcorder searches for the previous or next photo Your camcorder automatically starts playback from the photo To stop searching Pres...

Страница 56: ...ator changes as follows DATE SEARCH t PHOTO SEARCH t PHOTO SCAN 3 Press or Each photo is played back for about 5 seconds automatically To stop scanning Press x Note The photo search and photo scan work only for tapes recorded in the Digital8 system If a tape has a blank portion in the recorded portions The photo search and photo scan functions may not work correctly 3 2 SEARCH MODE PHOTO 00 SCAN ...

Страница 57: ...H MODE on the Remote Commander DISPLAY or DATA CODE so that they will not be superimposed on the edited tape You can edit on VCRs that support the following systems 8 mm Hi8 VHS S VHS VHSC S VHSC Betamax ED Betamax mini DV DV or Digital8 If your VCR is a monaural type Connect the yellow plug of the A V connecting cable to the video input jack and the white or the red plug to the audio input jack o...

Страница 58: ...ecording on the VCR Refer to the operating instructions of your VCR for more information When you have finished dubbing a tape Press x on both your camcorder and the VCR Note on tapes that are not recorded in the Digital8 system The picture may fluctuate This is not a malfunction During playback of tapes recorded in the Hi8 standard 8 system Digital signals are output as the image signals from the...

Страница 59: ...he instruction manual of PC and software After capturing images and sound Stop capturing procedares on your PC and stop the playback on the analog video unit Notes You need to install software which can exchange video signals Depending on the condition of the analog video signals the PC may not be able to output the images correctly when you convert analog video signals into digital video signals ...

Страница 60: ...s x on both your camcorder and the VCR Notes To enable smooth transition we recommend that you do not mix pictures recorded in the Hi8 standard 8 with the Digital8 system on a tape If you fast forward or slow playback on the other equipment the image being recorded may fluctuate When recording from other equipment be sure to play back the original tape at normal speed If your VCR is a monaural typ...

Страница 61: ...ture from a TV or VCR appears on the LCD screen or in the viewfinder 6 Press X on your camcorder at the scene where you want to start recording from When you have finished dubbing a tape Press x on both your camcorder and the VCR You can connect one VCR only using the i LINK cable DV connecting cable During digital editing The color of the display may be uneven However this does not affect the dub...

Страница 62: ... VCR onto your originally recorded tape by specifying the insert start and end points Use the Remote Commander for this operation Connections are the same as in Recording video or TV programs on page 60 61 Insert a cassette containing the desired scene to insert into the VCR a b c ...

Страница 63: ...tch to VTR 2 On the VCR locate just before the insert start point a then press X to set the VCR to the playback pause mode 3 On your camcorder locate the insert end point c by pressing m or M Then press X to set it to the playback pause mode 4 Press ZERO SET MEMORY on the Remote Commander The ZERO SET MEMORY indicator flashes and the end point of the insert is stored in memory 5 On your camcorder ...

Страница 64: ...TURN and press the dial then repeat steps from 2 to 4 For details see Selecting the mode setting of each item p 65 To make the menu display disappear Press MENU 1 2 3 4 MENU MANUAL SET AUTO SHTR MENU END VTR SET H i F i SOUND TBC DNR AUDIO MIX PB MODE A VtDV OUT MENU END CAMERA SET D ZOOM STEADYSHOT N S LIGHT MENU END CAMERA MEMORY VTR MANUAL SET AUTO SHTR OTHERS WORLD TIME BEEP 0 HR MANUAL SET WO...

Страница 65: ...when shooting in bright conditions To deactivate digital zoom Up to 25 zoom is carried out To activate digital zoom More than 25 to 50 zoom is performed digitally p 18 To activate digital zoom More than 25 to 450 zoom is performed digitally p 18 To record a 16 9 wide picture p 32 To compensate for camera shake To cancel the SteadyShot function Natural pictures are produced when shooting a stationa...

Страница 66: ...t the balance between the stereo 1 and stereo 2 To automatically select the system Hi8 standard 8 or Digital8 that was used to record on the tape and play back the tape To play back a tape that was recorded in the Hi8 standard 8 system when your camcorder does not automatically distinguish the recording system To convert digital video signals into analog video signals via your camcorder To convert...

Страница 67: ...images p 99 To cancel formatting To format an inserted Memory Stick 1 Select FORMAT with the SEL PUSH EXEC dial then press the dial 2 Turn the SEL PUSH EXEC dial to select FORMAT then press the dial 3 After EXECUTE appears press the SEL PUSH EXEC dial FORMATTING appears during formatting COMPLETE appears when formatting is finished To duplicate still images p 87 POWER switch VTR CAMERA MEMORY VTR ...

Страница 68: ...display date and time during playback POWER switch VTR CAMERA VTR CAMERA VTR CAMERA VTR Note on REC MODE When you record on the standard 8 tape your camcorder records in the SP mode even you select the LP mode in the menu settings In this case the indicator 8mm TAPE t SP REC Hi8 TAPE t LP SP REC appears on the LCD screen or in the viewfinder Use the Hi8 tapes for the LP mode Notes on the LP mode W...

Страница 69: ...e To make the demonstration appear To cancel the demonstration mode POWER switch CAMERA MEMORY VTR CAMERA MEMORY VTR CAMERA MEMORY VTR CAMERA MEMORY CAMERA Notes on DEMO MODE You cannot select DEMO MODE when a cassette is inserted in your camcorder DEMO MODE is set to STBY Standby at the factory and the demonstration starts about 10 minutes after you have set the POWER switch to CAMERA without a c...

Страница 70: ...d in the viewfinder To light up the camera recording lamp at the front of your camcorder To turn the camera recording lamp off so that the subject is not aware of the recording To turn off the backlight on display window To turn on the backlight POWER switch CAMERA MEMORY VTR CAMERA MEMORY VTR CAMERA MEMORY VTR CAMERA MEMORY CAMERA MEMORY VTR CAMERA MEMORY Note If you press DISPLAY with DISPLAY se...

Страница 71: ...JAN 1 12 00 AM Resetting the date and time The default clock setting is set to East Coast Standard Time The date and time are held in memory by the lithium battery If you replace the lithium battery with the battery pack or other power source connected you need not reset the date and time You must reset the date and time when the lithium battery becomes dead with no power source installed First se...

Страница 72: ...is set to LOCK We recommend backing up important data Image data may be damaged in the following cases If you remove the Memory Stick turn the power off or detach the battery for replacement when the access lamp is flashing If you use Memory Stick s near static electricity or magnetic fields Prevent metallic objects or your finger from coming into contact with the metal parts of the connecting sec...

Страница 73: ...a guaranteed compatibility with this camcorder Notes on image data compatibility Image data files recorded on Memory Stick s by your camcorder conform with the Design Rules for Camera File Systems universal standard established by the JEIDA Japan Electronic Industry Development Association You cannot play back on your camcorder still images recorded on other equipment DCR TRV890E TRV900 TRV900E or...

Страница 74: ...e compartment To eject the Memory Stick Open the lid of the cassette compartment then press the Memory Stick once lightly The Memory Stick pops up When the access lamp is lit or flashing Do not shake or strike your camcorder Do not turn the power off eject the Memory Stick or remove the battery pack Otherwise the image data breakdown may occur 2 Using Memory Stick introduction Memory Stick compart...

Страница 75: ...urn the SEL PUSH EXEC dial to select the desired image quality then press the dial 6 Press MENU to erase the menu display Note In some cases changing the image quality mode may not affect the image quality depending on the types of images you are shooting 1 2 6 3 4 5 MENU VTR OFF MEMORY CAMERA CHARGE MEMORY SET CONTINUOUS QUAL I TY FLD FRAME PRINT MARK PROTECT SLIDE SHOW DELETE ALL FORMAT RETURN M...

Страница 76: ...e shown in the table below The number of pixels is 640 480 regardless of image quality mode The data size before compression is about 600 KB Image quality mode Memory capacity FINE About 100 KB STANDARD About 60 KB Approximate number of images you can record on a Memory Stick The approximate number of images you can record on a Memory Stick formatted using this camcorder varies depending on which ...

Страница 77: ...et 3 Press PHOTO deeper The image displayed on the screen will be recorded on the Memory Stick Recording is complete when the bar scroll indicator disappears Notes When recording fast moving subjects in the FRAME mode the recorded image blurry When recording in the FRAME mode your camcorder may not correct camera shake We recommend that you shoot objects with a tripod When recording still images a...

Страница 78: ... of PROGRAM AE When you are recording a still image You can neither turn off the power nor press PHOTO When you press the PHOTO button on the Remote Commander Your camcorder immediately records the image that is on the screen when you press the button Recording images continuously You can record still images continuously Multi screen mode You can record 9 still images continuously on a single page...

Страница 79: ... display If the capacity of the Memory Stick becomes full FULL appears on the LCD screen or in the viewfinder and you cannot record still images on the Memory Stick 2 6 3 4 5 1 MENU VTR OFF MEMORY CAMERA CHARGE MEMORY SET CONTINUOUS QUAL I TY FLD FRAME PRINT MARK PROTECT SLIDE SHOW DELETE ALL FORMAT RETURN MENU END OFF MEMORY SET CONTINUOUS QUAL I TY FLD FRAME PRINT MARK PROTECT SLIDE SHOW DELETE ...

Страница 80: ...our camcorder shoots one image at a time no indicator MULTI SCRN Your camcorder shoots 9 still images at about 0 3 sec intervals and displays the images on a single page divided into 9 boxes Note on using the video flash light not supplied The video flash light does not work in the multi screen mode if you install it to the accessory shoe ...

Страница 81: ...wfinder 3 Press PHOTO firmly Self timer starts counting down from 10 with a beep sound In the last two seconds of the countdown the beep sound gets faster then recording starts automatically To cancel self timer recording Press self timer so that the indicator disappears from the LCD or viewfinder screen while your camcorder is in the standby mode You cannot cancel self timer recording with Remote...

Страница 82: ...ten illustlation or title with a moving image Record a title on the Memory Stick before a trip or event for convenience C CHROM Camera chroma key You can superimpose a moving image on top of a still image such as an image can be used as background Shoot the subject against a blue background The blue area of the moving image will be swapped with a still image M OVERLAP Memory overlap You can make a...

Страница 83: ...evious image press MEMORY To see the next image press MEMORY 4 Turn the SEL PUSH EXEC dial to select the desired mode The mode changes as follows M CHROM y M LUMI y C CHROM y M OVERLAP 5 Press the SEL PUSH EXEC dial The still image is superimposed on the moving image 6 Turn the SEL PUSH EXEC dial to adjust the effect M CHROM The color blue scheme of the area in the still image which is to be swapp...

Страница 84: ... step 7 and repeat the procedure from step 4 To cancel M CHROM M LUMI C CHROM M OVERLAP Press MEMORY MIX During recording You cannot change the mode setting The Memory Stick supplied with your camcorder stores 20 images For M CHROM 18 images such as a frame 100 0001 100 0018 For C CHROM 2 images such as a background 100 0019 100 0020 Sample images Sample images stored in the Memory Stick supplied ...

Страница 85: ...Recording is complete when the bar scroll indicator disappears When the acccess lamp is lit or flashing Never shake or strike the unit Also do not turn the power off eject the Memory Stick or remove the battery pack Otherwise an image data breakdown may occur If appears on the LCD screen or in the viewfinder The inserted Memory Stick is imcompartible with your camcorder because its format does not...

Страница 86: ...3 Follow the steps 3 and 4 on page 85 Using the A V connecting cable Connect the yellow plug of the A V connecting cable to the video jack on the VCR or the TV If your TV or VCR has an S video jack Connect using an S video cable not supplied to obtain high quality pictures With this connection you do not need to connect the yellow video plug of the A V connecting cable Connect an S video cable not...

Страница 87: ...the SEL PUSH EXEC dial to select PHOTO SAVE then press the dial PHOTO BUTTON appears on the LCD screen or in the viewfinder 5 Press PHOTO firmly The still image from the tape is recorded on the Memory Stick The number of still images copied is displayed END is displayed when copying is completed 2 3 5 4 1 MENU VTR OFF MEMORY CAMERA CHARGE PHOTO PHOTO SAVE 0 00 00 00 21 40 F I NE SAVING 0 MENU END ...

Страница 88: ...power off eject the Memory Stick or remove the battery pack Otherwise the image data breakdown may occur To record all the images recorded on the tape Rewind the tape all the way back and start copying If the write protect tab on the Memory Stick is set to LOCK NOT READY appears when you select PHOTO SAVE in the menu settings When you change the Memory Stick in the middle of copying Your camcorder...

Страница 89: ...press MEMORY To stop memory photo playback Press MEMORY PLAY To play back recorded images on a TV screen Connect your camcorder to the TV with the A V connecting cable supplied with your camcorder before the operation When operating memory photo playback on a TV or the LCD screen the image quality may appear to have deteriorated This is not a malfunction The image data is as good as ever Turn the ...

Страница 90: ... that is displayed before changing to the index screen mode To display the following 6 images keep pressing MEMORY To display the previous 6 images keep pressing MEMORY To return to the normal playback screen single screen Press MEMORY to move the B mark to the image you want to display on full screen then press MEMORY PLAY Data file name MEMORY INDEX Image number Total number of recorded images P...

Страница 91: ...isplayed on the index screen Image files shot with other equipment may not be displayed on the index screen either Viewing the recorded images using a personal computer The image data recorded with your camcorder is compressed in the JPEG format If you use the application software PictureGear 4 1Lite supplied with your camcorder you can see images recorded on the Memory Stick on a computer screen ...

Страница 92: ...ons search a point where you want to record the desired still image Set the Hi8 Digital8 tape to playback pause mode 3 Press z REC and the button on its right simultaneously on your camcorder The Hi8 Digital8 tape is set to the recording pause mode 4 Press MEMORY PLAY to play back the still image you want to copy p 89 5 Press X to start recording and press X again to stop 6 If you have more to cop...

Страница 93: ...tops Image data modified with personal computers or shot with other equipment You may not be able to copy them with your camcorder If you press the DISPLAY button in the standby or recording mode You can see memory playback and the file name indicators in addition to the indicators pertinent to Hi8 Digital8 tapes such as the time code indicator When copying You cannot copy the image recorded on Me...

Страница 94: ...XEC dial to move the enlarged image then press the dial R The image moves downward r The image moves upward T t becomes available 4 Turn SEL PUSH EXEC dial to move the enlarged image then press the dial T The image moves rightward Turn the dial downward t The image moves leftward Turn the dial upward To cancel memory PB ZOOM function Press PB ZOOM Pictures processed by PB ZOOM function Pictures pr...

Страница 95: ...hen press the dial 5 Press MEMORY PLAY Your camcorder plays back the images recorded on the Memory Stick in sequence Playing back images in a continuous loop SLIDE SHOW To stop the slide show Press MENU To pause during a slide show Press MEMORY PLAY To start the slide show from a particular image Select the desired image using MEMORY buttons before step 2 2 5 3 4 1 1 PLAY MENU VTR OFF MEMORY CAMER...

Страница 96: ...V connecting cable supplied with your camcorder before operation If you change the Memory Stick during operation The slide show does not operate If you change the Memory Stick be sure to follow the steps again from the beginning Playing back images in a continuous loop SLIDE SHOW ...

Страница 97: ...ta file name of the protected image To cancel image protection Select OFF in step 6 then press the SEL PUSH EXEC dial Note Formatting erases all information on the Memory Stick including the protected image data Check the contents of the Memory Stick before formatting If the write protect tab on the Memory Stick is set to LOCK You cannot carry out image protection 3 7 MENU 1 1 4 5 6 VTR OFF MEMORY...

Страница 98: ...CD screen 4 Press MEMORY DELETE again The selected image is deleted To cancel deleting an image Press MEMORY in step 4 To delete an image displayed on the index screen Press MEMORY to move the B indicator to the desired image and follow steps 3 and 4 Notes To delete a protected image first cancel image protection Once you delete an image you cannot restore it Check the images to delete carefully b...

Страница 99: ...tick Select RETURN in step 5 then press the SEL PUSH EXEC 2 3 4 6 5 MENU VTR OFF MEMORY CAMERA CHARGE 1 1 MEMORY SET CONTINUOUS QUAL I TY FLD FRAME PRINT MARK PROTECT SLIDE SHOW DELETE ALL FORMAT RETURN MENU END READY MEMORY SET CONTINUOUS QUAL I TY FLD FRAME PRINT MARK PROTECT SLIDE SHOW DELETE ALL FORMAT RETURN MENU END RETURN OK MEMORY SET CONTINUOUS QUAL I TY FLD FRAME PRINT MARK PROTECT SLIDE...

Страница 100: ...100 While DELETING appears Do not turn the POWER switch or press any buttons If the write protect tab on the Memory Stick is set to LOCK You cannot delete images Deleting images ...

Страница 101: ... Turn the SEL PUSH EXEC dial to select ON then press the dial 7 Press MENU to erase the menu display The mark is displayed beside the data file name of the image with a print mark To cancel writing print marks Select OFF in step 6 then press the SEL PUSH EXEC dial If the write protect tab on the Memory Stick is set to LOCK You cannot write print marks on still images 3 7 VTR OFF MEMORY CAMERA CHAR...

Страница 102: ... before the tape is played back During playback of tapes recorded in the Hi8 standard 8 system digital signals are output as the image signals from the DV IN OUT jack Display during automatic detection of system The Digital8 system or Hi8 standard 8 system is automatically detected and the playback system is automatically switched to During switching of systems the screen turns blue and the follow...

Страница 103: ...pe sound track tape STEREO Stereo Main sound and sub sound 1 Lch Main sound 2 Rch Sub sound When you use a tape recorded in the Hi8 standard 8 system When you play back a dual sound track tape recorded in an AFM HiFi stereo system set HiFi SOUND to the desired mode in the menu settings p 64 Sound from speaker HiFi Sound Playing back Playing back a dual Mode a stereo tape sound track tape STEREO St...

Страница 104: ...onnected to this unit by the i LINK cable DV cable When connecting this unit to i LINK compatible equipment having two or more i LINK jacks DV jacks refer to the instruction manual of the equipment to be connected About the Name i LINK i LINK is a more familiar term for IEEE 1394 data transport bus proposed by SONY and is a trademark approved by many corporations IEEE 1394 is an international stan...

Страница 105: ...by SONY e g VAIO series personal computer other than video equipment Before connecting this unit to a personal computer make sure that application software supported by this unit is already installed on the personal computer For details on precautions when connecting this unit also refer to the instruction manuals for the equipment to be connected Required i LINK Cable Use the Sony i LINK 4 pin to...

Страница 106: ...MORY In this case replace the battery with a Sony CR2025 or Duracell DL 2025 lithium battery Use of any other battery may present a risk of fire or explosion Discard used batteries according to the manufacturer s instructions WARNING The battery may explode if mistreated Do not recharge disassemble nor dispose of it in fire Lithium battery Keep the lithium battery out of the reach of children Shou...

Страница 107: ...id of the lithium battery compartment 2 Push the lithium battery in the direction of the arrow and pull it out from the holder 3 Install a Sony CR2025 or Duracell DL 2025 lithium battery with the positive side facing out 4 Close the lid Changing the lithium battery in your camcorder 1 1 2 3 4 ...

Страница 108: ...atize p 117 While being operated in CAMERA mode your camcorder has been in the standby mode for more than 3 minutes c Set the POWER switch to OFF CHARGE and then to CAMERA again p 16 The viewfinder lens is not adjusted c Adjust the viewfinder lens p 19 STEADYSHOT is set to OFF in the menu settings c Set it to ON p 64 16 9WIDE is set to ON in the menu settings c Set it to OFF p 64 FOCUS is set to M...

Страница 109: ...s turned to minimum c Open the LCD panel and press VOLUME p 24 AUDIO MIX is set to ST2 side in the menu settings c Adjust AUDIO MIX p 64 The tape has a blank portion in the recorded portion p 53 PB MODE is set to in the menu settings c Set it to AUTO p 64 Set PB MODE to in the menu settings p 64 Troubleshooting An unknown picture is displayed on the LCD screen or in the viewfinder A vertical band ...

Страница 110: ...letely dead and cannot be recharged c Replace with a new battery pack p 10 The battery is dead c Use a charged battery pack p 10 11 Charge the battery pack fully again so that the indication on the battery remaining indicator is correct The power source is disconnected c Connect it firmly p 11 14 The battery is dead c Use a charged battery pack p 10 11 Moisture condensation has occurred c Remove t...

Страница 111: ...tect tab on the Memory Stick is set to LOCK c Release the lock p 72 The write protect tab on the Memory Stick is set to LOCK c Release the lock p 72 The write protect tab on the Memory Stick is set to LOCK c Release the lock p 72 The image to protect is not played back c Press MEMORY PLAY to play back the image p 89 The write protect tab on the Memory Stick is set to LOCK c Release the lock p 72 T...

Страница 112: ...the cassette and leave your camcorder for at least 1 hour to acclimatize p 117 Some troubles has occurred in your camcorder c Remove the cassette and insert it again then operate your camcorder The AC power adaptor is disconnected c Connect it firmly p 14 Something is wrong with the battery pack c Contact your Sony dealer or local authorized Sony service facility The Remote Commander supplied with...

Страница 113: ...vice has occurred c Contact your Sony dealer or local authorized Sony service facility and inform them of the 5 digit code example E 61 10 If you are unable to rectify the problem even if you try corrective actions a few times contact your Sony dealer or local authorized Sony service facility Your camcorder has a self diagnosis display function This function displays the current condition of your ...

Страница 114: ...nction is activated p 113 You hear the melody or beep sound This indicator appears in the viewfinder only DCR TRV520 only The still image is protected Slow flashing The still image is protected p 97 Warning indicator as to Memory Stick Slow flashing No Memory Stick is inserted p 74 Fast flashing The Memory Stick is not readable with your camcorder p 72 The battery is dead or nearly dead Slow flash...

Страница 115: ...cture that has a copyright control signal p 102 FULL The Memory Stick is full p 79 The write protect tab on the Memory Stick is set to LOCK p 72 NO FILE No still image is recorded on the Memory Stick p 89 NO MEMORY STICK No Memory Stick is inserted p 74 MEMORY STICK ERROR The Memory Stick data is corrupted p 72 FORMAT ERROR Check the type of formatting DIRECTORY ERROR The Memory Stick has more tha...

Страница 116: ...via Canada Central America Chile Colombia Ecuador Jamaica Japan Korea Mexico Peru Surinam Taiwan the Philippines the U S A Venezuela etc PAL system Australia Austria Belgium China Czech Republic Denmark Finland Germany Great Britain Holland Hong Kong Italy Kuwait Malaysia New Zealand Norway Portugal Singapore Slovak Republic Spain Sweden Switzerland Thailand etc PAL M system Brazil PAL N system Ar...

Страница 117: ...corder and leave it for about 1 hour with the cassette compartment open Your camcorder can be used again if the indicator does not appear when the power is turned on again Note on moisture condensation Moisture may condense when you bring your camcorder from a cold place into a warm place or vice versa or when you use your camcorder in a hot place as follows You bring your camcorder from a ski slo...

Страница 118: ...ack pictures do not move playback pictures are hardly visible playback pictures do not appear the x indicator and CLEANING CASSETTE message appear one after another on the LCD screen or in the viewfinder When you play back in the Hi8 Standard 8 analog system The video head may be dirty when playback pictures contain noise playback pictures are hardly visible playback pictures do not appear If the ...

Страница 119: ... the RELEASE knob up 3turn the eyecup in a counterclockwise direction and pull it out 2 Clean the surface with a commercially available blower for a still camera 3 Turn the eyecup in a clockwise direction then replace the screw Caution Do not remove any other screws You may remove only the screw to remove the eyecup Maintenance information and precautions ...

Страница 120: ...thickness of the tape and if the recording tab is in or out Camcorder care Remove the tape and periodically turn on the power operate the CAMERA and VTR sections and play back a tape for about 3 minutes when your camcorder is not to be used for a long time Clean the lens with a soft brush to remove dust If there are fingerprints on the lens remove them with a soft cloth Clean the camcorder body wi...

Страница 121: ...or video equipment with the charging function To prevent accident from a short circuit do not allow metal objects to come into contact with the battery terminals Keep the battery pack away from fire Never expose the battery pack to temperatures above 140 F 60 C such as in a car parked in the sun or under direct sunlight Keep the battery pack dry Do not expose the battery pack to any mechanical sho...

Страница 122: ...iewfinder DCR TRV520 monochrome DCR TRV525 color Image device 1 4 type CCD Charge Coupled Device Approx 460 000 pixels Effective Approx 290 000 pixels Lens Combined power zoom lens Filter diameter 1 7 16 in 37 mm 25 Optical 450 Digital Focal length 5 32 2 7 8 in 3 7 92 5 mm When converted to a 35 mm still camera 1 5 8 32 3 8 in 48 1200 mm Color temperature Auto Minimum illumination 1 lux F 1 6 0 l...

Страница 123: ...ELEASE lever p 10 5 POWER switch p 16 6 START STOP button p 16 7 Hooks for shoulder strap p 125 8 DC IN jack p 11 This mark indicates that this product is a genuine accessory for Sony video products When purchasing Sony video products Sony recommends that you purchase accessories with this GENUINE VIDEO ACCESSORIES mark Camcorder 3 2 5 6 7 8 1 4 ...

Страница 124: ...SUPER NIGHTSHOT button p 20 qj NIGHTSHOT switch p 20 qk Display window p 129 ql FOCUS switch p 43 w Tripod receptacle base Make sure that the length of the tripod screw is less than 9 32 inch 6 5 mm Otherwise you cannot attach the tripod securely and the screw may damage your camcorder wa Remote sensor Identifying the parts and controls What is SUPER LASER LINK The super laser link system sends an...

Страница 125: ...tton p 98 ed FADER button p 33 ef BACK LIGHT button p 20 eg PROGRAM AE button p 41 eh EXPOSURE button p 42 ej MEMORY MIX button p 83 ek MEMORY button p 83 89 wk wh ws wd wf wg wj ek ej eh eg ed wl e ea es ef ws Eyecup wd Viewfinder wf MEMORY PLAY button p 89 wg MEMORY button p 83 89 wh LCD screen p 17 wj Speaker wk self timer button p 22 wl Viewfinder lens adjustment lever p 19 e Eyecup RELEASE kn...

Страница 126: ...d by the shoe on and off Refer to the operating instructions of the accessory for further information The intelligent accessory shoe has a safety device for fixing the installed accessory securely To connect an accessory press down and push it to the end and then tighten the screw To remove an accessory loosen the screw and then press down and pull out the accessory rh Memory Stick lamp This lamp ...

Страница 127: ... yd DV IN OUT jack p 58 86 The DV IN OUT jack is i LINK compatible th tj tk tf tg tl y ya yd ys td td EJECT button p 15 tf Access lamp p 74 tg Memory Stick compartment p 74 th Cassette compartment p 15 tj Grip strap tk LANC DIGITAL I O jack p 91 LANC stands for Local Application Control Bus System The LANC control jack is used for controlling the tape transport of video equipment and other periphe...

Страница 128: ...ander may not function properly Your camcorder works in the Commander mode VTR 2 Commander modes 1 2 and 3 are used to distinguish your camcorder from other Sony VCRs to avoid remote control misoperation If you use another Sony VCR in the Commander mode VTR 2 we recommend changing the Commander mode or covering the sensor of the VCR with black paper 1 PHOTO button p 29 77 2 DISPLAY button p 25 3 S...

Страница 129: ...nosis display indicator p 113 Remaining battery time indicator p 11 wh FULL charge indicator p 11 Identifying the parts and controls 40min REC 0 00 00 M FADER 16 9WIDE SEPIA 16B I T T W DATE 01 SEARCH ZERO SET MEMORY A V DV SP 2 4 5 6 7 8 9 0 qa qs qd 3 1 qf qh ql wa w ws wd wf qk qj qg wg ws 2 3 qd wh 1 1 Recording mode indicator p 16 Mirror mode indicator p 17 2 Format indicator p 102 or indicat...

Страница 130: ... give a natural appearance to your recordings in the recording mode Preventing deterioration of picture quality D ZOOM MENU p 64 in digital zoom Focusing manually Manual focus p 43 Shooting distant subjects Landscape mode p 40 Recording fast moving subjects Sports lesson mode p 40 Functions to use in editing in the recording mode Watching the picture on a wide screen TV Wide mode p 32 Viewing imag...

Страница 131: ...EMORY MIX 82 Memory overlap 82 Memory photo recording 77 Memory Stick 72 Menu settings 64 Mirror mode 17 Moisture condensation 117 Monaural 27 MONOTONE 33 Mosaic fader 33 NIGHTSHOT 20 Normal charge 11 NTSC system 116 O P Q OLD MOVIE 37 Operation indicators 129 OVERLAP 33 PB ZOOM 51 94 PC serial cable 91 Photo scan 56 Photo search 55 PICTURE EFFECT 36 49 Picture search 26 Playback pause 26 Power so...

Страница 132: ...Sony Corporation Printed in Japan ...

Отзывы: