background image

1

ES


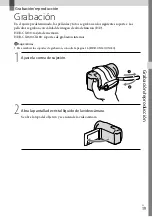
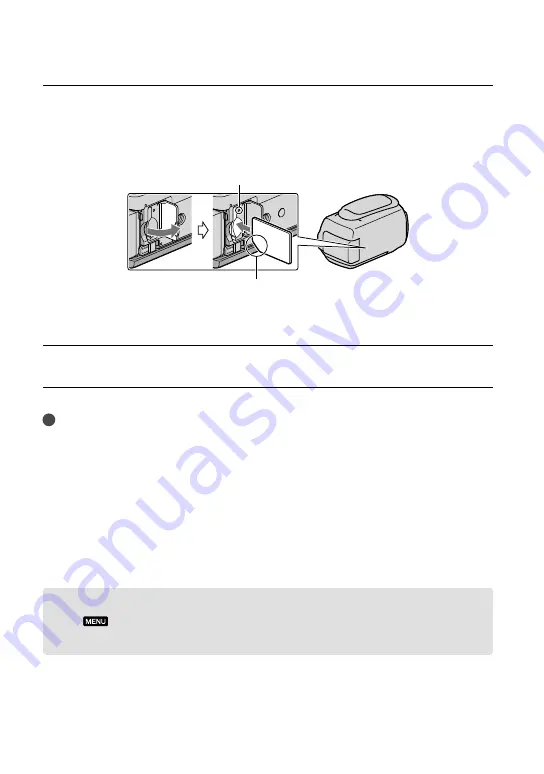
Abra la tapa e inserte la tarjeta de memoria con el borde biselado en la 
dirección que se muestra en la imagen hasta que encaje.

Cierre la tapa después de insertar la tarjeta de memoria.

Aparece la pantalla [Preparando archivo base datos imagen. Espere por favor.] si inserta 

una nueva tarjeta de memoria. Espere hasta que la pantalla desaparezca.


Cierre la tapa.

Notas

Si aparece [Error al crear un nuevo archivo de base de datos de imágenes. Es posible que no exista 

suficiente espacio libre.], formatee la tarjeta de memoria.

Confirme la dirección de la tarjeta de memoria. Si inserta la tarjeta de memoria forzadamente en la 

dirección incorrecta, es posible que se dañe la tarjeta de memoria, la ranura para la tarjeta de memoria o 

los datos de imagen.

No abra la tapa durante la grabación.

Al insertar o expulsar la tarjeta de memoria, tenga cuidado de que la tarjeta de memoria no salga 

impulsada y se caiga.

Para expulsar la tarjeta de memoria

Abra la tapa y presione ligeramente la tarjeta de memoria hacia dentro una vez.

Copiar películas y fotos (HDR-CX160/CX180)

Toque 

 (MENU) 

 [Editar/Copiar] 

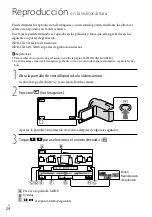
 

[Copiar] y siga las instrucciones que aparecen 

en la pantalla.


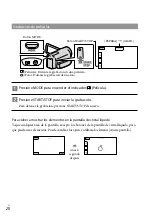
Indicador de acceso

Observe la dirección de la esquina biselada.

Содержание HANDYCAM CX130

Страница 1: ...obre este producto y respuestas a las preguntas más frecuentes en nuestro sitio Web de atención al cliente http www sony net Printed on 70 or more recycled paper Impreso en papel reciclado en un 70 o más 2011 Sony Corporation HDR CX130 CX160 CX180 US ES Printed in China Operating Guide US Guía de operaciones ES Digital HD Video Camera Recorder 4 271 482 12 1 ...

Страница 2: ...d do not expose the unit to rain or moisture Do not expose the batteries to excessive heat such as sunshine fire or the like This symbol is intended to alert the user to the presence of uninsulated dangerous voltage within the product s enclosure that may be of sufficient magnitude to constitute a risk of electric shock to persons This symbol is intended to alert the user to the presence of import...

Страница 3: ...utlet consult an electrician for replacement of the obsolete outlet Protect the power cord from being walked on or pinched particularly at plugs convenience receptacles and the point where they exit from the apparatus Only use attachments accessories specified by the manufacturer Use only with the cart stand tripod bracket or table specified by the manufacturer or sold with the apparatus When a ca...

Страница 4: ... 1 15P plug rated for 125 V 15 A Europe Countries regions Voltage Frequency Hz Plug type Austria 230 50 C Belgium 230 50 C Czech 220 50 C Denmark 230 50 C Finland 230 50 C France 230 50 C Germany 230 50 C Greece 220 50 C Hungary 220 50 C Iceland 230 50 C Ireland 230 50 C BF Italy 220 50 C Luxemburg 230 50 C Netherlands 230 50 C Norway 230 50 C Poland 220 50 C Portugal 230 50 C Romania 220 50 C Rus...

Страница 5: ...60 A Jamaica 110 50 A Mexico 120 127 60 A Nicaragua 120 240 60 A Panama 110 220 60 A South America Countries regions Voltage Frequency Hz Plug type Argentina 220 50 C BF O Brazil 127 220 60 A C Chile 220 50 C Colombia 120 60 A Peru 220 60 A C Venezuela 120 60 A Middle East Countries regions Voltage Frequency Hz Plug type Iran 220 50 C BF Iraq 220 50 C BF Israel 230 50 C Saudi Arabia 127 220 50 A C...

Страница 6: ...d battery packs promptly as described in the instructions Replace the battery with the specified type only Otherwise fire or injury may result AC Adaptor Do not use the AC Adaptor placed in a narrow space such as between a wall and furniture Use the nearby wall outlet wall socket when using the AC Adaptor Disconnect the AC Adaptor from the wall outlet wall socket immediately if any malfunction occ...

Страница 7: ...cautioned that any changes or modifications not expressly approved in this manual could void your authority to operate this equipment Note This equipment has been tested and found to comply with the limits for a Class B digital device pursuant to Part 15 of the FCC Rules These limits are designed to provide reasonable protection against harmful interference in a residential installation This equip...

Страница 8: ...ons The LCD screen is manufactured using extremely high precision technology so over 99 99 of the pixels are operational for effective use However there may be some tiny black points and or bright points white red blue or green in color that appear constantly on the LCD screen These points are normal results of the manufacturing process and do not affect the recording in any way Exposing the LCD s...

Страница 9: ...ge data To prevent your image data from being lost save all your recorded images on external media periodically To save images on your computer see page 36 and to save images on external devices see page 43 The type of discs or media on which the images can be saved depend on the REC Mode selected when the images were recorded Movies recorded with 60p Quality can be saved using external media p 45...

Страница 10: ...ory card are called recording media In this manual the DVD disc recorded with high definition image quality HD is called AVCHD recording disc Design and specifications of your camcorder and accessories are subject to change without notice Confirm the model name of your camcorder The model name is shown in this manual when there is a difference in specification between models Confirm the model name...

Страница 11: ...ording media settings 20 Copying movies and photos HDR CX160 CX180 22 Recording Playback Recording 23 Selecting the recording mode 27 Playback on the camcorder 28 Performing Highlight Playback 31 Playing images on a TV 32 Advanced operations Deleting movies and photos 35 Saving movies and photos with a computer Useful functions available if you connect the camcorder to a computer Windows 36 Prepar...

Страница 12: ...uality HD disc with a DVD writer etc other than DVDirect Express 51 Creating a standard definition image quality STD disc with a recorder etc 52 Customizing your camcorder Using menus 54 Getting detailed information from the Handycam Handbook 58 Additional information Troubleshooting 59 Recording time of movies number of recordable photos 61 Precautions 64 Specifications 66 Quick reference Screen ...

Страница 13: ...the LCD screen 2 Attach the battery pack by sliding it in the direction of the arrow until it clicks 3 Connect the AC Adaptor and the power cord mains lead to your camcorder and the wall outlet wall socket The CHG charge lamp lights up and charging starts The CHG charge lamp turns off when the battery pack is fully charged Battery pack CHG charge lamp DC IN jack To the wall outlet wall socket AC A...

Страница 14: ...se up its charge Do not leave the camcorder connected to a computer in this manner Charging with a personally assembled computer with a converted computer or through a USB hub are not guaranteed The camcorder may not function correctly depending on the USB device which is used with the computer Tips You can charge the battery by connecting the Built in USB Cable to a wall outlet wall socket using ...

Страница 15: ... the upper right on the LCD screen To remove the battery pack Close the LCD screen Slide the BATT battery release lever and remove the battery pack To use a wall outlet wall socket as a power source Make the same connections as Step 1 Charging the battery pack p 13 Even if the battery pack is attached the battery pack is not discharged Notes on the battery pack When you remove the battery pack or ...

Страница 16: ...Disconnect the AC Adaptor from the wall outlet wall socket immediately if any malfunction occurs while using your camcorder Do not use the AC Adaptor placed in a narrow space such as between a wall and furniture Do not short circuit the DC plug of the AC Adaptor or battery terminal with any metallic objects This may cause a malfunction Charging the battery pack abroad You can charge the battery pa...

Страница 17: ... turn on your camcorder when the LCD screen is open press POWER 2 Select the desired language then touch Next 3 Select the desired geographical area with then touch Next To set the date and time again touch MENU Setup Clock Settings Date Time Setting Date Time When an item is not on the screen touch until the item appears Touch the button on the LCD screen MODE lamp POWER button ...

Страница 18: ...ppears only when you set the clock for the first time The clock starts Notes The date and time does not appear during recording but they are automatically recorded on the recording media and can be displayed during playback To display the date and time touch MENU Setup Playback Settings Data Code Date Time You can turn off the operation beeps by touching MENU Setup General Settings Beep Off If the...

Страница 19: ...s turned off Tips You can turn off the camcorder also by pressing POWER When Power On By LCD is set to Off turn off your camcorder by pressing POWER Changing the language setting You can change the on screen displays to show messages in a specified language Touch MENU Setup General Settings Language Setting a desired language ...

Страница 20: ...lected medium Tips See page 62 for the recordable time of movies See page 63 for the number of recordable photos Selecting recording media HDR CX160 CX180 Touch MENU Setup Media Settings Media Select The Media Select screen appears Touch the desired recording medium then touch Both movies and photos are recorded on the selected medium To check the recording media settings In either movie recording...

Страница 21: ...Do not attach a label or the like on memory card or memory card adaptor Doing so may cause a malfunction Memory Stick PRO Duo media of up to 32 GB and SD cards of up to 64 GB have been verified to operate with your camcorder Notes A MultiMediaCard cannot be used with this camcorder Movies recorded on SDXC memory cards cannot be imported to or played back on computers or AV devices not supporting t...

Страница 22: ...ree space is displayed format the memory card Confirm the direction of the memory card If you forcibly insert the memory card in the wrong direction the memory card memory card slot or image data may be damaged Do not open the cover during recording When inserting or ejecting the memory card be careful so that the memory card does not pop out and drop To eject the memory card Open the cover and li...

Страница 23: ...ollowing media Movies are recorded with high definition image quality HD HDR CX130 Memory card HDR CX160 CX180 Internal recording media Tips To change the recording media see page 20 HDR CX160 CX180 1 Fasten the grip belt 2 Open the LCD screen of your camcorder Your camcorder is turned on and the lens cover is opened ...

Страница 24: ...ings using the Display Setting menu To capture smiles In the default setting a photo is automatically recorded when the camcorder detects the smile of a person during movie recording Smile Shutter When the camcorder detects faces during movie recording image quality is automatically adjusted Face Detection MODE button Movie When recording a movie Photo When recording a photo STBY REC START STOP bu...

Страница 25: ...ive in the default setting You can specify the priority face by touching it You can capture photos from recorded movies You can check the recordable time estimated remaining capacity etc by touching MENU Setup Media Settings Media Info The LCD screen of your camcorder can display recording images across the entire screen full pixel display However this may cause slight trimming of the top bottom r...

Страница 26: ...en aspect ratio becomes 4 3 Press PHOTO lightly to adjust the focus then press it fully Tips See page 63 on the recordable number of photos To change the image size touch MENU Image Quality Size Image Size a desired setting You cannot record photos while is displayed MODE button Movie When recording a movie Photo When recording a photo Flashes Lights up PHOTO button ...

Страница 27: ...t images can be saved on will depend on the recording mode selected For details on a save operation using the external devices see page 43 Types of media Recording mode PS FX FH HQ LP On this camcorder Internal recording media Memory card On external devices External media USB storage devices Blu ray discs AVCHD recording discs PS can be set only when Frame Rate is set to 60p ...

Страница 28: ... CX180 Internal recording media Tips To change the recording media see page 20 HDR CX160 CX180 The camcorder displays recorded images as an event automatically based on the date and time 1 Open the LCD screen of your camcorder Your camcorder is turned on and the lens cover is opened 2 Press View Images The Event View screen appears after some seconds 3 Touch to select the desired event To the MENU...

Страница 29: ...e and a half years to three months which changes the number of the events that can be displayed on the time line bar 4 Touch an image you want to view Touch to select the image type to be displayed in the index from MOVIE movies only PHOTO photos only or MOVIE PHOTO movies and photos mixed To go back to the Event View screen Displays the previous next page Touching and holding the button scrolls t...

Страница 30: ...hen playback from the selected image reaches the last image the screen returns to the INDEX screen Touch during pause to play back movies slowly As you repeat touching during playback movies are played as fast as about 5 times about 10 times about 30 times about 60 times The recording date time and shooting conditions are recorded automatically during recording This information is not displayed du...

Страница 31: ... touching the Switch Image Type button on the Event Index screen Tips To repeat Slideshow touch Slideshow Set Performing Highlight Playback Press Touch to select the desired event then touch Highlight Touch Scenario Save on the screen after the Highlight Playback is finished so that you can save the Highlight Playback scenario To start stop slide show Next Previous Delete Context ...

Страница 32: ...he camcorder to a TV Use the supplied AC Adaptor as the power source p 15 3 Play a movie or a photo on the camcorder p 28 List of connection Connecting to a high definition TV When the recording quality is high definition image quality HD the movies are played back in high definition image quality HD When the recoding quality is standard image quality STD the movies are played back in standard def...

Страница 33: ...the HDMI OUT jack of your camcorder Some TVs may not function correctly e g no sound or image with this connection Do not connect the camcorder HDMI OUT jack to an external device HDMI OUT jack as malfunction may result To set the aspect ratio according to the connected TV 16 9 4 3 Set TV Type to 16 9 or 4 3 according to your TV When you connect with A V connecting cable with S Video When the S VI...

Страница 34: ...le to output images the order of priority of the TV input jacks is as follows HDMI component S VIDEO video HDMI High Definition Multimedia Interface is an interface to send both video audio signals The HDMI OUT jack outputs high quality images and digital audio On Photo TV HD This camcorder is compatible with the Photo TV HD standard Photo TV HD allows for highly detailed photo like depiction of s...

Страница 35: ...ips If you start playing back an image by selecting it from the Event Index screen you can delete the image using on the playback screen To delete all images recorded in the recording media and recover all the recordable space of the media format the media Reduced size images which enable you to view many images at the same time on an index screen are called thumbnails 1 Touch MENU Edit Copy Delet...

Страница 36: ...udes functions that enable you to do more with the images recorded with the camcorder Easy uploading when away from home With PMB Portable which is pre installed on the camcorder you can play back or upload your images to the Web by connecting your camcorder to a computer away from home View Edit Save on a disc Upload Calendar DVD Blu ray Joining image files Network services ...

Страница 37: ...ed for installation Approximately 500 MB 10 GB or more may be necessary when creating AVCHD recording discs 50 GB maximum may be necessary when creating Blu ray discs Display Minimum 1 024 768 dots Others USB port this must be provided as standard Hi Speed USB USB 2 0 compatible Blu ray disc DVD burner CD ROM drive is necessary for installation Either NTFS or exFAT file system is recommended as th...

Страница 38: ...creen Read the terms of the license agreement carefully If you agree to the terms change to and then click Next Install Follow the instructions that appear on the computer screen to continue the installation You may be required to install some other applications included on the disc at the same time If the installation display appears follow the instructions that appear on the screen When you are ...

Страница 39: ...iscs that have been created using the PMB software to DVD players or recorders as these devices do not support the AVCHD standard If you do you may not be able to remove the disc from these devices This camcorder captures high definition footage in the AVCHD format Using the enclosed PC software high definition footage can be copied onto DVD media However DVD media containing AVCHD footage should ...

Страница 40: ...loading images to a network service The application software PMB Portable is pre installed in the camcorder You can enjoy the following functions using the PMB Portable Uploading images to network services such as blogs with ease Uploading by a network connected computer while away from home Register network services such as blogs to use frequently Click the Help button on the upper right of the c...

Страница 41: ... camcorder cache files may be stored in the computer you are using depending on the service provider to upload the image to If a problem occurs to PMB Portable or if you wrongly delete the software you can download the PMB Portable installer from the Web to repair Touch USB Connect on the camcorder screen When using Windows 7 The Device Stage window opens When using Windows XP Windows Vista The Au...

Страница 42: ...rvice can be suspended or altered without notice by the website organizer In these as well as other cases Sony shall not be liable in any way for any loss damages or trouble between you and a third party which arose from the use of the service You will be redirected to the websites by the Sony server However you may not be able to access the websites for some reason such as server maintenance If S...

Страница 43: ... image quality HD or with standard definition image quality STD Built in USB Cable 51 Hard disk recorder etc Saving images on a DVD disc with standard definition image quality STD A V connecting cable supplied 52 Movies that are recorded with standard definition image quality STD Use the A V connecting cable to connect the camcorder to an external device in which images are saved Notes The AVCHD r...

Страница 44: ...inition image quality HD AVCHD format playback devices such as a Sony Blu ray disc player or a PlayStation 3 DVD disc with standard definition image quality STD Ordinary DVD playback devices such as a DVD player Notes Always maintain your PlayStation 3 to use the latest version of the PlayStation 3 system software The PlayStation 3 may not be available in some countries regions ...

Страница 45: ...cted via a USB hub media devices with built in USB hub card reader Notes You may not be able to use external media devices with a code function The FAT file system is available for your camcorder If the storage medium of the external device was formatted for the NTFS file system etc format the external media device using the camcorder before use The format screen appears when an external media dev...

Страница 46: ... external media device are displayed on the LCD screen Images saved on the connected external media device appear on the LCD screen When an external media device is connected the USB icon will appear on the Event View screen etc You can make menu settings of the external media device such as deleting images Touch MENU Edit Copy on Event View To disconnect the external media device Touch while the ...

Страница 47: ...een If you select All In Event select the event to copy with You cannot select multiple events Touch on the camcorder screen Playing back images in the external media device on the camcorder Connect the camcorder to the external media device and touch Play without copying Event View of the external media device is displayed Select the image you want to view and play back the image p 28 You can als...

Страница 48: ...o to the instruction manual supplied with the DVD writer Notes Connect your camcorder to the wall outlet wall socket using the supplied AC Adaptor for this operation p 15 DVDirect Express is referred to as DVD writer in this section Discs that can be used 12 cm DVD R 12 cm DVD R The device does not support two layered discs 1 Connect the AC Adaptor and the power cord mains lead to the DC IN jack o...

Страница 49: ...ual discs according to the image quality If the files you want to copy do not fit onto one disc replace the disc in the DVD writer with an unused one and repeat the operation 5 After the operation is completed touch the tray opens remove the disc touch on the camcorder screen 6 Touch then disconnect the USB cable Tips If the total memory size of movies to be burnt by the DISC BURN operation exceed...

Страница 50: ...amcorder Play the created disc to make sure copying was performed correctly before deleting the movies on your camcorder If Failed or DISC BURN failed appears on the screen insert another disc into the DVD writer and perform the DISC BURN operation again Tips Disc creation time to copy movies to the limit of the disc is about 20 to 60 minutes It may take more time depending on the recording mode o...

Страница 51: ...tion device which is compatible with high definition image quality HD movies such as a Sony DVD writer Refer also to the instruction manuals supplied with the device to be connected Notes Connect your camcorder to the wall outlet wall socket using the supplied AC Adaptor for this operation p 15 Sony DVD writer may not be available in some countries regions Always maintain the firmware of the Sony ...

Страница 52: ...ting a standard definition image quality STD disc with a recorder etc You can copy images played back on your camcorder on a disc or video cassette by connecting your camcorder to a disc recorder a Sony DVD writer etc other than DVDirect Express with the A V connecting cable Connect the device in either way of or Refer also to the instruction manuals supplied with the devices to be connected Notes...

Страница 53: ...ly Connect your camcorder to the input jacks of the recording device 3 Start playback on your camcorder and record it on the recording device Refer to the instruction manuals supplied with your recording device for details 4 When dubbing is finished stop the recording device and then your camcorder Notes Since copying is performed via analog data transfer the image quality may deteriorate You cann...

Страница 54: ... or size p 56 Playback Function Items for playback p 56 Edit Copy Items for editing p 56 Setup Other setup items p 56 Operating menus Follow the procedures explained below to set the menu items The Camera Mic and Setup menus have sub categories Touch the sub category icon and the screen changes to other sub category menus Grayed out menu items or settings are not available Notes You may not be abl...

Страница 55: ...r is in photo recording mode Tele Macro Shoots a subject in focus with the background out of focus SteadyShot Sets the SteadyShot function when recording movies SteadyShot Sets the SteadyShot function when shooting photos Digital Zoom Sets the maximum zoom level of the digital zoom that exceeds the zoom level of the zoom Conversion Lens Sets the type of an attached conversion lens sold separately ...

Страница 56: ...f external media Setup Media Settings Media Select Sets the type of media to be used for recording movies or photos p 20 Media Info Displays information on the recording media such as free space Format Deletes all data on the internal recording media or a memory card Repair Img DB F Repairs the image database file on the internal recording media or a memory card p 60 File Number Sets how to assign...

Страница 57: ...tton General Settings Beep Sets whether the camcorder sounds operation beeps or not LCD Brightness Adjusts the brightness of the LCD screen A Shut Off Changes the A Shut Off setting p 16 Power On By LCD Sets whether or not the camcorder is turned on and off when you open and close the LCD screen Language Setting Sets the display language p 19 Calibration Calibrates the touch panel Battery Info Dis...

Страница 58: ... E CD ROM install exe Drive names such as E may vary depinding on the computer 2 Click Handbook 3 Click the desired language and the model name of your camcorder Install and follow the on screen instructions to install Handycam Handbook The model name of your camcorder is printed on the bottom surface To view the Handycam Handbook double click the short cut icon on the computer screen When using a...

Страница 59: ...g of the AC Adaptor to the wall outlet wall socket p 15 The camcorder does not operate even when the power is set to on It takes a few seconds for your camcorder to be ready to shoot after the power is turned on This is not a malfunction Disconnect the AC Adaptor from the wall outlet wall socket or remove the battery pack then reconnect it after about 1 minute If your camcorder still does not work...

Страница 60: ...persists even after you have tried to fix a couple of times contact your Sony dealer or local authorized Sony service facility In this case when you contact them give them all the numbers of the error code beginning with C or E C 04 The battery pack is not an InfoLITHIUM battery pack V series Use an InfoLITHIUM battery pack V series p 13 Connect the DC plug of the AC Adaptor to your camcorder secu...

Страница 61: ...ity Expected time of recording and playback with each battery pack Recording time Approximate time available when you use a fully charged battery pack unit minute Battery pack Continuous recording time Typical recording time Image quality HD STD HD STD NP FV50 supplied 150 165 75 80 NP FV70 315 345 155 170 NP FV100 625 680 310 340 Each recording time is measured when the camcorder is recording hig...

Страница 62: ...B 9 9 15 15 35 35 75 75 150 150 10 10 20 20 40 40 90 90 180 180 10 10 30 30 60 60 120 120 245 245 25 15 50 40 105 80 215 165 440 330 45 35 90 75 190 155 380 310 770 630 Standard definition image quality STD unit minute 2 GB 4 GB 8 GB 16 GB 32 GB 25 25 55 50 110 100 225 210 460 420 Playing time Approximate time available when you use a fully charged battery pack unit minute Battery pack Image quali...

Страница 63: ...l array of Sony s ClearVid and the image processing system BIONZ allow still image resolution equivalent to the sizes described Tips You can also use memory card with a capacity of under 1 GB for recording photos The following list shows the bit rate pixels and aspect ratio of each recording mode movie audio etc High definition image quality HD PS Max 28 Mbps 1 920 1 080 pixels 16 9 FX Max 24 Mbps...

Страница 64: ...rate it Doing so might cause heat to build up inside When disconnecting the power cord mains lead pull it by the plug and not the cord lead Do not damage the power cord mains lead such as by placing anything heavy on it Do not use a deformed or damaged battery pack Keep metal contacts clean If the battery electrolytic liquid has leaked Consult your local authorized Sony service facility Wash off a...

Страница 65: ...argeable battery is not charged the camcorder operation will not be affected as long as you are not recording the date Procedures Connect your camcorder to a wall outlet wall socket using the supplied AC Adaptor and leave it with the LCD screen closed for more than 24 hours Note on disposal transfer of the camcorder HDR CX160 CX180 Even if you delete all movies and still images or perform Format d...

Страница 66: ...in 16 9 For photos 29 8 mm 894 mm 1 3 16 in 35 1 4 in 4 3 Color temperature Auto One Push Indoor 3 200 K Outdoor 5 800 K Minimum illumination 11 lx lux in default setting shutter speed 1 60 second 3 lx lux Low Lux is set to On shutter speed 1 30 second 1 The unique pixel array of Sony s ClearVid and the image processing system BIONZ allow still image resolution equivalent to the sizes described 2 ...

Страница 67: ...ory Stick Memory Stick Duo Memory Stick PRO Duo Memory Stick PRO HG Duo MagicGate MagicGate Memory Stick and MagicGate Memory Stick Duo are trademarks or registered trademarks of Sony Corporation InfoLITHIUM is a trademark of Sony Corporation x v Color is a trademark of Sony Corporation BIONZ is a trademark of Sony Corporation BRAVIA is a registered trademark of Sony Corporation DVDirect is a trad...

Страница 68: ...nd are not mentioned in each case in this manual Add further enjoyment with your PlayStation 3 by downloading the application for PlayStation 3 from PlayStation Store where available The application for PlayStation 3 requires PlayStation Network account and application download Accessible in areas where the PlayStation Store is available ...

Страница 69: ... recording mode PS FX FH HQ LP 60min Remaining battery Recording playback editing media 0 00 00 Counter hour minute second 00Min Estimated recording remaining time Photo size 9999 9999 Approximate number of recordable photos and photo size Playback folder 100 112 Current playing movie or photo Number of total recorded movies or photo Bottom Indicator Meaning View Images button Micref Level low Win...

Страница 70: ...e the LCD panel with the LCD screen facing out This is convenient during playback operations View Images button 28 POWER button 17 Speaker RESET button Press RESET using a pointed object Press RESET to initialize all the settings including the clock setting MODE button 24 Movie Photo lamps 24 MIC PLUG IN POWER jack HDR CX160 CX180 HDMI OUT jack 32 USB jack 45 48 ...

Страница 71: ...ttery pack 13 START STOP button 24 DC IN jack 13 A V Remote Connector 32 Grip belt 23 Built in USB Cable 14 Memory card access lamp 22 While the lamp is lit or flashing the camcorder is reading or writing data Tripod receptacle Memory card slot 22 BATT battery release lever 15 ...

Страница 72: ... display 60 Setting the date and time 17 Software 37 Specifications 66 Supplied items 8 T Thumbnail 35 Tripod 71 Troubleshooting 59 Turning the power on 17 TV 32 U USB cable 48 51 V VBR 62 W Wall outlet wall socket 13 Warning indicators 60 Windows 37 A A V connecting cable 33 53 B Battery pack 13 Built in USB Cable 8 14 C Care 64 Charging the battery pack 13 Charging the battery pack abroad 16 Clo...

Страница 73: ...73 US Quick reference ...

Страница 74: ...argar la batería con un cargador de baterías original de Sony o con un dispositivo que pueda cargarla Mantenga la batería fuera del alcance de niños pequeños Mantenga la batería seca Sustitúyala únicamente por otra del mismo tipo o equivalente recomendada por Sony Deshágase de la baterías usada lo antes posible según el procedimiento que se describe en las instrucciones Sustituya la batería únicam...

Страница 75: ...ocámara No sujete la videocámara por las partes siguientes ni por las tapas de las tomas Pantalla de cristal líquido Batería Cable USB incorporado La videocámara no está protegida contra el polvo las salpicaduras ni el agua Consulte las Precauciones pág 62 Elementos del menú panel de cristal líquido y objetivo Los elementos de menú que aparezcan atenuados no estarán disponibles en las condiciones ...

Страница 76: ...les puede ir en contra de las leyes sobre los derechos de autor Use la videocámara según las normas locales Notas acerca de la reproducción Es posible que no pueda reproducir normalmente en otros dispositivos imágenes grabadas con la videocámara También es posible que no pueda reproducir en la videocámara imágenes grabadas con otros dispositivos Las películas con calidad de imagen estándar STD gra...

Страница 77: ...íquido Si lo hace podría perder los datos de imágenes que se grabaron Si no puede grabar o reproducir imágenes ejecute Formatear Si graba o elimina imágenes repetidamente durante mucho tiempo los datos del soporte de grabación se fragmentarán Las imágenes no se pueden guardar ni grabar En ese caso guarde primero las imágenes en algún tipo de soporte externo y luego ejecute Formatear tocando MENU C...

Страница 78: ...GB HDR CX180 32 GB Notas acerca del uso No realice ninguna de las siguientes acciones o podría dañar el soporte de grabación ser incapaz de reproducir las imágenes grabadas o perderlas u ocasionar otras fallas de funcionamiento expulsar la tarjeta de memoria cuando el indicador de acceso pág 18 está encendido o parpadeando extraer la batería o el adaptador de alimentación de ca de la videocámara o...

Страница 79: ...R CX160 CX180 18 Grabación reproducción Grabación 19 Selección del modo de grabación 23 Reproducción en la videocámara 24 Uso de la Reproducción de selección 27 Reproducción de imágenes en un televisor 28 Funciones avanzadas Eliminación de películas y fotos 31 Almacenamiento de películas y fotos con una computadora Funciones útiles disponibles si conecta la videocámara a una computadora Windows 33...

Страница 80: ...HD mediante una grabadora de DVD etc que no es DVDirect Express 49 Creación de un disco con calidad de imagen de definición estándar STD mediante una grabadora etc 50 Personalización de la videocámara Uso de los menús 52 Obtención de información detallada con la Guía práctica de Handycam 56 Información complementaria Solución de problemas 57 Tiempo de grabación de películas número de fotos que pue...

Страница 81: ...ta que oiga un clic 3 Conecte el adaptador de alimentación de ca y el cable de alimentación a la videocámara y al tomacorriente de pared El indicador CHG carga se enciende y se inicia el proceso de carga El indicador CHG carga se apaga cuando la batería está totalmente cargada 4 Cuando la batería esté cargada desconecte el adaptador de alimentación de ca de la toma DC IN de la videocámara Batería ...

Страница 82: ...tiza la carga si utiliza una computadora ensamblada personalmente una computadora reacondicionada o un concentrador USB Es posible que la videocámara no funcione adecuadamente según el dispositivo USB que se utilice con la computadora Sugerencias Puede cargar la batería conectando el cable USB incorporado a un tomacorriente de pared utilizando un cargador USB adaptador de alimentación de ca AC U50...

Страница 83: ...se mide sin utilizar el cable de soporte de conexión USB Sugerencias Consulte la página 60 para obtener información sobre los tiempos de reproducción y grabación Con la videocámara encendida puede comprobar el tiempo restante aproximado de la batería a través del indicador de batería restante situado en la esquina superior derecha de la pantalla de cristal líquido Para extraer la batería Cierre la...

Страница 84: ... utiliza la videocámara durante unos 5 minuto a fin de ahorrar energía de la batería Apagado auto Notas acerca del adaptador de alimentación de ca Cuando utilice el adaptador de alimentación de ca use el tomacorriente de pared más cercano Si se produce alguna falla de funcionamiento mientras utiliza la videocámara desconecte inmediatamente el adaptador de alimentación de ca del tomacorriente de pa...

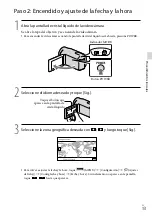
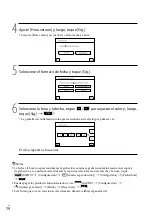
Страница 85: ... pantalla de cristal líquido está abierta presione POWER 2 Seleccione el idioma deseado y toque Sig 3 Seleccione la zona geográfica deseada con y luego toque Sig Para volver a ajustar la fecha y la hora toque MENU Configuración Ajustes del reloj Config fecha y hora Fecha y hora Si un elemento no aparece en la pantalla toque hasta que aparezca Indicador MODE Botón POWER Toque el botón que aparece e...

Страница 86: ... primera vez El reloj empezará a funcionar Notas La fecha y la hora no aparecen durante la grabación aunque se graban automáticamente en el soporte de grabación y se pueden mostrar durante la reproducción Para mostrar la fecha y la hora toque MENU Configuración Ajustes reproducción Código datos Fecha hora Puede apagar los pitidos de funcionamiento si toca MENU Configuración Ajustes generales Pitid...

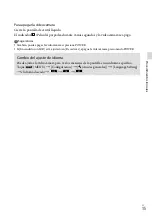
Страница 87: ...mara se apaga Sugerencias También puede apagar la videocámara si presiona POWER Si Encendido con LCD está ajustado en Desactivar apague la videocámara presionando POWER Cambio del ajuste de idioma Puede ajustar la videocámara para ver los mensajes de la pantalla en un idioma específico Toque MENU Configuración Ajustes generales Language Setting el idioma deseado ...

Страница 88: ...tiempo de grabación de las películas Consulte la página 61 para conocer el número de fotos que puede guardar Selección del soporte de grabación HDR CX160 CX180 Toque MENU Configuración Ajustes de soporte Selección soporte Aparecerá la pantalla Selección soporte Toque el soporte de grabación deseado y luego toque La películas y fotos se graban en el soporte seleccionado Para comprobar los ajustes d...

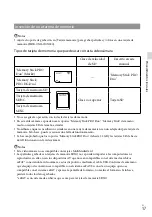
Страница 89: ...s en una tarjeta de memoria ni en un adaptador para tarjeta de memoria Si lo hace puede ocasionar una falla de funcionamiento Se ha comprobado que los soportes Memory Stick PRO Duo de hasta 32 GB y las tarjetas SD de hasta 64 GB funcionan con la videocámara Notas Esta videocámara no es compatible con tarjetas MultiMediaCard Las películas grabadas en tarjetas de memoria SDXC no se pueden importar a...

Страница 90: ...tarjeta de memoria Confirme la dirección de la tarjeta de memoria Si inserta la tarjeta de memoria forzadamente en la dirección incorrecta es posible que se dañe la tarjeta de memoria la ranura para la tarjeta de memoria o los datos de imagen No abra la tapa durante la grabación Al insertar o expulsar la tarjeta de memoria tenga cuidado de que la tarjeta de memoria no salga impulsada y se caiga Pa...

Страница 91: ... se graban con calidad de imagen de alta definición HD HDR CX130 tarjeta de memoria HDR CX160 CX180 soportes de grabación internos Sugerencias Para cambiar los soportes de grabación consulte la página 16 HDR CX160 CX180 1 Ajuste la correa de sujeción 2 Abra la pantalla de cristal líquido de la videocámara Se abre la tapa del objetivo y se enciende la videocámara ...

Страница 92: ...ver a mostrar los elementos en la pantalla de cristal líquido Toque cualquier área de la pantalla excepto los botones de la pantalla de cristal líquido para que pueda usar elementos Puede cambiar los ajustes utilizando el menú Ajuste pantalla Botón MODE Película Durante la grabación de una película Foto Durante la grabación de una foto ESPERA GRAB Botón START STOP unos 4 segundo después ...

Страница 93: ...ue aparece en la parte superior derecha de la pantalla de cristal líquido está parpadeando Sugerencias Consulte la página 60 para conocer el tiempo de grabación de las películas Para capturar fotos durante la grabación de una película presione PHOTO completamente Dual Rec SteadyShot está definido en Activo en el ajuste predeterminado Para especificar la prioridad de cara tóquela Puede capturar fot...

Страница 94: ...resione MODE para encender el indicador Foto La pantalla de cristal líquido cambia para el modo de grabación de fotos y la relación de aspecto de la pantalla cambia a 4 3 Presione PHOTO levemente para ajustar el enfoque y luego presiónelo completamente Sugerencias Consulte la página 61 para conocer la cantidad de fotos que puede guardar Para cambiar el tamaño de la imagen toque MENU Calidad img Ta...

Страница 95: ...del modo de grabación seleccionado Para obtener detalles sobre cómo guardar en dispositivos externos consulte la página 40 Tipos de soporte Modo de grabación PS FX FH HQ LP En esta videocámara Soportes de grabación internos Tarjeta de memoria En dispositivos externos Soportes externos dispositivos de almacenamiento USB Blu ray discos AVCHD discos de grabación PS sólo se puede usar cuando Imág p se...

Страница 96: ...ión internos Sugerencias Para cambiar los soportes de grabación consulte la página 16 HDR CX160 CX180 La videocámara muestra las imágenes grabadas como un evento de manera automática según la fecha y hora 1 Abra la pantalla de cristal líquido de la videocámara Se abre la tapa del objetivo y se enciende la videocámara 2 Presione Ver Imágenes Aparece la pantalla Visualización de eventos después de a...

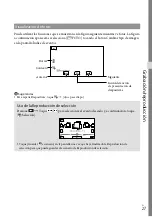
Страница 97: ... de tiempo desde un año y medio a tres meses lo cual cambia el número de eventos que pueden aparecer en la barra de línea de tiempo 4 Toque la imagen que desea ver Toque para seleccionar el tipo de imagen que desea mostrar en el índice desde PELÍCULA solo películas FOTO solo fotos o PELÍC FOTO películas y fotos mezcladas Para volver a la pantalla Visualización de eventos muestra la página anterior...

Страница 98: ...do la reproducción desde la imagen seleccionada llega a la última imagen vuelve a mostrarse la pantalla INDEX Toque durante la pausa para reproducir la película a cámara lenta Si sigue tocando durante la reproducción las películas se reproducen con un aumento de velocidad de aproximadamente 5 veces 10 veces 30 veces 60 veces La fecha y la hora de grabación y las condiciones de filmación se guardan...

Страница 99: ...lla Índice de eventos Sugerencias Para repetir Diapositivas toque Ajus pase diapo Uso de la Reproducción de selección Presione Toque para seleccionar el evento deseado y a continuación toque Selección Toque Guardar escenario en la pantalla una vez que haya finalizado la Reproducción de selección para que pueda guardar el escenario de Reproducción de selección Inicio detención de presentación de di...

Страница 100: ...e el adaptador de alimentación de ca suministrado como fuente de alimentación pág 11 3 Reproducir una película o una foto en la videocámara pág 24 Lista de conexión Conexión a un televisor de alta definición Cuando la calidad de grabación es calidad de imagen de alta definición HD las películas se reproducen con calidad de imagen de alta definición HD Cuando la calidad de grabación es calidad de i...

Страница 101: ...onectar el televisor en el otro extremo Las imágenes con protección de derechos de autor no se emiten desde la toma HDMI OUT de la videocámara Es posible que algunos televisores no funcionen correctamente por ejemplo que no se emita sonido o imagen con este tipo de conexión No conecte la toma HDMI OUT de la videocámara a la toma HDMI OUT de un dispositivo externo o puede ocasionar una falla de fun...

Страница 102: ...e imagen de definición estándar STD Sugerencias Si conecta la videocámara al televisor utilizando más de un tipo de cable para emitir imágenes el orden de prioridad de las tomas de entrada del televisor es el siguiente HDMI componente S VIDEO video HDMI High Definition Multimedia Interface es una interfaz que envía señales de audio y video La toma HDMI OUT emite imágenes de alta calidad y audio di...

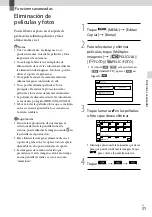
Страница 103: ...X160 CX180 Si borra todas las pelìculas fotos que se incluyen en los escenarios guardados los escenarios se borrarán también Sugerencias Si inicia la reproducción de una imagen al seleccionarla desde la pantalla Índice de eventos puede eliminar la imagen usando en la pantalla de reproducción Para eliminar las imágenes almacenadas en el soporte de grabación y recuperar todo el espacio disponible en...

Страница 104: ...s de un evento a la vez En el paso 2 toque Todo en evento Toque para seleccionar el evento deseado y a continuación toque Mantenga presionada la miniatura que desea para que pueda confirmar la imagen Toque para volver a la pantalla anterior Toque ...

Страница 105: ...ncluye funciones que le permiten realizar más operaciones con las imágenes grabadas con la videocámara Carga sencilla mientras está lejos de casa El software PMB Portable que se encuentra preinstalado en la videocámara le permite reproducir o cargar imágenes a Internet mientras se encuentra lejos de casa si conecta la videocámara a una computadora Ver Editar Guardar en un disco Cargar Calendario D...

Страница 106: ... 256 MB o más es suficiente para el procesamiento sólo de películas con calidad de imagen de definición estándar STD Para Windows Vista Windows 7 1 GB o más Disco duro Volumen de disco que se requiere para la instalación 500 MB aproximadamente puede necesitar 10 GB o más al crear discos con formato AVCHD 50 GB cómo máximo se puede necesitar al crear discos Blu ray Pantalla Mínimo 1 024 768 puntos ...

Страница 107: ...tware Ponga el CD ROM suministrado en la unidad de disco de su computadora Aparecerá la pantalla de instalación Si la pantalla no aparece haga clic en Inicio Equipo en Windows XP Mi PC y luego haga doble clic en SONYPMB E CD ROM Los nombres de las unidades como por ejemplo E pueden variar según la computadora Haga clic en Instalación Seleccione el país o región Seleccione el idioma a instalar la a...

Страница 108: ...torio de la computadora Extracción segura de Dispositivo de almacenamiento masivo USB Toque Cancelar Sí en la pantalla de la videocámara Desconecte el cable USB Si está usando Windows 7 es posible que el icono no aparezca en el escritorio de la computadora Si no aparece puede desconectar la videocámara de la computadora sin seguir los procedimientos descritos anteriormente Notas No intente formate...

Страница 109: ...cirse No se garantiza el funcionamiento si manipula los datos de la videocámara usando la computadora La videocámara divide automáticamente un archivo de imagen si tiene un tamaño superior a 2 GB y guarda las partes en archivos separados Todos los archivos de imagen se pueden ver como archivos separados en una computadora sin embargo se manejarán correctamente con la función de importación de la v...

Страница 110: ...e licencia Lea atentamente el acuerdo y haga clic en Acepto Se inicia el software PMB Portable Carga de imágenes a un servicio de red El software de aplicación PMB Portable está preinstalado en la videocámara PMB Portable le ofrece las siguientes funciones Cargar imágenes de manera sencilla a servicios de red como blogs Cargar imágenes a través de una computadora conectada a Internet cuando se enc...

Страница 111: ...io que usa para cargar la imagen Si tiene problemas con PMB Portable o si elimina el software por equivocación puede descargar el instalador de PMB Portable desde Internet para repararlo Notas sobre PMB Portable Puede descargar las URL de algunos sitios Web desde un servidor administrado por Sony en adelante llamado servidor Sony usando PMB Portable Debe aceptar las siguientes condiciones para uti...

Страница 112: ... 42 Grabadora de DVD DVDirect Express Almacenamiento de imágenes en un disco DVD con calidad de imagen de alta definición HD Cable USB incorporado de DVDirect Express 46 Grabadora de DVD que no sea DVDirect Express Almacenamiento de imágenes en un disco DVD con calidad de imagen de alta definición HD o con calidad de imagen de definición estándar STD Cable USB incorporado 49 Grabadora de disco dur...

Страница 113: ...ocámara no funcione correctamente Sin embargo una vez que elimine la película de demostración no podrá recuperarla Tipos de soporte donde se almacenan imágenes Consulte Selección del modo de grabación en la página 23 Dispositivos en los que se puede reproducir el disco creado DVD con calidad de imagen de alta definición HD Dispositivos de reproducción de formato AVCHD como un reproductor de discos...

Страница 114: ...positivo de soporte externo No puede usar los siguientes dispositivos como dispositivo de soporte externo dispositivos de soporte con una capacidad superior a 2 TB unidad de disco común como una unidad de CD o DVD dispositivos de soporte conectados mediante un concentrador USB dispositivos de soporte con concentrador USB incorporado lector de tarjeta Notas Es posible que no pueda usar dispositivos...

Страница 115: ... este tipo de conexión 5 Conecte el dispositivo de soporte externo y toque Copiar en la pantalla de la videocámara HDR CX130 Las películas y fotos que están almacenadas en la tarjeta de memoria inserta en la videocámara y que aún no se han guardado en el dispositivo de soporte externo se pueden guardar en él en este momento HDR CX160 CX180 Las películas y fotos que están almacenadas en uno de los ...

Страница 116: ...tivo de soporte externo Sin embargo aunque el dispositivo de soporte externo tenga espacio libre no puede guardar escenas que superen el siguiente número Películas con calidad de imagen de alta definición HD Máx 3 999 Películas con calidad de imagen de definición estándar STD Máx 9 999 Fotos Máx 40 000 La cantidad de escenas puede ser menor dependiendo del tipo de imágenes grabadas Almacenamiento ...

Страница 117: ...s en un televisor conectado a la videocámara pág 28 Puede reproducir las películas con calidad de imagen de alta definición HD en la computadora usando Player for AVCHD Inicie Player for AVCHD y seleccione la unidad donde está conectado el dispositivo de soporte externo con Configuración Ejecución de Copia directa de forma manual Puede ejecutar Copia directa manualmente mientras la videocámara est...

Страница 118: ...ared pág 11 2 Encienda la videocámara y conecte la grabadora de DVD en la toma USB de la videocámara con el cable USB de la grabadora de DVD No puede utilizar el cable USB incorporado para este tipo de conexión 3 Inserte un disco no utilizado anteriormente en la grabadora de DVD y cierre la bandeja de discos 4 Presione DISC BURN en la grabadora de DVD HDR CX130 Las películas que están almacenadas ...

Страница 119: ... deseada Al crear varias copias del mismo disco Conecte la videocámara a la grabadora de DVD y toque OPC GRAB DISCO Seleccione el soporte de grabación que contiene las películas que desea guardar HDR CX160 CX180 y toque Sig Toque la película que desea grabar en el disco aparece Mantenga presionada la miniatura que desea para que pueda confirmar la imagen Toque para volver a la pantalla anterior To...

Страница 120: ...en la grabadora de DVD Conecte el adaptador de alimentación de ca y el cable de alimentación a la toma DC IN de la videocámara y al tomacorriente de pared pág 11 Encienda la videocámara y conecte la grabadora de DVD en la toma USB de la videocámara con el cable USB de la grabadora de DVD Puede reproducir películas en la pantalla del televisor si conecta la videocámara a un televisor pág 28 Inserte...

Страница 121: ...adora de DVD Sony no esté disponible en algunos países o regiones 1 Conecte el adaptador de alimentación de ca y el cable de alimentación a la toma DC IN de la videocámara y al tomacorriente de pared pág 11 2 Encienda la videocámara y conecte una grabadora de DVD etc a la videocámara con el cable USB incorporado La pantalla Selección USB aparece en la pantalla de la videocámara Si la pantalla Sele...

Страница 122: ...peración pág 11 Es posible que la grabadora de DVD Sony no esté disponible en algunos países o regiones Las películas con calidad de imagen de alta definición HD se copian con calidad de imagen de definición estándar STD Cable de conexión de A V suministrado Cable de conexión de A V con S VIDEO se vende por separado Si usa este cable puede producir imágenes de mejor calidad que con un cable de con...

Страница 123: ...ivo de grabación 4 Cuando haya finalizado la copia detenga el dispositivo de grabación y a continuación detenga la videocámara Notas Debido a que la copia se realiza a través de la transferencia de datos analógica es posible que la calidad de imagen se deteriore No es posible realizar copias de imágenes en grabadoras conectadas con un cable HDMI Para copiar información de fecha y hora y datos de l...

Страница 124: ...lementos para la reproducción pág 54 Editar Copiar Elementos para la edición pág 54 Configuración Otros elementos de ajuste pág 54 Menús de funcionamiento Siga los procedimientos que se explican a continuación para ajustar los elementos del menú Los menús Cámara Micrófono y Configuración tienen subcategorías Toque el icono de subcategoría para que la pantalla muestre otros menús de subcategorías L...

Страница 125: ...a o una playa Desvanecedor Escenas fundidas Temporizad auto Ajusta el disparador automático cuando la videocámara se encuentra en el modo de grabación de fotos Tele macro Graba un motivo enfocado con el fondo desenfocado SteadyShot Ajusta la función SteadyShot al grabar películas SteadyShot Ajusta la función SteadyShot al capturar fotos Zoom digital Ajusta el nivel máximo del zoom digital que exce...

Страница 126: ...n guardado Editar Copiar Borrar Elimina películas o fotos Proteger Protege películas o fotos para evitar que se eliminen Copiar Copia imágenes desde el soporte de grabación interno seleccionado y la tarjeta de memoria insertada y viceversa Copia directa Copia imágenes almacenadas en el soporte de grabación interno o en una tarjeta de memoria a algún tipo de soporte externo Configuración Ajustes de...

Страница 127: ...está conectada a una computadora o a un dispositivo USB Ajuste USB LUN Ajusta la videocámara para mejorar la compatibilidad de una conexión USB restringiendo algunas funciones de USB Grabar en disco Permite grabar imágenes en discos con solo presionar un botón Ajustes generales Pitido Define si los pitidos de funcionamiento de la videocámara suenan o no Luminosidad LCD Ajusta el brillo de la panta...

Страница 128: ... Los nombres de las unidades como por ejemplo E pueden variar según la computadora 2 Haga clic en Guía práctica 3 Haga clic en el idioma deseado y en el nombre del modelo de la videocámara Instalación y siga las instrucciones en pantalla para instalar Guía práctica de Handycam El nombre de modelo de la videocámara está impreso en su superficie inferior Para ver la Guía práctica de Handycam haga do...

Страница 129: ...tante el distribuidor Sony no copiará ni conservará los datos Consulte la Guía práctica de Handycam pág 56 para obtener detalles sobre los síntomas de la videocámara y la Ayuda de PMB pág 37 para obtener detalles sobre la conexión de la videocámara a la computadora La videocámara no se enciende Instale una batería cargada en la videocámara pág 9 Conecte el enchufe del adaptador de alimentación de ...

Страница 130: ...a cualquier dispositivo que no sea el teclado el mouse y la videocámara Desconecte el cable USB de la computadora y de la videocámara y reinicie la computadora luego conecte la computadora y la videocámara nuevamente en el orden correcto Si hay un cable USB incorporado y otro cable USB que está conectado al puerto USB de la videocámara conectados a dispositivos externos al mismo tiempo desconecte ...

Страница 131: ...m el soporte de grabación HDR CX160 CX180 La tarjeta de memoria está dañada Formatee la tarjeta de memoria con la videocámara pág 54 Se insertó una tarjeta de memoria incompatible pág 17 La tarjeta de memoria está protegida contra escritura Se restringió el acceso a la tarjeta de memoria en otro dispositivo La videocámara se encuentra en posición inestable Sostenga la videocámara de forma estable ...

Страница 132: ...ión y de reproducción será más corto cuando utilice la videocámara a bajas temperaturas En función de las condiciones en las que utilice la videocámara es posible que el tiempo de grabación y reproducción se vea reducido Tiempo de reproducción Tiempo aproximado disponible cuando utiliza una batería completamente cargada unidad minuto Batería Calidad de imagen HD STD NP FV50 suministrada 240 280 NP...

Страница 133: ...05 80 215 165 440 330 45 35 90 75 190 155 380 310 770 630 Calidad de imagen de definición estándar STD unidad minuto 2 GB 4 GB 8 GB 16 GB 32 GB 25 25 55 50 110 100 225 210 460 420 Notas El tiempo disponible para grabación puede variar según las condiciones de grabación y del motivo y Modo grabación y Imág p segundo pág 54 Los números entre paréntesis indican el tiempo mínimo de grabación Número es...

Страница 134: ...es esta falla de funcionamiento puede resultar irreparable Si dentro de la videocámara entra algún objeto o líquido desconéctela y haga que la revise un distribuidor de Sony antes de volver a utilizarla Evite manipular desmontar o modificar la videocámara bruscamente y exponerla a golpes o impactos como martillazos caídas o pisotones Sea especialmente cuidadoso con el objetivo Mantenga la videocám...

Страница 135: ...ua y a continuación limpie la unidad con un paño suave y seco No realice ninguna de las acciones siguientes para evitar dañar el acabado Usar productos químicos como diluyentes bencina alcohol paños con productos químicos repelentes insecticidas y pantallas solares Utilizar la videocámara con las sustancias mencionadas en las manos Dejar la unidad en contacto con objetos de goma o vinilo durante u...

Страница 136: ...ectivo foto 16 9 Aprox 1 250 000 píxeles Efectivo foto 4 3 Aprox 1 670 000 píxeles Objetivo Objetivo G 30 Óptico 2 42 Extendido 3 350 Digital Diámetro de filtro 37 mm F1 8 3 4 Distancia focal f 2 1 mm 63 0 mm Si se convierte en una cámara de imágenes fijas de 35 mm Nota sobre la eliminación o transferencia de la videocámara HDR CX160 CX180 Aunque elimine todas las películas e imágenes fijas o ejec...

Страница 137: ... 5 W STD 2 3 W Temperatura de funcionamiento 0 C a 40 C Temperatura de almacenamiento 20 C a 60 C Dimensiones aprox 52 5 mm 57 mm 113 5 mm an al prf incluidas las partes salientes 52 5 mm 57 mm 123 5 mm an al prf incluidas las partes salientes y con la batería recargable suministrada instalada Peso aprox HDR CX130 250 g unidad principal solamente 300 g incluida la batería recargable suministrada H...

Страница 138: ...rciales de Microsoft Corporation en los Estados Unidos y o en otros países Macintosh y Mac OS son marcas comerciales registradas de Apple Inc en los Estados Unidos y en otros países Intel Intel Core y Pentium son marcas comerciales o marcas comerciales registradas de Intel Corporation o sus subsidiarias en los Estados Unidos y en otros países y PlayStation son marcas comerciales registradas de Son...

Страница 139: ... Central Indicador Significado ESPERA GRAB Estado de la grabación Presentación de diapositivas ajustada Advertencia Modo de reproducción Derecha Indicador Significado 60i Calidad de grabación de la imagen HD STD velocidad de cuadros 60p 60i y modo de grabación PS FX FH HQ LP 60min Batería restante Soporte de grabación reproducción edición 0 00 00 Contador hora minuto segundo 00Min Tiempo de grabac...

Страница 140: ... posiciones son aproximados y pueden variar respecto de su apariencia real Según el modelo de la videocámara es posible que algunos indicadores no aparezcan Piezas y controles Los números entre corresponden a las páginas de referencia Objetivo objetivo G Micrófono incorporado Pantalla de cristal líquido panel táctil Si gira el panel de cristal líquido en 180 grado podrá cerrarlo con la pantalla de...

Страница 141: ...X180 Toma HDMI OUT 28 Toma USB 43 46 Palanca del zoom motorizado Botón PHOTO 22 Indicador CHG carga 9 Batería 9 Botón START STOP 20 Toma DC IN 9 Conector remoto de A V 28 Correa de sujeción 19 Cable USB incorporado 10 Indicador de acceso de la tarjeta de memoria 18 Si el indicador está encendido o parpadeando significa que la videocámara está leyendo o escribiendo datos Receptáculo del trípode Ran...

Страница 142: ...levisor 28 Tiempo de grabación y reproducción 60 Tiempo de grabación de películas número de fotos que puede grabar 60 Tomacorriente de pared 9 Totalmente cargada 9 Trípode 69 V VBR 60 Visualización de autodiagnóstico 58 W Windows 34 A Ajuste de la fecha y la hora 13 Ajustes de soporte 16 Ajustes del reloj 13 Almacenamiento de imágenes en soportes externos 42 B Batería 9 Borrar 31 C Cable de conexi...

Страница 143: ......

Отзывы: