background image

5

US

C:\WIN95-E\DESKTOP\386725411CPDE200UCA\01US03BAS-UC.fm

masterpage:Right

CPD-E200

3-867-254-11 (1)

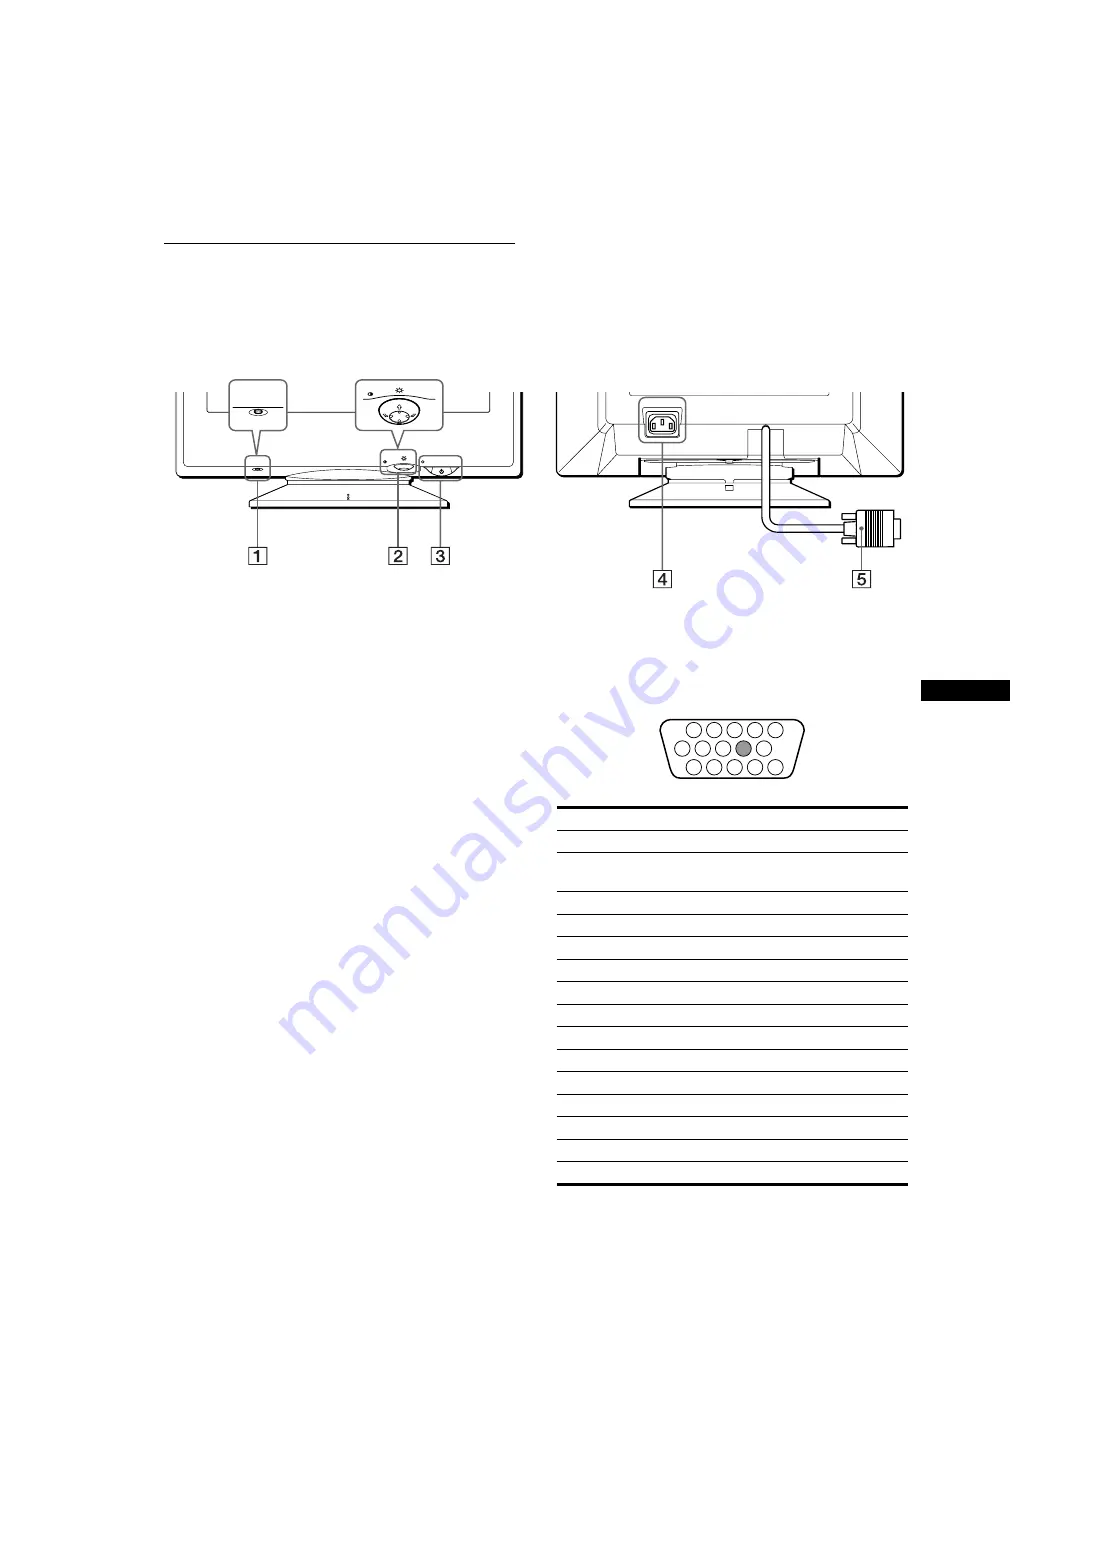
Identifying parts and controls

See the pages in parentheses for further details.

1

RESET button (page 12)

This button resets the adjustments to the factory settings.

2

Control button (page 9)

The control button is used to display the menu and make 
adjustments to the monitor, including brightness and contrast 
adjustments.

3

1

 (power) switch and indicator (pages 7, 13, 16)

This button turns the monitor on and off. The power indicator 
lights up in green when the monitor is turned on, and either 
flashes in green and orange, or lights up in orange when the 
monitor is in power saving mode.

4

AC IN connector (page 6)

This connector provides AC power to the monitor.

5

Video input connector (HD15) (page 6)

This connector inputs RGB video signals (0.700 Vp-p, 
positive) and sync signals.

* DDC (Display Data Channel) is a standard of VESA.

AC  IN

MENU

RESET

MENU

RESET

Rear

Front

Pin No.

Signal

1

Red

2

Green
(Sync on Green)

3

Blue

4

ID (Ground)

5

DDC Ground*

6

Red Ground

7

Green Ground

8

Blue Ground

9

10

Ground

11

ID (Ground)

12

Bi-Directional Data (SDA)*

13

H. Sync

14

V. Sync

15

Data Clock (SCL)*

1 2

3 4 5

8

7

6

11 12 13 14 15

10

9

Содержание FD Trinitron Multiscan CPD-E200/L

Страница 1: ... Sony Corporation Trinitron Color Computer Display Operating Instructions Mode d emploi Manual de instrucciones US FR ES C WIN95 E DESKTOP 386725411CPDE200UCA 01US01COV UC fm masterpage Right CPD E200 3 867 254 11 1 CPD E200 ...

Страница 2: ...chriften des Swedish National Council for Metrology MPR vom Dezember 1990 MPR II INFORMACIÓN Este producto cumple las normas del Consejo Nacional Sueco para Metrología MPR emitidas en diciembre de 1990 MPR II para frecuencias muy bajas VLF y frecuencias extremadamente bajas ELF Dieses Garät entspricht den folgenden europäischen EMV Vorschriften für Betrieb in Wohngebieten gewerblicher Gebleten und...

Страница 3: ...7 254 11 1 Precautions 4 Identifying parts and controls 5 Setup 6 Step 1 Connect your monitor to your computer 6 Step 2 Connect the power cord 6 Step 3 Turn on the monitor and computer 7 Selecting the on screen menu language LANG 7 Customizing Your Monitor 8 Navigating the menu 8 Adjusting the brightness and contrast 9 Adjusting the centering of the picture CENTER 9 Adjusting the size of the pictu...

Страница 4: ...an unstable surface near equipment which generates magnetism such as a transformer or high voltage power lines near or on an electrically charged metal surface Maintenance Clean the screen with a soft cloth If you use a glass cleaning liquid do not use any type of cleaner containing an anti static solution or similar additive as this may scratch the screen s coating Do not rub touch or tap the sur...

Страница 5: ... and off The power indicator lights up in green when the monitor is turned on and either flashes in green and orange or lights up in orange when the monitor is in power saving mode 4 AC IN connector page 6 This connector provides AC power to the monitor 5 Video input connector HD15 page 6 This connector inputs RGB video signals 0 700 Vp p positive and sync signals DDC Display Data Channel is a sta...

Страница 6: ...ter before connecting Note Do not touch the pins of the video cable connector as this might bend the pins x Connecting to an IBM PC AT or compatible computer x Connecting to a Macintosh or compatible computer Step 2 Connect the power cord With the monitor and computer switched off first connect the power cord to the monitor then connect it to a power outlet AC IN IBM PC AT or compatible computer t...

Страница 7: ...onitor s model name as the monitor type For customers using Windows NT4 0 Monitor setup in Windows NT4 0 is different from Windows 95 98 and does not involve the selection of monitor type Refer to the Windows NT4 0 instruction manual for further details on adjusting the resolution refresh rate and number of colors Adjusting the monitor s resolution and color number Adjust the monitor s resolution ...

Страница 8: ...tion about this monitor 5 COLOR page 10 Select the COLOR menu to adjust the picture s color temperature You can use this to match the monitor s colors to a printed picture s colors MENU MENU EXIT CENTER SIZE GEOM COLOR LANG HELP CONV OPTION OK MENU 2 6 S I ZE CENTER 2 6 S I ZE CENTER 2 6 GEOMETRY RETURN TO MA I N MENU RECOMMENDED RESOLUT I ON F L I CKER TH I N HOR I ZONTAL L I NE D I STORTED SHAPE...

Страница 9: ...tton in any direction The BRIGHTNESS CONTRAST menu appears on the screen 2 Move the control button m M to adjust the brightness and to adjust the contrast 6 The menu automatically disappears after about 3 seconds Adjusting the centering of the picture CENTER This setting is stored in memory for the current input signal 1 Press the center of the control button The main MENU appears on the screen 2 ...

Страница 10: ...ching the monitor s colors to a printed picture s colors This setting is stored in memory for all input signals 1 Press the center of the control button The main MENU appears on the screen 2 Move the control button to highlight COLOR and press the center of the control button again The COLOR menu appears on the screen 3 Move the control button m M to select a color temperature The preset color tem...

Страница 11: ...l or wavy patterns appear on the screen adjust the moire cancellation level To adjust the amount of moire cancellation first move the control button m M to select MOIRE ADJUST Then move the control button until the moire effect is at a minimum Moire is a type of natural interference which produces soft wavy lines on your screen It may appear due to interference between the pattern of the picture o...

Страница 12: ...ng the picture s geometry Move the control button to jump directly to the GEOMETRY menu OUT OF FOCUS The picture may seem to be out of focus when the red and blue color signals are not aligned properly causing red or blue shadows to appear around letters and lines Try adjusting the picture s convergence to make the shadows disappear Move the control button to jump directly to the CONVERGENCE menu ...

Страница 13: ...y When your computer is in a power saving mode MONITOR IS IN POWER SAVE MODE appears on the screen if you press any button on the monitor After a few seconds the monitor enters the power saving mode again Troubleshooting Before contacting technical support refer to this section If thin lines appear on your screen damper wires The lines you are experiencing on your screen are normal for the Trinitr...

Страница 14: ...hat specified for the monitor If you replaced an old monitor with this monitor reconnect the old monitor and adjust the frequency range to the following Horizontal 30 85 kHz Vertical 48 120 Hz If no message is displayed and the 1 power indicator is green or flashing orange Use the Self diagnosis function page 16 If using Windows 95 98 If you replaced an old monitor with this monitor reconnect the ...

Страница 15: ... centering page 9 Note that some video modes do not fill the screen to the edges Edges of the image are curved Adjust the geometry page 10 Wavy or elliptical pattern moire is visible Select MOIRE ADJUST and adjust the moire cancellation effect page 11 xProblems caused by the connected computer or other equipment Change your desktop pattern Color is not uniform Degauss the monitor page 11 If you pl...

Страница 16: ...king properly If the 1 power indicator is still flashing there is a potential monitor failure Count the number of seconds between orange flashes of the 1 power indicator and inform your authorized Sony dealer of the monitor s condition Be sure to note the model name and serial number of your monitor Also note the make and model of your computer and video board Specifications CRT 0 24 mm aperture g...

Страница 17: ... CPD E200 3 867 254 11 1 FR Précautions 4 Identification des composants et des commandes 5 Installation 6 1re étape Raccordez le moniteur à votre ordinateur 6 2e étape Branchez le cordon d alimentation 6 3e étape Mettez le moniteur et l ordinateur sous tension 7 Sélection de la langue d affichage des menus LANG 7 Personnalisation de votre moniteur 8 Pilotage par menus 8 Réglage de la luminosité et...

Страница 18: ...iques sur une surface instable à proximité d appareils générant un champ magnétique comme un transformateur ou des lignes à haute tension à proximité de ou sur une surface métallique chargée électriquement Entretien Nettoyez l écran à l aide d un chiffon doux Si vous utilisez un produit nettoyant pour vitres n utilisez aucun type de produit contenant une solution antistatique ou des additifs simil...

Страница 19: ...s tension L indicateur d alimentation s allume en vert lorsque le moniteur est sous tension et clignote en vert et en orange ou s allume en orange lorsque le moniteur se trouve en mode d économie d énergie 4 Connecteur AC IN page 6 Ce connecteur assure l alimentation du moniteur 5 Connecteur d entrée vidéo HD15 page 6 Ce connecteur assure l entrée des signaux vidéo RVB 0 700 Vp p positifs et des s...

Страница 20: ...r au raccordement Remarque Ne touchez pas les broches du connecteur de câble vidéo car vous risqueriez de les plier x Raccordement à un PC AT IBM ou à un ordi nateur compatible x Raccordement à un ordinateur Macintosh ou compatible 2e étape Branchez le cordon d alimentation Le moniteur et l ordinateur étant hors tension branchez d abord le cordon d alimentation sur le moniteur et ensuite sur une p...

Страница 21: ...tion de ce moniteur comme type de moniteur Pour les clients utilisant Windows NT4 0 L installation du moniteur sous Windows NT4 0 est différente de Windows 95 98 et n implique pas la sélection du type de moniteur Reportez vous au mode d emploi de Windows NT4 0 pour plus de détails sur le réglage de la résolution le taux de régénération et le nombre de couleurs Réglage de la résolution du moniteur ...

Страница 22: ...concernant ce moniteur MENU MENU SORTIR CENTRE TAILLE GEOM COUL LANG AIDE CONV OPTION OK MENU 2 6 TA I LLE CENTRE 2 6 TA I LLE CENTRE 2 6 GEOMETR I E RETOURNER AU MENU PR I NC I PAL RESOLUT I ON RECOMMANDEE SC I NT I L LEMENTS F I NE L I GNE HOR I ZONTALE I MAGE DEFORMEE I MAGE F LOUE I MAGE DECOLOREE A I DE 5 COUL page 10 Sélectionne le menu COUL pour régler la température de couleur de l image V...

Страница 23: ... CONTRASTE apparaît à l écran 2 Déplacez la manette de commande vers le haut ou le bas m M pour régler la luminosité et vers la gauche ou la droite pour régler le contraste 6 Le menu disparaît automatiquement au bout d environ 3 secondes Réglage du centrage de l image CENTRE Ce réglage est enregistré dans la mémoire pour le signal d entrée en cours 1 Appuyez au centre de la manette de commande Le ...

Страница 24: ...d une image imprimée Ce réglage est enregistré dans la mémoire pour tous les signaux d entrée 1 Appuyez au centre de la manette de commande Le MENU principal apparaît à l écran 2 Déplacez la manette de commande pour mettre COUL en évidence et appuyez à nouveau au centre de la manette de commande Le menu COULEUR apparaît à l écran 3 Déplacez la manette de commande vers le haut ou le bas m M pour sé...

Страница 25: ...on du moiré Pour régler le niveau de suppression du moiré déplacez d abord la manette de commande vers le haut ou le bas m M afin de sélectionner REGLAGE MOIRE Déplacez ensuite la manette de commande vers la gauche ou la droite jusqu à ce que l effet de moiré soit minimal L effet de moiré est un type d interférence naturelle qui produit de légères lignes ondulées sur l écran Il peut résulter d une...

Страница 26: ...éder directement au menu GEOMETRIE IMAGE FLOUE L image peut paraître floue lorsque les signaux rouge et bleu ne sont pas correctement alignés provoquant l apparition d ombres rouges ou bleues autour des lettres et des lignes Essayez de régler la convergence de l image pour faire disparaître ces ombres Déplacez la manette de commande vers la droite pour accéder directement au menu CONVERGENCE Lorsq...

Страница 27: ... un mode d économie d énergie l indication MONITEUR EN MODE D ECONOMIE D ENERGIE apparaît sur l écran si vous appuyez sur une touche quelconque du moniteur Au bout de quelques secondes le moniteur passe de nouveau en mode d économie d énergie Dépannage Consultez cette section avant de faire appel au service d assistance technique Si de fines lignes apparaissent à l écran fils d amortissement Les l...

Страница 28: ...pareil raccordé Vérifiez si la plage de fréquence vidéo correspond aux spécifications du moniteur Si vous remplacez un ancien moniteur par ce moniteur reconnectez l ancien moniteur et ajustez la plage de fréquence comme suit Horizontale 30 à 85 kHz Verticale 48 à 120 Hz Si aucun message ne s affiche et si l indicateur 1 alimentation est vert ou clignote en orange Activez la fonction d autodiagnost...

Страница 29: ...rs prises respectives L image n est pas centrée ou de taille incorrecte Ajustez la taille page 9 ou le centrage page 9 de l image Attention que certains modes vidéo ne remplissent pas l écran jusqu aux bords Les bords de l image sont incurvés Ajustez la géométrie page 10 Un motif ondulatoire ou elliptique moiré est visible Sélectionnez REGLAGE MOIRE et réglez le niveau de suppression de moiré page...

Страница 30: ...est que le moniteur fonctionne correctement Si l indicateur 1 alimentation clignote toujours c est probablement parce qu il y a une anomalie au niveau du moniteur Comptez le nombre de secondes entre les clignotements oranges de l indicateur 1 alimentation et informez votre revendeur Sony agréé de l état du moniteur Notez également la désignation du modèle et le numéro de série de votre moniteur No...

Страница 31: ...entificación de los componentes y los controles 5 Instalación 6 Paso 1 Conexión del monitor al ordenador 6 Paso 2 Conexión del cable de alimentación 6 Paso 3 Encendido del monitor y del ordenador 7 Selección del idioma de los menús en pantalla LANG 7 Personalización del monitor 8 Navegación por el menú 8 Ajuste del brillo y del contraste 9 Ajuste del centrado de la imagen CENTRO 9 Ajuste del tamañ...

Страница 32: ...uperficies inestables cerca de equipos que generen magnetismo como transformadores o líneas eléctricas de alta tensión cerca o sobre una superficie metálica con carga eléctrica Mantenimiento Limpie la pantalla con un paño suave Si utiliza algún líquido limpiador de cristales no emplee ningún tipo de producto de limpieza que contenga soluciones antiestáticas o aditivos similares ya que pueden rayar...

Страница 33: ...lumina en verde cuando el monitor está encendido y parpadea en verde y en naranja o se ilumina en naranja cuando dicho monitor se encuentra en el modo de ahorro de energía 4 Conector AC IN página 6 Este conector proporciona alimentación CA al monitor 5 Conector de entrada de vídeo HD15 página 6 Este conector introduce las señales de vídeo RGB 0 700 Vp p positivas y de sincronización DDC Display Da...

Страница 34: ...zar la conexión Nota No toque los terminales del conector de cable de vídeo ya que podría dañar dichos terminales x Conexión a un ordenador IBM PC AT o compatible x x x x Conexión a un ordenador Macintosh o compatible Paso 2 Conexión del cable de alimentación Con el monitor y el ordenador apagados primero conecte el cable de alimentación al monitor y a continuación a una toma de corriente AC IN Or...

Страница 35: ...o de monitor Para los usuarios que utilicen Windows NT4 0 La instalación del monitor en Windows NT4 0 difiere de la utilizada en Windows 95 98 y no implica selección de tipo de monitor Consulte el manual de instrucciones de Windows NT4 0 para obtener más información sobre el ajuste de la resolución frecuencia de barrido y número de colores Ajuste de la resolución y el número de colores del monitor...

Страница 36: ...mación útiles sobre este monitor MENU MENU MENU SALIR CENTRO TAMAÑO GEOM COLOR LANG AYUDA CONV OPCION OK 2 6 TAMAÑO CENTRO 2 6 TAMAÑO CENTRO 2 6 GEOMETR I A VOLVER A MENU PR I NC I PAL RESOLUC I ON RECOMENDADA PARPADEO L I NEA F I NA HOR I ZONTAL FORMA D I STORS I ONADA DESENFOCADO DECOLORAC I ON AYUDA 5 COLOR página 10 Seleccione el menú COLOR para ajustar la temperatura del color de la imagen Pu...

Страница 37: ...1 Desplace el botón de control en cualquier dirección El menú de BRILLO CONTRASTE aparece en pantalla 2 Desplace el botón de control m M para ajustar el brillo y para ajustar el contraste 6 El menú desaparece automáticamente transcurridos unos 3 segundos Ajuste del centrado de la imagen CENTRO Este ajuste se almacena en la memoria para la señal de entrada actual 1 Pulse el centro del botón de cont...

Страница 38: ...na en la memoria para todas las señales de entrada 1 Pulse el centro del botón de control El MENU principal aparece en pantalla 2 Desplace el botón de control para resaltar COLOR y vuelva a pulsar el centro de dicho botón El menú COLOR aparece en pantalla 3 Desplace el botón de control m M para seleccionar una temperatura del color Las temperaturas del color predefinidas son 5000K y 9300K Puesto q...

Страница 39: ...s u ondulados en pantalla ajuste el nivel de cancelación del muaré Para ajustar la cantidad de cancelación de muaré primero desplace el botón de control m M para seleccionar AJUSTE MUARE A continuación desplace el botón hasta que el efecto de muaré sea mínimo El muaré es un tipo de interferencia natural que produce líneas suaves y onduladas en la pantalla Puede aparecer debido a la interferencia e...

Страница 40: ...e la geometría de la imagen Desplace el botón de control para acceder directamente al menú GEOMETRIA DESENFOCADO La imagen puede aparecer desenfocada si las señales de color rojo y azul no están correctamente alineadas produciendo sombras rojas o azules alrededor de las letras y las líneas Ajuste la convergencia de la imagen para que las sombras desaparezcan Desplace el botón de control para acced...

Страница 41: ...or se encuentra en el modo de ahorro de energía el mensaje MONITOR EN MODO AHORRO ENERGIA aparece en pantalla al pulsar cualquier botón del monitor Transcurridos unos segundos éste entra de nuevo en el modo de ahorro de energía Solución de problemas Antes de ponerse en contacto con personal de servicio técnico consulte esta sección Si aparecen líneas finas en pantalla hilos de amortiguación Las lí...

Страница 42: ...entro del especificado para el monitor Si ha sustituido un monitor antiguo por este vuelva a conectar el antiguo y ajuste el margen de frecuencia de acuerdo con lo siguiente Horizontal 30 85 kHz Vertical 48 120 Hz Si no aparece ningún mensaje y el indicador 1 alimentación se ilumina en verde o parpadea en naranja Utilice la función de autodiagnóstico página 16 Si utiliza Windows 95 98 Si ha sustit...

Страница 43: ...te el tamaño página 9 o el centrado página 9 Tenga en cuenta que ciertos modos de vídeo no llenan la pantalla hasta los bordes Los bordes de la imagen aparecen curvos Ajuste la geometría página 10 Se aprecian patrones ondulados o elípticos muaré Seleccione AJUSTE MUARE y ajuste el efecto de cancelación de muaré página 11 xProblemas causados por el ordenador u otro equipo conectado Cambie el patrón...

Страница 44: ...verde significa que el monitor funciona correctamente Si el indicador 1 alimentación sigue parpadeando significa que hay un fallo potencial del monitor Cuente el número de segundos entre los parpadeos en naranja del indicador 1 alimentación e informe al proveedor Sony autorizado sobre el estado del monitor Asegúrese de anotar el nombre del modelo y el número de serie de dicho monitor Tome nota tam...

Страница 45: ...esolution dots lines Horizontal Frequency Vertical Frequency Graphics Mode 1 640 480 31 5 kHz 60 Hz VGA G 2 640 480 43 3 kHz 85 Hz VESA 3 720 400 31 5 kHz 70 Hz VGA Text 4 800 600 53 7 kHz 85 Hz VESA 5 832 624 49 7 kHz 75 Hz Macintosh 16 Color 6 1024 768 60 0 kHz 75 Hz VESA 7 1024 768 68 7 kHz 85 Hz VESA 8 1280 1024 80 0 kHz 75 Hz VESA ...

Страница 46: ...ii C WIN95 E DESKTOP 386725411CPDE200UCA 01US04APP UC fm masterpage Singlecolumn Left CPD E200 3 867 254 11 1 ...

Страница 47: ...iii C WIN95 E DESKTOP 386725411CPDE200UCA 01US04APP UC fm masterpage Right CPD E200 3 867 254 11 1 ...

Страница 48: ...C WIN95 E DESKTOP 386725411CPDE200UCA 01US04APP UC fm masterpage Left CPD E200 3 867 254 11 1 Sony Corporation Printed in U S A ...

Отзывы: