background image

B

ef

or

e us

e

GB

17

Before use

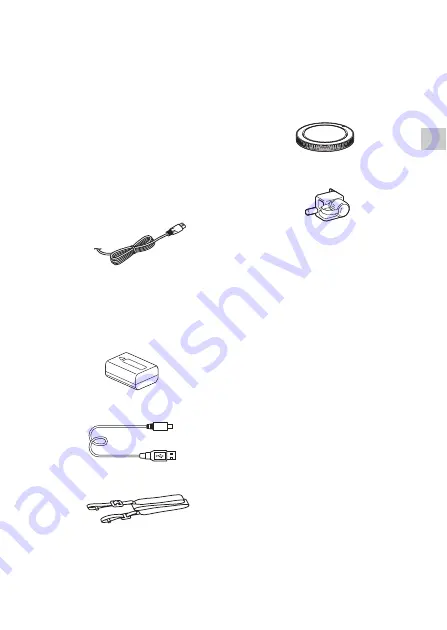
Checking the supplied items

The number in parentheses indicates the number of pieces.

• Camera (1)
• AC Adaptor (1)

The shape of the AC Adaptor may 
differ depending on the country/
region.

• Battery charger BC-VW1 (1)
• Power cord (mains lead) (1)* (not 

supplied in the U.S.A. and 
Canada)

* Multiple power cords may be supplied 

with your camera. Use the appropriate 
one that matches your country/region.

• Rechargeable battery pack NP-

FW50 (2)

• Micro USB cable (1)

• Shoulder strap (1)

For how to attach the shoulder strap to 
the camera, refer to page 22.

• Body cap (1) (Attached on the 

camera)

• Cable protector (1)

For how to attach the cable protector 
to the camera, refer to page 22.

• Shoe cap (1) (Attached on the 

camera)

• Eyepiece Cup (1) (Attached on 

the camera)

• Instruction Manual (1) (this 

manual)

• Wi-Fi Connection/One-touch 

(NFC) Guide (1)

This guide explains the functions that 
require a Wi-Fi connection.

Содержание E-mount WW898259 (ILCE-7SM2)

Страница 1: ...1 ILCE 7SM2 Interchangeable Lens Digital Camera Instruction Manual E mount Help Guide Web manual Refer to Help Guide for in depth instructions on the many functions of the camera http rd1 sony net help ilc 1530 h_zz ...
Страница 2: ...e numbers whenever you call your Sony dealer regarding this product Model No WW898259 ILCE 7SM2 Serial No Model No AC UD10 AC UUD11 Serial No To reduce fire or shock hazard do not expose the unit to rain or moisture IMPORTANT SAFETY INSTRUCTIONS SAVE THESE INSTRUCTIONS DANGER TO REDUCE THE RISK OF FIRE OR ELECTRIC SHOCK CAREFULLYFOLLOW THESE INSTRUCTIONS If the shape of the plug does not fit the p...

Страница 3: ...AC Adaptor from the wall outlet wall socket immediately if any malfunction occurs while using the apparatus Battery charger Use the nearby wall outlet wall socket when using the Charger Disconnect the Charger from the wall outlet wall socket immediately if any malfunction occurs while using the apparatus The power cord mains lead if supplied is designed specifically for use with this camera only a...

Страница 4: ... used in accordance with the instructions may cause harmful interference to radio communications However there is no guarantee that interference will not occur in a particular installation If this equipment does cause harmful interference to radio or television reception which can be determined by turning the equipment off and on the user is encouraged to try to correct the interference by one or ...

Страница 5: ...cal and electronic equipment applicable in the European Union and other European countries with separate collection systems This symbol on the product the battery or on the packaging indicates that the product and the battery shall not be treated as household waste On certain batteries this symbol might be used in combination with a chemical symbol The chemical symbols for mercury Hg or lead Pb ar...

Страница 6: ...tion marks for standards supported by the camera can be confirmed on the screen of the camera Select MENU t Setup t Certification Logo If display is not possible due to problems such as camera failure contact your Sony dealer or local authorized Sony service facility For Customers in Singapore For customers who purchased their camera from a store in Japan that caters to tourists For Customers in U...

Страница 7: ...on the monitor 24 Functions list Functions that can be operated using the buttons dials 28 How to use the Quick Navi screen 29 Operating the camera 31 How to use the control wheel 31 How to use the front dial rear dial 32 Selecting a function using the Fn Function button 33 Functions that can be registered using the Fn Function button 34 Functions that can be selected using the MENU button 35 Usin...

Страница 8: ...the date time and area 63 Shooting a clear image without camera shake 64 Camera shake warning indicator 64 Using the SteadyShot function 64 Holding the camera properly 66 Removing the Eyepiece cup 67 Shooting and viewing images Shooting still images 68 Recording movies 70 Playing back images 71 Switching between still images and movies 72 Playback functions 73 Deleting images 74 Selecting a shooti...

Страница 9: ...Image Data Converter 88 Installing Image Data Converter 88 Importing images to your computer and using them PlayMemories Home 89 Installing PlayMemories Home 90 Controlling the camera using your computer Remote Camera Control 91 Installing Remote Camera Control 91 Others Checking the number of images and recordable time of movies 92 Specifications 97 Index 102 For details on the Wi Fi and NFC One ...

Страница 10: ...ted between ISO 50 and ISO 409600 White Balance 37 You can adjust the color tones You can select an option to suit a light source or perform fine adjustments using color temperature and color filters Drive Mode 36 You can select an appropriate drive mode to suit your purposes such as single shooting continuous shooting or bracket shooting Focus Mode 81 Focus Area 81 Focus Settings 37 You can adjus...

Страница 11: ...o Off Slow motion movie recording 39 You can record slow motion movies 4 or 5 slow motion in full HD resolution 1920 1080 Picture Profile 38 You can change the color tone and gradation of recorded images 5 axis in body image stabilization 64 Reduce blurring caused by vertical shift and horizontal shift pitch and yaw and roll Silent Shooting 82 You can shoot images without the shutter producing a s...

Страница 12: ... DISP on the control wheel Quick Navi 29 In For viewfinder screen you can quickly switch from the monitor to the Quick Navi screen by pressing the Fn button You can set the items with an intuitive operation by using the front rear dial and the control wheel Customization 42 The camera are equipped with the Custom buttons where you can assign desired function on each button You can also assign func...

Страница 13: ...nd then format the memory card using the camera Notes on recording playback In order to stabilize the operation of the memory card it is recommended that you format the memory card on the camera when you use it with that camera for the first time Once you format the memory card all the data recorded on the memory card will be deleted and cannot be restored Before formatting copy the data to a comp...

Страница 14: ... the power zoom lens be careful not to get your fingers or any other objects caught in the lens Do not expose the camera to a strong light source such as a sunlight The internal components may become damaged Do not look at sunlight or a strong light source through the lens when it is detached This may result in unrecoverable damage to the eyes or cause a malfunction Do not use the camera in areas ...

Страница 15: ...ecide at your own discretion In case you may feel uncomfortable refrain from using the viewfinder until your condition recovers and consult your doctor as necessary Notes on recording for long periods of time or recording 4K movies Depending on the camera and battery temperature you may be unable to record movies or the power may turn off automatically to protect the camera A message will be displ...

Страница 16: ... used in this manual The photographs used as examples of pictures in this manual are reproduced images and are not actual images shot using this camera On the data specifications described in this manual The data on performance and specifications are defined under the following conditions except as described in this manual at an ordinary ambient temperature of 25ºC 77 F and using a battery pack th...

Страница 17: ...our camera Use the appropriate one that matches your country region Rechargeable battery pack NP FW50 2 Micro USB cable 1 Shoulder strap 1 For how to attach the shoulder strap to the camera refer to page 22 Body cap 1 Attached on the camera Cable protector 1 For how to attach the cable protector to the camera refer to page 22 Shoe cap 1 Attached on the camera Eyepiece Cup 1 Attached on the camera ...

Страница 18: ...ter button B Front dial C Remote sensor D Wi Fi antenna built in E Lens release button F Built in microphone 1 G AF illuminator 37 Self timer lamp H Mount index I Image sensor 2 J Mount K Contacts 2 1 Do not cover this part during movie recording Doing so may cause noise or lower the volume 2 Do not directly touch these parts Front side ...

Страница 19: ...t the monitor to an easily viewable angle and shoot from any position F Diopter adjustment dial Adjust the diopter adjustment dial according to your eyesight until the display appears clearly in the viewfinder G For shooting C3 Custom 3 button 28 For viewing Enlarge button 73 H AF MF AEL switch lever I Rear dial Rear side ...

Страница 20: ...g Image index button 73 K MOVIE button 70 L For shooting Fn button 33 For viewing Send to Smartphone button You can display the screen for Send to Smartphone by pressing this button M Control wheel 31 N For shooting C4 Custom 4 button 28 For viewing Delete button 74 O Access lamp P Playback button 71 ...

Страница 21: ...lied by the camera D i Headphones jack E Multi Micro USB Terminal Supports Micro USB compatible device F Charge lamp 51 G HDMI micro jack H Multi interface shoe Some of the accessories may not be inserted fully and protrude backward from the Multi interface shoe However when the accessory reaches the front end of the shoe the connection is completed I Mode dial 75 J C2 Custom 2 button 28 K C1 Cust...

Страница 22: ...erminal visit the Sony website or consult your Sony dealer or local authorized Sony service facility You can also use accessories that are compatible with the accessory shoe Operations with other manufactures accessories are not guaranteed Attaching the cable protector Use the cable protector to prevent the HDMI cable from being disconnected when shooting images connected by the HDMI cable Open bo...

Страница 23: ...ra may occur D Battery cover locking button E Battery cover release lever When you attach a vertical grip sold separately remove the battery cover Connection plate cover Use this when using an AC PW20 AC Adaptor sold separately Insert the connection plate into the battery compartment and then pass the cord through the connection plate cover as shown below Make sure that the cord is not pinched whe...

Страница 24: ...ntrol wheel the screen status will change to the viewfinder mode You can also display the histogram by pressing DISP The displayed contents and their position shown below are just a guideline and may differ from the actual display Monitor mode For playback Basic information display Viewfinder mode Histogram display Auto Mode or Scene Selection mode P A S M Sweep Panorama mode ...

Страница 25: ...FINE STD Image quality of still images 36 120p 60p 60i 30p 24p 100p 50p 50i 25p Frame rate of movies Image size of movies 79 Remaining battery 53 Remaining battery warning USB power supply 54 Flash charge in progress APS C Super 35mm 42 Setting Effect OFF 40 AF Illuminator 37 NFC is activated Airplane Mode No audio recording of movies 39 Wind Noise Reduction 39 SteadyShot off on Camera shake warni...

Страница 26: ...oting 82 Bright Monitoring Write Copyright Information 46 120fps 100fps Frame rate for HFR shooting 39 Gamma Disp Assist 45 Display Indication Display Indication Drive mode 36 Flash mode 37 Red eye reduction 37 0 0 Flash compensation 37 Focus mode 37 AF area Face Detection Smile Shutter 38 Metering mode 37 35mm Lens focal length AWB 7500K A5 G5 White balance Auto Preset Underwater Auto Custom Colo...

Страница 27: ...ding standby REC 0 12 Recording time of the movie m s z Focus Display Indication 1 250 Shutter speed F3 5 Aperture Value ISO400 ISO AUTO ISO sensitivity 37 AE lock FEL lock Shutter speed indicator Aperture indicator Histogram Digital level gauge Audio level 40 D Range Optimizer Auto HDR Auto HDR image warning Picture Effect error 2015 1 1 10 37PM Date of recording 3 7 File number Number of images ...

Страница 28: ...tiple images on the screen simultaneously button 73 Scales an image up when viewing images Fn button 33 button Displays the setup screen for functions set using the Fn button In For viewfinder screen switches to the Quick Navi screen In playback mode pressing button switches to Send to Smartphone screen Exposure compensation dial Sets the range for exposure adjustment button 71 Plays back images b...

Страница 29: ...m Settings t DISP Button t Monitor t For viewfinder t Enter 2 Press the DISP on the control wheel to set the screen mode to For viewfinder 3 Press the Fn button to switch to the Quick Navi screen In Auto Mode or Scene Selection mode In P A S M Sweep Panorama mode The displayed contents and their position shown are just a guideline and may differ from the actual display 4 Select the desired item wi...

Страница 30: ...es can be finely adjusted by turning the rear dial Pressing the center of the control wheel turns on the designated screen used to set up the selected item page 31 Pressing the Fn button again turns off the Quick Navi screen and the screen goes back to the original one Drive Mode Flash Mode Flash Comp Focus Mode Focus Area Exposure Comp ISO Metering Mode White Balance DRO Auto HDR Creative Style P...

Страница 31: ... of the control wheel is indicated by v V b B The following functions are assigned to v b B on the control wheel You can assign a desired function to the V b B z buttons and to the control wheel turning position in shooting mode When you turn the control wheel or press b B on the control wheel in playback mode you can display the previous or next image How to use the control wheel v DISP Changes t...

Страница 32: ...Operating the camera GB 32 You can turn the front dial or rear dial to change the settings required for each shooting mode with immediate effect How to use the front dial rear dial ...

Страница 33: ...he desired item using v V b B on the control wheel For a list of functions that can be registered and how to register them see page 34 4 Select the desired setting by turning the front dial then press z on the control wheel Some setting values can be finely adjusted by turning the rear dial To set the individual settings in the dedicated screen In step 3 select a setting item and press z on the co...

Страница 34: ...istered using the Fn Function button Drive Mode Selftimer during Brkt Flash Mode Flash Comp Focus Mode Focus Area Exposure Comp ISO ISO AUTO Min SS Metering Mode White Balance DRO Auto HDR Creative Style Shoot Mode Picture Effect Picture Profile Center Lock on AF Smile Face Detect Soft Skin Effect Auto Obj Framing Image Size Aspect Ratio Quality SteadyShot SteadyShot Adjust SteadyS Focal Len Audio...

Страница 35: ...display the first screen of the menu when you press the MENU button MENU button t Setup t Tile Menu t On 1 Press the MENU button to display the menu screen 2 Select the desired setting item using v V b B on the control wheel or by turning the control wheel and then press z on the center of the control wheel Select an icon at the top of the screen and press the b B on the control wheel to move to a...

Страница 36: ...at XAVC S 4K XAVC S HD AVCHD MP4 Record Setting Selects the quality and size of the recorded movie frame XAVC S 4K 30p 100M 25p 100M 30p 60M 25p 60M 24p 100M 24p 60M XAVC S HD 60p 50M 50p 50M 30p 50M 25p 50M 24p 50M 120p 100M 100p 100M 120p 60M 100p 60M AVCHD 60i 24M FX 50i 24M FX 60i 17M FH 50i 17M FH 60p 28M PS 50p 28M PS 24p 24M FX 25p 24M FX 24p 17M FH 25p 17M FH MP4 1920 1080 60p 28M 1920 108...

Страница 37: ...al or control wheel AF Illuminator Sets the AF illuminator which provides light for a dark scene to aid focusing Auto Off Exposure Comp Compensates for the brightness of the entire image 5 0EV to 5 0EV Exposure step Selects the size of the increment step for shutter speed aperture and exposure 0 5EV 0 3EV ISO Sets the ISO sensitivity Multi Frame NR ISO AUTO ISO 50 to ISO 409600 ISO AUTO Min SS Set...

Страница 38: ...n check the focus Long Exposure NR Sets noise reduction processing for shots with a shutter speed of 1 second or longer On Off High ISO NR Sets noise reduction processing for high sensitivity shooting Normal Low Off Center Lock on AF Sets the function to track a subject and continue focusing when pressing the center button in the shooting screen Off On Smile Face Detect Selects to detect faces and...

Страница 39: ...ducible colors sRGB AdobeRGB Auto Slow Shut Sets the function that automatically adjusts the shutter speed following the brightness of the environment in movie mode On Off Audio Recording Sets whether to record audio when shooting a movie On Off Audio Rec Level Adjusts the audio recording level during movie recording 0 to 31 Audio Out Timing Sets the timing of audio output during the movie recordi...

Страница 40: ...outline of in focus ranges with a specific color when focusing manually High Mid Low Off Peaking Color Sets the color used for the peaking function Red Yellow White Exposure Set Guide Sets the guide displayed when exposure settings are changed in the shooting screen Off On Live View Display Sets whether to reflect settings such as exposure compensation in screen display Setting Effect ON Setting E...

Страница 41: ... is useful when you want to adjust the focus and exposure separately On Off AEL w shutter Sets whether to adjust the exposure by pressing the shutter button halfway down This is convenient when you want to adjust the focus and exposure separately Auto On Off Silent Shooting Shoots images without the shutter sound On Off e Front Curtain Shut Sets whether to use the electronic front curtain shutter ...

Страница 42: ... AUTO Min SS Metering Mode White Balance DRO Auto HDR Creative Style Shoot Mode Picture Effect Picture Profile Center Lock on AF Smile Face Detect Soft Skin Effect Auto Obj Framing Image Size Aspect Ratio Quality SteadyShot SteadyShot Adjust SteadyS Focal Len Audio Rec Level Zebra Grid Line Marker Display Audio Level Display Peaking Level Peaking Color Silent Shooting Gamma Disp Assist Not set Cus...

Страница 43: ...Smartphone Send to Computer Backs up images by transferring them to a computer connected to a network View on TV You can view images on a network enabled TV One touch NFC Assigns one application to One touch NFC You can call up the application when shooting by touching an NFC enabled Smartphone to the camera Airplane Mode You can set this device to not perform wireless communications On Off WPS Pu...

Страница 44: ...g All in this Folder All with this date View Mode Plays back images from a specified date or specified folder of still images and movies Date View Folder View Still Folder View MP4 AVCHD View XAVC S HD View XAVC S 4K View Image Index Displays multiple images at the same time 9 Images 25 Images Display Rotation Sets the playback direction of the recording image Auto Manual Off Slide Show Shows a sl...

Страница 45: ... Fi card On Off Tile Menu Sets whether to display the tile menu every time you press the MENU button On Off Mode Dial Guide Turns the mode dial guide the explanation of each shooting mode on or off On Off Delete confirm Sets whether Delete or Cancel is preselected in the Delete confirmation screen Delete first Cancel first Display Quality Sets the display quality High Standard Pwr Save Start Time ...

Страница 46: ...puter or AV component cannot be established Multi Single USB Power Supply Sets whether to supply power via USB connection when the camera is connected to a computer or USB device using a micro USB cable On Off Language Selects the language Date Time Setup Sets date and time and daylight savings Area Setting Sets the location of use Copyright Info Sets copyright information for still images Write C...

Страница 47: ...vies recorded with the NTSC system on a PAL system TV 2 Overseas model only Display Media Info Displays the remaining recording time of movies and the recordable number of still images on the memory card Version Displays the camera software version Certification Logo 2 The certification can be displayed on the camera Setting Reset Restores settings to their defaults Select Initialize to restore al...

Страница 48: ...ations for the currently selected menu function or setting MENU button t Custom Settings t Custom Key Settings t Select the desired button assigned to the function t In Camera Guide Press the MENU button and use the control wheel to select a MENU item whose explanation you want to read and then press the button to which In Camera Guide is assigned ...

Страница 49: ...shoot charge the battery pack again before shooting Charging the battery pack using the battery charger 1 Insert the battery pack onto the battery charger Push the battery pack until it clicks 2 Connect the battery charger to the wall outlet wall socket The CHARGE lamp lights orange when charging is started The CHARGE lamp turns off when charging is finished If the CHARGE lamp lights up and then i...

Страница 50: ...arging the battery pack using the AC Adaptor 1 Set the ON OFF Power switch to OFF 2 Slide the lever to open the cover 3 Insert the battery pack completely using the tip of the battery to press the lock lever 4 Close the cover Lock lever ...

Страница 51: ... charge lamp lights up and then immediately turns off the battery pack is fully charged When the charge lamp flashes and charging is not finished remove and re insert the battery pack For countries regions other than the USA and Canada connect the power cord to the AC Adaptor and connect the AC Adaptor to the wall outlet wall socket Charge lamp Lit Charging Off Charging finished Flashing Charging ...

Страница 52: ...hen you use a battery pack that has not been used for a long time the charge lamp CHARGE lamp may flash quickly when the battery is charged for the first time If that happens remove the battery pack from the camera and then re insert it to recharge Do not continuously or repeatedly charge the battery without using it if it is already fully charged or close to fully charged Doing so may cause a det...

Страница 53: ...art the computer or wake the computer to resume from sleep mode when a USB connection has been established between the computer and the camera The camera may cause a malfunction Before turning on off or restarting the computer or waking the computer from sleep mode disconnect the camera and the computer No guarantees are made for charging using a custom built computer or a modified computer A rema...

Страница 54: ...s the power is on the battery pack will not be charged even if the camera is connected to the AC Adaptor Under certain conditions power may be supplied from the battery supplementarily even if you are using the AC Adaptor Do not remove the micro USB cable while power is being supplied via USB connection Before you remove the micro USB cable turn off the camera While power is being supplied via USB...

Страница 55: ...k Preparing the camera GB 55 To remove the battery pack Turn off the camera Slide the lock lever after confirming that the access lamp page 20 is off and remove the battery pack Be sure not to drop the battery pack Lock lever ...

Страница 56: ...he access lamp page 20 is not lit then push the memory card in once 1 Slide the memory card cover to open it 2 Insert the memory card With the notched corner facing as illustrated insert the memory card until it clicks into place Ensure the notched corner faces correctly 3 Close the cover ...

Страница 57: ... 4 or faster or UHS Speed Class 1 or faster 2 Memory cards that fulfill all of the following conditions Capacity of 64 GB or more SD Speed Class 10 or UHS Speed Class 1 or faster When recording in 100 Mbps or more UHS Speed Class 3 is required For details on the number of recordable still images and recordable duration of movies refer to pages 92 to 95 Check the tables to select a memory card with...

Страница 58: ...ure to use with the appropriate adaptor Images recorded on an SDXC memory card cannot be imported to or played on computers or AV devices that are not compatible with exFAT Make sure that the device is compatible with exFAT before connecting it to the camera If you connect your camera to an incompatible device you may be prompted to format the card Never format the card in response to this prompt ...

Страница 59: ... dust or debris from getting inside the camera When shooting remove the front lens cap from the front of the lens 2 Mount the lens by aligning the white index marks mounting indexes on the lens and camera Hold the camera with the lens facing down to prevent dust from entering into the camera 3 While pushing the lens lightly toward the camera turn the lens clockwise until it clicks into the locked ...

Страница 60: ... lens that is extended for the zoom or focus adjustment To remove the lens Notes on changing the lens When changing the lens if dust or debris gets inside the camera and adheres to the surface of the image sensor the part that converts the light to an electric signal it may appear as dark spots on the image depending on the shooting environment Make sure to change the lens quickly somewhere away f...

Страница 61: ...ndicated on the lens For example the angle of view will correspond to 75 mm when a 50 mm lens is attached Lens Compatibility with the camera A mount lens Lens compatible with 35 mm full frame format A Mount Adaptor sold separately compatible with full frame format is required APS C size dedicated lens A Mount Adaptor sold separately is required E mount lens Lens compatible with 35 mm full frame fo...

Страница 62: ...off set the power switch to OFF 2 Select a desired language then press z on the control wheel The screen to set the date and time appears 3 Check that Enter is selected on the screen then press z 4 Select a desired geographic location and then press z 5 Press v V on the control wheel or select a setting item by turning the control wheel then press z 6 Press v V b B or select a desired setting by t...

Страница 63: ...me use the menu Notes This camera does not have a function to insert the date on an image You can insert the date and save or print the image by using PlayMemories Home For Windows only page 89 Maintaining the date and time setting This camera has an internal rechargeable battery for maintaining the date and time and other settings regardless of whether the power is on or off or the battery is ins...

Страница 64: ...ions The exposure mode is set to M S or during movie recording This function allows you to shoot with the optimal camera shake compensation for the lens you are using Camera shake warning indicator In situations where the camera may be subject to camera shake the Camera shake warning indicator flashes In this case use a tripod or the flash Using the SteadyShot function 1 MENU button t Camera Setti...

Страница 65: ...ual and set SteadyS Focal Len to match the lens you are using In this case the currently set SteadyShot focal length value will be displayed to the side of When using an SEL16F28 lens sold separately with a teleconverter etc set SteadyShot Adjust to Manual and set the focal length Switching SteadyShot On Off will simultaneously change the setting both in the camera body and the lens When a lens wi...

Страница 66: ... grip of the camera and the other hand supports the lens Point 2 Take a secure stance with your feet shoulder width apart Point 3 Lightly tuck your elbows against your body When shooting in a kneeling position steady your upper body by placing your elbow on your knee Holding the camera properly Viewfinder mode Monitor mode Viewfinder mode vertical position ...

Страница 67: ...e camera remove the Eyepiece cup Notes When an FDA A1AM Angle Finder sold separately is attached to the camera switch the display between the viewfinder and the monitor by selecting Viewfinder Manual or Monitor Manual from FINDER MONITOR in Custom Settings Put your fingers under the Eyepiece cup and slide it upward ...

Страница 68: ...ock release button on the center of the mode dial 3 Look into the viewfinder and hold the camera 4 Determine the size of a subject When using a lens with a zoom lever Move the zoom lever When using a lens with a zoom ring Turn the zoom ring The optical zoom is not available when a fixed focal length lens is mounted If the zoom range of the optical zoom is exceeded when a Power zoom lens is mounted...

Страница 69: ...ndicator lights 6 Press the shutter button fully down to shoot an image If Auto Obj Framing is set to Auto when shooting faces close up macro subjects or subjects tracked by Lock on AF the camera analyzes the scene and automatically trims the captured image into a suitable composition Both the original and the trimmed images will be saved ...

Страница 70: ...uous recording time of a movie depends on the ambient temperature or the condition of the camera See Notes on continuous movie recording page 96 When the icon appears the temperature of the camera is too high Turn the camera off and wait until the temperature of the camera decreases When you are recording continuously for a long time you may feel that the camera is warm This is normal Also Interna...

Страница 71: ... not play back on this camera 1 Press the button 2 Select an image by pressing the b B on the control wheel To play back movies press z on the control wheel Control panel Action during movie playback N Playback X Pause M Fast forward m Fast rewind T Forward slow playback t Rewind slow playback Next movie Previous movie C Frame advance c Frame rewind Volume settings Closes the control panel button ...

Страница 72: ...lay back movies set View Mode to Folder View MP4 AVCHD View XAVC S HD View or XAVC S 4K View When you select Date View both still images and movies will be displayed on the screen sorted by date MENU button t Playback t View Mode t Select the desired mode Switching between still images and movies ...

Страница 73: ...duces images Turn the control wheel to magnify or reduce an image Turn the front or rear dial to switch to the next previous image B Image index screen You can select the number of images to be displayed MENU button t Playback t Image Index C Deletes unnecessary images D Changes to the playback screen Playback functions ...

Страница 74: ... to delete the image before proceeding Notes Protected images cannot be deleted 1 While displaying the image you want to delete press the Delete button 2 Select Delete with v V on the control wheel then press z To delete several images at a time select MENU button t Playback t Delete Delete button ...

Страница 75: ...ure Priority Shoots by adjusting the aperture and changing the focus range or by defocus the background Shutter Priority Adjusts the shutter speed to show the movement of the subject Manual Exposure Allows you to shoot after manually adjusting the exposure the shutter speed and the aperture value using the front or rear dial 1 2 Memory recall Calls up settings pre registered in Memory in the Camer...

Страница 76: ...ting mode In the table below indicates the function is available and a indicates the function is not available When the shooting mode is set to M the exposure can be adjusted only when ISO is set to ISO AUTO Shoot Mode Exposure Comp Self timer Cont Shooting Face Detection Smile Shutter Auto Obj Framing ...

Страница 77: ...ges can be recorded MENU button t Camera Settings t Image Size t Select the desired setting When APS C Super 35mm is set to On Notes When Quality is set to RAW or RAW JPEG the image size for RAW images corresponds to L Image Size still image When Aspect Ratio is 3 2 When Aspect Ratio is 16 9 L 12M 4240 2832 pixels L 10M 4240 2384 pixels M 5 1M 2768 1848 pixels M 4 3M 2768 1560 pixels S 3 0M 2128 1...

Страница 78: ... Record Setting set to other than 120p 100M or 100p 100M When shooting with Movie HFR set to High Frame Rate When File Format is set to XAVC S 4K HDMI Info Display is temporarily set to Off When File Format is set to XAVC S 4K and the camera is connected to an HDMI device for movie recording the picture will not be displayed on the monitor When File Format is set to XAVC S 4K and the camera is con...

Страница 79: ...XAVC S HD Record Setting Record Setting Bit rate Description 30p 100M 25p 100M Approx 100 Mbps Records the highest image quality movies at 3840 2160 30p 25p 30p 60M 25p 60M Approx 60 Mbps Records high image quality movies at 3840 2160 30p 25p 24p 100M Approx 100 Mbps Records the highest image quality movies at 3840 2160 24p This produces a cinema like atmosphere 24p 60M Approx 60 Mbps Records high...

Страница 80: ... movies at 1920 1080 60p 50p 24p 24M FX 25p 24M FX 24 Mbps Max Records high image quality movies at 1920 1080 24p 25p This produces a cinema like atmosphere 24p 17M FH 25p 17M FH Approx 17 Mbps Avg Records standard image quality movies at 1920 1080 24p 25p This produces a cinema like atmosphere Record Setting Bit rate Description 1920 1080 60p 28M 50p 28M Approx 28 Mbps Avg Records high image qual...

Страница 81: ...ovies will be output as 60i 50i movies When using the following functions you cannot set Record Setting to 120p 100M 100p 100M 120p 60M 100p 60M Intelligent Auto Superior Auto Scene Selection When File Format is set to XAVC S HD and Record Setting is set to 120p 100M 100p 100M 120p 60M or 100p 60M or when Movie HFR is set to High Frame Rate the angle of view will be decreased Focus Mode You can se...

Страница 82: ...t Allows you to move the AF range frame to the desired point on the screen and focus on an extremely small subject in a narrow area On the Flexible Spot shooting screen you can change the size of the AF range finder frame by rotating the control wheel Expand Flexible Spot If the product fails to focus on the single selected point it uses the focus points around the flexible spot as the second prio...

Страница 83: ...der instantaneous lightning or flickering lights such as the flash light from other cameras or fluorescent lighting a striping effect may occur on the image If you want to turn off the beep that sounds when the subject is in focus or the self timer operates set Audio signals to Off Even if Silent Shooting is set to On the shutter sound may beep under the following circumstances White Balance is se...

Страница 84: ...nd NFC One touch functions For details on the Wi Fi and NFC One touch functions refer to the attached document Wi Fi Connection One touch NFC Guide or to the Help Guide page 2 Saving images to a computer Transferring images from the camera to a smartphone Using the smartphone as a remote control for the camera Viewing still images on a TV ...

Страница 85: ... the administrator of the access point To save images to a computer install the following dedicated software on your computer When using Windows PlayMemories Home http www sony net pm When using Mac Wireless Auto Import http www sony co jp imsoft Mac Connecting the camera to a wireless access point 1 MENU button t Wireless t Access Point Set 2 Use v V on the control wheel to select the access poin...

Страница 86: ...cation downloading website http www sony net pmca For more information on the computer environment required for downloading refer to the application download website 2 Follow the instructions on the screen to obtain a service account first time only If you have an account sign in to the application download site 3 Select the desired application and download the application to the camera following ...

Страница 87: ...point to be connected t change IP Address Setting to Auto if it is set to Manual Launching the application 1 MENU button t Application t Application List t Select the desired application to launch You can use the One touch NFC menu to install NFC one touch functions and call up the applications by simply touching the smartphone to the mark on the camera Before using the NFC One touch functions set...

Страница 88: ...e it in a general file format You can display and compare the RAW images and JPEG images recorded by this camera You can rank images in 5 grades You can apply color labels Using the Internet browser on your computer go to the following URL and then follow the instructions on the screen to download Image Data Converter http www sony co jp ids se An Internet connection is required For details on ope...

Страница 89: ...d to use PlayMemories Online or other network services PlayMemories Online or other network services may not be available in some countries or regions Refer to the following URL for Mac software http www sony co jp imsoft Mac If the software PMB Picture Motion Browser supplied with models released before 2011 has already been installed on your computer it will be overwritten by PlayMemories Home d...

Страница 90: ...ternet browser on your computer go to the following URL and then follow the instructions on the screen to download PlayMemories Home http www sony net pm An Internet connection is required For details on operation refer to the following PlayMemories Home support page English only http www sony co jp pmh se To add functions to PlayMemories Home Installing PlayMemories Home When you connect the came...

Страница 91: ...ter Perform an Interval Timer Shooting Set up the following before use MENU button t Setup t USB Connection t PC Remote Using the Internet browser on your computer go to the following URL and then follow the instructions on the screen to download Remote Camera Control Windows http www sony co jp imsoft Win Mac http www sony co jp imsoft Mac An Internet connection is required For details on operati...

Страница 92: ...oting conditions and the type of memory card used Image Size L 12M Aspect Ratio 3 2 Memory card formatted with this camera Units Images When Aspect Ratio is set to 16 9 you can record more images than the numbers shown in the table above except when RAW is selected When you insert a memory card into the camera and set the power switch to ON the number of images that can be recorded should you cont...

Страница 93: ...ucts Association DISP is set to Display All Info Focus Mode is set to AF S Shooting once every 30 seconds The power turns on and off once every ten times The number of minutes for movie shooting is based on the CIPA standard and are for shooting under the following conditions Record Setting is set to 60i 17M FH 50i 17M FH Typical movie shooting Battery life based on repeatedly shooting zooming sho...

Страница 94: ...r a movie Capacity Record Setting 8 GB 16 GB 32 GB 64 GB 30p 100M 25p 100M 1 h 15 m 30p 60M 25p 60M 2 h 5 m 24p 100M 1 1 h 15 m 24p 60M 1 2 h 5 m 60p 50M 50p 50M 2 h 35 m 30p 50M 25p 50M 2 h 35 m 24p 50M 1 2 h 35 m 120p 100M 100p 100M 1 h 15 m 120p 60M 100p 60M 2 h 5 m 30p 16M 2 25p 16M 2 1 h 55 m 24p 12M 1 2 1 h 55 m 60i 24M FX 50i 24M FX 40 m 1 h 25 m 3 h 6 h 60i 17M FH 50i 17M FH 55 m 2 h 4 h 5...

Страница 95: ...riable Bit Rate which automatically adjusts image quality depending on the shooting scene When you record a fast moving subject the image is clearer but the recordable time is shorter because more memory is required for recording The recordable time also varies depending on the shooting conditions the subject or the image quality size settings The values shown are not for continuous recording time...

Страница 96: ... inside the camera will rise and the recording time available will be shorter When is indicated stop recording the movie The temperature inside the camera has increased to an unacceptable level If the camera stops recording due to the temperature leave it for several minutes with the power turned off Start recording after the temperature inside the camera drops fully If you observe the following p...

Страница 97: ... 70 mm F3 5 5 6 OSS Electronic viewfinder Type Electronic viewfinder Total number of dots 2 359 296 dots Frame coverage 100 Magnification Approx 0 78 with 50 mm lens at infinity 1 m 1 Eye Point Approx 23 mm from the eyepiece 18 5 mm from the eyepiece frame at 1 m 1 CIPA standard compliant Diopter Adjustment 4 0 m 1 to 3 0 m 1 Monitor LCD monitor 7 5 cm 3 0 type TFT drive Total number of dots 1 228...

Страница 98: ...continuous shooting can be slower depending on the shooting conditions The number of continuous shots Speed priority continuous shooting Extra fine 64 images Continuous shooting Extra fine 100 images Recording format File format JPEG DCF Ver 2 0 Exif Ver 2 3 MPF Baseline compliant RAW Sony ARW 2 3 format Movie XAVC S format MPEG 4 AVC H 264 XAVC S ver 1 0 format compliant Video MPEG 4 AVC H 264 Au...

Страница 99: ...at IEEE 802 11 b g n Frequency band 2 4 GHz bandwidth Security WEP WPA PSK WPA2 PSK Connection method Wi Fi Protected Setup WPS Manual Access method Infrastructure mode NFC NFC Forum Type 3 Tag compliant Model No WW898259 Battery charger BC VW1 Input rating AC 100 V to 240 V 50 Hz 60 Hz 4 2 W Output rating 8 4 V DC 0 28 A Operating temperature range 0 C to 40 C 32 F to 104 F Storage temperature ra...

Страница 100: ...ion and Sony Corporation Dolby and the double D symbol are trademarks of Dolby Laboratories The terms HDMI and HDMI High Definition Multimedia Interface and the HDMI Logo are trademarks or registered trademarks of HDMI Licensing LLC in the United States and other countries Windows is a registered trademark of Microsoft Corporation in the United States and or other countries Mac is a registered tra...

Страница 101: ...cebook and the f logo are trademarks or registered trademarks of Facebook Inc YouTube and the YouTube logo are trademarks or registered trademarks of Google Inc Eye Fi is a trademark of Eye Fi Inc In addition system and product names used in this manual are in general trademarks or registered trademarks of their respective developers or manufacturers However the or marks may not be used in all cas...

Страница 102: ...rol wheel 31 Custom Key Settings 42 D Date Time Setup 62 Delete 74 Diopter adjustment 19 DISP 24 40 Drive Mode 36 E Exposure compensation dial 28 Eye sensor 19 Eyepiece cup 67 F File Format 78 Fn 33 34 Focus Area 82 Focus Magnif Time 39 Focus Mode 81 Function button 33 34 H Help Guide 2 I Image Data Converter 88 Image Size 77 In Camera Guide 48 ISO 37 L Language 46 62 Lens 59 ...

Страница 103: ...mera Apps 86 PlayMemories Home 89 90 Q Quick Navi 29 R Record Setting 79 Recordable time of movies 94 Remote Camera Control 91 S Scene Selection 39 Set the clock 62 Shooting mode 75 Shooting still images 68 Shoulder strap 22 Silent Shooting 82 Software 88 89 91 Specifications 97 SteadyShot 64 SteadyShot Settings 64 Super 35 mm 42 V View Mode 72 Viewfinder 19 Viewing image 71 W White Balance 37 Wi ...

Страница 104: ... 2015 Sony Corporation Printed in Thailand Additional information on this product and answers to frequently asked questions can be found at our Customer Support Website ...

Отзывы: