background image

59

Settings

 and Adjustments

Custom Settings 

(CUSTOM SETUP)

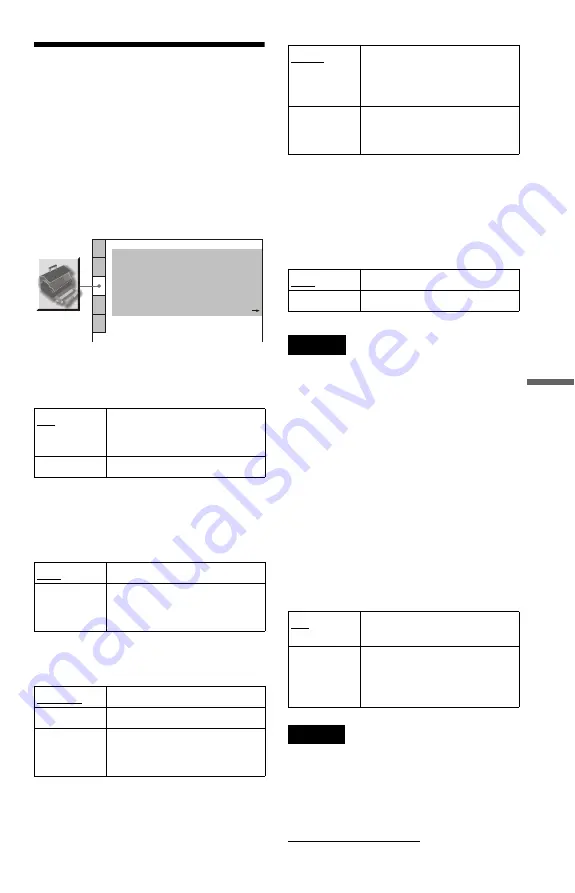
Use this to set up playback related and other 
settings.

Select “CUSTOM SETUP” in the Setup 
Display. To use the display, see “Using the 
Setup Display” (page 55).
The default settings are underlined.

AUTO POWER OFF

Switches the Auto Power Off setting on or 
off.

AUTO PLAY

Switches the Auto Play setting on or off. This 
function is useful when the player is 
connected to a timer (not supplied).

DIMMER

Adjusts the lighting of the front panel display.

PAUSE MODE (DVDs only)

Selects the picture in pause mode.

TRACK SELECTION (DVD VIDEO only)

Gives the sound track which contains the 
highest number of channels priority when you 
play a DVD VIDEO on which multiple audio 
formats (PCM, MPEG audio, DTS, or Dolby 
Digital format) are recorded.

Notes

• When you set the item to “AUTO,” the language 

may change. The “TRACK SELECTION” setting 
has higher priority than the “AUDIO” settings in 
“LANGUAGE SETUP” (page 56).

• If you set “DTS” to “OFF” (page 61), the DTS 

sound track is not played even if you set “TRACK 
SELECTION” to “AUTO.”

• If PCM, DTS, MPEG audio, and Dolby Digital 

sound tracks have the same number of channels, 
the player selects PCM, DTS, MPEG, and Dolby 
Digital sound tracks in this order.

MULTI-DISC RESUME (DVD VIDEO/

VIDEO CD only)

Switches the Multi-disc Resume setting on or 
off. Resume playback can be stored in 
memory for up to 6 different DVD VIDEOs/
VIDEO CDs (page 26).

Note

If you run Quick Setup, Multi-disc Resume settings 
stored in memory may return to the default settings.

DivX

Displays the registration code for this player. 
For more information, go to 
http://www.divx.com/vod 
on the Internet.

ON

The player enters standby mode 
when left in stop mode for more 
than 30 minutes.

OFF

Switches this function off.

OFF

Switches this function off.

ON

Automatically starts playback 
when the player is turned on by 
a timer (not supplied).

BRIGHT

Makes the lighting bright.

DARK

Makes the lighting dark.

AUTO 
DARK

Makes the lighting dark if you 
do not operate the player or 
remote for a short while.

CUSTOM SETUP

AUTO PLAY:
DIMMER:

OFF

BRIGHT

AUTO

PAUSE MODE:

OFF

TRACK SELECTION:

ON

AUTO POWER OFF:

ON

MULTI-DISC RESUME:

Registration Code    

DivX:

AUTO

The picture, including subjects 
that move dynamically, is 
output with no jitter. Normally, 
select this position.

FRAME

The picture, including subjects 
that do not move dynamically, 
is output in high resolution.

OFF

No priority given.

AUTO

Priority given.

ON

Stores the resume setting in 
memory for up to 6 discs.

OFF

Does not store the resume 
setting in memory. Playback 
restarts at the resume point only 
for the current disc in the player.

Содержание DVP-NS708H

Страница 1: ...3 283 151 11 1 Operating Instructions 2008 Sony Corporation DVP NS708H CD DVD Player ...

Страница 2: ...r household waste disposal service or the shop where you purchased the product Disposal of waste batteries applicable in the European Union and other European countries with separate collection systems This symbol on the battery or on the packaging indicates that the battery provided with this product shall not be treated as household waste By ensuring these batteries are disposed of correctly you...

Страница 3: ...elf or similar unit Install the player so that the AC power cord mains lead can be unplugged from the wall socket immediately in the event of trouble On operation If the player is brought directly from a cold to a warm location or is placed in a very damp room moisture may condense on the lenses inside the player Should this occur the player may not operate properly In this case remove the disc an...

Страница 4: ...6 Quick Setup 22 Playback 24 Playing Discs 24 Various Play Mode Functions Programme Play Shuffle Play Repeat Play A B Repeat Play 29 Adjusting the Playback Picture CUSTOM PICTURE MODE 33 Sharpening the Picture SHARPNESS 34 Adjusting the Delay Between the Picture and Sound AV SYNC 35 Locking Discs CUSTOM PARENTAL CONTROL PARENTAL CONTROL 36 Searching for a Scene 39 Searching for a Particular Point ...

Страница 5: ...ons used in this manual is described below Icons Meaning Functions available for commercial DVDs and DVD RWs DVD Rs DVD Rs DL in VR mode or DVD RWs DVD Rs DVD Rs DL in video mode Functions available for DVD RWs DVD Rs DVD Rs DL in VR Video Recording mode Functions available for VIDEO CDs including Super VCDs or CD Rs CD RWs in video CD format or Super VCD format Functions available for music CDs o...

Страница 6: ...ta part of CD Extras DVD Audio discs HD layer on Super Audio CDs DATA DVDs that do not contain MP3 audio tracks JPEG image files or DivX video files BDs HD DVDs Discs recorded with an AVCHD compatible DVD video camera Also the player cannot play the following discs A commercial DVD with a different region code A disc that has a non standard shape e g card heart A disc with paper or stickers on it ...

Страница 7: ... that cannot play images that contain a copy protection only Images in DVD VR mode with CPRM protection may not be played if they contain a copy protection signal Copyright lock appears on the screen CPRM Content Protection for Recordable Media is a coding technology that protects the copyright of images Note on DualDiscs A DualDisc is a two sided disc product which mates DVD recorded material on ...

Страница 8: ...n compliant device with HDMI or DVI Digital Visual Interface input F Z open close button 24 G N play button 24 H x stop button 25 This DVD player incorporates High Definition Multimedia Interface HDMI technology HDMI the HDMI logo and High Definition Multimedia Interface are trademarks or registered trademarks of HDMI Licensing LLC Rear panel A HDMI OUT High Definition Multimedia Interface out jac...

Страница 9: ...VIDEO CD without PBC When playing DivX video files the current track is not displayed Current title chapter or playing time 27 Lights up when you can change the angle 25 Lights up during Repeat Play 31 Playing status Current scene or playing time 27 Playing status Lights up during A B Repeat Play 32 Playing time 27 Current track 27 Lights up during Repeat Play 31 Playing status continued ...

Страница 10: ...OOM button 25 48 L SLOW PLAY FAST PLAY buttons 25 M audio button 43 N subtitle button 25 49 O 1 on standby button 24 P 2 volume buttons 21 The button has a tactile dot Q t TV video button 21 R PICTURE NAVI picture navigation button 42 48 S TIME TEXT button 27 T MENU button 26 U ENTER button 22 V DISPLAY button 11 W H play button 24 The H button has a tactile dot X x stop button 25 Y X pause button...

Страница 11: ... number or JPEG image file number for DATA CDs DATA DVDs DivX video file number for DATA CDs DATA DVDs 3 Displays Super VCD as SVCD 4 Displays the date for JPEG files To turn off the display Press DISPLAY repeatedly Control Menu display 1 m Control Menu display 2 appears for certain discs only m Control Menu display off OFF OFF SET ON PLAY 1 8 3 4 1 2 2 7 T 1 3 2 5 5 DVD VIDEO Quit PROGRAM ENTER D...

Страница 12: ...y A B REPEAT Specifies the parts you want to play repeatedly CUSTOM PICTURE MODE Adjusts the video signal from the player You can select the picture quality that best suits the programme you are watching SHARPNESS Exaggerates the outline of the image to produce a sharper picture AV SYNC Adjust the delay between the picture and sound PARENTAL CONTROL Set to prohibit playback on this player SETUP QU...

Страница 13: ... Super VCD without PBC Displays and track number When playing a VIDEO CD or Super VCD with PBC page 27 Displays and scene number When the disc s menu appears you can select an item by pressing X x When playing a DATA CD or DATA DVD Displays MENU and PICTURE NAVI To turn off the display Press RETURN or SYNC MENU button on the TV s remote z Hint You can also control these functions on the player s r...

Страница 14: ...instructions supplied with the components to be connected You cannot connect this player to a TV that does not have a SCART or video input jack Be sure to disconnect the mains lead of each component before connecting Step 1 Unpacking Check that you have the following items Audio Video cord phono plug 3 y phono plug 3 1 Remote commander remote 1 R6 size AA batteries 2 ...

Страница 15: ...jector or monitor you must use pattern C Select pattern B when connecting to a TV projector or audio component equipped with HDMI input L CENTER A VIDEO AUDIO INPUT L R C PR CR PB CB Y COMPONENT VIDEO IN D B INPUT HDMI IN Audio video cord supplied Component video cord not supplied yellow TV projector or audio component green TV projector or audio component red blue green blue red to LINE OUT VIDEO...

Страница 16: ...ou cannot connect the HDMI OUT jack to DVI jacks that are not HDCP compliant e g DVI jacks on PC displays C Component video input jacks Y PB CB PR CR You will enjoy accurate colour reproduction and high quality images If your TV accepts progressive 525p 625p format signals use this connection and set PROGRESSIVE COMPONENT OUT ONLY in SCREEN SETUP to ON page 58 to output progressive signals D SCART...

Страница 17: ...y components that are compatible with the CONTROL FOR HDMI function with an HDMI cord not supplied you can enjoy the following features One Touch Play page 24 System Power Off When you turn the TV off by using the 1 button on the TV s remote the components compatible with CONTROL FOR HDMI function turn off automatically To prepare for the BRAVIA Sync features Set CONTROL FOR HDMI to ON in HDMI SET...

Страница 18: ...ructions supplied with the connected components L CENTER VIDEO AUDIO INPUT L R B A HDMI cord not supplied red TV projector or audio component Audio video cord supplied Signal flow to DIGITAL OUT COAXIAL HDMI OUT to LINE OUT L R AUDIO Rear L CD DVD player white yellow yellow white red Speakers Front L Speakers Rear R Front R Subwoofer Centre Coaxial digital cord not supplied to coaxial HDMI digital...

Страница 19: ...the DTS logos and Symbol are trademarks of DTS Inc 1996 2007 DTS Inc All Rights Reserved Notes After you have completed the connection be sure to set DOLBY DIGITAL to DOLBY DIGITAL and DTS to ON in Quick Setup page 22 If your audio component has an MPEG audio decoder function set MPEG to MPEG in Audio Setup page 61 Otherwise no sound or a loud noise will come from your speakers When you connect an...

Страница 20: ...nt When using the remote point it at the remote sensor on the player Notes Do not leave the remote in an extremely hot or humid place Do not drop any foreign object into the remote casing particularly when replacing the batteries Do not expose the remote sensor to direct light from the sun or a lighting apparatus Doing so may cause a malfunction If you do not use the remote for an extended period ...

Страница 21: ...see the table below 2 Release TV 1 Code numbers of controllable TVs If more than one code number is listed try entering them one at a time until you find the one that works with your TV Notes When you replace the batteries of the remote the code number you have set may be reset to the default setting Set the appropriate code number again Depending on the connected unit you may not be able to contr...

Страница 22: ...ting the language used in the on screen display appears 5 Press X x to select a language The player displays the menu and subtitles in the selected language 6 Press ENTER The Setup Display for selecting the aspect ratio of the TV to be connected appears 7 Press X x to select the setting that matches your TV type If you have a wide screen TV or a 4 3 standard TV with a wide screen mode 16 9 page 57...

Страница 23: ... to your audio component If your audio component has a Dolby Digital decoder select DOLBY DIGITAL Otherwise select D PCM 13Press ENTER DTS is selected 14Press X x to select whether or not you wish to send a DTS signal to your audio component If your audio component has a DTS decoder select ON Otherwise select OFF 15Press ENTER Quick Setup is finished and connections are complete If your audio comp...

Страница 24: ...or VIDEO CDs see page 27 To turn off the player Press 1 The player enters standby mode One Touch Play for HDMI connections only With one touch of the H button on the remote the player and your TV automatically turn on and the TV s input is switched to the player Playback starts automatically The TV s input will also switch to the player automatically in the following cases You press H TOP MENU MEN...

Страница 25: ... listen to dialogue or sound while playing the current scene quickly or slowly During playback press FAST PLAY or SLOW PLAY The speed changes when you press either FAST PLAY or SLOW PLAY To return to normal playback Press H Notes You can only use this function with DVDs VIDEO CDs or Super VCDs only Operation not possible will appear when maximum or minimum speed is reached During Fast Play or Slow...

Страница 26: ...u stopped playing is cleared when you change the play mode you change the settings on the Setup Display For DVD VR mode CDs DATA CDs and DATA DVDs the player remembers the resume playback point for the current disc The resume point is cleared when you opened the disc tray you disconnect the mains lead the player enters standby mode DATA CD DATA DVD containing MP3 audio tracks JPEG image files only...

Страница 27: ... pictures such as a menu To return to PBC playback press x twice then press H Checking the Playing Time and Remaining Time You can check the playing time and remaining time of the current title chapter or track Also you can check the DVD CD text track name ID3 tag information MP3 audio or file name DivX video recorded on the disc 1 Press TIME TEXT during playback The following display appears 2 Pr...

Страница 28: ...information on the front panel display changes as follows when you change the time information on your TV screen When playing a DVD When playing a DATA CD MP3 audio or DATA DVD MP3 audio When playing a DATA CD DivX video or DATA DVD DivX video T 17 30 128k JAZZ RIVER SIDE Bit rate Album name Track file name T 17 30 128k JAZZ CONCERT 2008 RIVER SIDE SPOT OF THE WORLD Bit rate ID3 album name ID3 tra...

Страница 29: ...EG is set to AUTO or AUTO BGM and JPEG appears when MODE MP3 JPEG is set to IMAGE JPEG in the front panel display Various Play Mode Functions Programme Play Shuffle Play Repeat Play A B Repeat Play You can set the following play modes Programme Play page 29 Shuffle Play page 31 Repeat Play page 31 A B Repeat Play page 32 Note The play mode is cancelled when you eject the disc tray the player enter...

Страница 30: ...ON in step 3 and press ENTER To change or cancel a programme 1 Follow steps 1 to 3 of Creating your own programme Programme Play 2 Select the programme number of the title chapter or track you want to change or cancel using X x and press c If you want to delete the title chapter or track from the programme press CLEAR PROGRAM 1 TITLE ALL CLEAR 2 TITLE 3 TITLE 4 TITLE 5 TITLE 6 TITLE 7 TITLE T 01 0...

Страница 31: ... VIDEO TITLE CHAPTER When playing a VIDEO CD or CD TRACK When Programme Play is activated ON shuffles titles chapters or tracks selected in Programme Play 4 Press ENTER Shuffle Play starts To return to normal play Press CLEAR or select OFF in step 3 z Hints You can set Shuffle Play while the player is stopped After selecting the SHUFFLE option press H Shuffle Play starts Up to 200 chapters in a di...

Страница 32: ... not match the image When MODE MP3 JPEG is set to IMAGE JPEG page 50 you cannot select TRACK Repeating a specific portion A B Repeat Play You can play a specific portion of a title chapter or track repeatedly This function is useful when you want to memorize lyrics etc 1 Press DISPLAY during playback The Control Menu appears 2 Press X x to select A B REPEAT then press ENTER The options for A B REP...

Страница 33: ...er increasing the picture contrast and colour intensity CINEMA 1 enhances details in dark areas by increasing the black level CINEMA 2 white colours become brighter and black colours become richer and the colour contrast is increased MEMORY adjusts the picture in greater detail 4 Press ENTER The selected setting takes effect z Hint When you watch a movie CINEMA 1 or CINEMA 2 is recommended Adjusti...

Страница 34: ...to produce a sharper picture 1 Press DISPLAY twice during playback The Control Menu appears 2 Press X x to select SHARPNESS then press ENTER The options for SHARPNESS appear 3 Press X x to select a level 1 enhances the outline 2 enhances the outline more than 1 4 Press ENTER The selected setting takes effect To cancel the SHARPNESS setting Select OFF in step 3 Notes This function does not work whe...

Страница 35: ...h time you press C c the delay is adjusted by 10 milliseconds 5 Press ENTER The selected setting takes effect To reset the AV SYNC setting Press CLEAR in step 4 Notes This function is not effective if you use the DIGITAL OUT COAXIAL jack and set DOLBY DIGITAL MPEG or DTS in AUDIO SETUP to DOLBY DIGITAL MPEG or ON respectively page 60 This function is not effective if you connect a Dolby Digital or...

Страница 36: ... to select ON t then press ENTER If you have not entered a password The display for registering a new password appears Enter a 4 digit password using the number buttons then press ENTER The display for confirming the password appears When you have already registered a password The display for entering the password appears 5 Enter or re enter your 4 digit password using the number buttons then pres...

Страница 37: ...etting the playback limitation level appears 5 Press X x to select STANDARD then press ENTER The selection items for STANDARD are displayed 6 Press X x to select a geographic area as the playback limitation level then press ENTER The area is selected When you select OTHERS t select and enter a standard code in the table on page 70 using the number buttons 7 Press X x to select LEVEL then press ENT...

Страница 38: ...PLAY while the player is in stop mode The Control Menu appears 2 Press X x to select PARENTAL CONTROL then press ENTER The options for PARENTAL CONTROL appear 3 Press X x to select PASSWORD t then press ENTER The display for entering the password appears 4 Enter your 4 digit password using the number buttons then press ENTER 5 Enter a new 4 digit password using the number buttons then press ENTER ...

Страница 39: ...n changes as shown below Actual speeds may differ between discs Playback direction Opposite direction DivX video only The 2B 2b playback speed is about twice the normal speed The 3M 3m playback speed is faster than 2M 2m and the 2M 2m playback speed is faster than 1M 1m Watching frame by frame Slow motion Play Press m or M when the player is in pause mode To return to normal speed press H Each tim...

Страница 40: ...n search a DVD by title or chapter and you can search a VIDEO CD CD DATA CD DATA DVD by track index file or scene As titles and tracks are assigned unique numbers on the disc you can select the desired one by entering its number You can also search for a scene using the time code 1 Press DISPLAY When playing a DATA CD or DATA DVD with JPEG image files press twice The Control Menu appears 2 Press X...

Страница 41: ...scene using the time code DVD and DivX video files only 1 In step 2 select TIME TEXT Playing time of the current title or file is selected Then press ENTER 2 Input the time code using the number buttons then press ENTER For example to find the scene at 2 hours 10 minutes and 20 seconds after the beginning just enter 2 10 20 z Hints When the Control Menu display is turned off you can search for a c...

Страница 42: ... Press ENTER The first scene of each chapter title or track appears as follows 4 Press C X x c to select a chapter title or track and press ENTER Playback starts from the selected scene To return to normal play during setting Press O RETURN or DISPLAY z Hint If there are more than 9 chapters titles or tracks V is displayed at the bottom right of the screen To display the additional chapters titles...

Страница 43: ...mes the DVD VIDEO is recorded in multiple audio formats When playing in DVD VR mode The types of sound tracks recorded on a disc are displayed The default setting is underlined Example 1 MAIN main sound 1 SUB sub sound 1 MAIN SUB main and sub sound When playing a VIDEO CD or CD The default setting is underlined STEREO the standard stereo sound 1 L the sound of the left channel monaural 2 R the sou...

Страница 44: ...e current audio signal Dolby Digital DTS PCM etc appears as shown below When playing a DVD VIDEO Example Dolby Digital 5 1 ch When playing a DivX video file on a DATA CD or a DATA DVD Example MP3 audio About audio signals Audio signals recorded in a disc contain the sound elements channels shown below Each channel is output from a separate speaker Front L Front R Centre Rear L Rear R Rear Monaural...

Страница 45: ...TVS DYNAMIC THEATER TVS DYNAMIC TVS WIDE This mode is effective when the distance between the front L and R speakers is short such as with built in speakers on a stereo TV TVS NIGHT This feature is useful when you want to hear the dialogue and enjoy the surround sound effects of TVS WIDE at low volume TVS STANDARD Use this setting when you want to use TVS with 2 separate speakers Notes When the pl...

Страница 46: ... format MP3 audio track or JPEG image file that the player can play The player can play the following tracks and files MP3 audio tracks with the extension MP3 JPEG image files with the extension JPEG or JPG JPEG image files that conform to the DCF image file format Design rule for Camera File system Image standards for digital cameras regulated by JEITA Japan Electronics and Information Technology...

Страница 47: ...llustration The playback order above may not be applicable if there are more than 200 albums and 300 tracks files in each album The player can recognize up to 200 albums the player will count just albums including albums that do not contain MP3 audio tracks and JPEG image files The player will not play any albums beyond the 200th album Proceeding to the next or another album may take some time Pla...

Страница 48: ...EG image file 1 After step 2 of Selecting an album press PICTURE NAVI The image files in the album appear in 16 subscreens A scroll box is displayed on the right To display additional images select a bottom image and press x To return to a previous image select a top image and press X 2 Press C X x c to select the image you want to view and press ENTER The selected image appears To go to the next ...

Страница 49: ...e viewing JPEG image files you can set options such as INTERVAL page 51 EFFECT page 52 and SHARPNESS page 34 You can view JPEG images files without MP3 audio by setting MODE MP3 JPEG to IMAGE JPEG page 50 The date the picture was taken is displayed beside DATE in the Control Menu page 11 Note that no date may appear depending on the digital camera Note PICTURE NAVI does not work if AUDIO MP3 is se...

Страница 50: ...0 albums regardless of the selected mode Of each album the player recognizes up to 300 MP3 audio tracks and 300 JPEG image files when AUTO or AUTO BGM is selected 600 MP3 audio tracks when AUDIO MP3 is selected 600 JPEG image files when IMAGE JPEG is selected Notes If you play a disc containing MP3 audio tracks only and MODE MP3 JPEG is set to AUTO or AUTO BGM you can listen to MP3 audio tracks on...

Страница 51: ...HDMI to YCBCR automatically even though the current settings are kept You cannot select HDMI RESOLUTION or YCBCR RGB HDMI in HDMI SETUP page 62 or TV TYPE in SCREEN SETUP page 57 when PhotoTV HD mode is activated If you set PhotoTV HD mode the wipe rotation zoom and effect functions are not available When PhotoTV HD mode is activated the selection for TV TYPE is skipped during Quick Setup page 22 ...

Страница 52: ...1 the images randomly cycle through the effects MODE 2 the next image slides over the previous image MODE 3 the image sweeps in from top to bottom MODE 4 the image sweeps in from left to right MODE 5 the image stretches out from the center of the screen OFF turns off this function 4 Press ENTER Notes Note that this setting does not work if the JPEG file has rotation information Depending on the JP...

Страница 53: ...ack order of albums tracks and files page 46 Note that the playback order may not be applicable depending on the software used for creating the DivX video file or if there are more than 200 albums and 600 DivX video files in each album Note The player may not be able to play some DATA CDs DATA DVDs created in the Packet Write format DivX video files that the player can play The player can play dat...

Страница 54: ...m the selected album To select DivX video files see Selecting a DivX video file page 54 To stop playback Press x To go to the next or previous page Press C or c To turn the display on or off Press MENU repeatedly Selecting a DivX video file 1 After step 2 of Selecting an album press ENTER The list of files in the album appears 2 Press X x to select a file and press ENTER The selected file starts p...

Страница 55: ...en press ENTER The Setup Display appears 4 Press X x to select the setup item from the displayed list LANGUAGE SETUP SCREEN SETUP CUSTOM SETUP AUDIO SETUP or HDMI SETUP Then press ENTER The Setup item is selected Example SCREEN SETUP 5 Press X x to select an item then press ENTER The options for the selected item appear Example TV TYPE ENTER DISPLAY Number buttons 47 STOP QUICK CUSTOM RESET DVD VI...

Страница 56: ...ge 55 OSD On Screen Display Switches the display language on the screen MENU DVD VIDEO only You can select the desired language for the disc s menu AUDIO DVD VIDEO only Switches the language of the sound track When you select ORIGINAL the language given priority in the disc is selected SUBTITLE DVD VIDEO only Switches the language of the subtitle recorded on the DVD VIDEO When you select AUDIO FOL...

Страница 57: ...screen when the player is in stop mode or while playing a CD or DATA CD MP3 audio DATA DVD MP3 audio 16 9 Select this when you connect a wide screen TV or a TV with a wide mode function 4 3 LETTER BOX Select this when you connect a 4 3 screen TV Displays a wide picture with bands on the upper and lower portions of the screen 4 3 PAN SCAN Select this when you connect a 4 3 screen TV Automatically d...

Страница 58: ... 1 to turn off the player and enter 369 using the number buttons on the remote then press 1 to turn on the player again MODE PROGRESSIVE In order for these images to appear natural on your screen when output in progressive mode the progressive video signal needs to be converted to match the type of DVD software that you are watching This setting is effective only when you set PROGRESSIVE COMPONENT...

Страница 59: ...in this order MULTI DISC RESUME DVD VIDEO VIDEO CD only Switches the Multi disc Resume setting on or off Resume playback can be stored in memory for up to 6 different DVD VIDEOs VIDEO CDs page 26 Note If you run Quick Setup Multi disc Resume settings stored in memory may return to the default settings DivX Displays the registration code for this player For more information go to http www divx com ...

Страница 60: ...LBY DIGITAL MPEG DTS and 48kHz 96kHz PCM after setting DIGITAL OUT to ON If you connect a component that is incompatible with the selected audio signal a loud noise or no sound may be heard from the speakers risking damage to your ears or speakers Notes The AV SYNC function page 35 is not effective if you use the DIGITAL OUT COAXIAL jack and set DOLBY DIGITAL MPEG or DTS to DOLBY DIGITAL MPEG or O...

Страница 61: ...e automatically output even when you select 96kHz 24bit D PCM Select this when the player is connected to an audio component without a built in Dolby Digital decoder You can select whether the signals conform to Dolby Surround Pro Logic or not by making adjustments to the DOWNMIX item in AUDIO SETUP page 60 DOLBY DIGITAL Select this when the player is connected to an audio component with a built i...

Страница 62: ...I connection You cannot select this when HDMI RESOLUTION is set to 720 480 576p or TV TYPE is set to 4 3 LETTER BOX or 4 3 PAN SCAN Notes 1920 1080i HD and 1920 1080i HD are effective only when you set HDMI RESOLUTION to 1920x1080i and TV TYPE to 16 9 If you set this setting to PhotoTV HD 1920 1080i HD or 1920 1080i HD wipe rotation and zoom function are not available If you want to use wipe rotat...

Страница 63: ...with DOLBY DIGITAL DTS signals and AUTO is selected In this case select PCM CONTROL FOR HDMI Switches the CONTROL FOR HDMI setting on or off Note When you change this function from OFF to ON on a Sony TV that is compatible with the CONTROL FOR HDMI function all compatible devices will change to ON automatically or vice versa For more details refer to the operation instructions supplied with the TV...

Страница 64: ...PONENT OFF in SCREEN SETUP page 58 the player outputs no component video signals The player is connected to an input device that is not HDCP compliant the HDMI indicator on the front panel does not light up See page 16 If the HDMI OUT jack is used for video output changing the HDMI RESOLUTION setting in HDMI SETUP may solve the problem page 62 Connect the TV and the player using a video jack other...

Страница 65: ... the disc with the playback side facing down The disc is skewed The player cannot play certain discs page 6 The region code on the DVD does not match the player Moisture has condensed inside the player page 3 The player cannot play a recorded disc that is not correctly finalized page 6 The MP3 audio track cannot be played page 46 The DATA CD is not recorded in MP3 format that conforms to ISO 9660 ...

Страница 66: ...mages that contain a copy protection only Playback stops automatically While playing discs with an auto pause signal the player stops playback at the auto pause signal Some functions such as Stop Fast Play Slow Play Slow motion Play Repeat Play Shuffle Play or Programme Play cannot be performed Depending on the disc you may not be able to do some of the operations above Refer to the operating manu...

Страница 67: ...ng in HDMI SETUP to ON page 63 Make sure that the connected component is compatible with the CONTROL FOR HDMI function Please refer to the operating instructions of the component for detailed explanation If you change the HDMI connection connect and disconnect the AC power cord mains lead or if a power failure occurs turn on all components connected to HDMI and set CONTROL FOR HDMI setting in HDMI...

Страница 68: ...ng table First three characters of the service number Cause and or corrective action C 13 The disc is dirty or recorded in a format that this player cannot play page 6 Clean the disc with a cleaning cloth or check its format C 31 The disc is not inserted correctly Re insert the disc correctly E XX xx is a number To prevent a malfunction the player has performed the self diagnosis function Contact ...

Страница 69: ...nector LINE OUT VIDEO Phono jack 1 0 Vp p 75 ohms COMPONENT VIDEO OUT Y PB CB PR CR Phono jack Y 1 0 Vp p PB CB PR CR 0 7 Vp p 75 ohms General Power requirements 220 240 V AC 50 60 Hz Power consumption 11 W Dimensions approx 430 43 206 mm width height depth incl projecting parts Mass approx 1 7 kg Operating temperature 5 C to 35 C Operating humidity 25 to 80 Supplied accessories See page 14 Specif...

Страница 70: ...345 Malagasy 1347 Maori 1349 Macedonian 1350 Malayalam 1352 Mongolian 1353 Moldavian 1356 Marathi 1357 Malay 1358 Maltese 1363 Burmese 1365 Nauru 1369 Nepali 1376 Dutch 1379 Norwegian 1393 Occitan 1403 Afan Oromo 1408 Oriya 1417 Punjabi 1428 Polish 1435 Pashto Pushto 1436 Portuguese 1463 Quechua 1481 Rhaeto Romance 1482 Kirundi 1483 Romanian 1489 Russian 1491 Kinyarwanda 1495 Sanskrit 1498 Sindhi ...

Страница 71: ...DMI RESOLUTION 62 LANGUAGE FOLLOW 63 HDMI SETUP 62 Hooking up 14 I ID3 Tag 27 INDEX 41 INTERVAL 51 J JPEG 46 JPEG RESOLUTION 62 L LANGUAGE SETUP 56 LINE 58 Locating a specific point by watching the TV screen 39 M MEMORY 33 MENU 56 MODE MP3 JPEG 50 MODE PROGRESSIVE 58 MP3 5 46 MPEG 43 61 MULTI DISC RESUME 26 59 N Normal Interlace format 58 O On screen display Control Menu Display 11 Setup Display 5...

Страница 72: ...laysia Printed on 70 or more recycled paper using VOC Volatile Organic Compound free vegetable oil based ink z To find out useful hints tips and information about Sony products and services please visit www sony europe com myproduct ...

Отзывы: