Sony DVP-NS611H Скачать руководство пользователя страница 2

2

US

WARNING

To reduce the risk of fire or 
electric shock, do not expose 
this apparatus to rain or 
moisture.
To avoid electrical shock, do 
not open the cabinet. Refer 
servicing to qualified 
personnel only.
The AC power cord must be 
changed only at a qualified 
service shop.
Batteries or batteries 
installed apparatus shall not 
be exposed to excessive heat 
such as sunshine, fire or the 
like.

CAUTION

The use of optical instruments with 
this product will increase eye 
hazard. As the laser beam used in 
this CD/DVD player is harmful to 
eyes, do not attempt to disassemble 
the cabinet.
Refer servicing to qualified 
personnel only.

This symbol is 
intended to alert the 
user to the presence 
of uninsulated 
“dangerous voltage” 

within the product’s enclosure that 
may be of sufficient magnitude to 
constitute a risk of electric shock to 
persons.

This symbol is 
intended to alert the 
user to the presence 
of important 
operating and 

maintenance (servicing) 
instructions in the literature 
accompanying the appliance.

CAUTION

You are cautioned that any 
changes or modifications not 
expressly approved in this manual 
could void your authority to 
operate this equipment.

b

This equipment has been tested 
and found to comply with the 
limits for a Class B digital device, 
pursuant to Part 15 of the FCC 
Rules. These limits are designed to 
provide reasonable protection 
against harmful interference in a 
residential installation. This 
equipment generates, uses, and can 
radiate radio frequency energy 
and, if not installed and used in 
accordance with the instructions, 
may cause harmful interference to 
radio communications. However, 
there is no guarantee that 
interference will not occur in a 
particular installation. If this 
equipment does cause harmful 
interference to radio or television 
reception, which can be 
determined by turning the 
equipment off and on, the user is 
encouraged to try to correct the 
interference by one or more of the 
following measures:
– Reorient or relocate the 

receiving antenna.

– Increase the separation between 

the equipment and receiver.

– Connect the equipment into an 

outlet on a circuit different from 
that to which the receiver is 
connected.

– Consult the dealer or an 

experienced radio/TV technician 
for help.

Lightning

For added protection for this set 
during a lightning storm, or when it 
is left unattended and unused for 
long periods of time, unplug it 
from the wall outlet. This will 
prevent damage to the set due to 
lightning and power-line surges.

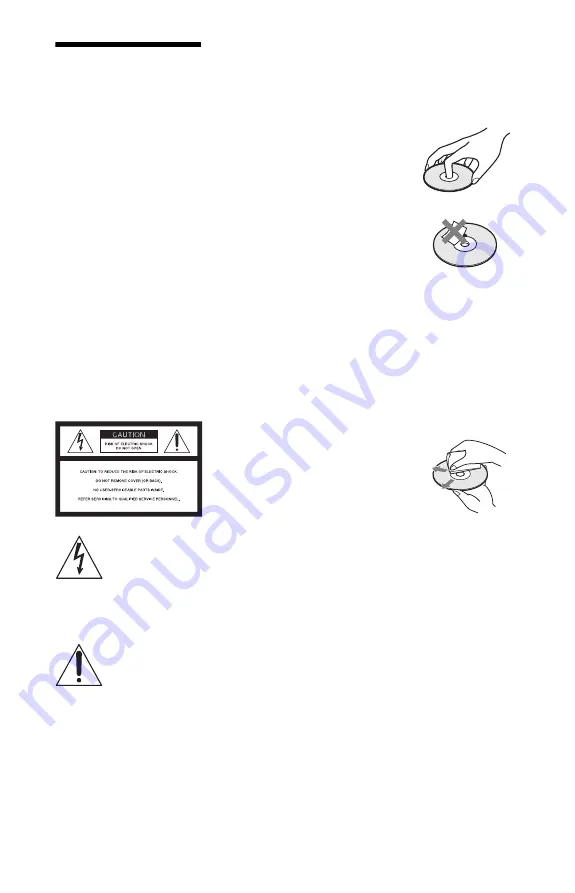
Notes about the discs

• To keep the disc clean, handle 

the disc by its edge. Do not touch 
the surface. Dust, fingerprints, or 
scratches on the disc may cause 
it to malfunction.

• Do not expose the disc to direct 

sunlight or heat sources such as 
hot air ducts, or leave it in a car 
parked in direct sunlight as the 
temperature may rise 
considerably inside the car.

• After playing, store the disc in its 

case.

• Clean the disc with a cleaning 

cloth.
Wipe the disc from the center 
out.

• Do not use solvents such as 

benzine, thinner, commercially 
available cleaners, or anti-static 
spray intended for vinyl LPs.

• If you have printed the disc’s 

label, dry the label before 
playing.

• Do not use the following discs:

– A disc recorded in a color 

system other than NTSC, such 
as PAL or SECAM (this player 
conforms to the NTSC color 
system).

– A disc that has a non-standard 

shape (e.g., card, heart).

– A disc with a label or sticker 

on it.

– A disc that has cellophane tape 

or sticker adhesive on it.

Содержание DVP-NS611H

Страница 1: ...Refer to them whenever you call upon your Sony dealer regarding this product Model No DVP NS611H DVP NS611HP Serial No ______________ For Customers in Canada If this product is not working properly please call 1 877 602 2008 for Peace of Mind Warranty Replacement service For other product related questions please contact our Customer Information Service Centre at 1 877 899 7669 or write to us at C...

Страница 2: ...er there is no guarantee that interference will not occur in a particular installation If this equipment does cause harmful interference to radio or television reception which can be determined by turning the equipment off and on the user is encouraged to try to correct the interference by one or more of the following measures Reorient or relocate the receiving antenna Increase the separation betw...

Страница 3: ... liquid has been spilled or objects have fallen into the apparatus the apparatus has been exposed to rain or moisture does not operate normally or has been dropped Precautions The power requirements and power consumption of this player are indicated on the back of the player Check that the player s operating voltage is identical with your local power supply On safety To prevent fire or shock hazar...

Страница 4: ... uses only unless otherwise authorized by Macrovision Reverse engineering or disassembly is prohibited DVD RW DVD RW DVD R DVD R DL DVD R DVD VIDEO and CD logos are trademarks This DVD player incorporates High Definition Multimedia Interface HDMI technology HDMI the HDMI Logo and High Definition Multimedia Interface are trademarks or registered trademarks of HDMI Licensing LLC About this manual Th...

Страница 5: ...tions 23 Creating your own program Program Play 23 Playing in random order Shuffle Play 24 Playing repeatedly Repeat Play 24 Repeating a specific portion A B Repeat Play 25 Customizing the Playback Configuration 25 Adjusting the playback picture CUSTOM PICTURE MODE 25 Sharpening the picture SHARPNESS 26 Adjusting the delay between the picture and sound AV SYNC 26 Locking discs PARENTAL CONTROL 26 ...

Страница 6: ...ional Information 37 Troubleshooting 37 Self diagnosis Function When letters numbers appear on the screen 39 Playable Media 40 Specifications 43 Language Code List 44 Parental Control Area Code List 44 Index 45 ...

Страница 7: ...TV or sets to standby mode 1 on standby 15 Turns on the player or sets to standby mode VOL 15 Adjusts the TV volume B Number buttons Enters the title chapter numbers etc CLEAR 20 Clears the entry field C TIME TEXT 10 Displays the playing time and remaining time on the TV screen or front panel display Press repeatedly to change the displayed information CD DVD text appears only when text is recorde...

Страница 8: ...ious display DISPLAY 19 Displays the playback information on the screen C X x c 20 Moves the highlight to select a displayed item Center button ENTER 15 Enters the selected item E PREV NEXT Skips to the previous next chapter track or scene in continuous play mode REPLAY STEP STEP ADVANCE Replays the scene 1 3 briefly fast forward the scene 2 3 when pressed during playback Plays backward 4 forward ...

Страница 9: ... the player is in standby mode press O RETURN ENTER and then 1 on the remote The player turns on and LOCKED appears on the front panel display The Z button on the player does not work while the Child Lock is set To unlock the disc tray When the player is in standby mode press O RETURN ENTER and then 1 again b Even if you select RESET under SETUP in the Control Menu page 30 the disc tray remains lo...

Страница 10: ...aining time r Current chapter playing time r Current chapter remaining time r Text r Current title and chapter number Returns to top automatically When playing music or video files Current file 1 or track 2 playing time and number r Current file 1 or track name MP3 ID3 track title 2 r Current album and file 1 or track 2 number Returns to top automatically 1 for video file 2 for music file When pla...

Страница 11: ...deo cord Select one of the patterns A through C according to the input jack on your TV In order to view progressive signal 480p pictures with a compatible TV you must use pattern B Select pattern C when connecting to a TV equipped with HDMI input A VIDEO AUDIO INPUT L R PR PB Y COMPONENT VIDEO IN B HDMI IN C Audio video cord supplied Component video cord not supplied yellow TV green TV red green b...

Страница 12: ...mages may not fit your TV screen To change the picture size see page 31 b Do not connect a VCR etc between your TV and the player If you pass the player signals via the VCR you may not receive a clear image on the TV screen If your TV has only one audio video input jack connect the player to this jack If the picture appears too white when you are using A connection set BLACK LEVEL in SCREEN SETUP ...

Страница 13: ...ons supplied with the connected components VIDEO AUDIO INPUT L R B A Audio component with a decoder red TV projector or audio component Audio video cord supplied Signal flow Coaxial digital cord not supplied to DIGITAL OUT COAXIAL HDMI OUT to LINE OUT L R AUDIO Rear L CD DVD player white yellow yellow white red Speakers Front L Speakers Rear R Front R Subwoofer Center The yellow plug is used for v...

Страница 14: ...ur speakers The TVS effects of this player cannot be used with this connection When you connect the player to an audio component using an HDMI cord you will need to do one of the following Connect the audio component to the TV with the HDMI cord Connect the player to the TV with a video cord other than HDMI cord component video cord or audio video cord When connecting to the HDMI OUT jack carefull...

Страница 15: ...run QUICK SETUP appears at the bottom of the screen If this message does not appear select QUICK under SETUP in the Control Menu to run Quick Setup page 20 3 Press ENTER without inserting a disc The Language Setup Display appears 4 Press X x to select a language The player displays the menu and subtitles in the selected language 5 Press ENTER The Screen Setup Display appears Buttons Operations TV ...

Страница 16: ...rd 9 Press X x to select the type of Dolby Digital signal to your audio component If your audio component has a Dolby Digital decoder select DOLBY DIGITAL Otherwise select D PCM 10Press ENTER DTS is selected 11Press X x to select whether or not to send a DTS signal to your audio component If your audio component has a DTS decoder select ON Otherwise select OFF 12Press ENTER Quick Setup is finished...

Страница 17: ...o close z You can have the player turned off automatically whenever you leave it in stop mode for more than 30 minutes To turn this function on or off set AUTO POWER OFF in CUSTOM SETUP to ON or OFF page 33 b Depending on the DVD or VIDEO CD some operations may be different or restricted Refer to the operating instructions supplied with your disc Discs created on DVD recorders must be correctly fi...

Страница 18: ...the menu on your TV screen When you start playing a VIDEO CD with PBC functions the menu for your selection appears Select an item using the number buttons and press ENTER Then follow the instructions in the menu press N when Press SELECT appears To return to the menu Press O RETURN z To play without using PBC press or the number buttons while the player is stopped to select a track then press N o...

Страница 19: ...r VIDEO CDs PBC is on and track number for VIDEO CDs CDs 2 Displays the video photo music files numbers and index numbers for VIDEO CDs 3 Displays Super VCD as SVCD 4 Displays the date for photo files Control Menu display 1 m Control Menu display 2 Except CD and when MEDIA is set to MUSIC m Control Menu display off OFF OFF SET ON PLAY 1 8 3 4 1 2 2 7 T 1 3 2 5 5 DVD VIDEO Quit PROGRAM ENTER DISPLA...

Страница 20: ...r or track to play in the order you want SHUFFLE page 24 Plays the title chapter or track in random order REPEAT page 24 Plays all titles tracks albums or a single title chapter track album file repeatedly A B REPEAT page 25 Specifies the parts you want to play repeatedly PARENTAL CONTROL page 26 Set to prohibit playback on this player SETUP page 15 30 QUICK Use Quick Setup to choose the desired l...

Страница 21: ... WIDE at low volume TVS STANDARD Use this setting when you want to use TVS with 2 separate speakers b When you select one of the TVS modes turn off the surround setting of the connected TV or audio component The TVS effects do not work when using the Fast Play or Slow Play functions even though you can change the TVS modes If you use the DIGITAL OUT COAXIAL HDMI OUT jack and set DOLBY DIGITAL to D...

Страница 22: ...PBC page 18 Displays and scene number When the disc s menu appears you can select an item by pressing X x When playing video photo and music files Displays MENU and PICT NAVI Picture Navigation To change the display Press SYNC MENU on the TV s remote repeatedly to turn or change the display BRAVIA Sync display and Control Menu are displayed alternately To turn off the display Press RETURN or SYNC ...

Страница 23: ... For example select track 02 Press X x to select 02 under T then press ENTER 4 Repeat steps 2 to 3 to program other titles chapters or tracks The programmed titles chapters and tracks are displayed in the selected order 5 Press N Program Play begins When the program ends you can restart the same program again by pressing N PROGRAM 1 TITLE ALL CLEAR 2 TITLE 3 TITLE 4 TITLE 5 TITLE 6 TITLE 7 TITLE T...

Страница 24: ...ng may produce a different playing order 1 After selecting SHUFFLE on the Control Menu page 19 press X x to select the item to be shuffled When playing a DVD VIDEO TITLE CHAPTER When playing a VIDEO CD or CD TRACK When Program Play is activated ON shuffles titles chapters or tracks selected in Program Play 2 Press ENTER Shuffle Play starts To return to normal play Press CLEAR or select OFF in step...

Страница 25: ...eo signal from the player to obtain the picture quality you want 1 After selecting CUSTOM PICTURE MODE on the Control Menu page 19 press X x to select the setting you want The default setting is underlined STANDARD displays a standard picture DYNAMIC 1 produces a bold dynamic picture by increasing the picture contrast and the color intensity DYNAMIC 2 produces a more dynamic picture than DYNAMIC 1...

Страница 26: ...s not effective if you use the DIGITAL OUT COAXIAL jack and set DOLBY DIGITAL or DTS in AUDIO SETUP to DOLBY DIGITAL or ON respectively page 34 This function is not effective if you connect a Dolby Digital or DTS compliant device via the HDMI OUT jack and set DOLBY DIGITAL or DTS in AUDIO SETUP to DOLBY DIGITAL or ON respectively page 34 For DATA disc this function works for video files only Locki...

Страница 27: ...R The display will ask you to enter a new 4 digit password After you enter a new 4 digit password replace the disc in the player and press N When the display for entering your password appears enter your new password b Depending on the disc you may be asked to change the parental control level while playing the disc In this case enter your password then change the level If the Resume Play mode is ...

Страница 28: ...oto file Press C or c during playback Note that you cannot return to the previous album by using C Select the previous album from the album list To rotate a photo image Press X x while viewing the image Each time you press X the image rotates counterclockwise by 90 degrees To return to normal view press CLEAR Note that the view also returns to normal if you press C c to go to the next or previous ...

Страница 29: ...age 31 when PhotoTV HD mode is activated If you set PhotoTV HD mode the effect rotation and zoom functions are not available When PhotoTV HD mode is activated the selection for TV TYPE is skipped during Quick Setup page 15 Setting the pace for a slide show INTERVAL You can set the time the slides are displayed on the screen 1 After selecting INTERVAL on the Control Menu page 19 press X x to select...

Страница 30: ...0 to 36 LANGUAGE SETUP You can set various languages for the on screen display or sound track OSD On Screen Display Switches the display language on the screen MENU DVD VIDEO only You can select the desired language for the disc s menu AUDIO DVD VIDEO only Switches the language of the sound track When you select ORIGINAL the language given priority in the disc is selected SUBTITLE DVD VIDEO only S...

Страница 31: ...video signals output from the jacks other than COMPONENT VIDEO OUT HDMI OUT 16 9 Select this when connecting to a wide screen TV or a TV with a wide mode function 4 3 LETTER BOX Select this when connecting to a 4 3 screen TV Displays a wide picture with bands on the upper and lower portions of the screen 4 3 PAN SCAN Select this when connecting to a 4 3 screen TV Automatically displays the wide pi...

Страница 32: ...to appear natural on your screen when output in progressive mode the progressive video signal needs to be converted to match the type of DVD software that you are watching This setting is effective only when you set PROGRESSIVE COMPONENT OUT ONLY in SCREEN SETUP to ON 4 3 OUTPUT This setting is effective only when you set TV TYPE in SCREEN SETUP to 16 9 Adjust this to watch 4 3 aspect ratio If you...

Страница 33: ...order MULTI DISC RESUME DVD VIDEO VIDEO CD only Switches the Multi disc Resume setting on or off Resume playback can be stored in memory for up to 6 different DVD VIDEOs VIDEO CDs page 17 b If you run Quick Setup Multi disc Resume setting stored in memory may return to the default settings DivX DVP NS717HP only Displays the registration code for this player For more information go to http www divx...

Страница 34: ...The AV SYNC function page 26 is not effective if you use the DIGITAL OUT COAXIAL jack and set DOLBY DIGITAL or DTS to DOLBY DIGITAL or ON respectively The AV SYNC function page 26 is not effective if you connect a Dolby Digital or DTS compliant device via the HDMI OUT jack and set DOLBY DIGITAL or DTS to DOLBY DIGITAL or ON respectively DOLBY DIGITAL DVDs only Selects the type of Dolby Digital sig...

Страница 35: ...r details refer also to the instruction manual supplied with the TV projector etc You cannot select this when PhotoTV HD mode is activated page 28 To reset the setting If the picture does not appear normal or goes blank press 1 to turn off the player and enter 369 using the number buttons on the remote then press 1 to turn on the player again b In case of AUTO 1920 1080p the player automatically a...

Страница 36: ...when you select YCBCR AUDIO HDMI Selects the type of audio signal output from the HDMI OUT jack b A loud noise or no sound will be output if you connect the player to a TV that is not compatible with DOLBY DIGITAL DTS signals and AUTO is selected In this case select PCM CONTROL FOR HDMI Switches the Control For HDMI setting on or off LANGUAGE FOLLOW Switches the languages of the DVD player to the ...

Страница 37: ... the TV s input to the connected video input so that you can see the on screen displays Change the HDMI RESOLUTION setting in HDMI SETUP and switch the TV s input back to HDMI If the picture still does not appear repeat the steps and try other options Press 1 to turn off the player and enter 369 using the number buttons on the remote then press 1 to turn on the player again page 36 There is no pic...

Страница 38: ...blue screen may appear instead of the images It may take a while when looking for playable images For player that cannot play images that contain a copy protection only Some functions such as Stop Fast Play Slow Play Slow motion Play Repeat Play Shuffle Play or Program Play cannot be performed Depending on the disc you may not be able to do some of the operations above The player does not operate ...

Страница 39: ...age settings on your TV etc Self diagnosis Function When letters numbers appear on the screen When the self diagnosis function is activated to prevent the player from malfunctioning a five character service number e g C 13 50 with a combination of a letter and four digits appears on the screen In this case check the following table First three characters of the service number Cause and or correcti...

Страница 40: ...n the above table even if the file format differs Playing such data may generate noise that can result in speaker damage The player can play the following files Photo files that conform to the DCF image file format DATA CDs recorded according to ISO 9660 Level 1 Level 2 or its extended format Joliet DATA DVDs recorded according to UDF Universal Disk Format Type Disc Logo Icon Characteristic DVD VI...

Страница 41: ...lower bit rate The player may not playback the high bit rate video file on the DATA CD smoothly You are recommended to playback using DATA DVD When playing visual data that is not supported by MPEG 4 format only sound will be heard Region code Your player has a region code printed on the back of the unit and only will play commercial DVDs playback only labeled with identical region codes This syst...

Страница 42: ...yback features may not be available Also refer to the operating instructions supplied with the DVDs or VIDEO CDs About MPEG 4 VISUAL DVP NS717HP only THIS PRODUCT IS LICENSED UNDER THE MPEG 4 VISUAL PATENT PORTFOLIO LICENSE FOR THE PERSONAL AND NON COMMERCIAL USE OF A CONSUMER FOR DECODING VIDEO IN COMPLIANCE WITH THE MPEG 4 VISUAL STANDARD MPEG 4 VIDEO THAT WAS ENCODED BY A CONSUMER ENGAGED IN A ...

Страница 43: ...E OUT VIDEO Phono jack 1 0 Vp p 75 ohms General Power requirements 120 V AC 60 Hz Power consumption 10 W Dimensions approx 430 43 206 mm 17 111 16 81 10 in width height depth incl projecting parts Mass approx 1 5 kg 33 10 lb Operating temperature 5 C to 35 C 41 F to 95 F Operating humidity 25 to 80 Supplied accessories Audio Video cord phono plug 3 y phono plug 3 1 Remote commander remote 1 Size A...

Страница 44: ...345 Malagasy 1347 Maori 1349 Macedonian 1350 Malayalam 1352 Mongolian 1353 Moldavian 1356 Marathi 1357 Malay 1358 Maltese 1363 Burmese 1365 Nauru 1369 Nepali 1376 Dutch 1379 Norwegian 1393 Occitan 1403 Afan Oromo 1408 Oriya 1417 Punjabi 1428 Polish 1435 Pashto Pushto 1436 Portuguese 1463 Quechua 1481 Rhaeto Romance 1482 Kirundi 1483 Romanian 1489 Russian 1491 Kinyarwanda 1495 Sanskrit 1498 Sindhi ...

Страница 45: ...LOW PLAY 8 FILE 21 Film based software 32 Front panel display 10 H Handling discs 2 HDMI AUDIO HDMI 36 CONTROL FOR HDMI 12 36 HDMI RESOLUTION 35 LANGUAGE FOLLOW 36 HDMI SETUP 35 I ID3 tag 7 INDEX 20 INTERVAL 21 29 J JPEG 40 JPEG RESOLUTION 35 L LANGUAGE SETUP 30 M MEDIA 21 MEMORY 25 MENU 30 MODE PROGRESSIVE 32 MP3 40 MULTI DISC RESUME 17 33 O On screen display Control Menu display 19 Setup Display...

Страница 46: ......

Страница 47: ...del CONTROL PARA HDMI para BRAVIA Sync para conexiones HDMI solamente 3 Paso 2 Conexión al componente de audio 4 Paso 3 Conexión del cable de alimentación 5 Paso 4 Preparación del control remoto 5 Control del televisor con el control remoto 6 Paso 5 Ajuste Rápido 6 Reproducción 8 Reproducción de discos 8 ...

Страница 48: ...A o C según la toma de entrada del televisor Para ver imágenes de señales progresivas 480p con un televisor compatible debe usar el patrón B Seleccione el patrón C para conectar a un televisor equipado con entrada HDMI A VIDEO AUDIO INPUT L R PR PB Y COMPONENT VIDEO IN B HDMI IN C Cable de audio video suministrado l Flujo de señal amarillo Reproductor de CD DVD disco compacto y videodisco digital ...

Страница 49: ...le que el tamaño de la imagen no se ajuste a la pantalla del televisor Para cambiar la relación de aspecto consulte la versión en inglés de las instrucciones de uso b No conecte una videograbadora etc entre el televisor y el reproductor Si filtra las señales del reproductor por medio de la videograbadora es posible que no reciba una imagen clara en la pantalla del televisor Si el televisor cuenta ...

Страница 50: ...ujo de señal El adaptador amarillo se utiliza para señales de video página 2 Componente de audio con codificador rojo Televisor proyector o componente de audio Cable de audio video suministrado Cable digital coaxial no suministrado Tomas LINE OUT L R AUDIO salida línea izquierda derecha Posterior izquierdo Reproductor de CD DVD disco compacto y videodisco digital blanco amarillo amarillo blanco ro...

Страница 51: ...estridente Los efectos TVS sonido envolvente virtual de televisor de este reproductor no son compatibles con esta conexión Cuando conecta el reproductor a un componente de audio con un cable HDMI es necesario realizar uno de los siguientes pasos Conectar el componente de audio al televisor con un cable HDMI Conectar el reproductor al televisor con un cable de video que no sea HDMI cable de video c...

Страница 52: ...n la pantalla del televisor En la parte inferior de la pantalla aparecerá Press ENTER to run QUICK SETUP Si este mensaje no aparece seleccione QUICK en SETUP del menú de control para ejecutar el ajuste rápido Para obtener información detallada consulte la versión en inglés del Manual de instrucciones 3 Presione ENTER ingresar sin insertar ningún disco Aparece la pantalla de ajustes de idioma 4 Pre...

Страница 53: ...r el tipo de señal Dolby Digital que desee enviar al componente de audio Si el componente de audio posee un decodificador Dolby Digital seleccione DOLBY DIGITAL De lo contrario seleccione D PCM 10Presione ENTER ingresar Se selecciona DTS sistema digital de sala de cine 11Presione X x para seleccionar si desea o no enviar una señal DTS sistema digital de sala de cine al componente de audio Si el co...

Страница 54: ...or La reproducción comienza de manera automática La entrada del televisor también se alternará al reproductor de manera automática en los siguientes casos Si presiona los botones N TOP MENU menú superior MENU menú o DISPLAY indicación del control remoto Estos botones no funcionan al reproducir un CD de audio o archivos de música en el modo MUSIC Si se carga un disco con la función de reproducción ...

Страница 55: ...la versión en inglés del Manual de instrucciones La reanudación de reproducción no funciona durante la reproducción aleatoria ni durante la reproducción de programa Es posible que en algunos discos la función de reanudación de la reproducción no funcione dependiendo del punto en el que la haya detenido o si presiona 1 Reproducción de VIDEO CD videodiscos compactos con funciones PBC control de repr...

Страница 56: ...Sony Corporation Printed in Malaysia Printed on 70 or more recycled paper using VOC Volatile Organic Compound free vegetable oil based ink ...

Отзывы: