background image

2-1

DVP-NS36/NS37/NS45P/NS55P/NS61P/NS63P

Note:

 Follow the disassembly procedure in the numerical order given.

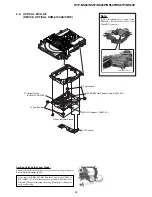
2-1. UPPER CASE

SECTION 2

DISASSEMBLY

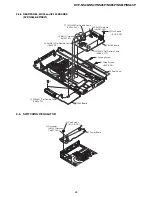
2-2. FRONT PANEL ASSEMBLY

4

 Two Tapping Screws

3

 Tray Cover

5

 Three Tapping Screws

2

1

 Chassis Back

5

 Claw

1

 Claw

4

 Claw

2

 Claw

8

 Front Panel Assembly

e

e

3

 Claw

6

 FSW-001 Flat Flexible Cable

 (CN001, 

7P)

7

 Three Screws

 +BVTP2.6 

(3CR)

9

 SW-468 Board

Содержание DVP-NS36

Страница 1: ... jack 2 Vrms 10 kilohms VIDEO SCART jack 1 0 Vp p 75 ohms S VIDEO SCART jack Y 1 0 Vp p C 0 3 Vp p PAL 0 286 Vp p NTSC 75 ohms RGB SCART jack 0 7 Vp p 75 ohms DVP NS36 Except RUS NS37 only LINE OUT VIDEO Phono jack 1 0 Vp p 75 ohms General Power requirements 220 240 V AC 50 60 Hz DVP NS36 NS37 120 V AC 60 Hz DVP NS45P US CND NS55P US CND 110 240 V AC 50 60 Hz DVP NS61P NS55P PX NS63P SPECIFICATION...

Страница 2: ...rt having a return to chassis must not exceed 0 5mA 500 microampers Leakage current can be measured by any one of three methods 1 A commercial leakage tester such as the Simpson 229 or RCA TW 540A Follow the manufacturers instructions to use these instruments 2 A battery operatedAC milliammeter The Data Precision 245 digital multimeter is suitable for this job 3 Measuring the voltage drop across a...

Страница 3: ...ay SCREEN SETUP 1 16 Custom Settings CUSTOM SETUP 1 16 Settings for the Sound AUDIO SETUP 1 16 Additional Information 1 17 Troubleshooting 1 17 Self diagnosis Function When letters numbers appear in the display 1 18 Glossary 1 18 Specifications 1 18 2 DISASSEMBLY 2 1 Upper Case 2 1 2 2 Front Panel Assembly 2 1 2 3 Loading Assembly 2 2 2 4 Optical Pick Up Device Optical KHM 313CAA C2RP 2 3 2 5 Rear...

Страница 4: ...mation 6 3 6 5 If Con Self Diagnostic Function 6 3 7 ELECTRICAL ADJUSTMENT 7 1 Power Supply Output Voltage Check 7 1 7 2 Adjustment of Video System DVP NS36 AEP UK NS37 7 2 7 3 Adjustment of Video System Except DVP NS35 NS36 AEP UK NS37 7 4 8 REPAIR PARTS LIST 8 1 Exploded Views 8 1 8 1 1 Main Section 8 1 8 1 2 Mechanism Deck Assembly 8 3 8 2 Electrical Parts List 8 4 ...

Страница 5: ...ture of the unit bottom and move the lever of chuck can in the direction of the arrow A See Fig 1 2 Draw out the tray in the direction of the arrow B and remove a disc See Fig 1 3 After removing the disc push in the direction of arrow C until the tray fully in 4 Move the lever of chuck cam in the direction of arrow D The lever of a chuck cam Hole Tray A D B C Fig 1 5E ...

Страница 6: ...CD logos are trademarks Note about CDs DVDs The player can play CD ROMs CD Rs CD RWs recorded in the following formats music CD format video CD format MP3 audio tracks JPEG image files and DivX video files of format conforming to ISO 9660 Level 1 Level 2 or its extended format Joliet KODAK Picture CD format A logical format of files and folders on CD ROMs defined by ISO International Organization ...

Страница 7: ... Macrovision Reverse engineering or disassembly is prohibited 8 Index to Parts and Controls For more information see the pages indicated in parentheses Front panel A 1 on standby button 22 B Disc tray 22 C Front panel display 9 D A open close button 22 E H play button 22 F x stop button 23 G previous next buttons 31 H PROGRESSIVE button indicator 17 Lights up when the player outputs progressive si...

Страница 8: ...me you are watching SHARPNESS page 45 Exaggerates the outline of the image to produce a sharper picture PARENTAL CONTROL page 56 Set to prohibit playback on this player SETUP page 61 QUICK Setup page 20 Use Quick Setup to choose the desired language of the on screen display the aspect ratio of the TV and the audio output signal CUSTOM Setup In addition to the Quick Setup setting you can adjust var...

Страница 9: ...l format in which the player outputs video signals Progressive or Interlace and the conversion method for progressive signals The PROGRESSIVE indicator lights up when the player outputs progressive signals Each time you press PROGRESSIVE the display changes as follows PROGRESSIVE AUTO m PROGRESSIVE VIDEO m NORMAL INTERLACE PROGRESSIVE AUTO Select this setting when your TV accepts progressive signa...

Страница 10: ...X x to select the type of jack if any you are using to connect to an amplifier receiver then press ENTER If you did not connect an AV amplifier receiver select NO then go to step 13 If you connected an AV amplifier receiver using just an audio cord select YES LINE OUTPUT L R AUDIO then go to step 13 If you connected an AV amplifier receiver using either a digital optical or coaxial cord select YES...

Страница 11: ... CUSTOM SETUP must be set to ON default for this function to work page 65 The point where you stopped playing is cleared when you change the play mode you change the settings on the Setup Display For DVD RWs DVD Rs in VR mode CDs DATA CDs and DATA DVDs the player remembers the resume playback point for the current disc The resume point is cleared when you opened the disc tray you disconnect the ma...

Страница 12: ... VIDEO CD or CD TRACK T 01 02 03 04 05 PROGRAM 1 TITLE 0 2 0 3 ALL CLEAR 2 TITLE 3 TITLE 4 TITLE 5 TITLE 6 TITLE 7 TITLE Selected title and chapter PROGRAM 1 TRACK 0 2 ALL CLEAR 2 TRACK 3 TRACK 4 TRACK 5 TRACK 6 TRACK 7 TRACK 0 15 30 01 02 03 04 05 T Selected track Total time of the programmed tracks PLAY 1 8 3 4 1 2 2 7 T 1 3 2 5 5 OFF CHAPTER TITLE OFF DVD VIDEO 29 Playing Discs When Programme P...

Страница 13: ...DVD VIDEO DVD VR mode disc TITLE CHAPTER TIME TEXT Select TIME TEXT to search for a starting point by inputting the time code ENTER DISPLAY CLEAR Number buttons 33 Searching for a Scene When playing a VIDEO CD or Super VCD without PBC playback TRACK INDEX When playing a VIDEO CD or Super VCD with PBC Playback SCENE When playing a CD TRACK When playing a DATA CD DATA DVD ALBUM TRACK MP3 audio track...

Страница 14: ...th PBC functions the scene number or the playing time are displayed Long text that does not fit in a single line will scroll across the front panel display You can also check the time information and text using the Control Menu page 11 Notes Depending on the type of disc being played the DVD CD text or track name may not be displayed The player can only display the first level of the DVD CD text s...

Страница 15: ... actual rear speakers and subwoofer shown below This mode is effective when the distance between the front L and R speakers is short such as with built in speakers on a stereo TV TVS DYNAMIC Creates one set of virtual rear speakers from the sound of the front speakers L R without using actual rear speakers shown below This mode is effective when the distance between the front L and R speakers is s...

Страница 16: ... off the display Press O RETURN or DISPLAY Note The BRIGHTNESS setting is not effective if you connect the player via the LINE OUT VIDEO or S VIDEO OUT jack and select PROGRESSIVE AUTO or PROGRESSIVE VIDEO by using the PROGRESSIVE button on the front panel DVD VIDEO 1 8 3 4 1 2 2 7 T 1 3 2 5 5 DYNAMIC 1 STANDARD STANDARD PICTURE 0 45 Enjoying Movies Sharpening the Picture SHARPNESS You can enhance...

Страница 17: ... x to select a track and press ENTER Playback starts from the selected track To stop playback Press x To go to the next or previous page Press c or C To return to the previous display Press O RETURN To go to the next or previous MP3 audio track Press or during playback You can select the first track of the next album by pressing during playback of the last track of the current album Note that you ...

Страница 18: ...s over the previous image OFF turns off this function 4 Press ENTER 2 9 1 0 2 0 0 6 1 MODE 1 DATA CD JPEG WIPE MODE 1 MODE 2 MODE 3 MODE 4 MODE 5 OFF 4 3 1 2 53 Enjoying DivX Videos Enjoying DivX Videos About DivX Video Files DivX is a video file compression technology developed by DivX Inc This product is an official DivX Certified product You can play DATA CDs and DATA DVDs that contain DivX vid...

Страница 19: ...TAL CONTROL display asks you for your password then press ENTER The display will ask you to enter a new 4 digit password Parental Control limited playback Playback of some DVD VIDEOs can be limited according to a predetermined level such as the age of the users The PARENTAL CONTROL function allows you to set a playback limitation level 1 Press DISPLAY while the player is in stop mode The Control M...

Страница 20: ...3 Press X x to select CUSTOM then press ENTER The Setup Display appears 4 Press X x to select the setup item from the displayed list LANGUAGE SETUP SCREEN SETUP CUSTOM SETUP or AUDIO SETUP Then press ENTER The Setup item is selected Example SCREEN SETUP 5 Press X x to select an item then press ENTER The options for the selected item appear Example TV TYPE ENTER DISPLAY STOP 47 QUICK CUSTOM RESET D...

Страница 21: ...ng dark CUSTOM SETUP AUTO POWER OFF AUTO PLAY DIMMER OFF OFF BRIGHT AUTO PAUSE MODE OFF TRACK SELECTION ON MULTI DISC RESUME Registration Code DivX 65 Settings and Adjustments PAUSE MODE DVD VIDEO DVD VR mode only Selects the picture in pause mode TRACK SELECTION DVD VIDEO only Gives the sound track which contains the highest number of channels priority when you play a DVD VIDEO on which multiple ...

Страница 22: ...DIO ATT in AUDIO SETUP to ON page 66 The sound volume is low The sound volume is low on some DVDs The sound volume may improve if you set AUDIO DRC in AUDIO SETUP to TV MODE page 66 Set AUDIO ATT in AUDIO SETUP to OFF page 66 69 Additional Information Operation The remote does not function The batteries in the remote are weak There are obstacles between the remote and the player The distance betwe...

Страница 23: ... modes VR mode and Video mode DVD RWs created in Video mode have the same format as a DVD VIDEO while discs created in VR Video Recording mode allow the contents to be programmed or edited DVD RW page 5 A DVD RW plus RW is a recordable and rewritable disc DVD RWs use a recording format that is comparable to the DVD VIDEO format File page 47 53 A JPEG image or DivX video recorded on a DATA CD DATA ...

Страница 24: ...cal order given 2 1 UPPER CASE SECTION 2 DISASSEMBLY 2 2 FRONT PANEL ASSEMBLY 4 Two Tapping Screws 3 Tray Cover 5 Three Tapping Screws 2 1 Chassis Back 5 Claw 1 Claw 4 Claw 2 Claw 8 Front Panel Assembly e e 3 Claw 6 FSW 001 Flat Flexible Cable CN001 7P 7 Three Screws BVTP2 6 3CR 9 SW 468 Board ...

Страница 25: ...P NS36 NS37 NS45P NS55P NS61P NS63P 2 3 LOADING ASSEMBLY a a 4 Three Screws BV3 3 CR 5 Loading Assembly 1 FMO 009 Flat Flexible Cable CN101 24P 3 FMS 010 Flat Flexible Cable CN202 5P 2 MD 111 Harness CN201 6P ...

Страница 26: ...9 Flat Flexible Cable from CN101 of MV 50 MV 51 board immediately ground FMO 009 Flat Flexible Cable pattern using short clip Metal paper clip can be used as short clip Shortland Position Note Solder shortland before remove the FMO 009 Flat Flaxible Cable from 24 pin BU connector 5 FMO 009 Flat Flexible Cable CN101 24P 4 MD 111 Harness CN201 6P 1 Four Insulator Screws 6 Two Insulator 6 Two Insulat...

Страница 27: ...09 Flat Flexible Cable CN101 24P 7 MV 51 Board 3 MD 111 Harness CN201 6P 8 PM 127 Harness CN501 10P 6 Five Screws BV3 3 CR 1 Three Screws BV3 3 CR 2 Rear Panel 1 Tapping Screw q IF 144 Board 9 a a l 3 FSW 001 Flat Flexible Cable CN403 7P 0 IF 145 Board o l EXCEPT DVP NS63P DVP NS63P Note Caution Point on the PWB IF 144 IF 145 When handling IF 144 IF 145 PWB avoid contact with the sharp metal edge ...

Страница 28: ... 127 Harness CN201 10P 3 Power Board 4 FMS 010 Flat Flexible Cable CN202 5P 6 FIM 013 Flat Flexible Cable CN404 17P 5 FMO 009 Flat Flexible Cable CN101 24P 7 MV 50 Board 3 MD 111 Harness CN201 6P 8 PM 127 Harness CN501 10P 6 Five Screws BV3 3 CR 1 Three Screws BV3 3 CR 2 Rear Panel 1 Tapping Screw a a l 3 FSW 001 Flat Flexible Cable CN403 7P 0 IF 144 Board q 9 ...

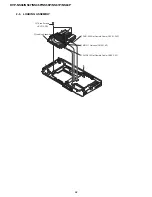
Страница 29: ...2 6 DVP NS36 NS37 NS45P NS55P NS61P NS63P 2 7 INTERNAL VIEWS MS 203 MOUNT Optical Pick Up Device Optical KHM 313CAA C2RP Service Assembly TOPVIEW BOTTOMVIEW ...

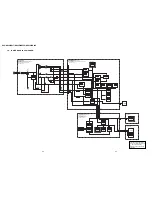
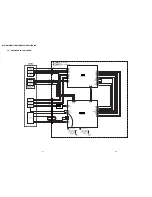
Страница 30: ...XCEPT DVP NS63P INTERFACE IF 145 Board DVP NS63P INTERFACE SW 468 Board EXCEPT DVP NS63P SWITCH SW 475 Board DVP NS63P SWITCH MV 50 Board DVP NS36 NS37 CPU Servo DSP AVDEC DRIVE VIDEO EURO AUDIO POWER MV 51 Board DVP NS45P 55P 61P 63P CPU Servo DSP AVDEC DRIVE VIDEO AUDIO POWER Power Board ...

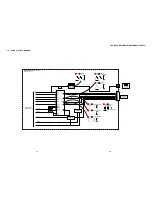
Страница 31: ...DVP NS63P SEE PAGE 3 15 to 3 16 BASE UNIT DEVICE OPTICAL KHM 313CAA C2RP DVP NS45P NS55P NS61P POWER LINE SEE PAGE 3 3 to 3 4 Except DVP NS63P MV 50 BOARD DVP NS36 NS37 SEE PAGE 3 5 to 3 14 MV 51 BOARD DVP NS45P NS55P NS61P NS63P SEE PAGE 3 5 to 3 14 IC201 IC101 IC102 IC103 RESET IC IC408 IR RECEIVER IC001 LED KEY FUNCTION SW 475 BOARD DVP NS63P SEE PAGE 3 15 to 3 16 IR RECEIVER VFD ND401 IC407 IF...

Страница 32: ...NS55P NS61P NS63P SEE PAGE 4 31 to 4 40 PS502 Video Buffer IC304 Video Buffer IC305 3 3V Reg IC105 7 MTK IC IC101 1 8V Reg IC110 SDRAM IC104 EEPROM IC103 RESET IC IC108 Coaxial Q411 Audio DAC IC406 Optical Out IC404 405 FLASH ROM IC102 MUTE DRIVER D401 Q501 5V Reg IC303 5V Reg IC403 Motor Driver IC201 FLD ND401 F1 F2 VKK DC DC CONV Audio Buffer IC401 IC402 Q401 Q416 DVP NS36 NS37 IPD IC101 5 T401 ...

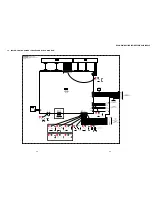
Страница 33: ...8 RESET IC CN 106 TO MV 50 MV 51 AUDIO SEE PAGE 3 13 TO 3 14 TO MV 50 VIDEO SEE PAGE 3 9 TO 3 10 TO MV 51 VIDEO SEE PAGE 3 11 TO 3 12 IFBSY IFSCK IFSDO XIFCS IFSDI XSYSRST XV MUTE XA MUTE TO IF 144 IF 145 INTERFACE SEE PAGE 3 15 TO 3 16 XA_MUTE TO MV 50 MV 51 AUDIO SEE PAGE 3 13 TO 3 14 9 5 7 4 6 2 10 14 MV 50 BOARD DVP NS36 AEP UK NS37 SEE PAGE 4 19 to 4 20 MV 51 BOARD EXCEPT DVP NS36 AEP UK NS37...

Страница 34: ...IN1 IN2 IN3 IN4 CTL 20 22 MUTE4 TSD_M 7 19 21 6 45 OPO RES1 RES2 MUTE123 PS MOTOR DRIVER IC LDM LDM OKSW1 OCSW1 FCS FCS TRK TRK LD 780 LD 650 PD RF F E M001 LOADING MOTOR S001 CHUCK TRAY DETECT FOCUS COIL TRACKING COIL DVD CD LD MODULE CN202 2 5 8 11 C D A B DVD CD PDIC 168 FWD 169 178 174 170 47 39 37 38 41 42 REV 16 FWD 17 REV IC101 6 CD PB 1 IC101 6 DVD PB 2 200nsec 100nsec 24 23 22 21 6 2 5 14...

Страница 35: ...UT BLANKING OUT R C OUT G OUT FUNC SW B OUT V Y R C G B H 2 0Vp p MV 50 BOARD DVP NS36 AEP UK NS37 SEE PAGE 4 23 to 4 24 SYSTEM CONTROL SEE PAGE 3 5 to 3 6 IC304 1 4Vp p 1 4Vp p 1 4Vp p IC304 C BAR PB RGB MODE 18 29 IC304 C BAR PB RGB MODE 19 27 IC304 C BAR PB RGB MODE 17 34 H 572mVp p NTSC 600mVp p PAL IC304 C BAR PB S VIDEO MODE 16 34 IC304 C BAR PB VIDEO MODE RGB MODE 15 25 H 2 0Vp p IC305 C BA...

Страница 36: ... C IN C OUT MUTE2 Y IN Y OUT Y Cb Cr Cb IN Cr IN Cb OUT Cr OUT VIDEO COMBO JACK VIDEO BUFFER SYSTEM CONTROL SEE PAGE 3 5 to 3 6 MV 51 BOARD EXCEPT DVP NS36 AEP UK NS37 SEE PAGE 4 35 to 4 36 IC304 J301 H 2 0Vp p H IC304 C BAR PB 19 31 IC304 C BAR PB 15 29 H 2 0Vp p IC304 C BAR PB 14 27 IC304 C BAR PB 16 IC304 C BAR PB 17 IC304 C BAR PB 18 25 2 0Vp p H 1 4Vp p 1 4Vp p H H 23 21 572mVp p NTSC 600mVp ...

Страница 37: ...L OUTPUT XA MUTE CN301 ERAUDIOR ERAUDIOL COAXIAL D IN 11 12 10 9 2 3 5 6 1 7 1 INTERFACE CONTROL SEE PAGE 3 15 TO 3 16 EXCEPT DVP NS36 AEP UK NS37 DVP NS36 AEP UK NS37 IC406 CD 12 BUFFER Q411 MUTE Q408 MUTE Q407 MUTE DRIVER Q402 Q405 Q406 MUTE DRIVER Q406 Q409 Q410 IC405 DVP NS61P NS63P AR BR MV 050 BOARD DVP NS36 AEP UK NS37 SEE PAGE 4 25 to 4 26 MV 051 BOARD EXCEPT DVP NS36 AEP UK NS37 SEE PAGE ...

Страница 38: ...26 37 35 34 36 2 3 IF 144 BOARD EXCEPT DVP NS63P SEE PAGE 4 9 to 4 10 IF 145 BOARD DVP NS63P SEE PAGE 4 13 to 4 14 IR RECEIVER IC406 3 1 RESET VFD DRIVER CIRCUIT IC408 2 1 DVP NS36 NS37 NS45P NS55P NS61P SW 468 BOARD EXCEPT DVP NS63P SEE PAGE 4 41 to 4 42 5 7 16 14 11 12 9 4 8 13 6 2 3 5 6 4 3 7 8 6 4 2 5 1 7 3 2 4 5 1 S006 R031 R030 S001 S002 R029 S003 PREV PLAY OPEN CLOSE N NEXT Z x R028 S004 S0...

Страница 39: ... GND 3 3V V2REF0 RF MON 17P CN404 GND SYSRST 3 3V_MNT XIFCS XIFBUSY SIO SOO GND SCO V_MUTE SW 3 3V PCONT EVER 5V A_MUTE SW 10V POWER_SWITCH GND 17P CN106 6P CN105 5P CN202 1 2 3 4 5 OCSW1 REV CKSW1 FWD GND CTL LDM LDM 5P CN202 5 4 3 2 1 PI TE FE GND RF 5P CN103 TO SERVO JIG 1 831 524 11 FFC FMS 010 1 2 3 4 5 6 7 8 9 10 11 12 13 14 15 16 17 18 19 20 21 22 23 24 GND LD 24P CN101 LD 650 N C N C PD LD...

Страница 40: ...side Parts on the parts face side seen from Side B the parts face are indicated 4 2 PRINTED WIRING BOARDS AND SCHEMATIC DIAGRAMS THIS NOTE IS COMMON FOR WIRING BOARDS AND SCHEMATIC DIAGRAMS In addition to this the necessary note is printed in each block H H IC101 C BAR PB IC101 C BAR PB IC101 C BAR PB IC101 9 IC101 CD PB 1 200nsec IC101 DVD PB 2 100nsec 5 1Vp p H 1 9Vp p 4 1Vp p H 3 H 3 3Vp p 24MH...

Страница 41: ...Vp p H IC101 8 0 7Vp p H 203 202 200 198 194 196 4 1Vp p H 3 H 3 3Vp p 24MHz IC101 DVD 11 3 3Vp p 110MHz IC101 10 3 5Vp p 22 67usec 3 5Vp p 20 82usec IC406 4 CD 12 IC406 4 DVD 13 IC304 wl C BAR PB 15 2 0Vp p IC304 wg C BAR PB 16 2 0Vp p IC304 wj C BAR PB 14 2 0Vp p IC304 ea C BAR PB 19 IC304 wd 17 1 4Vp p H IC304 wa 18 1 4Vp p H 0 5Vp p to 1 1Vp p 0 65Vp p to 1 48Vp p 286 mVp p NTSC 300 mVp p PAL ...

Страница 42: ...INTERFACE IF 145 Board DVP NS63P ONLY INTERFACE SW 468 Board EXCEPT DVP NS63P SWITCH SW 475 Board DVP NS63P ONLY SWITCH MV 50 Board DVP NS36 NS37 CPU Servo DSP AVDEC DRIVE VIDEO EURO AUDIO POWER MV 51 Board DVP NS45P 55P 61P 63P CPU Servo DSP AVDEC DRIVE VIDEO AUDIO POWER Power Board There are a few cases that the part printed on this diagram isn t mounted in this model For printed wiring board 1 ...

Страница 43: ... I J 2 12 13 11 10 9 8 7 6 5 4 3 14 15 For Schematic Diagram Refer to page 4 7 for printed wiring board of IF 144 board IF 144 BOARD EXCEPT DVP NS63P INTERFACE REF NO 1000 SERIES XX MARK NO MOUNT NO MARK PB MODE MARKED MOUNT TABLE 4 9 4 10 INTERFACE IF 144 ...

Страница 44: ...inted on this diagram isn t mounted in this model For printed wiring board 4 11 INTERFACE IF 145 1 866 102 11 11 A B C D 1 2 7 6 8 5 4 3 IF 144 Board EXCEPT DVP NS63P INTERFACE IF 145 Board DVP NS63P ONLY INTERFACE SW 468 Board EXCEPT DVP NS63P SWITCH SW 475 Board DVP NS63P ONLY SWITCH MV 50 Board DVP NS36 NS37 CPU Servo DSP AVDEC DRIVE VIDEO EURO AUDIO POWER MV 51 Board DVP NS45P 55P 61P 63P CPU ...

Страница 45: ... J 2 12 13 11 10 9 8 7 6 5 4 3 14 15 For Schematic Diagram Refer to page 4 11 for printed wiring board of IF 145 board IF 145 BOARD DVP NS63P INTERFACE REF NO 1000 SERIES XX MARK NO MOUNT NO MARK PB MODE MARKED MOUNT TABLE TO CN002 4 13 4 14 INTERFACE IF 145 ...

Страница 46: ...ACE IF 145 Board DVP NS63P INTERFACE SW 468 Board EXCEPT DVP NS63P SWITCH SW 475 Board DVP NS63P SWITCH MV 50 Board DVP NS36 NS37 CPU Servo DSP AVDEC DRIVE VIDEO EURO AUDIO POWER MV 51 Board DVP NS45P 55P 61P 63P CPU Servo DSP AVDEC DRIVE VIDEO AUDIO POWER Power Board 1 A B C D 2 7 6 5 4 3 MS 203 LOADING MOTOR PRINTEDWIRING BOARD MS 203 BOARD CN001 S001 CHUCK TRAY DETECT C001 S001 1 861 327 12 21 ...

Страница 47: ...0 MV 50 CPU Servo DSP AVDEC DRIVE VIDEO EURO AUDIO POWER PRINTEDWIRING BOARD Uses unleaded solder MV 50 BOARD DVP NS36 NS37 SIDE A MV 50 BOARD DVP NS36 NS37 SIDE B 4 18 1 726 575 11 11 A B C D E 1 2 5 4 3 6 A B C D E 1 2 5 4 3 6 MV 50 BOARD SIDE A IC101 D 4 IC102 C 6 IC103 D 6 IC104 E 5 IC108 B 6 IC110 B 3 IC201 B 5 IC305 C 2 IC401 D 2 IC406 D 3 D301 B 2 D302 B 2 D303 B 1 D304 B 1 D305 A 1 D306 B ...

Страница 48: ... 8 7 6 5 4 3 14 15 For Schematic Diagram Refer to page 4 17 for printed wiring board of MV 50 board Refer to page 4 4 for waveform MV 50 BOARD 1 5 DVP NS36 NS37 CPU Servo DSP AVDEC REF NO 1000 SERIES XX MARK NO MOUNT NO MARK REC PB MODE 4 19 4 20 CPU Servo DSP AVDEC MV 50 1 5 ...

Страница 49: ...12 13 11 10 9 8 7 6 5 4 3 14 15 P1 For Schematic Diagram Refer to page 4 17 for printed wiring board of MV 50 board Refer to page 4 4 for waveform MV 50 BOARD 2 5 DVP NS36 NS37 DRIVE REF NO 1000 SERIES XX MARK NO MOUNT NO MARK REC PB MODE 4 21 4 22 DRIVE MV 50 2 5 ...

Страница 50: ...1 10 9 8 7 6 5 4 3 14 15 IC303 For Schematic Diagram Refer to page 4 17 for printed wiring board of MV 50 board Refer to page 4 4 for waveform MV 50 BOARD 3 5 DVP NS36 NS37 VIDEO EURO REF NO 1000 SERIES XX MARK NO MOUNT NO MARK REC PB MODE 4 23 4 24 VIDEO EURO MV 50 3 5 ...

Страница 51: ... 13 11 10 9 8 7 6 5 4 3 14 15 IC403 4 25 4 26 AUDIO MV 50 4 5 For Schematic Diagram Refer to page 4 17 for printed wiring board of MV 50 board Refer to page 4 4 for waveform MV 50 BOARD 4 5 DVP NS36 NS37 AUDIO REF NO 1000 SERIES XX MARK NO MOUNT NO MARK REC PB MODE ...

Страница 52: ... by mark or dotted line with mark are critical for safety Replace only with part number specified 4 27 4 28 POWER MV 50 5 5 For Schematic Diagram Refer to page 4 17 for printed wiring board of MV 50 board Refer to page 4 4 for waveform MV 50 BOARD 5 5 DVP NS36 NS37 POWER REF NO 1000 SERIES XX MARK NO MOUNT NO MARK REC PB MODE ...

Страница 53: ... NS37 CPU Servo DSP AVDEC DRIVE VIDEO EURO AUDIO POWER MV 51 Board DVP NS45P 55P 61P 63P CPU Servo DSP AVDEC DRIVE VIDEO AUDIO POWER Power Board There are a few cases that the part printed on this diagram isn t mounted in this model For printed wiring board MV 51 BOARD SIDE A IC101 D 5 IC102 C 6 IC103 D 6 IC104 E 5 IC108 B 6 IC201 B 5 IC110 B 3 IC401 D 2 IC405 D 1 D402 D 2 Q101 B 4 Q102 B 4 Q103 B...

Страница 54: ... 6 5 4 3 14 15 For Schematic Diagram Refer to page 4 29 for printed wiring board of MV 51 board Refer to page 4 5 for waveform MV 51 BOARD 1 5 DVP NS45P 55P 61P 63P CPU Servo DSP AVDEC REF NO 1000 SERIES XX MARK NO MOUNT NO MARK REC PB MODE 4 31 4 32 CPU Servo DSP AVDEC MV 51 1 5 ...

Страница 55: ...3 11 10 9 8 7 6 5 4 3 14 15 P1 For Schematic Diagram Refer to page 4 29 for printed wiring board of MV 51 board Refer to page 4 5 for waveform MV 51 BOARD 2 5 DVP NS45P 55P 61P 63P DRIVE REF NO 1000 SERIES XX MARK NO MOUNT NO MARK REC PB MODE 4 33 4 34 DRIVE MV 51 2 5 ...

Страница 56: ...13 11 10 9 8 7 6 5 4 3 14 15 For Schematic Diagram Refer to page 4 29 for printed wiring board of MV 51 board Refer to page 4 5 for waveform MV 51 BOARD 3 5 DVP NS45P 55P 61P 63P VIDEO REF NO 1000 SERIES XX MARK NO MOUNT NO MARK REC PB MODE 4 35 4 36 VIDEO MV 51 3 5 ...

Страница 57: ...13 11 10 9 8 7 6 5 4 3 14 15 4 37 4 38 AUDIO MV 51 4 5 For Schematic Diagram Refer to page 4 29 for printed wiring board of MV 51 board Refer to page 4 5 for waveform MV 51 BOARD 4 5 DVP NS45P 55P 61P 63P AUDIO REF NO 1000 SERIES XX MARK NO MOUNT NO MARK REC PB MODE ...

Страница 58: ... mark or dotted line with mark are critical for safety Replace only with part number specified 4 39 4 40 POWER MV 51 5 5 For Schematic Diagram Refer to page 4 29 for printed wiring board of MV 51 board Refer to page 4 5 for waveform MV 51 BOARD 5 5 DVP NS45P 55P 61P 63P REF NO 1000 SERIES XX MARK NO MOUNT NO MARK REC PB MODE ...

Страница 59: ...A B C D 2 7 6 5 4 3 For Schematic Diagram Refer to page 4 41 for printed wiring board of SW 468 board SW 468 BOARD EXCEPT DVP NS63P SWITCH REF NO 1000 SERIES XX MARK NO MOUNT NO MARK REC PB MODE IF 144 Board EXCEPT DVP NS63P INTERFACE IF 145 Board DVP NS63P ONLY INTERFACE SW 468 Board EXCEPT DVP NS63P SWITCH SW 475 Board DVP NS63P ONLY SWITCH MV 50 Board DVP NS36 NS37 CPU Servo DSP AVDEC DRIVE VID...

Страница 60: ...efer to page 4 43 for printed wiring board of SW 475 board SW 475 BOARD DVP NS63P SWITCH REF NO 1000 SERIES XX MARK NO MOUNT NO MARK REC PB MODE A 1 2 3 1 868 235 11 11 1 A B C D E F 2 7 6 5 4 3 IF 144 Board EXCEPT DVP NS63P INTERFACE IF 145 Board DVP NS63P ONLY INTERFACE SW 468 Board EXCEPT DVP NS63P SWITCH SW 475 Board DVP NS63P ONLY SWITCH MV 50 Board DVP NS36 NS37 CPU Servo DSP AVDEC DRIVE VID...

Страница 61: ...08 A 4 D211 A 5 D212 C 5 D311 B 5 D312 B 6 D313 B 5 D315 A 6 D317 A 6 D318 A 7 D319 B 7 D411 B 5 D511 C 5 SIDE B IC611 A 3 D101 B 6 Q311 A 1 Q611 B 2 Q712 A 1 There are a few cases that the part printed on this diagram isn t mounted in this model For printed wiring board IF 144 Board EXCEPT DVP NS63P INTERFACE IF 145 Board DVP NS63P ONLY INTERFACE SW 468 Board EXCEPT DVP NS63P SWITCH SW 475 Board ...

Страница 62: ...201 The components identified by mark or dotted line with mark are critical for safety Replace only with part number specified 4 47 4 48 For Schematic Diagram Refer to page 4 45 for printed wiring board of Power board POWER BOARD POWER SUPPLY SRV1872WW DVP NS36 NS37 NS55P PX NS61P NS63P REF NO 1000 SERIES XX MARK NO MOUNT NO MARK PB MODE MARKED MOUNT TABLE POWER BOARD POWER BLOCK SRV1872WW ...

Страница 63: ...D313 B 5 D315 A 6 D317 B 6 D318 A 7 D319 B 7 D411 B 5 D511 C 5 SIDE B IC611 A 3 Q311 A 1 Q611 B 2 Q712 A 1 D101 B 6 There are a few cases that the part printed on this diagram isn t mounted in this model For printed wiring board B A 1 2 7 6 5 4 3 B A 1 2 7 6 5 4 3 IF 144 Board EXCEPT DVP NS63P INTERFACE IF 145 Board DVP NS63P ONLY INTERFACE SW 468 Board EXCEPT DVP NS63P SWITCH SW 475 Board DVP NS6...

Страница 64: ...V CN201 The components identified by mark or dotted line with mark are critical for safety Replace only with part number specified For Schematic Diagram Refer to page 4 49 for printed wiring board of Power board POWER BOARD POWER SUPPLY SRV1873UC DVP NS45P NS55P EXCEPT PX REF NO 1000 SERIES XX MARK NO MOUNT NO MARK PB MODE MARKED MOUNT TABLE 4 51 4 52E POWER BOARD POWER BLOCK SRV1873UC ...

Страница 65: ...Input Laser power monitor input 21 MDI2 Analog Input Laser power monitor input 22 LDO2 Analog Output Laser driver output 23 LDO1 Analog Output Laser driver output 24 SVDD3 Power Analog 3 3V power 25 CSO Analog Output Central servo 26 RFLVL Analog Output RFRP low pass output 27 SGND Ground Ground pin for analog circuitry 28 V2REFO Analog Output Reference voltage 2 8V 29 V20 Analog Output Reference ...

Страница 66: ...ost address bit13 71 HA12 Output PU Host address bit12 72 HA11 Output PU Host address bit11 73 DVDD3 Power 3 3V power pin for internal digital circuitry 74 HA10 Output PU Host address bit10 75 HA9 Output PU Host address bit9 76 HA20 Output SMT Host address bit20 77 xROMCS Output PU SMT Chip select active Low 78 HA1 Output PU Host address bit1 79 xRD Output SMT Read enable active Low 80 DVDD3 Power...

Страница 67: ...d pin for internal digital circuitry 120 RD4 Output DRAM data bit4 121 RD3 Output DRAM data bti3 122 DVDD18 Power 1 8V power pin for internal digital circuitry 123 RD2 Output DRAM data bit2 124 RD1 Output DRAM data bit1 125 RD0 Output DRAM data bit0 126 RD15 Output DRAM data bit15 127 DVDD3 Power 3 3V power pin for internal digital circuitry 128 RD14 Output DRAM data bit14 129 RD13 Output DRAM dat...

Страница 68: ...used 172 NC Not used 173 DVDD18 Power 1 8V power pin for internal digital circuitry Output Default 174 MUTE Output PD Servo driver MUTE signal 175 NC Not used 176 xMAMUTE Default LOW Main Audio Mute Signal H Unmute L Mute 177 DSEL MV 50 only Output Interlace Prog select output signal H 480i L 480P GPIO MV 51 only Not used 178 TSD_M Input PU SERVO GPIO 3 179 EUROVY MV 50 only Output PU CVBS S termi...

Страница 69: ...2 Output Not used 220 xRST Default Low Reset output signal for ADAC Low Active 221 DVDD18 Power 1 8V power pin for intenal digital circuitry 222 ASDATA4 Output PD SMT Audio serial data 4 Down mixed L R 223 DVSS Ground Ground pin for internal digital circuitry 224 Disc XEXT MV 50 only Output Disc External input select output signal H Disc L External XVOICE MV 51 only Input Karaoke Voice function 22...

Страница 70: ...apacitor connecting 249 RFGND Ground Ground pin for RF digital circuitry 250 NC Not used 251 NC Not used 252 OSP Analog Output RF Offset cancellation capacitor connecting 253 OSN Analog Output RF Offset cancellation capacitor connecting 254 RFGC Analog Output RF AGC loop capacitor conecting for DVD ROM 255 IREF Analog Input Input reference current input 256 AVDD3 Power 3 3V power pin for analog ci...

Страница 71: ...to previous menu 4 Select Iop by pressing 6 key on the remote commander 5 Wait until a hexadecimal number appear Manual Adjust 1 Track Balance Adjust 2 Track Gain Adjust 3 Focus Balance Adjust 4 Focus Gain Adjust 5 Eq Boost Adjust 6 Iop ED 7 TRV Level 8 S curve FE Level 9 RFL PI Level 0 MIRR Time 4 Change Value RETURN Return to previous menu 6 Convert data from hexadecimal to decimal 7 Use the fol...

Страница 72: ...ss DISPLAY CLEAR keys in this order Both CD and DVD data are cleared Emg History Check Laser Hours CD 0h 0min DVD 0h 0min 1 01 05 04 04 00 92 46 00 00 00 00 00 00 00 23 45 2 02 02 01 01 00 A9 4B 00 00 00 00 00 00 00 23 45 Next Next Page Prev Prev Page Return to Top Menu 10 How to Clearing Emergency code Press TOPMENU CLEAR keys in this order All emergency code are cleared Emg History Check Laser H...

Страница 73: ...lowing functions can be checked 1 Button function 2 Remote commander receiving function 3 SYSTEM CONTROL IF CON serial communication 4 Fluorescent display tube lighting check Grid check Anode check 5 LED control function In the test mode the main unit operates same as usual except voltage monitoring communication display of fluorescent display tube and LED control 1 The routine that monitors 3 3V ...

Страница 74: ...t the AC Power ON or by key input the test display of the following steps 1 to 4 is repeated 1 FLD and LED all ON for 5 seconds 2 MODEL display for 2 seconds NS36 NS37 MODEL display for 2 seconds NS45P 55P 61P MODEL display for 2 seconds NS63P 3 Version display for 2 seconds 4 ROM creation date display for 2 seconds ...

Страница 75: ...Self Check Mode Keys on the main unit except keys transited in Self Check Mode 2 3 2 2 Operation and Display When a key on the main unit is pressed in the Self Check mode the name of that key is displayed on the FLD Aslo the key name display and the key code display can be switched with the DISPLAY key on the remote commander NOTHING is displayed when nothing is entered Also DVD V CD segments turn...

Страница 76: ...eck Mode 2 3 3 2 Operation and Display When a key on the remote commander is pressed in the Self Check Mode the name of that key is displayed on the FLD Aslo the key name display and the key code display can be switched with the DISPLAY key on the remote commander NOTHING is displayed when nothing is entered Also VIDEO CD DVD and CD segments turn on when a communication error occurred Remote comma...

Страница 77: ...Test 2 3 5 1 Transition Keys in Self Check Mode t key on the remote commander SHUTTLE on the remote commander duringAnode Test display This unit does not provide JOG SHUTTLE and therefore use another DVD remote commander having the JOG SHUTTLE 2 3 5 2 Operation and Display The Self Check Mode transits to this mode when t key is entered This tests whether each segment turns on individually Only the...

Страница 78: ... off Each time the SHUTTLE is entered the grid is switched in order When SHUTTLE input is clockwise the grid switched in 1 2 3 direction or counterclockwise it switches in 3 2 1 direction Display at the start of Grid Test 2 3 7 LED Test Display 2 3 7 1 Transition Keys in Self Check Mode r key on the remote commander SHUTTLE on the remote commander during Grid Test display This model does not provi...

Страница 79: ...h h h h b b b b b b b f f f f f f f m m m m m m m s s s s s s s g g g g g g g c c c c c c c d d d d d d d r r r r r r r p p p p p p p n n n n n n n e e e e e e e 6G 2G 1G 6G 7G 5G 4G 3G 2G Dp 7G 4G 7G 3G 1G col 7G 1G ANODE CONNECTION P1 P2 P3 P4 P5 P6 P7 P8 P9 P10 P11 P12 P13 P14 P15 P16 P17 P18 P19 P20 a f h g e r p n s c m d j k b 6 9E ...

Страница 80: ... J 6090 089 A dual layer NTSC 7 1 POWER SUPPLY OUTPUT VOLTAGE CHECK Mode Except standby Instrument Digital multimeter EVER 5 V Check Test point CN201 pin 4 Specification 5 0 0 3 Vdc SW 3 3 V Check Test point CN201 pin 5 Specification 3 35 0 2 Vdc SW 5 V Check Test point CN201 pin 6 Specification 5 0 Vdc SW 8 V Check Test point CN201 pin 1 Specification 8 0 0 5 Vdc EVER 11 V Check Test point CN201 ...

Страница 81: ...eo Signal menu 1 Color Bar 100 play back 2 Confirm that theY level is 1 0 0 08 Vp p Fig 7 2 3 Checking Scart SVideo Output S Y S Video Mode Purpose Check S terminal video output If it is incorrect pictures will not be displayed correctly in spite of connection to the TV with a S terminal cable Mode HLX 504 play back Signal Color bars 100 Test point S VIDEO OUT S Y 19p 75 Ω terminated Instrument Os...

Страница 82: ...ct colors will not be displayed when connected to for instance projector Mode HLX 504 play back Signal Color bars Test point Blue Out 7p 75 Ω terminated Instrument Oscilloscope Specification B 700 70 mVp p Checking method 1 In theVideo Signal menu 1 Color Bar 100 play back 2 Confirm that the B level is A Fig 7 6 A B C 7 Checking RGB Output R RGB Mode Purpose This checks RGB video output R level If...

Страница 83: ... 08 Vp p Adjusting method 1 In theVideo Signal menu 1 Color Bar 100 play back 2 Confirm that theY level is 1 0 0 08 Vp p Fig 7 2 3 Checking S Video Output S Y Purpose Check S terminal video output If it is incorrect pictures will not be displayed correctly in spite of connection to the TV with a S terminal cable Mode HLX 504 play back Signal Color bars 100 Test point S VIDEO OUT S Y connector 75 Ω...

Страница 84: ...s incorrect correct colors will not be displayed when connected to for instance projector Mode HLX 504 play back Signal Color bars Test point COMPONENT VIDEO OUT PB connector 75 Ω terminated Instrument Oscilloscope Specification A 700 70 mVp p Checking method 1 In theVideo Signal menu 1 Color Bar 100 play back 2 Confirm that the B Y level is A Fig 7 6 7 Checking ComponentVideo Output R Y Purpose T...

Страница 85: ... s Color 8 1 EXPLODED VIEWS Abbreviation AEP AEP Model RUS Russian Model UK UK Model CND Canadian Model US USA Model AR Argentina Model BR Brazilian Model The components identified by mark or dotted line with mark are critical for safety Replace only with part number specified E Latin America Model PX PX Model AUS Australia New Zealand Model CH Chinese Model ME Middle East SP Singpaore Model 8 1 1...

Страница 86: ...NS55P EXCEPT PX 12 1 832 166 11 POWER SUPPLY CORD DVP NS36 EXCEPT UK NS37 NS55P PX NS61P ME SP NS63P 12 1 832 167 11 POWER SUPPLY CORD DVP NS36 UK 12 1 828 451 11 POWER SUPPLY CORD DVP NS45P NS55P EXCEPT PX 12 1 828 450 11 POWER SUPPLY CORD DVP NS55P PX NS61P EXCEPT AUS CH NS63P E BR 12 1 828 452 11 POWER SUPPLY CORD DVP NS61P AUS 12 1 828 901 12 CORD POWER DVP NS61P CH 12 1 828 460 11 CORD POWER ...

Страница 87: ...scription Remark 20 A 6071 669 C LOADING ASSY M 21 3 088 372 01 INSULATOR 22 3 087 599 01 INSULATOR SCREW 23 4 674 137 11 SCREW PTP2X5 24 3 088 371 01 BELT 25 4 974 725 11 SCREW M1 7X2 5 P 26 8 820 321 05 DEVICE OPTICAL KHM 313CAA C2RP 21 21 20 22 22 22 21 22 21 23 24 26 25 ns ns ns ns ns ns ns ns ns ns ns ...

Страница 88: ...3P C409 1 104 665 91 ELECT 100UF 20 00 25V C410 1 130 479 91 MYLAR 0 0047UF 5 00 50V C411 1 115 339 91 CERAMICCHIP 0 1UF 10 00 50V C412 1 126 965 91 ELECT 22UF 20 00 50V DVP NS63P C413 1 115 339 91 CERAMICCHIP 0 1UF 10 00 50V C414 1 163 021 91 CERAMICCHIP 0 01UF 10 00 50V C416 1 164 489 91 CERAMICCHIP 0 22UF 10 00 16V C417 1 164 489 91 CERAMICCHIP 0 22UF 10 00 16V C418 1 104 660 91 CAP ELECT 47UF ...

Страница 89: ...MV DVP NS36 RUS A 1158 177 A SERVICE ASSY MV DVP NS37 A 1158 439 A SERVICE ASSY MV DVP NS45P 55P A 1158 445 A SERVICE ASSY MV DVP NS61P AUS A 1158 444 A SERVICE ASSY MV DVP NS63P E A 1158 443 A SERVICE ASSY MV DVP NS61P SP A 1163 457 A SERVICE ASSY MV DVP NS61P CH A 1169 017 A SERVICE ASSY MV DVP NS63P E A 1169 215 A SERVICE ASSY MV DVP NS63P AR A 1169 183 A SERVICE ASSY MV DVP NS63P BR CAPACITOR ...

Страница 90: ... 01UF 10 00 25V C214 1 162 964 11 CERAMICCHIP 0 001UF 10 00 50V C216 1 107 826 11 CERAMICCHIP 0 1UF 10 00 16V C217 1 104 660 91 ELECT 47UF 20 00 16V C218 1 126 964 11 ELECT 10UF 20 00 50V C219 1 162 970 11 CERAMICCHIP 0 01UF 10 00 25V C220 1 126 964 11 ELECT 10UF 20 00 50V C221 1 107 826 11 CERAMICCHI 0 1UF 10 00 16V C222 1 107 826 11 CERAMICCHIP 0 1UF 10 00 16V C223 1 107 826 11 CERAMICCHIP 0 1UF...

Страница 91: ...CEPT DVP NS45P NS55P FB108 1 400 974 21 FERRITE 0UH DVP NS45P NS55P FB109 1 414 760 21 FERRITE 0UH FB110 1 414 760 21 FERRITE 0UH FB111 1 400 974 21 FERRITE 0UH DVP NS45P NS55P FB112 1 400 974 21 FERRITE 0UH DVP NS45P NS55P FB114 1 400 974 21 FERRITE 0UH DVP NS45P NS55P FB115 1 400 974 21 FERRITE 0UH EXCEPTNS36 AEP NS37 FB116 1 469 118 21 FERRITE 0UH DVP NS45P NS55P FB117 1 469 118 21 FERRITE 0UH ...

Страница 92: ...64 11 SHORTCHIP 0 R151 1 216 833 11 METAL CHIP 10K 5 1 10W R152 1 216 864 11 SHORTCHIP 0 NS36 AEP NS37 R153 1 216 864 11 SHORTCHIP 0 NS36 AEP NS37 R154 1 216 864 11 SHORTCHIP 0 NS36 AEP NS37 R155 1 216 864 11 SHORTCHIP 0 NS36 AEP NS37 R156 1 216 809 11 METAL CHIP 100 5 1 10W R159 1 216 864 11 SHORTCHIP 0 R160 1 216 864 11 SHORTCHIP 0 R161 1 216 864 11 SHORTCHIP 0 R162 1 216 864 11 SHORTCHIP 0 R163...

Страница 93: ... 7K 0 5 1 10W EXCEPTNS36 AEP NS37 R405 1 208 800 11 METAL CHIP 5 6K 0 5 1 10W R406 1 208 800 11 METAL CHIP 5 6K 0 5 1 10W R407 1 216 825 11 METAL CHIP 2 2K 5 1 10W R408 1 216 825 11 METAL CHIP 2 2K 5 1 10W R409 1 216 825 11 METAL CHIP 2 2K 5 1 10W R410 1 216 825 11 METAL CHIP 2 2K 5 1 10W R411 1 208 800 11 METAL CHIP 5 6K 0 5 1 10W R412 1 208 800 11 METAL CHIP 5 6K 0 5 1 10W R413 1 216 829 11 META...

Страница 94: ...1 SHORTCHIP 0 NS36 AEP NS37 R1147 1 216 295 91 SHORTCHIP 0 NS36 AEP NS37 R1150 1 216 827 11 METAL CHIP 3 3K 5 1 10W R1151 1 216 827 11 METAL CHIP 3 3K 5 1 10W R1152 1 216 827 11 METAL CHIP 3 3K 5 1 10W R1160 1 216 864 11 SHORTCHIP 0 R1168 1 216 815 11 METAL CHIP 330 5 1 10W EXCEPT DVP NS61P NS63P E R1168 1 216 819 91 METAL CHIP 680 5 1 10W DVP NS61P NS63P E R1169 1 216 864 11 SHORTCHIP 0 NS36 AEP ...

Страница 95: ... NS36 AE1 NS37 AE1 2 661 163 41 MANUAL INSTRUCTION ITALIAN NS36 AE1 NS37 AE1 2 661 163 51 MANUAL INSTRUCTION SPANISH NS36 AE2 NS37 AE2 2 661 163 61 MANUAL INSTRUCTION PORTUGIS NS36 AE2 NS37 AE2 2 661 163 71 MANUAL INSTRUCTION GREEK NS36 AE2 NS37 AE2 2 661 164 61 MANUAL INSTRUCTION RUSSIAN NS36 RUS NS37 RUS 2 661 647 11 MANUAL INSTRUCTION ENGLISH DVP NS61P SP AUS ME 2 661 647 21 MANUAL INSTRUCTION ...

Страница 96: ...8 12 DVP NS36 NS37 NS45P NS55P NS61P NS63P 130 Sony Corporation Home Electronics Network Company 9 874 898 11 2006A0100 1 2006 01 Published by Product Design 1 Department ...

Отзывы: