background image

14

Getting Started

Quick Overview

A quick overview presented in this chapter will give you enough information to start using the 
player for your enjoyment. To use the surround sound features of this player, refer to “Hookups” 
on page 17.

Note

You cannot connect this player to a TV that does not have either a SCART (EURO AV) or video input jack. 
Be sure to turn off the power of each component before connecting.

Step 1: Unpacking

Check that you have the following items:

Audio/video cord (pinplug 

×

 3 

y

 pinplug 

×

 3) (1)

Remote commander (remote) RMT-D126P (1)

R6 (size AA) batteries (2)

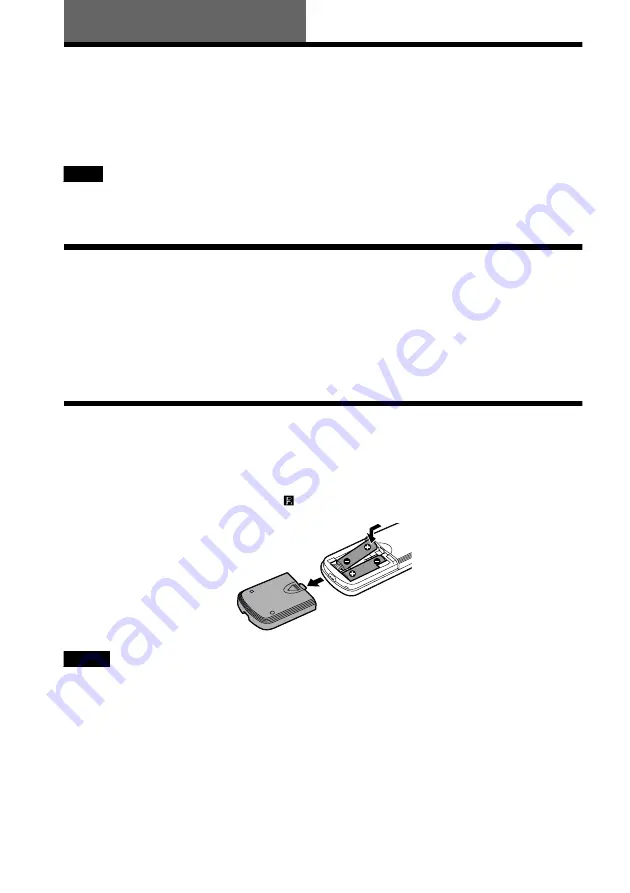
Step 2: Inserting Batteries into the Remote

You can control the player using the supplied remote. Insert two R6 (size AA) batteries by 
matching the 

3

 and 

#

 ends on the batteries to the markings inside the compartment. When using 

the remote, point it at the remote sensor 

 on the player.

Notes

Do not leave the remote in an extremely hot or humid place. 

Do not drop any foreign object into the remote casing, particularly when replacing the batteries.

Do not expose the remote sensor to direct light from the sun or lighting apparatus. Doing so may cause a 
malfunction. 

If you do not use the remote for an extended period of time, remove the batteries to avoid possible damage from 
battery leakage and corrosion.

Содержание DVP-NS300

Страница 1: ...Operating Instructions 3 069 729 11 1 CD DVD Player DVP NS300 2001 Sony Corporation ...

Страница 2: ...ower supply If anything falls into the cabinet unplug the unit and have it checked by qualified personnel before operating it any further The unit is not disconnected from the mains as long as it is connected to the mains outlet even if the unit itself has been turned off Unplug the unit from the wall outlet if you do not intend to use it for an extended period of time To disconnect the cord pull ...

Страница 3: ... warm location or is placed in a very damp room moisture may condense on the lenses inside the player Should this occur the player may not operate properly In this case remove the disc and leave the player turned on for about half an hour until the moisture evaporates When you move the player take out any discs If you don t the disc may be damaged On adjusting volume Do not turn up the volume whil...

Страница 4: ...ecting the Audio Cords 19 Step 3 Connecting the Mains Lead 26 Step 4 Quick Setup 26 Playing Discs 30 Playing Discs 30 Resuming Playback from the Point Where You Stopped the Disc Resume Play 32 Using the DVD s Menu 33 Playing VIDEO CDs with PBC Functions PBC Playback 34 Various Play Mode Functions Programme Play Shuffle Play Repeat Play A B Repeat Play 35 Searching for a Scene 39 Searching for a Pa...

Страница 5: ...Effects Sound Feedback 54 Controlling Your TV with the Supplied Remote 55 Settings and Adjustments 56 Using the Setup Display 56 Setting the Display or Sound Track Language LANGUAGE SETUP 57 Settings for the Display SCREEN SETUP 58 Custom Settings CUSTOM SETUP 59 Settings for the Sound AUDIO SETUP 61 Additional Information 64 Troubleshooting 64 Self diagnosis Function When letters numbers appear i...

Страница 6: ... be labeled even though playing the DVD is prohibited by area restrictions The player cannot play the following discs CD ROMs PHOTO CDs included CD Rs Data part of CD Extras DVD ROMs DVD Audio discs HD layer on SACDs Also the player cannot play the following discs A DVD with a different region code page 67 A disc that has a non standard shape e g card heart A disc with paper or stickers on it A di...

Страница 7: ...rporation and is intended for home and other limited viewing uses only unless otherwise authorized by Macrovision Corporation Reverse engineering or disassembly is prohibited Notes about the Discs On handling discs To keep the disc clean handle the disc by its edge Do not touch the surface Do not expose the disc to direct sunlight or heat sources such as hot air ducts or leave it in a car parked i...

Страница 8: ...on button indicator 48 3 SURROUND button indicator 45 4 Disc tray 30 5 A open close button 30 6 previous next buttons 31 7 C X x c ENTER buttons 26 8 TITLE button 33 9 DVD MENU button 33 q O RETURN button 34 qa DISPLAY button 12 qs x stop button 30 qd X pause button 31 54 qf H play button 30 qg Front panel display 9 qh remote sensor 14 Front panel ...

Страница 9: ...47 Current play mode 35 Current title 41 Lights up when the player outputs the signal in NTSC format VIDEOCD CD PBC NTSC MIN SEC A B Playing status Current play mode 35 Disc type Current scene 41 Playing time 41 Lights up when playing back a VIDEO CD with PBC 34 Lights up when the player outputs the signal in NTSC format VIDEOCD CD PGM SHUFFLE NTSC TRACK INDEX MIN SEC REPEAT1 A B Playing time 41 D...

Страница 10: ...k 21 22 24 2 LINE RGB TV connector 15 17 3 S VIDEO OUT jack 17 4 LINE OUT VIDEO jack 17 5 LINE OUT L R AUDIO jacks 20 21 22 Rear Panel PCM DTS MPEG DOLBY DIGITAL R AUDIO L VIDEO COAXIAL LINE RGB TV LINE OUT S VIDEO OUT DIGITAL OUT ...

Страница 11: ...an slow buttons 39 qs H play button 30 qd X pause button 31 qf TITLE button 33 qg DISPLAY button 56 qh TV 1 on standby button 55 qj 1 on standby button 54 qk wide mode button 55 ql A B button 38 w t TV VIDEO button 55 wa 2 volume buttons 55 ws CLEAR button 35 wd subtitle button 47 wf SEARCH MODE button 40 wg TV DVD button 55 wh x stop button 30 wj DVD MENU button 33 wk C X x c buttons 26 wl ENTER ...

Страница 12: ...8 T 0 08 41 3 2 1 DOLBY DIGITAL CHAPTER Type of disc being played back Title number of the DVD or the track number of the VIDEO CD or CD 67 Chapter number of the DVD or the index number of the VIDEO CD or CD 67 Playback status BPlayback XPause xStop etc DVD playback only Lights up in green during Shuffle Play 35 Lights up in green during Repeat Play 37 Playing time or remaining time 41 Unit being ...

Страница 13: ...Lights up in green when a playback function is selected Example of when angle is pressed on the remote Control Menu QUICK CUSTOM PARENTAL CONTROL 49 Set this to limit the playback of selected discs PROGRAM 35 Allows you to play titles chapters or tracks in any order you want SETUP 56 Select QUICK to make the minimum number of basic adjustments to use the player Select CUSTOM to make a full range o...

Страница 14: ...RMT D126P 1 R6 size AA batteries 2 Step 2 Inserting Batteries into the Remote You can control the player using the supplied remote Insert two R6 size AA batteries by matching the 3 and ends on the batteries to the markings inside the compartment When using the remote point it at the remote sensor on the player Notes Do not leave the remote in an extremely hot or humid place Do not drop any foreign...

Страница 15: ...e may not fit your TV screen If you want to change the aspect ratio please refer to page 58 If your TV does not have a SCART EURO AV connection Refer to B in Step 1 Connecting the Video Cords page 17 PCM DTS MPEG DOLBY DIGITAL R AUDIO L VIDEO COAXIAL LINE RGB TV LINE OUT S VIDEO OUT DIGITAL OUT LINE RGB TV 3 Power source 1 SCART EURO AV cord not supplied CD DVD Player TV 2 Power source l Signal fl...

Страница 16: ...nd the player begins playing the disc After Step 6 Depending on the disc a menu may be displayed on the TV screen If so select the item you want from the menu and play the DVD page 33 or VIDEO CD disc page 34 To stop playing Press x To take out the disc Press A To turn off the player Press 1 on the remote The player is set to standby mode and the power indicator lights up in red Press POWER on the...

Страница 17: ...ideo Cords Connect your CD DVD player to your TV monitor projector or AV amplifier receiver using a video cord Select one of the patterns A through C according to the input jack on your TV monitor projector or AV amplifier receiver INPUT S VIDEO B A LINE RGB TV VIDEO AUDIO INPUT L R C PCM DTS MPEG DOLBY DIGITAL R AUDIO L VIDEO COAXIAL LINE RGB TV LINE OUT S VIDEO OUT DIGITAL OUT CD DVD player TV p...

Страница 18: ...ct your player to a VCR You may not receive a clear image on the TV screen if you pass the player signals via the VCR When you connect the player to your TV via the SCART EURO AV jacks the TV s input source is set to the player automatically when you start playback or press any button except for POWER on the player or 1 on the remote If you wish to watch TV press TV DVD on the remote to return the...

Страница 19: ...ark of Digital Theater Systems Inc Select a connection Connection Components to be connected page 20 TV stereo page 21 Stereo amplifier receiver having L and R audio input jacks only or having a digital input jack 2 speakers front L and R page 21 MD deck DAT deck page 22 AV amplifier receiver with a Dolby Surround Pro Logic decoder having L and R audio input jacks only or having a digital input ja...

Страница 20: ...ecommended surround sound effects for this connection TVS DYNAMIC page 45 TVS WIDE page 45 The yellow plug is used for video signals page 17 Connecting to your TV A PCM DTS MPEG DOLBY DIGITAL R AUDIO L VIDEO COAXIAL LINE RGB TV LINE OUT S VIDEO OUT DIGITAL OUT LINE OUT R AUDIO L VIDEO A TV l Signal flow CD DVD player red Audio video cord supplied yellow to audio input yellow white red white ...

Страница 21: ...udio cord z To realize better surround sound effects make sure that your listening position is in between your speakers Note If you select one of the TVS effects while playing a disc no sound will come from your speakers with the connection Connecting to a stereo amplifier receiver and 2 speakers Connecting to an MD deck or DAT deck B B 1 B 2 B 2 B 1 B 1 B 2 PCM DTS MPEG DOLBY DIGITAL R AUDIO L VI...

Страница 22: ...rs front L and R and rear monaural The surround effects are enhanced if 6 speakers front L and R centre rear L and R and subwoofer are used If your amplifier receiver has R and L audio input jacks only use If your amplifier receiver has a digital input jack use xRecommended surround sound effects using this connection with your amplifier receiver Dolby Surround Pro Logic page 67 z For correct spea...

Страница 23: ...V LINE OUT S VIDEO OUT DIGITAL OUT PCM DTS MPEG DOLBY DIGITAL COAXIAL DIGITAL OUT C 2 LINE OUT R AUDIO L VIDEO C 1 CD DVD player or Front R Front L Rear R Subwoofer l Signal flow Rear L Dolby Surround amplifier receiver Centre Rear mono Speakers to coaxial digital input Coaxial digital cord not supplied Stereo audio cord not supplied to audio input white red Speakers white red continued ...

Страница 24: ...surround sound effects refer to the operating instructions of the amplifier receiver for correct speaker setting location Note After you have completed the connection be sure to set DOLBY DIGITAL to DOLBY DIGITAL page 26 If your AV amplifier receiver has a DTS decoder set DTS to ON page 26 If your AV amplifier receiver has an MPEG audio decoder set MPEG to MPEG page 62 Otherwise no sound or a loud...

Страница 25: ...TV LINE OUT S VIDEO OUT DIGITAL OUT PCM DTS MPEG DOLBY DIGITAL COAXIAL DIGITAL OUT D Front R Front L Rear R Rear L AV amplifier receiver with a decoder Subwoofer Centre Speakers Speakers Coaxial digital cord not supplied to coaxial digital input l Signal flow CD DVD player ...

Страница 26: ...o the previous adjustment press A Turn on the TV B Switch the input selector on the TV to the player C Press POWER on the player and press 1 on the remote Press ENTER to run QUICK SETUP appears at the bottom of the screen If this message does not appear select QUICK under SETUP in the Control Menu page 13 to run Quick Setup D Press ENTER without inserting a disc The Setup Display for selecting the...

Страница 27: ...selecting the type of jack used to connect your amplifier receiver appears TV type You select Page A wide screen TV or 4 3 standard TV with the wide screen mode 16 9 58 4 3 standard TV 4 3 LETTER BOX or 4 3 PAN SCAN 58 Signal type You select Page Video signals VIDEO 59 S video signals S VIDEO 59 RGB signals RGB 59 SCREEN SETUP TV TYPE SCREEN SAVER BACKGROUND 16 9 4 3 LETTER BOX 4 3 PAN SCAN 16 9 C...

Страница 28: ...ns are complete If your AV amplifier receiver has an MPEG audio decoder set MPEG to MPEG page 62 Note You can directly start Quick Setup only when you run it for the first time To run Quick Setup a second time select QUICK under SETUP in the Control Menu page 56 Audio Cord Connection Type You select Page D PCM 62 DOLBY DIGITAL only if the amplifier receiver has a Dolby Digital decoder 62 Audio Cor...

Страница 29: ...ings and do not need to be adjusted when you first connect the player Refer to page 56 for using the Setup Display Audio Connection page 19 to 24 No additional settings are needed If the sound distorts even when the volume is turned down set AUDIO ATT to ON page 61 Enjoying the surround sound effects Item You select Page DOWNMIX DOLBY SURROUND 61 Item You select Page DOWNMIX DOLBY SURROUND 61 DIGI...

Страница 30: ...llowing Step 5 Depending on the disc a menu may appear on the TV screen You can play the disc interactively by following the instructions on the menu DVD page 33 VIDEO CD page 34 To turn on the player Press POWER on the player The player enters standby mode and the power indicator lights up in red Press 1 on the remote The player turns on and the power indicator lights up in green In standby mode ...

Страница 31: ...OFF in the Setup Display page 62 and may affect your ears or cause your speakers to be damaged Notes on playing DVDs with a DTS sound track DTS audio signals are output only through the DIGITAL OUT COAXIAL jack If you connect the player to audio equipment without a DTS decoder do not set DTS to ON in AUDIO SETUP page 62 A loud noise may come out from the speakers affecting your ears or causing the...

Страница 32: ...front panel display and you can restart the disc from the point where you stopped the disc If RESUME does not appear Resume Play is not available 2 Press H The player starts playback from the point where you stopped the disc in Step 1 z To play from the beginning of the disc press x twice then press H Notes Depending on where you stopped the disc the player may not resume playback from exactly the...

Страница 33: ...ess ENTER The player starts playing the selected title z You can also display the title menu by pressing TITLE on the player Some DVDs allow you to select the disc contents using a menu When you play these DVDs you can select items such as the language for the subtitles and the language for the sound using the DVD menu 1 Press DVD MENU The DVD menu appears on the TV screen The contents of the menu...

Страница 34: ...s in the menu for interactive operations Refer to the instructions supplied with the disc as the operating procedure may differ according to the VIDEO CD To go back to the menu Press O RETURN z To play without using PBC press while the player is stopped to select a track then press H or ENTER Play without PBC appears on the TV screen and the player starts continuous play You cannot play still pict...

Страница 35: ...rder of the titles chapters or tracks on the disc to create your own programme You can programme up to 99 titles chapters and tracks 1 Press DISPLAY while the player is in stop mode The Control Menu is displayed 2 Press X x to select PROGRAM and press ENTER 3 Press X x to select SET t and press ENTER The display for programming appears 4 Press c The cursor moves to the title or track in this case ...

Страница 36: ...umber of the title chapter or track you want to change using X x and press c 2 Follow Step 5 for new programming To cancel the programmed order To cancel all the titles chapters or tracks in the programmed order press X and select ALL CLEAR in Step 4 To cancel the selected programme select the programme using X x in Step 4 then press CLEAR or select in Step 5 then press ENTER z You can do Repeat P...

Страница 37: ...laying a VIDEO CD CD or DVD Programme Play is set to ON ON Shuffles titles or tracks selected in Programme Play and plays them in random order To return to normal play Press CLEAR or select OFF in Step 2 z You can set the player to shuffle in stop mode as well After pressing SHUFFLE to select the item you want to set press H Shuffle Play starts Note Up to 200 chapters in a disc can be played in ra...

Страница 38: ...the item you want to set press H Repeat Play starts You can play a specific portion of a title chapter or track repeatedly This function is useful when you want to memorize lyrics etc 1 During playback when you find the starting point point A of the portion to be played repeatedly press A B The Control Bar appears The starting point point A is set 2 When you reach the ending point point B press A ...

Страница 39: ... as follows Playback direction Opposite direction The x2B x2b playback speed is about twice the normal speed The 2M 2m playback speed is faster than 1M 1m You can use this function only for DVDs or VIDEO CDs Press or y when the player is in pause mode To return to the normal speed press H Each time you press or y during Slow motion play the playback speed changes Two speeds are available With each...

Страница 40: ...d xWhen playing a DVD TITLE CHAPTER TIME TEXT or NUMBER INPUT Select TIME TEXT to search for a starting point by inputting the time code xWhen playing a VIDEO CD TRACK or INDEX xWhen playing a VIDEO CD with PBC Playback SCENE xWhen playing a CD TRACK or INDEX 3 Select the number of the title track scene time code etc you want by pressing X x to select the digit followed by c to move the cursor For...

Страница 41: ...rts When playing a DVD When playing a VIDEO CD without PBC functions or CD z When playing VIDEO CDs with PBC functions the scene number and the playing time are displayed TIME TEXT CHAP HOUR MIN SEC TITLE CHAP HOUR MIN SEC TITLE CHAP HOUR MIN SEC CHAP HOUR MIN SEC Playing time and number of the current title Remaining time of the current title Playing time and number of the current chapter Remaini...

Страница 42: ...g played and the playing mode the above mentioned disc information may not be displayed Checking the Playing Time and Remaining Time You can check the playing time and remaining time of the current title chapter or track and the total playing time or remaining time of the disc Also you can check the DVD CD text recorded on the disc 1 Press DISPLAY once during playback The Status Bar is displayed T...

Страница 43: ...time of the current track T Remaining time of the current track D Playing time of the current disc D Remaining time of the current disc To turn off the Status Bar Press DISPLAY repeatedly until the Status Bar is turned off Checking the DVD CD text Press TIME TEXT repeatedly in Step 2 to display the text recorded on the DVD CD z If the DVD CD text does not fit on a single line you can see the entir...

Страница 44: ...number of available audio signals 2 Press audio repeatedly to select the desired audio signal xWhen playing a DVD Depending on the DVD the choice of language varies When 4 digits are displayed they represent the language code Refer to the language code list on page 70 to see which language the code represents When the same language is displayed two or more times the DVD is recorded in multiple aud...

Страница 45: ... you enjoy surround sound effects by using sound imaging to create virtual rear speakers from the sound of the front speakers L left R right without using actual rear speakers This function is designed to work with the LINE OUT L R AUDIO and LINE RGB TV jacks Note that if you select one of the TVS settings while playing a DVD the player does not output the following signals from the DIGITAL OUT CO...

Страница 46: ...IDE TVS TV Virtual Surround STANDARD Uses sound imaging to create virtual rear speakers from the sound of the front speakers L R without using actual rear speakers The virtual speakers are reproduced as shown in the illustration below Use this setting when you want to use TVS with 2 separate speakers and retain the sound quality z You can also change the TVS setting by pressing SURROUND on the pla...

Страница 47: ...not be able to change the angles even if multi angles are recorded on the DVD Displaying the Subtitles If subtitles are recorded on the disc you can turn the subtitles on and off whenever you want while playing If multilingual subtitles are recorded on the disc you can change the subtitle language while playing and turn it on or off whenever you want For example you can select the language you wan...

Страница 48: ...isplayed 2 Press BNR repeatedly to select a level As the value increases the mosaic like patterns on your TV screen will decrease 1 reduces the block noise 2 reduces the block noise more than 1 3 reduces the block noise more than 2 To reset the BNR setting Select OFF in Step 2 z You can also change the BNR value by pressing BNR on the player If you select any setting other than OFF the indicator o...

Страница 49: ...Insert the disc you want to lock If the disc is playing press x to stop playback 2 Press DISPLAY while the player is in stop mode The Control Menu is displayed 3 Press X x to select CUSTOM PARENTAL CONTROL then press ENTER CUSTOM PARENTAL CONTROL is selected 4 Press X x to select ON t then press ENTER xIf you have not entered a password The display for registering a new password appears Enter a 4 ...

Страница 50: ...digit followed by c to move the cursor Then press ENTER 4 To confirm your password re enter it using X x to select the digit followed by c to move the cursor Then press ENTER 1 Insert the disc for which Custom Parental Control is set The CUSTOM PARENTAL CONTROL display appears 2 Enter your 4 digit password using X x to select the digit followed by c to move the cursor Then press ENTER The player i...

Страница 51: ...password appears xWhen you have already registered a password The display for entering the password appears 6 Enter or re enter your password using X x to select the digit followed by c to move the cursor Then press ENTER The display for setting the playback limitation level and changing the password appears 7 Press X x to select STANDARD then press ENTER The selection items for STANDARD are displ...

Страница 52: ...ion If you make a mistake Press O RETURN to go back to the previous screen To turn off the Control Menu Press DISPLAY repeatedly until the Control Menu is turned off To turn off the Parental Control function and play the DVD after entering your password Set LEVEL to OFF in Step 10 To change the password 1 In Step 7 select CHANGE PASSWORD t using x then press ENTER The display for entering the pass...

Страница 53: ...ep 6 replace the disc in the player and press H When the Control Bar appears enter your new password Note When you play DVDs which do not have the Parental Control function playback cannot be limited on this player Area Code Playing the disc for which Parental Control is set PASSWORD Standard Code number Argentina 2044 Australia 2047 Austria 2046 Belgium 2057 Brazil 2070 Canada 2079 Chile 2090 Chi...

Страница 54: ...s and hold X on the player for more than two seconds You will hear one beep and the Sound Feedback function is turned on To turn off the Sound Feedback function When there is no disc in the player press and hold X on the player for more than two seconds You will hear two beeps and the Sound Feedback function is turned off Operation Operation sound Power is turned on One beep Power is turned off Tw...

Страница 55: ...lly when you start playback or press any button except for 1 In this case press TV DVD to return the input to the TV Note Depending on the units being connected you may not be able to control your TV or to use some of the buttons By pressing You can TV 1 Turn the TV off Turn on your TV using the TV s remote 2 volume Adjust the volume of the TV wide Switch to or from the wide mode of a Sony Wide TV...

Страница 56: ...UP CUSTOM SETUP or AUDIO SETUP Then press ENTER The selected setup item appears Example SCREEN SETUP 5 Select an item using X x then press ENTER The options for the selected item appear Example TV TYPE 6 Select a setting using X x then press ENTER The setting is selected and setup is complete Example 4 3 PAN SCAN To turn off the Setup Display Press DISPLAY repeatedly until the Setup Display is tur...

Страница 57: ...es for the on screen display or sound track Select LANGUAGE SETUP in the Setup Display For details on using the display see Using the Setup Display page 56 xOSD On Screen Display Switches the display language on the screen Selects the language from the displayed list xDVD MENU DVD only You can select the desired language for the DVD menu xAUDIO DVD only Switches the language of the sound track Sel...

Страница 58: ...V to be connected Select SCREEN SETUP in the Setup Display For details on using the display see Using the Setup Display page 56 The default settings are underlined xTV TYPE DVD only Selects the aspect ratio of the connected TV 4 3 standard or wide 16 9 Select this when you connect a wide screen TV or a TV with a wide mode function 4 3 LETTER BOX Select this when you connect a 4 3 screen TV Display...

Страница 59: ...thod of outputting video signals from the LINE RGB TV jack on the rear panel of the player Notes If your TV does not conform to the S video or the RGB signals no picture appears on the TV screen even if you select S VIDEO or RGB Refer to the instructions supplied with your TV If your TV has only one SCART EURO AV jack do not select S VIDEO ON Turns on the screen saver OFF Turns off the screen save...

Страница 60: ...gital sound tracks have the same number of channels the player selects PCM DTS Dolby Digital and MPEG audio sound tracks in this order Depending on the DVD the audio channel with priority may be predetermined In this case you cannot give priority to the DTS Dolby Digital or MPEG audio format by selecting AUTO OFF Does not use TIMER DEMO1 or DEMO2 to start playback TIMER Starts playing when the pla...

Страница 61: ... the Sound page 44 This function affects the output of the following jacks LINE OUT L R AUDIO jacks DIGITAL OUT COAXIAL jack when DOLBY DIGITAL is set to D PCM in DIGITAL OUT page 62 OFF Turns off the audio attenuation Normally select this position ON Reduces the audio output level so that no sound distortion occurs Select this when the playback sound from the speakers is distorted AUDIO SETUP AUD...

Страница 62: ...ARD ON DOWNMIX DOLBY SURROUND D PCM PCM DTS OFF D PCM Select this when the player is connected to an audio component lacking a built in Dolby Digital decoder You can select whether the signals conform to Dolby Surround Pro Logic or not by making adjustments to the DOWNMIX item in AUDIO SETUP page 61 DOLBY DIGITAL Select this when the player is connected to an audio component with a built in Dolby ...

Страница 63: ...ignals OFF Select this when the player is connected to an audio component lacking a built in DTS decoder Note however that the DTS signals contained in a CD are output even if OFF is selected ON Select this when the player is connected to an audio component having a built in DTS decoder If the player is connected to an audio component lacking a built in DTS decoder do not set this Otherwise when y...

Страница 64: ...our TV please try connecting your CD DVD player to your TV s S video input page 17 The picture is black and white In the Setup Display set LINE in CUSTOM SETUP to the appropriate item that conforms to your TV page 59 Depending on the TV the picture on the screen becomes black and white when you play a disc recorded in the NTSC colour system Even though you set the aspect ratio in TV TYPE of SCREEN...

Страница 65: ...layback page 32 The title DVD or PBC menu automatically appears on the TV screen The CD DVD player starts playing the disc automatically The DVD features an auto playback function AUTO PLAY in CUSTOM SETUP is set to TIMER page 59 Playback stops automatically Some discs may contain an auto pause signal While playing such a disc the CD DVD player stops playback at the auto pause signal You cannot pe...

Страница 66: ...oes not open and LOCKED appears on the front panel display Contact your Sony dealer or local authorized Sony service facility Self diagnosis Function When letters numbers appear in the display When the self diagnosis function is activated to prevent the player from malfunctioning a five character service number e g C 13 00 with a combination of a letter and digits appears on the screen and the fro...

Страница 67: ...g is digital DVD page 6 A disc that contains up to 8 hours of moving pictures even though its diameter is the same as a CD The data capacity of a single layer and single sided DVD is 4 7 GB Giga Byte which is 7 times that of a CD The data capacity of a double layer and single sided DVD is 8 5 GB a single layer and double sided DVD is 9 4 GB and double layer and double sided DVD is 17 GB The pictur...

Страница 68: ...ons called scenes Title page 9 The longest section of a picture or music feature on a DVD movie etc in video software or the entire album in audio software Track page 9 Sections of a picture or a music feature on a VIDEO CD or CD the length of a song TV Virtual Surround TVS page 45 Technology from Sony developed to produce surround sound for home use using just a stereo TV Designed to work with th...

Страница 69: ...the DIGITAL OUT COAXIAL jack are converted to 48 kHz sampling frequency Outputs General Power requirements 220 to 240 V AC 50 60 Hz Power consumption 12 W Dimensions approx 430 74 256 mm width height depth incl projecting parts Mass approx 2 7 kg Operating temperature 5 C to 35 C Operating humidity 25 to 80 Supplied accessories See page 14 Specifications and design are subject to change without no...

Страница 70: ...Javanese 1287 Georgian 1297 Kazakh 1298 Greenlandic 1299 Cambodian 1300 Kannada 1301 Korean 1305 Kashmiri 1307 Kurdish 1311 Kirghiz 1313 Latin 1326 Lingala 1327 Laothian 1332 Lithuanian 1334 Latvian Lettish 1345 Malagasy 1347 Maori 1349 Macedonian 1350 Malayalam 1352 Mongolian 1353 Moldavian 1356 Marathi 1357 Malay 1358 Maltese 1363 Burmese 1365 Nauru 1369 Nepali 1376 Dutch 1379 Norwegian 1393 Occ...

Страница 71: ...ITALIANO ESPAÑOL NEDERLANDS DANSK SVENSKA SUOMI NORSK PORTUGUÊS PYCCKИЙ CHINESE JAPANESE OTHERS t ENGLISH FRANÇAIS DEUTSCH ITALIANO ESPAÑOL NEDERLANDS DANSK SVENSKA SUOMI NORSK PORTUGUÊS PYCCKИЙ CHINESE JAPANESE OTHERS t PYCCKИЙ ENGLISH FRANÇAIS DEUTSCH ITALIANO ESPAÑOL NEDERLANDS DANSK SVENSKA SUOMI NORSK PORTUGUÊS CHINESE JAPANESE OTHERS t AUDIO ORIGINAL All other selections are same as the DVD ...

Страница 72: ...AY OFF TIMER DEMO1 DEMO2 DIMMER BRIGHT DARK OFF PAUSE MODE AUTO FRAME PARENTAL CONTROL t TRACK SELECTION OFF AUTO AUDIO ATT OFF ON AUDIO DRC STANDARD TV MODE WIDE RANGE DOWNMIX DOLBY SURROUND NORMAL DIGITAL OUT ON DOLBY DIGITAL D PCM DOLBY DIGITAL MPEG PCM MPEG DTS OFF ON OFF ...

Страница 73: ...se 39 Front Panel display 9 H Handling discs 7 Hooking up 17 I INDEX 40 Index 40 L LANGUAGE SETUP 57 LINE 59 Locating a specific point by watching the TV screen 39 M MPEG 22 44 62 N Number input 40 O On screen display Control Menu display 13 Setup Display 56 OSD 71 P PARENTAL CONTROL 49 60 PAUSE MODE 60 PBC Playback 34 PROGRAM 35 Programme Play 35 Q QUICK 57 Quick Setup 26 R Remote 14 55 REPEAT 35...

Страница 74: ......

Страница 75: ......

Страница 76: ...Sony Corporation ...

Отзывы: