


1-5
DVP-NS28/NS38/NS39/NS47P/NS57P/NS64P/NS67P
19
H
oo
kups
Step 5: Connecting the Power Cord
Plug the player and TV power cords into an AC outlet.
Step 6: Quick Setup
Follow the steps below to make the minimum number of basic adjustments for using the player.
To skip an adjustment, press
>
. To return to the previous adjustment, press
.
.
1
Turn on the TV.
2
Press
[
/
1
.
3
Switch the input selector on your
TV so that the signal from the
player appears on the TV screen.
“Press [ENTER] to run QUICK SETUP”
(press enter to run Quick Setup) appears
at the bottom of the screen. If this
message does not appear, select
“QUICK” under “SETUP” in the Control
Menu to run Quick Setup (page 60).
4
Press ENTER without inserting a
disc.
The Setup Display for selecting the
language used in the on-screen display
appears.
5
Press
X
/
x
to select a language.
The player displays the menu and
subtitles in the selected language.
6
Press ENTER.
The Setup Display for selecting the
aspect ratio of the TV to be connected
appears.
ENTER
LANGUAGE SETUP
OSD:
MENU:
AUDIO:
SUBTITLE:
FRENCH
ENGLISH
ENGLISH
SPANISH
PORTUGUESE
SCREEN SETUP
TV TYPE:
SCREEN SAVER:
BACKGROUND:
4:3 LETTER BOX
4:3 PAN SCAN
4:3 LETTER BOX
PROGRESSIVE
(COMPONENT OUT)
:
MODE
(PROGRESSIVE)
:
AUTO
16:9
BLACK LEVEL:
OFF
BLACK LEVEL
(COMPONENT OUT)
:
OFF
4:3 OUTPUT:
FULL
,
continued
20
7
Press
X
/
x
to select the setting that
matches your TV type.
◆
If you have a 4:3 standard TV
• 4:3 LETTER BOX or 4:3 PAN SCAN
(page 61)
◆
If you have a wide-screen TV or a 4:3
standard TV with a wide-screen mode
• 16:9 (page 61)
8
Press ENTER.
The Setup Display for selecting the type
of jack used to connect your amplifier
(receiver) appears.
9
Press
X
/
x
to select the type of jack
(if any) you are using to connect to
an amplifier (receiver), then press
ENTER.
If you did not connect an AV amplifier
(receiver), select “NO,” then go to step
13.
If you connected an AV amplifier
(receiver) using just an audio cord, select
“YES: LINE OUTPUT L/R (AUDIO),”
then go to step 13.
If you connected an AV amplifier
(receiver) using a digital coaxial cord,
select “YES: DIGITAL OUTPUT.”
10
Press
X
/
x
to select the type of
Dolby Digital signal you wish to
send to your amplifier (receiver).
If your AV amplifier (receiver) has a
Dolby Digital decoder, select “DOLBY
DIGITAL.” Otherwise, select “D-PCM.”
11
Press ENTER.
“DTS” is selected.
12
Press
X
/
x
to select whether or
not you wish to send a DTS signal
to your amplifier (receiver).
If your AV amplifier (receiver) has a
DTS decoder, select “ON.” Otherwise,
select “OFF.”
13
Press ENTER.
Quick Setup is finished. All connections
and setup operations are complete.
YES
NO
Is this player connected to an
amplifier (receiver) ? Select the type
of jack you are using.
LINE OUTPUT L/R (AUDIO)
DIGITAL OUTPUT
48kHz/96kHz PCM:
AUDIO SETUP
AUDIO DRC:
DIGITAL OUT:
DOLBY DIGITAL:
DTS:
STANDARD
ON
DOWNMIX:
DOLBY SURROUND
D-PCM
DOLBY DIGITAL
D-PCM
AUDIO SETUP
AUDIO DRC:
DIGITAL OUT:
DOLBY DIGITAL:
STANDARD
ON
DOWNMIX:
DOLBY SURROUND
D-PCM
DTS:
48kHz/96kHz PCM:
OFF
OFF
ON
21
Playing Discs
Playing Discs
Playing Discs
Depending on the DVD or VIDEO CD, some
operations may be different or restricted.
Refer to the operating instructions supplied
with your disc.
2
Press
[
/
1
.
The player turns on.
3
Switch the input selector on your
TV so that the signal from the
player appears on the TV screen.
◆
When using an amplifier (receiver)
Turn on the amplifier (receiver) and
select the appropriate channel so that you
can hear sound from the player.
4
Press
A
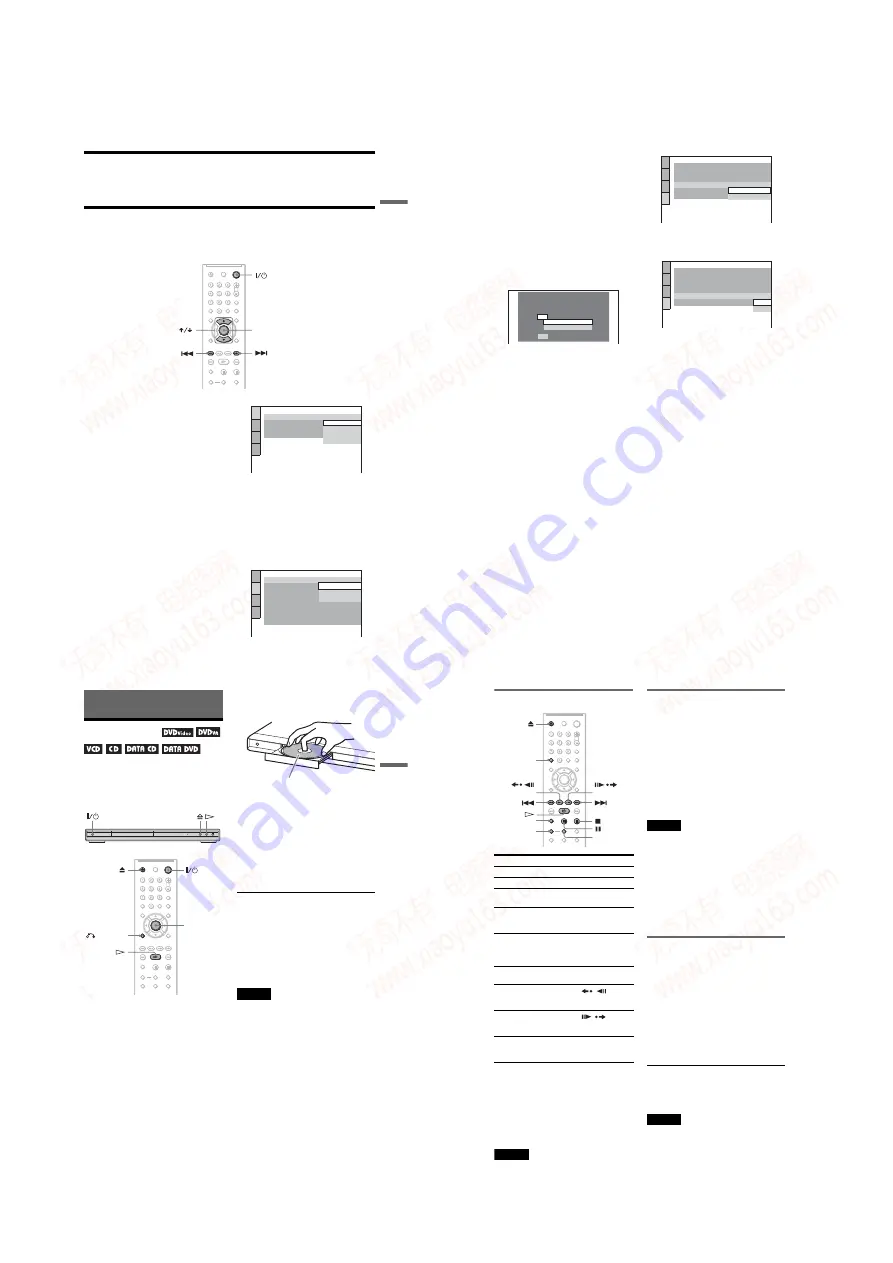
on the player, and place a
disc on the disc tray.
5
Press
H
.
The disc tray closes. The player starts
playback (continuous play). Adjust the
volume on the TV or the amplifier
(receiver).
Depending on the disc, a menu may
appear on the TV screen. For DVD
VIDEOs, see page 24. For VIDEO CDs,
see page 25.
To turn off the player
. The player enters standby mode.
You can have the player turn off automatically
whenever you leave it in stop mode for more than
30 minutes. To turn this function on or off, set
“AUTO POWER OFF” in “CUSTOM SETUP” to
“ON” or “OFF” (page 63).
Discs created on DVD recorders must be correctly
finalized before they can be played. For more
information about finalizing, refer to the operating
instructions supplied with the DVD recorder.
Notes on playing DTS sound tracks on a
DVD VIDEO
• DTS audio signals are output only through
the DIGITAL OUT (COAXIAL) jack.
• When you play a DVD VIDEO with DTS
sound tracks, set “DTS” to “ON” in
“AUDIO SETUP” (page 65).
• If you connect the player to audio
equipment without a DTS decoder, do not
set “DTS” to “ON” in “AUDIO SETUP”
(page 65). A loud noise may come out from
the speakers, affecting your ears or causing
the speakers to be damaged.
Playback side facing down
,
continued
22
Additional operations
*
1
All DVDs except for DVD+Rs/DVD+RWs/
DVD+Rs DL. The button cannot be used for
DivX video files.
*
2
DVDs only. The button cannot be used for
DivX video files.
*
3
Video and JPEG pictures only (except
BACKGROUND pictures). You can move the
enlarged picture using
C/X/x/c
. Depending
upon the contents of the disc, the zoom function
may be canceled automatically when the picture
is moved.
Note
You may not be able to use the Replay or Advance
function with some scenes.
Playback quickly or slowly with
sound
You can listen to dialog or sound while
playing the current scene quickly or slowly.
During playback, press FAST PLAY or
SLOW PLAY.
The speed changes when you press either
FAST PLAY or SLOW PLAY.
To return to normal playback
Press
H
.
Notes
• You can only use this function with DVDs,
VIDEO CDs, or Super VCDs only.
• “Operation not possible” will appear when
maximum or minimum speed is reached.
• During Fast Play or Slow Play mode, you cannot
change the angle (page 41), subtitle (page 41),
and sound (page 38). The sound can only be
changed for VIDEO CDs/Super VCDs.
• Fast Play and Slow Play functions do not work
when playing DTS sound tracks.
• You cannot use Fast Play or Slow Play function
when playing a still picture in DVD-VR mode.
Locking the disc tray (Child
Lock)
You can lock the disc tray to prevent children
from opening it.
When the player is in standby mode, press
O
RETURN, ENTER, and then
[
/
1
on the
remote.
The player turns on and “LOCKED” appears
on the front panel display. The
A
and
Z
buttons on the player or the remote do not
work while the Child Lock is set.
To unlock the disc tray
When the player is in standby mode, press
O
RETURN, ENTER, and then
[
/
1
again.
Note
Even if you select “RESET” under “SETUP” in the
Control Menu (page 60), the disc tray remains
locked.
To
Operation
Stop
Press
x
Pause
Press
X
Resume play after
pause
Press
X
or
H
Go to the next chapter,
track, or scene in
continuous play mode
Press
>
Go back to the
previous chapter,
track, or scene in
continuous play mode
Press
.
Stop play and remove
the disc
Press
Z
Replay the previous
scene*
1
Press
REPLAY during
playback
Briefly fast forward
the current scene*
2
Press
ADVANCE during
playback
Magnify the image*
3
Press ZOOM
repeatedly. Press
CLEAR to cancel.
CLEAR
REPLAY
ZOOM
SLOW PLAY
FAST PLAY
ADVANCE
www. xiaoyu163. com
QQ 376315150
9
9
2
8
9
4
2
9
8
TEL 13942296513
9
9
2
8
9
4
2
9
8
0
5
1
5
1
3
6
7
3
Q
Q
TEL 13942296513 QQ 376315150 892498299
TEL 13942296513 QQ 376315150 892498299


