


49
US
Enjo
yin
g MP3 Aud
io an
d JPE
G
Ima
ges
Selecting an album
1
Press MENU.
The list of albums on the disc appears.
When an album is being played, its title is
shaded.
2
Press
X
/
x
to select the album you
want to play.
3
Press
H
.
Playback starts from the selected album.
To select MP3 audio tracks, see
“Selecting an MP3 audio track”
(page 49).
To select JPEG image files, see
“Selecting a JPEG image file” (page 49).
To stop playback
Press
x
.
To go to the next or previous page
Press
c
or
C
.
To turn on or off the display
Press MENU repeatedly.
z
Hint
Of the selected album, you can select to play only
the MP3 audio tracks, JPEG image files, or both, by
setting “MODE (MP3, JPEG)” (page 51).
Selecting an MP3 audio track
1
After step 2 of “Selecting an album,”
press ENTER.
The list of tracks in the album appears.
2
Press
X
/
x
to select a track and press
ENTER.
Playback starts from the selected track.
To stop playback
Press
x
.
To go to the next or previous page
Press
c
or
C
.
To return to the previous display
Press
O
RETURN.
To go to the next or previous MP3 audio
track
Press
>
or
.
during playback. You can
select the first track of the next album by
pressing
>
during playback of the last
track of the current album.
Note that you cannot return to the previous
album by using
.
and that you need to
select the previous album from the album list.
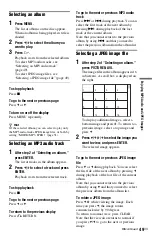
Selecting a JPEG image file
1
After step 2 of “Selecting an album,”
press PICTURE NAVI.
The image files in the album appear in 16
subscreens. A scroll box is displayed on
the right.
To display additional images, select a
bottom image and press
x
. To return to a
previous image, select a top image and
press
X
.
2
Press
C
/
X
/
x
/
c
to select the image you
want to view, and press ENTER.
The selected image appears.
To go to the next or previous JPEG image
file
Press
C
or
c
during playback. You can select
the first file of the next album by pressing
c
during playback of the last file of the current
album.
Note that you cannot return to the previous
album by using
C
and that you need to select
the previous album from the album list.
To rotate a JPEG image
Press
X
/
x
while viewing the image. Each
time you press
X
, the image rotates
counterclockwise by 90 degrees.
To return to normal view, press CLEAR.
Note that the view also returns to normal if
you press
C
/
c
to go to the next or previous
image.
1
2
3
4
5
6
7
8
13
14
15
16
9
10
11
12
,
continued


