background image

30

6

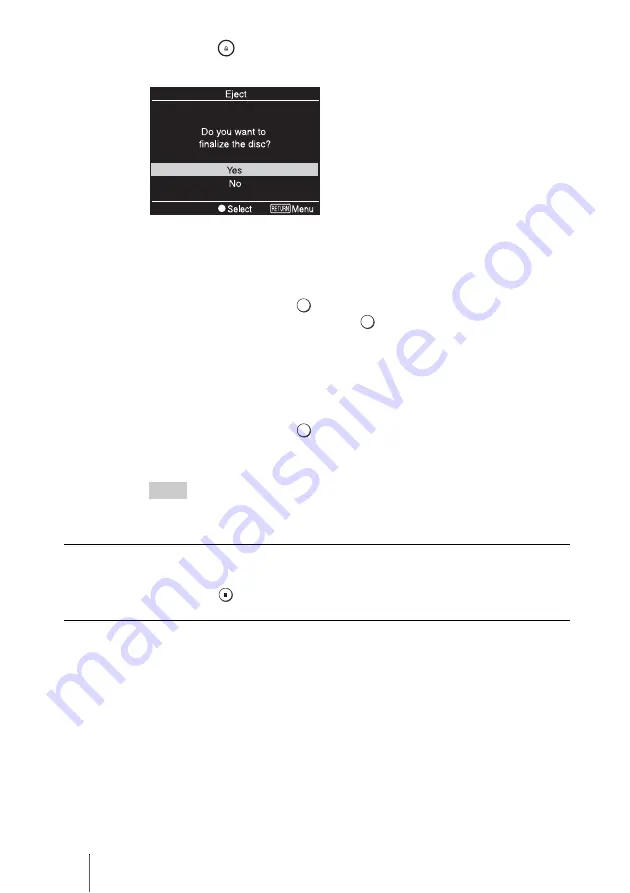
Press the 

 (Eject) button.

A message asking whether to finalize the disc just recorded on appears.

7

Select whether to finalize the disc.

For details on finalizing discs, see “What is ‘finalize disc’?” (page 66).

To finalize the disc:

Select [Yes] and press the 

 (Select) button. A confirmation message will 

appear, so select [Yes] and press the 

 (Select) button again. Disc 

finalization will begin, and the process may take a few minutes. 
When finalization is finished, the disc is ejected and the video DVD is 
completed. You can now play the disc on DVD players or the DVD drives 
of computers. 

To not finalize the disc:

Select [No] and press the 

 (Select) button. The disc will be ejected 

without finalization. This disc is not completed yet, and it cannot be played 
with other DVD players or DVD drives of computers.

Hint

If you eject a disc without finalizing after videos have been recorded, you can add videos 
onto the same disc later.

To stop recording 

You cannot stop while recording is in progress. You can only stop recording 
by pressing the 

 (Stop) button after a disc becomes full.

Note on recording with the DVD BURN button

This function is only available when the DVDirect is in the following states:

no button on the DVDirect is pressed after the power is turned on

the main menu appears in the display window


Содержание DVDirect VRD-MC3

Страница 1: ... Recording videos from HDD camcorders Recording videos from DVD camcorders Recording videos from DV camcorders Recording videos from miscellaneous video devices Recording photos from memory cards Recording photos from HDD camcorders Video Recordable DVD Drive VRD MC3 ...

Страница 2: ...s may cause harmful interference to radio communications However there is no guarantee that interference will not occur in a particular installation If this equipment does cause harmful interference to radio or television reception which can be determined by turning the equipment off and on the user is encouraged to try to correct the interference by one or more of the following measures Reorient ...

Страница 3: ... Electrical Electronic Equipment Applicable in the European Union and other European countries with separate collection systems This symbol on the product or on its packaging indicates that this product shall not be treated as household waste Instead it shall be handed over to the applicable collection point for the recycling of electrical and electronic equipment By ensuring this product is dispo...

Страница 4: ...BURN 28 One Touch Recording Full Recording 31 Incremental Recording 35 Consolidation Recording 39 Normal Video Recording 42 Previewing a Video DVD 46 Creating Viewing a Photo DVD Creating a Photo DVD 48 Types of Recording 48 Types of Photo DVD 48 Supported Memory Cards and Camcorders 49 Writable Discs That Can Be Used for Creating Photo DVDs 49 About Created Photo DVDs 50 Recording Photos Stored o...

Страница 5: ...tSmart 74 Notes on Using Other Software With the DVDirect 74 Additional Information About Discs 75 Compatible Writable Discs 75 Recommended Writable Discs 76 Writable Discs and Compatibility 76 Precautions on Writing Playing Discs 77 About Memory Cards 79 About Memory Stick 79 About the CompactFlash SD xD Picture Cards 80 Precautions 81 Support Overview 82 User Support Web Site 82 System Software ...

Страница 6: ...evision transmitter and or program owner Our product warranty is valid only when the supplied accessories including software are used in the specified or recommended system environment in accordance with the documentation and applies only to this DVDirect Our customer service and user support apply only under these product warranty conditions Please note that we cannot accept responsibility for fa...

Страница 7: ...tion The DVDirect automatically detects inserted memory cards and discs and input signals from connected devices It then displays a message prompting the next necessary operation Preparations for recording are made without any complicated button operations Direct printing operation You can print out photos recorded on DVDs or memory cards by connecting the DVDirect to a PictBridge compatible print...

Страница 8: ...h a DV camcorder Available functions One Touch Recording Full Recording 1 page 31 Recording videos from miscellaneous video devices Create a DVD using video taken with an HDD DVD DV or D8 camcorder or using video from any other video device equipped with a video output connector To connect a device use the AV cable supplied with your camera or standard video or S video cables Available functions N...

Страница 9: ... missing or damaged please contact your dealer AC power cord Quick Start Guide Operating Instructions this document Software disc Warranty card Note Make sure that you back up the supplied software disc on another disc as the software disc is not sold separately DVDirect Hi Speed USB cable for PC Printer connection AC adaptor ...

Страница 10: ...your computer and then insert a thin elongated object into this hole to eject the disc tray manually C Top panel The buttons and display for operating the DVDirect are located here page 11 D Disc tray Insert a disc here with the label side up page 17 E Eject button Opens and closes the disc tray F DC IN connector Connect the supplied AC adaptor here page 14 5 4 2 3 1 6 ...

Страница 11: ...k device or photos from a memory card B Mm cursor Select button Selects a function C RETURN button This returns the display to the main menu screen or to the previous screen when navigating menus D Stop button Stops recording E Record button Starts recording Lights red during recording 1 2 3 4 5 ...

Страница 12: ...upplied here when connecting the DVDirect to a video device such as a video camera or VCR D VIDEO IN connector Connect the video plug of an AV cable not supplied here when connecting the DVDirect to a video device such as a video camera or VCR E S VIDEO IN connector Connect an S video cable not supplied here when connecting the DVDirect to a video device with an S video connector such as a video c...

Страница 13: ...memory card B Memory Stick Duo slot Insert a Memory Stick Duo here C Multi memory card slot Insert a Memory Stick SD Card or xD Picture Card here D CompactFlash card slot Insert a CompactFlash card here Note You can use the memory card slot for both stand alone and computer operation 4 3 2 1 ...

Страница 14: ...3 Insert the power plug of the AC power cord into a power outlet Notes Be sure to use the supplied AC power cord Do not use damaged cables such as cables with deformed connectors 4 Press the 1 Power button After the display window lights and the DVDirect logo appears a different screen appears depending on the DVDirect s current status To turn power off Press the 1 Power button again ...

Страница 15: ...ou intended without complicated button operations Accessing functions from the main menu You can perform recording procedures manually by selecting options from the main menu You can also go to the setup screen Setup menu from the main menu for various settings Press the RETURN button when RETURN Menu is displayed at the bottom right of the display window to return to the main menu Auto Setup Navi...

Страница 16: ... HDD DVD Camcorder DVD Create a video DVD from an HDD or DVD camcorder connected via a USB cable page 28 31 35 39 Photo DVD Create a photo DVD page 48 DVD Video Preview Playback a created video DVD page 46 Photo View Print Display or print out photos page 58 Setup Configure various settings page 61 Note When connecting an HDD or DVD camcorder to the VIDEO IN or S VIDEO IN connector with an AV or S...

Страница 17: ...tray ejects 2 Place the disc in the disc tray with its label facing up and press the Eject button again Notes Do not touch the recording side of the disc When inserting the disc make sure it rests flat under the four tabs on the disc tray When the Eject button is pressed again the disc tray closes and the DVDirect starts reading the inserted disc ...

Страница 18: ...s a DVD R disc a message prompting you to select an input source appears To continue with operations press M or m to select a source to record from and press the Select button Note If a disc that cannot be recorded on is inserted an indication message appears If this occurs confirm all the compatible discs and replace the disc ...

Страница 19: ...slot The CompactFlash card stays half exposed Never remove the memory card while the memory card LED is lit Otherwise data in the memory card may be damaged Do not remove the memory card while recording onto a disc CF SD xD Memory Stick Duo CompactFlash Memory Stick Memory Stick Duo Push the Memory Stick Duo into the slot until you hear a click To remove push the Memory Stick Duo and pull out Memo...

Страница 20: ...lows you to record video from an HDD camcorder onto a disc by simply pressing the DVD BURN button on the camera or Handycam Station or touching the DVD BURN button in the camera s LCD screen The actual recording process is the same as that of Incremental Recording see below and you can record additional video onto a disc that has been previously recorded on Full Recording One touch recording page ...

Страница 21: ...camera during the entire process and completes creation of the video DVD The completed DVD is automatically finalized allowing immediate playback on DVD players Incremental Recording page 35 This mode allows you to record the content of an HDD camcorder connected via a USB cable onto a disc Using this mode you can record only the newly taken contents of a camera whose previous contents have alread...

Страница 22: ...corder onto the corresponding number of 12 cm discs Normal Video Recording page 42 This mode allows you to create a video DVD using the Record and Stop buttons on the DVDirect and the play pause and stop buttons on the device connected to the DVDirect You can record from any video device with a video output connector ...

Страница 23: ...amcorders must be set to AUTO AUTO is the default setting The A V t DV OUT setting on DV camcorders must be set to OFF OFF is the default setting Supported Camcorders Video Devices and Recording Modes Type of Device Interface DVD BURN Full Record ing Incremental Recording Consolida tion Recording Normal Video Recording Sony HDD camcorder1 USB Sony DVD camcorder1 USB DV camcorder2 DV IN D8 camcorde...

Страница 24: ...quired to record a 1 hour video containing one scene onto a disc When recording from an HDD camcorder HQ mode about 30 min 1 2 of the video playback length SP mode about 20 min 1 3 of the video playback length LP mode about 10 min 1 6 of the video playback length When recording from a DVD camcorder HQ mode about 60 min almost equal to the video playback length SP mode about 40 min 2 3 of the video...

Страница 25: ... video input cable onto a DVD R disc with video dubbed from a DVD camcorder that was connected via a USB cable When recording video from an HDD camcorder onto a disc only the video images stored in the camera are available for recording You cannot record both the video and still images stored in the camera onto a disc at the same time When using a DVD camcorder recording is not possible when the d...

Страница 26: ...nfigured in the Setup menu page 63 For discs created through recording from HDD or DVD camcorders connected via USB cable Titles are created at points in the video where the date recorded REC mode from HQ or SP to LP or vice versa and aspect ratio from 4 3 to 16 9 or vice versa change Chapters are created for each scene taken with the HDD or DVD camcorder Scenes are created each time recording is ...

Страница 27: ...is inserted into a DVD player and serves as a title page or table of contents for the video DVD You can create DVDs that display thumbnail images of titles in their menu screens You can select from four different menu styles when creating video DVDs with the DVDirect page 63 ...

Страница 28: ...ut source to record from appears You do not need to make a selection here as this message will disappear and recording will start automatically when you press the DVD BURN button in step 5 3 Turn on the HDD camcorder 4 Connect the camera to the DVDirect Connect the camera s USB connector Type mini B to the DVDirect s USB connector Type A using a USB cable not supplied Note The USB cable supplied w...

Страница 29: ... recording automatically stops and the Record button dims Press the RETURN button to go back to the main menu Note When the contents of the HDD camcorder do not fit on a single disc the disc will be finalized once it becomes full and a message will appear in the display window Remove the completed disc and insert a blank disc Recording will resume automatically USB SELECT END DVD BURN PictBridge P...

Страница 30: ... the DVD drives of computers To not finalize the disc Select No and press the Select button The disc will be ejected without finalization This disc is not completed yet and it cannot be played with other DVD players or DVD drives of computers Hint If you eject a disc without finalizing after videos have been recorded you can add videos onto the same disc later To stop recording You cannot stop whi...

Страница 31: ...k mode For most cameras switch the power mode button to the playback PLAY EDIT or VTR mode to play the video or perform recording For details refer to the operating instructions for your camera 4 Connect the camera to the DVDirect When using an HDD or DVD camcorder Connect the camera s USB connector Type mini B to the DVDirect s USB connector Type A using a USB cable not supplied Note The USB cabl...

Страница 32: ... camera s LCD screen the DVDirect detects the connected camera and the display window on the DVDirect changes Note Depending on the DVD camcorder you are using the above USB SELECT screen may not appear automatically and settings configuration for USB connection may be required beforehand Refer to the section on connecting to computers in the operating instructions for your camcorder when configur...

Страница 33: ...e DVDirect starts recording at the same time the camera starts playback or file transfer Recording appears in the display window and the Record button lights up during recording Hint When using a DV camcorder and the video tape is not at its beginning the tape is automatically rewound and played back from the beginning before the DVDirect starts recording Type of input Recording mode REC quality R...

Страница 34: ...ng automatically stops and the Record button dims When recording is complete the disc is automatically ejected The video DVD is completed and you can now play it on DVD players or the DVD drives of computers To stop recording When using an HDD camcorder You cannot stop while recording is in progress You can only stop recording by pressing the Stop button after a disc becomes full When using a DVD ...

Страница 35: ...camcorder and set it to PLAY EDIT mode 4 Connect the camera to the DVDirect Connect the camera s USB connector Type mini B to the DVDirect s USB connector Type A using a USB cable not supplied Note The USB cable supplied with the DVDirect cannot be used to connect to an HDD or DVD camcorder as the shape of the camera s connector is different After connecting the USB cable the USB SELECT screen app...

Страница 36: ...r is recorded recording automatically stops and the Record button dims Press the RETURN button to go back to the main menu Notes If the HDD camcorder does not contain new video all of the video contents have already been recorded onto a DVD Incremental Recording is not available In such a case only Full Recording is available When the contents of the HDD camcorder do not fit on a single disc the d...

Страница 37: ... again Disc finalization will begin and the process may take a few minutes When finalization is finished the disc is ejected and the video DVD is completed You can now play the disc on DVD players or the DVD drives of computers To not finalize the disc Select No and press the Select button The disc will be ejected without finalization This disc is not completed yet and it cannot be played with oth...

Страница 38: ...s full Note on Incremental Recording Always use the 1 Power button to turn off the DVDirect after Incremental Recording is finished If you turn off the power by pulling out the AC power cord the DVDirect will not be able to detect newly taken video properly and Incremental Recording will not be possible the next time you attempt to perform it ...

Страница 39: ... For most cameras switch the power mode button to the playback or PLAY EDIT mode to perform recording For details refer to the operating instructions for your camera 4 Connect the DVD camcorder to the DVDirect Connect the camera s USB connector Type mini B to the DVDirect s USB connector Type A using a USB cable not supplied Note The USB cable supplied with the DVDirect cannot be used to connect t...

Страница 40: ...camcorder 6 Press or to switch the recording mode Pressing or switches the recording mode displayed in the top right of the display window For Consolidation Recording press or until Consolidation displays 7 Press the Record button to start recording During recording the progress appears in the display window Recording automatically stops and the Record button dims Press the RETURN button to go bac...

Страница 41: ...a few minutes When finalization is finished the disc is ejected and the video DVD is completed You can now play the disc on DVD players or the DVD drives of computers To not finalize the disc Select No and press the Select button The disc will be ejected without finalization This disc is not completed yet and it cannot be played with other DVD players or DVD drives of computers Hint If you eject a...

Страница 42: ...d disc 3 Turn on the camera or video device and set it to playback mode For most cameras switch the power mode button to the playback PLAY EDIT or VTR mode to play the tape or perform recording For details refer to the operating instructions for your camera 4 Connect the camera or video device to the DVDirect When connecting a DV camcorder using a DV i LINK cable Connect the camera s DV connector ...

Страница 43: ...evice and use the appropriate AV cable For S video cables Connect the video device s S video out connector to the DVDirect s S VIDEO IN connector using the S video cable not supplied You must also connect an audio cable for audio input Hint If your video device has an S video connector use an S video cable for improved picture quality compared to video cable quality or AV cable not supplied To aud...

Страница 44: ...ted If the correct input source is not selected or if the video playback does not display press M or m to select the correct input manually 6 Press the Record button to start recording Dubbing from the camera or video device starts During recording Recording appears in the display window as the video is played back Note If you stop playback on the camera or video device during recording or the vid...

Страница 45: ...ether to finalize the disc For details on finalizing discs see What is finalize disc page 66 To finalize the disc Select Yes and press the Select button A confirmation message will appear so select Yes and press the Select button again Disc finalization will begin and the process may take a few minutes When finalization is finished the disc is ejected and the video DVD is completed You can now pla...

Страница 46: ...er button to turn on the DVDirect The display window turns on 2 Press to display the main menu Press M or m to select DVD Video Preview and then press the Select button 3 Insert a video DVD created with the DVDirect After the disc is finished being read its contents are displayed in the display window When a finalized disc is inserted The video titles recorded on the disc appear in the display win...

Страница 47: ...button Hints When a DVD RW disc is inserted the video titles appear in the display window as in the case of finalized discs If you insert a finalized video DVD immediately after turning on the DVDirect auto setup navigation activates and the video titles recorded on the disc appear in the display window automatically For details on titles see Titles and chapters page 26 Current title number total ...

Страница 48: ...emory card or all of the photos on the hard disk of an HDD camcorder and record them onto a DVD with one touch Up to 2000 photos can be recorded Photo select recording This method allows you to select only the photos taken with a digital camera that you want to record from a memory card and record them onto a disc The following types of photo DVD can be created with the DVDirect You can decide whi...

Страница 49: ...ice you are using Supported Memory Cards and Camcorders Type of device Interface All photo recording Photo select recording Sony HDD camcorder USB Memory card Memory Stick Duo Memory Stick SD Card xD Picture Card or ComapactFlash card Memory card slots on the DVDirect Other devices connected to the DVDirect s USB port DVD camcorders digital still cameras USB storage devices etc USB Not available W...

Страница 50: ...with video DVDs you can also select from four different menu styles when creating slideshow DVDs page 63 Storage locations on photo DVDs The following shows the folders and files of a photo DVD as shown on a computer screen All photos are stored in the folder 100VRDMC Hint File names are automatically created when the photo DVD is created About Created Photo DVDs Title 1 Chapter 1 10 Photos 4 3 2 ...

Страница 51: ...of the photos on the memory card remove the check marks from the photos you do not want to record The check marks on the thumbnails indicate photos that will be recorded All of the thumbnails are checked when the photos are first loaded from the memory card If you want to record only a portion of the photos remove some of the check marks 1 Press M or m to scroll through the photos 2 Select a photo...

Страница 52: ...mory card onto the same disc To do this change the memory card and press the Record button after the new photos are displayed in the display window 6 Press the Eject button A message asking whether to finalize the disc just recorded on appears Hint This message will not appear when using a DVD RW disc 7 Select whether to finalize the disc For details on finalizing discs see What is finalize disc p...

Страница 53: ...eshow DVD depends on the number and size of the photos For example it may take 20 minutes or more to record 100 files 5 megapixel photos onto a DVD When you press the Select button the disc is processed according to your selections in steps 7 and 8 When all of the processing is complete the disc is ejected and the photo DVD is complete To record more photos If you eject a disc after recording phot...

Страница 54: ... button 5 Press M or m to select HDD Camcorder and then press the Select button 6 Turn on the HDD camcorder and set it to PLAY EDIT mode 7 Connect the camera to the DVDirect Connect the camera s USB connector Type mini B to the DVDirect s USB connector Type A using a USB cable not supplied Note The USB cable supplied with the DVDirect cannot be used to connect to an HDD or DVD camcorder as the sha...

Страница 55: ...VDirect changes 9 Press the Record button to start recording During recording the progress appears in the display window and the Record button remains lit When all of the photos are recorded onto the disc recording automatically stops and the Record button dims Press the RETURN button to go back to the main menu USB SELECT END DVD BURN PictBridge PRINT HDD 60min ...

Страница 56: ...select Yes and press the Select button again A message asking whether to create a slideshow appears Move on to the next step To not finalize the disc Select No and press Select button The disc will be ejected without finalization This disc is not completed yet and it cannot be played with other DVD players or DVD drives of computers 12 Select whether to create a slideshow Press M or m to select wh...

Страница 57: ... the photos For example it may take 20 minutes or more to record 100 files 5 megapixel photos onto a DVD When you press the Select button the disc is processed according to your selections in steps 11 and 12 When all of the processing is complete the disc is ejected and the photo DVD is complete To create a slideshow DVD with a single button touch You can create a slideshow DVD with a single touch...

Страница 58: ... disc containing the photos you want to view print To insert a memory card see page 19 To insert a photo DVD created with the DVDirect see page 17 Hint When you insert a finalized photo DVD the auto setup function page 15 activates and the photos on the disc will be displayed automatically In this case skip to step 5 3 Press the RETURN button The main menu appears in the display window 4 Press M o...

Страница 59: ...rint images directly from the thumbnail display screen To do this skip to step 6 after moving the cursor to the photo you want to print 6 Press the Record button The following message appears 7 Turn on the printer and prepare it for printing For details on preparation refer to the operating instructions for your printer Refer to the section on connection with a PictBridge compatible device Type of...

Страница 60: ...lay the photo you want to print and then press the Record button Notes on viewing and printing photos You cannot view or print photos from a photo DVD created on a device other than the DVDirect such as a computer You can view and print JPEG format photos taken with digital still cameras Any other photo files JPEG files created edited or finished on a computer for example are not guaranteed to dis...

Страница 61: ... Setup menu 1 Press the 1 Power button to turn on the DVDirect The display window turns on 2 Press the RETURN button The main menu appears Hint Whenever RETURN is displayed in the bottom left during operation of the DVDirect the main menu returns when you press the RETURN button 3 Press m to select Setup and press the Select button The Setup menu appears ...

Страница 62: ...d Normal Video Recording modes Note The Auto Stop Timer setting is cancelled when the recording is completed the Stop button is pressed during recording or the power is turned off Rec Quality Rec Quality Default setting Picture quality Recording time approx Single layer disc Double layer disc HQ High 1 hour 2 hours HSP R 1 5 hours 3 hours SP Standard 2 hours 4 hours LP R 3 hours 6 hours SLP Low 6 ...

Страница 63: ... Select the type of menu to apply to a video DVD created with the DVDirect Select whether to record background music onto a photo DVD slideshow DVD Auto Chaptering Setting Default setting OFF 5min 10min 15min DVD Menu Setting Default setting Feature Menu 1 to 4 1 Applies the selected menu to the video DVD s menu screen Slideshow BGM Setting Default setting OFF Relaxation POP Whistle ...

Страница 64: ...ature ON After the photos are recorded onto the disc a slideshow is created and the disc is finalized automatically allowing immediate playback on a DVD player OFF When you press the Eject button after recording to a disc a message asking whether to create a slideshow always appears in the display window PC Connect Setting Default setting Feature Not use Select this when you are not connecting the...

Страница 65: ... 2 Press M or m to select Yes and press the Select button The following message appears 3 Press M or m to select OK and press the Select button 4 The DVDirect starts finalization For video DVDs The following message appears Finalize Select ...

Страница 66: ... the created disc playable on other DVD devices When ejecting a disc immediately after recording the DVDirect asks you if you want to finalize the disc or not You can select to finalize the disc or not depending on your purpose You can also finalize the disc from the Setup menu page 61 Generally you complete the disc by finalizing The finalized disc can be used like DVD Video or DVD ROM discs on a...

Страница 67: ...ed to finalize from the Setup menu You can always add videos or photos on a DVD RW disc excluding slideshow DVDs with the DVDirect and the disc can always be played with a DVD player or the DVD drive of a computer Erase all data recorded on a DVD RW or DVD RW disc The erased disc is reusable as a blank disc Notes Be aware that this operation erases all data You cannot erase individual titles chapt...

Страница 68: ...heck the system software version of the DVDirect Press m to select System and press the Select button to display the software version in the display window Hint The system software is the built in software that makes the DVDirect work Select whether to enable the demo System Demo Setting Default setting Feature ON Enables the demo When the DVDirect is not operated for a set period of time the demo...

Страница 69: ...tem of the disc and that of the DVD player Note The appropriate color system is preset or the setting way not be selectable depending on the country or region of use Select the language display for the display window Note Available languages may differ or the setting may not be selectable depending on the country or region of use Color System Language ...

Страница 70: ... RAM 256 MB 512 MB or more recommended 1 GB 10 GB for DVD creation free hard disk space or more recommended Operating system Windows 2000 SP4 or Windows XP Home Professional SP2 Hi Speed USB USB 2 0 compliant port The above requirements are the minimum necessary requirements to write to disc normally Under actual operating conditions the requirements imposed by your software must also be met For d...

Страница 71: ...art automatically Note If the Language Selection screen appears click a language button and then click Application Install to continue installation 2 Click Nero 7 Essentials to install the software 3 After installation is completed continue to install other options or click EXIT to finish installation Installing the Software Click Nero 7 Essentials ...

Страница 72: ...ied USB cable to the DVDirect 3 Press the 1 Power button to turn on the DVDirect 4 Turn on your computer 5 Connect the other end of the USB cable to your computer PC Mode appears in the display window Note Please connect the DVDirect directly to a USB connector on the computer Click My computer and make sure the DVDirect icon has been added You can now use the DVDirect with your computer Connectin...

Страница 73: ...ur computer may operate erratically or data may be damaged Be sure to perform the procedure above before disconnecting the USB cable If you insert a memory card into the memory card slot when using the DVDirect as an external DVD drive you can use the memory card as a removable disc for the computer The memory card is displayed as a removable disk icon in the My Computer folder of the Windows disp...

Страница 74: ...ach icon or application to display a summary in a pop up window Click any of the icons or applications that you intend to use Using software other than the bundled software such as commercially available software shareware or freeware to write data to disc with the DVDirect is not under warranty and Sony provides no customer service for such use Make sure that the bundled writing software and othe...

Страница 75: ...Disc type Logo Using without computer Using with computer Video DVD creation PhotoDVD creation Write Read Playback DVD R DVD R DL Double layer DVD RW DVD RW High speed DVD R DVD R DL Dual layer DVD RW CD R CD RW CD RW High speed CD RW ultra speed CD RW ultra speed plus Except when recording from HDD or DVD camcorder with USB interface Maximum 16 speed ...

Страница 76: ...y cause errors when read CD R discs Data can be written on this type of disc only once and once it has been written it cannot be erased Music CDs created on this media can be played on standard CD players CD RW discs Data can be written on and erased from this type of disc repeatedly Typically a new CD RW disc can be rewritten about 1 000 times Music CDs created on this media cannot be played on a...

Страница 77: ...of the differences in quality and characteristics between various DVD drive DVD player and disc manufacturers playback reading may not be possible depending on the combination Playback compatibility is not under warranty Write speed and compatible discs When writing data to disc at high speeds you must use the appropriate type of disc Set the writing speed with your writing software For details on...

Страница 78: ...orized copy Attempting to copy protected discs violates copyright laws About copy controlled CDs The DVDirect is designed to play back discs conforming to the Compact Disc CD standard Audio CDs encoded with copyright protection technology are now marketed by various record companies Be aware that some of these discs do not conform to the CD standard and you may not be able to play them back with t...

Страница 79: ...emory Stick Formatter onto your computer start the installer MSfmtInst240 exe located in the folder MSfmt on the software disc To launch Memory Stick Formatter after installation access the Memory Stick Utility folder in the program menu of Windows However a Memory Stick formatted on a computer may not be usable depending on the digital camera In this case the Memory Stick needs to be formatted ag...

Страница 80: ...a Memory Stick SD Card and xD Picture Card With the CompactFlash Card slot of the DVDirect you can use a CompactFlash Storage Card Type I Type II and CF Card Type I Type II compatible CompactFlash Storage Card Not all the memory card operations are supported Notes on use You cannot use CompactFlash Cards with a power specification of 3V 3 3V or less only Do not insert other types of CompactFlash C...

Страница 81: ...portant data always keep discs in their cases Do not wipe writable discs using a disc cleaner before recording data Instead use a blower to remove any dust Data may not be recorded properly if there are scratches or dust on the unrecorded area of writable discs Handle discs very carefully Handling memory cards Do not drop bend or submit the memory cards to external shock Do not disassemble or modi...

Страница 82: ...screen to proceed with download and installation Please visit the web sites on this page for technical support and other information on the DVDirect and the supplied software When asking questions by telephone or e mail please have the following information available Model number VRD MC3 Serial number Date and place of purchase Computer maker and model number Computer specifications CPU speed memo...

Страница 83: ...R DL DVD RW DVD R DVD RW Video encoding MPEG 2 Audio encoding Dolby Digital 2ch Supported photo file photo backup JPEG DCF2 0 compliant Printing PictBridge compliant printer connection via USB port DVD CD rewritable drive Maximum write speed Recordable discs DVD R DL 8x DVD R 16x DVD RW 8x DVD R DL 8x DVD R 16x DVD RW 6x CD R 40x CD RW 24x Maximum read speed DVD ROM 16x DVD Video 6x CD ROM 40x CD ...

Страница 84: ... computer with an i LINK connector 2 Multi card slot 3 For Sony HDD or DVD camcorder excluding camcorders supporting AVCHD format connection only General Power DC 12 V supplied from the DC IN jack Consumption Max 2 5 A AC adaptor Type MPA AC1 Input 100 V 240 V Output DC 12 V 3 A Use an AC power cord appropriate to the region or country of use Size Approx 204 65 222 mm W H D Weight Approx 1 75 kg O...

Страница 85: ...85 ...

Страница 86: ...86 ...

Страница 87: ...87 ...

Страница 88: ...Sony Corporation Printed in China P N 7819901750 ...

Отзывы: