background image

Chapter 3 Shooting

48

Chapter 3 Shooting

3

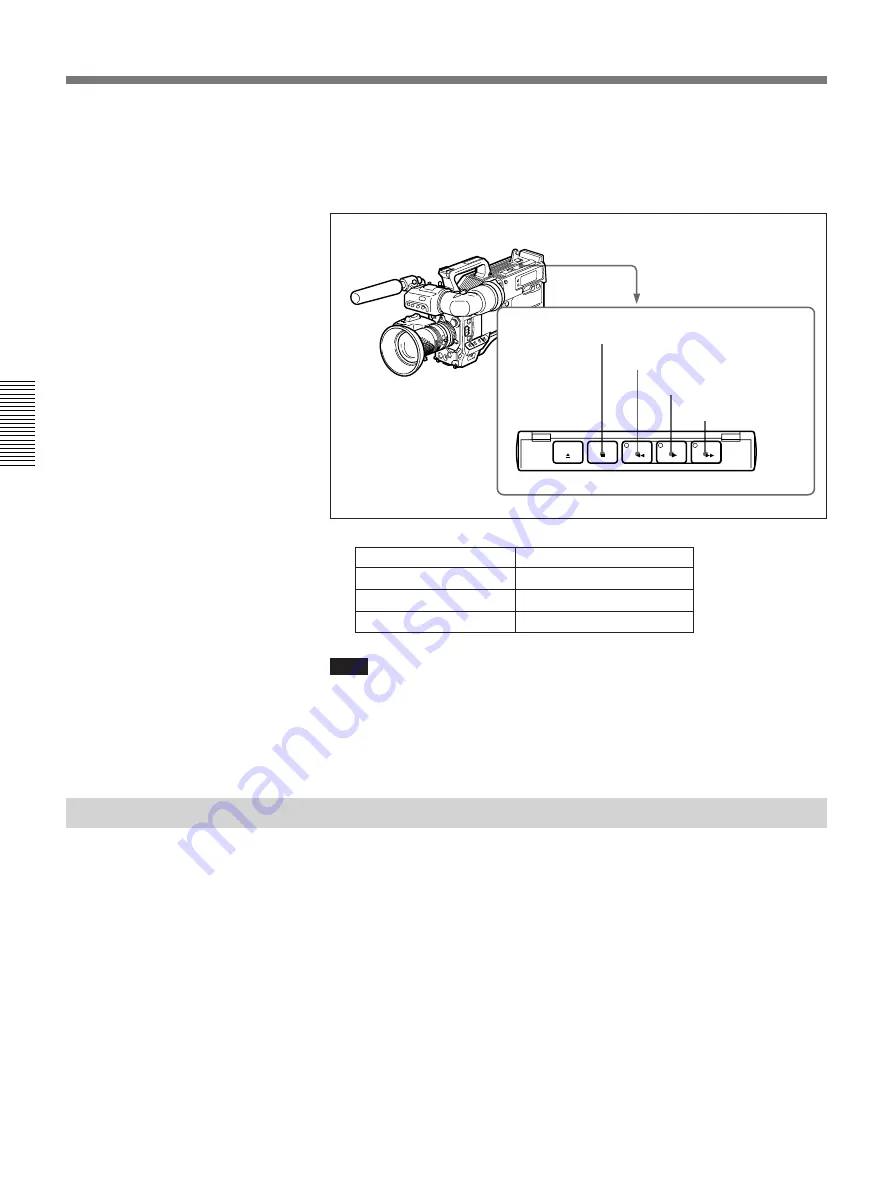
Press the PLAY button.

This starts playback, during which a monochrome playback of the
recording is shown in the camera’s viewfinder.

Note

If two or more series of index pictures are recorded separately on the tape,
they may be played back at back space editing points.

For details about index pictures, see Chapter 5 “ClipLink Shooting”.

Viewing Color Playback

Using a color television or color video monitor, you can view a color
playback (with no playback adaptors).

Connect a color television or color video monitor to the VIDEO OUT
connector or the S VIDEO OUT connector.
See the previous section “Viewing Monochrome Playback in the
Viewfinder” for playback operation.

EJECT

F FWD

STOP

PLAY

REW

STOP button

REW button

PLAY button

F FWD button

Operation

Step

Fast forward the tape

Press the F FWD button.

Rewind the tape

Press the REW button.

Stop the tape

Press the STOP button.

Playback — Checking Recorded Contents

Содержание DSR-1P

Страница 1: ... 1996 by Sony Corporation 1 Operating Instructions Before operating the unit please read this manual thoroughly and retain it for future reference 3 858 431 13 1 Digital Videocassette Recorder DSR 1 1P ...

Страница 2: ...terference at his own expense You are cautioned that any changes or modifications not expressly approved in this manual could void your authority to operate this equipment The shielded interface cable recommended in this manual must be used with this equipment in order to comply with the limits for a digital device pursuant to Subpart B of Part 15 of FCC Rules Caution Television programs films vid...

Страница 3: ...ration 23 Mounting on Video Camera 24 Fitting the Shoulder Strap 27 Connecting Audio System 29 Using a Wireless Microphone System 29 Using an External Audio System 30 Power Supply 31 Using the BP L40 L60A Battery Pack 31 Using an AC Power Source 34 Cassettes for the DSR 1 1P 35 Shooting 38 Back Space Editing 43 Starting Back Space Editing at Any Tape Position 44 Playback Checking Recorded Contents...

Страница 4: ... Connection for Gen Lock 53 Locking the Internal Time Code Generator to the Reference Time Code 54 Recording Using ClipLink Function 55 Setting Editing Points While Shooting When Using the DXC D30 D30P D35 D35P 57 Resuming Recording in ClipLink Mode 58 Contents of the VTR Menu 61 VTR Menu Operation 62 Basic Operation 62 Setting the Real Time Clock and Calendar Menu 101 63 Checking the Total Operat...

Страница 5: ...l Menu 213 68 Settting Fade In Fade Out for the Audio Recording Start and Stop Points Menu 214 68 Using Setup Add for DSR 1 Only Menu 220 69 Using Setup Remove1 for DSR 1Only Menu 22 69 Cleaning the Video Heads 71 Warning System 72 Condensation 73 Troubleshooting 74 Notes on Use 77 Specifications 78 Glossary 80 Index 81 ...

Страница 6: ......

Страница 7: ...on The ClipLink function links all stages from shooting to editing Once editing points have been set with this function during shooting they can be used to boost the efficiency of editing work Creation of clips Using the ClipLink function the camera operator can create clips to be used during editing The images captured at the Mark IN points are recorded in a compressed format onto the tape as Ind...

Страница 8: ...ecording start point when you restart shooting at any point on the tape Time code display on viewfinder screen during playback The playback time code data can be superimposed on the viewfinder screen Audio level adjustable from camera You can use a knob on the camera s front panel to adjust the channel 1 audio recording level Standard Functions as a Dockable VCR The DSR 1 1P is equipped with all o...

Страница 9: ...al DC L90 Battery Adaptor the DSR 1 1P can use the BP 90A Lithium Battery Pack for about 130 minutes of continuous operation with the DXC D30 D30P D35 D35P With an optional AC 550 550CE DN1 DN2A AC Adaptor the DSR 1 1P can operate on AC power Design for Easy Working Equipped with both digital and analog camera connectors The DSR 1 1P has both PRO 76 pin connector for digital camera connection and ...

Страница 10: ...r a WRR 855A 860A UHF Portable Tuner 3 DC IN DC power input connector XLR 4 pin male To use the DSR 1 1P with an AC power supply connect an optional AC 550 550CE CMA 8A CMA 8ACE AC Adaptor 4 POWER switch Turn the power supply on and off 5 BREAKER breaker reset button If an excessive current flows in the internal circuits the internal circuit breaker shuts off the power supply Push this button afte...

Страница 11: ...ervice indication p Battery capacity indication q Tape remaining indication s Time value indication 4 LIGHT switch 5 BACK TALLY switch 6 TALLY indicator a Playback indication b DATE indication c Non drop frame indication DSR 1 only d External synchronization lock indication e Hold indication g ClipLink log data indication h ClipLink continue indication i IP indication j Lithium backup battery warn...

Страница 12: ...page 21 k DVCAM indication Disppears when the cassette being played back is not for DVCAM format l Cassette memory indication Appears when using a cassette with cassette memory m Audio mode indications These show audio recording playback mode Fs32k 4 channel mode 32 kHz sampling frequency Fs48k 2 channel mode 48 kHz sampling frequency For further information about selecting audio recording mode se...

Страница 13: ... to 20 minutes TAPE ppp 10 to 15 minutes TAPE pp 5 to 10 minutes TAPE p 2 to 5 minutes TAPE p blinking 0 to 2 minutes TAPE blinking End of tape q Tape remaining indication r Clip remaining indication s Time value indication Depending on the DISPLAY switch setting this shows a counter value time code value or user bit value Press the MENU button 3 to display the VTR menu Indication Description 2 WA...

Страница 14: ...me code see Setting Time Code Value on page 51 2 TC IN time code input connector BNC Input an external signal for synchronizing the built in time code generator Use an SMPTE DSR 1 or EBU DSR 1P time code signal Note Use a jitterless LTC signal Using an LTC signal reproduced by other equipment may cause the DSR 1 1P to malfunction 3 GEN LOCK IN connector Rear Shoulder strap fitting 4 AUDIO OUT CH 1...

Страница 15: ...ayback audio is output from this connector 7 VIDEO OUT composite video output connector BNC This outputs the image being shot or played back as composite video signals Connect to the video input connector on a VCR or video monitor Notes The output signal from this connector may discontinue when switching the operation between recording and playback Do not use as a reference signal for external equ...

Страница 16: ...n 6 Speaker Cassette holder 1 EJECT button 2 Tape transport buttons and indicators 3 AUDIO LEVEL CH 1 CH 2 knobs 4 AUDIO SELECT CH 1 CH 2 switches 5 AUDIO IN CH 1 CH 2 switches Button Operation REW 0 Rewinds the tape The indicator lights while the tape is being rewound Press while the tape is being rewound or during playback to view reverse search playback F FWD Fast forwards the tape The indicato...

Страница 17: ...quipment connected to the AUDIO IN CH 1 CH 2 connectors 6 Speaker Outputs the recorded or playback audio When a warning indicator appears in the viewfinder or display window the speaker sounds a warning tone The speaker is muted does not output a warning tone when an earphone is connected to the EARPHONE connector For details on the warning tone see Warning System page 72 7 ALARM alarm tone volume...

Страница 18: ...FT button 5 TC mode switch 2 6 TC mode switch 1 DISPLAY COUNTER Resets counter value to 0 00 00 DISPLAY TC TC mode switch 1 PRESET TC mode switch 2 SET Resets time code to 00 00 00 00 DISPLAY U BIT TC mode switch 1 PRESET TC mode switch 2 SET Resets user bita to 00 00 00 00 Switch setting RESET button operation 1 RESET MENU SET counter reset VTR menu set button Resets the time value shown in the d...

Страница 19: ...lign the time code value with real time SET Use this setting to set the time code or user bit value R RUN The time code value advances only during recording Use this setting to have consecutive time code values for consecutive recordings on the tape Note for the DSR 1 There are two time code frame modes drop frame DF mode and non drop frame NDF mode This product is shipped with drop frame mode sel...

Страница 20: ......

Страница 21: ...battery s voltage falls the lithium backup battery warning Li appears in the display window If this warning appears replace the lithium battery CR2032 within three or four days The lithium battery has an average service life of about two years however operation in ClipLink mode will shorten the lifetime until about one year Inserting or replacing the lithium battery Notes Carefully read the instru...

Страница 22: ...quipment 22 Chapter 2 Fitting and Connecting Related Equipment Inserting and Replacing the Lithium Battery 4 Reverse step 3 to insert a replacement lithium battery Make sure that the symbol on the battery is facing you 5 Close the battery cover ...

Страница 23: ... Color TV or color video monitor DVCAM standard size cassette tape DVCAM mini size cassette tape AC DN2A AC Adaptor BC 1WD 1WDCE Battery Charger DC L1 Battery Adaptor NP 1B Battery Pack BP 90A Battery Pack BP L40 60A Battery Pack AC DN1 AC Adaptor CMA 8A 8ACE AC 550 550CE AC Adaptor BC 410 410CE Battery Charger BC L100 L100CE Battery Charger CAC 12 Microphone Holder Shoulder strap supplied LC 421 ...

Страница 24: ...GITAL connector Using a DXC 637 series camera Use the PRO 50 pin connector Note Turn the POWER switch off before mounting the DSR 1 1P on the video camera Using the DXC D30 D30P D35 D35P Replace the PRO 50 pin connector with the PRO 76 pin DIGITAL connector 1 Loosen the two screws M3 and remove the cover from the PRO 50 pin connector 2 Press the right side of the PRO 50 pin connector until the PRO...

Страница 25: ...ith the PRO50P indication Mounting on the camera This section describes the procedure for mounting the DSR 1 1P on a DXC D30 D30P D35 D35P Use the same procedure for mounting on a DXC 637 series camera Replace the PRO 76 pin DIGITAL connector with the PRO 50 pin connector When using the camcorder grip When configuring a camcorder with the camera a camcorder grip not supplied can be attached instea...

Страница 26: ...elated Equipment Mounting on Video Camera 2 Fit the projection on the bottom of the DSR 1 1P into the slot on the camera 3 Slide the DSR 1 1P along the groove on the camera and press firmly until fixed 4 Tighten the two screws M4 12 in the figure M4 12 screws Groove Slot Projection Camera ...

Страница 27: ...position before tightening the screws Otherwise the screws may not be properly fixed M4 6 screws Removing from the camera Follow the procedure above in reverse Fitting the Shoulder Strap This section describes the procedure for fitting the supplied shoulder strap to the camcorder 1 Fit one of the clips to a shoulder strap fitting on the DSR 1 1P Shoulder strap fitting Press and pull up PRESS Conti...

Страница 28: ...ing and Connecting Related Equipment Mounting on Video Camera 2 Fit the other clip to the shoulder strap fitting on the camera in the same way Removing the shoulder strap Press and pull up While pressing here move the clip downwards to release it from the fitting PRESS ...

Страница 29: ...m see the operating instructions for the microphone and tuner 2 1 1 Attach the WRR tuner fitting not supplied Part No A 8278 057 A to the rear of the DSR 1 1P as shown in the figure 1 Pass a screwdriver through the holes and tighten the screws 2 Loosen the adjustment screws 3 Adjust the metal fitting position for a battery pack to be attached and tighten the adjustment screws to fix its position 4...

Страница 30: ... the DC OUT connector 4 Set the AUDIO IN CH 1 CH 2 switch for the tuner connected channel to REAR and the input selection switch for the AUDIO IN CH 1 CH 2 connector where the tuner cable is connected to MIC center position Connecting Audio System Using an External Audio System Connect an audio mixer or other external audio system component to the AUDIO IN CH 1 CH 2 connector as shown below Input ...

Страница 31: ...acks as soon as possible after recharging To prolong the life of battery packs store them in a cool place about 20 C 68 F and charge in a place with an ambient temperature between 10 C and 30 C 50 F to 86 F Before long term storage discharge the battery fully This extends the battery life It is recommended that the BP L40 be used at 30 W or less The specified capacity may not be obtained if the BP...

Страница 32: ...pack is recommended The BP L40 L60A is free from memory effect There is no need to discharge it fully before recharging Attaching the battery pack LOCK BP L40 L60A Align these lines LOCK Matching line on the DSR 1 1P LOCK arrow Power Supply 1 Press the battery pack against the rear of the DSR 1 1P aligning the side line of the battery pack with the line on the DSR 1 1P 2 Slide the battery pack dow...

Страница 33: ... the DSR 1 1P with a fully charged internal battery pack then remove the DC output cable of the external battery from the DC IN connector The power source will switch to the internal battery pack To use an external battery again connect a fully charged external battery to the DC IN connector before unloading the internal battery pack The power source will switch to the external battery Continuous ...

Страница 34: ...ttery to the AC power source Using the AC 550 550CE or CMA 8A 8ACE AC Adaptor Using an AC DN1 DN2A AC Adaptor Mount the AC DN1 DN2A on the DSR 1 1P in the same way as a battery then connect to the AC power source Note When power consumption of the DSR 1 1P camera and accessories is 38 W or higher use the AC DN2A AC adaptor lower than 150 W DC IN DC OUT POWER switch ON To AC power source AC power c...

Страница 35: ...ette it will be automatically ejected When using a DV cassette the maximum recording time is reduced to two thirds of the time indicated on the cassette For example up to 40 minutes of recording can be done on a 60 minute DV cassette DVCAM cassettes The following figure illustrates the DVCAM cassette s appearance For ClipLink shooting a DVCAM cassette including cassette memory is necessary In the ...

Страница 36: ...nnection problems may occur and cause a loss of functions Remove away any dust or dirt from this area before using the cassette If the cassette is dropped on the floor or otherwise receives a hard impact the tape may become slackened and may not record and or play back correctly For instructions on removing tape slack see next page Follow the instructions on page 39 to insert a cassette or the DSR...

Страница 37: ...Turn the reel gently in the direction shown by the arrow If the reel does not move there is no slack Insert the cassette into the cassette holder close the cassette holder and after about 10 seconds take it out See page 39 on how to insert a cassette Paper clip etc Reel ...

Страница 38: ... 7 EditStation for editing purposes there must be about at least 40 seconds of recording on the tape before the IN point To perform editing without problems it is recommended that you pre record at least 40 seconds of color bar signals at the beginning of the tape 1 Set the POWER switch to ON and check the following items in the display window Shooting 3 1 4 1 2 Item to check Indication and steps ...

Страница 39: ...then insert or eject the cassette When inserting a mini size cassette confirm the cassette is under the lock see the above figure and then close the cassette holder If the cassette is not inserted fully under the lock a stopper will prevent the cassette holder from closing when you press down on it Indication PUSH Cassette holder window Insert the cassette with the cassette window on the front fac...

Страница 40: ...pe will not be loaded and the tape operation buttons will not function If you find the tape operation buttons inoperable press on the PUSH indication again to make sure that the cassette holder is solidly closed 3 Make the switch settings shown in the figure below Shooting Do not insert cassette backside front Do not insert cassette sideways H MIN SEC FRM 1 dB 2 PB DATE NDF EXT LK HOLD CLIP TAPE B...

Страница 41: ... s WARNING indicator to light and the warning tone is emitted At the same time the REC TALLY indicator s blink s in the viewfinder Warning indication Status Fs 48K flashes four times per second Attempting to switch from 32 kHz mode four channel mode to 48 kHz mode two channel mode Fs 32K flashes four times per second Attempting to switch from 48 kHz mode two channel mode to 32 kHz mode four channe...

Страница 42: ...he battery with a charged battery immediately If you continue to use the low battery the BATT indication will blink four times a second and the operation will stop For description of how to replace batteries see Power Supply on page 31 Note Turn the POWER switch OFF before replacing the battery Audio level indications AUDIO LEVEL CH 1 CH 2 knobs H MIN SEC FRM 1 dB 2 PB DATE NDF EXT LK HOLD CLIP TA...

Страница 43: ...ecording operation Note Do not do any of the following before the next scene is shot as it will interrupt the recording the recording will not be continuous Remove the cassette Transport the tape play rewind fast forward Press the STOP button Replace the battery when the DSR 1 1P is powered 3 When you are ready to shoot the next scene again press the VTR button on the camera or lens This restarts ...

Страница 44: ...witch ON SAVE ON STBY see the operating instructions for your camera For details on setting the timeout value for automatic switching to standby off mode see Setting the Standby Period Menu 207 on page 64 Starting Back Space Editing at Any Tape Position This section describes the steps for insert a new scene at any desired position on the tape The following steps can also be used to restart record...

Страница 45: ...cified by step 5 then sets the DSR 1 1P to recording pause state 7 Press the VTR button on the camera or lens This starts recording When using the DXC D30 D30P D35 D35P the edit search function enables you to search for the continue position For details see the operating instructions for the DXC D30 D30P D35 D35P EJECT F FWD STOP PLAY REW F FWD button STOP button REW button PLAY button Operation a...

Страница 46: ...n takes several seconds do not turn the POWER switch is turned off or replace the battery during this interval as the automatic recording continuity will be lost Note also that the recording continuity is lost in the following case If the POWER switch is turned on and off repeatedly If the DSR 1 1P is left powered off for several hours If the DSR 1 1P is subject to severe vibration while powered o...

Страница 47: ...s shown in the viewfinder You can also listen to the recorded sound via an earphone or the speaker After the recorded part is played back the DSR 1 1P is automatically returns to the pause state Notes During recording review do not turn the POWER switch off The DSR 1 1P may not be able to find the continue point If you press the VTR button on the camera or lens during recording review the DSR 1 1P...

Страница 48: ...ng Viewing Color Playback Using a color television or color video monitor you can view a color playback with no playback adaptors Connect a color television or color video monitor to the VIDEO OUT connector or the S VIDEO OUT connector See the previous section Viewing Monochrome Playback in the Viewfinder for playback operation EJECT F FWD STOP PLAY REW STOP button REW button PLAY button F FWD but...

Страница 49: ...lue shows the tape s running time in hours minutes seconds and frames format Before starting a tape perform the following steps to reset the counter 1 Set the DISPLAY switch to COUNTER The time value indication in the display window shows the current counter value 2 Press the RESET MENU SET button This resets the counter shown in the viewfinder and display window as 0 00 00 00 The counter value st...

Страница 50: ...st digit in the user bits indication to start blinking 4 Set the user bits Hexadecimal digits A to F are displayed as follows 5 Perform step 6 in Setting the Time Code Value on page 52 Operation Step Select a digit Press the SHIFT button Each time you press the SHIFT button the next digit to the right starts blinking Change a value Press the ADVANCE button Each time you press the ADVANCE button th...

Страница 51: ... or 23 59 59 24 DSR 1P H MIN SEC FRM 1 dB 2 PB DATE NDF EXT LK HOLD CLIP TAPE BATT DIAG E F RF SERVO HUMID SLACK Li 40 30 12 0 IP CL CONT OVER OVER WARNING RESET MENU SET MENU ADVANCE SHIFT ALARM MONITOR PRESET DATE TIME ClipLink CONTINUE MONITOR SELECT BACK TALLY LIGHT DISPLAY AUDIO LEVEL AUDIO SELECT AUDIO IN CH 2 CH 1 OFF ON MIX REGEN SET F RUN R RUN AUTO MANUAL CAM REAR ON OFF COUNTER TC U BIT...

Страница 52: ...1 Once you set this switch to DATE TIME position it is not possible to retrieve the previous value user bits and time code in the time code generator For how to set the real time clock and calendar see Setting the Real Time Clock and Calendar Menu 101 on page 63 Operation Setting Time code advances freely regardless of the VTR s current operation mode F RUN Time code value advances only while reco...

Страница 53: ...gnals to another camcorder s video and time code signals Camera DSR 1 1P GEN LOCK IN TC IN Using one camcorder as reference to its video and time code signals lock the other camcorders video and time code signals If the reference camcorder is gen locked to an external reference signal any other connected camcorders are gen locked to the same reference signal a The output signal from the VIDEO OUT ...

Страница 54: ...ator will maintain its externally synchronized state even after you disconnect the reference time code signal The precision of this synchronization phase alignment of time codes depends on the precision of the camera s sync signal generator Notes After setting up external synchronization allow a few seconds for the camera s sync signal generator to stabilize before recording Only the time code can...

Страница 55: ... TALLY LIGHT DISPLAY AUDIO LEVEL AUDIO SELECT AUDIO IN CH 2 CH 1 OFF ON MIX REGEN SET F RUN R RUN AUTO MANUAL CAM REAR ON OFF COUNTER TC U BIT CH 1 CH 2 20 DVCAM F8 32k F8 48k 1 2 1 3 Make sure that the lithium battery has been correctly inserted and is not used up Li appears in the display window if the lithium battery has not been inserted or is used up Display Meaning CLIP The DSR 1 1P is in Cl...

Страница 56: ...the next scene For details of this operation see the operating instructions for the DXC D30 D30P D35 D35P 2 Check the number and perform one of the following responses The number of recordable index pictures also appears in the time value indication area for as long as you hold down the ADVANCE button For details of this display see 1 Display window in Display Section under Chapter 1 page 11 Note ...

Страница 57: ...witch to OFF before disconnecting the power supply Setting Editing Points While Shooting When Using the DXC D30 D30P D35 D35P When shooting with the DSR 1 1P and the DXC D30 D30P D35 D35P you can use the DXC D30 D30P D35 D35P s TAKE button to record a time code for a cue point or a Mark IN OUT point For details refer to the operating instructions for the DXC D30 D30P D35 D35P Setting cue points Th...

Страница 58: ... is impossible to continue recording from that data on ClipLink mode 3 Check the following points 4 Press the ClipLink CONTINUE button The tape remaining indication in the display window flashes as the DSR 1 1P automatically searches the recording stop point When it finds the recording stop point it stops and enters recording pause mode Once it has stopped check that the CONT indicator appears in ...

Страница 59: ...f changing the camcorder on resuming for example If there is no need for ClipLink continue It is not necessary to press the ClipLink CONTINUE button when restarting recording See step 4 in the previous section Resuming Recording in ClipLink Mode The contents recorded on the cassette may differ in this case depending on the settings when the recording is restarted When recording in ClipLink mode is...

Страница 60: ......

Страница 61: ...rame mode selection for time code DSR 1 only 204 Page 63 Battery capacity indication selection 206 Page 64 Standby on period setting 207 Page 64 Use auto check function 210 Page 65 Selection of ClipLink function 211 Page 67 Audio recording mode selection 212 Page 67 Audio reference level selection 213 Page 68 Fade in fade out setting for the audio recording start and stop points 214 Page 68 Use se...

Страница 62: ...ESET MENU SET button This records the new setting and returns to a blinking display of the menu number 6 Press the MENU button This returns the display window to the display shown before the VTR menu Basic Operation H MIN SEC FRM 1 dB 2 PB DATE NDF EXT LK HOLD CLIP TAPE BATT DIAG E F RF SERVO HUMID SLACK Li 40 30 12 0 IP CL CONT OVER OVER WARNING RESET MENU SET MENU ADVANCE SHIFT ALARM MONITOR PRE...

Страница 63: ...me value indication see page 49 in the following way 19961008 Blinking 221505 Blinking On the DSR 1 Displayed in mmddyyyy format Example 10081996 On the DSR 1P Displayed in ddmmyyyy format Example 08101996 Menu 201 Checking the Total Operating Power On Hours 1 Display menu 201 and press the SHIFT button Pressing the SHIFT button cycles through the following display items 2 Check the indication the...

Страница 64: ...NCE button Pressing the ADVANCE button cycles through the following indications LI n Antn n nI a To use the Anton Bauer Magnum Battery System a special battery mount developed by Anton Bauer Corporation is required For details contact an Anton Bauer dealer or your Sony dealer 3 Press the RESET MENU SET button and then the MENU button The settings are recorded and the display window returns to the ...

Страница 65: ...es Preparations for testing Make preparations as shown in the table below 207 08 Blinking Standby on period To perform the auto check 1 Display menu 210 2 Press the SHIFT button to make the auto check function indication oFF start blinking then press the ADVANCE button to change the indication to on To cancel the auto check function press the MENU button to close the menu 3 Press the RESET MENU SE...

Страница 66: ...If the video and audio recording qualities are normal the unit is ready for use At ng 01 There may be a problem in the VCR or the cassette Contact your Sony dealer At ng 02 There may be a problem in VCR s internal operations or data loading from the tape Clean the video heads using the DVM 12CL Cleaning Cassette see page 71 and repeat the auto check If the result is the same contact your Sony deal...

Страница 67: ... The audio recording mode can be set to either of the following modes 48 kHz mode factory setting Enables two channel recording mode with 48 kHz sampling frequency 32 kHz mode Enables four channel recording mode with 32 kHz sampling frequency for channels 1 and 2 1 Display menu 212 The menu number and current audio recording mode is displayed Example 48 2 channel mode with 48 kHz sampling frequenc...

Страница 68: ...m containing both consumer DV and professional equipment setting the audio reference level to 12 dB is recommended Changing the audio reference level setting from 20 dB or 18 dB to 12 dB increases the audio recording level by 8 dB or 6 dB whether the AUDIO SELECT CH 1 CH 2 switch is set to AUTO or MANUAL Menu 214 Setting Fade In Fade Out for the Audio Recording Start and Stop Points You can reduce...

Страница 69: ...f the setting does not need to be changed press the MENU button to close the menu 2 Press the SHIFT button to make the setup remove on oFF indication start blinking then press the ADVANCE button to change the setting to oFF 3 Press the RESET MENU SET button and then the MENU button The settings are recorded and display window returns to the display shown before the VTR menu How to use the setup ad...

Страница 70: ......

Страница 71: ...d in the DSR 1 1P only STOP PLAY and EJECT buttons function Replacing the video heads If cleaning the video heads fails to restore picture quality the heads may be due for replacement Keep a check of the hours of head drum operation with normal use the heads should need replacing after about 2 000 hours of use When the heads need replacement contact your Sony dealer Check the hours of head drum op...

Страница 72: ...lem persists power off and consult your Sony dealer Continuousa RF a a a Servo lock lost Recording continues but quality is poor Power off and consult your Sony dealer SERVO Continuousa a a a Condensa tion on head drum The DSR 1 1P stops and all operations are inhibited except eject Without powering off wait until the HUMID indication disappears HUMID Continuous The tape cannot be wound properly O...

Страница 73: ...eps to prevent this from happening Remove the cassette before moving the unit from a very cold place to a warm place Before inserting a cassette turn the power on and check that the HUMID indication is not showing in the display window If it is showing wait do not insert a cassette until the HUMID indication disappears You can save waiting time if you keep the VCR powered For details of cassette i...

Страница 74: ... low The battery pack is inadequately charged Recharge the battery pack or replace with a new fully charged one page 31 It is not possible to eject the cassette The battery pack is exhausted Replace the battery pack with a fully charged one page 31 The POWER switch is turned off Turn the POWER switch on page 10 The playback picture quality is poor The video heads are dirty Clear the video heads us...

Страница 75: ...to on meaning ClipLink shooting is allowed in menu 211 CONT is displayed in the display window and the time code generator is in the REGEN mode Only the REGEN mode can be used for ClipLink shooting If you will not perform ClipLink shooting set the ClipLink function to oFF see page 67 The time code value does not advance though the TC mode switch 1 or 2 is set to the F RUN or DATE TIME ...

Страница 76: ......

Страница 77: ...ith a cloth or other material This can cause the temperature to rise leading to a malfunction When closing the cassette holder Be careful not to catch your fingers between the cassette holder and the body of the unit After Use Turn the POWER switch off When not used for a period of time Remove the battery pack Care If the unit is dirty wipe it with a dry cloth For severe dirt use a soft cloth stee...

Страница 78: ...es Cassette tapes used Video system at playback with the DSR 85 85P Audio system at playback with the DSR 85 85P Inputs and outputs Input connectors AUDIO IN CH 1 CH 2 XLR 3 pin 2 female 60 dB 3 kΩ 4 dBu 10 kΩ 0 dBu 0 775 Vrms GEN LOCK IN BNC 1 0 V p p 75 Ω TC IN BNC 0 5 to 18 Vp p 10 kΩ Camera connector PRO 76 pin DIGITAL or PRO 50 pin DC IN XLR 4 pin male Model name Size PDV 64ME 94ME 124ME 184M...

Страница 79: ...ign and specifications are subject to change without notice Related Equipment DXC D30 D30P D35 D35P Color Video Camera DXC 637 537A 327A 327B or DXC 637P 537AP 327AP 327BP Color Video Camera NP 1B and BP L40 L60A 90A Battery Packs BC 410 410CE L50 L100 L100CE and BC 1WD 1WDCE Battery Chargers DC L1 Battery Adaptor for NP 1B DC L90 Battery Adaptor for BP 90A AC 550 550CE DN1 DN2A and CMA 8A 8ACE AC...

Страница 80: ...interference between Y and C signals that can occur in conventional composite video signals to obtain a higher resolution picture Search The search function enables recorded images or time codes to be viewed while the tape is played back at various forward or reverse speeds as a means of locating a particular scene in the taped program Setup The difference between the reference black level and the...

Страница 81: ...ernal time code signals connection 53 locking the internal time code generator 54 H Head cleaning 71 I J K Index picture 7 55 to 59 Input output connectors 14 IP index picture indication 12 55 58 L Li lithium backup battery warning 12 21 LIGHT switch 13 Lithium battery inserting replacing 21 warning 12 M Maintenance 71 Mark IN point 7 57 Mark OUT point 7 57 Menu See VTR menu MENU button 13 62 to 6...

Страница 82: ...19 for displaying the date time 49 for locking the internal time code generator 54 for making the time code continuous 52 for setting the time code to the real time clock calendar 52 for shooting 40 44 for time code value setting 51 for user bit value setting 50 TC mode switch 2 19 for displaying the date time 49 for locking the internal time code generator 54 for making the time code continuous 5...

Страница 83: ......

Страница 84: ...Sony Corporation Printed in Japan ...

Отзывы: