background image

7

ES

[

AVISO

La batería puede explotar o presentar fugas si se manipula de forma incorrecta. No la recargue, 
la desmonte ni la arroje al fuego.
Compruebe la fecha de validez (mes y año) impresa en las baterías.

[

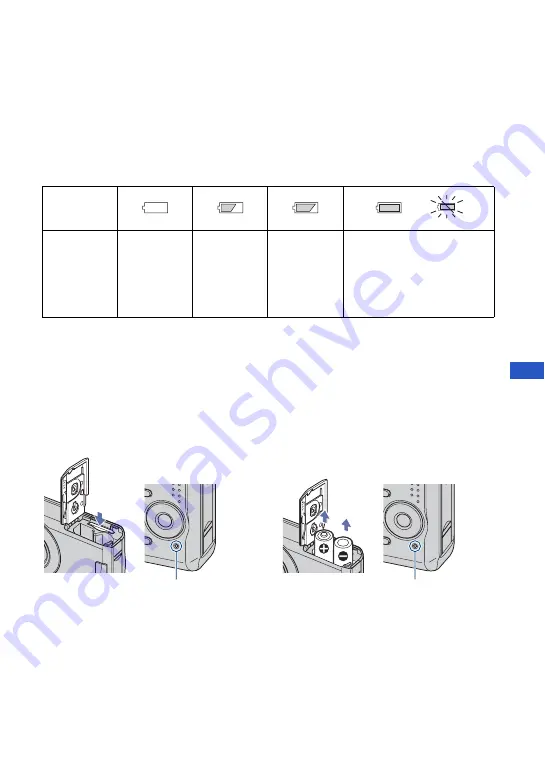
Para comprobar el tiempo de batería restante

Pulse POWER para encender la unidad y compruebe la hora en la pantalla LCD.

• En ciertas circunstancias, es posible que el tiempo restante que se muestra no sea correcto.

• Si utiliza baterías alcalinas o de oxi-níquel, es posible que el indicador de carga restante no muestre la 

información correcta.

• Si se utiliza el adaptador de ca (no suministrado), el indicador de carga restante no aparecerá.

[

Para extraer las baterías o el “Memory Stick Duo”

Abra la tapa del compartimiento de la batería o el “Memory Stick Duo”.

Indicador de 
batería 
restante

Instrucciones 
acerca de la 
carga restante 
de la batería

Carga 
restante 
suficiente

Batería con 
media carga

Poca carga 
restante; la 
grabación o 
reproducción 
se detendrá 
en breve.

Sustituya las baterías por otras 
nuevas o por baterías de 
hidruro de níquel-metal 
completamente cargadas (el 
indicador de advertencia 
parpadeará).

• Asegúrese de no dejar caer las baterías.
• No abra la tapa de las baterías ni apague 

la cámara mientras el indicador de 
acceso esté encendido, ya que los datos 
podrían destruirse.

• Asegúrese de que 

el indicador de 

acceso

 no esté encendido y, a 

continuación, presione una vez el 
“Memory Stick Duo”.

Baterías

“Memory Stick Duo”

Indicador de acceso

Indicador de acceso

Содержание DSC S650 - Cyber-shot Digital Camera

Страница 1: ...n it for future reference Manual de instrucciones Antes de utilizar la unidad lea detenidamente este manual y consérvelo para consultarlo en el futuro For details on the advanced operations please access Cyber shot Handbook contained on the supplied CD ROM via a computer Para obtener más información acerca de las operaciones avanzadas consulte en un ordenador la Guía práctica de Cyber shot que se ...

Страница 2: ...having one blade wider than the other This plug will fit into the power outlet only one way This is a safety feature If you are unable to insert the plug fully into the outlet try reversing the plug If the plug should still fail to fit contact your electrician to have a suitable outlet installed Do not defeat the safety purpose of the polarized plug by forcing it in Overloading Do not overload wal...

Страница 3: ...lightning storm or when it is left unattended and unused for long periods of time unplug it from the wall outlet and disconnect the antenna or cable system This will prevent damage to the set due to lightning and power line surges Damage Requiring Service Unplug the set from the wall outlet and refer servicing to qualified service personnel under the following conditions When the power cord or plu...

Страница 4: ...se harmful interference to radio communications However there is no guarantee that interference will not occur in a particular installation If this equipment does cause harmful interference to radio or television reception which can be determined by turning the equipment off and on the user is encouraged to try to correct the interference by one or more of the following measures Reorient or reloca...

Страница 5: ... with separate collection systems This symbol on the product or on its packaging indicates that this product shall not be treated as household waste Instead it shall be handed over to the applicable collection point for the recycling of electrical and electronic equipment By ensuring this product is disposed of correctly you will help prevent potential negative consequences for the environment and...

Страница 6: ...wn damage or loss Clean the flash surface before use The heat of flash emission may cause dirt on the flash surface to become discolored or to stick to the flash surface resulting in insufficient light emission Notes on the LCD screen The LCD screen is manufactured using extremely high precision technology so over 99 99 of the pixels are operational for effective use However there may be some tiny...

Страница 7: ...cators on the screen 17 Changing the settings Menu Setup 19 Menu items 20 Setup items 21 Enjoying your computer 22 Supported Operating Systems for USB connection and application software supplied 22 Viewing Cyber shot Handbook 22 Battery life and memory capacity 23 Battery life and number of images that can be recorded viewed 23 Number of still images and recording time of movies 25 Troubleshootin...

Страница 8: ...size AA alkaline batteries 2 Dedicated USB cable 1 Dedicated A V cable 1 Wrist strap 1 CD ROM Cyber shot application software Cyber shot Handbook 1 Instruction Manual this manual 1 Attach the strap to prevent the camera from damage by being dropped etc Hook ...

Страница 9: ...MB Batteries you can and cannot use with your camera 1 NH AA 2DB twin pack etc 2 Operating performance cannot be ensured if voltage drops or other problems are caused by the nature of the battery 2 1 Insert the Memory Stick Duo with the terminal side facing the lens Battery Memory Stick Duo cover ɟ ɠ Terminal side Battery type supplied supported rechargeable LR6 size AA alkaline batteries a a HR 1...

Страница 10: ...pplied is used the battery remaining indicator is not displayed To remove the batteries Memory Stick Duo Open the battery Memory Stick Duo cover Battery remaining indicator Battery remaining guidelines Sufficient power remaining Battery half full Battery low recording playback will stop soon Replace the batteries with new ones or fully charged Nickel Metal Hydride batteries The warning indicator f...

Страница 11: ...ress z 3 Select OK with B then press z To change the date and time Select Clock Set in the Setup screen page 19 When you turn on the power Unless you set the clock the Clock Set screen appears each time the camera is turned on If the camera is running on battery power and you do not operate the camera for about three minutes the camera turns off automatically to prevent wearing down the battery Au...

Страница 12: ...g press the shutter button fully down again Mode dial DISP button Tripod receptacle bottom Image Size button Shutter button ɠ Zoom W T button Control button Position the subject in the center of the focus frame Still image 1 Press and hold the shutter button halfway down to focus The z AE AF lock indicator green flashes a beep sounds the indicator stops flashing and remains lit 2 Press the shutter...

Страница 13: ...in No indicator Macro Off Macro On W side Approx 5 cm or farther 2 inches or farther T side Approx 35 cm or farther 13 7 8 inches or farther Auto Adjustment mode Allows easy shooting with the settings adjusted automatically Program auto shooting mode Allows you to shoot with the exposure adjusted automatically both the shutter speed and the aperture value Also you can select various settings using...

Страница 14: ...s the b button again To change the still image size Press the Image Size button then press v V to select the size To turn off the Image Size menu press the button again On the recordable number of still images and recordable time of movies Recordable number of still images vary depending on the selected image size Still images Movies The number of recordable images and time can differ according to...

Страница 15: ...movie is played back To listen to the audio connect with external outputs such as a TV a speaker etc To delete images 1 Display the image you want to delete and press Delete 2 Select Delete with v then press z To view an enlarged image playback zoom Press while displaying a still image To undo the zoom press Adjust the portion v V b B Cancel playback zoom z Viewing an index screen Press Index and ...

Страница 16: ...ress z 2 Select the image you want to delete with v V b B then press z to display the Delete indicator on the selected image 3 Press Delete 4 Select OK with B then press z To view images on TV screen Connect the camera to the TV with the dedicated A V cable supplied To the USB A V OUT terminal To audio video input jacks Dedicated A V cable ...

Страница 17: ...ies When playing back A Battery remaining z AE AF lock Recording mode White balance STBY REC Standby Recording a movie Mode dial Scene Selection Mode dial Program Auto Camera mode Playback mode Flash mode Flash charging Zoom scaling Red eye reduction Sharpness Metering mode RICH NATURAL SEPIA B W Color mode Protect Print order DPOF mark Zoom scaling N Playback 1 3 ...

Страница 18: ...me 400 Remaining number of recordable images Self timer ISO number 12 12 Image number Number of images recorded in selected folder 00 00 12 Counter 3 2 7M 5M 3M 2M VGA 16 9 101 Vibration warning E Low battery warning PictBridge connecting 2 0EV Exposure Value ISO number Metering mode Flash White balance Spot metering cross hair AF range finder frame 500 Shutter speed F2 8 Aperture value 125 Shutte...

Страница 19: ...d menu item with b B on the control button If the desired item is invisible keep pressing b B until the item appears on the screen Press z after selecting an item in the Playback mode 4Select a setting with v V The setting you select is zoomed and set 5Press MENU to turn off the menu Control button ɠ MENU button ɟ Mode dial Playback button To select a Setup item Press and hold MENU or select Setup...

Страница 20: ...ects a luminous sensitivity P Quality Selects the still image quality Mode REC Mode Selects the continuous shooting method Flash Level Adjusts the amount of flash light Sharpness Adjusts the sharpness of the image Setup Changes Setup items Menu for viewing Folder Selects the folder for viewing images Protect Prevents accidental erasure DPOF Adds a Print order mark Print Prints images using a PictB...

Страница 21: ...nges the folder currently used for recording images Copy Copies all images in the internal memory to a Memory Stick Duo Setup 1 LCD Backlight Selects the brightness of the LCD backlight when using the camera with batteries Beep Selects the sound produced when you operate the camera Language Selects the language to be used to display the menu items warnings and messages Initialize Initializes the s...

Страница 22: ... computer and insert the CD ROM into the CD ROM supplied drive The screen below appears When you click the Cyber shot Handbook button the screen for copying Cyber shot Handbook appears Follow the on screen instructions to copy 2 After the installation is complete double click the shortcut created on the desktop For Macintosh users 1 Turn on your computer and insert the CD ROM supplied into the CD ...

Страница 23: ...frequently The brightness of LCD Backlight is set to up The battery power is low The values shown for alkaline battery are based on commercial norms and do not apply to all alkaline batteries in all conditions The values may vary depending on the battery manufacturer type environmental conditions product setting etc The supplied alkaline battery is for trial use only You may need to purchase an ad...

Страница 24: ...No of images Battery life min DSC S650 Alkaline Approx 7000 Approx 350 NH AA DB Ni MH Approx 10600 Approx 530 DSC S700 Alkaline Approx 7000 Approx 350 NH AA DB Ni MH Approx 10600 Approx 530 Battery Battery life min DSC S650 Alkaline Approx 50 NH AA DB Ni MH Approx 200 DSC S700 Alkaline Approx 50 NH AA DB Ni MH Approx 200 ...

Страница 25: ...amera If the Memory Stick Duo has already 40 000 images stored you can not shoot more images on this camera Also Memory Stick Duo will not be able to playback images when the number of stored images exceeds 40 000 on this camera Capacity Size Internal memory Memory Stick Duo formatted with this camera Approx 24MB 64MB 128MB 256MB 512MB 1GB 2GB 4GB 7M 6 18 37 67 137 279 573 1132 13 36 73 132 268 54...

Страница 26: ...le size reaches approx 2 GB the camera stops recording automatically When images recorded using earlier Sony models are played back on this camera the display may differ from the actual image size Capacity Size Internal memory Memory Stick Duo formatted with this camera Approx 24MB 64MB 128MB 256MB 512MB 1GB 2GB 4GB 320 240 0 01 00 0 02 50 0 05 50 0 10 40 0 21 40 0 44 20 1 31 00 3 00 00 ...

Страница 27: ...y so the batteries are not charged sufficiently Clean them with a cotton swab etc When using the Nickel Metal Hydride batteries the displayed time remaining differs from the current one due to the memory effect etc Fully discharge and then charge the batteries to correct the display The batteries are dead Replace them with new ones The batteries run down too quickly You are using the camera in an ...

Страница 28: ... Delete unnecessary images page 15 Change the Memory Stick Duo You are using the Memory Stick Duo with the write protect switch and the switch is set to the LOCK position Set the switch to the recording position You cannot record images while charging the flash Set the mode dial to or when shooting still images Set the mode dial to when shooting movies Cannot insert dates on images This camera doe...

Страница 29: ...with rubber or vinyl for a long time On operating temperatures Your camera is designed for use under the temperatures between 0 C and 40 C 32 F and 104 F Shooting in extremely cold or hot places that exceed this range is not recommended On moisture condensation If the camera is brought directly from a cold to a warm location moisture may condense inside or outside the camera This moisture condensa...

Страница 30: ...ied 3 V AC LS5K AC Adaptor not supplied 4 2 V Power consumption during shooting DSC S650 1 2W DSC S700 1 2 W Operating temperature 0 to 40 C 32 to 104 F Storage temperature 20 to 60 C 4 to 140 F Dimensions DSC S650 91 0 61 0 26 5 mm 3 5 8 2 1 2 1 1 16 inches W H D excluding protrusions DSC S700 91 0 61 0 25 1 mm 3 5 8 2 1 2 1 inches W H D excluding protrusions Mass DSC S650 Approx 178 g 6 3 oz inc...

Страница 31: ...31 ...

Страница 32: ...recogida selectiva de residuos Este símbolo en el equipo o el embalaje indica que el presente producto no puede ser tratado como residuos domésticos normales sino que debe entregarse en el correspondiente punto de recogida de equipos eléctricos y electrónicos Al asegurarse de que este producto se desecha correctamente Ud ayuda a prevenir las consecuencias negativas para el medio ambiente y la salu...

Страница 33: ...guración 16 Elementos del menú 17 Elementos de configuración 18 Utilización del ordenador 19 Sistemas operativos compatibles con la conexión USB y el software suministrado 19 Visualización de la Guía práctica de Cyber shot 19 Vida útil de la batería y capacidad de la memoria 20 Duración de la batería y número de imágenes que se pueden grabar visualizar 20 Número de imágenes fijas y tiempo de graba...

Страница 34: ...impie la superficie del flash antes de utilizarlo El calor de la emisión del flash puede hacer que la suciedad de la superficie del flash se descolore o se adhiera en ella lo que ocasionaría una emisión de luz insuficiente Notas sobre la pantalla LCD La pantalla LCD está fabricada mediante tecnología de muy alta precisión de forma que más del 99 99 de los píxeles son operativos para uso efectivo N...

Страница 35: ...erías alcalinas LR6 tamaño AA 2 Cable USB específico 1 Cable de A V específico 1 Correa de la muñeca 1 CD ROM software Cyber shot Guía práctica de Cyber shot 1 Manual de instrucciones este manual 1 Coloque la correa para evitar que la cámara se dañe a causa de caídas etc Enganche ...

Страница 36: ... interna aprox 24 MB Baterías que puede utilizar con la cámara 1 NH AA 2DB paquete doble etc 2 No se garantiza el funcionamiento si se produce una bajada de tensión o si se producen otros problemas debido a la batería 2 1 Inserte el Memory Stick Duo con el lado del terminal orientado hacia el objetivo Tapa del compartimiento de la batería o el Memory Stick Duo ɟ ɠ Lado del terminal Tipo de batería...

Страница 37: ...parecerá Para extraer las baterías o el Memory Stick Duo Abra la tapa del compartimiento de la batería o el Memory Stick Duo Indicador de batería restante Instrucciones acerca de la carga restante de la batería Carga restante suficiente Batería con media carga Poca carga restante la grabación o reproducción se detendrá en breve Sustituya las baterías por otras nuevas o por baterías de hidruro de n...

Страница 38: ... con v V y a continuación pulse z 3 Seleccione Acept con B y a continuación pulse z Para cambiar la fecha y la hora Seleccione Ajuste reloj en la pantalla Ajustes página 16 Al encender la cámara Si no ajusta el reloj siempre que encienda la cámara aparecerá la pantalla Ajuste reloj Si la cámara funciona con baterías y no la utiliza durante unos tres minutos se apaga automáticamente para evitar que...

Страница 39: ...nuevo el botón del disparador a fondo Dial de modo Botón DISP Rosca para trípode parte inferior Botón Tamaño de imagen Botón del disparador ɠ Botón de zoom W T Botón de control Sitúe el motivo en el centro del cuadro de enfoque Imagen fija 1 Mantenga pulsado el botón del disparador hasta la mitad para realizar el enfoque El indicador z bloqueo AE AF parpadea en verde suena un pitido el indicador d...

Страница 40: ...nuevamente Sin indicador Macro desactivado Macro activado lado W aprox 5 cm o más lejos lado T aprox 35 cm o más lejos Modo de ajuste automático Permite tomar imágenes fácilmente con los ajustes establecidos automáticamente Modo automático de toma de imágenes programado Permite tomar imágenes con la exposición ajustada automáticamente la velocidad de obturación y el valor de la abertura También pu...

Страница 41: ...b de nuevo Para cambiar el tamaño de la imagen fija Pulse el botón Tamaño de imagen y a continuación pulse v V para seleccionar el tamaño Para desactivar el menú Tamaño de imagen pulse otra vez el botón Acerca del número de imágenes fijas grabables y el tiempo de grabación de películas El número de imágenes fijas que pueden grabarse varía según el tamaño de imagen seleccionado Imágenes fijas Pelíc...

Страница 42: ...audio conecte la cámara a salidas externas como por ejemplo un televisor un altavoz etc Para borrar imágenes 1 Visualice la imagen que desee borrar y pulse borrar 2 Seleccione Borrar con v y a continuación pulse z Para visualizar una imagen ampliada zoom de reproducción Pulse mientras se visualiza una imagen fija Para cancelar el zoom pulse Ajuste la porción v V b B Cancele el zoom de reproducción...

Страница 43: ...n que desee borrar con v V b B y a continuación pulse z para visualizar el indicador borrar de la imagen seleccionada 3 Pulse borrar 4 Seleccione Aceptar con B y a continuación pulse z Para visualizar imágenes en la pantalla de un televisor Conecte la cámara al televisor con el cable de A V específico suministrado Al terminal USB A V OUT A las tomas de entrada de audio vídeo Cable de A V específic...

Страница 44: ...a restante z Bloqueo AE AF Modo de grabación Balance del blanco ESPERA GRABAR Modo en espera grabación de una película Dial de modo selección de escena Dial de modo programa automático Modo de cámara Modo de reproducción Modo de flash Carga del flash Relación del zoom Reducción del efecto ojos rojos Sharpness Modo de medición RICH NATURAL SEPIA B W Modo de color Protección Marca de orden de impres...

Страница 45: ...stante de imágenes grabables Autodisparador Número ISO 12 12 Número de imagen Número de imágenes grabadas en la carpeta seleccionada 00 00 12 Contador 3 2 7M 5M 3M 2M VGA 16 9 101 Aviso de vibración E Aviso de poca carga restante Conexión PictBridge 2 0EV Valor de exposición Número ISO Modo de medición Flash Balance del blanco Cruz filial de medición de foco Cuadro del visor de rango AF 500 Veloci...

Страница 46: ...i el elemento deseado no aparece siga pulsando b B hasta que el elemento aparezca en la pantalla Pulse z después de seleccionar un elemento en el modo de reproducción 4Seleccione un ajuste con v V El ajuste que seleccione se ampliará y se ajustará 5Pulse MENU para desactivar el menú Botón de control ɠ Botón MENU ɟ Dial de modo Botón Reproducir Para seleccionar un elemento de configuración Mantenga...

Страница 47: ...magen Selecciona la calidad de imagen fija Mode Modo GRAB Selecciona el método de toma continua de imágenes Nivl flash Permite ajustar la cantidad de luz del flash Nitidez Permite ajustar la nitidez de la imagen Ajustes Cambia los elementos de configuración Menú para la visualización de imágenes Carpeta Selecciona la carpeta que contiene las imágenes que se visualizarán Proteger Evita el borrado a...

Страница 48: ...Copia todas las imágenes de la memoria interna en un Memory Stick Duo Ajustes 1 Luz de fondo Selecciona el brillo de la luz de fondo de la pantalla LCD cuando se utiliza la cámara con pilas Pitido Permite seleccionar el sonido que se produce al realizar una operación en la cámara Idioma Selecciona el idioma que se va a utilizar para visualizar los elementos de menú avisos y mensajes Inicializar In...

Страница 49: ...a usuarios de Windows 1 Encienda el ordenador e inserte el CD ROM suministrado en la unidad de CD ROM Aparece la pantalla siguiente Al hacer clic en el botón Cyber shot Handbook aparece la pantalla para copiar la Guía práctica de Cyber shot Siga las instrucciones que aparecen en pantalla para realizar la copia 2 Cuando finalice la instalación haga doble clic en el acceso directo que se creará en e...

Страница 50: ...ntalla LCD está ajustado en un nivel alto La batería dispone de poca carga restante Los valores indicados para las baterías alcalinas se basan en normas comerciales y no son aplicables a todos los modelos y todas las condiciones de uso Los valores pueden variar en función del fabricante y el tipo de batería las condiciones del entorno la configuración del producto etc La batería alcalina suministr...

Страница 51: ...las Batería N de imágenes Duración de la batería min DSC S650 Alcalina Aprox 7000 Aprox 350 NH AA DB Ni MH Aprox 10600 Aprox 530 DSC S700 Alcalina Aprox 7000 Aprox 350 NH AA DB Ni MH Aprox 10600 Aprox 530 Batería Duración de la batería min DSC S650 Alcalina Aprox 50 NH AA DB Ni MH Aprox 200 DSC S700 Alcalina Aprox 50 NH AA DB Ni MH Aprox 200 ...

Страница 52: ...ick Duo puede contener hasta 40 000 imágenes en esta cámara Si ya hay 40 000 imágenes almacenadas en el Memory Stick Duo no podrá tomar más imágenes en esta cámara Asimismo si hay más de 40 000 imágenes almacenadas en el Memory Stick Duo esta cámara no será capaz de reproducirlas Capacidad Tamaño Memoria interna Memory Stick Duo formateado con esta cámara Aprox 24 MB 64 MB 128 MB 256 MB 512 MB 1 G...

Страница 53: ... tamaño de archivo alcanza un valor aproximado de 2 GB la cámara dejará de grabar automáticamente Cuando se reproduzcan en esta cámara imágenes grabadas con modelos anteriores de Sony la indicación podrá variar del tamaño de imagen real Capacidad Tamaño Memoria interna Memory Stick Duo formateado con esta cámara Aprox 24 MB 64 MB 128 MB 256 MB 512 MB 1 GB 2 GB 4 GB 320 240 0 01 00 0 02 50 0 05 50 ...

Страница 54: ...cientemente Límpielos con un bastoncillo de algodón o similar Si utiliza baterías de hidruro de níquel metal el tiempo restante visualizado varía respecto del actual debido al efecto de memoria etc Descargue las baterías totalmente y vuelva a cargarlas para corregir la indicación Las baterías ya no sirven Reemplácelas por otras nuevas Las baterías se agotan muy rápidamente Está utilizando la cámar...

Страница 55: ... Borre las imágenes innecesarias página 12 Cambie el Memory Stick Duo Está utilizando el Memory Stick Duo con el conmutador de protección contra escritura ajustado en la posición LOCK Ajuste el selector en la posición de grabación No es posible grabar imágenes mientras se carga el flash Ajuste el dial de modo en o cuando tome imágenes fijas Ajuste el dial de modo en cuando tome películas No es pos...

Страница 56: ...je la cámara en contacto con objetos de goma o vinilo durante un tiempo prolongado Acerca de la temperatura de funcionamiento La cámara ha sido diseñada para utilizarse con temperaturas de entre 0 C y 40 C No se recomienda tomar imágenes en lugares extremadamente fríos o calurosos que excedan esta rango Acerca de la condensación de humedad Si se traslada la cámara directamente de un lugar frío a u...

Страница 57: ...B Full Speed USB compatible con USB 2 0 Pantalla LCD DSC S650 Panel LCD Unidad TFT de 5 1 cm tipo 2 0 Número total de puntos 115 200 480 240 puntos DSC S700 Panel LCD Unidad TFT de 6 0 cm tipo 2 4 Número total de puntos 112 320 480 234 puntos Alimentación general Alimentación baterías alcalinas LR6 tamaño AA 2 3 V Baterías de hidruro de metal de níquel HR 15 51 HR6 tamaño AA 2 no suministradas 2 4...

Страница 58: ...s países Macintosh Mac OS iMac iBook PowerBook Power Mac y eMac son marcas comerciales o marcas comerciales registradas de Apple Computer Inc Intel MMX y Pentium son marcas comerciales o marcas comerciales registradas de Intel Corporation Google es una marca comercial registrada de Google Inc Además los nombres de sistemas y productos utilizados en este manual son en general marcas comerciales o m...

Страница 59: ...29 ES ...

Страница 60: ...30 ...

Страница 61: ...31 ES ...

Страница 62: ...32 ...

Страница 63: ...33 ES ...

Страница 64: ... cliente puede encontrar información adicional sobre este producto y respuesta a las preguntas hechas con más frecuencia Printed in China Printed on 70 or more recycled paper using VOC Volatile Organic Compound free vegetable oil based ink Impreso en papel 70 o más reciclado utilizando tinta hecha con aceite vegetal exento de compuesto orgánico volátil COV ...

Отзывы: