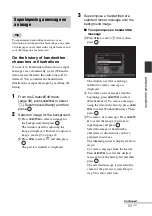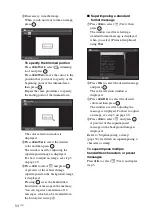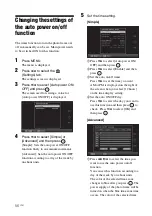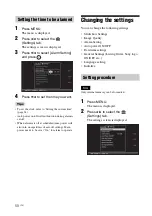
background image

52 

GB

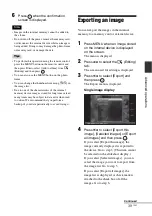
5

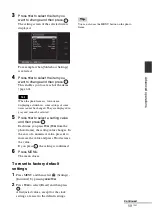
Set the calendar.

1

Press 

B

/

b

/

v

/

V

 to select the calendar 

area and press 

.

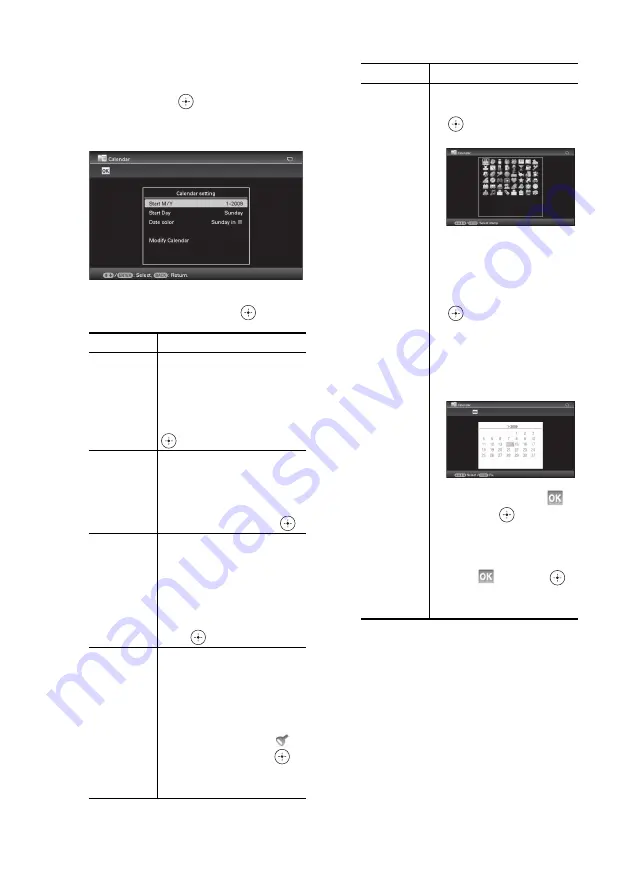
The calendar setting window is 
displayed.

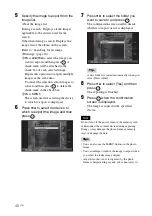
2

Press 

v

/

V

 to select the item that you 

want to set, and then press 

.

The calendar is displayed in the calendar 
area.

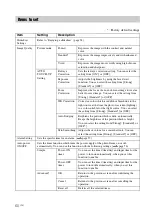
Item

Settings/Procedures

Start Y/M

Set the first month and the 
year starting the calendar. 
Press 

B

/

b

 to select the 

month or year and press 

v

/

V

 to set the number. Press 

.

Start Day

Set the day of the week 
(placed furthest left in the 
calendar). Press 

v

/

V

 to 

select “Sunday” or 
“Monday.” Then press 

.

Date color

Set the color of Saturday, 
Sunday and holiday to be 
displayed in the calendar. 
Press 

b

 and then 

v

/

V

 to 

select the desired color for 
Sunday and Saturday. Then 
press .

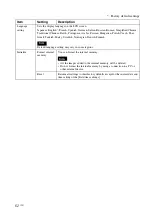
Modify 
Calendar

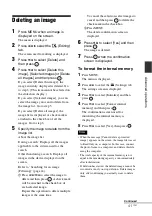
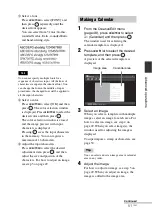
You can add a stamp or 
desired color to a specific 
day in the calendar.

When adding a stamp 
(Example)

1

Press 

B

/

b

 to select 


(Stamp), and press 

.

The stamp selection 
window is displayed.

2

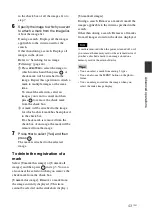
Press 

B

/

b

/

v

/

V

 to select a 

desired stamp, and press 

.

The calendar is displayed.

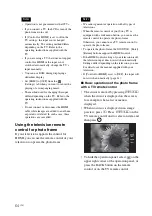
3

Press 

B

/

b

/

v

/

V

 to select a 

desired date to which to 
add the stamp and press 

.

When you want to change 
the stamp type, select the 
BACK button and then 
repeat steps 

2

 and 

3

.

4

Press 

v

/

V

 to select 


and press 

.

To exit Modify Calendar 
and return to the Calendar 
setting window, press 

B

/

b


to select 

 and press 

You can set “Date color” 
using similar procedures.

Item

Settings/Procedures

Содержание DPF-V1000

Страница 1: ...Troubleshooting Additional information Operating Instructions Before operating this unit please read this manual thoroughly and retain it for future reference Owner s Record The model and serial numbers are located at the rear Record the serial number in the space provided below Refer to these numbers whenever you call upon your Sony dealer regarding this product Model No DPF X800 X1000 DPF V800 V...

Страница 2: ...U S A CAUTION You are cautioned that any changes or modifications not expressly approved in this manual could void your authority to operate this equipment If you have any questions about this product you may call Sony Customer Information Services Center 1 800 222 SONY 7669 The number below is for the FCC related matters only Regulatory Information WARNING WARNING Declaration of Conformity Trade ...

Страница 3: ... compliant with the limits set out in the EMC Directive for using connection cables shorter than 3 meters 9 8 feet Attention The electromagnetic fields at the specific frequencies may influence the picture of this digital photo frame Notice If static electricity or electromagnetism causes data transfer to discontinue midway fail restart the application or disconnect and connect the communication c...

Страница 4: ...t or battery please contact your local Civic Office your household waste disposal service or the shop where you purchased the product Notice for the customers in the countries applying EU Directives The manufacturer of this product is Sony Corporation 1 7 1 Konan Minato ku Tokyo 108 0075 Japan The Authorized Representative for EMC and product safety is Sony Deutschland GmbH Hedelfinger Strasse 61 ...

Страница 5: ...ft Windows and Windows Vista are either registered trademarks or trademarks of Microsoft Corporation in the United States and or other countries Macintosh and Mac OS are registered trademarks of Apple Inc in the United States and or other countries CompactFlash is a trademark of SanDisk Corporation in the U S A or xD Picture Card is a trademark of FUJIFILM Corporation The Bluetooth word mark and l...

Страница 6: ... Sony Corporation reserves the right to make any modification to this manual or the information contained herein at any time without notice The software described herein may also be governed by the terms of a separate user license agreement Any design data such as sample pictures provided in this software cannot be modified or duplicated except for the purpose of personal use Any unauthorized dupl...

Страница 7: ...7 Adding images to the internal memory 37 Exporting an image 39 Deleting an image 41 Registering a mark 42 Searching for an image Filtering 44 Specifying the playback device 45 Auto Touch up 45 Adjusting the image size and position 47 Enlarging reducing an image 47 Rotating an image 47 Using the CreativeEdit function 48 Making a Scrapbook 48 Making a Calendar 51 Superimposing a message on an image...

Страница 8: ... to exchange images 69 Disconnecting your computer 70 Error messages If an error message appears 71 Troubleshooting If trouble occurs 73 Additional information Precautions 78 Safety 78 Installation 78 Cleaning 78 Restrictions on duplication 79 About memory cards 79 Memory Stick 79 SD memory card 80 xD Picture Card 80 CompactFlash card 80 Notes on using a memory card 81 Specifications 82 Index 85 ...

Страница 9: ...ore operation Enjoying your photo frame in various ways The Sony DPF X800 X1000 DPF V800 V1000 is a digital photo frame for easily displaying images taken with a digital camera or other device without using a computer Continued ...

Страница 10: ...ng modes such as the slideshow display Clock and calendar display Single view mode and Index image display page 26 xVarious modes The displayed image can be switched automatically as though you are turning the pages of an album yourself You can select from various modes including just images a clock or calendar view You can also change playback settings such as the playback order page 34 xAdding i...

Страница 11: ...otated when the photo frame is set in either the portrait or landscape position page 17 xConnecting to a high definition TV to display images on a large screen Using the photo frame s HDMI output connector you can enjoy the images stored on a memory card external device or in internal memory on a large screen with accompanying music page 63 xEasy transfer of images taken with a Bluetooth compatibl...

Страница 12: ...1 Warranty 1 In some regions the warranty is not supplied Identifying the parts For details see the pages indicated in the parentheses The illustrations are of the DPF X1000 The locations and names of buttons and connectors of the DPF X800 DPF V1000 V800 are identical to those of the DPF X1000 although the LCD screen size and shape is different Front A LCD screen B Remote sensor When using the sup...

Страница 13: ...o the AC adaptor and the wall outlet F Power Switch page 23 G VIEW MODE button page 26 H Memory Stick PRO Standard Duo slot page 25 I Access lamp J Alarm switch page 57 K Standby indicator L 1 on standby button M MENU button Displays the menu From the menu you can operate the same functions as those of the buttons on the remote control such as Slideshow Settings Rotate Add to album and Date time s...

Страница 14: ...14 GB S Buzzer T Brightness sensor U Card slot cover V Holes for hanging unit on the wall page 18 W Space for storing the stand X Connector cover ...

Страница 15: ... 26 D INDEX button page 26 This button switches from the single view mode to the index image display E SINGLE button page 26 F MENU button G BACK button H 1 on standby button I CLOCK button page 26 J Zoom in Zoom out buttons page 47 K ALBUM button page 37 L Direction B b v V buttons M enter button N ROTATE button page 47 ...

Страница 16: ... replace the battery CR2025 lithium battery with a new one 1 Pull out the battery holder While pressing in the tab of the battery holder pull out the battery holder 2 Remove the old battery from the battery holder and then insert a new battery Insert the battery so that is facing upwards 3 Reinsert the battery holder into the remote control Notes When the lithium battery becomes weak the operating...

Страница 17: ...and corrosion Incorrectly inserting shorting dismantling or heating the battery or throwing it into a fire may cause the battery to rupture or leak About descriptions in this manual The operations described in this manual are based on remote control operation When an operation is performed differently for example with the remote control and the buttons on the photo frame it will be explained in a ...

Страница 18: ...ar a CRT based television the color of the TV s display may be changed Tip It is easier to turn the stand if you wind or wrap a rubber band tightly around the stand when you remove the stand from the photo frame To display the photo frame on the wall You can hang the photo frame on the wall using the following procedure 1 Prepare screws not supplied suitable for the screw holes on the rear panel 2...

Страница 19: ...onnecting to the AC power source 1 Insert the plug of the AC adaptor into the DC IN 8 4 V jack on the rear of the photo frame 2 Connect the AC power cord to the AC adaptor and the wall outlet Notes The socket outlet should be as close as possible to the unit and easily accessible Do not place the photo frame in an unsteady location such as on an unsteady table or tilted surface Connect the AC adap...

Страница 20: ...ptor from the DC IN 8 4 V jack of the photo frame and remove the AC power cord from the outlet Even if your photo frame is turned off AC power house current is still supplied to it while connected to the wall outlet via the AC adaptor ...

Страница 21: ... CEE Type SE Type CEE Type O Type Ocean Type Countries regions Voltage Frequency Hz Plug type Austria 230 50 C Belgium 230 50 C Czech 220 50 C Denmark 230 50 C Finland 230 50 C France 230 50 C Germany 230 50 C Greece 220 50 C Hungary 220 50 C Iceland 230 50 C Ireland 230 50 C BF Italy 220 50 C Luxemburg 230 50 C Netherlands 230 50 C Norway 230 50 C Poland 220 50 C Portugal 230 50 C Romania 220 50 ...

Страница 22: ...60 A Jamaica 110 50 A Mexico 120 127 60 A Nicaragua 120 240 60 A Panama 110 220 60 A Countries regions Voltage Frequency Hz Plug type Argentina 220 50 C BF O Brazil 127 220 60 A C Chile 220 50 C Colombia 120 60 A Peru 220 60 A C Venezuela 120 60 A Countries regions Voltage Frequency Hz Plug type Iran 220 50 C BF Iraq 220 50 C BF Israel 230 50 C Saudi Arabia 127 220 50 A C BF Turkey 220 50 C UAE 24...

Страница 23: ...oto frame or remote control until the power turns off The standby indicator turns to red from green Note Do not turn the photo frame off or disconnect the AC adaptor from the photo frame before the standby indicator turns red Doing so may damage the photo frame Operations in an initial state When the photo frame is turned on without a memory card connected the initial display below appears on the ...

Страница 24: ...and then press 2Press B b to select year month and day and then press v V to select a value then press 5 Adjust the time 1Press v V to select Time and then press 2Press B b to select hour minute and second and then press v V to select a value then press 6 Select the format of the date 1Press v V to select Date Display Order and then press 2Press v V to select a format and then press Y M D M D Y D ...

Страница 25: ...ert the memory card firmly into the corresponding slot with its label side facing toward you The slot order from the top is Memory Stick Memory Stick Duo CompactFlash card SD memory card and xD Picture Card To remove a memory card Remove the memory card from its slot in the opposite direction from which it was inserted Notes When inserting the memory card it will only insert part of the way so do ...

Страница 26: ...yed on the screen when you turned the photo frame to OFF If no memory card is inserted and no device is connected the images saved in the album in the internal memory are displayed Notes Due to one of the characteristics of the internal memory device images stored for long time or read many times may be subject to data error when read too often The photo frame can display JPEG image files compatib...

Страница 27: ...27 GB Basic operations 3 Press B b v V or VIEW MODE to select the style you want and then press ...

Страница 28: ...images with the present date and time D Calendar view Displays images one after another while showing a calendar The present date and time is displayed E Time Machine Displays images with the shooting date and time The present date and time cannot be displayed F Scrap book Displays an image processed using the template in CreativeEdit G Creative H Random view Displays images while randomly switchi...

Страница 29: ...n mode ends if a button other than 1 on standby is pressed For details on the playback order in a slideshow display see page 61 You can set the interval effect listing order or color effect when you select the slideshow display Refer to Slideshow Settings page 36 You can select the single view mode when you press on the photo frame when the image you want appears in the slideshow display You can u...

Страница 30: ...se the VIEW MODE button on the photo frame Clock1 Clock2 Clock3 Clock4 Clock5 Clock6 Clock7 Clock8 Clock9 Clock10 Clock11 Calendar1 Calendar2 Calendar3 Lunar Calendar when you select Simplified Chinese in Language setting Arabic Calendar when you select Arabic in Language setting Farsi Calendar when you select Persian in Language setting ...

Страница 31: ...n on the photo frame Group Image Style Explanation A Entire image Displays an entire image in the screen You can switch the images to be displayed by pressing B b B Fit to screen Displays an image over the whole screen You can switch the images to be displayed by pressing B b C Entire image with Exif Displays image information such as the image number file name and shooting date while displaying t...

Страница 32: ...in internal memory demonstration mode starts automatically Demonstration mode ends if a button other than 1 on standby is pressed You can select the single view mode when you press on the photo frame when the image you want appears in the index image display You can use the VIEW MODE button on the photo frame Group Image Style Explanation Index A Index 1 Displays a list of large thumbnails You can...

Страница 33: ...e input device Model name of image input device Shutter speed e g 1 8 Aperture value e g F2 8 Exposure value e g 0 0EV Rotation information 4Setting information 5Image number folder file number This is displayed if the image is DCF compliant 6Shooting date time Icons Meaning Memory Stick input SD Memory Card input CompactFlash input xD Picture Card input External Device input Internal memory input...

Страница 34: ... tab The settings screen is displayed 3 Press v V to select Slideshow Settings and then press The slideshow settings screen is displayed 4 Press v V to select the item and then press Refer to the tables on the next page for details on the setting items Notes Note the following when you select a slideshow using the image stored on the memory card Due to one of the characteristics of the memory card...

Страница 35: ... When the screen is too bright it may make you feel nauseous Be careful that you do not make the brightness settings too bright when you use the photo frame Tip You can also use the VIEW MODE button on the photo frame Continued ...

Страница 36: ... reveal the next image Random Uses the above five effects randomly Shuffle ON Displays images randomly OFF Cancels shuffle playback Color effect Color Displays an image in color Sepia Displays an image in a sepia color Monochrome Displays an image in monochrome Auto Touch up Displays an image which has been corrected by the auto touch up function Display Mode You can select the view mode for the s...

Страница 37: ...ou perform a backup of your data periodically to avoid losing it Do not run a slideshow with less than 10 images continuously if you have set the interval time for the slideshow to 3 seconds You may not be able to protect some images in the internal memory Adding images to the internal memory You can use the photo frame as a digital album saving important images in the internal memory Tip In Image...

Страница 38: ...he search Other than during a search Displays all images in the device displayed on the screen Refer to Searching for an image Filtering page 44 1Press B b v V to select the image to add to the album and then press A check mark will be attached to the check box of each selected image Repeat this operation to add multiple images at the same time To cancel the selection select images to cancel and t...

Страница 39: ... We recommend that you perform a backup of your data periodically to avoid losing it Exporting an image You can export the images in the internal memory to a memory card or external device 1 Press MENU when an image stored on the internal device is displayed on the screen The menu is displayed 2 Press B b to select the Editing tab The screen used for editing is displayed 3 Press v V to select Expo...

Страница 40: ...s displayed 6 Press v V to select the device to which to export the image and then press 7 Press v V to select the folder you want to save to and press The confirmation screen used to decide whether to export or not is displayed Tip A new folder is created automatically when you select New folder 8 Press v V to select Yes and then press The exporting is finished 9 Press when the confirmation scree...

Страница 41: ... check mark will be attached to the check box of each selected image Repeat this operation to delete multiple images at the same time To cancel the selection select images to cancel and then press to delete the check mark in the check box 2Press MENU The delete confirmation screen is displayed 6 Press v V to select Yes and then press The image is deleted 7 Press when the confirmation screen is dis...

Страница 42: ...ess B b to select the Editing tab The screen used for editing is displayed 3 Press v V to select Marking and then press 4 Press v V to select the mark you want and then press 5 Press v V to select Mark this image Selected images or Mark all images and then press If you select Mark this image the image currently displayed will be marked and showed in the future Go to step 7 This item cannot be sele...

Страница 43: ...age the mark will be removed from the image 7 Press v V to select Yes and then press The mark is attached to the selected image To delete the registration of a mark Select Unmark this image or Unmark all images and then press in step 5 You can also cancel the selection when you remove the check mark from the check box Unmark this image Removes a mark from the image currently displayed This item ca...

Страница 44: ...older Search by vertical horizontal Filters by the image orientation Search by mark Filters by the mark 5 Press v V to select the item you want and then press To cancel the search for an image Press the MENU button when an image is displayed on the screen and then select Exit search show all photo To change the criteria for a search Press the BACK button when an image you searched for is displayed...

Страница 45: ...age 60 for details on each level Red eye Correction Automatically corrects red eye caused by the flash Exposure Correction Adjusts the brightness by using the face detect function Focus Correction Improves the focus of an out of focus image to create a better focused image WB Correction Corrects a color which is reddish or bluish due to the light source at the time the photo was taken lighting to ...

Страница 46: ... displayed after saving is finished To return to the original image image before correction Select Cancel and then press in step 2 Notes The effect of the Auto Touch up function may not appear on the corrected images depending on the images Depending on the image it may take a while for the correction Tips The original image is the same as it was before correction The corrected image is saved on t...

Страница 47: ...image is saved as a new image If you select Overwrite the image is overwritten A confirmation screen is displayed when you select Overwrite Go to step 4 on page 46 Notes Enlarging an image may reduce the quality depending on the image size It is not possible to enlarge an image using the buttons on the photo frame Press ROTATE on the remote control Each press of the button rotates the image 90 deg...

Страница 48: ...ab The screen used for editing is displayed 3 Press v V to select CreativeEdit and then press The screen used for CreativeEdit is displayed 1 From the CreativeEdit menu press B b v V to select Scrapbook and then press The window for selecting a theme is displayed 2 Press B b v V to select the desired theme then press The window used for selecting templates of the selected theme is displayed 3 Pres...

Страница 49: ... added to the image area To add an image for another image area repeat steps 4 and 5 To superimpose characters or stamps on the image proceed with step 7 7 Superimpose characters or stamps Press v V to select the desired setting such as stamp or characters and then press Image area Adjustment tools Items Procedures Increases or reduces the size of an image when the buttons are pressed Move the ima...

Страница 50: ...lected on the next stamp x Superimposing characters 1Press v V to select Keyboard after selecting Text using B b and then press The keyboard is displayed 2Input characters Press B b v V to select the desired character and then press The selected characters are input in the character input box You can enter up to 50 characters To change the character or symbol Select A a and then press Each time yo...

Страница 51: ...imum of 16 characters 5Adjust the input characters Press B b v V to select the desired adjustment item press and then adjust the size and position of the characters For how to adjust an image see step 5 on page 49 1 From the CreativeEdit menu page 48 press B b v V to select Calendar and then press The window used for selecting the calendar template is displayed 2 Press B b v V to select the desire...

Страница 52: ... holiday to be displayed in the calendar Press b and then v V to select the desired color for Sunday and Saturday Then press Modify Calendar You can add a stamp or desired color to a specific day in the calendar When adding a stamp Example 1 Press B b to select Stamp and press The stamp selection window is displayed 2 Press B b v V to select a desired stamp and press The calendar is displayed 3 Pr...

Страница 53: ... 5 on page 49 2Press B b to select and then press The preview window is displayed 3 Superimpose a handwritten or a standard format message over the background image x To superimpose a handwritten message 1Press B b to select Text then press The window used for selecting a method to create a message is displayed 2 To create a new message from the beginning press B b v V to select Freehand new To cr...

Страница 54: ...s the handwritten illustration or message in the memory You can register a maximum of 12 messages which can be recalled from the history list in step 3 x Superimposing a standard format message 1Press B b to select Text then press The window used for selecting a standard format message is displayed when you select Preinstalled phrase using v V 2Press v V to select the desired message and press The...

Страница 55: ... panels 4 panels 9 panels 13 panels 16 panels 1 From the CreativeEdit menu page 48 press B b v V to select Layout Print and then press The Layout Print templates are displayed 2 Press B b v V to select the desired template then press A preview of the selected template is displayed 3 Select an image When you select a template with multiple images select an image for each area For how to select an i...

Страница 56: ... the week by one hour units 5 Set the time setting Simple 1Press v V to select Auto power ON OFF and then press 2Press v V to select Enable and then press 3Set the auto on off timer Press v V to set the time you want AM or PM is displayed on the right of the screen when you select 12 hours on the time display setting 4Set the auto ON OFF day Press v V to select the day you want to use this functio...

Страница 57: ...r ON during the standby mode 2Press B b v V to select OK Using the alarm function You can use the photo frame as an alarm clock Set to the alarm switch on the rear panel to ON Under condition of main power switch set to On the alarm sound and alarm mode screen will appear at the scheduled alarm time To turn off the alarm Set the alarm switch on the rear panel to OFF The alarm is stopped although a...

Страница 58: ...cheduled time power will also turn on regardless of auto off settings Main power needs to be set at On for alarm to operate Changing the settings You can change the following settings Slideshow Settings Image Quality Alarm Setting Auto power ON OFF Date time settings General Settings Listing Order Sony logo ON OFF etc Language setting Initialize Note Only internal memory can be formatted 1 Press M...

Страница 59: ...isplayed in gray and cannot be selected 5 Press v V to select a setting value and then press Each time you press v V v V from the photo frame the setting value changes In the case of a numerical value press V to increase the value and press v to decrease the value If you press the setting is confirmed 6 Press MENU The menu closes To reset to factory default settings 1 Press MENU and then select Se...

Страница 60: ...hting to a color suitable for that light source You can select the setting from Strong Standard or OFF Auto Dodging Brightens the portion which is dark automatically Keeps the brightness of the portion which is bright You can select the setting from Strong Standard or OFF Skin Smoothing Adjusts the skin tone for a smoother look You can select the setting from Strong Standard or OFF Alarm Setting S...

Страница 61: ... and saves them in the internal memory that you can save more images Be aware that deterioration in image quality compared to the original images is noticeable when the images are displayed on a large monitor via the HDMI OUT connector or a computer Original Saves images to the internal memory without compressing them There is no deterioration but you can save fewer images Control for HDMI ON OFF ...

Страница 62: ...Danish Finnish Note Default language setting may vary in some regions Initialize Format internal memory You can format the internal memory Notes All the images added to the internal memory will be deleted Do not format the internal memory by using a connection to a PC or other external device Reset Returns all settings to their factory defaults except for the current date and time setting of the D...

Страница 63: ...flower petal and the textures of sand and waves on a large screen Note Depending on the original images high definition display may not be possible 1 Connect the photo frame to the AC power source page 19 2 Prepare a commercially available HDMI cable Notes Use an HDMI cable that is less than 3 meters long Use an HDMI cable with the HDMI logo 3 Connect the HDMI OUT connector A type connector of the...

Страница 64: ... remote control of your television to operate the photo frame Notes We cannot guarantee operation with all types of televisions When the remote control of your Sony TV is equipped with a link menu button you can use the remote control to operate the photo frame Otherwise you cannot use a TV remote control to operate the photo frame To operate the photo frame the 5 4 Enter Return buttons support th...

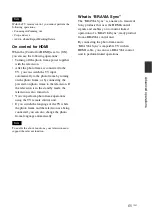
Страница 65: ...television is in the standby mode the television is also turned on You can perform photo frame operations using the TV remote control unit If you switch the language of the TV while the photo frame and the television are being connected you can also change the photo frame language automatically Note To enable the above functions your television must support the relevant function What is BRAVIA Syn...

Страница 66: ... Storage 3 Turn the photo frame to ON page 23 4 Connect the digital camera or external device to the EXT INTERFACE connector Use the USB cable supplied with the digital camera or external device to connect to the photo frame 5 Select the playback device page 45 An image on the device is displayed on the screen For details on the slideshow refer to page 34 For details on adding images to the intern...

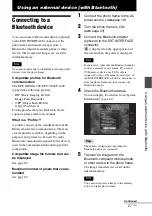
Страница 67: ...cation possible the devices used in the communicated should support the same profile Compatible image file formats that can be displayed See page 82 Maximum number of pixels that can be handled See page 82 1 Connect the photo frame to the AC power source page 19 2 Turn the photo frame to ON page 23 3 Connect the Bluetooth adaptor optional to the EXT INTERFACE connector is displayed on the upper po...

Страница 68: ...bjects or a wall Where a wireless LAN is established or a microwave oven is being used near by or other electromagnetic waves are emitted We cannot guarantee that this product works with all devices enabled with Bluetooth wireless technology Sony cannot assume any responsibility for any information leakage that may be caused by the use of Bluetooth communications Sony cannot accept responsibilitie...

Страница 69: ...ice being used simultaneously Do not disconnect the USB cable during data communication Operation with all computers that satisfy the recommended system requirements is not guaranteed The photo frame has been demonstrated as operable when connected to PC or Sony digital photo printer When other devices are connected to the photo frame these devices may not recognize the internal memory of the phot...

Страница 70: ...the shooting date on the index image display etc as the information on the shooting date may have been changed or lost when you edited or saved that image file on a computer When images from the computer are saved in the internal memory of the photo frame the image files are saved without being compressed As a result fewer images may be able to be saved to the internal memory of the photo frame Im...

Страница 71: ...ry card is inserted Or an unsupported external device is connected to the EXT INTERFACE connector Use a memory card or external device that is supported by the photo frame No images on file There is no image file that can be displayed on the screen of the photo frame on the memory card or the external device Use a memory card or on external device containing image files that can be displayed with ...

Страница 72: ...emory Stick is read only A Memory Stick ROM is inserted To save the images use the Memory Stick recommended The Memory Stick is protected A protected Memory Stick is inserted To edit and save the images use an external device to remove protection Media format not supported In case of a memory card use your digital camera or other device to format the memory card In case of the internal memory form...

Страница 73: ...mory card inserted or an external device connected properly c Insert a memory card or connect an external device properly pages 25 67 Does the memory card contain images saved with a digital camera or other device Are images stored on the external device c Insert a memory card containing images or connect an external device containing images c Check the file formats that can be displayed page 82 I...

Страница 74: ... is displayed again the image cannot be displayed because the image file is not supported by the photo frame Does the mark displayed below appear in the index view c If the mark shown on the left is displayed the image file is supported by the photo frame but the thumbnail data or image itself cannot be opened Select the mark and press If the mark shown on the left is displayed again the image can...

Страница 75: ...width Symptom Check item Cause Solutions Cannot save an image Is the memory card write protected c Cancel write protection and try saving again Is the write protect switch of the memory card in the LOCK position c Slide the write protect switch to the enable position Is the memory card full c Replace the memory card with one with sufficient free space Or delete any unwanted images page 41 Is the i...

Страница 76: ...isplayed Is the cable connected properly c Connect the cable properly Is the photo frame turned on c Turn both the photo frame and the camera to ON Nothing happens even if the USB cable is disconnected and then re connected c An over current error may have occurred with the photo frame To recover from the error turn the power of the photo frame off and then back on Images are not displayed on the ...

Страница 77: ... the battery inserted in the remote control properly c Replace the battery page 16 c Insert a battery page 16 c Insert a battery in the proper orientation page 16 c Point the top end of the remote control towards the remote sensor on the photo frame page 16 c Remove any obstruction between the remote control and the remote sensor ...

Страница 78: ... the AC adaptor Be sure to use the AC adaptor supplied with the photo frame Do not use other AC adaptors as this may cause a malfunction Do not use the supplied AC adaptor for other devices Do not use an electrical transformer travel converter as this may cause overheating or a malfunction In case the cord of the AC adaptor is damaged do not use it any longer as this may be dangerous On moisture c...

Страница 79: ...atible with both standard size and Duo size media Without a Memory Stick Duo adaptor you can use both a standard size Memory Stick and the compact size Memory Stick Duo 3 When using a Memory Stick Micro with the photo frame always insert it into an M2 adaptor 4 M2 is an abbreviation for Memory Stick Micro In this section M2 is used to describe a Memory Stick Micro 5 Data reading recording that req...

Страница 80: ...e data if you slide the write protect switch to LOCK Do not attach any other material than the supplied label on the labelling position When you attach the supplied label be sure to attach it to the labelling position Be careful that the label does not stick out The SD memory card slot of the photo frame allows you to use the following SD memory card 1 miniSD card microSD card An adaptor is necess...

Страница 81: ...on of the card and the correct insertion slot When inserting the memory card it will only insert part of the way so do not try to force it as this could damage the memory card and or photo frame Do not remove a card or turn off the photo frame while the photo frame is reading or writing data or the access indicator is flashing Otherwise data may be rendered unreadable or be erased We recommend tha...

Страница 82: ...le USB connector TypeB Hi Speed USB Bluetooth EXT INTERFACE connector TypeA Hi Speed USB Slots Memory Stick PRO slot SD memory card MMC xD Picture Card slot CompactFlash card Microdrive slot Compatible image file formats JPEG DCF 2 0 compatible Exif 2 21 compatible JFIF 1 TIFF Exif 2 21 compatible BMP 1 4 8 16 24 32 bit Windows format RAW preview only 2 SRF SR2 ARW 2 0 or lower version Some image ...

Страница 83: ...cluded items on page 12 x AC adaptor AC DPF200 Power requirements 100 V to 240 V 50 60 Hz 0 35 A 0 18 A Power consumption 18 W Rated output voltage 8 4 V Dimensions Approx 48 29 81 mm 1 15 16 1 3 16 3 1 4 inches width height depth excluding the protruding parts Mass Approx 140 g 5 oz See the label of AC adaptor for more details Design and specifications are subject to change without notice 1 Basel...

Страница 84: ...the images taken by 2 000 000 pixels equivalent camera are saved The value may vary depending on the shooting condition Customer support home page The latest support information is available at the following home page address http www sony net ...

Страница 85: ... G General Settings 61 H HDMI OUT 63 High definition TV 63 I Image file size 61 Image Quality 60 Index image display 32 Initialize 62 L Language setting 61 M Mass storage compatible devices 66 Memory cards 79 Memory Stick 79 CompactFlash card 80 Notes on use 81 SD memory card 80 xD Picture Card 80 P Placing in portrait or landscape orientation 17 Playback device 45 Precautions 78 R Remote control ...

Страница 86: ......

Страница 87: ......

Страница 88: ...Sony Corporation Printed in China Printed using VOC Volatile Organic Compound free vegetable oil based ink ...

Отзывы: