background image

DPF-D830/D830L

– 6 –

Set the destination when the MAIN PWB ASSY SERVICE was replaced.

2-1.  HOW  TO  CHANGE  THE  DESTINATION

Procedure

1.  Plug the AC adapter attached to the set into the DC IN 12V terminal 

on the rear panel of the set and insert the power cord into the socket. 

Press  the 

(on/standby)  button  to  turn  off  the  power  once.

(The power switch LED on the set changes from green to red.)

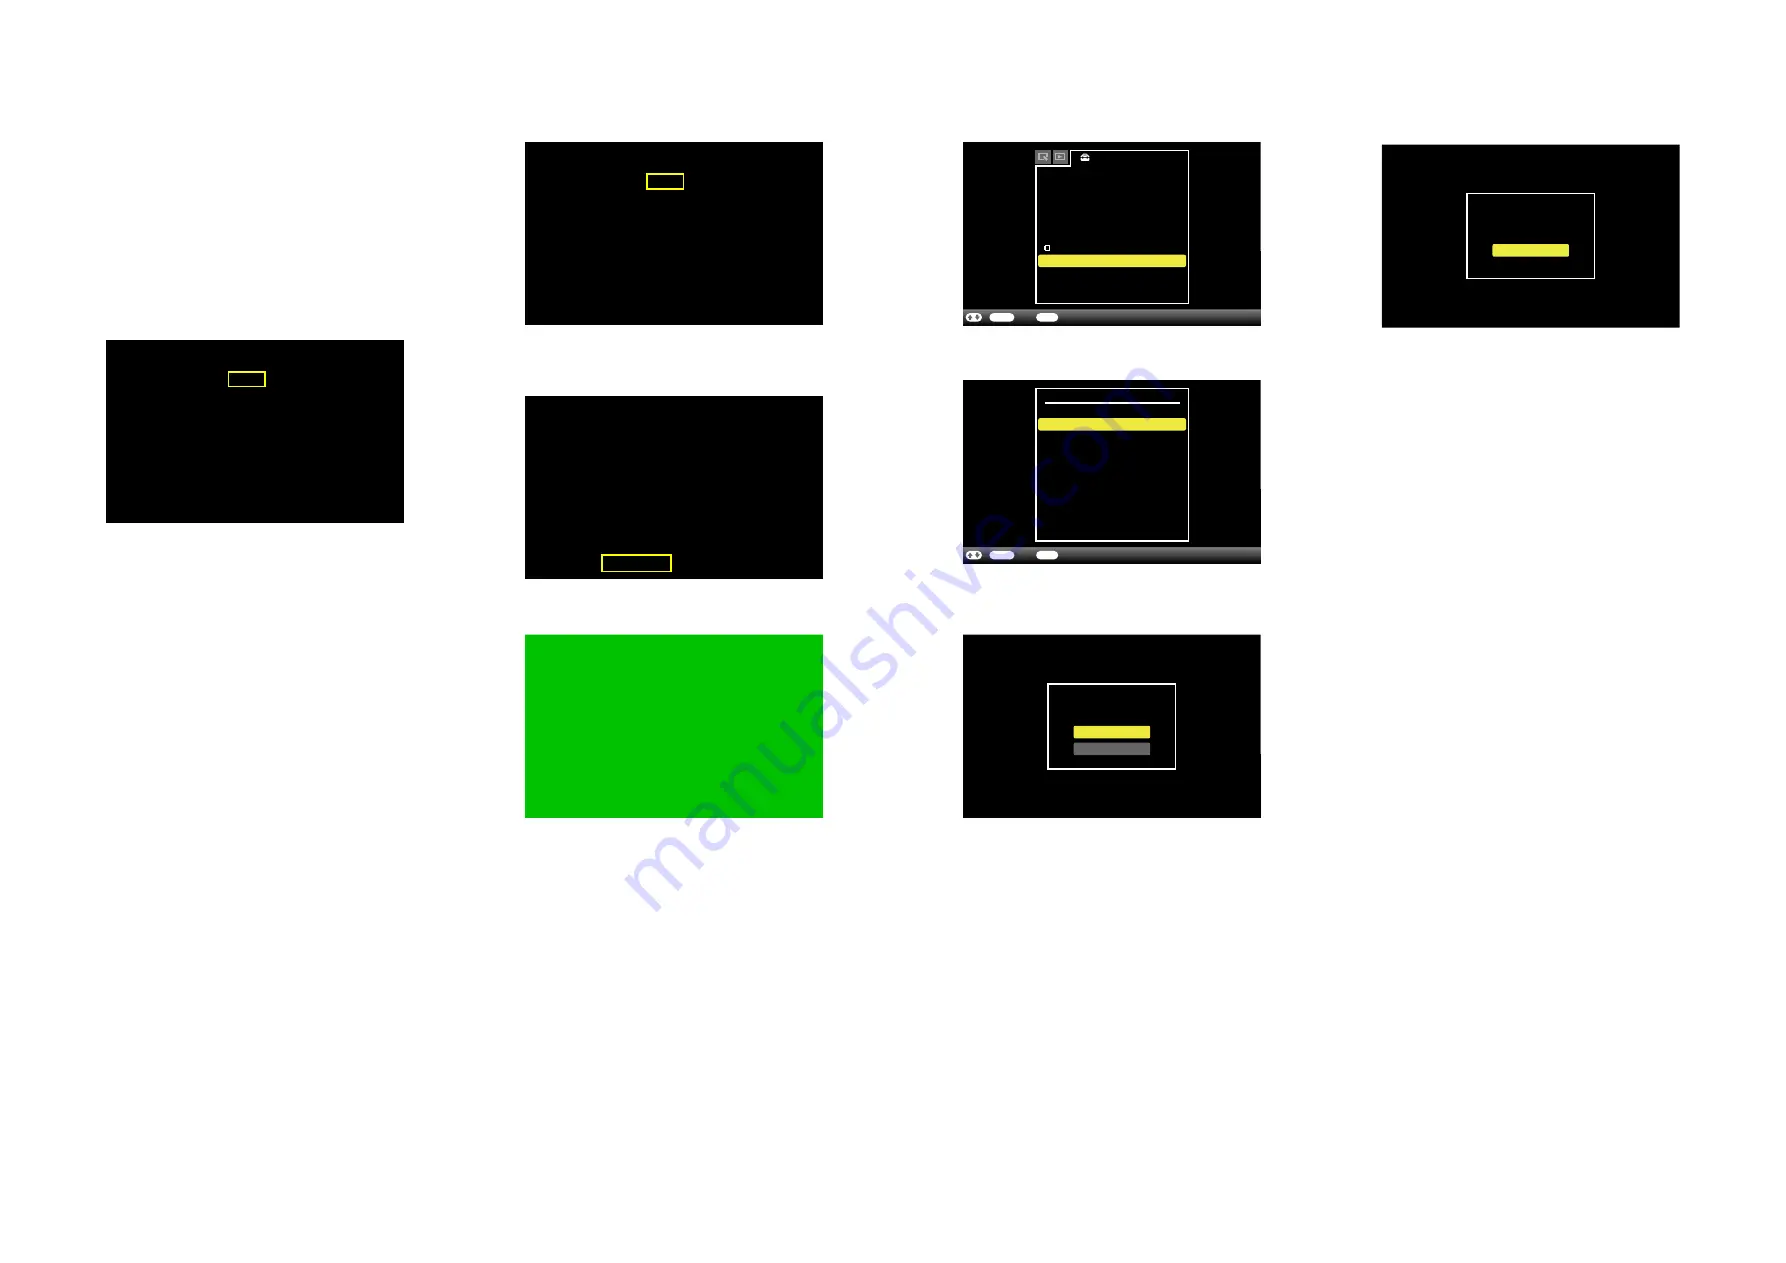
2.  With the [VIEW MODE] button and [MENU] button pressed, turn 

on  the 

(on/standby)  button,  and  when  the  default  setting

screen (Fig. 2-1-1) appears, release the [VIEW MODE] button and 

[MENU] button.

2-2.  CONFIRMATION OF DESTINATION

1.  Press the [MENU] button to display the menu, and if the language 

you selected is set, the setting has been completed.

– ENGLISH –

Fig. 2-1-1

Model:

CED

CEP

CEU

E37

E33

E32

JE3

KR2

CN9

TW6

HK4

Restore all setting

XXXXXXXXX XXXXXXXXX - X

U2

CA2

CEK

Destination:

AR2

BR4

E35

J1

AU3

D830L

D830

Fig. 2-1-2

Model:

CED

CEP

CEU

E37

E33

E32

JE3

KR2

CN9

TW6

HK4

Restore all setting

XXXXXXXXX XXXXXXXXX - X

U2

CA2

CEK

Destination:

AR2

BR4

E35

J1

AU3

D830L

D830

Fig. 2-1-3

Model:

CED

CEP

CEU

E37

E33

E32

JE3

KR2

CN9

TW6

HK4

Restore all setting

XXXXXXXXX XXXXXXXXX - X

U2

CA2

CEK

Destination:

AR2

BR4

E35

J1

AU3

D830L

D830

Fig. 2-1-4

Fig. 2-1-5

Settings

Slideshow Settings

Auto Power ON/OFF
Date/time Settings
General Settings
System Information


Language Setting

Initialize

ENTER

BACK

Select

End

/

A

Slideshow Sound Setting

Fig. 2-1-

6

ENTER

BACK

Select

Return

/

Initialize

Format internal memory

Initialize settings

All settings will be
returned to factory default.

Yes

Fig. 2-1-

7

No

Completed

OK

Fig. 2-1-

8

3.  Check  that  the  model  name  displayed  on  the  side  of  “Model” 

name meets the following: 

D830 

DPF-D830

D830L 

DPF-D830L

Note: 

Using [

B

]


[

b

] buttons, move a yellow frame to the model   


name to be set.

4.  Red characters of “Destination” show default setting of this set. 

(Fig.  2-1-1  shows  that  the  destination  has  been  set  to  J1) 

Using  [

V

]  [

v

]  [

B

]


[

b

]  buttons,  move  a  yellow  frame  to  the

destination to be set. (Fig. 2-1-1 shows that U2 has been selected as 

destination.)

5.  Press the [ENTER] button, and the characters will change to red, 

indicating that the selected destination was set. (Fig. 2-1-2) 

6.  With  a  yellow  frame  moved  to  “Restore  all  setting”,  press  the 

[ENTER] button. (Fig. 2-1-3)

7.  The screen becomes green and the setting is complete. (Fig. 2-1-4)

8.  With green screen displayed, unplug the AC adapter from the DC 

IN 12V terminal.

9.  Press the 

(on/standby) button to turn off the power once.

10.  Plug the AC adapter into the DC IN 12V  terminal and turn on the 

power.

11.  Press the [MENU] button to display the Settings menu, and select 

“Initialize” to execute. (Fig. 2-1-5)

12.  Select “Initialize settings” of “Initialize” to execute. (Fig. 2-1-6)

13.  Select “Yes” for the dialog message “All settings will be returned 

to factory default.” to execute. (Fig. 2-1-7)

14.  Select “OK” for the dialog message “Completed” to finish all the 

initialize settings. (Fig. 2-1-8)

Содержание DPF-D1020

Страница 1: ... Sony Techno Create Corporation Ver 1 0 2010 09 DIGITAL PHOTO FRAME 9 834 536 11 DPF D830 D830L US Model Canadian Model AEP Model UK Model East European Model E Model Russian Model Australian Model Chinese Model Japanese Model Tourist Model Ver Date History Contents S M Rev issued 1 0 2010 09 Official Release ...

Страница 2: ...V to 240 V 50 Hz 60 Hz 0 4 A Rated output voltage 12 V 1 5 A Dimensions depth width height Approx 64 mm 50 mm 30 mm 2 5 8 2 1 excluding the protruding parts Mass Approx 110 g 3 See the label of AC adaptor for more details Design and specifications are subject to change without notice 1 Baseline JPEG with 4 4 4 4 2 2 or 4 2 0 format 2 RAW files of a Sony α camera are displayed as thumbnail preview ...

Страница 3: ...を確認してください 5 チップ部品交換時の注意 取外した部品は再使用しないでください タンタルコンデンサのマイナス側は熱に弱いため交換時 は注意してください 6 フレキシブルプリント基板の取扱いについて コテ先温度を270 前後にして行なってください 同一パターンに何度もコテ先を当てないでください 3回以内 パターンに力が加わらないよう注意してください サービス 点検時には次のことにご注意ください 無鉛半田について 本機には無鉛半田が使用されています 無鉛半田を使用している基板には 無鉛 Lead Free を意味する レッドフリーマークリントされています 注意 基板サイズによっては 無鉛半田を使用していてもレッ ドフリーマークがプリントされていないものがありま す レッドフリーマーク 無鉛半田には 以下の特性があります 融点が従来の半田よりも約40 高い 従来の半田こてをそのまま使用する...

Страница 4: ...CE BLACK 16 4 267 995 01 4DIRECTION BUTTON S SERVICE SILVER 16 4 267 996 01 4DIRECTION BUTTON B SERVICE BLACK 17 4 267 997 01 ENTER BUTTON S SERVICE SILVER 17 4 267 998 01 ENTER BUTTON B SERVICE BLACK 18 1 842 517 11 CONNECTOR USB SOCKET 19 1 842 518 11 CONNECTOR USB SOCKET 20 4 267 999 01 LIGHT PIPE SERVICE 21 4 268 000 01 CONDUCTIVE TAPE SERVICE Note6 Note Note2 Attach the sponge to the LCD Assy...

Страница 5: ... 262 216 41 SIMPLIFIED CHINESE JE E Saudi Hong Kong 4 262 216 51 TRADITIONAL CHINESE 4 262 216 61 SIMPLIFIED CHINESE CH CD ROM 4 265 432 01 EXCEPT CH 4 265 301 01 JAPANESE 4 265 301 11 ENGLISH 4 265 301 21 FRENCH 4 265 301 31 GERMAN 4 265 301 41 DUTCH 4 265 301 51 ITALIAN 4 265 301 61 SPANISH 4 265 301 71 PORTUGUESE 4 265 301 81 RUSSIAN 4 265 301 91 UKRAINIAN 4 265 304 11 ARABIC 4 265 304 21 PERSI...

Страница 6: ...g Initialize ENTER BACK Select End A Slideshow Sound Setting Fig 2 1 6 ENTER BACK Select Return Initialize Format internal memory Initialize settings All settings will be returned to factory default Yes Fig 2 1 7 No Completed OK Fig 2 1 8 3 Check that the model name displayed on the side of Model name meets the following D830 DPF D830 D830L DPF D830L Note Using B b buttons move a yellow frame to t...

Страница 7: ...tination AR2 BR4 E35 J1 AU3 D830L D830 図2 1 3 図2 1 4 図2 1 5 設定 スライドショー設定 Slideshow Sound Settings 決定 戻る 項目を選択 終了 自動電源ON OFF設定 時計設定 本体設定 本体情報表示 言語設定 Language 工場出荷状態に戻す A 図2 1 6 工場出荷状態に戻す 内蔵メモリーの初期化 設定の初期化 決定 戻る 項目を選択 前へ戻る 図2 1 7 工場出荷時の設定に戻しますか はい いいえ 図2 1 8 設定の初期化が終了しました OK 3 Model の横に表示されたモデル名が下記と合っているこ とを確認してください D830 DPF D830 D830L DPF D830L 注 黄色枠を設定したいモデル名に B b ボタンで移動させま す 4 Destination の赤文字がこの...

Отзывы: