background image

ES


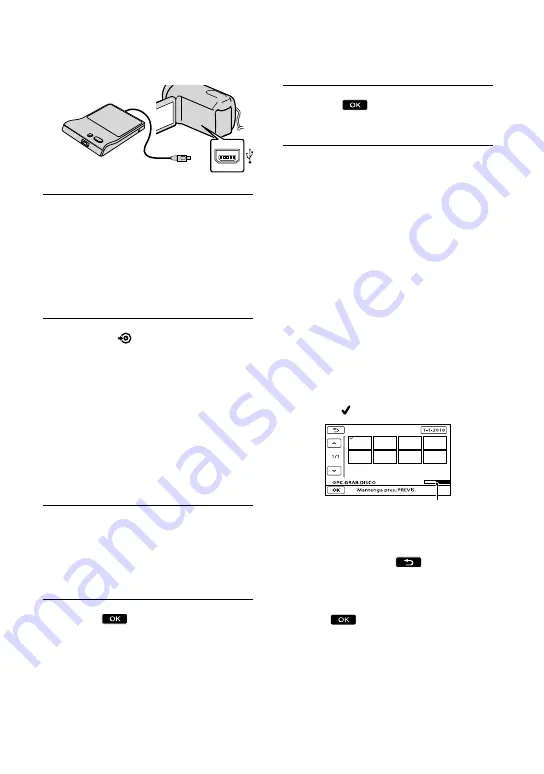
Inserte un disco no utilizado 
anteriormente en la grabadora de 
DVD y cierre la bandeja de discos.

La pantalla [GRABAR EN DISCO] 

aparece en la pantalla de la 

videocámara.


Presione 

 (DISC BURN) en la 

grabadora de DVD.

Las películas grabadas en el soporte 

de grabación interno que no se han 

guardado en ningún disco se grabarán 

en el disco (DCR-SR68/SR88/SX44/

SX63).

Las películas que no se han guardado 

en ningún disco se grabarán en el disco 

(DCR-SX43).


Repita los pasos 3 y 4 cuando 
el tamaño de memoria total de 
las películas que desea grabar 
supere el tamaño del disco.


Toque 


 [FIN] 


[EXPULSAR DISCO] en la pantalla 
de la videocámara. 

Extraiga el disco una vez que finalice la 

operación.


Toque 

 y, a continuación, 

desconecte el cable USB.

Para personalizar un disco con OPC.

GRAB.DISCO

Lleve a cabo esta operación en los 

siguientes casos:

Al copiar una imagen deseada

Al crear varias copias del mismo disco

Al copiar imágenes en la tarjeta de memoria  

(DCR-SR68/SR88/SX44/SX63)

 Toque [OPC.GRAB.DISCO] en el paso 

4.

 Seleccione el soporte de grabación que 

contiene las películas que desea guardar


(DCR-SR68/SR88/SX44/SX63).

 Toque la película que desea grabar en el 

disco.

Aparece  .

Mantenga presionada la imagen en 

la pantalla de cristal líquido para 

confirmarla. Toque 

 para volver a la 

pantalla anterior.

Al tocar la fecha, puede buscar imágenes 

por la fecha.

 Toque 


 [SÍ] en la pantalla de la 

videocámara.

Para crear otro disco con el mismo 

contenido, inserte un disco nuevo y toque 

[CREAR UN DISCO IGUAL].

 Al finalizar la operación, toque 

[SALIR] 

 [FIN] en la pantalla de la 

videocámara.


Capacidad restante del disco

Содержание DCR-SR68/L - Hard Disk Drive Handycam Camcorder

Страница 1: ...2010 Sony Corporation Operating Guide US Guía de operaciones ES DCR SR68 SR88 SX43 SX44 SX63 Additional information on this product and answers to frequently asked questions can be found at our Customer Support Website http www sony net Printed in China ...

Страница 2: ...d do not expose the unit to rain or moisture Do not expose the batteries to excessive heat such as sunshine fire or the like This symbol is intended to alert the user to the presence of uninsulated dangerous voltage within the product s enclosure that may be of sufficient magnitude to constitute a risk of electric shock to persons This symbol is intended to alert the user to the presence of import...

Страница 3: ...et consult an electrician for replacement of the obsolete outlet Protect the power cord from being walked on or pinched particularly at plugs convenience receptacles and the point where they exit from the apparatus Only use attachments accessories specified by the manufacturer Use only with the cart stand tripod bracket or table specified by the manufacturer or sold with the apparatus When a cart ...

Страница 4: ... 1 15P plug rated for 125 V 15 A Europe Countries regions Voltage Frequency Hz Plug type Austria 230 50 C Belgium 230 50 C Czech 220 50 C Denmark 230 50 C Finland 230 50 C France 230 50 C Germany 230 50 C Greece 220 50 C Hungary 220 50 C Iceland 230 50 C Ireland 230 50 C BF Italy 220 50 C Luxemburg 230 50 C Netherlands 230 50 C Norway 230 50 C Poland 220 50 C Portugal 230 50 C Romania 220 50 C Rus...

Страница 5: ...60 A Jamaica 110 50 A Mexico 120 127 60 A Nicaragua 120 240 60 A Panama 110 220 60 A South America Countries regions Voltage Frequency Hz Plug type Argentina 220 50 C BF O Brazil 127 220 60 A C Chile 220 50 C Colombia 120 60 A Peru 220 60 A C Venezuela 120 60 A Middle East Countries regions Voltage Frequency Hz Plug type Iran 220 50 C BF Iraq 220 50 C BF Israel 230 50 C Saudi Arabia 127 220 50 A C...

Страница 6: ...e specified type only Otherwise fire or injury may result AC Adaptor Do not use the AC Adaptor placed in a narrow space such as between a wall and furniture Use the nearby wall outlet wall socket when using the AC Adaptor Disconnect the AC Adaptor from the wall outlet wall socket immediately if any malfunction occurs while using your camcorder Even if your camcorder is turned off AC power source m...

Страница 7: ...terference that may cause undesired operation Declaration of Conformity Trade Name SONY Model No DCR SX63 Responsible Party Sony Electronics Inc Address 16530 Via Esprillo San Diego CA 92127 U S A Telephone No 858 942 2230 This device complies with Part 15 of the FCC Rules Operation is subject to the following two conditions 1 This device may not cause harmful interference and 2 this device must a...

Страница 8: ...t the interference by one or more of the following measures Reorient or relocate the receiving antenna Increase the separation between the equipment and receiver Connect the equipment into an outlet on a circuit different from that to which the receiver is connected Consult the dealer or an experienced radio TV technician for help The supplied interface cable must be used with the equipment in ord...

Страница 9: ...age and sound are recorded without any problems Compensation for the contents of recordings cannot be provided even if recording or playback is not possible due to a malfunction of the camcorder storage media etc TV color systems differ depending on the country region To view your recordings on a TV you need an NTSC system based TV Television programs films video tapes and other materials may be c...

Страница 10: ...ansfer Function The number value indicates the amount of light from a subject coming into the lens Notes on optional accessories We recommend using genuine Sony accessories Availability of such products is subject to country region About images illustrations and screen displays of this manual The example images used in this manual for illustration purposes are captured using a digital still camera...

Страница 11: ...y do not crash the camcorder against an object Do not use your camcorder in very loud areas On the drop sensor DCR SR68 SR88 To protect the internal hard disk from shock by dropping the camcorder has a drop sensor function When a drop occurs or under a non gravity condition the block noise made when this function is activated by the camcorder may also be recorded If the drop sensor catches a drop ...

Страница 12: ... photos p 26 Playing movies and photos Playback on the camcorder p 28 Playing images on a TV p 31 Saving images Saving movies and photos with a computer p 36 Saving movies and photos in external media p 43 Saving images with a DVD writer recorder p 45 Deleting movies and photos p 34 If you delete the image data that has been saved on your computer or a disc you can record new images on the free me...

Страница 13: ...o memory card DCR SR68 SR88 SX44 SX63 22 Recording Playback Recording 23 Playback on the camcorder 28 Playing images on a TV 31 Making good use of your camcorder Deleting movies and photos 34 Saving movies and photos with a computer Preparing a computer Windows 36 When using a Macintosh 36 Starting PMB Picture Motion Browser 39 Creating a disc with one touch One Touch Disc Burn 39 Importing movies...

Страница 14: ...amcorder Using menus 51 Getting detailed information from the Handycam Handbook 57 Additional information Troubleshooting 58 Precautions 60 Specifications 62 Quick reference Screen indicators 66 Parts and controls 67 Index 70 ...

Страница 15: ...ry pack DCR SR68 SR88 DCR SX43 SX44 SX63 Battery pack DC IN jack CHG charge lamp DC plug AC Adaptor To the wall outlet wall socket Power cord Mains lead Battery pack DC IN jack DC plug AC Adaptor Power cord Mains lead CHG charge lamp To the wall outlet wall socket ...

Страница 16: ...t wall socket Align the mark on the DC plug with that on the DC IN jack The CHG charge lamp lights up and charging starts The CHG charge lamp turns off when the battery pack is fully charged 4 When the battery is charged disconnect the AC Adaptor from the DC IN jack of your camcorder Tips See page 64 on recording and playing time When your camcorder is on you can check the approximate amount of re...

Страница 17: ...following conditions The battery pack is not attached correctly The battery pack is damaged The temperature of the battery pack is low Remove the battery pack from your camcorder and put it in a warm place The temperature of the battery pack is high Remove the battery pack from your camcorder and put it in a cool place In the default setting the power turns off automatically if you leave your camc...

Страница 18: ...e desired geographical area with then touch NEXT To set the date and time again touch MENU Show others CLOCK LANG under GENERAL SET category CLOCK SET When an item is not on the screen touch until the item appears 3 Set DST SET or SUMMERTIME date and time then touch The clock starts If you set DST SET or SUMMERTIME to ON the clock advances 1 hour Touch the button on the LCD screen MODE lamp POWER ...

Страница 19: ...T under GENERAL SET category BEEP OFF If the button you touch does not react correctly calibrate the touch panel To turn off the power Close the LCD screen The Movie lamp flashes for a few seconds and the power is turned off Tips You can turn off your camcorder also by pressing POWER When POWER ON BY LCD is set to OFF turn off your camcorder by pressing POWER Changing the language setting You can ...

Страница 20: ... recording playback and editing operations on the selected medium Tips See page 64 for the recordable time of movies Selecting the recording media for movies DCR SR68 SR88 SX44 SX63 Touch MENU Show others MEDIA SETTINGS under MANAGE MEDIA category MOVIE MEDIA SET The MOVIE MEDIA SET screen appears Touch the desired recording media Touch YES The recording medium is changed Selecting the recording m...

Страница 21: ...camcorder A MultiMediaCard cannot be used with this camcorder In this manual Memory Stick PRO Duo media and Memory Stick PRO HG Duo media are referred to as Memory Stick PRO Duo media Memory cards of up to 32 GB are guaranteed to work with your camcorder Types of Memory Stick media that can be used with your camcorder For recording movies it is recommended that you use Memory Stick PRO Duo media o...

Страница 22: ...le It may be possible that there is not enough free space is displayed initialize the memory card by touching MENU Show others MEDIA FORMAT under MANAGE MEDIA category MEMORY CARD DCR SR68 SR88 SX44 SX63 YES YES To eject the memory card Open the cover and lightly push the memory card in once Do not open the cover during recording When inserting or ejecting the memory card be careful so that the me...

Страница 23: ...ard DCR SX44 SX63 Internal memory DCR SR68 SR88 Internal hard disk Tips See page 20 on changing the recording media DCR SR68 SR88 SX44 SX63 To open the lens cover Slide the LENS COVER switch to open Tips When you finish recording or when you play back images close the lens cover 1 Fasten the grip belt DCR SR68 SR88 DCR SR68 SR88 DCR SX43 SX44 SX63 ...

Страница 24: ...the LCD screen is already open press POWER p 18 You can switch recording modes by pressing MODE Press MODE to light up the desired recording mode lamp DCR SR68 SR88 DCR SX43 SX44 SX63 MODE button Movie When recording a movie Photo When shooting a photo Movie When recording a movie Photo When shooting a photo MODE button ...

Страница 25: ...cording movie photo playback modes To display the icons and indicators again touch anywhere on the screen except the rec zoom buttons on the LCD Notes If you close the LCD screen while recording movies the camcorder stops recording The maximum continuous recordable time of movies is about 13 hours When a movie file exceeds 2 GB the next movie file is created automatically It will take several seco...

Страница 26: ...ight trimming of the top bottom right and left edges of images when played back on a TV which is not compatible with full pixel display In this case set GUIDEFRAME to ON and record images using the outer frame displayed on the screen as a guide STEADYSHOT is set to ON in the default setting To adjust the angle of the LCD panel first open the LCD panel 90 degrees to the camcorder and then adjust th...

Страница 27: ...ightly to adjust the focus then press it fully You can record photos also by touching on the LCD screen When disappears the photo is recorded Tips To change the image size touch MENU Show others IMAGE SIZE under PHOTO SETTINGS category a desired setting You can check the recordable number of photos on the LCD screen p 66 Flashes Lights up DCR SR68 SR88 DCR SX43 SX44 SX63 ...

Страница 28: ...Open the LCD screen of your camcorder Your camcorder turns on To turn on your camcorder when the LCD screen is already open press POWER p 18 2 Press VIEW IMAGES The VISUAL INDEX screen appears after some seconds You can display the VISUAL INDEX screen also by touching VIEW IMAGES on the LCD screen 3 Touch Movie a desired movie to play back a movie Touch the Photo a desired photo to view a photo Mo...

Страница 29: ... the screen returns to the VISUAL INDEX screen Touch during pause to play back movies slowly As you repeat touching during playback movies are played as fast as about 5 times about 10 times about 30 times about 60 times You can display the VISUAL INDEX by touching MENU Show others VISUAL INDEX under PLAYBACK category The recording date time and shooting conditions are recorded automatically during...

Страница 30: ...g photos Your camcorder displays the selected photo Tips When viewing photos recorded on a memory card playback folder appears on the screen Previous To the VISUAL INDEX screen To start stop slide show Next OPTION ...

Страница 31: ...rately When connecting to another device via the S VIDEO jack by using an A V connecting cable with an S VIDEO cable sold separately higher quality images can be produced than with an A V connecting cable Connect the white and red plugs left right audio and the S VIDEO plug S VIDEO channel of the A V connecting cable with an S VIDEO cable sold separately The yellow plug connection is not necessary...

Страница 32: ...one audio input jack Connect the yellow plug of the A V connecting cable to the video input jack and connect the white left channel or red right channel plug to the audio input jack of your TV or VCR Notes When you connect your camcorder to a TV compatible with the ID 1 ID 2 system set TV TYPE to 16 9 The TV switches to full mode automatically Refer also to the instruction manuals supplied with yo...

Страница 33: ...33 Recording Playback US Tips To check information counter etc on the screen of the monitor touch MENU Show others OUTPUT SETTINGS under GENERAL SET category DISP OUTPUT V OUT PANEL ...

Страница 34: ...ON MENU To delete all images recorded in the recording media and recover all the recordable space of the media format the media Reduced size images which enable you to view many images at the same time on an index screen are called thumbnails 1 Touch MENU Show others DELETE under EDIT category 2 To delete movies touch DELETE DELETE To delete photos touch DELETE DELETE 3 Touch and display the mark ...

Страница 35: ...ood use of your camcorder US Touch to select the recording date of the desired movies photos then touch Touch the image down on the LCD screen to confirm the image Touch to return to the previous screen Touch YES ...

Страница 36: ...4 768 dots Others USB port this must be provided as standard Hi Speed USB USB 2 0 compatible DVD burner CD ROM drive is necessary for installation 1 Standard installation is required Operation is not assured if the OS has been upgraded or in a multi boot environment 2 64 bit editions and Starter Edition are not supported Windows Image Mastering API IMAPI Ver 2 0 or newer is required to use disc cr...

Страница 37: ...e next screen Read the terms of the license agreement carefully If you agree to the terms change to and then click Next Install Turn on your camcorder then connect the camcorder to the computer using the supplied USB cable The USB SELECT screen appears on the camcorder screen automatically Touch the one of the media types displayed on the screen to make the computer recognize your camcorder USB CO...

Страница 38: ... installation screen and install it following the procedures displayed The computer must be connected to the internet for the installation You may install Image Mastering API v2 0 for Windows XP in response to the message displayed when you try to start those functions To disconnect your camcorder from the computer Click the icon at the bottom right of the desktop of the computer Safely remove USB...

Страница 39: ... Creating a disc with one touch One Touch Disc Burn Movies and photos recorded on your camcorder that have not yet been saved with One Touch Disc Burn function can be saved on a disc automatically Install PMB beforehand p 36 however do not start PMB Connect your camcorder to the wall outlet wall socket using the AC Adaptor supplied for this operation p 17 With One Touch Disc Burn function on your ...

Страница 40: ...ed AC Adaptor for this operation p 17 1 Turn on your camcorder then connect the camcorder to the computer using the supplied USB cable The USB SELECT screen appears on the camcorder screen 2 Touch the recording media that contains the images you want to save on the camcorder screen USB CONNECT Internal hard disk USB CONNECT Internal memory USB CONNECT Memory card The displayed recording media diff...

Страница 41: ...D drive See page 36 for the type of discs you can use If any other software than PMB starts automatically shut it down 2 Start PMB p 39 3 Click Calendar or Index on the left side in the window and select the folder or date then select the movies To select plural movies hold the Ctrl key down and click thumbnails 4 At the top of the window click Create DVD Video Format Discs STD The window used to ...

Страница 42: ...e operation Editing movies You can cut out only necessary parts from a movie and save it as another file Double click the movie to be edited on PMB then click Show Edit Palette on the right side of the screen Trim Video or select the Manipulate menu Edit Trim Video See PMB Help p 39 for details Capturing photos from a movie You can save a frame of a movie as a photo file Double click the movie to ...

Страница 43: ...creen appears when the external media is connected to your camcorder Operation is not assured with every connectable device Connect your camcorder to the wall outlet wall socket using the supplied AC adaptor p 17 Refer to the instruction manual supplied with the external media Refer to the Sony support page for your country region for details on external media that can be used 1 Connect the AC Ada...

Страница 44: ...hout copying in step 5 above The VISUAL INDEX screen of the external media is displayed Touch MENU Show others MOVIE DUB when selecting movies PHOTO COPY when selecting photos Follow the on screen instructions to select the recording media DCR SR68 SR88 SX44 SX63 and image selection methods When you selected DUB by select touch the image to be saved appears When you selected DUB by date select the...

Страница 45: ...sc or play back the images on a created disc by using the dedicated DVD writer DVDirect Express sold separately Refer also to the instruction manual supplied with the DVD writer Notes Connect your camcorder to the wall outlet wall socket using the supplied AC Adaptor for this operation p 17 Only unused discs of the following types can be used 12cm DVD R 12cm DVD R The device does not support two l...

Страница 46: ...omize a disc with DISC BURN OPTION Perform this operation in the following cases When dubbing a desired image When creating multiple copies of the same disc When dubbing images in the memory card DCR SR68 SR88 SX44 SX63 Touch DISC BURN OPTION in step 4 Select the recording media containing the movie s you want to save DCR SR68 SR88 SX44 SX63 Touch the movie you want to burn on the disc appears Pre...

Страница 47: ...ting the movies on your camcorder If Failed or DISC BURN failed appears on the screen insert another disc into the DVD writer and perform the DISC BURN operation again Tips If the total memory size of movies to be burnt by the DISC BURN operation exceeds that of the disc disc creation stops when the limit is reached The last movie on the disc may be cut off Disc creation time to dub movies to the ...

Страница 48: ...ette by connecting your camcorder to a disc recorder a Sony DVD writer etc other than DVDirect Express with the A V connecting cable Connect the device in either way of or Refer also to the instruction manuals supplied with the devices to be connected Notes Connect your camcorder to the wall outlet wall socket using the supplied AC Adaptor for this operation p 17 Sony DVD writer may not be availab...

Страница 49: ... When dubbing is finished stop the recording device and then your camcorder Notes Since dubbing is performed via analog data transfer the image quality may deteriorate To hide the screen indicators such as a counter etc on the screen of the monitor device connected touch MENU Show others OUTPUT SETTINGS under GENERAL SET category DISP OUTPUT LCD PANEL the default setting To record the date time or...

Страница 50: ...Show others OUTPUT SETTINGS under GENERAL SET category TV TYPE 4 3 When you connect a monaural device connect the yellow plug of the A V connecting cable to the video input jack and the white left channel or the red right channel plug to the audio input jack on the device ...

Страница 51: ...for recording media p 55 GENERAL SET Other setup items p 56 Menu items are described in more details in the Handycam Handbook Setting menus Touch Touch Show others on the MY MENU screen See the next page for details on MY MENU Touch the central part in the left side of screen to change the display Touch the menu item to be changed After changing the setting touch To finish setting the menu touch T...

Страница 52: ...tems more easily by registering the menu items you use most often on MY MENU You can register 6 menu items on each MY MENU of the MOVIE PHOTO and PLAYBACK Example deleting SPOT MTR FCS and registering FADER Touch Touch MY MENU SETTING Touch MOVIE Touch SPOT MTR FCS Touch Touch FADER under MANUAL SETTINGS category When MY MENU is displayed touch Repeat the same steps above to register menu items on...

Страница 53: ...ENU You touch and the menu items you can change in the context appear Touch OPTION Touch the desired tab the item to change the setting After completing the setting touch Notes Grayed out menu items or settings are not available When the item you want is not on the screen touch another tab There may be no tab The tabs and items that appear on the screen depend on the recording playback status of y...

Страница 54: ...YSHOT Sets the SteadyShot function when recording movies AUTO SLW SHUTTR Adjusts the shutter speed automatically FACE DETECTION Adjusts the image quality of the face s automatically AUDIO REC SET BLT IN ZOOM MIC Records movies with vivid sound appropriate to the zoom position MICREF LEVEL Sets the microphone level OTHER REC SET DIGITAL ZOOM Sets the maximum zoom level of the digital zoom that exce...

Страница 55: ...t ERASE Erases movies from a playlist ERASE ALL Erases all movies from a playlist MOVE Changes the order of movies in a playlist OTHERS category USB CONNECT USB CONNECT 1 Connects the internal hard disk via USB USB CONNECT 2 Connects the internal memory via USB USB CONNECT Connects the memory card via USB DISC BURN Allows you to save images onto discs by pressing the DISC BURN button p 39 BATTERY ...

Страница 56: ...ns or indicators are displayed on the LCD screen OUTPUT SETTINGS TV TYPE Converts the signal depending on the TV connected p 31 DISP OUTPUT Sets whether the on screen displays appears on the TV screen or not CLOCK LANG CLOCK SET Sets the date and time p 18 AREA SET Adjusts for a time difference without stopping the clock p 18 DST SET SUMMERTIME Sets the summertime p 18 LANGUAGE SET Sets the displa...

Страница 57: ... installation screen displayed click Handycam Handbook 3 Select the desired language and the model name of your camcorder then click Handycam Handbook PDF The model name of your camcorder is printed on its bottom surface 4 Click Exit Exit then remove the CD ROM from your computer To view the Handycam Handbook double click the short cut icon on the computer screen When using a Macintosh open the Ha...

Страница 58: ...e plug of the AC Adaptor to the wall outlet wall socket p 17 The camcorder does not operate even when the power is set to on It takes a few seconds for your camcorder to be ready to shoot after the power is turned on This is not a malfunction Disconnect the AC Adaptor from the wall outlet wall socket or remove the battery pack then reconnect it after about 1 minute If your camcorder still does not...

Страница 59: ... them give them all the numbers of the error code beginning with C or E C 04 The battery pack is not an InfoLITHIUM battery pack V series Use an InfoLITHIUM battery pack V series p 15 Connect the DC plug of the AC Adaptor to your camcorder securely p 15 C 06 The battery pack temperature is high Change the battery pack or place it in a cool place C 13 C 32 Remove the power source Reconnect it and o...

Страница 60: ...ay not be able to record properly Near AM receivers and video equipment Noise may occur On a sandy beach or anywhere dusty If sand or dust gets in your camcorder it may malfunction Sometimes this malfunction cannot be repaired Near windows or outdoors where the LCD screen or the lens may be exposed to direct sunlight This damages the inside of the LCD screen Operate your camcorder on DC 6 8 V 7 2 ...

Страница 61: ...C Adaptor and leave it with the LCD screen closed for more than 24 hours such as by placing anything heavy on it Do not use a deformed or damaged battery pack Keep metal contacts clean If the battery electrolytic liquid has leaked Consult your local authorized Sony service facility Wash off any liquid that may have contacted your skin If any liquid gets in your eyes wash with plenty of water and c...

Страница 62: ...at NTSC color EIA standards Movie recording format Video MPEG 2 PS Audio recording system Dolby Digital 2ch Dolby Digital Stereo Creator Photo file format DCF Ver 2 0 Compatible Exif Ver 2 21 Compatible MPF Baseline Compatible Recording media Movie Photo Internal hard disk DCR SR68 80 GB DCR SR88 120 GB Internal memory DCR SX44 4 GB DCR SX63 16 GB Memory Stick PRO Duo media SD memory card SDHC mem...

Страница 63: ... ON shutter speed 1 30 second Input Output connectors A V Remote Connector Video audio output jack USB jack mini AB LCD screen Picture 6 7 cm 2 7 type aspect ratio 16 9 Total number of pixels 230 400 960 240 General Power requirements DC 6 8 V 7 2 V battery pack DC 8 4 V AC Adaptor Average power consumption During camera recording using LCD screen at normal brightness DCR SR68 SR88 2 0 W DCR SX43 ...

Страница 64: ... SET category In the default setting the recording mode is SP p 54 Internal hard disk 80 GB DCR SR68 Recording mode Recording time HQ 1220 SP 1750 LP 3660 Internal hard disk 120 GB DCR SR88 Recording mode Recording time HQ 1830 SP 2630 LP 5510 Internal memory 4 GB DCR SX44 Recording mode Recording time HQ 55 SP 80 LP 175 Internal memory 16 GB DCR SX63 Recording mode Recording time HQ 235 SP 340 LP...

Страница 65: ...rks or trademarks of Microsoft Corporation in the United States and or other countries Macintosh and Mac OS are registered trademarks of Apple Inc in the U S and other countries Intel Intel Core and Pentium are trademarks or registered trademarks of Intel Corporation or its subsidiaries in the United States and other countries Adobe the Adobe logo and Adobe Acrobat are either registered trademarks...

Страница 66: ...aining time FADER Drop sensor off Drop sensor activated 9999 9999 9999 Approximate number of recordable photos and recording media Playback folder of memory card 100 112 Current playing movie or photo Number of total recorded movies or photos Bottom Indicator Meaning FACE DETECTION set to OFF Manual focus SCENE SELECTION White balance SteadyShot off SPOT MTR FCS SPOT METER EXPOSURE TELE MACRO Back...

Страница 67: ...creen Touch panel If you rotate the LCD panel 180 degrees you can close the LCD panel with the LCD screen facing out This is convenient during playback operations DCR SR68 SR88 Speaker VIEW IMAGES button 28 DISC BURN button 39 POWER button 18 RESET button Press RESET using a pointed object Press RESET to initialize all the settings including the clock setting PHOTO button 27 movie photo lamp 24 MO...

Страница 68: ...SB jack 37 39 40 43 45 DCR SR68 SR88 Power zoom lever PHOTO button 27 CHG charge lamp 15 Battery pack 15 DC IN jack 15 START STOP button 25 Grip belt 23 Hook for a shoulder belt BATT battery release lever 16 Tripod receptacle Attach a tripod sold separately to the tripod receptacle using a tripod screw sold separately the length of the screw must be less than 5 5 mm 7 32 in Access lamp memory card...

Страница 69: ...ck 15 Memory card slot 21 BATT battery release lever 16 A V Remote Connector 31 Tripod receptacle Attach a tripod sold separately to the tripod receptacle using a tripod screw sold separately the length of the screw must be less than 5 5 mm 7 32 in Access lamp memory card 21 While the lamp is lit or flashing the camcorder is reading or writing data ...

Страница 70: ...external media 43 Screen indicators 66 Self diagnosis display 59 Setting the date and time 18 Software 36 Specifications 62 Supplied items 8 T Thumbnail 34 Troubleshooting 58 Turning the power on 18 TV 31 TV TYPE 31 U USB cable 45 47 USB CONNECT 45 47 V VIEW IMAGES 28 VISUAL INDEX 28 Volume 29 W Wall outlet wall socket 15 Warning indicators 59 Windows 36 Z Zoom 25 Symbols 16 9 32 4 3 32 A A V conn...

Страница 71: ......

Страница 72: ...Sony o con un dispositivo que pueda cargarla Mantenga la batería fuera del alcance de niños pequeños Mantenga la batería seca Sustitúyala únicamente por otra del mismo tipo o equivalente recomendada por Sony Deshágase de la baterías usada lo antes posible según el procedimiento que se describe en las instrucciones Sustituya la batería únicamente por otra del tipo especificado De lo contrario es po...

Страница 73: ...ede provocar fallas de funcionamiento No apunte directamente al sol Si lo hace puede ocasionar fallas en la unidad Tome imágenes del sol sólo en condiciones de baja intensidad como al atardecer Cambio del ajuste de idioma Para ilustrar los procedimientos operativos se utilizan indicaciones en pantalla en cada idioma local Si es necesario cambie el idioma de la pantalla antes de utilizar la videocá...

Страница 74: ...ámara En este caso aparecerá un indicador en la pantalla de cristal líquido Si la videocámara se conecta a una computadora o a accesorios No intente formatear el soporte de grabación de la videocámara mediante una computadora Si lo hace es posible que la videocámara no funcione correctamente Cuando conecte la videocámara a otro dispositivo a través de un cable asegúrese de insertar la clavija del ...

Страница 75: ...especificación de esta serie son las siguientes Soportes de grabación Capacidad del soporte de grabación interno Toma USB DCR SR68 Disco duro interno tarjeta de memoria 80 GB Entrada salida DCR SR88 120 GB DCR SX43 Tarjeta de memoria DCR SX44 Memoria interna tarjeta de memoria 4 GB DCR SX63 16 GB Notas sobre la utilización No realice ninguna de las acciones que se describen a continuación de lo co...

Страница 76: ... Si el sensor de caídas detecta una caída repetidamente es posible que se detenga la grabación o la reproducción Nota sobre el uso de la videocámara a grandes altitudes DCR SR68 SR88 No encienda la videocámara en áreas de baja presión de altitud superior a los 5 000 metro Si lo hace puede dañarse la unidad de disco duro interno de la videocámara ...

Страница 77: ...las y fotos Reproducción en la videocámara pág 23 Reproducción de imágenes en un televisor pág 26 Almacenamiento de imágenes Almacenamiento de películas y fotos con una computadora pág 31 Almacenamiento de películas y fotos en soportes externos pág 39 Almacenamiento de imágenes con una grabadora de DVD pág 41 Eliminación de películas y fotos pág 29 Si elimina los datos de imágenes que se guardaron...

Страница 78: ...18 Reproducción en la videocámara 23 Reproducción de imágenes en un televisor 26 Utilización correcta de la videocámara Eliminación de películas y fotos 29 Almacenamiento de películas y fotos con una computadora Preparación de la computadora Windows 31 Si utiliza un Macintosh 31 Inicio de PMB Picture Motion Browser 34 Creación de un disco con un solo toque One Touch Disc Burn 35 Importación de pel...

Страница 79: ...e los menús 47 Obtención de información detallada de la Guía práctica de Handycam 53 Información complementaria Solución de problemas 54 Precauciones 57 Especificaciones 59 Referencia rápida Indicadores de la pantalla 62 Piezas y controles 63 Índice 66 ...

Страница 80: ...X43 SX44 SX63 Batería Toma DC IN Clavija de cc Adaptador de alimentación de ca Cable de alimentación Indicador CHG carga Al tomacorriente de pared Batería Toma DC IN Indicador CHG carga Clavija de cc Adaptador de alimentación de ca Al tomacorriente de pared Cable de alimentación ...

Страница 81: ... con la marca de la toma DC IN El indicador CHG carga se enciende y se inicia el proceso de carga El indicador CHG carga se apaga cuando la batería está completamente cargada 4 Cuando la batería esté cargada desconecte el adaptador de ca de la toma DC IN de la videocámara Sugerencias Consulte la página 60 para conocer los tiempos de grabación y reproducción Con la videocámara encendida puede compr...

Страница 82: ...tada correctamente La batería está dañada La temperatura de la batería es baja Retire la batería de la videocámara y póngala en un lugar cálido La temperatura de la batería es alta Retire la batería de la videocámara y póngala en un lugar frío En el ajuste predeterminado la alimentación se apaga automáticamente si no utiliza la videocámara durante unos 5 minuto para ahorrar energía de la batería A...

Страница 83: ...lla de cristal líquido está abierta presione POWER 2 Seleccione la zona geográfica deseada con y a continuación toque SIGUIENTE Para ajustar la fecha y la hora de nuevo toque MENU Mostrar otros AJ REL IDIOM en la categoría AJUST GENERALES AJUS RELOJ Cuando un elemento no aparece en la pantalla toque hasta que aparezca Toque el botón que aparece en la pantalla de cristal líquido Indicador MODE Botó...

Страница 84: ... toque MENU Mostrar otros AJUS SON PANT en la categoría AJUST GENERALES PITIDO DESACTIV Si el botón que toca no reacciona correctamente debería calibrar el panel táctil Para apagar la videocámara Cierre la pantalla de cristal líquido El indicador película parpadea durante varios segundo y se apaga la videocámara Sugerencias También puede apagar la videocámara al presionar POWER Cuando ENCEND CON L...

Страница 85: ...es de grabación reproducción o edición en el soporte seleccionado Sugerencias Consulte la página 60 para conocer el tiempo de grabación de las películas Selección del soporte de grabación para las películas DCR SR68 SR88 SX44 SX63 Toque MENU Mostrar otros AJUSTES SOPORTE en la categoría GESTIÓN SOPORTE AJ SOPORTE PEL Aparecerá la pantalla AJ SOPORTE PEL Toque el soporte de grabación deseado Toque ...

Страница 86: ...rjetas de memoria SD y SDHC Con esta videocámara no se puede usar una MultiMediaCard En este manual tanto Memory Stick PRO Duo como Memory Stick PRO HG Duo reciben el nombre de Memory Stick PRO Duo Se garantiza el funcionamiento de tarjetas de memoria de hasta 32 GB con la videocámara Tipos de Memory Stick que se pueden utilizar con la videocámara Para grabar películas se recomienda utilizar un Me...

Страница 87: ...or al crear un nuevo archivo de base de datos de imágenes Es posible que no exista suficiente espacio libre toque MENU Mostrar otros FORMAT SOPORTE en la categoría GESTIÓN SOPORTE TARJ MEMORIA DCR SR68 SR88 SX44 SX63 SÍ SÍ para inicializar la tarjeta de memoria Para expulsar la tarjeta de memoria Abra la tapa y presione ligeramente la tarjeta de memoria hacia adentro una vez No abra la tapa durant...

Страница 88: ...o interno Sugerencias Consulte la página 15 para obtener información acerca de cómo cambiar el soporte de grabación DCR SR68 SR88 SX44 SX63 Para abrir la tapa del objetivo Deslice el interruptor de la LENS COVER para abrirla Sugerencias Cuando termine de grabar o cuando reproduzca las imágenes cierre la tapa del objetivo 1 Ajuste la correa de sujeción DCR SR68 SR88 DCR SR68 SR88 DCR SX43 SX44 SX63...

Страница 89: ...talla de cristal líquido está abierta presione POWER pág 13 Para alternar entre modos de grabación presione MODE Presione MODE para que se encienda el indicador de acceso del modo de grabación DCR SR68 SR88 DCR SX43 SX44 SX63 Película Cuando graba una película Foto Cuando captura una foto Botón MODE Botón MODE Película Cuando graba una película Foto Cuando captura una foto ...

Страница 90: ...icadores del panel de cristal líquido se muestran durante unos 3 segundo y luego desaparecen Para mostrar los iconos e indicadores de nuevo toque cualquier parte de la pantalla de cristal líquido excepto los botones de grabación y zoom Notas Si cierra la pantalla de cristal líquido mientras graba películas se detendrá la grabación El tiempo máximo de grabación continua de películas es de aproximad...

Страница 91: ...ORTE en la categoría GESTIÓN SOPORTE La pantalla de cristal líquido de la videocámara puede mostrar imágenes de grabación en toda la pantalla visualización de píxeles completos Sin embargo esto puede ocasionar un leve recorte de los bordes superior inferior derecho e izquierdo de las imágenes al reproducirlas en un televisor que no sea compatible con la visualización de píxeles completos En este c...

Страница 92: ...la pantalla de cristal líquido cambia para el modo de grabación de fotos y el formato de la pantalla se ajusta en 4 3 Presione PHOTO levemente para ajustar el enfoque y luego presiónelo completamente Para grabar fotos también puede tocar en la pantalla de cristal líquido Cuando desaparece se graba la foto Sugerencias Para cambiar el tamaño de la imagen toque MENU Mostrar otros TAM IMAGEN en la cat...

Страница 93: ...SR68 SR88 SX44 SX63 1 Abra la pantalla de cristal líquido de la videocámara La videocámara se enciende Para encender la videocámara cuando la pantalla de cristal líquido está abierta presione POWER pág 13 2 Presione VISUALIZAR IMÁGENES Luego de unos segundo aparece la pantalla VISUAL INDEX También puede mostrar la pantalla VISUAL INDEX al tocar VISUALIZAR IMÁGENES en la pantalla de cristal líquido...

Страница 94: ...la película seleccionada llega a la última película vuelve a mostrarse la pantalla VISUAL INDEX Toque durante la pausa para reproducir la película a cámara lenta Si sigue tocando durante la reproducción las películas se reproducen con un aumento de velocidad de aproximadamente 5 veces 10 veces 30 veces 60 veces Puede mostrar la pantalla VISUAL INDEX si toca MENU Mostrar otros VISUAL INDEX en la ca...

Страница 95: ...MENU Visualización de fotos La videocámara muestra la foto seleccionada Sugerencias Cuando visualiza fotos grabadas en una tarjeta de memoria aparece en la pantalla carpeta de reproducción Anterior Ir a la pantalla VISUAL INDEX Inicio detención de presentación de diapositivas Siguiente OPTION ...

Страница 96: ...n cable de conexión de A V Cable de conexión de A V con S VIDEO se vende por separado Si se conecta a otro dispositivo a través de la toma de S VIDEO mediante un cable de conexión de A V con un cable S VIDEO se vende por separado se pueden producir imágenes de mayor calidad que con un cable de conexión de A V Conecte las clavijas blanca y roja audio izquierdo derecho y la clavija S VIDEO canal S V...

Страница 97: ...ma de entrada LINE IN de la videograbadora mediante el cable de conexión de A V Ajuste el selector de entrada de la videograbadora en LINE VIDEO 1 VIDEO 2 etc Si el televisor es monoaural si el televisor sólo dispone de una toma de entrada de audio Conecte la clavija amarilla del cable de conexión de A V a la toma de entrada de video y conecte la clavija blanca canal izquierdo o la clavija roja ca...

Страница 98: ...e funcionamiento Cuando se reproduce una imagen grabada con relación de aspecto 16 9 panorámica en un televisor 4 3 que no es compatible con la señal 16 9 panorámica ajuste el TIPO TV en 4 3 Sugerencias Para comprobar la información contador etc de la pantalla del monitor toque MENU Mostrar otros AJUSTES SALIDA en la categoría AJUST GENERALES SALIDA PANT SAL V LCD ...

Страница 99: ...antalla de reproducción desde OPTION MENU Para eliminar todas las imágenes almacenadas en el soporte de grabación y recuperar todo el espacio disponible en el soporte formatee el soporte Las imágenes de tamaño reducido que permiten ver varias imágenes al mismo tiempo en una pantalla de índice se conocen como miniaturas 1 Toque MENU Mostrar otros BORRAR en la categoría EDIT 2 Para eliminar película...

Страница 100: ...smo día toque BORRAR BORRAR p fecha Toque para seleccionar la fecha de grabación de las películas fotos que desee y a continuación toque Toque la imagen en la pantalla de cristal líquido para confirmarla Toque para volver a la pantalla anterior Toque SÍ ...

Страница 101: ...ia 256 MB o más Otros requisitos del sistema que debe cumplir el sistema operativo Disco duro Volumen en disco necesario para la instalación aproximadamente 500 MB es posible que sean necesarios 5 GB o más para la creación de discos DVD Pantalla Mínimo 1 024 768 puntos Otros Puerto USB debe incluirse como estándar Hi Speed USB compatible con USB 2 0 grabadora de DVD se necesita una unidad de CD RO...

Страница 102: ...M suministrado en la unidad de disco de la computadora Aparecerá la pantalla de instalación Si la pantalla no aparece haga clic en Inicio Equipo en Windows XP Mi PC y a continuación haga doble clic en SONYPMB E CD ROM Los nombres de las unidades como E pueden variar en función de la computadora Haga clic en Instalación Seleccione el país o la región Seleccione el idioma del programa que desea inst...

Страница 103: ...as Para crear discos o utilizar otras funciones en Windows XP debe estar instalado el software Image Mastering API versión 2 0 para Windows XP Si aún no se ha instalado Image Mastering API versión 2 0 para Windows XP selecciónelo desde los programas requeridos en la pantalla de instalación y siga los siguientes procedimientos que se muestran para instalarlo La computadora debe estar conectada a In...

Страница 104: ...nicio Todos los programas PMB para iniciar PMB Puede visualizar editar o crear discos de películas y fotos mediante PMB Lectura de Ayuda de PMB Si desea obtener más información acerca de la utilización de PMB lea la Ayuda de PMB Haga doble clic en el icono de acceso directo Ayuda de PMB en la pantalla de la computadora para abrirla Notas Si el icono no se muestra en la pantalla de la computadora h...

Страница 105: ... función One Touch Disc Burn de la videocámara es posible guardar películas y fotos grabadas únicamente en el soporte de grabación interno DCR SR68 SR88 SX44 SX63 1 Encienda la computadora y coloque un disco no utilizado anteriormente en la unidad de DVD Consulte la página 31 para obtener información acerca de los discos que puede utilizar Si un software diferente a PMB se inicia automáticamente c...

Страница 106: ...la pantalla de la videocámara 2 Toque en la pantalla de la videocámara el soporte de grabación que contiene las imágenes que desea guardar CONEXIÓN USB disco duro interno CONEXIÓN USB memoria interna CONEXIÓN USB tarjeta de memoria El soporte de grabación mostrado difiere en función del modelo Si no aparece la pantalla SELEC USB toque MENU Mostrar otros CONEXIÓN USB en la categoría OTROS La ventan...

Страница 107: ... de selección de películas Para añadir películas a las seleccionadas anteriormente selecciónelas en la ventana principal y arrástrelas y suéltelas en la ventana de selección de películas 5 Siga las instrucciones en pantalla para crear un disco La creación de un disco puede tardar bastante Copia de un disco Es posible copiar un disco grabado a otro disco mediante la aplicación Video Disc Copier Hag...

Страница 108: ...rama de una película como un archivo de fotografía Haga doble clic en la película que desea editar en PMB y a continuación haga clic en Mostrar paleta de edición en el lateral derecho de la pantalla Guardar fotograma Para obtener más detalles consulte Ayuda de PMB pág 34 ...

Страница 109: ...e código El sistema de archivos FAT está disponible para la videocámara Si el soporte externo se formateó con el sistema de archivos NTFS o similar formatéelo en la videocámara antes de utilizarlo Aparecerá la pantalla de formato cuando el soporte externo se conecte a la videocámara No se asegura el funcionamiento con todos los dispositivos conectables Conecte la videocámara al tomacorriente de pa...

Страница 110: ...l líquido Los botones de visualización de películas y fotos de la pantalla VISUAL INDEX cambian tal como se muestra en la siguiente ilustración Puede hacer ajustes del menú de los soportes externos como por ejemplo eliminar imágenes Toque MENU Mostrar otros en la pantalla VISUAL INDEX Para guardar las películas y fotos deseadas Notas No puede buscar o copiar fotos grabadas en la tarjeta de memoria...

Страница 111: ...erno Toque en la pantalla VISUAL INDEX del soporte externo Desconecte el cable adaptador USB Creación de un disco con una grabadora de DVD Creación de un disco con la grabadora de DVD dedicada DVDirect Express Es posible crear un disco o reproducir las imágenes de un disco creado usando la grabadora de DVD específica DVDirect Express se vende por separado Consulte también los manuales de instrucci...

Страница 112: ...a continuación desconecte el cable USB Para personalizar un disco con OPC GRAB DISCO Lleve a cabo esta operación en los siguientes casos Al copiar una imagen deseada Al crear varias copias del mismo disco Al copiar imágenes en la tarjeta de memoria DCR SR68 SR88 SX44 SX63 Toque OPC GRAB DISCO en el paso 4 Seleccione el soporte de grabación que contiene las películas que desea guardar DCR SR68 SR88...

Страница 113: ...xpulsar la tarjeta de memoria de la videocámara Reproduzca el disco creado para asegurarse de que la copia se realizó correctamente antes de eliminar las películas de la videocámara Si Se produjo un error o Error al ejecutar GRABAR EN DISCO aparecen en la pantalla inserte otro disco en la grabadora de DVD y repita la operación de DISC BURN Sugerencias Si el tamaño de memoria total de las películas...

Страница 114: ...l soporte de grabación que contiene las imágenes CONEXIÓN USB disco duro interno CONEXIÓN USB memoria interna CONEXIÓN USB tarjeta de memoria El soporte de grabación mostrado difiere en función del modelo Grabe las películas en el dispositivo conectado Para obtener más detalles consulte el manual de instrucciones suministrado de los dispositivos que conecte Al finalizar la operación toque FIN SÍ e...

Страница 115: ...spositivo a través de la toma de S VIDEO mediante un cable de conexión de A V con un cable S VIDEO se vende por separado se pueden producir imágenes de mayor calidad que con un cable de conexión de A V Conecte las clavijas blanca y roja audio izquierdo derecho y la clavija S VIDEO canal S VIDEO del cable de conexión de A V con el cable S VIDEO Si conecta solamente la clavija S VIDEO no se oirá son...

Страница 116: ...posible que la calidad de imagen se deteriore Para ocultar los indicadores de la pantalla como un contador etc en la pantalla del dispositivo monitor conectado toque MENU Mostrar otros AJUSTES SALIDA en la categoría AJUST GENERALES SALIDA PANT LCD el ajuste predeterminado Para grabar la fecha la hora o los ajustes de la cámara toque MENU Mostrar otros AJUSTES REPROD en la categoría REPRODUCCIÓN CÓ...

Страница 117: ...mentos para otros ajustes pág 51 GESTIÓN SOPORTE Elementos para los soportes de grabación pág 51 AJUST GENERALES Otros elementos de la configuración pág 52 Los elementos de menú se describen detalladamente en la Guía práctica de Handycam Ajustes del menú Toque Toque Mostrar otros en la pantalla de MI MENÚ Consulte la página siguiente para obtener detalles sobre MI MENÚ Toque la parte central del l...

Страница 118: ...e el modo de reproducción y el modo de grabación película foto Uso de la función MI MENÚ Es posible utilizar los elementos de menú más fácilmente si registra los elementos de menú que utiliza con más frecuencia en MI MENÚ Es posible registrar 6 elementos de menú en cada MI MENÚ de PELÍCULA FOTO y REPRODUCCIÓN Ejemplo eliminar MED ENF PUNTO y registrar DESVANECEDOR Toque Toque AJUSTE MI MENÚ Toque ...

Страница 119: ...s posible utilizar el OPTION MENU Toque para que aparezcan los elementos de menú que es posible cambiar en el contexto Toque OPTION Toque la ficha deseada el elemento cuyo ajuste desea cambiar Cuando finalice el ajuste toque Notas Los elementos de menú o ajustes atenuados no están disponibles Si el elemento que desea no aparece en la pantalla toque otra ficha Es posible que no haya ninguna ficha L...

Страница 120: ...ivo está en posición horizontal o vertical STEADYSHOT Permite ajustar la función SteadyShot cuando se graban películas OB LENTO AUTO Permite ajustar de forma automática la velocidad de obturación DETECCIÓN CARA Permite ajustar la calidad de imagen de las caras automáticamente AJ GRAB AUDIO MIC ZOOM INCOR Permite grabar películas con sonido intenso de acuerdo con la posición del zoom NIVEL REFMIC P...

Страница 121: ... 1 2 COPIAR por selec Permite seleccionar fotos y realizar copias COPIAR por fecha Permite copiar todas las fotos de una fecha especificada EDICIÓN PLAYLIST AÑADIR Permite añadir películas a una playlist AÑADIR p fecha Permite añadir películas grabadas en un mismo día y a una hora en una playlist BORRAR Permite borrar películas de una playlist BORRAR TODO Permite borrar todas las películas de una ...

Страница 122: ... la luz de fondo de la pantalla de cristal líquido COLOR LCD Permite ajustar la intensidad del color de la pantalla de cristal líquido AJUSTE PANTALLA Permite ajustar la duración de la visualización de los iconos o indicadores en la pantalla de cristal líquido AJUSTES SALIDA TIPO TV Permite convertir la señal en función del televisor conectado pág 26 SALIDA PANT Permite ajustar si se visualizan la...

Страница 123: ...tica de Handycam 3 Seleccione el idioma deseado y el nombre del modelo de la videocámara y a continuación haga clic en Guía práctica de Handycam PDF El nombre del modelo de la videocámara se encuentra impreso en la superficie inferior de esta 4 Haga clic en Salir Salir y a continuación extraiga el CD ROM de la computadora Para ver la Guía práctica de Handycam haga doble clic en el icono de acceso ...

Страница 124: ...s Consulte la Guía práctica de Handycam pág 53 para obtener información sobre los problemas de la videocámara y la Ayuda de PMB pág 34 para obtener información sobre la conexión de la videocámara a una computadora La videocámara no se enciende Instale una batería cargada en la videocámara pág 10 Conecte la clavija del adaptador de alimentación de ca al tomacorriente de pared pág 12 La videocámara ...

Страница 125: ...e la computadora La computadora no reconoce la videocámara Desconecte cualquier dispositivo de la toma USB de la computadora excepto el teclado el ratón y la videocámara Desconecte el cable USB de la computadora y de la videocámara reinicie la computadora y a continuación conecte de nuevo la computadora con la videocámara de la manera apropiada Visualización de autodiagnóstico Indicadores de adver...

Страница 126: ...ias pág 16 o formatee la tarjeta de memoria después de guardar las imágenes en otro soporte El archivo de base de datos de imágenes está dañado Para comprobar el archivo de la base de datos toque MENU Mostrar otros REP ARCH BD IM en la categoría GESTIÓN SOPORTE el soporte de grabación DCR SR68 SR88 SX44 SX63 La tarjeta de memoria está dañada Formatee la tarjeta de memoria con la computadora pág 51...

Страница 127: ...ocámara bruscamente y exponerla a golpes o impactos como martillazos caídas o pisotones Sea especialmente cuidadoso con el objetivo Cuando no utilice la videocámara manténgala apagada No utilice la videocámara envuelta en una toalla por ejemplo Si lo hace puede recalentarse internamente Cuando desconecte el cable de alimentación tire del enchufe y nunca del cable Procure no dañar el cable de alime...

Страница 128: ...a batería recargable se descargará completamente transcurridos aproximadamente 3 meses si no utiliza la videocámara en absoluto Utilice la videocámara después de cargar la batería recargable preinstalada Sin embargo aunque no esté cargada el funcionamiento de la videocámara no se verá afectado siempre que no se esté grabando la fecha Procedimientos Conecte la videocámara a un tomacorriente de pare...

Страница 129: ... convierte en una cámara de imágenes fijas de 35 mm Para películas 39 2 340 mm 16 9 Para fotos 44 2 640 mm 4 3 Temperatura de color AUTOM UNA PULS INTERIOR 3 200 K EXTERIOR 5 800 K Iluminación mínima 3 lx lux cuando OB LENTO AUTO está ajustado en ACTIVADO velocidad de obturación 1 30 de segundo Conectores de entrada salida Conector remoto de A V toma de salida de video y audio Toma USB mini AB Pan...

Страница 130: ...ries Tiempo de carga y funcionamiento estimado de la batería suministrada en minuto Soportesdegrabación DCR SR68 SR88 DCR SX43 SX44 SX63 Tiempo de carga completa 115 Tiempo de grabación continua 100 110 Tiempo de grabación normal 45 50 Tiempo de reproducción 135 160 El tiempo de grabación puede variar en función de las condiciones de grabación y del motivo MODO GRAB Condiciones de grabación modo d...

Страница 131: ... otros países Adobe el logotipo de Adobe y Adobe Acrobat son marcas comerciales registradas o marcas comerciales de Adobe Systems Incorporated en los Estados Unidos y o en otros países El logotipo SDHC es una marca comercial MultiMediaCard es una marca comercial de MultiMediaCard Association Todos los demás nombres de productos mencionados en este manual pueden ser marcas comerciales o marcas come...

Страница 132: ... 00 Contador hora minuto segundo 00min Tiempo de grabación restante previsto DESVANECEDOR Sensor de caídas desactivado Sensor de caídas activado 9999 9999 9999 Número aproximado de fotos que puede grabar y soporte de grabación Carpeta de reproducción de la tarjeta de memoria 100 112 Película o foto en reproducción número total de películas o fotos grabadas Parte inferior Indicador Significado DETE...

Страница 133: ... algunos indicadores no aparezcan Piezas y controles Los números entre corresponden a las páginas de referencia DCR SR68 SR88 Micrófono incorporado Objetivo objetivo Carl Zeiss Interruptor de la LENS COVER LED VIDEO LIGHT Conector remoto de A V 26 DCR SX43 SX44 SX63 Altavoz Objetivo objetivo Carl Zeiss Interruptor de la LENS COVER LED VIDEO LIGHT Micrófono incorporado ...

Страница 134: ...to puntiagudo Presione RESET para inicializar todos los ajustes incluido el del reloj Botón PHOTO 22 Indicador película foto 19 Botón MODE 19 Botón luz de fondo Botón LIGHT Presione para encender la LIGHT Toma USB 32 35 36 39 41 DCR SX43 SX44 SX63 Botón VISUALIZAR IMÁGENES 23 Botón DISC BURN 35 Botón POWER 17 Botón RESET Presione el botón RESET con un objeto puntiagudo Presione RESET para iniciali...

Страница 135: ...icador está encendido o parpadea la videocámara está grabando o leyendo datos Ranura de tarjeta de memoria 16 DCR SX43 SX44 SX63 Palanca del zoom motorizado Botón PHOTO 22 Batería Indicador CHG carga 10 Botón START STOP 20 Correa de sujeción 18 Toma DC IN 10 Ranura de tarjeta de memoria 16 Palanca BATT liberación de la batería 11 Conector remoto de A V 26 Receptáculo del trípode Coloque un trípode...

Страница 136: ... Solución de problemas 54 Soportes de grabación 15 Soportes externos 39 T Tarjeta de memoria 16 Tiempo de grabación y reproducción 60 TIPO TV 26 Tomacorriente de pared 10 TV 26 V VISUAL INDEX 23 Visualización de autodiagnóstico 55 VISUALIZAR IMÁ 23 Volumen 24 W Windows 31 Z Zoom 20 Símbolos 16 9 27 4 3 27 A AJ SOPORTE FOTO 15 AJ SOPORTE PEL 15 AJUS RELOJ 13 Ajuste de la fecha y la hora 13 AJUSTE I...

Страница 137: ......

Страница 138: ......

Страница 139: ......

Отзывы: