background image

1

US

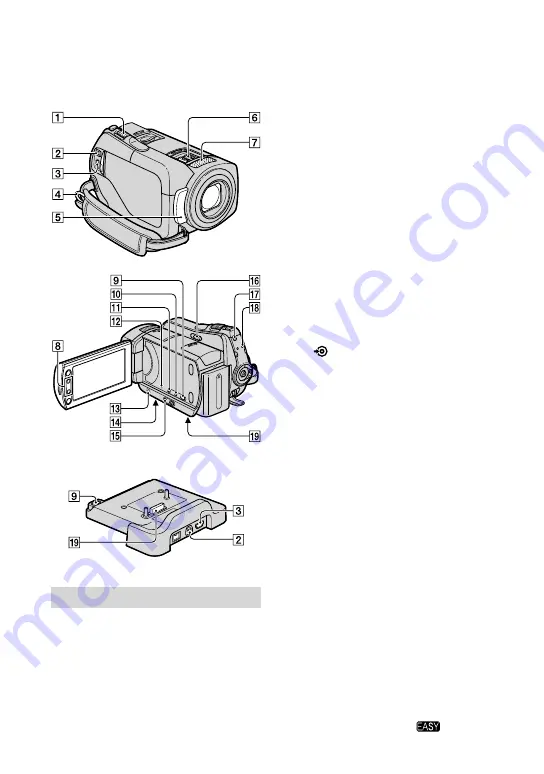
Other parts and functions of the camcorder

Buttons, jacks, etc., which are not explained 

in other chapters, are explained here.

Recording/Playback

 Power zoom lever

Move the power zoom lever slightly for 

a slower zoom. Move it further for a 

faster zoom.

You can magnify still images from 

about 1.1 to 5 times the original size 

(Playback zoom).

 When you touch the screen during 

playback zoom, the point you touched will 

be displayed in the center of the displayed 

frame.

 Hook for a shoulder belt

Attach the shoulder belt (optional).

 Remote sensor (DCR-SR65/SR85)/

Infrared port

Receives the signal from the Remote 

Commander.

 Built-in microphone

 Zoom buttons

Press for zooming in/out.

You can magnify still images from 

about 1.1 to 5 times the original size 

(Playback zoom).

 When you touch the screen during playback 

zoom, the point you touched will be 

displayed in the center of the LCD screen.


 (DISC BURN) button

Create a disc by connecting the 

camcorder to a computer. For details, 

see “PMB Guide” (p. 26).

 DISP/BATT INFO button

You can switch the screen display when 

you press while the power is set to on.

When you press while the power is 

set to OFF (CHG), you can check the 

remaining battery.


 (back light) button

Press 

 (back light) to display 

 for 

adjusting the exposure for backlit 

subjects. Press 

 (back light) again to 

cancel the backlight function.

 RESET button

Press RESET to initialize all the settings, 

including the clock setting.

 Speaker

 Tripod receptacle (Bottom surface)

Attach the tripod (optional: the length 

of the screw must be less than 5.5 mm 

(7/32 in.)) to the tripod receptacle using 

a tripod screw.

 EASY button

Press EASY to display 

 and most 

Handycam Station
(DCR-SR65/SR85)

Содержание DCR-SR65 - 40gb Hdd Handycam Camcorder

Страница 1: ...a Recorder For details on the advanced operations please refer to Handycam Handbook PDF Para obtener más información acerca de las funciones avanzadas consulte la Guía práctica de Handycam PDF DCR SR45 SR46 SR65 SR85 US Operating Guide ES Guía de operaciones ...

Страница 2: ...power supplied to your home consult your dealer or local power company For those sets designed to operate from battery power or other sources refer to the operating instructions Polarization This set may be equipped with a polarized ac power cord plug a plug having one blade wider than the other This plug will fit into the power outlet only one way This is a safety feature If you are unable to ins...

Страница 3: ...t unattended and unused for long periods of time unplug it from the wall outlet and disconnect the antenna or cable system This will prevent damage to the set due to lightning and power line surges Service Damage Requiring Service Unplug the set from the wall outlet and refer servicing to qualified service personnel under the following conditions When the power cord or plug is damaged or frayed If...

Страница 4: ...ou may call Sony Customer Information Center 1 800 222 SONY 7669 The number below is for the FCC related matters only Regulatory Information Declaration of Conformity Trade Name SONY Model No DCR SR45 DCR SR46 Responsible Party Sony Electronics Inc Address 16530 Via Esprillo San Diego CA 92127 U S A Telephone number 858 942 2230 This device complies with Part 15 of the FCC Rules Operation is subje...

Страница 5: ...interface cable must be used with the equipment in order to comply with the limits for a digital device pursuant to Subpart B of Part 15 of FCC Rules For the State of California USA only Perchlorate Material special handling may apply See www dtsc ca gov hazardouswaste perchlorate Perchlorate Material Lithium battery contains perchlorate For customers in the U S A and CANADA Battery pack This devi...

Страница 6: ... In this case an indicator appears on the LCD screen p 30 Do not turn on the camcorder in a low pressure area where the altitude is more than 3 000 meters 9 800 feet Doing so may damage the hard disk drive of your camcorder If you repeat recording deleting images for a long time fragmentation of data occurs on the media Images cannot be saved or recorded In such a case save your images on some typ...

Страница 7: ...g your computer Also you can save your image data using a VCR or a DVD HDD recorder When the camcorder is connected to a computer Do not try to format the hard disk of the camcorder using a computer If you do so your camcorder may not operate correctly Note on disposal transfer If you perform MEDIA FORMAT to format the hard disk of the camcorder data may not be completely deleted from the hard dis...

Страница 8: ...k 16 Playing the image on a TV 17 Other parts and functions of the camcorder 18 Indicators displayed during recording playback 20 Performing various functions HOME and OPTION 22 Saving images 24 Deleting images 25 Enjoying with a computer Performing with a computer 26 Handbook software to be installed 26 Installing Picture Motion Browser 26 Troubleshooting Troubleshooting 29 Self diagnosis display...

Страница 9: ...our camcorder Open the jack cover and connect the DC plug of the AC Adaptor to the DC IN jack 4 For DCR SR65 SR85 Connect the power cord mains lead to the AC Adaptor and the wall outlet wall socket Insert the camcorder into the Handycam Station securely all the way to the bottom When setting the camcorder onto the Handycam Station close the DC IN jack cover For DCR SR45 SR46 Connect the power cord...

Страница 10: ...d disk Bottom When the media is set to the Memory Stick PRO Duo Notes All times measured under the following settings Recording mode SP The LCD backlight turns ON Typical recording time shows the time when you repeat recording start stop turning the power on off and zooming On the battery pack Before changing the battery pack or removing the AC Adaptor from the camcorder turn the POWER switch to O...

Страница 11: ...occurs while using your camcorder Do not use the AC Adaptor placed in a narrow space such as between a wall and furniture Do not short circuit the DC plug of the AC Adaptor or battery terminal with any metallic objects This may cause a malfunction Even if your camcorder is turned off AC power source mains is still supplied to it while connected to the wall outlet wall socket via the AC Adaptor ...

Страница 12: ... geographical area with then touch NEXT 4 Set DST SET or SUMMERTIME Y year M month D day hour and minute then touch The clock starts Tips The date and time do not appear during recording but they are automatically recorded on the media and can be displayed during playback You can turn off the operation beeps by touching HOME SETTINGS SOUND DISP SET BEEP OFF Changing the language setting You can ch...

Страница 13: ...p 20 1 Touch HOME MANAGE MEDIA tab on the screen 2 Touch MOVIE MEDIA SET to select the media for movies and touch PHOTO MEDIA SET to select the media for still images The media setting screen appears 60min 3 Select the media you want to set 4 Touch YES The media is changed To confirm the recording media setting Turn the POWER switch repeatedly to light up the Movie Still lamp depending on which me...

Страница 14: ...emory Stick PRO Duo Notes Do not open the Memory Stick Duo cover while recording Inserting a Memory Stick PRO Duo forcibly in the wrong direction may cause a malfunction to the Memory Stick PRO Duo Memory Stick Duo slot or image data If Failed to create a new Image Database File It may be possible that there is not enough free space appears in step 3 format the Memory Stick PRO Duo All recorded da...

Страница 15: ... Press START STOP or To stop recording press START STOP again Still Images Press PHOTO lightly to adjust the focus a beep sounds then press it fully a shutter click sounds appears beside or When disappears the image has been recorded Tips You can check the free media space by touching HOME MANAGE MEDIA MEDIA INFO The maximum continuous recordable time of movies is approximately 13 hours When a mov...

Страница 16: ...e played back Still Images Touch the tab and the still image to be played back VIEW IMAGES button POWER switch VIEW IMAGES button HOME MENU Previous 6 images Next 6 images Returns to the recording screen Displays movies Displays still images OPTION Searches for images by date Goes to the Face Index screen Goes to the Film Roll Index screen Slide show button Goes to the VISUAL INDEX screen Previous...

Страница 17: ...ed When you touch image marked with you can play it back from the point you have stopped previously Playing the image on a TV Connect your camcorder to the input jack of a TV or VCR using the A V connecting cable supplied or an A V connecting cable with S VIDEO optional For details see Handycam Handbook PDF Yellow A V OUT jack White Red Yellow Signal flow VCR or TVs DCR SR65 SR85 A V Remote Connec...

Страница 18: ...es the original size Playback zoom When you touch the screen during playback zoom the point you touched will be displayed in the center of the LCD screen DISC BURN button Create a disc by connecting the camcorder to a computer For details see PMB Guide p 26 DISP BATT INFO button You can switch the screen display when you press while the power is set to on When you press while the power is set to O...

Страница 19: ...h QUICK ON STBY you can set the time when the camcorder turns off in sleep mode ACCESS lamp Hard disk When the ACCESS lamp is lit or flashing your camcorder is writing reading data Connecting to the devices A V Remote Connector A V OUT jack Connect with the A V connecting cable USB jack Connect with the USB cable Active Interface Shoe DCR SR65 SR85 The Active Interface Shoe supplies power to optio...

Страница 20: ...ing remaining times OPTION button VIEW IMAGES button Face Index set Image size Approximate number of recordable still images Recording media Return button Playback mode Currently playing movie number Number of total recorded movies Previous Next button Video operation buttons Data file name Currently playing still image number Number of total recorded still images Playback folder Displays only whe...

Страница 21: ...r Meaning IMAGE SIZE Slide show set NightShot plus Super NightShot plus Color Slow Shutter PictBridge connecting Warning Bottom Indicator Meaning Picture effect Digital effect Manual focus SCENE SELECTION Back light White balance SteadyShot off EXPOSURE SPOT METER TELE MACRO Face Index Tips Indicators and their positions are approximate and differ from what you actually see See Handycam Handbook P...

Страница 22: ...eously the grayed items in the current recording playback situation To see the explanation of the HOME MENU HELP Press HOME or Touch HELP The bottom of the HELP button turns orange Using the OPTION MENU The OPTION menu appears like the pop up window that appears when you right click the mouse on a computer Touch OPTION then the menu items you can set at that moment appears 1 Touch the desired tab ...

Страница 23: ...MORY STICK REPAIR IMG DB F HDD MEMORY STICK SETTINGS category MOVIE SETTINGS REC MODE NIGHTSHOT LIGHT WIDE SELECT DIGITAL ZOOM STEADYSHOT AUTO SLW SHUTTR GUIDEFRAME REMAINING SET INDEX SET 1 PHOTO SETTINGS IMAGE SIZE 1 FILE NO NIGHTSHOT LIGHT GUIDEFRAME FLASH MODE 1 2 FLASH LEVEL 2 REDEYE REDUC 2 VIEW IMAGES SET DATA CODE DISPLAY SOUND DISP SET 3 VOLUME 1 BEEP 1 LCD BRIGHT LCD BL LEVEL LCD COLOR O...

Страница 24: ... up You can save images recorded on the camcorder on the hard disk of a computer Creating a DVD with selected images You can save images imported to your computer on a DVD You can also edit those images Connecting your camcorder to other devices For details see Handycam Handbook PDF Connecting with the A V connecting cable You can dub to VCRs DVD HDD recorders Connecting with the USB cable You can...

Страница 25: ...p 13 Deleting movies 1 Touch HOME OTHERS DELETE 2 Touch DELETE 3 Touch DELETE 4 Touch the movie to be deleted The selected movie is marked with 5 Touch YES To delete all movies at one time In step 3 touch DELETE ALL YES YES To delete the still images In step 2 touch DELETE Touch DELETE then touch the still image to be deleted The selected still image is marked with Touch YES Tips To delete all sti...

Страница 26: ...tion appears Click Handycam Handbook The installation screen for Handycam Handbook PDF appears Select the desired language and the model name of your Handycam then click Handycam Handbook PDF Installation starts When the installation is completed the short cut icon of Handycam Handbook PDF appears on the desktop of your computer The model name of your Handycam is printed on its bottom surface Clic...

Страница 27: ...k SONYPICTUTIL E CD ROM disc drive Drive names such as E may vary depending on the computer Click Install on the installation screen of the computer Select the language for the application to be installed then click Next As the screen to confirm the connection appears connect your camcorder to the computer following the steps below For DCR SR65 SR85 Connect the AC Adaptor to the Handycam Station a...

Страница 28: ... computer if required to complete the installation Remove the CD ROM from the disc drive of your computer To disconnect the USB cable Click the icon Safely remove USB Mass Storage Device OK Windows 2000 only on the task tray on the bottom right of the desktop of your computer Touch END YES on the screen of your camcorder Disconnect the USB cable Operating Picture Motion Browser To start Picture Mo...

Страница 29: ...wall socket or remove the battery pack then reconnect it after about 1 minute If the functions still do not work press the RESET button p 18 using a sharp pointed object If you press the RESET button all settings including the clock setting are reset The temperature of your camcorder is extremely high Turn off your camcorder and leave it for a while in a cool place The temperature of your camcorde...

Страница 30: ...m Station or your camcorder securely p 9 C 13 C 32 Remove the power source Reconnect it and operate your camcorder again Indicators Messages Causes Solutions E 20 E 31 E 61 E 62 E 91 E 94 A malfunction that you cannot service has occurred Contact your Sony dealer or local authorized Sony service facility Inform them of the 5 digit code which starts from E 101 0001 The file is damaged or unreadable...

Страница 31: ...hing wrong with the flash DCR SR65 SR85 The amount of light is not sufficient so camera shake easily occurs Use the flash DCR SR65 SR85 The camcorder is unsteady so camera shake easily occurs Hold the camcorder steady with both hands and record the image However note that the camera shake warning indicator does not disappear The media is full Still images cannot be recorded during processing Wait ...

Страница 32: ...t to build up inside When disconnecting the power cord mains lead pull it by the plug and not the cord Do not damage the power cord mains lead such as by placing anything heavy on it Keep metal contacts clean Keep the Remote Commander and button type battery out of children s reach If the battery is accidentally swallowed consult a doctor immediately DCR SR65 SR85 If the battery electrolytic liqui...

Страница 33: ...chargeable battery However even if the pre installed rechargeable battery is not charged the camcorder operation will not be affected as long as you are not recording the date Procedures Connect your camcorder to a wall outlet wall socket using the supplied AC Adaptor and leave it with the POWER switch set to OFF CHG for more than 24 hours Power supply You can use your camcorder in any countries r...

Страница 34: ... 64 5 8 in 16 9 2 For still images 48 1 920 mm 1 15 16 75 5 8 in 4 3 DCR SR65 SR85 F 1 8 3 2 f 2 5 62 5 mm 1 8 2 1 2 in When converted to a 35 mm still camera For movies 41 1 189 mm 1 5 8 46 7 8 in 16 9 2 For still images 36 900 mm 1 7 16 35 1 2 in 4 3 Color temperature AUTO ONE PUSH INDOOR 3 200 K OUTDOOR 5 800 K Minimum illumination DCR SR45 SR46 6 lx lux when AUTO SLW SHUTTR is set to ON Shutte...

Страница 35: ...DC 7 2 V Capacity 4 9 wh 680 mAh Type Li ion Design and specifications are subject to change without notice On trademarks Handycam and are registered trademarks of Sony Corporation Memory Stick Memory Stick Duo Memory Stick PRO Duo Memory Stick PRO HG Duo Memory Stick Micro MagicGate MagicGate Memory Stick and MagicGate Memory Stick Duo are trademarks or registered trademarks of Sony Corporation I...

Страница 36: ...imágenes fijas pág 9 o ACCESS pág 11 16 está encendido o parpadea Si lo hace podría dañar el soporte perder las imágenes grabadas u ocasionar otras fallas de funcionamiento Extraer el Memory Stick PRO Duo Extraer la batería o el adaptador de alimentaciόn de ca de la videocámara Someter la videocámara a golpes o vibraciones Cuando conecte la videocámara a otro dispositivo mediante un cable asegúres...

Страница 37: ...etire la lámina de aislamiento del control remoto antes de utilizarlo DCR SR65 SR85 Tipos de Memory Stick que puede usar para su videocámara Para grabar películas se recomienda utilizar un Memory Stick PRO Duo de 512 MB o capacidad superior con una de las marcas siguientes Memory Stick PRO Duo Memory Stick PRO HG Duo Están disponibles tanto los que tienen la marca Mark2 como los que no la tienen U...

Страница 38: ... se recomienda ejecutar VACIAR para impedir la recuperación de sus datos Además se recomienda destruir el cuerpo de la videocámara al desecharla Acerca del ajuste del idioma Para ilustrar los procedimientos operativos se utilizan indicaciones en pantalla en cada idioma local Si es necesario cambie el idioma de la pantalla antes de utilizar la videocámara pág 9 Acerca de este manual Las imágenes de...

Страница 39: ...14 Otras piezas y funciones de la videocámara 15 Indicadores que se muestran durante la grabación reproducción 17 Realización de diversas funciones HOME y OPTION 19 Almacenamiento de imágenes 21 Borrado de imágenes 22 Uso con una computadora Operaciones con computadora 23 Guía práctica software de la instalación 23 Instalación de Picture Motion Browser 23 Solución de problemas Solución de problema...

Страница 40: ...la toma de entrada de cc de la videocámara Abra la tapa de la toma y conecte la clavija de cc del adaptador de alimentaciόn de ca a la toma de entrada de cc 4 Para el modelo DCR SR65 SR85 conecte el cable de alimentación al adaptador de alimentaciόn de ca y al tomacorriente de pared Inserte la videocámara firmemente en la Handycam Station hasta que toque el fondo Al colocar la videocámara en la Ha...

Страница 41: ...ga la batería Tiempo de funcionamiento disponible para la batería suministrada Tiempo de carga Tiempo aproximado min necesario para cargar completamente una batería totalmente descargada Tiempo de grabación reproducción Tiempo aproximado min disponible cuando utiliza una batería completamente cargada Unidad min DCR SR45 SR46 DCR SR65 SR85 Tiempo de carga 125 125 Tiempo de grabación Tiempo de graba...

Страница 42: ...lice la videocámara a bajas temperaturas En función de las condiciones en las que utilice la videocámara es posible que el tiempo de grabación y reproducción disponible se vea reducido Acerca del adaptador de alimentaciόn de ca Si utiliza el adaptador de alimentaciόn de ca conéctelo a un tomacorriente de pared cercano Si se produce alguna falla de funcionamiento al utilizar la videocámara desconec...

Страница 43: ...a con y a continuación toque SIGUIENTE 4 Ajuste HORA VERANO A año M mes D día hora y minuto y a continuación toque El reloj empezará a operar Sugerencias La fecha y la hora no aparecen durante la grabación aunque se graban automáticamente en el disco y se pueden mostrar durante la reproducción Puede silenciar los pitidos de la operación tocando HOME AJUSTES AJUS SON PANT PITIDO DESACTIV Cambio del...

Страница 44: ...to DCR SR85 21 hora 50 minuto Memory Stick PRO Duo 4 GB fabricado por Sony Corporation 80 minuto Compruebe el número de imágenes fijas que puede grabar en la pantalla de cristal líquido de la videocámara pág 17 1 Toque HOME ficha GESTIONAR SOPORTE en la pantalla 2 Toque AJ SOPORTE PEL para seleccionar el soporte de almacenamiento de películas y toque AJ SOPORTE FOTO para seleccionar el soporte par...

Страница 45: ...líquido aparece Crear nuevo arch base de datos de imágenes 3 Toque SÍ Para grabar sólo imágenes fijas en un Memory Stick PRO Duo toque NO Para extraer el Memory Stick PRO Duo Abra la tapa del Memory Stick Duo y presione ligeramente el Memory Stick PRO Duo Notas No abra la tapa del Memory Stick Duo durante la grabación Si inserta un Memory Stick PRO Duo a la fuerza en la dirección incorrecta puede ...

Страница 46: ...r la grabación presione START STOP de nuevo Imágenes fijas Presione PHOTO ligeramente para enfocar se oye un pitido y a continuación presione totalmente se oye el clic del obturador aparece junto a o a Cuando desaparece significa que se ha grabado la imagen Sugerencias Puede comprobar el espacio libre del soporte tocando HOME GESTIONAR SOPORTE INFO SOPORTE El tiempo máximo de grabación continua de...

Страница 47: ... reproducir Imágenes fijas Toque la ficha y la imagen fija que desee reproducir Botón VISUALIZAR IMÁGENES Interruptor POWER Botón VISUALIZAR IMÁGENES HOME MENU 6 imágenes anteriores 6 imágenes posteriores Permite volver a la pantalla de grabación Muestra películas Muestra imágenes fijas OPTION Busca imágenes por fecha Abre la pantalla Índice de caras Abre la pantalla Índice de rollos de película P...

Страница 48: ...e el punto en el que se detuvo anteriormente Reproducción de imágenes en un televisor Conecte la videocámara a la toma de entrada del televisor o la VCR mediante el cable de conexión de A V suministrado o mediante un cable de conexión de A V con S VIDEO opcional Para obtener más información consulte la Guía práctica de Handycam PDF amarillo Toma A V OUT blanco rojo amarillo flujo de señales VCR o ...

Страница 49: ... de zoom Presiónelos para ampliar disminuir la imagen Es posible ampliar una imagen fija desde aproximadamente 1 1 hasta 5 veces su tamaño original zoom de reproducción Si toca la pantalla durante el zoom de reproducción el punto que haya tocado aparecerá en el centro de la pantalla de cristal líquido Botón DISC BURN Para crear un disco conecte la videocámara a la computadora Para obtener más info...

Страница 50: ...la grabación la próxima vez La videocámara vuelve al modo de espera de grabación en aproximadamente 1 segundo Con la función ESPERA ENC RÁP puede especificar la hora de apagado de la videocámara en modo de desconexión automática Indicador ACCESS Disco duro Cuando el indicador ACCESS se enciende o parpadea significa que la videocámara está grabando o leyendo datos Conexión a otros dispositivos Toma...

Страница 51: ... de grabación Botón OPTION Botón VISUALIZAR IMÁGENES Ajuste Índice de caras Tamaño de imagen Número aproximado de imágenes fijas grabables soporte de grabación Botón Volver Modo de reproducción Número de película actual en reproducción número total de películas grabadas Botón Anterior Siguiente Botones de control de video Nombre del archivo de datos Número de imagen fija actual en reproducción núm...

Страница 52: ...Presentación de diapositivas NightShot plus Super NightShot plus Color Slow Shutter Conexión PictBridge Advertencia Parte inferior Indicador Significado Efecto de imagen Efectos digitales Enfoque manual SELEC ESCENA Función de contraluz Balance de blancos SteadyShot desactivado EXPOSICIÓN MEDID PUNTO TELE MACRO Índice de caras Sugerencias Los indicadores y sus posiciones son aproximados y pueden v...

Страница 53: ...o no aparece en pantalla toque para cambiar de página Para ocultar la pantalla HOME MENU toque No es posible seleccionar o activar simultáneamente los elementos atenuados en la situación actual de grabación reproducción Para ver la explicación del HOME MENU HELP Presione HOME o bien Toque HELP La parte inferior del botón HELP se enciende en naranja Uso del OPTION MENU El OPTION se muestra como la ...

Страница 54: ...cha BORRAR BORRAR TODO MOVER IMPRIMIR CONEXIÓN USB CONEXIÓN USB CONEXIÓN USB DISC BURN Categoría GESTIÓN DE SOPORTES AJ SOPORTE PEL 1 HDD MEMORY STICK AJ SOPORTE FOTO 1 HDD MEMORY STICK INFO SOPORTE FORMAT SOPORTE 1 HDD MEMORY STICK REP ARCH BD IM HDD MEMORY STICK Categoría AJUSTES AJUSTES PEL CÁM MODO GRAB ILUM NIGHTSHOT SELEC PANOR ZOOM DIGITAL STEADYSHOT OB LENTO AUTO GUÍA FOTOG RESTANTE AJ AJU...

Страница 55: ...das de la videocámara en el disco duro de una computadora Creación de un DVD con imágenes seleccionadas Se pueden guardar las imágenes importadas a la computadora en un DVD También se pueden editar estas imágenes Conexión de la videocámara a otros dispositivos Para obtener más información consulte la Guía práctica de Handycam PDF Conexión mediante el cable de conexión A V Puede grabar en VCR y gra...

Страница 56: ...peración pág 10 Borrado de películas 1 Toque HOME OTROS BORRAR 2 Toque BORRAR 3 Toque BORRAR 4 Toque la película que desee borrar La imagen seleccionada tiene la marca 5 Toque SÍ Para borrar todas las películas de una vez En el paso 3 toque BORRAR TODO SÍ SÍ Para borrar las imágenes fijas En el paso 2 toque BORRAR Toque BORRAR y a continuación toque la imagen fija que desee borrar La imagen fija s...

Страница 57: ...o en la lectora de discos de su computadora Aparecerá la pantalla de selección de la instalación Haga clic en Handycam Handbook Aparecerá la pantalla de instalación para la Guía práctica de Handycam PDF Seleccione el idioma deseado y el nombre del modelo de su Handycam y a continuación haga clic en Handycam Handbook PDF Comenzará la instalación Cuando finaliza la instalación aparecerá en el escrit...

Страница 58: ...icaciones que se estén ejecutando en la computadora antes de instalar el software Coloque el CD ROM suministrado en la lectora de discos de su computadora Aparecerá la pantalla de instalación Si la pantalla no aparece Haga clic en Start y a continuación en My Computer En Windows 2000 haga doble clic en My Computer Haga doble clic en SONYPICTUTIL E CD ROM lectora de discos Los nombres de las unidad...

Страница 59: ...nstalar el software En función de la computadora es posible que deba instalar software de terceros Si aparece la pantalla de instalación siga las instrucciones para instalar el software necesario Reinicie la computadora si es necesario para completar la instalación Extraiga el CD ROM de la lectora de discos de su computadora Para desconectar el cable USB Haga clic en el icono Safely remove USB Mas...

Страница 60: ...falla de funcionamiento Desconecte el adaptador de alimentaciόn de ca del tomacorriente de pared o extraiga la batería y vuelva a realizar la conexión transcurrido aproximadamente 1 minuto Si las funciones siguen sin estar disponibles presione el botón RESET pág 15 con un objeto puntiagudo Si presiona el botón RESET se restablecerán todos los ajustes incluido el reloj La temperatura de la videocám...

Страница 61: ...ucionarlo varias veces póngase en contacto con su distribuidor de Sony o con un centro de servicio técnico local autorizado de Sony Indicadores Mensajes Causas Soluciones C 04 La batería no es una batería InfoLITHIUM serie H Use una batería InfoLITHIUM serie H pág 6 Conecte firmemente la clavija de cc del adaptador de alimentaciόn de ca a la toma de entrada de cc de la Handycam Station o de la vid...

Страница 62: ... está dañado El Memory Stick PRO Duo está dañado El Memory Stick PRO Duo no está correctamente formateado Se colocó un Memory Stick PRO Duo incompatible Indicadores Mensajes Causas Soluciones Se restringió el acceso al Memory Stick PRO Duo en otro dispositivo Existe algún tipo de problema con el flash DCR SR65 SR85 La cantidad de luz no es suficiente por lo que la cámara vibra con facilidad Use el...

Страница 63: ...dadoso con el objetivo Cuando no utilice la videocámara mantenga el interruptor POWER en la posición OFF CHG No utilice la videocámara envuelta en una toalla por ejemplo Si lo hace puede recalentarse internamente Cuando desconecte el cable de alimentación tire del enchufe y nunca del cable Procure no dañar el cable de alimentación al colocar un objeto pesado sobre él Mantenga limpios los contactos...

Страница 64: ...a videocámara está conectada al tomacorriente de pared a través del adaptador de alimentaciόn de ca o cuando tiene la batería insertada La batería recargable se descargará completamente transcurridos aproximadamente 3 meses si no utiliza la videocámara en absoluto Utilice la videocámara después de cargar la pila recargable preinstalada Sin embargo aunque no esté cargada el funcionamiento de la vid...

Страница 65: ... 25 Digital 50 2 000 Diámetro del filtro 30 mm Distancia focal DCR SR45 SR46 F 1 8 4 1 f 1 9 76 0 mm Si se convierte a una cámara fija de 35 mm Para películas 41 1 640 mm 16 9 2 Para imágenes fijas 48 1 920 mm 4 3 DCR SR65 SR85 F 1 8 3 2 f 2 5 62 5 mm Si se convierte a una cámara fija de 35 mm Para películas 41 1 189 mm 16 9 2 Para imágenes fijas 36 900 mm 4 3 Temperatura del color AUTOM UNA PULS ...

Страница 66: ...a Handycam Station DCRA C200 DCR SR65 SR85 Conectores de entrada salida Toma A V OUT toma de salida de audio video Toma USB mini B Adaptador de alimentaciόn de ca AC L200 L200B Requerimientos de energía ca de 100 V a 240 V y 50 60 Hz Consumo de corriente De 0 35 0 18 A Consumo de energía 18 W Tensión de salida cc de 8 4 V 1 5 A ó 1 7 A refiérase a la etoqieta del adaptador suministrado Temperatura...

Страница 67: ...as o marcas comerciales de Microsoft Corporation en Estados Unidos y u otros países Macintosh y Mac OS son marcas comerciales registradas de Apple Inc en los Estados Unidos y en otros países Intel Intel Core y Pentium son marcas comerciales o marcas comerciales registradas de Intel Corporation o de sus filiales en Estados Unidos y en otros países Adobe el logotipo de Adobe y Adobe Acrobat son marc...

Страница 68: ...US ES Additional information on this product and answers to frequently asked questions can be found at our Customer Support Website http www sony net Printed in China ...

Отзывы: