background image

10

• If you cannot copy all your image data on a DVD, 

the image data is automatically saved on more 
than one DVD. The required number of DVDs is 
displayed in step 6 on the screen.

1

Confirm that the camcorder is not 
connected to a computer. 

2

Turn on the computer.

• Close all applications running on the 

computer.

3

Place the recordable DVD to be 
saved in the disc drive of your 
computer.

• It is recommended that you use a new 

recordable DVD.

• If any software starts on the computer 

automatically, close it.

4

Connect your camcorder to the 
wall outlet using the supplied AC 
Adaptor, then set the POWER 
switch to turn on.

• You can perform this operation, whichever 

position of the 

 (Movie) / 

 (Still) / 

 (PLAY/EDIT) is lit.

• For operating the POWER switch, see 

“Camera Operating Guide”.

5

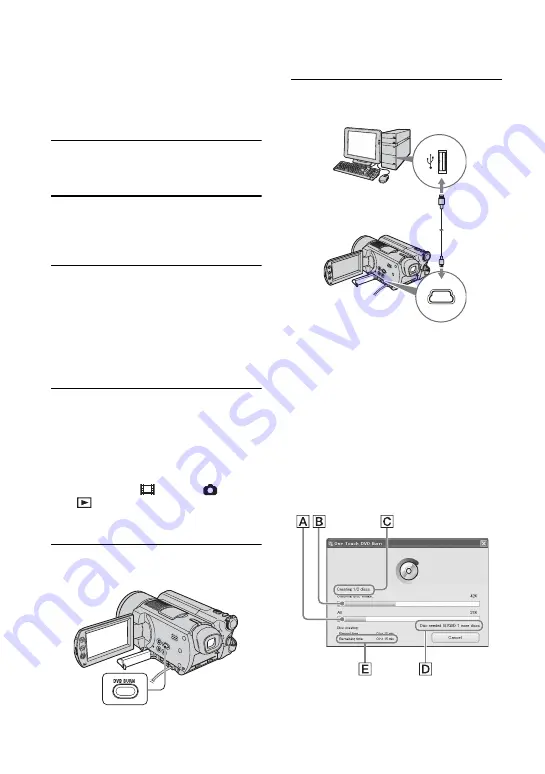
Press DVD BURN button of the 
camcorder.

[Check the connected device.] appears on 
the LCD screen of the camcorder.

6

Connect the camcorder with a 
computer using the USB cable.

DVD creation starts up.

• During DVD creation, do not apply vibration. 

The DVD creation may be terminated.

• When you insert a burned DVD-RW/

DVD+RW in the disc drive in step 3, 
message appears, asking if you want to delete 
images saved on a DVD.

• Make sure no other USB devices are 

connected to your computer.

• If your computer has a USB keyboard and a 

USB mouse as standard equipment, leave 
them connected and connect the camcorder 
to an available USB jack with the USB cable.

A

 Current status of all DVD creation

B

 Current status per DVD

C

 Number of DVD created

D

 Number of DVD required

Creating a DVD with One Touch (continued)

Содержание DCR SR100 - Handycam Camcorder - 3.3 MP

Страница 1: ...ng a DVD with edited images 18 Others 22 Troubleshooting 25 Printed on 100 recycled paper using VOC Volatile Organic Compound free vegetable oil based ink US Additional information on this product and answers to frequently asked questions can be found at our Customer Support Website Camera Operating Guide See Camera Operating Guide for the operation for recording viewing of the camcorder ...

Страница 2: ...e for dual layer DVD system 28 GB or more required When copying images to a computer more available disk space required for saving image data than shown above Display 4MB VRAM video card Minimum 1024 768 dots High color 16bitcolor 65000 colors Thisproduct will not operate correctly at less than 800 600 dots and 256 colors or less USB port As standard equipment USB 2 0 recommended The camcorder is ...

Страница 3: ...out limitation copying modifying reproducing uploading transmitting or placing to the external network accessible to the public transferring distributing lending licensing selling and publishing any of the Music Contents without obtaining authorization or approval of the respective owners thereof Licenseof ImageMixer for HDD Camcorder by Sony Corporation would not be construed as conferring to you...

Страница 4: ...the USB cable 11 Copying images to a computer 12 Destination of saved images 12 Copying the last saved diff files Easy PC Back up 12 Copying selected images 14 Viewing copied images on a computer 16 Printing still images 17 Editing images 18 Creating a DVD with selected images 20 Saving images in the Playlist to a DVD 22 Deleting image data from a computer 24 Troubleshooting 25 Index 27 Getting St...

Страница 5: ...x DVD creation with One Touch p 9 By pressing DVD BURN button of the camcorder you can save images recorded on the camcorder to a DVD automatically You can use easy DVD creation x Copying and viewing images on the computer p 12 You can view images recorded on the camcorder by copying them to your computer You can print still images on a computer x Creating a DVD with edited images p 18 You can edi...

Страница 6: ...re 3 PlacetheCD ROM supplied inthe disc drive of your computer The installation screen appears If the screen does not appear follow the steps below 1 Click start then click My Computer Ifyou are usingWindows 2000 double click My Computer on the desktop 2 Double click IMAGEMIXER E CD ROM Drive names such as E vary depending on the computer 3 Double click install exe 4 Click Install 5 Select the lan...

Страница 7: ...the DCR SR90E SR100E select PAL then click Next To check the model name of your camcorder see the cover page of Camera Operating Guide 10Click Install on the Ready to Install the Program screen The installation of ImageMixer for HDD Camcorder starts 11If the Installing Microsoft R DirectX R screen is displayed follow the steps below to install DirectX 9 0c If not skip to step 12 1 Read License Agr...

Страница 8: ...r turns off once then starts up again automatically Restart When you complete the installation the short cut icons for ImageMixer for HDD Camcorder and ImageMixer destination folder appears on the desktop of your computer 13Remove the CD ROM from the disc drive of your computer Installing software continued ...

Страница 9: ...Only the 12cm DVD can be used The 8cm DVD cannot be used WhencreatingaDVDwithOneTouchDVDBurn function thereisnooperationaldifferenceamong DVD types except that DVD RW DVD RW are both reusable WhenyoucreateaDVDbyeditingimagescopied to your computer some of the operations may differ depending on the DVD type When saving data on a DVD RW the data is recorded in VIDEO format You cannot add more data o...

Страница 10: ...Movie Still PLAY EDIT is lit For operating the POWER switch see Camera Operating Guide 5 Press DVD BURN button of the camcorder Checktheconnecteddevice appearson the LCD screen of the camcorder 6 Connect the camcorder with a computer using the USB cable DVD creation starts up DuringDVDcreation donotapplyvibration The DVD creation may be terminated When you insert a burned DVD RW DVD RW in the disc...

Страница 11: ...ree hard disk space of your camcorder To copy a created DVD use the DVD creation software installed on your computer You cannot copy created DVDs with the supplied software You cannot record image data on the hard disk of your computer in this operation You cannot delete image data on the hard disk of the camcorder in this operation You cannot edit images on the created DVD with a computer When yo...

Страница 12: ... folder is created Each folder name becomes YY_MM_DD copy date Number of copies sub numbers Example Ifyou copied imageson March 1 2006 First Copy 06_03_01_01 Second Copy 06_03_01_02 Third Copy 06_03_01_03 Folder names created by copying the selected images Each day you copy images a new folder is created Each folder name becomes YY_MM_DD Copydate 00 Whenyou copy images a few times on the same day ...

Страница 13: ...corder to an available USB jack with the USB cable 5 Touch HDD on the LCD screen of the camcorder ImageMixer Menu appears on the screen of the computer IfthescreenotherthantheImageMixerMenu appears close the screen 6 Click Easy PC Back up on the screen of the computer The setting screen appears 7 Apply the settings for copying images then click Start importing AImages to be copied Select if you wa...

Страница 14: ...PC Back up again If the operation ends unexpectedly including an indication of insufficient free hard disk space the last correctly copied file is saved When you restart the operation the next image data will be copied You can copy selected images to your computer 1 Confirmthat your camcorderisnot connected to the computer 2 Turn on the computer Close all applications running on the computer 3 Con...

Страница 15: ...images on the hard disk of the camcorder 8 To copy movies click Movies or to copy still images click Still Images If the message about Hi Speed USB appears click OK Then select Preview directly from the Hard Disk Drive Handycam on the displayed Option screen and click OK 9 Click the images you want to copy The selected images on which you have clicked are marked with Mark all the desired images wi...

Страница 16: ...r 2 Click Viewing and Editing Browser starts up 3 Click the Computer tab 4 Click the folder containing the desired image When you right click the thumbnail you can view the information of the movie or still image 5 Double click the desired image The preview screen appears Movie You can play stop and pause using the buttons at the top of the screen Depending on the computer you use the played back ...

Страница 17: ...nt and expand images using the buttons at the top of the screen For data compatible with Exif click Exif to display the recording conditions such as shutter speed exposure aperture etc Click Print in step 5 Printing still images ...

Страница 18: ...ageMixer Menu appears You can also start up ImageMixer Menu by clicking start t All Programs t PIXELA t ImageMixer for HDD Camcorder t ImageMixer for HDD Camcorder 3 Click Viewing and Editing Browser starts up 4 Click the Computer tab 5 Clickthefolderincludingthemovie you want to edit 6 Double click the movie you want to edit The preview screen appears 7 Click Edit ImageMixer MPEG Cutter starts up...

Страница 19: ...y clicking or then drag and drop the frame to END 12Click Cut When you want to delete more of the frames repeat the steps from step 9 to step 12 13Click Compile Thenewfileexceptfor deleted scenesare created on the computer The image data selected as editing materials is saved on the computer 14When Save as appears on the screen specify the destination and file name then click Save Fordetails refer...

Страница 20: ... automatically 3 Double click ImageMixer for HDD Camcorder on the desktop ImageMixer Menu appears You can also start up ImageMixer Menu by clicking start t All Programs t PIXELA t ImageMixer for HDD Camcorder t ImageMixer for HDD Camcorder 4 Click Viewing and Editing By clicking Options you can change the settings for the DVD Drive Writing speed or Temporary folder Browser starts up 5 Clickthe Com...

Страница 21: ...ck Yes After creating a DVD check that the DVD can be played back properly on a DVD player or other devices If you check that the DVD can be played back it is recommended that you delete the image data from the camcorder by following the steps in Camera Operating Guide In this way you can increase the free hard disk space of your camcorder To copy a created DVD use the DVD creation software instal...

Страница 22: ... Operating Guide 5 Connect the camcorder with a computer using the USB cable USB SELECT appears on the LCD screen of the camcorder For connecting with the USB cable see page 10 6 Touch HDD on the LCD screen of the camcorder ImageMixer Menu appears on the screen of the computer 7 Click Playlist DVD creation on the screen of the computer Project Settings screen appears You do not need to change the ...

Страница 23: ...K DVD creation starts up When you insert a burned DVD RW DVD RW in the disc drive in step 3 a message appears asking if you want to delete images saved on a DVD 11Once the completion dialog for DVD creation appears click No To create another DVD click Yes See page 11 to remove your camcorder from the computer ...

Страница 24: ...ures if you do not change the destination folders for your image data Whenyouhavechangedadestinationfolder delete the images from the last destination folder Do not delete the image data on the hard disk of the camcorder with your computer 1 When using Windows XP click start t My Pictures The contents of My Pictures are displayed For Windows 2000 double click My Document t My Pictures on the deskt...

Страница 25: ...or 16 bits 65 000 colors or more You cannot use the supplied software on a Macintosh computer The supplied software ImageMixer for HDD Camcorder is not compatible with a Macintosh computer Cannot start Easy Handycam or Cannot cancel Easy Handycam appears on the screen of your camcorder You cannot start or cancel the Easy Handycam operation while the USB cable is connected Remove the USB cable from...

Страница 26: ...irst then slide the POWER switch on your camcorder to turn on another lamp The actual display and message look different on your computer The actual display and message may look different The extension of a file is not displayed on your computer To display the extension follow the steps below 1 Click Tool in the window folder t Folder option t View tab 2 Remove the check mark from the Hide file ex...

Страница 27: ...on 26 F Folder 12 H Hard Disk 2 HDD 13 15 22 Hi Speed USB 2 I ImageMixer Menu 13 15 16 18 20 22 ImageMixer MPEG Cutter 18 ImageMixer3 DVD Authoring 21 22 Inquire 2 Install 6 M Macintosh 2 Memory 2 My Computer 6 My Pictures 24 O One Touch DVD Burn 9 OS 2 P Pixela User Support Center 2 Playlist 22 Preview 16 18 Print 17 R Removing the USB cable 11 S Software 6 Sound card 2 System requirement 2 T Tas...

Отзывы: