background image

Recording

28

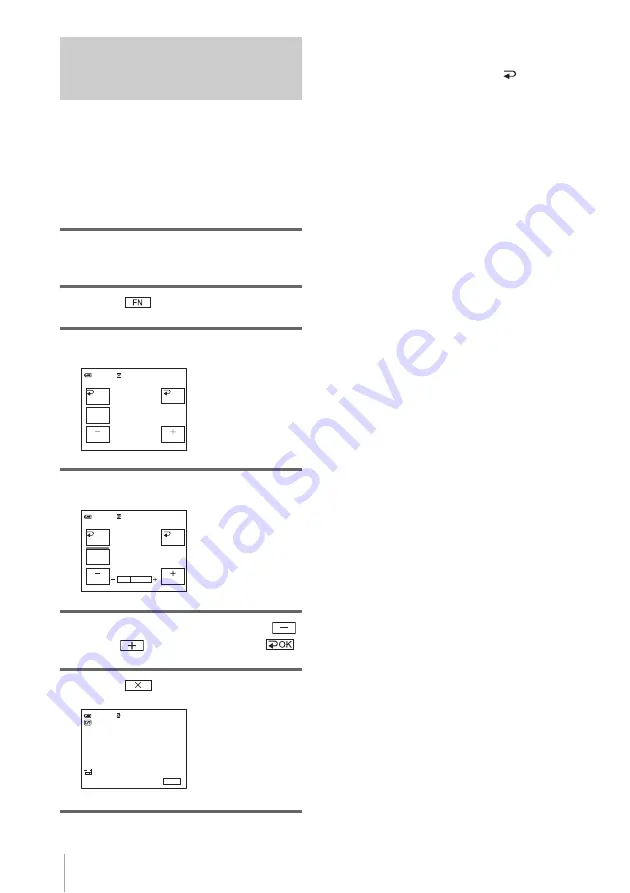
Adjusting the exposure manually

You can fix the brightness of a picture at the 
best exposure. When recording indoors on a 
clear day, for instance, you can avoid 
backlight shadows on people next to the 
window by manually fixing the exposure to 
that of the wall side of the room.

1

Slide the POWER switch to select the 
CAMERA mode.

2

Touch 

 to display [PAGE1].

3

Touch [EXPOSURE].

4

Touch [MANUAL].

5

Adjust the exposure by touching 


(dim)/ 

 (bright), then touch 

.

6

Touch .

To return the setting to automatic 
exposure

Follow steps 1 to 3, then select [

AUTO] in 

step 4.

b

Note

• You cannot use the manual exposure together with 

the NightShot plus function.

MANU–

AL

EXPOSURE

OK

0:00:00

STBY

60min

AUTO

AUTO

MANU–

AL

EXPOSURE

OK

0:00:00

STBY

60min

0:00:00

STBY

FN

60min

Содержание DCR-HC20 - Digital Handycam Camcorder

Страница 1: ... Australian Model Chinese Model Hong Kong Model SERVICE MANUAL DIGITAL VIDEO CAMERA RECORDER INSTRUCTION MANUAL is shown at the end of this document Table for differences of function of each model Revision History Revision History Ver 1 0 2004 02 LEVEL 1 Link ACCESSORIES SPECIFICATIONS ACCESSORIES SPECIFICATIONS Link Photo DCR HC20E Z MECHANISM MDX Z200 DCR HC16E HC18E HC20 HC20E RMT 830 ...

Страница 2: ...Stereo mini minijack ø 2 5 mm USB jack mini B MIC jack Minijack 0 388 mV low impedance with DC 2 5 to 3 0 V output impedance 6 8 kΩ kilohms ø 3 5 mm Stereo type LCD screen Picture 6 2 cm 2 5 type Total dot number 123 200 560 220 General Power requirements DC 7 2 V battery pack DC 8 4 V AC Adaptor Average power consumption when using the battery pack During camera recording using the viewfinder 2 2...

Страница 3: ... unauthorized replacement parts particularly transistors that were installed during a previous repair Point them out to the customer and recommend their replacement SAFETY CHECK OUT After correcting the original service problem perform the following safety checks before releasing the set to the customer 4 Look for parts which through functioning show obvious signs of deterioration Point them out t...

Страница 4: ...8 337 51 MANUAL INSTRUCTION GERMAN DUTCH HC16E AEP HC18E AEP HC20E AEP 3 088 337 61 MANUAL INSTRUCTION SWEDISH RUSSIAN HC16E NE HC18E NE HC20E NE JE 3 088 337 71 MANUAL INSTRUCTION DANISH FINNISH HC16E NE HC18E NE HC20E NE 3 088 337 81 MANUAL INSTRUCTION ARABIC PERSIAN HC20E E 3 088 337 91 MANUAL INSTRUCTION TRADITIONAL CHINESE HC20E HK 3 088 338 11 MANUAL INSTRUCTION SIMPLIFIED CHINESE HC20E E CH...

Страница 5: ...DCR HC16E HC18E HC20 HC20E 6 Sony EMCS Co 2004B1600 1 2004 2 Published by DI CS Strategy Div 9 876 704 41 ...

Страница 6: ...3 088 336 11 1 2004 Sony Corporation Camera Operations Guide Read this first Digital Video Camera Recorder DCR HC20 ...

Страница 7: ...800 822 8837 or visit http www rbrc org Caution Do not handle damaged or leaking Lithium Ion batteries Battery pack This device complies with Part 15 of the FCC Rules Operation is subject to the following two conditions 1 This device may not cause harmful interference and 2 this device must accept any interference received including interference that may cause undesired operation This Class B digi...

Страница 8: ...ou can use Title search p 40 Date search p 41 Photo search p 41 TITLE p 52 TAPE TITLE p 54 Cassettes with Cassette Memory are marked with Notes on recording Before starting to record test the recording function to make sure the picture and sound are recorded without any problems Compensation for the contents of recordings cannot be provided even if recording or playback is not possible due to a ma...

Страница 9: ...r hand on the back side of the LCD panel to support it Then touch the buttons displayed on the screen Unavailable buttons will be grayed out You can change the language to be used for screen display on your camcorder p 20 Be careful not to press buttons beside the LCD screen accidentally when you open or close the LCD panel or when you adjust the angle of the LCD panel Do not hold the camcorder by...

Страница 10: ...the screen language 20 Recording Recording movies 21 Recording for a longer time 22 Using zoom 22 Recording in mirror mode 22 Using the self timer 23 Recording still images Tape photo recording 24 Recording with ease Easy Handycam 25 Adjusting the exposure 26 Adjusting the exposure for backlit subjects 26 Fixing the exposure for the selected subject Flexible spot meter 26 Adjusting the white balan...

Страница 11: ...g back in various modes 35 Playing back with ease Easy Handycam 36 Various playback functions 37 Displaying the screen indicators 37 Displaying the date time and camera settings data Data code 37 Playing the picture on a TV 39 Locating a scene on a tape for playback 40 Searching quickly for a desired scene Zero set memory 40 Searching for a scene using Cassette Memory Title search 40 Searching for...

Страница 12: ...D TIME etc 60 Dubbing Editing Connecting to a VCR or TV 62 Dubbing to another tape 63 Recording pictures from a VCR 63 Dubbing selected scenes from a tape Digital program editing 64 Dubbing sound to a recorded tape 69 Creating DVDs or VCDs 71 Troubleshooting Troubleshooting 72 Warning indicators and messages 78 Additional Information Using your camcorder abroad 81 Usable cassette tapes 82 About th...

Страница 13: ...y pack in the direction of the arrow until it clicks a Slide the OPEN ZEJECT lever in the direction of the arrow to open the lid The cassette compartment comes out automatically b Insert the cassette with its window side facing up then push the center of the back of the cassette c Press Close the cassette lid after the cassette compartment slides back in by itself OPEN ZEJECT lever Window side ...

Страница 14: ...pressing the green button slide the POWER switch down to light up the CAMERA lamp The power turns on d Press REC START STOP Recording starts To change to the standby mode press REC START STOP again You can also record by pressing REC START STOP beside the LCD screen a Slide the POWER switch repeatedly until the PLAY EDIT lamp lights up b Touch rewind c Touch play to start the playback To stop pres...

Страница 15: ...operation allows easy recording playback for even first time users by providing only the basic functions for recording playback For details see instructions for each operation See page 25 for recording page 36 for playback Press EASY when recording playing back EASY lights up in blue a and the screen font size increases b during Easy Handycam operation 2 1 ...

Страница 16: ... indicates the number of that item supplied AC Adaptor 1 Power cord 1 Wireless Remote Commander 1 A button type lithium battery is already installed A V connecting cable 1 USB cable 1 Rechargeable battery pack NP FP50 1 CD ROM SPVD 012 USB Driver 1 Cleaning cloth 1 Shoe cover 1 Attached to the camcorder Camera Operations Guide This manual 1 Computer Applications Guide 1 ...

Страница 17: ...he wall outlet immediately if any malfunction occurs 1 Attach the battery pack by sliding it in the direction of the arrow until it clicks 2 With the v mark on the DC plug facing down connect the AC Adaptor to the DC IN jack on your camcorder 3 Connect the power cord to the AC Adaptor 4 Connect the power cord to the wall outlet 5 Set the POWER switch to OFF CHG The CHG charge lamp lights up and ch...

Страница 18: ...bout 20 seconds A Battery charge level Displays approximate remaining amount of power left in the battery pack B Approximate possible recording time using the LCD panel C Approximate possible recording time using the viewfinder Charging time Approximate number of minutes required when you fully charge a fully discharged battery pack at 25 C 77 F 10 30 C 50 86 F recommended Recording time when reco...

Страница 19: ...ing charging or the battery information will not be correctly displayed in following conditions The battery pack is not attached correctly The battery pack is damaged The battery pack is fully discharged For Battery information only Using an outside power source You can use the AC Adaptor as the power source when you do not want the battery to run out While you are using the AC Adaptor the battery...

Страница 20: ... 1 Set the LENS COVER switch to OPEN 2 While pressing the green button slide the POWER switch down The power turns on To enter the recording or playing mode slide the switch repeatedly until the respective lamp for the desired power mode lights up CAMERA To record on a tape PLAY EDIT To play or edit pictures To turn off the power Slide the POWER switch up to OFF CHG then set the LENS COVER switch ...

Страница 21: ... be affected If you rotate the LCD panel 180 degrees to the lens side you can close the LCD panel with the LCD screen facing out If you are using the battery pack for power source you can adjust the brightness by selecting LCD B L on the LCD VF SET menu p 51 When you use your camcorder in bright conditions set LCD BACKLIGHT to turn off the backlight for the LCD panel appears and this setting saves...

Страница 22: ...dly to select a desired effect The LCD screen lights up To hide the buttons on the LCD screen touch z Tip To adjust the brightness of the viewfinder backlight select LCD VF SET then VF B L when you are using the battery pack p 51 Step 5 Setting the date and time Set the date and time when using this camcorder for the first time If you do not set the date and time the CLOCK SET screen appears every...

Страница 23: ...hour and M minute in the same way as was done in step 7 then touch For midnight set it to 12 00AM For midday set it to 12 00PM 0 00 00 SPOT FOCUS FOCUS WHT BAL MENU FADER END SCH EXPO SURE SPOT METER PAGE1 PAGE2 60min MANUAL SET PROGRAM AE P EFFECT FLASH MODE FLASH LVL AUTO SHTR EXEC RET SETUP MENU CLOCK SET USB STREAM LANGUAGE DEMO MODE EXEC RET CLOCK SET Y M D H M OK 2004 JAN 1 12 00AM CLOCK SET...

Страница 24: ...en the lid The cassette compartment automatically comes out and opens up 2 Insert a cassette with its window side facing up 3 Press The cassette compartment automatically slides back in 4 Close the lid To eject the cassette 1 Slide the OPEN ZEJECT lever in the direction of the arrow and open the lid The cassette compartment automatically comes out 2 Take out the cassette then press The cassette co...

Страница 25: ...t LANGUAGE with then touch EXEC 6 Select the desired language with then touch EXEC 7 Touch z Tip Your camcorder offers ENG SIMP Simplified English for when you cannot find your native tongue among the options POWER switch 0 00 00 STBY SPOT FOCUS FOCUS WHT BAL MENU FADER END SCH EXPO SURE SPOT METER PAGE1 PAGE2 60min SETUP MENU CLOCK SET USB STREAM LANGUAGE DEMO MODE ENGLISH ENG SIMP FRANÇAIS ESPAN...

Страница 26: ...ord movies by pressing REC START STOP beside the LCD screen It is useful for recording from a low angle or recording yourself in mirror mode To press REC START STOP beside the LCD screen support the LCD panel with your hand If you install a large capacity battery pack NP FP70 FP90 on your camcorder we recommend recording with the LCD screen Indicators displayed during recording The indicators will...

Страница 27: ...creen p 37 Recording for a longer time To record for a longer time In the TAPE SET menu select REC MODE then LP p 55 In the LP mode you can record 1 5 times longer than you can when recording in the SP mode A tape recorded in the LP mode should be played back only on this camcorder Using zoom You can choose zoom to magnification levels greater than 10 times and from that point activate the digital...

Страница 28: ...lf timer you can start recording after a delay of about 10 seconds 1 Touch and select PAGE2 2 Touch SELF TIMER 3 Touch appears 4 Press REC START STOP You will hear a beep sound counting down for about 10 seconds The recording starts To stop recording press REC START STOP To cancel the count down Press REC START STOP To cancel the self timer Follow steps 1 and 2 Extend the viewfinder REC START STOP...

Страница 29: ...O fully A shutter sound is heard and the image is recorded with sound for 7 seconds The still image is displayed on the screen until recording is completed To turn the power off Slide the POWER switch up to OFF CHG then set the LENS COVER switch to CLOSE b Note appears when the tape photo recording does not work z Tips You can record about 510 images in the SP mode and about 765 images in the LP m...

Страница 30: ...ars on the LCD screen and the Camera recording lamp lights up Press REC START STOP again to stop recording To turn the power off Slide the POWER switch up to OFF CHG then set the LENS COVER switch to CLOSE To cancel Easy Handycam operation Press EASY again b Notes You cannot switch from to Easy Handycam operation during recording During Easy Handycam operation you cannot connect the USB cable to y...

Страница 31: ... MANUAL p 28 or select SPOT METER p 26 Fixing the exposure for the selected subject Flexible spot meter You can adjust and fix the exposure to the subject so that it is recorded in suitable brightness even when there is strong contrast between the subject and the background such as subjects in the limelight on stage 1 Slide the POWER switch to select the CAMERA mode 2 Touch to display PAGE1 3 Touc...

Страница 32: ... to display PAGE1 3 Touch WHT BAL 4 Touch the desired effect When you touch ONE PUSH 1 Frame a white object such as a piece of paper filling the screen under the same lighting conditions as you will shoot the subject 2 Touch flashes quickly When the white balance has been adjusted and stored in the memory the indicator stops flashing 5 Touch 6 Touch b Notes You cannot use the white balance togethe...

Страница 33: ...ide of the room 1 Slide the POWER switch to select the CAMERA mode 2 Touch to display PAGE1 3 Touch EXPOSURE 4 Touch MANUAL 5 Adjust the exposure by touching dim bright then touch 6 Touch To return the setting to automatic exposure Follow steps 1 to 3 then select AUTO in step 4 b Note You cannot use the manual exposure together with the NightShot plus function MANU AL EXPOSURE OK 0 00 00 STBY 60mi...

Страница 34: ...nces colors may not be reproduced properly z Tip If you record subjects in complete darkness set N S LIGHT to ON in the menu setting The maximum shooting distance using the NightShot Light is about 3 meters 10 feet If you record subjects in dark places such as night scene or in moonlight set N S LIGHT to OFF in the menu setting You can make image color deeper p 49 Adjusting the focus The focus is ...

Страница 35: ...Slide the POWER switch to select the CAMERA mode 2 Touch to display PAGE1 3 Touch FOCUS 4 Touch MANUAL 9 appears 5 Touch or to adjust the focus To focus on close subjects To focus on distant subjects 9 changes to when the focus cannot be adjusted any further 9 changes to when the focus cannot be adjusted any closer Tips for focusing manually It is easier to focus on the subject when you use the zo...

Страница 36: ...POWER switch to select the CAMERA mode 2 Touch to display PAGE1 in the standby mode to fade in or during recording to fade out 3 Touch FADER 4 Touch the desired effect then touch 5 Touch 6 Press REC START STOP The fader indicator stops flashing and disappears when the fade is complete To cancel the operation In step 3 touch OFF b Note You cannot use the FADER function together with Tape photo reco...

Страница 37: ...rding is played back for about 5 seconds and the camcorder enters the standby mode at the point where the last recording has finished 4 Touch To cancel the operation Touch END SCH again b Note The END SEARCH function will not work correctly when there is a blank section between recorded sections on the tape z Tip When the PLAY EDIT mode is selected you can do this operation Searching manually EDIT...

Страница 38: ...ou stopped the tape 1 Slide the POWER switch to select the CAMERA mode 2 Touch to display PAGE1 3 Touch MENU 4 Select CAMERA SET then select EDITSEARCH with then touch EXEC 5 Select ON then touch EXEC 6 Touch 7 Touch once The last few seconds of the most recently recorded scene are played back Then your camcorder is set to the standby mode ...

Страница 39: ... lamp lights up 3 Touch rewind to go to the point you want to view 4 Touch play to start playback To adjust the volume 1 Touch to display PAGE1 2 Touch VOL 3 Adjust the volume by touching decrease increase then touch 4 Touch To stop playback Touch stop To pause Touch pause during playback Touch it again to restart the playback Playback stops automatically when the pause mode continues for more tha...

Страница 40: ...ecorded sound Also you may see mosaic like images of the previously played picture remaining on the screen 1 Touch and select PAGE3 during playback or playback pause 2 Touch V SPD PLAY 3 Select a playback mode To return to the normal playback mode touch play pause twice once from frame playback Horizontal lines may appear at the top bottom or in the center of the screen This is not a malfunction P...

Страница 41: ...he screen 1 Open the LCD panel 2 Slide the POWER switch repeatedly to select the PLAY EDIT mode 3 Press EASY EASY lights up in blue 4 Play back a tape The following buttons can be operated play pause fast forward stop rewind You can operate these operations and SLOW on the Remote Commander To cancel Easy Handycam operation Press EASY again b Notes During Easy Handycam operation you cannot connect ...

Страница 42: ...nd camera settings data Data code During playback you can view the date time data DATE TIME and the camera settings data CAM DATA that are automatically recorded while recording pictures on a tape 1 Slide the POWER switch repeatedly to select the PLAY EDIT mode 2 Touch and select PAGE2 during playback or playback pause 3 Touch DATA CODE 4 Select CAM DATA or DATE TIME then touch 5 Touch To hide the...

Страница 43: ...ayback 38 If you record the picture without setting the clock and will appear A SteadyShot off B Exposure C White balance D Gain E Shutter speed F Aperture value FN 0 00 00 00 60min AWB 100 9dB F1 7 AUTO ...

Страница 44: ... to that jack instead of using the yellow video plug The audio will not be output when you connect with the S video plug alone When your TV is connected to a VCR Connect your camcorder to the LINE IN input on the VCR using the A V connecting cable Set the input selector on the VCR to LINE When your TV is monaural When your TV has only one audio input jack Connect the yellow plug of the A V connect...

Страница 45: ...gnated 0 00 00 on the tape counter To cancel the operation Press ZERO SET MEMORY on the Remote Commander again b Notes There may be a discrepancy of several seconds between the time code and the tape counter Zero set memory will not function correctly if there is a blank section between recorded sections on the tape Searching for a scene using Cassette Memory Title search You can locate a scene wh...

Страница 46: ...your cassette does not have Cassette Memory you can select the previous or the next date of the present point on the tape Playback starts automatically from the point where the date changes To cancel the operation Press STOP on the Remote Commander b Notes If one day s recording is less than 2 minutes your camcorder may not accurately find the point where the recording date changes Date search wil...

Страница 47: ...urrent point of the tape Playback of the photo starts automatically at the selected scene To cancel the operation Press STOP on the Remote Commander b Note Photo search will not function correctly when there is a blank section between recorded sections on the tape Playing back still images in sequence Photo scan You can also locate still images one after another and display each images for 5 secon...

Страница 48: ...em with then touch EXEC The available menu items vary depending on the power mode of your camcorder The unavailable items will not be displayed 6 Select the desired setting with then touch EXEC 7 Touch close to hide the menu screen You can go back to the previous screen each time you touch RET POWER switch 0 00 00 STBY SPOT FOCUS FOCUS WHT BAL MENU FADER END SCH EXPO SURE SPOT METER PAGE1 PAGE2 60...

Страница 49: ... RET STBY G AUTO Select this when not using PROGRAM AE SPOTLIGHT spotlight Select to prevent people s faces from appearing excessively white when subjects are lit by strong light such as in a theater or at a wedding PORTRAIT soft portrait Select to bring out the subject such as people or flowers while creating a soft background SPORTS sports lesson Select to minimize shake when shooting fast movin...

Страница 50: ...n with external flashes that do not support the following settings GOFF Select when not using the Picture effect setting NEG ART Select to record play the picture with the color and brightness of the picture reversed SEPIA Select to record play the picture appearing in sepia B W Select to record play the picture appearing in monochrome black and white SOLARIZE Select to record play the picture loo...

Страница 51: ...t the power source from your camcorder for more than 5 minutes AUTO SHTR HIGH To make the flash optional level higher than normal GNORMAL To use the normal setting LOW To make the flash optional level lower than normal GON Select to automatically activate the electronic shutter to adjust the shutter speed when recording in bright conditions OFF Select when recording without using the electronic sh...

Страница 52: ...ant subject such as a bird 16 9WIDE You can record a 16 9 wide picture on the tape to watch on a 16 9 wide screen TV 16 9WIDE mode With this function ON your camcorder offers even wider angles when you move the power zoom lever to the W side than recording in OFF When you connect your camcorder to the S video input jack of a TV compatible with the ID 1 ID 2 system and play the tape the TV switches...

Страница 53: ...ITSEARCH GOFF Standard setting to record pictures to play back on a 4 3 TV The recorded picture will not be wide ON Select to record a picture to be played back on a 16 9 wide TV The recorded picture will be played in full mode when you connect to your TV compatible with ID 1 ID 2 systems GON Standard setting enable the SteadyShot function OFF Select to deactivate the SteadyShot function Select to...

Страница 54: ...order 49 N S LIGHT When using the NightShot plus function to record you can record clearer pictures by using the NightShot Light to emit infrared rays invisible GON Select to use the NightShot Light p 29 OFF Select to disable the NightShot Light p 29 ...

Страница 55: ...u cannot record a dual sound track on this camcorder The setting returns to STEREO when you disconnect the power source from your camcorder for more than 5 minutes AUDIO MIX You can adjust the audio balance between the originally recorded sound ST1 and sound added afterwards ST2 on the tape p 70 b Notes You cannot adjust sound recorded in 16 bit audio mode Only the originally recorded sound will b...

Страница 56: ...lected for the setting When you select BRIGHT the battery life is reduced by about 10 percent during recording LCD COLOR Touch to adjust the color on the LCD screen The recorded picture will not be affected by this setting VF B L You can adjust the brightness of the viewfinder The recorded picture will not be affected by this setting b Notes When you connect your camcorder to outside power sources...

Страница 57: ...abel 12 photo data is recorded 1 Select a desired title from the displayed titles 2 original titles that you have created before and the preset titles that have been stored in your camcorder You can create original titles up to 2 types of title of within 20 characters each in the following procedure 1 Select CUSTOM 1 or CUSTOM 2 with then touch EXEC 2 Select CREATE EDIT with then touch EXEC 3 Touc...

Страница 58: ...n the battery pack and do not operate it for 5 minutes the power automatically goes off as the default setting If you may take 5 minutes or longer to enter characters set A SHUT OFF on the OTHERS menu to NEVER p 60 The power will not be turned off Even though the power goes off the characters you have entered remain stored in memory Turn the power back on then start again from step 1 to continue s...

Страница 59: ...e character in the same manner 3 When you have finished entering characters touch 4 Touch z Tips To erase the label you have created touch repeatedly to erase the characters then touch To change the label you have created insert the cassette into your camcorder and go through the procedure from step 1 ERASE ALL You can delete all data such as date title cassette label and photo data saved in the C...

Страница 60: ...e written properly between the scenes AUDIO MODE REMAIN FRAME REC You can record pictures with a stop motion animated effect by alternately frame recording and then moving the subject a little Operate your camcorder using the Remote Commander to prevent camera shake TAPE SET REC MODE AUDIO MODE REMAIN FRAME REC INT REC EXEC RET STBY GSP SP Select to record in the SP Standard Play mode on a cassett...

Страница 61: ...nds 1 5 10 minutes then touch EXEC 4 Select REC TIME then touch EXEC 5 Select a desired recording time 0 5 1 1 5 2 seconds then touch EXEC 6 Touch RET 7 Select ON then touch EXEC 8 Touch flashes 9 Press REC START STOP Interval recording starts lights up on the screen during Interval recording To cancel Interval recording set to OFF then touch EXEC in the menu settings b Note There may be a discrep...

Страница 62: ...zing Your Camcorder Customizing Your Camcorder 57 z Tips If you adjust the focus manually you may be able to record clear pictures even if the light changes p 30 You can silence the beeps during recording p 60 ...

Страница 63: ... You can select from English Simplified English Canadian French Latin American Spanish Brazilian Portuguese Traditional Chinese or Korean DEMO MODE When you remove a cassette from your camcorder and select the CAMERA mode you can view the demonstration in about 10 minutes b Note You can view the demonstration only when the NIGHTSHOT PLUS switch is set to OFF z Tips The demonstration will be suspen...

Страница 64: ...Customizing Your Camcorder Customizing Your Camcorder 59 If A SHUT OFF is set to 5min when the camcorder is used on the battery pack the power will be turned off after approximately 5 minutes p 60 ...

Страница 65: ... wall outlet A SHUT OFF is automatically set to NEVER COMMANDER OTHERS WORLD TIME BEEP A SHUT OFF COMMANDER DISPLAY REC LAMP EXEC RET STBY GMELODY Select to sound a melody when you start stop recording operate the touch panel or when an unusual condition occurs on your camcorder NORMAL Select to sound a beep instead of the melody OFF Select to cancel the melody the beep sound the shutter sound or ...

Страница 66: ...ime code on the LCD screen and in the viewfinder V OUT LCD Select to show the displays such as the time code on the TV screen LCD screen and in the viewfinder GON Select to turn on the camera recording lamp on the front of your camcorder during recording OFF Select this setting in the following recording situations The camera recording lamp will not light up during recording When you do not want t...

Страница 67: ...ct your camcorder to the other devices using the A V connecting cable make sure the DISPLAY setting in the OTHERS menu is set to LCD the default setting before connecting p 61 When you are connecting your camcorder to monaural device connect the yellow plug of the A V connecting cable to the video jack and the red or the white plug to the audio jack on the VCR or the TV To use an i LINK cable for ...

Страница 68: ...ch as time code p 37 Otherwise they will be recorded on the tape When dubbing using the A V connecting cable to record the date time and camera settings data have it displayed on the screen p 37 Pictures edited with Picture effect P EFFECT p 45 cannot be output via the DV Interface When connected using the i LINK cable the recorded picture becomes rough when a picture is paused on your camcorder w...

Страница 69: ...ding device p 62 You can use either the A V connecting cable or the i LINK cable to make the connection The dubbing procedure is easier with the i LINK connection 2 Prepare your VCR Insert a cassette for recording Set the input selector to input mode if your VCR has one 3 Prepare your camcorder playing device Insert a cassette for editing Slide the POWER switch repeatedly to select the PLAY EDIT m...

Страница 70: ...ctions 6 Insert a cassette into your VCR and set the VCR to recording pause 7 Select IR TEST with then touch EXEC 8 Select EXECUTE with then touch EXEC The recording starts on your VCR when the setting is correct COMPLETE appears when the IR SETUP code test is finished Go on to Step 2 Adjusting the synchronization of the VCR p 66 When recording fails to start select another IR SETUP code and try a...

Страница 71: ...T with then touch EXEC 4 Select EXECUTE with then touch EXEC EXECUTING flashes and a picture about 50 seconds long with 5 IN and OUT indicators each for adjusting Marta 47 Memorex 37 77 Minolta 8 42 Mitsubishi MGA 22 23 24 28 29 Multitech 23 32 80 NEC 21 33 35 Olympic 77 78 Optimus 22 Orion 60 Panasonic 16 17 77 78 Pentax 8 42 Philco 26 70 77 78 Philips 47 77 78 83 Pioneer 78 Quasar 6 16 17 77 78 ...

Страница 72: ...ND then touch Recording the selected scenes as programs When you are performing Digital program editing for the first time to a tape in a VCR go through the procedures described in Steps 1 and 2 p 64 p 66 beforehand 1 Prepare a cassette Insert a tape to be played back into the camcorder then insert a cassette for recording into your VCR 2 Touch to display PAGE1 3 Touch MENU 4 Select OTHERS then se...

Страница 73: ...To cancel recording touch CANCEL To end Digital program editing Touch END To save a program without using it to record Touch END in step 9 The program is stored in memory until the cassette is ejected To erase programs 1 Follow steps 1 to 4 in Recording the selected scenes as programs p 67 then touch UNDO 2 Touch ERASE 1MARK to delete the last set program Or touch ERASE ALL to delete all the progr...

Страница 74: ... your camcorder is connected via the i LINK cable On blank sections of the tape When the write protect tab of the cassette is set to SAVE When you are using the internal microphone to record additional sound the picture will not be output from the A V OUT jack Check the picture on the LCD screen or the viewfinder When you use an external microphone optional to record additional audio you can check...

Страница 75: ...eps 4 to 8 The recording stops automatically at the selected scene b Note You can only record additional audio over a tape recorded on your camcorder The sound may deteriorate when you dub audio on a tape recorded on other camcorders including other DCR HC20 camcorders Checking and adjusting the recorded sound 1 Play back the tape on which you have recorded audio in Recording sound p 69 2 Touch to...

Страница 76: ...ecorded on the tape to a DVD Direct Access to Click to DVD And when your camcorder is connected to a personal computer you can easily burn the picture recorded on the tape to a CD R Direct Access to Video CD Burn 1 Touch and select PAGE2 2 Touch BURN DVD when creating a DVD or touch BURN VCD when creating a VCD For details refer to the Computer Applications Guide ...

Страница 77: ...COMMANDER on the OTHERS menu to ON p 60 cInsert a battery into the battery holder with the polarities correctly matching the marks If this still does not solve the problem insert a new battery since the battery is dead p 95 cRemove any obstructions between the Remote Commander and the remote sensor The camcorder gets warm This is because the power has been turned on for a long time This is not a m...

Страница 78: ... Adaptor A problem occurs when the camcorder is connected to the AC Adaptor cTurn off the power and disconnect the AC Adaptor from the wall outlet Then connect it again Symptom Cause and or Corrective Actions Cassette cannot be ejected from the compartment cMake sure the power source battery pack or AC Adaptor is connected correctly p 12 cRemove the battery pack from the camcorder then attach it a...

Страница 79: ...e DC plug from your camcorder or the like while turning on the power This is not a malfunction Symptom Cause and or Corrective Actions The tape does not start when you press REC START STOP cSlide the POWER switch to select the CAMERA mode p 15 cThe tape has reached the end Rewind it or insert a new cassette cSet the write protect tab to REC or insert a new cassette p 82 cThe tape is stuck to the d...

Страница 80: ...ecording pictures under a fluorescent lamp sodium lamp or mercury lamp in the PORTRAIT or SPORTS mode cSet the PROGRAM AE to AUTO in the MANUAL SET menu p 44 The END SEARCH function does not work The cassette was ejected after recording when using a cassette without Cassette Memory p 82 The cassette is new and has nothing recorded The END SEARCH function does not work correctly There is a blank se...

Страница 81: ... correctly using the A V connecting cable cMake sure your camcorder is connected correctly to the input jack of the other device via the A V connecting cable cSet DISPLAY to LCD in the OTHERS menu p 61 Pictures from connected devices are not displayed correctly The input signal is not NTSC p 63 New sound added to a recorded tape is not heard cIn the VCR SET menu adjust AUDIO MIX from the ST1 origi...

Страница 82: ... for operation p 64 cAdjust the synchronization of the VCR p 66 cEnter a correct IR SETUP code p 65 cSelect the mode used to cancel recording pause again p 65 cSet your camcorder and the VCR more than 30 cm 12 in apart p 65 The program may not be set to a blank section on the tape The VCR is not responding properly during Digital program editing when it is connected via an i LINK cable While conne...

Страница 83: ...t perform this procedure if moisture starts to condense p 86 cRemove the power source Reconnect it again and operate your camcorder again cChange the tape cPress the RESET button p 92 then operate your camcorder again E 61 ss E 62 ss cContact your Sony dealer or local authorized Sony service facility Inform them of the 5 digit code which starts from E E Battery level warning The battery pack is ne...

Страница 84: ...ing indicators appear on the screen Warning indicator pertaining to the external flash Slow flashing During charging Fast flashing The self diagnosis display code is displayed p 78 There is something wrong with the external flash optional Indication Cause and or Corrective Actions ...

Страница 85: ...age while charging the flash Wait until the flash charge indicator remains lit Others Cannot record due to copyright protection Cannot add audio Disconnect the i LINK cable cSee page 69 Not recorded in SP mode Cannot add audio cSee page 69 Not recorded in 12 bit audio Cannot add audio cSee page 69 Cannot add audio on the blank portion of a tape cSee page 69 Cassette Memory is full cSee page 54 x D...

Страница 86: ...ple setting of clock by time difference You can easily set the clock to the local time by setting a time difference when using your camcorder abroad Select WORLD TIME in the OTHERS menu then set the time difference p 60 System Used in NTSC Bahama Islands Bolivia Canada Central America Chile Colombia Ecuador Guyana Jamaica Japan Korea Mexico Peru Surinam Taiwan the Philippines the U S A Venezuela e...

Страница 87: ...ARCH function If there is a blank section or discontinuous signals on your tape re record from the beginning to the end of the tape as described above b Note The Cassette Memory may not function correctly when you record using a digital video camera recorder that does not support Cassette Memory on a tape already recorded on using a Cassette Memory compatible digital video camera recorder z Tip Th...

Страница 88: ...attery pack P series Your camcorder operates only with the InfoLITHIUM battery pack InfoLITHIUM P series battery packs have the mark What is the InfoLITHIUM battery pack The InfoLITHIUM battery pack is a lithium ion battery pack that has functions for communicating information related to operating conditions between your camcorder and an optional AC Adaptor charger The InfoLITHIUM battery pack cal...

Страница 89: ...he indication on the remaining battery time will be indicated correctly Note however that the battery indication will not be restored if it is used in high temperatures for a long time or if left in a fully charged state or when the battery pack is frequently used Use the remaining battery time indication as a guide to the approximate shooting time The E mark that indicates low battery flashes eve...

Страница 90: ...LINK Baud rate i LINK s maximum baud rate varies according to the device There are 3 types S100 approx 100Mbps S200 approx 200Mbps S400 approx 400Mbps The baud rate is listed under Specifications in the operating instructions of each piece of device It is also indicated near the i LINK interface on some devices The maximum baud rate for device that does not have any indication such as this unit is...

Страница 91: ...ng so might cause heat to build up inside When disconnecting the power cord pull by the plug and not the cord Do not damage the power cord such as by placing anything heavy on it Keep metal contacts clean Keep the Remote Commander and button type battery out of children s reach If the battery is accidentally swallowed consult a doctor immediately If the battery electrolytic liquid has leaked consu...

Страница 92: ...e If you cannot obtain a clear image even after using a cleaning cassette it might be because the video head is worn Please contact your Sony dealer or local authorized Sony service facility to have the video head replaced LCD screen Do not add excessive pressure on the LCD screen as it may cause damage If your camcorder is used in a cold place a residual image may appear on the LCD screen This is...

Страница 93: ... seaside Store in a well ventilated location subject to little dirt or dust To prevent molds periodically clean the lens as described above It is recommended you operate your camcorder about once a month to keep it in an optimum state for a long time To charge the pre installed button type battery Your camcorder has a pre installed button type battery to retain the date time and other settings eve...

Страница 94: ...re AUTO ONE PUSH INDOOR 3 200 K OUTDOOR 5 800 K Minimum illumination 5 lx lux F 1 7 0 lx lux during the NightShot plus function Objects unable to be seen due to the dark can be shot with infrared lighting Input Output connectors Audio Video output 10 pin connector Video signal 1 Vp p 75 Ω ohms unbalanced Luminance signal 1 Vp p 75 Ω ohms unbalanced Chrominance signal 0 286 Vp p 75 Ω ohms unbalance...

Страница 95: ...rature 0 C to 40 C 32 F to 104 F Storage temperature 20 C to 60 C 4 F to 140 F Dimensions approx 56 31 100 mm 2 1 4 1 1 4 4 in w h d excluding the projecting parts Mass approx 190 g 6 7 oz excluding the power cord Rechargeable battery pack NP FP50 Maximum output voltage DC 8 4 V Output voltage DC 7 2 V Capacity 4 9 Wh 680 mAh Dimensions approx 31 8 18 5 45 0 mm 1 5 16 3 4 1 13 16 in w h d Mass app...

Страница 96: ... panel screen p 3 16 B LCD BACKLIGHT button p 16 C REC START STOP button p 21 D BACK LIGHT button p 26 E DSPL BATT INFO button p 13 37 F EASY button p 25 36 G Viewfinder p 3 16 H Battery pack p 12 These buttons are not available during Easy Handycam operation There is the z mark 1 2 3 6 7 8 5 4 continued ...

Страница 97: ...ing the date and time return to the default H NIGHTSHOT PLUS switch p 29 I Lens Carl Zeiss Lens Lens cover Your camcorder is equipped with a Carl Zeiss lens which can reproduce fine images The lens for your camcorder was developed jointly by Carl Zeiss in Germany and Sony Corporation It adopts the MTF measurement system for video cameras and offers a quality as fine as a Carl Zeiss lens MTF stands...

Страница 98: ... lens adjustment lever p 16 C BATT battery release button p 13 D CHG charge lamp p 12 E REC START STOP button p 21 F DC IN jack p 12 G Power zoom lever H CAMERA PLAY EDIT mode lamps p 15 I POWER switch p 15 J Speaker K DC IN jack cover 1 2 3 4 5 6 8 9 qa 0 7 continued ...

Страница 99: ...e you cannot attach the tripod securely and the screw may damage your camcorder Using the Strap Belt as a wrist strap It is useful when you carry your camcorder 1 Open the hook and loop fastener of the hand pad a and remove it from the ring b 2 Move the hand pad fully to the right a then close the hook and loop fastener again b 3 Use the Strap Belt as shown below 1 3 2 4 Hand pad ...

Страница 100: ...ote sensor to control your camcorder G REC START STOP button p 23 H Power zoom button p 22 I DISPLAY button p 40 These buttons are not available during Easy Handycam operation To remove the insulation sheet To change the button type battery 1 While pressing on the tab insert your fingernail into the slit to pull out the battery case 2 Remove the button type lithium battery 3 Place a new button typ...

Страница 101: ...sor away from strong light sources such as direct sunlight or overhead lighting Otherwise the Remote Commander may not function properly The Remote Commander may not function properly when the remote sensor is obstructed with a conversion lens optional When you are operating with the Remote Commander supplied with your camcorder your VCR may also operate In that case select a commander mode other ...

Страница 102: ...mory p 82 Audio mode p 55 60min q Remaining tape p 21 Self timer recording p 23 Tape photo recording p 24 Frame recording p 55 Interval recording p 56 DV input p 63 Zero set memory p 40 NightShot plus p 29 Z Warning p 78 Picture effect p 45 Manual exposure p 28 9 Manual focus p 30 PROGRAM AE p 44 0 00 00 STBY FN E D I T 60min 60min Example Indicators in the CAMERA mode Time code p 22 Tape counter ...

Страница 103: ...ick to DVD See BURN DVD Direct Access to Video CD Burn See BURN VCD Display DISPLAY 61 Display indicators 97 Dual sound track tape 50 Dubbing REC CTRL 63 E Easy Handycam 25 36 EDIT SEARCH 32 END SEARCH 32 Erase ERASE ALL Cassette Memory 54 F FADER 31 Flexible spot meter SPOT METER 26 Frame playback 35 Frame recording FRAME REC 55 Full charge 12 G Grip belt See Strap Belt H HiFi SOUND 50 I i LINK 8...

Страница 104: ...elf timer recording SELF TIMER 23 Skip scan 35 Smooth transition See END SEARCH SP Standard Play See Recording mode REC MODE SPOT FOCUS 29 STEADYSHOT 48 Stereo monaural 50 Strap Belt 4 94 Sub sound See HiFi SOUND T Tape counter 22 Tape photo recording 24 Telephoto See Zoom Time code 22 Title Cassette Memory TAPE TITLE 54 TITLE 52 TITLE DSPL 53 TITLEERASE 53 Title search 40 TV color systems 81 U US...

Страница 105: ...Printed in Japan Printed on 100 recycled paper using VOC Volatile Organic Compound free vegetable oil based ink ...

Страница 106: ...Revision History 987670441 pdf Ver 1 0 Date 2004 02 History Official Release Contents S M Rev issued Reverse ...

Отзывы: