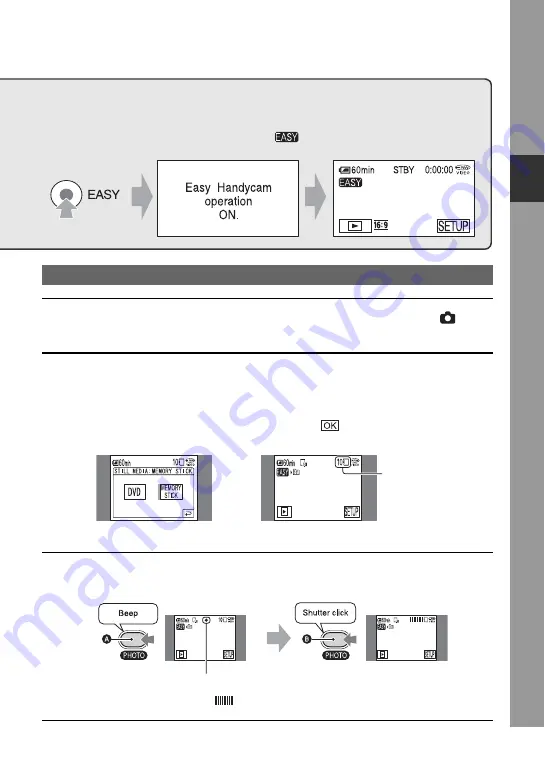
Sony DCR-DVD705E Скачать руководство пользователя страница 35

35

E

a

sy

 H

andy

ca

m

 -

 u

si

ng y

our c

a

m

co

rde

w

ith

 aut

om
at

ic

 se
tti

n

gs

1

Slide the POWER switch 

A

 in the direction of the arrow to light up the 

(Still) 

lamp.

2

Select the recording destination for still images (For DCR-DVD304E/DVD305E/
DVD755E).

1

Touch [SETUP] 

t

 [STILL MEDIA].

2

Select the media for recording still images, then touch 

.

The recording screen returns with the selected recording media displayed at the top right.

• The default setting is [MEMORY STICK].

3

Press PHOTO 

D

 lightly to adjust the focus 

A

, then press it fully 

B

.

• The default setting is [FINE] (p.74).

A shutter sound is heard. When 

 disappears, the image has been recorded.

Still images

Before Easy Handycam operation

Turn on your camcorder and press EASY to set to Easy Handycam operation 
(p.32).

[Easy Handycam operation ON.] appears, then 

 appears on the LCD screen.

1

2

The number of 
recordable still 
images and 
recording media

Flashing 

b

Lights up

Содержание DCR-DVD705E

Страница 1: ...tion Enjoying with your DVD Handycam 12 Getting Started 18 Easy Handycam 32 Recording Playback 40 Playback onDVD devices 54 Using the Recorded disc 61 Using the Setup items 64 Editing on DVD Handycam 85 Dubbing Printing 94 Using a Computer 101 Troubleshooting 107 Additional Information 130 Glossary Index 144 ...

Страница 2: ... service station ATTENTION The electromagnetic fields at the specific frequencies may influence the picture and sound of this camcorder This product has been tested and found compliant with the limits set out in the EMC Directiveforusingconnection cables shorter than 3 meters 9 8 feet Notice If static electricity or electromagnetism causes data transfer to discontinue midway fail restart the appli...

Страница 3: ...ference to radio or television reception which can be determined by turning the equipment off and on the user is encouraged to try to correct the interference by one or more of the following measures Reorient or relocate the receiving antenna Increase the separation between the equipment and receiver Connect the equipment into an outlet on a circuit different from that to which the receiver is con...

Страница 4: ...n beused only with Memory Stick PRO compatible equipment Whenusinga MemoryStickDuo with Memory Stick compatible equipment For DCR DVD304E DVD305E DVD755E Be sure to insert the Memory Stick Duo into the Memory Stick Duo Adaptor Memory Stick Duo Adaptor On using the camcorder Do not hold the camcorder by the following parts The camcorder is not dustproofed dripproofed or waterproofed See Maintenance...

Страница 5: ...ing p 14 Compensation for the contents of recordings cannot be provided even if recording or playback is not possible due to a malfunction of the camcorder storage media etc TV color systems differ depending on the countries regions To view your recordings on a TV you need a PAL system based TV Television programs films video tapes and other materials may be copyrighted Unauthorized recording of s...

Страница 6: ...n Germany and Sony Corporation and produces superior images It adopts the MTF measurement system for video cameras and offers a quality typical of a Carl Zeiss lens MTF stands for Modulation Transfer Function The number value indicates the amountof lightfrom a subject coming into the lens Read this first continued ...

Страница 7: ...7 ...

Страница 8: ...atio 16 9 or 4 3 of the recording picture DCR DVD205E DVD304E DVD305E DVD705E DVD755E 30 Using Easy Handycam operation 32 Recording with ease 34 Playing back with ease 36 Preparation for playing back on a DVD player Finalizing 38 Recording 40 Playback 42 Functions used for recording playback etc 44 Recording To use zoom To record sound with more presence 5 1ch surround recording For DCR DVD304E DV...

Страница 9: ...d during recording playback 49 Remote Commander DCR DVD304E DVD305E DVD755E 51 Playing the picture on a TV 52 Making the disc compatible with playback on DVD devices or DVD drives Finalizing 54 Playing back a disc on DVD devices etc 58 Playing back a disc on a computer with a DVD drive installed 59 Recording additional scenes after finalizing 61 Deleting all of the scenes on the disc Formatting 62...

Страница 10: ... the still images DCR DVD304E DVD305E DVD755E 85 Deleting still images from the Memory Stick Duo DCR DVD304E DVD305E DVD755E 87 Editing the original data 88 Creating the Playlist 89 Playing the Playlist 92 Dubbing to VCR DVD devices 94 Recording images from a TV or VCR DVD device DCR DVD305E DVD755E 96 Printing recorded still images PictBridge compliant printer DCR DVD305E DVD755E 98 Jacks to conn...

Страница 11: ...your camcorder abroad 130 About the disc 132 About the Memory Stick DCR DVD304E DVD305E DVD755E 133 About the InfoLITHIUM battery pack 135 Maintenance and precautions 137 Specifications 141 Glossary 144 Index 146 Troubleshooting Additional Information Glossary Index ...

Страница 12: ...recordedonthediscor MemoryStick Duo Some models may not support recording onto a Memory Stick Duo You can find a scene quickly using a VISUAL INDEX screen p 36 42 The VISUAL INDEX screen allows you to check disc content at a glance All you have to do is touch the scene you want to view The disc does not wear out no matter how many times you play it back The precious moments you have captured on di...

Страница 13: ...e panoramic effect Discs are also recorded with 5 1ch surround sound to provide full sound on a home theater Some models may not support wide screen and 5 1ch surround recording A recorded disc can be played back on a variety of devices High speed image transfer p 101 Image data can be quickly transferred to a computer without requiring playback Computers with Hi Speed USB USB 2 0 provide even fas...

Страница 14: ...mat that is compatible with most DVD devices especially after finalizing In VIDEO mode only the most recent image can be erased A recording format that enables editing with your DVD Handycam deleting and rearranging the order of images A finalized disc can be played back in DVD devices that support VR mode 1 Disc format features Figures in parentheses indicate page numbers Disc types and symbols D...

Страница 15: ...e care not to smudge the surface with fingerprints When a double sided disc is used in your DVD Handycam recording playback are performed on that side only You cannot switch to record on or play back the other side with the disc set to the DVD Handycam When recording playback of one side is complete remove the disc and turn it over to access the other side The following operations are performed fo...

Страница 16: ...ng and editing images in your DVD Handycam The disc can be played back on various DVD devices The disc can be played back even without finalizing 2Shooting deleting and editing See pages 34 40 48 and 88 You cannot delete a recorded image Youcan deleteoredit a recorded image anytime p 88 You can only delete the images you have just recorded p 48 3Viewing on your DVD Handycam See pages 36 and 42 You...

Страница 17: ...ded even if there is free space left Like commercially sold DVD this disc can be played back in most DVD devices after finalizing Thedisccanbeplayedback in a device compatible with the DVD RW VR mode The disc can be played back without finalizing But finalizing is required in some cases For details see page 54 Unfinalizing allows you to add recordings p 61 Recordings can be added without unfinaliz...

Страница 18: ...Rechargeable battery pack NP FP50 1 p 20 Cleaning cloth 1 Shoe cover 1 p 100 For DCR DVD304E DVD305E DVD755E Attached to the camcorder Lens cap 1 p 23 Surround microphone ECM L100 1 p 44 For DCR DVD304E DVD305E DVD755E CD ROM Picture Package Ver 1 8 1 1 p 101 For DCR DVD304E DVD305E DVD755E CD ROM Nero Express 6 1 p 101 For DCR DVD105E DVD205E DVD304E DVD605E DVD705E Use when copying a disc record...

Страница 19: ... pack 1 Slide the battery pack in the direction of the arrow until it clicks 2 Slide the POWER switch in the direction of the arrow to set it to OFF CHG The default setting 3 Connect the AC Adaptor to the DC IN jack on your camcorder OpentheDC IN jack coverto connect the AC Adaptor 4 Connect the mains lead to the AC Adaptor and the wall socket The CHG charge lamp lights up and charging starts Step...

Страница 20: ... the battery pack The battery pack will not lose its charge in this case Charging time full charge Approximate time min required when you fully charge a fully discharged battery pack Recording time Approximatetime min availablewhen you use a fully charged battery pack For DCR DVD105E DVD605E For DCR DVD205E DVD705E Battery pack Charging time NP FP50 supplied 125 NP FP70 155 NP FP71 170 NP FP90 220...

Страница 21: ... the battery as long as the AC Adaptor is connected to the DC IN jack of your camcorder even when the mains lead is disconnected from the wall socket We recommend that you use an NP FP70 NP FP71 orNP FP90battery pack when avideolight optional is attached On the charging recording playback time Times measured with the camcorder at 25 C 77 F 10 30 C 50 86 F is recommended Available recording and pla...

Страница 22: ...o not use the AC Adaptor placed in a narrow space such as between a wall and furniture Do not short circuit the DC plug of the AC Adaptor or battery terminal with any metallic objects This may cause a malfunction PRECAUTION The set is not disconnected from the AC power source mains as long as it is connected to the wall socket even if the set itself has been turned off Step 2 Charging the battery ...

Страница 23: ...e lamp lights up Movie To record movies Still To record still images After you have set the date and time CLOCK SET p 26 the next time you turn on the power of your camcorder the current date and time will be displayedon theLCDscreenforafewseconds 3 Hold your camcorder correctly 4 Ensure agoodgrip thenfastenthe belt To turn off the power Slide the POWER switch to OFF CHG At the time of purchase th...

Страница 24: ...save battery power The recorded picture will not be affected by the setting To cancel press and hold DISP BATT INFO until disappears See LCD VF SET LCD BRIGHT p 79 to adjust the brightness of the LCD screen You can view pictures using the viewfinder with the LCD panel closed to avoid wearing down the battery or when the picture seen on the LCD screen is poor You can adjust the brightness of the vi...

Страница 25: ...CD frame Be careful not to press buttons on the LCD frame accidentally while using the touch panel If the buttons on the touch panel do not work correctly adjust the LCD screen CALIBRATION p 138 To hide the screen indicators Press DISP BATT INFO to hide or show the screen indicators counter etc You can change the on screen displays to show messages in a specified language Selectthescreenlanguagein...

Страница 26: ... step 4 when you set the clock for the first time 1 Touch t SETUP 2 Select TIME LANGU with then touch 3 Select CLOCK SET with then touch 4 Select the desired geographical area with then touch 5 Set SUMMERTIME to ON with if necessary then touch 6 Set Y year with then touch You can set any year up to the year 2079 7 Set M month D day hour and minute then touch The clock starts Refer to page 131 for ...

Страница 27: ...After the beeps stop the disc cover opens slightly automatically If you catch the lens cap strap when closing the disc cover it may cause your camcorder to malfunction 3 Setthediscwiththerecordingside facing your camcorder then press the center of the disc until it clicks Do not touch the disc with the recording side or pickup lens p 139 When using a double sided disc take care not to smudge the s...

Страница 28: ...16 9 WIDE or 4 3 for DVD RW then touch x16 9 WIDE You can record wide angle high resolution pictures If you intend to view pictures on a wide TV selecting 16 9 WIDE is recommended x4 3 You can record to play back pictures on a 4 3 TV 7 Touch YES t YES 8 Touch when Completed appears When the formatting is completed you can start recording on the DVD RW DVD RW Do not remove the battery pack or disco...

Страница 29: ...mage size For details see page 74 1 Open the Memory Stick Duo cover 2 Insert the Memory Stick Duo into the Memory Stick Duo slot in the right direction until it clicks If you force the Memory Stick Duo into the slot in thewrong direction the Memory Stick Duo slot or image data may be damaged 3 Close the Memory Stick Duo cover To eject a Memory Stick Duo Lightly push the Memory Stick Duo after step...

Страница 30: ...e recording time may be shorter in the following situations when you toggle between 16 9 wide and 4 3 while recording on a DVD R DVD RW VIDEO mode when you change REC MODE p 78 with a DVD R DVD RW VIDEO mode DVD RW inserted while 4 3 is set To play back pictures after connecting your camcorder to a TV Set TV TYPE to 16 9 or 4 3 according to your TV 16 9 4 3 p 52 When viewing 16 9 wide pictures wit...

Страница 31: ...VD755E 1 Touch t STILL MEDIA 2 Select the recording media for still images and touch The default setting is MEMORY STICK 3 Press WIDE SELECT repeatedly to select the desired setting Still imagesizeis 0 7M when 16 9 wide is set and maximum 1 0M when 4 3 is set The number of recordable still images varies depending on image quality and image size For details see p 74 Still images ...

Страница 32: ... try recording page 34 EASY button The settings of your camcorder during Easy Handycam operation Touch SETUP to display the available setup items For details on setup See page 64 Nearly all setup items are automatically fixed to the setting of Easy Handycam operation is not displayed during Easy Handycam operation To perform settings such as focusing manually and adding special effects cancel Easy...

Страница 33: ...33 Easy Handycam using your camcorder with automatic settings ...

Страница 34: ...ecording if you have not finalized the disc p 54 and there is remaining space to record on the disc when you turn off the power then turn it on again you remove a disc from your camcorder then insert it again Recording with ease Movies To record movies To record still images Slide the POWER switch in the direction of the arrow while pressing the green button only when the POWER switch is in the OF...

Страница 35: ... with the selected recording media displayed at the top right The default setting is MEMORY STICK 3 Press PHOTO D lightly to adjust the focus A then press it fully B The default setting is FINE p 74 A shutter sound is heard When disappears the image has been recorded Still images Before Easy Handycam operation Turn on your camcorder and press EASY to set to Easy Handycam operation p 32 Easy Handyc...

Страница 36: ...reen 2 Start playing back Touch tab then the movie to be played back Playing back with ease Movies Slide the POWER switch in the direction of the arrow while pressing the green button only when the POWER switch is in the OFF CHG position Previous 6 pictures Next 6 pictures 1 3 Disc type Appears with the image on each of the tab that was lastly played back recorded DVD RW recording format Returns t...

Страница 37: ...and the still image to be played back Touch to play back a series of still images p 47 When you playback during Easy Handycam operation you cannot use following functions Playback zoom p 46 Turning off the backlight of the LCD screen For DCR DVD205E DVD304E DVD305E DVD705E DVD755E p 24 Still Images Before Easy Handycam operation Turn on your camcorder and press EASY to set to Easy Handycam operati...

Страница 38: ...rded If you finalize a DVD RW VIDEO mode DVD RW you cannot record additional material on the disc during Easy Handycam operation Cancel Easy Handycam operation then follow the steps shown on page 61 Preparation for playing back on a DVD player Finalizing Preparation for finalizing a disc 1 Place your camcorder in a stable position Connect the AC Adaptor to the DC IN jack on your camcorder Be sure ...

Страница 39: ...D device or DVD drive etc Refer also to the instruction manuals supplied with the DVD device etc If you format the disc the disc recovers recording used capacity and is reusable for recording thereafter If you want to reuse a DVD RW to record in VR mode format the disc after canceling Easy Handycam operation p 62 Note that you cannot recover a scene once you delete it Touch the LCD screen in the f...

Страница 40: ... stop recording press START STOP again Recording Playback Recording Movies PHOTO POWER switch START STOP A Remove the lens cap START STOP B DCR DVD105E DVD605E Slidethe POWERswitchin the direction of the arrow while pressing the green button only when the POWER switch is in the OFF CHG position REC 60min STBY REC ...

Страница 41: ... 3 Press PHOTO lightly to adjust the focus A then press it fully B A shutter sound is heard When disappears the image has been recorded Still Images To check or delete the last recording Review Review deleting See page 48 If the ACCESS lamp is on after recording is finished it means data is still being written onto the disc or Memory Stick Duo For DCR DVD304E DVD305E DVD755E Do not apply shock or ...

Страница 42: ...pears with the image on each of the tab that was lastly played back recorded DVD RW recording format Returns to the recording screen 2 Useful functions on VISUAL INDEX screen Moving the zoom lever changes the VISUAL INDEX screen indication from 6 to 12 and more images can be displayed at the same time Touch DISPLAY in STANDARD SET to set the number of thumbnails that appear in the VISUAL INDEX scr...

Страница 43: ...with i you can play it back from the point you have stopped previously Disc Touch tab and the still image to be played back Memory Stick Duo For DCR DVD304E DVD305E DVD755E Touch tab and the still image to be played back To adjust the volume Touch t VOLUME then adjust it with If you cannot find VOLUME in touch SETUP p 64 To playback the disc on other DVD devices See page 54 Beginning of the scene ...

Страница 44: ...nd about 80 cm about 2 5 8 feet for telephoto You can set DIGITAL ZOOM p 72 if you want to zoom to a level greater than the following To record sound with more presence 5 1ch surround recording For DCR DVD304E DVD305E DVD755E 2 Your camcorder has Dolby Digital 5 1 Creator installed for recording 5 1ch surround sound Enjoy realistic sound when playingthediscondevicesthatsupport5 1ch surround sound ...

Страница 45: ... surround sound with your camcorder If your supplied microphone is lost or damaged contactyourSonydealerorlocal authorizedSony service facility You must also leave your camcorder with us so that we can tune your new or repaired microphone To record in dark places NightShot plus 3 Set the NIGHTSHOT PLUS switch 3 to ON and NIGHTSHOT PLUS appear To record an image brighter useSuper NightShot plus fun...

Страница 46: ...pod qg Attach the tripod optional the length of the screwmust beless than 5 5 mm to thetripod receptacle qg using a tripod screw To attach the shoulder belt qf Attach the shoulder belt optional with your camcorder to the hook for the shoulder belt To use Playback zoom 15 You can magnify pictures from about 1 1 to 5 times the original size Magnificationcanbeadjustedwiththepower zoom lever 1 or the ...

Страница 47: ...then press DISP BATTINFOqs Ifyou pressthis buttononce BATTERYINFOappearsonthe screen for about 7 seconds Press the button whileBATTERYINFOappearsonthescreen to extend the indication to the 20 second maximum To turn off the operation confirmation beep 6 See BEEP on page 81 To initialize the settings RESET qd Press RESET qd to initialize all the settings including settings for date and time Setup it...

Страница 48: ...ce recorded on DVD Rs cannot be deleted 1 Press during the review 2 Touch YES You cannot recover a scene once you delete it Youcanonlydeletethelastrecordedscene When is grayed out you cannot delete the scene due to the following reasons The last recorded scene has been already deleted There is a movie or still image that has been recorded just after the scene being played back When you delete stil...

Страница 49: ... DVD305E DVD705E DVD755E qs Quality FINE STD 74 qd The number of recordable still images and recording media For DCR DVD304E DVD305E DVD755E qf Recording folder only for Memory Stick Duo For DCR DVD304E DVD305E DVD755E As the number of still images recorded in Memory Stick Duo increases new folders are automatically created to store them Viewing movies Viewing still images qg Playback mode qh Prev...

Страница 50: ...ference page Indicators on the LCD screen and viewfinder Indicator Meaning 5 1ch surround recording playback 44 Self timer recording 71 Continuous photo recording Bracket recording 73 Flash light 70 MICREF LEVEL low 79 LCD panel off 76 Indicator Meaning Repeat of Slide show 47 Indicator Meaning Fader 75 LCD backlight off 24 Upper left Upper Center Upper right Bottom Center Indicator Meaning NightS...

Страница 51: ...46 qa PAUSE p 36 43 qs VISUAL INDEX p 36 43 Displays a VISUAL INDEX screen when you press this while playing back qd b B v V ENTER When you press any button the orange frame appears on the LCD screen Select a desired button or an item with b B v V then press ENTER to enter PointtheRemoteCommandertowardstheremote sensor to operate your camcorder p 47 When no commands have been sent from the Remote ...

Страница 52: ...ion is not necessary S VIDEO connection only will not output audio When your TV is connected to a VCR Connect your camcorder to the LINE IN input on the VCR Set the input selector on theVCRtoLINE VIDEO1 VIDEO2 etc if the VCR has an input selector To set the aspect ratio according to the connected TV 16 9 4 3 For DCR DVD205E DVD304E DVD305E DVD705E DVD755E Change the setting according to the screen...

Страница 53: ... cable to the video input jack and connect the white left channel or the red right channel plug to the audio input jack of your TV or VCR You can display the counter on the TV screen by setting DISP OUTPUT to V OUT PANEL p 81 If your TV VCR has a 21 pin adaptor EUROCONNECTOR Use a 21 pin adaptor optional to view playback picture TV VCR ...

Страница 54: ...finalized Discs that do not require finalizing To play back a disc in a DVD device for the first time p 56 Playback on DVD devices Making the disc compatible with playback on DVD devices or DVD drives Finalizing Operation flow DVD RW Disc type has to be finalized in the following cases 1 To create the DVD menus or Photomovie 2 To enable playback in DVD drives of computers 3 When only little materi...

Страница 55: ...57 Make a new recording Recordings cannot be added Unfinalize the disc When the DVD menu or Photomovie has been created a confirmation screen prompts you to confirm that you wish to add a recording Recordings can be added as usual Finalize Finalize Finalize Only in case 1 Make desired settings BDVD menu BPhotomovie BDisc title Playback on other DVD device ...

Страница 56: ...alizing starts Do not apply shock or vibration to your camcorder and do not disconnect the AC Adaptor during finalizing When you need to disconnect the AC Adaptor make sure that the power of your camcorder is set to off and disconnect the adaptoraftertheCHG charge lampgoesoff Finalizing restarts when you connect the AC Adaptor and turn on your camcorder again You cannot remove the disc until the f...

Страница 57: ...ing a Photomovie p 59 You cannot create a Photomovie on a DVD RW VR mode in this step Customize it on the EDIT screen p 92 To change the disc title 1 Touch DISC TITLE 2 Delete unnecessary characters by touching T The yellow cursor moves and characters are deleted from the end 3 Select the type of a character then touch the desired character To erase a character Touch T To insert a space Touch t 4 ...

Страница 58: ...If you have created a DVD menu You can select the desired scene in the menu A Photomovie is listed after all the movies in the menu The disc cannot be played back freezes for an instantbetweenthescenes orsomefunctionsmay be disabled on some DVD devices Still images are played back as a Photomovie swapping images in every 3 seconds DVD devices that support subtitles can display the recording date a...

Страница 59: ...pied from the disc to the hard disc of your computer For details on how to import movies refer to the First Step Guide in the supplied CD ROM For DCR DVD305E DVD755E Still images stored on the disc are displayed in the JPEG format Note that erasing or changing the original data may occur accidentally in this operation since you use the original data on the disc 1 Insert the finalized disc into a D...

Страница 60: ... Images are stored in the following folders on the disc x Movies DVD R DVD RW VIDEO mode DVD RW VIDEO_TS folder DVD RW VR mode DVD_RTAV folder x Still images DCIM 100MSDCF folder e g The folder for data for DVD Rs DVD RWs VIDEO mode DVD RWs when using Windows XP Volume label Still image folder Playing back a disc on a computer with a DVD drive installed continued ...

Страница 61: ...lead to the wall socket 2 Slide the POWER switch to turn on your camcorder 3 Insert the finalized disc into your camcorder 4 Touch t SETUP 5 For DCR DVD105E DVD205E DVD605E DVD705E Touch DISC SET t UNFINALIZE For DCR DVD304E DVD305E DVD755E Touch MEDIA SET t UNFINALIZE 6 Touch YES t YES then touch when Completed appears If you have created a Photomovie or a DVD menuinfinalizing p 57 thefollowing s...

Страница 62: ...ert the disc to be formatted into your camcorder 4 For DCR DVD105E DVD205E DVD605E DVD705E Touch t FORMAT For DCR DVD304E DVD305E DVD755E Touch t FORMAT xDVD RW Select the recording format then format the disc Proceed to step 5 xDVD RW Select the aspect ratio of the recording picture then format the disc Proceed to step 6 5 Select the recording format for a DVD RW touch then proceed to step 7 Ford...

Страница 63: ... in step 6 for the DVD RW Format the disc again to change the aspect ratio During the Easy Handycam operation p 32 the screen in step 5 does not appear even if you insert a DVD RW in your camcorder Proceed to step 7 You cannot format a disc that has been protected on other devices Cancel the protection with the original devices and then format it ...

Страница 64: ...s are added You can customize Personal Menu as you like p 83 1 Touch 2 Touch the desired setup item If the desired setup item is not displayed on the screen touch until it is displayed 3 Select the desired setting then touch x To change the setup items You can customize setup items that are not added to Personal Menu Using the Setup items Using the Setup items 1 2 3 4 MODE ON Settings for movies S...

Страница 65: ... close to hide the setup screen If you decide not to change the setting touch to return to the previous screen x To change the setup items during Easy Handycam operation does not appear during Easy Handycam operation p 32 1 Touch SETUP Available setup items appear 2 Select the desired item 3 Customize the item Touch after finishing the setting Touch not to change the item without changing the sett...

Страница 66: ...z ON SPOT FOCUS z z AUTO FOCUS z z AUTO FLASH SET 2 z 1 OFF SUPER NSPLUS z OFF NS LIGHT z z ON COLOR SLOW S z OFF SELF TIMER z OFF SELF TIMER z OFF DIGITAL ZOOM z OFF WIDE SELECT 3 z 4 3 STEADYSHOT z ON STILL SET p 73 BURST 4 z OFF QUALITY z FINE IMAGE SIZE 4 z z FILE NO z 1 PICT APPLI p 75 FADER z OFF D EFFECT z OFF PICT EFFECT z OFF REC CTRL 5 z USB SELECT 5 z 7 DEMO MODE z ON DISC SET 6 MEDIA S...

Страница 67: ...evice with a USB cable Movie Still PLAY EDIT Easy Handycam STANDARD SET p 78 REC MODE z SP STILL MEDIA 2 z z 1 VOLUME z z 1 MULTI SOUND z OFF MICREF LEVEL 4 z NORMAL SUR MONITOR 2 z LCD VF SET z z z NORMAL NORMAL 1 TV TYPE 4 z z z 1 USB SPEED 5 z AUTO DATA CODE z DATE TIME DISPLAY z 1 MOVIE PB z 1 REMAINING z AUTO REMOTE CTRL 2 z z z ON BEEP z z z z 1 DISP OUTPUT z z z LCD PANEL SETUP ROTATE z z z...

Страница 68: ...ect to maintain the atmosphere of situations such as sunsets general night views or fireworks LANDSCAPE Select to shoot distant subjects clearly This setting also prevents your camcorder from focusing on glass or metal meshin windows that comes in between the camcorder and the subject Items with one asterisk can be adjusted so as nottofocusonsubjectsonlyashortdistanceaway Items with two asterisks ...

Страница 69: ... studios where the lighting conditions change quickly Underthevideolampsofthoseatastudio or under sodium lamps or incandescent like color lamps ONE PUSH The white balance will be adjusted according to the ambient light 1 Touch ONE PUSH 2 Frame a white object such as a piece of paper to fill the screen under the same lighting conditions as you will shoot the subject 3 Touch flashes quickly When the...

Страница 70: ...power zoom lever towards T telephoto to adjust the focus then towards W wide angle to adjust the zoom for recording When you want to record a subject at close range move the power zoom lever to W wide angle then adjust the focus The minimum distance required between your camcorder and the subject to get a sharp focus is about 1 cm about 1 2 inch for wide angle and about 80 cm about 2 5 8 feet for ...

Страница 71: ...er objects p 45 Remove the conversion lens optional The maximum shooting distance using NS LIGHT is about 3 m 10 feet You can record an image brighter in color even in dark places Set COLOR SLOW S to ON and COLOR SLOW SHUTTER flash on the screen To cancel COLOR SLOW S touch OFF Adjustthefocusmanually FOCUS p 70 when it is hard to focus automatically The shutter speed of your camcorder changes depe...

Страница 72: ...tures to be played back on a 4 3 TV 16 9 WIDE Recordspicturestobe playedbackona16 9 wide TV in full screen mode When viewed on the LCD screen viewfinder with 16 9 WIDE selected 1 When 16 9 screen TV switches to full screen mode the picture appears on the TV screen at the right ratio 2 When you play back in TV 4 3 screen the picturemay becompressed Whenyouplay back in the wide mode the picture appe...

Страница 73: ...images are as follows 1 0M 8 images VGA 0 3M 21 images 0 7M 8 images EXP BRKTG Records 3 images consecutively with different exposures at approximately 0 5 second intervals You can compare the 3 images and select an image recorded at the best exposure The flash will not function during continuous recording Themaximumnumberofimageswillberecorded in the self timer mode or when you are operating with...

Страница 74: ...e still images varies depending on the recording environment Number of still images recordable on a disc approx Top FINE Bottom STANDARD The table shows approximate recordable number and the above numbers apply to a single sided disc anditwillbedoubledforadouble sideddisc QUALITY 1 0M 0 7M VGA 0 3M FINE FINE 500 380 150 STANDARD STD 210 160 060 IMAGE SIZE DCR DVD205E DVD304E DVD305E DVD705E DVD755...

Страница 75: ...llowingeffectstocurrently recording pictures 1 Selectthedesiredeffectduringstandby fade in or recording fade out then touch When you select OVERLAP or WIPE the image is stored as a still image While storing the image the screen turns to blue 2 Press START STOP The fader indicator stops flashing and disappears when the fade is complete Tocancelbeforestartingtheoperation touch OFF in step 1 The sett...

Страница 76: ...saved as a still image 3 Touch appears To cancel D EFFECT touch OFF in step 1 LUMI KEY luminance key Replaces a brighter area in a previously recorded still image e g a person with a movie OLD MOVIE Adds an old movie effect to pictures The scene is recorded in the 16 9 wide mode The aspect ratio cannot be changed when OLD MOVIE is selected Youcanaddspecialeffectstoapictureduring recording appears ...

Страница 77: ...uations such as those described below when you touch the screen during the demonstration Thedemonstrationstartsagain in about 10 minutes when you slide the disc cover OPEN switch when the Memory Stick Duo is inserted DCR DVD304E DVD305E DVD755E when the POWER switch is set to Still when you set the NIGHTSHOT PLUS switch to ON p 45 DEMO MODE See page 64 for details on selecting setup items See page...

Страница 78: ...quality mode approx recordable time is up to 30 min LP LP Increases the recording time Long Play approx recordable time is up to 60 min The time in parenthesis indicates the approximate recordable time when recording only a movie on a single sided disc When recording on a double sided disc this value is applied for both sides Your camcorder has a VBR encoding system p 15 so when you record an obje...

Страница 79: ...he recording sound comes when recording in 5 1ch mode Therecordedpicturewillnotbeaffectedeven when you change the setting x LCD BRIGHT You can adjust the brightness of the LCD screen 1 Adjust the brightness with 2 Touch x LCD BL LEVEL You can adjust the brightness of the LCD screen s backlight BNORMAL Standard brightness BRIGHT Brightens the LCD screen When you use the AC Adaptor as the power sour...

Страница 80: ...nding to USB1 1 full speed transfer You can check the information recorded automatically data code during playback BOFF Data code is not displayed DATE TIME Displays the date and time of recorded images CAMERA DATA Displaysthecamerasettingdataofrecorded images DATE TIME 1Date 2Time CAMERA DATA 3SteadyShot off 4Exposure 5White balance 6Gain 7Shutter speed 8Aperture value 9Exposure value appears for...

Страница 81: ...mcorder recognizes the remainingdisccapacitywiththe POWER switch set to Movie When you press DISP BATT INFO to switch the indicator from off to on with the POWER switch to Movie When the recordable time for movies is less than 5 minutes When you start recording from the line input For DCR DVD305E DVD755E ON Always displays the remaining disc indicator The default setting is ON so that you can use ...

Страница 82: ...See page 138 A SHUT OFF Auto shut off SUB T DATE CALIBRATION See page 64 for details on selecting setup items See page 26 You can adjust a time difference without stopping the clock Set your local area using v V when using your camcorder overseas Refer to the World time difference on page 131 You can change this setting without stopping the clock Set to ON to move the time forward one hour You can...

Страница 83: ...ant setup item if you want to add more 1 Touch t P MENU SET UP t ADD 2 Touch to select a setup category then touch 3 Touch to select a setup item then touch t YES t The setup item is added to the end of list 1 Touch t P MENU SET UP t DELETE If the desired setup item is not displayed touch 2 Touch the setup item that you want to delete 3 Touch YES t You cannot delete SETUP FINALIZE and P MENU SET U...

Страница 84: ...Touch to move the setup item to the desired place 4 Touch To sort more items repeat step 2 to 4 5 Touch END t You cannot move P MENU SET UP Touch t P MENU SET UP t RESET t YES t YES t Arranging the order of setup items displayed on Personal Menu Initializing the Personal Menu settings Reset Customizing Personal Menu continued ...

Страница 85: ...hold the image on the LCD screen to confirm the image Touch to return to the previous screen You can select up to 100 images at once 5 Touch t YES Image copying starts 6 Touch when Completed appears tab appears in the VISUAL INDEX screen To copy all the still images on the Memory Stick Duo Touch COPY ALL in step 3 The still images cannot be copied to the finalized DVD R DVD RW VIDEO mode DVD RW Co...

Страница 86: ... 5 Touch t YES Image copying starts 6 Touch when Completed appears tab appears in theVISUALINDEX screen To copy all the still images on the DVD Touch COPY ALL in step 3 It sometimes takes time when copying a number of still images When Not enough memory space appears deleteunnecessaryimages p 87 inthe Memory Stick Duo before operating your camcorder again Some still images cannot be copied in the ...

Страница 87: ...e Touch to return to the previous screen You can select up to 100 images at once 6 Touch t YES You cannot recover an image once you delete it To delete all the still images in the Memory Stick Duo Touch DELETE ALL in step 4 You cannot delete in the following when the write protect tab of the Memory Stick Duo is set to the write protect position p 133 whenthestillimagehasbeenprotectedonother device...

Страница 88: ...cannot recover an image once you delete it To delete all movies or still images on the disc at the same time Touch DELETE ALL in step 3 If you delete an original movie that is listed in a Playlist p 89 it is also deleted from the Playlist Deleting scenes may not provide enough space to record movies or still images additionally To delete all the images on the disc and restore original recording ca...

Страница 89: ... been selected with A Playlist is a list showing thumbnails of the still images and movies that you have selected Theoriginalscenesarenotchanged even though you edit or delete the scenes in the Playlist Playlist Glossary p 145 Make sure to insert the recorded disc into your camcorder DonotremovethebatterypackortheACAdaptor from your camcorder while editing the Playlist It may damage the disc You c...

Страница 90: ... may be lower than that of the original still images 1 Slide the POWER switch to turn on your camcorder and press PLAY EDIT 2 Touch t EDIT 3 Touch ERASE 4 Select the scene to be deleted from the list The selected scene is marked with Press and hold the image on the LCD screen to confirm the image Touch to return to the previous screen 5 Touch t YES Toeraseallthescenesatthesametime Touch ERASE ALL ...

Страница 91: ...ess PLAY EDIT 2 Touch t EDIT 3 Touch DIVIDE 4 Select the scene to be divided The playback of the selected scene starts 5 Touch at the point where you want todivide the movie intoscenes The movie pauses Play and pause toggles as you press A slight difference may occur from the point where you touch and the actual dividing point as your camcorder selects the dividing point based on half second incre...

Страница 92: ...Still images which are not compatible with your camcorder such as ones shot with a digital still camera and then copied to a computer can not be converted from still images to a Photomovie Converting allthe still imageson a disc to a movie file Photomovie Make sure to insert the disc on which the Playlist is added into your camcorder 1 Slide the POWER switch to turn on your camcorder and press PLA...

Страница 93: ...93 Editing on DVD Handycam ...

Страница 94: ...e produced than with an A V connecting cable Connect the white and red plug left right audio and the S VIDEO plug S VIDEOchannel ofthe A Vconnecting cable with an S VIDEO cable optional The yellow plug connection is not necessary S VIDEO connection only will not output audio To hide the screen indicators such as a counter etc on the screen of the monitor device connected set DISP OUTPUT to LCD PAN...

Страница 95: ... recording device has an input selector set it to the input mode 4 Connect your camcorder to the VCR DVD device with the A V connecting cable supplied 1 or the A V connecting cable with S VIDEO optional 2 Connect your camcorder to the input jacks of a VCR or DVD device 5 Start the playback on your camcorder and record it on the recording device Refer to the instruction manuals supplied with your r...

Страница 96: ...IDEO cable optional The yellow plug connection is not necessary S VIDEO connection only will not output audio You cannot record images from a TV with no output jacks You cannot record TV programs which allow you to record once or have copy control technology When you are connecting your camcorder to a monaural device connect the yellow plug of the A V connecting cable to the video output jack and ...

Страница 97: ...VIDEO t Touch SET to change the recording mode or adjust the volume Touch SET t REMAIN t ON to display the remaining disc indicator all the time 5 Insert a blank disc into your camcorder Format the disc if you use a new DVD RW DVD RW p 62 6 Start playing the cassette or the disc on the playback device or select a TV program The picture played on the connected deviceappearsontheLCDscreenofyour camc...

Страница 98: ...SB SELECT We cannot guarantee the operation ofmodels that are not PictBridge compatible 1 Select the image to be printed with 2 Touch t COPIES 3 Select the number of copies to be printed with You can set a maximum of 20 copies of one image to be printed 4 Touch t END To print the date on the image touch t DATE TIME t DATE or DAY TIME t 5 Touch EXEC t YES When printing is finished Printing disappea...

Страница 99: ...with a 16 9 wide ratio left and right ends of the image may be cut off Some printer models may not support the date printing function Refer to your printer s instruction manual for details We cannot guarantee the printing of images recorded with adeviceotherthan yourcamcorder Still images recorded by other devices that have afilesizeof2MB ormore orarelargerthan 2304 1728 pixels cannot be printed P...

Страница 100: ...The Active Interface Shoe hasa safety device for fixing the installed accessory securely To connect an accessory press down and push it to the end and then tighten the screw To remove an accessory loosen the screw and then press down and pull out the accessory When you are recording with the external flash optional turn off the power of the external flash to prevent charging noisebeing recorded Wh...

Страница 101: ...ucer2 You can select your favorite movie and still images and easily create an original movie with added music and visual styles x Duplicating to an 8cm DVD t Picture Package Duplicator You can copy the disc you recorded with your camcorder to an 8cm DVD x When copying a disc to the 12cm DVD You can copy the disc recorded with your camcorder to the 12cm DVD The First Step Guide is an instruction m...

Страница 102: ...limagesrecordedon a Memory Stick Duo on a computer OS Microsoft Windows 2000 Professional Windows XP Home Edition Windows XP Professional Standard installation is required Operation is not assured if the above OS has been upgraded CPU MMX Pentium 200MHz or faster Others USB port This must be provided as standard x When using Macintosh computer Youcanonlycopy stillimagesfrom the Memory Stick Duo OS...

Страница 103: ...f your computer The installation screen appears If the screen does not appear follow the procedure below 1 Double click My Computer If you are usingWindowsXP click Start then My Computer 2 Double click PICTUREPACKAGE Disc drive Drive names such as E may vary depending on the computer 4 Click Install Depending on the operating system on the computer a message appears notifying you that First Step G...

Страница 104: ...estarts 11Click Next then follow the on screen instructions to install the First Step Guide Depending on the computer this screen may notbedisplayed In such a case skip to step 12 12Click Next then follow the on screen instructions to install ImageMixer EasyStepDVD 13If the Installing Microsoft R DirectX R screen is displayed follow the steps below to install DirectX 9 0c If not skip to step 14 1 ...

Страница 105: ...M If you have any questions about PicturePackage see For inquires about this software p 106 You can copy the still images from the Memory Stick Duo to the Macintosh computer Install First Step Guide in the supplied CD ROM Refer to First Step Guide for the details on connecting your camcorder to the computer and copying the still images 1 Confirm thatyourcamcorderisnot connected to the computer 2 T...

Страница 106: ...p www ppackage com North America Los Angeles Telephone Toll Free 1 800 458 4029 1 213 341 0163 Europe U K Telephone Toll Free U K Germany France and Spain 800 1532 4865 Other countries 44 1489 564 764 Asia Philippines Telephone 63 2 438 0090 On Copyrights Music works sound recording or other third partymusicalcontentsyoumay acquirefrom CDs the Internet or other sources the Music Contents are the c...

Страница 107: ...andycam operation on or off while recording or communicating with another device via USB cable For DCR DVD305E DVD755E Cancel Easy Handycam operation p 32 Settings change during Easy Handycam operation Some of the settings of your camcorder are restored to the default setting when you set Easy Handycam operation p 32 DEMO MODE does not start You cannot view the demonstration when the NIGHTSHOT PLU...

Страница 108: ...ck is being charged Attach the battery pack to the camcorder correctly p 19 If the problem persists disconnect the AC Adaptor from the wall socket and contact your Sony dealer The battery pack may be damaged The power turns off frequently although the remaining battery indicator indicates that the battery pack has enough power to operate A problem has occurred in the remaining battery time indicat...

Страница 109: ... without turning off the power first This is not a malfunction You cannot turn the LCD backlight off During Easy Handycam operation p 32 you cannot turn the LCD backlight on off pressing and holding DISP BATT INFO The buttons do not appear on the touch panel Touch the LCD screen lightly Press DISP BATT INFO on your camcorder or DISPLAY on the Remote Commander For DCR DVD304E DVD305E DVD755E p 25 5...

Страница 110: ...n are grayed out The disc may be created other than your camcorder You can play back with your camcorder but you cannot record additional scenes You cannot operate functions using the Memory Stick Duo Slide the POWER switch to light up the Still lamp or press PLAY EDIT with your camcorder switched on p 23 Insert a Memory Stick Duo into your camcorder p 29 If you use a Memory Stick Duo formatted on...

Страница 111: ...2 Or delete the unnecessary images p 88 The DVD RW VIDEO mode DVD RW has been finalized Make a disc to be able to record additional scenes p 61 The temperature of your camcorder is extremely high Turn off your camcorder and leave it for a while in a cool place Moisture condensation has occurred with the disc Turn off your camcorder and leave it for about 1 hour p 137 You cannot record on the Memor...

Страница 112: ...moves fast the time available for recording may shorten p 15 78 The recording stops The temperature of your camcorder is extremely high Turn off your camcorder and leave it for a while in a cool place Moisture condensation has occurred with the disc Turn off your camcorder and leave it about 1 hour in a cool place p 137 There is a time difference between the point where you press START STOP and th...

Страница 113: ...s not a malfunction A vertical band appears when recording a bright subject This phenomenon is called the smear effect This is not a malfunction Tiny spots in white red blue or green appear on the screen The spots appear when you are recording in SUPER NSPLUS or COLOR SLOW S This is not a malfunction The color of the picture is not correctly displayed Set the NIGHTSHOT PLUS switch to OFF p 45 The ...

Страница 114: ...rding side facing your camcorder p 27 The disc recorded in other devices may not be played back on your camcorder The playback picture is distorted Clean the disc using the cleaning cloth supplied p 132 Still images stored on a Memory Stick Duo are not played back in the actual size For DCR DVD304E DVD305E DVD755E Stillimagesrecordedonotherdevicesmaynotappearintheactualsize Thisisnotamalfunction S...

Страница 115: ...ied p 132 is indicated on an image in the DVD menu Loading of the data may have failed when the disc was finalized For DVD RW VIDEO mode DVD RW make the disc capable of additional recording p 61 then remake the DVD menu by finalizing the disc again p 57 The DVD menu may be displayed correctly Playback freezes for an instant between the scenes The image may freeze for an instant between scenes depe...

Страница 116: ...TER is automatically set to AUTO You cannot use EXPOSURE You cannot use EXPOSURE together with NightShot plus SUPER NSPLUS COLOR SLOW S If you set PROGRAM AE EXPOSURE is automatically set to AUTO You cannot use WHITE BAL You cannot use WHITE BAL together with NightShot plus SUPER NSPLUS You cannot use SPOT FOCUS You cannot use SPOT FOCUS together with PROGRAM AE You cannot use SUPER NSPLUS The NIG...

Страница 117: ...FECT You cannot use D EFFECT together with SUPER NSPLUS COLOR SLOW S FADER You cannot use OLD MOVIE together with PROGRAM AE PICT EFFECT WIDE SELECT For DCR DVD105E DVD605E You cannot use PICT EFFECT You cannot use PICT EFFECT together with OLD MOVIE You cannot view SUR MONITOR For DCR DVD304E DVD305E DVD755E Youcannotviewthe SUR MONITOR either youarenotrecordingin5 1chsurroundrecording or togethe...

Страница 118: ...nyourTV ForDCR DVD205E DVD304E DVD305E DVD705E DVD755E p 52 Pictures from connected devices are not displayed on the LCD screen or the viewfinder For DCR DVD305E DVD755E Touch t REC CTRL p 96 Pictures from connected devices cannot be zoomed For DCR DVD305E DVD755E You cannot zoom scenes input from the other device on your camcorder No sound is heard when playing back a disc The audio will not be o...

Страница 119: ...e destination is Memory Stick Duo with the lock on the write protect tab release the lock on the write protect tab of the Memory Stick Duo For DCR DVD304E DVD305E DVD755E p 133 You may not copy still images recorded edited using other devices Unable to finalize Battery is running out during finalizing Use the AC Adaptor The disc has already been finalized If you are using a DVD RW VIDEO mode DVD R...

Страница 120: ...amcorder restart the computer then connect them again correctly When editing the images in the disc the computer does not recognize your camcorder Install the Picture Package software p 103 Confirm the USB driver is correctly installed with the following procedures For Windows XP 1 Click Start then Control Panel 2 Click Performance and Maintenance then System The System Properties window appears 3...

Страница 121: ...B Device appears in DVD CD ROM drives Generic volume in Storage volumes and USB Mass Storage Device in Universal Serial Bus controllers respectively When all the devices appear the USB driver is installed correctly If any of these devices are not shown install USB driver 1 Place the supplied CD ROM in the disc drive on your computer 2 Double click My Computer 3 Right click PICTUREPACKAGE icon Disc...

Страница 122: ...p 76 Disconnect the USB device other than the keyboard mouse and camcorder from the computer You cannot view the still images recorded on a Memory Stick Duo on the computer Insert the Memory Stick Duo in the correct direction firmly Select USB SELECT t COMPUTER in the menu settings of your camcorder p 76 The computer does not recognize the Memory Stick Duo during camcorder operation such as disc p...

Страница 123: ... it does not effect to the images or sounds transferred to your computer Depending on the computer you use the played back image or sound may stop temporarily but this does not effect the images or sound transferred to your computer You cannot write data from your computer on a disc in your camcorder using the USB cable The disc is not compatible with your camcorder Use a disc compatible with your...

Страница 124: ...lace the supplied CD ROM in the disc drive of your computer 2 Double click My Computer 3 Right click PICTUREPACKAGE Disc drive Drive names such as E may vary depending on the computer 4 Click Explorer 5 Double click FirstStepGuide 6 Double click the desired language folder 7 Double click FirstStepGuide pdf Troubleshooting continued ...

Страница 125: ...E 20 ss E 31 ss E 40 ss E 61 ss E 62 ss E 91 ss E 94 ss A malfunction that you cannot service has occurred Contact your Sony dealer or local authorized Sonyservice facility Inform them of the 5 digit code which starts from E 100 0001 Warning indicator pertaining to files Slow flashing The file is damaged The file is unreadable Warning indicator pertaining to discs Slow flashing A disc is not inser...

Страница 126: ...n incompatible Memory Stick Duo is inserted p 133 Warning indicator pertaining to the write protect of the Memory Stick Duo The write protect tab on the Memory Stick Duo is set to lock p 133 Warningindicatorpertainingtothe flash Slow flashing Still charging Fast flashing There is something wrong with the flash Warning indicator pertaining to camera shake warning The amount of lights is not suffici...

Страница 127: ...lay back an incompatible disc with your camcorder Z Disc finalized Cannot record on disc A finalized DVD R cannot be recorded Use a new disc Z Need to unfinalize disc To record on the finalized DVD RW VIDEO mode unfinalize it p 61 Cannot change movie aspect ratio on DVD RW Recordsmoviesin16 9 Formattoset p 62 Records movies in 4 3 Format to set p 62 Insert a disc or change STILL MEDIA to Memory St...

Страница 128: ...ll You cannot create folders exceeding 999MSDCF You cannot create or delete created folders using your camcorder You will have to format the Memory Stick Duo p 78 or delete them using your computer Do not eject the Memory Stick during writing Insert a Memory Stick or change STILL MEDIA to DVD p 29 35 41 x PictBridge compliant printer Check the connected device Switch off the printer and switch it ...

Страница 129: ... space on the disc or Memory Stick Duo Cannot divide Youcannot divide still images converted to a movie with You cannot divided a movie that is extremely short Data protected The dischas been protectedwithanother device Copy inhibit You cannot copy scenes with the copy protection signal Not enough memory space p 85 86 This file cannot be copied p 85 86 Cannot select any morefiles p 85 86 Disc cove...

Страница 130: ...ion Using your camcorder abroad System Used in PAL Australia Austria Belgium China Czech Republic Denmark Finland Germany Holland Hong Kong Hungary Italy Kuwait Malaysia New Zealand Norway Poland Portugal Singapore Slovak Republic Spain Sweden Switzerland Thailand United Kingdom etc PAL M Brazil PAL N Argentina Paraguay Uruguay NTSC Bahama Islands Bolivia Canada Central America Chile Colombia Ecua...

Страница 131: ...an 6 04 00 Abu Dhabi Baku 7 04 30 Kabul 8 05 00 Karachi Islamabad 9 05 30 Calcutta New Delhi 10 06 00 Almaty Dhaka 11 06 30 Rangoon 12 07 00 Bangkok Jakarta 13 08 00 HongKong Singapore 14 09 00 Seoul Tokyo 15 09 30 Adelaide Darwin 16 10 00 Melbourne Sydney 17 11 00 Solomon Is 18 12 00 Fiji Wellington 19 12 00 Eniwetok Kwajalein 20 11 00 Midway Is Samoa 21 10 00 Hawaii 22 09 00 Alaska 23 08 00 LosA...

Страница 132: ...ismaycauseamalfunctionofthedisc or your camcorder Care and storage of the discs Keep the disc clean or the quality of the audio and video output may deteriorate Clean the disc with the supplied cleaning cloth Wipe the disc from the center out For dirt clean the disc with a soft cloth slightly moistened in water then remove the moisture with a soft dry cloth Do not use solvents such as benzine clea...

Страница 133: ...mory Stick Duo with a small tapered object to the write protect position Notes on use Image data may be damaged in the following cases Compensation for damaged image data will not be made If you eject the Memory Stick Duo turn the power off on your camcorder or remove the battery pack for replacement while your camcorderis reading or writing image files on the Memory Stick Duo while the ACCESS lam...

Страница 134: ...e damaged Do not insert a Memory Stick Duo Adaptor without a Memory Stick Duo attached Doing so may result in malfunctions of the unit x On a Memory Stick PRO Duo The maximum memory capacity of a Memory Stick PRO Duo that can be used on your camcorder is 2 GB On image data compatibility Image data files recorded on a Memory Stick Duo by your camcorder conform to the Design rule for Camera File sys...

Страница 135: ...battery packfaster It is recommendedthat you use a large capacity battery pack NP FP71 NP FP90 Be sure to slide the POWER switch to OFF CHG whennotshootingorplayingbackonyour camcorder The battery pack is also consumed when your camcorder is in the standby mode or playback is paused Have spare battery packs ready for two or three times the expected recording time and make trial recordings on a DVD...

Страница 136: ...When the available battery time is shortened considerably a probable cause is that the battery pack has reached the end of its life Please buy a new battery pack The battery life varies according to how it is stored theoperatingconditions andenvironment in which each battery pack is used About the InfoLITHIUM battery pack continued ...

Страница 137: ...ight cause heat to build up inside When disconnecting the mains lead pull it by the plug and not the cord Do not damage the mains lead such as by placing anything heavy on it Keep metal contacts clean Keep the Remote Commander and button type battery out of children s reach If the battery is accidentally swallowed consult a doctor immediately For DCR DVD304E DVD305E DVD755E If the battery electrol...

Страница 138: ...our camcorder to the wall socket using the supplied AC Adaptor during the operation 1 Slide the POWER switch to turn on your camcorder and press PLAY EDIT 2 Disconnect cables other than that of the AC Adaptor from your camcorder then remove the disc and Memory Stick Duo For DCR DVD304E DVD305E DVD755E from your camcorder 3 Touch t SETUP t STANDARD SET t CALIBRATION 4 Touch the displayed on the scr...

Страница 139: ...e To charge the pre installed rechargeable battery Your camcorder has a pre installed rechargeable battery to retain the date time and other settings even when the POWER switchissettoOFF CHG Thepre installed rechargeable battery is always charged while you are using your camcorder but it will get discharged gradually if you do not use your camcorder The rechargeable battery will be fully discharge...

Страница 140: ...der Do not use batteries other than the CR2025 When the lithium battery becomes weak the operating distance of the Remote Commander may shorten or the Remote Commander may not function properly In this case replace the battery with a Sony CR2025 lithium battery Use of another battery may present a risk of fire or explosion Maintenance and precautions continued ...

Страница 141: ...VD105E DVD605E Optical 20 Digital 40 800 F 1 8 3 1 DCR DVD205E DVD304E DVD305E DVD705E DVD755E Optical 12 Digital 24 800 F 1 8 2 5 Focal length DCR DVD105E DVD605E f 2 3 46mm 3 32 1 13 16 in When converted to a 35 mm still camera For movies 44 880mm 1 3 4 34 1 32 in For still images 44 880mm 1 3 4 34 1 32 in DCR DVD205E DVD304E DVD305E DVD705E DVD755E f 3 0 36mm 1 8 1 7 16 in When converted to a 3...

Страница 142: ... REMOTE jack Stereo mini minijack Ø 2 5 mm LCD screen Picture DCR DVD105E DVD605E 6 2 cm 2 5 type DCR DVD205E DVD304E DVD305E DVD705E DVD755E 6 9 cm 2 7 type aspect ratio 16 9 Total number of pixels 123 200 560 220 General Power requirements 7 2 V battery pack 8 4 V AC Adaptor Average power consumption During camera recording using LCD DCR DVD105E DVD605E 2 7W DCR DVD205E DVD705E 3 4W DCR DVD304E ...

Страница 143: ... the label of AC Adaptor for other specifications Rechargeable battery pack NP FP50 Maximum output voltage DC8 4V Output voltage DC7 2V Capacity 4 9 wh 680 mAh Dimensions Approx 31 8 18 5 45 0 mm 1 5 16 3 4 1 13 16 in w h d Mass Approx 40 g 1 5 oz Operating temperature 0 C to 40 C 32 F to 104 F Type Li ion Design and specifications are subject to change without notice ...

Страница 144: ...n be recorded on both sides x DVD menu A menu screen that enables you to select a particular scene from a disc being played back on a DVD device or other device You can create a DVD menu with DVD Handycam showing the beginning of each scene with date x DVD R A DVD format that does not enable re recording It is mostly used for saving data that does not need to be edited It is characterized by excel...

Страница 145: ...rding you can select the image quality There are 3 modes HQ high quality SP standard play and LP long play The higher the recording quality the shorter the recording time x Thumbnail Reduced size images which enable you to view many images at the same time DVD Handycam VISUAL INDEX and DVD menu use a thumbnail display system x Unfinalizing The process of treating a finalized disc that has some unu...

Страница 146: ...20 CHG charge lamp 19 Cleaning cloth 18 CLOCK SET 26 COLOR SLOW S Color Slow Shutter 71 117 Computer 101 Connect TV 52 VCR DVD device 94 96 Copyright 5 106 129 Counter 49 D DATA CODE 26 50 80 DATE TIME 26 80 DC IN jack 19 100 DC plug 19 Delete Disc 48 88 Memory Stick Duo 48 87 DEMO MODE 77 DIGITAL ZOOM 72 Disc cover OPEN switch 27 DISC SET 77 Disc title 57 77 DISP OUTPUT 81 DISP BATT INFO 24 25 47...

Страница 147: ...ptor 4 133 Memory Stick Duo slot 29 Memory Stick PRO Duo 134 MICREF LEVEL 79 Mirror mode 46 Moisture condensation 137 MOSAIC 76 Movie REC MODE Recording mode 78 Recording 34 40 MPEG2 145 MULTI SOUND 79 N Nero Express 6 18 101 NightShot plus 45 NIGHTSHOT PLUS switch 45 NORMAL 73 NS LIGHT NightShot Light 71 NTSC 130 Number of still images recordable on a disc 74 O OLD MOVIE 76 On recording 5 ONE PUS...

Страница 148: ...Software 103 SP 78 Speaker 47 Specifications 141 SPORTS Sports lesson 68 SPOTLIGHT 68 SPOT FOCUS 70 SPOT METER Flexible spot meter 68 116 STANDARD 74 STANDARD SET 78 START STOP 40 STEADYSHOT 73 113 Still image IMAGE SIZE 74 QUALITY 74 Recording 35 41 STILL MEDIA 35 41 STILL SET 73 Sub sound 79 SUB T DATE 81 SUMMERTIME 26 82 SUNSET MOON 68 SUPER NSPLUS Super NightShot plus 71 116 SUR MONITOR 79 Sys...

Страница 149: ...l socket 19 Warning indicators 125 Warning messages 125 WHITE BAL White balance 69 116 WHITE FADER 75 Wide angle 44 WIDE SELECT 30 72 Windows 102 WIPE 75 World time difference 131 Write protect tab 133 Z Zoom 44 Zoom lever 44 ...

Страница 150: ......

Страница 151: ...ademarks of Apple Computer Inc in the U S and other countries Macromedia and Macromedia Flash Player are trademarks or registered trademarks of Macromedia Inc in the United States and or other countries Pentium is a trademark or registered trademark of Intel Corporation Nero 6 and other software products developed by Nero AG are registered trademarks of Nero AG and its subsidiaries and affiliates ...

Страница 152: ...inted on 100 recycled paper using VOC Volatile Organic Compound free vegetable oil based ink GB Additional information on this product and answers to frequently asked questions can be found at our Customer Support Website ...

Отзывы: