Sony DCR-DVD306E Скачать руководство пользователя страница 44

38

Start playing back

Touch 

 tab and the movie to be played back.

The VISUAL INDEX screen reappears when playback from the selected movie until the 
last movie is completed.

Touch 

 tab and the still image to be played back.

To switch to the playback mode 
using the 

(HOME) button 

D

 (or 

E

)

Touch 

 (VIEW IMAGES) 

t

 [VISUAL 

INDEX]

To adjust the movie volume

Touch (OPTION) 

t


tab 

t


[VOLUME], then adjust it with 

/

.

z

Tips

• Touch 

/

 during pause to play back 

movie slowly.

• One touch makes the reverse/fast forward 

approximately 5 times faster, two touches makes 
it approximately 10 times

*

 faster.

*

Approximately 8 times faster using a DVD+RW
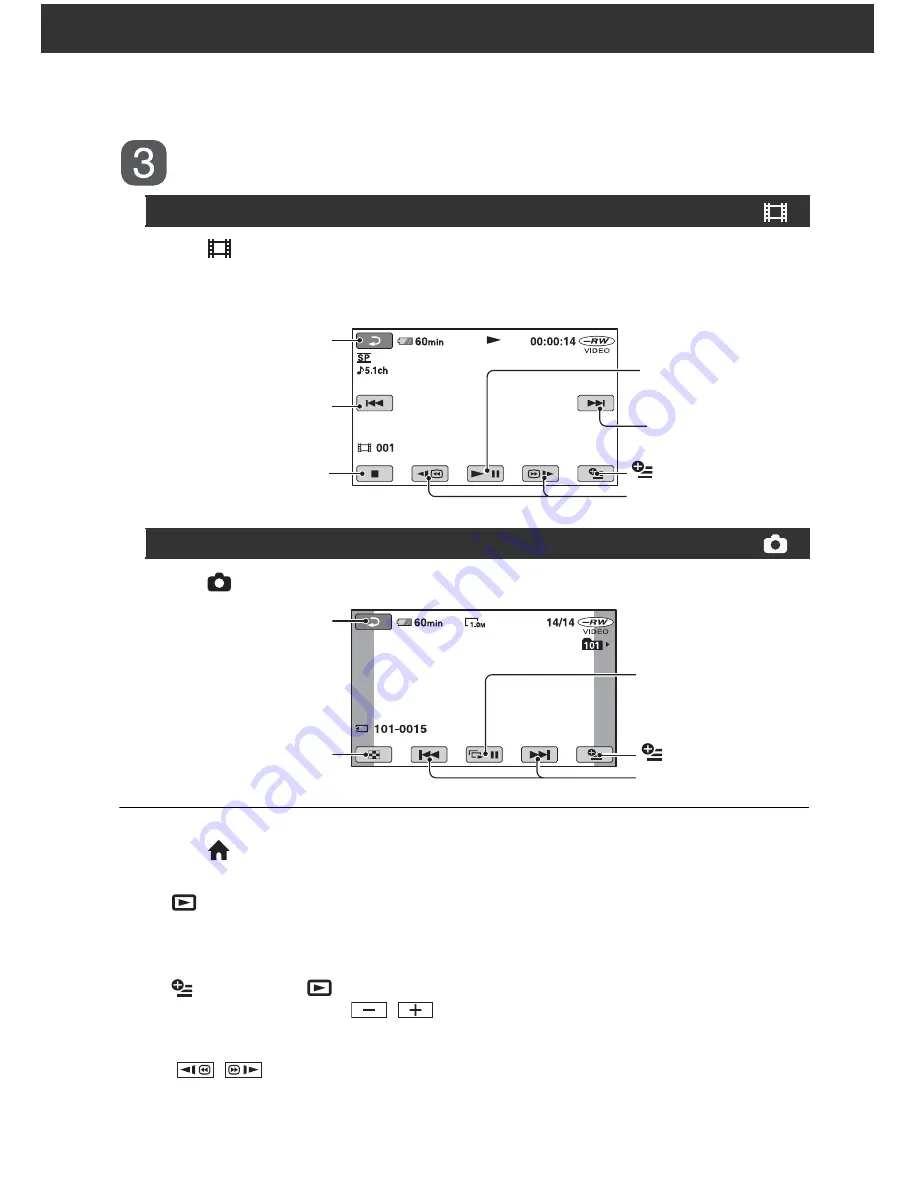
 Movies

Beginning of the scene/
previous scene

Toggles Play or 
Pause as you touch

Next scene

Stop (go to the 
VISUAL INDEX screen)

Reverse/ Forward

Return (to the VISUAL 
INDEX screen)

(OPTION)

 Still Images

Slide show button 
(page 39)

Previous/Next

Go to the VISUAL 
INDEX screen

Return (to the VISUAL 
INDEX screen)

(OPTION)

Содержание DCR-DVD306E

Страница 1: ...l for safety Replace only with part num ber specified Les composants identifiés par une marque 0 sont critiques pour la sécurité Ne les remplacer que par une pièce portant le numéro spécifié Ver 1 0 2007 01 DIGITAL VIDEO CAMERA RECORDER 2007A0500 1 2007 1 Published by Kohda TEC US Model Canadian Model AEP Model UK Model East European Model North European Model E Model Australian Model Hong Kong Mo...

Страница 2: ...o Video output 10 pin connector Video signal 1 Vp p 75 Ω ohms Luminance signal 1 Vp p 75 Ω ohms Chrominance signal 0 3 Vp p 75 Ω ohms Audio signal 327 mV at Load impedance 47 kΩ kilohms Output impedance less than 2 2 kΩ kilohms USB jack mini B DCR DVD106E DVD109E output only LCD screen Picture 6 2 cm 2 5 type Total number of pixels 123 200 560 220 General Power requirements 6 8 V 7 2 V battery pac...

Страница 3: ...l HK Hong Kong model JE Tourist model KR Korea model MX Mexican model NE North European model Model DCR DVD106E DCR DVD108 DCR DVD108E Destination AEP UK EE NE US CND E AR BR NE Color system PAL NTSC PAL 5 1ch recording Data CAM PC a a a copy PC CAM a a Model DCR DVD109E DCR DVD608 DCR DVD608E Destination AEP UK EE NE E E HK AUS CH Color system PAL NTSC PAL 5 1ch recording a Data CAM PC a a a copy...

Страница 4: ...TTENTION AU COMPOSANT AYANT RAPPORT À LA SÉCURITÉ LES COMPOSANTS IDENTIFÉS PAR UNE MARQUE 0 SUR LES DIAGRAMMES SCHÉMATIQUES ET LA LISTE DES PIÈCES SONT CRITIQUES POUR LA SÉCURITÉ DE FONCTIONNEMENT NE REMPLACER CES COMPOSANTS QUE PAR DES PIÈSES SONY DONT LES NUMÉROS SONT DONNÉS DANS CE MANUEL OU DANS LES SUPPÉMENTS PUBLIÉS PAR SONY WARNING WHEN SERVICING DO NOT APPROACH THE LASER EXIT WITH THE EYE ...

Страница 5: ...ock in which the problem occurred and detailed code of the problem 3 Self diagnosis Code Table C C C Block Function 0 4 1 3 1 3 Detailed Code 0 0 0 1 0 2 Symptom State Non standard battery is used Memory Stick Duo is unformatted Memory Stick Duo is broken Disc access error Self diagnosis Code Repaired by Correction Use the InfoLITHIUM battery Format the Memory Stick Duo Insert a new Memory Stick D...

Страница 6: ...AL INSTRUCTION HUNGARIAN SLOVAK DVD106E EE DVD109E EE 2 319 498 21 MANUAL INSTRUCTION SIMPLIFIED CHINESE DVD608E E CH 2 319 498 61 MANUAL INSTRUCTION TRADITIONAL CHINESE DVD608E HK 2 319 498 71 MANUAL INSTRUCTION ARABIC PERSIAN DVD608E E AC Adaptor AC L200 0 1 479 285 21 Power Cord 0 1 555 074 91 AUS 0 1 782 476 71 CH 0 1 823 945 41 US CND 0 1 827 269 31 UK HK 0 1 827 826 41 AEP EE NE E PAL E NTSC...

Страница 7: ...answers to frequently asked questions can be found at our Customer Support Website GB Digital Video Camera Recorder Operating Guide DCR DVD106E DVD108E DVD109E DVD306E DVD308E DVD608E DVD708E Enjoying with your camcorder 10 Getting Started 19 Recording Playback 29 Editing 46 Utilizing recording media 55 Customizing your camcorder 60 Using a Computer 78 Troubleshooting 83 Additional Information 96 ...

Страница 8: ...sound of this unit This product has been tested and found compliant with the limits set out in the EMC Directive for using connection cables shorter than 3 meters 9 8 feet Notice If static electricity or electromagnetism causes data transfer to discontinue midway fail restart the application or disconnect and connect the communication cable USB etc again Disposal of Old Electrical Electronic Equip...

Страница 9: ...be used with the equipment in order to comply with the limits for a digital device pursuant to Subpart B of Part 15 of FCC Rules Battery pack This device complies with Part 15 of the FCC Rules Operation is subject to the following two conditions 1 This device may not cause harmful interference and 2 this device must accept any interference received including interference that may cause undesired o...

Страница 10: ...annot use any type of memory card except Memory Stick Duo Memory Stick PRO and Memory Stick PRO Duo can be used only with Memory Stick PRO compatible equipment Do not attach a label or the like on a Memory Stick Duo or a Memory Stick Duo Adaptor When using a Memory Stick Duo with Memory Stick compatible equipment Be sure to insert the Memory Stick Duo into the Memory Stick Duo Adaptor Memory Stick...

Страница 11: ... a DVD R DVD R DL Use a DVD RW DVD RW for trial recording p 12 Compensation for the contents of recordings cannot be provided even if recording or playback is not possible due to a malfunction of the camcorder storage media etc TV color systems differ depending on the countries regions To view your recordings on a TV you need a PAL system based TV Television programs films video tapes and other ma...

Страница 12: ...er Function The number value indicates the amount of light from a subject coming into the lens About the marks used in this manual The operations available depend on the disc used The following marks are used to indicate the type of disc you can use for a particular operation ...

Страница 13: ...e for backlit subjects 35 Recording in mirror mode 35 Selecting the aspect ratio 16 9 or 4 3 DCR DVD306E DVD308E DVD708E 35 Playback 37 Using PB zoom 39 Playing back a series of still images Slide show 39 Playing the picture on a TV 40 Making the disc compatible with playback on other devices or DVD drives Finalizing 42 OTHERS category 46 Deleting images 46 Dividing the image 48 Creating the Playl...

Страница 14: ...ons using the OPTION MENU 71 Using the OPTION MENU 71 Recording items on the OPTION MENU 72 Viewing items on the OPTION MENU 72 Functions set in the OPTION MENU 73 What you can do with Windows computer 78 Installing the First Step Guide and software 79 Viewing First Step Guide 81 Using a Macintosh computer 82 Troubleshooting 83 Warning indicators and messages 92 Using your camcorder abroad 96 Main...

Страница 15: ...e of the screen BFOCUS 73 BSPOT FOCUS 73 Getting a good shot of a ski slope or beach BBACK LIGHT 35 BBEACH 75 BSNOW 75 Checking your golf swing BSPORTS 75 A child on the stage under a spot light BSPOTLIGHT 75 Fireworks with all its splendor BFIREWORKS 74 BFOCUS 73 A sleeping child under dim light BNightShot plus 35 BCOLOR SLOW SHTR 76 ...

Страница 16: ... be recorded only on Memory Stick Duo You can find a scene quickly using a VISUAL INDEX screen p 30 37 The VISUAL INDEX screen allows you to check recorded at a glance All you have to do is touch the scene you want to view The disc does not wear out no matter how many times you play it back The precious moments you have captured on disc last for a long time Records widescreen format and 5 1ch surr...

Страница 17: ...scs are also recorded with 5 1ch surround sound to provide full sound on a home theater b Notes Some models may not support wide screen and 5 1 ch surround recording A recorded disc can be played back on a variety of devices High speed image transfer p 78 Image data can be quickly transferred to a computer without requiring playback Computers with Hi Speed USB USB 2 0 provide even faster image tra...

Страница 18: ...ng a disc Apporoximate recordable time the minimum recording time Recording mode 9M HQ high quality 20 18 35 32 6M SP standard quality 30 18 55 32 3M LP long play 60 44 110 80 Your camcorder uses the VBR Variable Bit Rate format to automatically adjust image quality to suit the recording scene This technology causes fluctuations in the recording time of a disc Movies containing quickly moving and ...

Страница 19: ...ay cause the computer to malfunction Disc format features Figures in parentheses indicate page numbers Disc types and symbols DVD RW DVD RW DVD R DVD R DL Symbols used in this manual Both 16 9 wide and 4 3 movie can be recorded on the same disc 35 z z z z Deleting the most recent recording 47 z z z Deleting or editing recordings on your camcorder 46 z Using a disc repeatedly even if the disc becom...

Страница 20: ...ng 2Recording playback editing See pages 32 37 and 46 What you can do with your camcorder depends on the type of disc p 13 3Viewing on your camcorder See pages 30 and 37 You can also connect it to a TV for viewing p 40 Select the recording format and format the disc on your camcorder p 26 z Tips You can select the disc from DISC SELECT GUIDE p 56 Yes No Do you want to delete images and reuse the d...

Страница 21: ...added even if there is free space left Like commercially sold DVD this disc can be played back in most DVD devices after finalizing Thedisccanbeplayedback in a device compatible with the DVD RW VR mode The disc can be played back without finalizing But finalizing is required in some cases For details see page 42 Unfinalizing allows you to add recordings p 58 Recordings can be added without unfinal...

Страница 22: ...these items during Easy Handycam operation p 29 For items available in the SETTINGS category see page 61 HOME MENU the starting point for operations with your camcorder HELP Displays a description of the item p 17 Category Items Page MOVIE 33 PHOTO 33 Items Page VISUAL INDEX 37 PLAYLIST 49 Items Page DELETE 46 EDIT 48 PLAYLIST EDIT 49 PRINT 53 COMPUTER 78 Items Page FINALIZE 42 DISC SELECT GUIDE 5...

Страница 23: ... 4 Touch the item you want to use Example EDIT 5 Continue operation by following the guidance on the screen To hide the HOME MENU screen Touch When you want to know something about the function of each item on the HOME MENU HELP 1 Press HOME The HOME MENU appears 2 Touch HELP The bottom of the HELP button turns orange Using the HOME MENU HOME A HOME B Continued ...

Страница 24: ...therwise touch NO To deactivate the HELP Touch HELP again in step 2 Just a touch on the screen during recording or playback displays the functions available at that moment You will find it easy to make various settings See page 71 for further details Using the OPTION MENU Records a movie Activate MOVIE YES NO OPTION HOME and OPTION Continued ...

Страница 25: ...ntheses indicates the number of that item supplied AC Adaptor 1 p 20 Mains lead 1 p 20 A V connecting cable 1 p 40 52 USB cable 1 p 53 Wireless Remote Commander DCR DVD306E DVD308E DVD708E 1 p 113 A button type lithium battery is already installed Rechargeable battery pack NP FH40 1 p 20 CD ROM Handycam Application Software 1 p 78 Operating Guide This manual 1 ...

Страница 26: ...of the AC Adaptor Match the v mark on the DC plug with the v mark on your camcorder 4 Connect the mains lead to the AC Adaptor and the wall socket The CHG charge lamp lights up and charging starts The CHG charge lamp turns off when the battery is fully charged 5 Disconnect the AC Adaptor from the DC IN jack on your camcorder b Notes Disconnect the AC Adaptor from the DC IN jack holding both the ca...

Страница 27: ...e time and battery information appear for about 7 seconds You can view the battery information for up to 20 seconds by pressing DISP BATT INFO again while the information is displayed Charging time Approximate time min required when you fully charge a fully discharged battery pack Recording time Approximate time min available when you use a fully charged battery pack DCR DVD106E DVD108E DVD608E BA...

Страница 28: ...amp p 23 The CHG charge lamp flashes during charging or Battery Info p 21 will not be correctly displayed under the following conditions The battery pack is not attached correctly The battery pack is damaged The battery pack is worn out For Battery Info only Battery pack Continuous recording time Typical recording time NP FH40 supplied 90 45 100 50 NP FH50 105 50 115 55 NP FH70 230 110 245 115 NP ...

Страница 29: ...or Disconnect the AC Adaptor from the wall socket immediately if any malfunction occurs while using your camcorder Do not use the AC Adaptor placed in a narrow space such as between a wall and furniture Do not short circuit the DC plug of the AC Adaptor or battery terminal with any metallic objects This may cause a malfunction Even if your camcorder is turned off AC power mains is still supplied t...

Страница 30: ...the date and time again p 105 It takes a few seconds for your camcorder to be ready to shoot after the power is turned on You cannot operate your camcorder during this time In the setting at the time of purchase the power turns off automatically if you leave your camcorder without any operation attempted for approximately 5 minutes to save battery power A SHUT OFF p 70 z Tips The date and time doe...

Страница 31: ...me when you open or adjust the LCD panel z Tips If you open the LCD panel 90 degrees to the camcorder then rotate it 180 degrees to the lens side you can close the LCD panel with the LCD screen facing out This is convenient during playback operations On the HOME MENU touch SETTINGS t SOUND DISP SET t LCD BRIGHT p 67 to adjust the brightness of the LCD screen The information is displayed or hidden ...

Страница 32: ...SS appears on the LCD screen It may take some time for the camcorder to recognize the disc x DVD RW DVD RW A screen appears to ask whether you will use DISC SELECT GUIDE Using DISC SELECT GUIDE lets you format the disc by following the guidance on the screen If you do not want to use it proceed to step 5 x DVD R DVD R DL You can start recording immediately after DISC ACCESS disappears from the LCD...

Страница 33: ...ver with the disc set incorrectly it may cause your camcorder to malfunction Do not disconnect the power sources during formatting Do not apply shock or vibration to your camcorder while the ACCESS lamp is on while the ACCESS lamp is flashing while DISC ACCESS or PREPARING TO OPEN is displayed on the LCD screen It may take some time to remove the disc depending on the disc condition or recorded ma...

Страница 34: ... b Notes Do not try to force the Memory Stick Duo out Doing so may result in damage When the access lamp is lit or flashing your camcorder is reading writing data Do not shake or knock your camcorder turn the power off eject the Memory Stick Duo or remove the battery pack Otherwise image data may be damaged If you insert the Memory Stick Duo into the slot in the wrong direction the Memory Stick Du...

Страница 35: ...rt recording To stop recording press START STOP again 1 Turn the POWER switch A until the Still lamp turns on 2 Press EASY B appears on the LCD screen 3 Press PHOTO E to record a still image If the POWER switch is set to OFF CHG turn it while pressing the green button Open the lens cover p 25 DCR DVD106E DVD108E DVD109E DVD608E DCR DVD306E DVD308E DVD708E Movies STBY t REC Still Images 6 6 Press P...

Страница 36: ... movie you want to view Viewing recorded movies still images Previous 6 images Next 6 images Disc type Appears with the image on each of the tab that was lastly played back recorded B for the still image Returns to the recording screen Displays the movies Displays the still images Returns to the recording screen 1 1 2007 11 23 45 Beginning of the scene previous scene Toggles Play or Pause as you t...

Страница 37: ...age 83 DVD RW are formatted in VIDEO mode p 12 OPTION will not appear Cancel Easy Handycam operation if you want to add effects to images or change settings Invalid buttons during Easy Handycam operation You cannot use some buttons functions during Easy Handycam operation since they are automatically set p 83 Invalid during Easy Handycam operation may appear if operations not available during Easy...

Страница 38: ...d it means data is still being written onto the disc or Memory Stick Duo Do not apply shock or vibration to your camcorder and do not disconnect the battery or AC Adaptor POWER switch A PHOTO F START STOP C HOME D START STOP B Open the Lens cover p 25 HOME E HOME D START STOP C DCR DVD106E DVD108E DVD109E DVD608E DCR DVD306E DVD308E DVD708E Adjusting the grip belt ...

Страница 39: ...orded on the Memory Stick Duo For the number of recordable still images see page 64 1 Turn the POWER switch A until the Still lamp turns on 2 Press PHOTO F appears next to When disappears the image has been recorded To switch to the movie recording mode using the HOME button D or E Touch CAMERA of HOME MENU t MOVIE or PHOTO Movies STBY t REC Still Images FlashingtLights up Press slightly to focus ...

Страница 40: ... subject while maintaining sharp focus is about 1 cm about 13 32 in for wide angle and about 80 cm about 2 5 8 feet for telephoto z Tips Using DIGITAL ZOOM p 63 let you zoom in further than the magnification shown in the table Sound picked up by the built in microphone is converted to 5 1ch surround sound and recorded Your camcorder has Dolby Digital 5 1 Creator installed for recording 5 1ch surro...

Страница 41: ...ction p 76 To adjust the exposure for backlit subjects press BACK LIGHT to display To cancel the back light function press BACK LIGHT again Open the LCD panel 90 degrees to the camcorder 1 then rotate it 180 degrees to the lens side 2 z Tips A mirror image of the subject appears on the LCD screen but the image will be normal when recorded When recording in mirror mode the images is not displayed i...

Страница 42: ...pending on subjects p 40 To select the aspect ratio of the still images 1 Turn the POWER switch until the Still lamp turns on The aspect ratio of the picture switches to 4 3 2 Press WIDE SELECT repeatedly to select the desired screen aspect ratio b Notes The size of still images is 0 7M 16 9 or 1 0M 4 3 at the maximum z Tips See page 64 for the number of recordable still images With the DCR DVD106...

Страница 43: ... INDEX screen To fix this number touch SETTINGS in the HOME MENU t VIEW IMAGES SET t DISPLAY p 66 POWER switch A VIEW IMAGES B HOME D VIEW IMAGES C HOME E Zoom lever F HOME D DCR DVD106E DVD108E DVD109E DVD608E DCR DVD306E DVD308E DVD708E Previous 6 images Next 6 images Disc type Appears with the image on each of the tab that was lastly played back recorded B for the still image Returns to the rec...

Страница 44: ...tab t VOLUME then adjust it with z Tips Touch during pause to play back movie slowly One touch makes the reverse fast forward approximately 5 times faster two touches makes it approximately 10 times faster Approximately 8 times faster using a DVD RW Movies Beginning of the scene previous scene Toggles Play or Pause as you touch Next scene Stop go to the VISUAL INDEXscreen Reverse Forward Return to...

Страница 45: ...ramed 3 Touch the screen at the point you want to display in the center of the displayed frame 4 Adjust the magnification with W Wide angle T Telephoto To cancel touch Touch on the still image playback screen The slide show begins from the selected image Touch to stop the slide show To restart touch again b Notes You cannot operate playback zoom during slide show z Tips You can set continuous slid...

Страница 46: ... an S VIDEO cable optional The yellow plug connection is not necessary S VIDEO connection only will not output audio When your TV is connected to a VCR Connect your camcorder to the LINE IN input on the VCR Set the input selector on theVCRtoLINE VIDEO1 VIDEO2 etc if the VCR has an input selector To set the aspect ratio according to the connected TV 16 9 4 3 Change the setting according to the scre...

Страница 47: ...e audio input jack Connect the yellow plug of the A V connecting cable to the video input jack and connect the white left channel or the red right channel plug to the audio input jack of your TV or VCR z Tips You can display the counter on the TV screen by setting DISP OUTPUT to V OUT PANEL p 69 If your TV VCR has a 21 pin adaptor EUROCONNECTOR Use a 21 pin adaptor optional to view playback pictur...

Страница 48: ... R DVD R DL require finalizing DVD RW do not require finalizing except in the following cases 1 To create a DVD menu 2 To play back on a computer DVD drive 3 If the disc has a short total recording time less than 5 min in HQ mode 8 min in SP mode or 15 min in LP mode b Notes Playback compatibility with all device is not guaranteed No DVD menu is created for DVD RW VR mode To play back a disc in a ...

Страница 49: ... so cancel Easy Handycam operation p 31 To play back a disc in a DVD device after adding a recording p 44 Make a new recording Recordings cannot be added Unfinalize the disc When the DVD menu has been created a confirmationscreenpromptsyoutoconfirmthat you wish to add a recording Recordings can be added as usual Finalize Finalize Finalize Only in case 1 Makedesiredsettingsfor the DVD menu Playback...

Страница 50: ...ize the disc using STYLE1 default setting 5 Touch YES t YES Finalizing starts 6 When Completed appears touch b Notes Do not apply shock or vibration to your camcorder and do not disconnect the AC Adaptor during finalizing When you need to disconnect the AC Adaptor make sure that the power of your camcorder is set to off and disconnect the AC Adaptor after the Movie or Still lamp goes off Finalizin...

Страница 51: ...style 1 In step 4 touch OPTION t DVD MENU 2 Select the desired style from 4 types of pattern with T t Select NO MENU if you do not create a DVD menu 3 Touch b Notes The DVD menu style is fixed to STYLE1 during the Easy Handycam operation DVD RW ...

Страница 52: ...8 Deleting images You can delete the images recorded on a disc or a Memory Stick Duo using your camcorder Insert a recorded disc or Memory Stick Duo into your camcorder b Notes You cannot retrieve the deleted images You cannot delete movies during Easy Handycam operation Cancel the Easy Handycam operation first z Tips You can select up to 100 images at once You can delete images on the playback sc...

Страница 53: ...make additional recording To delete all images recorded in the disc and restore the original capacity of the disc format the disc page 57 z Tips The images recorded by this camcorder and stored onto a disc are called original 1 Touch OTHERS of the HOME menu t DELETE 2 Touch DELETE 3 Touch DELETE 4 Touch the still image that you want to delete The selected still image is marked with Press and hold ...

Страница 54: ...y Handycam operation first 1 Touch OTHERS of the HOME menu t EDIT 2 Touch DIVIDE 3 Touch the movie that you want to divide The selected movie starts playing 4 Touch at the point where you want to divide the movie into the scenes The movie pauses Play and pause toggles as you press 5 Touch t YES t Returns to the beginning of the selected movie Adjusts the dividing point more precisely after the div...

Страница 55: ...ments Creating the Playlist A Playlist is a list showing thumbnails of the movies that you have selected The original scenes are not changed even though you edit or delete the scenes in the Playlist Make sure to insert the recorded disc into your camcorder b Notes You cannot add or edit movies during Easy Handycam operation Cancel the Easy Handycam operation first 1 Touch OTHERS of the HOME menu t...

Страница 56: ...lected scene to the end then the screen returns to the Playlist screen To erase added images from the Playlist at a time 1 Touch OTHERS of the HOME menu t PLAYLIST EDIT 2 Touch ERASE To erase all images at a time touch ERASE ALL t YES t YES t 3 Touch the image that you want to erase from the Playlist The selected image is marked with Press and hold the image on the LCD screen to confirm the image ...

Страница 57: ...ouch DIVIDE 3 Select the movie that you want to divide The playback of the selected movie starts 4 Touch at the point where you want to divide the movie into scenes The movie pauses 5 Touch t YES t b Notes A slight difference may occur from the point where you touch and the actual dividing point as your camcorder selects the dividing point based on about half second increments z Tips The original ...

Страница 58: ...ith an A V connecting cable Connect the white and red plug left right audio and the S VIDEO plug S VIDEO channel of the A V connecting cable with an S VIDEO cable optional The yellow plug connection is not necessary S VIDEO connection only will not output audio b Notes To hide the screen indicators such as a counter etc on the screen of the monitor device connected set SETTINGS t OUTPUT SETTINGS t...

Страница 59: ...hed stop the recording device and then your camcorder Printing recorded images PictBridge compliant printer You can print out still images using a PictBridge compliant printer without connecting the camcorder to a computer Connect your camcorder to the AC Adaptor to obtain power from the wall socket p 20 Insert the Memory Stick Duo containing still images into your camcorder and turn on the printe...

Страница 60: ...inter To remove the Memory Stick Duo from your camcorder If the printer stops working disconnect the USB cable turn the printer off and on again and restart the operation from the beginning You can select only the paper sizes that the printer can print On some printer models the top bottom right and left edges of images may be trimmed If you print a still image recorded in a 16 9 wide ratio the le...

Страница 61: ...tically installed device is placed in a position such as that the disc can be placed horizontally Some discs cannot be played back may freeze for an instant between scenes Some functions may be disabled on some devices z Tips Devices that support subtitles can display the recording date and time where the subtitles normally appear p 63 Refer to the instruction manual of your device If you have cre...

Страница 62: ...stored in the following folders DVD RW VR mode DVD_RTAV folder Other discs and modes VIDEO_TS folder Volume label Finding the right disc DISC SELECT GUIDE Select the option that is right for you on the screen then you will be informed of the appropriate disc for your purposes 1 Touch MANAGE DISC MEMORY of the HOME 2 Touch DISC SELECT GUIDE 3 Touch the option that is right for you on the screen Whe...

Страница 63: ...sc that you want to format into your camcorder 4 Touch MANAGE DISC MEMORY of the HOME t FORMAT Perform the following steps if your disc is DVD RW or DVD RW x DVD RW Select VIDEO or VR for the recording format p 12 then touch x DVD RW Select the aspect ratio of the movie 16 9 WIDE or 4 3 then touch 5 Touch YES 6 Touch when Completed is displayed b Notes Use the AC Adaptor as the power source to pre...

Страница 64: ...ng You can record additional movies on the finalized DVD RWs DVD RWs after the following steps if the disc has free space When using the finalized DVD RW VR mode you can record additional movies on the disc without an additional steps 1 Connect the AC Adaptor to the DC IN jack on your camcorder then connect the mains lead to the wall socket 2 Turn on your camcorder 3 Insert the finalized disc into...

Страница 65: ...5 When Completed appears touch b Notes Use the AC Adaptor as power source to prevent your camcorder from running out of power during the operation Do not apply shock or vibration to your camcorder and do not disconnect the AC Adaptor during the operation A DVD menu created during finalizing are deleted For a double sided disc perform these steps for each side of the disc You cannot record addition...

Страница 66: ... settings for your convenience 1 Turn on your camcorder then press HOME 2 Touch SETTINGS 3 Touch the desired setup item If the item is not on the screen touch v V to change the page 4 Touch the desired item If the item is not on the screen touch v V to change the page 5 Change the setting then touch Using the HOME MENU HOME HOME SETTINGS category ...

Страница 67: ...TTINGS category items Items Page REC MODE 62 NIGHTSHOT LIGHT 62 WIDE SELECT 1 62 DIGITAL ZOOM 63 STEADYSHOT 63 AUTO SLW SHUTTR 63 REMAINING 63 SUB T DATE 63 Items Page IMAGE SIZE 2 3 64 QUALITY 64 FILE NO 64 NIGHTSHOT LIGHT 62 FLASH LEVEL 2 65 REDEYE REDUC 2 65 Items Page DATA CODE 65 DISPLAY 66 Items Page VOLUME 3 67 BEEP 3 67 LCD BRIGHT 67 LCD BL LEVEL 67 LCD COLOR 67 VF B LIGHT 67 Items Page TV...

Страница 68: ... each recording mode REC MODE Recording mode When using the NightShot plus p 35 or S NIGHTSHOT PLS p 76 function to record you can record clearer images by setting NIGHTSHOT LIGHT which emits infrared light invisible to ON the default setting b Notes Do not cover the infrared port with your fingers or other objects p 111 Remove the conversion lens optional The maximum shooting distance using NIGHT...

Страница 69: ...ecomes natural When this is set to ON the default setting the shutter speed is automatically reduced to 1 25 second when recording in dark conditions B AUTO Displays the remaining disc indicator for about 8 seconds in situations such as those described below When your camcorder recognizes the remaining disc capacity with the POWER switch set to Movie When you press DISP BATT INFO to switch the ind...

Страница 70: ...20 325 160 390 390 980 128MB 245 650 325 780 780 1970 b Notes All numbers measured at the following settings Top FINE is selected for image quality Bottom STANDARD is selected for image quality When using the Memory Stick Duo made by Sony Corporation Thenumberof recordable still images varies depending on the recording environment B FINE Records still images at the fine image quality level STANDAR...

Страница 71: ...ot produce the desired effect due to individual differences and other conditions FLASH LEVEL DCR DVD306E DVD308E DVD708E REDEYE REDUC Redeye reduction DCR DVD306E DVD308E DVD708E VIEW IMAGES SET Items to customize the display Touch 1 then 2 If the item is not on the screen touch v V to change the page How to set HOME MENU t page 60 OPTION MENU t page 71 The default settings are marked with B Durin...

Страница 72: ...TV The indicator toggles through the following sequences as you press DATA CODE on the Remote Commander DATE TIME t CAMERADATA t OFF no indication DCR DVD306E DVD308E DVD708E Depending on the disc condition bars appear You can select the number of thumbnails that appear on the VISUAL INDEX screen B ZOOM LINK Change the number of thumbnails 6 or 12 with the zoom lever on your camcorder 6IMAGES Disp...

Страница 73: ... LCD screen b Notes When you connect your camcorder to outside power sources BRIGHT is automatically selected for the setting When you select BRIGHT battery life is slightly reduced during recording If you open the LCD panel 180 degrees to face the screen outside and close the LCD panel to the camcorder body the setting becomes NORMAL automatically z Tips This adjustment does not affect the record...

Страница 74: ...settings are marked with B You need to convert the signal depending on the TV connected when playing back the image The recorded images are played back as following illustrations 16 9 Default setting for DCR DVD306E DVD308E DVD708E Select to view your images on a 16 9 wide TV 4 3 Default setting for DCR DVD106E DVD108E DVD109E DVD608E Select to view your images on a 4 3 standard TV TV TYPE Wide 16...

Страница 75: ...How to set HOME MENU t page 60 OPTION MENU t page 71 See page 23 You can adjust a time difference without stopping the clock Set your local area using v V when using your camcorder overseas Refer to the world time difference on page 97 You can change this setting without stopping the clock Set to ON to move the time forward 1 hour You can select the language to be used on the LCD screen z Tips You...

Страница 76: ...s When you slide the disc cover open switch When you remove or insert a Memory Stick Duo When you set the POWER switch to Still When you press HOME VIEW IMAGES See page 103 DEMO MODE CALIBRATION B 5min The camcorder is automatically turned off when you do not operate your camcorder for more than approximately 5 minutes NEVER The camcorder is not automatically turned off b Notes When you connect yo...

Страница 77: ...d item If you cannot find the desired item touch another tab to change the page 3 Change the setting then touch When the item you want is not on the screen Touch another tab If you cannot find the item anywhere the function does not work under the situation b Notes The tabs and items that appear on the screen depend on the recording playback status of your camcorder at the time Some items appear w...

Страница 78: ... 74 SPOT METER 74 SCENE SELECTION 74 WHITE BAL 75 COLOR SLOW SHTR 76 S NIGHTSHOT PLS 76 tab FADER 76 D EFFECT 77 PICT EFFECT 77 tab REC MODE a 62 MICREF LEVEL 77 IMAGE SIZE a 64 QUALITY a 64 SELF TIMER 77 FLASH MODE 77 Viewing items on the OPTION MENU Items Page tab DELETE a 46 DELETE ALL a 47 tab DIVIDE a 48 ERASE a 50 ERASE ALL a 50 MOVE a 50 A tab depends on the situation ADD a 50 ADD ALL a 50 ...

Страница 79: ...cording When you want to record a subject at close range move the power zoom lever to W wide angle then adjust the focus The focal distance information the distance at which the subject is focused on for when it is dark and hard to adjust focus appears for a few seconds in the following cases It will not be displayed correctly if you are using a conversion lens optional When the focus mode is swit...

Страница 80: ...contrast between the subject and the background such as subjects in the spotlight on stage 1 Touch the point where you want to fix and adjust the exposure on the screen appears 2 Touch END To return the setting to automatic exposure touch AUTO t END in step 1 b Notes If you set SPOT METER EXPOSURE is automatically set to MANUAL You can record images effectively in various situations with the SCENE...

Страница 81: ... you set SCENE SELECTION You can adjust the color balance to the brightness of the recording environment B AUTO The white balance is adjusted automatically OUTDOOR The white balance is adjusted to be appropriate for the following recording conditions Outdoors Night views neon signs and fireworks Sunrise or sunset Under daylight fluorescent lamps INDOOR n The white balance is adjusted to be appropr...

Страница 82: ...The shutter speed of your camcorder changes depending on the brightness which may result in a slowdown of the motion of the image The image will be recorded at a maximum of 16 times the sensitivity of NightShot plus recording if you set S NIGHTSHOT PLS to ON while the NIGHTSHOT PLUS switch p 35 is also set to ON appears on the screen To return to the normal setting set S NIGHTSHOT PLS to OFF b Not...

Страница 83: ...converting them into the certain level LOW Records surround sound faithfully This setting is not suitable for recording conversations The self timer records a still image about 10 seconds after being set Press PHOTO to record still images when SELF TIMER is set to ON and appears To cancel the count down touch RESET To cancel the self timer select OFF z Tips You can also operate by pressing PHOTO o...

Страница 84: ...our camcorder and computer and making settings to general operation the first time you use the software Picture Motion Browser stored on the CD ROM supplied Referring to Installing the First Step Guide p 79 start the First Step Guide then follow the instructions The Help guide explains all the functions of all the software applications Refer to the Help guide for further detailed operations after ...

Страница 85: ... images are recorded into the Memory Stick Duo Adaptor optional then insert it into the Memory Stick slot on your computer to copy still images to the computer When using a Memory Stick PRO Duo and your computer is not compatible with it connect your camcorder with the USB cable instead of using the Memory Stick slot on the computer Installing the First Step Guide and software You need to install ...

Страница 86: ...your area and country region then click Next The software is set up for your selected country region 5 Read License Agreement select I accept the terms of the license agreement when you agree then click Next 6 Connect your camcorder to your computer via a USB cable then click Next on the connection confirmation screen b Notes Even if a screen prompting you to restart your computer appears you do n...

Страница 87: ...www sony net support disoft Viewing First Step Guide z Tips See page 82 when you use a Macintosh computer To view First Step Guide on your computer Microsoft Internet Explorer Ver 6 0 or later is recommended Double click the shortcut of First Step Guide on the desktop z Tips You can also start this program by selecting Start t Programs All Programs for Windows XP t Sony Picture Utility t First Ste...

Страница 88: ... provided as standard The First Step Guide is an instruction manual you can refer to on your computer This describes basic operations from initial hookup of your camcorder and computer and making setting Referring to Installing the First Step Guide start the First Step Guide then follow the instructions Copy FirstStepGuide PDF stored in the desired language in the FirstStepGuide folder to your com...

Страница 89: ... after about 1 minute If the functions still do not work press the RESET button p 112 using a sharp pointed object If you press the RESET button all settings including the clock setting are reset The temperature of your camcorder is extremely high Turn off your camcorder and leave it for a while in a cool place Buttons do not work During Easy Handycam operation the following buttons functions are ...

Страница 90: ...DVD708E Set REMOTE CTRL to ON p 70 Insert a battery into the battery holder with the polarities correctly matching the marks p 113 Remove any obstructions between the Remote Commander and the remote sensor Point the remote sensor away from strong light sources such as direct sunlight or overhead lighting Otherwise the Remote Commander may not function properly Another DVD device malfunctions when ...

Страница 91: ... panel do not work correctly or do not work at all Adjust the touch panel CALIBRATION p 103 Menu items are grayed out You cannot select grayed items in the current recording playback status Some functions cannot be used simultaneously p 90 The image in the viewfinder is not clear Move the viewfinder lens adjustment lever until the image appears clearly p 25 The image in the viewfinder has disappea...

Страница 92: ... the disc The playback screen is displayed Set your camcorder to recording standby p 33 Your camcorder is recording the scene you have just shot on the disc The disc has run out of space Use a new disc or format the disc DVD RW DVD RW only p 57 Or delete the unnecessary images p 46 When you are using one of the following discs after finalizing it make the disc to be able to record additional scene...

Страница 93: ... cannot be changed DCR DVD306E DVD308E DVD708E You cannot change the movie aspect ratio if your disc is DVD RW The auto focus does not function Set FOCUS to AUTO p 73 The recording conditions are not suitable for auto focus Adjust the focus manually p 73 STEADYSHOT does not function Set STEADYSHOT to ON p 63 STEADYSHOT may not be able to compensate for excessive vibrations The BACK LIGHT function ...

Страница 94: ...t play back a disc Turn the POWER switch to turn on your camcorder and press VIEW IMAGES On the HOME MENU touch VIEW IMAGES then VISUAL INDEX Check out the disc compatibility p 12 Insert a disc with the recording side facing your camcorder p 26 The disc that was recorded formatted of finalized on other devices may not be played back on your camcorder The playback image is distorted Clean the disc ...

Страница 95: ...ot a malfunction In case of a DVD R DL the image may freeze for an instant when the recording layer changes This is not a malfunction Playback does not move to the previous scene when you press If playback crosses 2 titles made automatically by your camcorder when is pressed playback may not move to the previous scene Select the desired scene from the menu screen Refer to the instruction manual of...

Страница 96: ...V p 40 68 You cannot dub correctly The A V connecting cable is not connected properly Make sure that the A V connecting cable is connected to the proper jack i e to the input jack of another device for dubbing a image from your camcorder p 52 When using the movies on a disc a computer does not recognize your camcorder Install Picture Motion Browser p 80 Disconnect the USB device other than the key...

Страница 97: ...NIGHTSHOT PLS FADER D EFFECT COLOR SLOW SHTR FADER D EFFECT SCENE SELECTION FADER S NIGHTSHOT PLS COLOR SLOW SHTR D EFFECT CANDLE FIREWORKS D EFFECT S NIGHTSHOT PLS COLOR SLOW SHTR FADER OLD MOVIE SCENE SELECTION PICT EFFECT PICT EFFECT OLD MOVIE TELE MACRO SCENE SELECTION AUTO SLW SHUTTR S NIGHTSHOT PLS SCENE SELECTION COLOR SLOW SHTR D EFFECT WIDE SELECT OLD MOVIE Cannot use Because of following...

Страница 98: ...camcorder again E 20 ss E 31 ss E 61 ss E 62 ss E 91 ss E 94 ss A malfunction that you cannot service has occurred Contact your Sony dealer or local authorized Sony service facility Inform them of the 5 digit code which starts from E 101 0001 Warning indicator pertaining to files Slow flashing The file is damaged The file is unreadable Warning indicator pertaining to discs Slow flashing A disc is ...

Страница 99: ...ndicator pertaining to the write protect of the Memory Stick Duo The write protect tab on the Memory Stick Duo is set to lock p 100 Access to the Memory Stick Duo was restricted on another device Warning indicator pertaining to the flash Fast flashing There is something wrong with the flash Warning indicator pertaining to camera shake warning The amount of lights is not sufficient so camera shake ...

Страница 100: ...t create folders exceeding 999MSDCF Youcannotcreateordelete created folders using your camcorder You will have to format the Memory Stick Duo p 58 or delete them using your computer x PictBridge compliant printer Not connected to PictBridge compatible printer Switch off the printer and switch it on again then disconnect the USB cable and reconnect it Cannot print Check the printer Switch off the p...

Страница 101: ...95 Troubleshooting Please wait This is displayed if the disc removal process takes time Turn on the camcorder and leave it for about 10 minutes preventing vibration ...

Страница 102: ...he playback image on a TV it must be a PAL system based TV with an AUDIO VIDEO input jack System Used in PAL Australia Austria Belgium China Czech Republic Denmark Finland Germany Holland Hong Kong Hungary Italy Kuwait Malaysia New Zealand Norway Poland Portugal Singapore Slovak Republic Spain Sweden Switzerland Thailand United Kingdom etc PAL M Brazil PAL N Argentina Paraguay Uruguay NTSC Bahama ...

Страница 103: ...hran 04 00 Abu Dhabi Baku 04 30 Kabul 05 00 Karachi Islamabad 05 30 Calcutta New Delhi 06 00 Almaty Dhaka 06 30 Rangoon 07 00 Bangkok Jakarta 08 00 Hong Kong Singapore Beijing 09 00 Seoul Tokyo 09 30 Adelaide Darwin 10 00 Melbourne Sydney 11 00 Solomon Is 12 00 Fiji Wellington 12 00 Eniwetok Kwajalein 11 00 Midway Is Samoa 10 00 Hawaii 09 00 Alaska 08 00 Los Angeles Tijuana 07 00 Denver Arizona 06...

Страница 104: ...ou do so the disc may become unbalanced and this may cause a malfunction of the disc or your camcorder Use of double sided discs Double sided discs allow you to record both sides of a disc x Recording on the A side Placethediscinyourcamcorderwiththeside with the symbol at the center facing outwards until it clicks When using a double sided disc take care not to smudge the surface with fingerprints...

Страница 105: ...ize of a standard Memory Stick with your camcorder However we do not guarantee the operation of all types of Memory Stick Duo on your camcorder Still image format Your camcorder compresses and records image data in the JPEG Joint Photographic Experts Group format The file extension is JPG File names of still images 101 0001 This file name appears on the screen of your camcorder DSC00001 JPG This f...

Страница 106: ... swallow it Do not insert anything other than a Memory Stick Duo into the Memory Stick Duo slot Doing so may cause a malfunction x On a location for use Do not use or keep the Memory Stick Duo in the following locations Places subject to extremely high temperature such as a car parked outside in the summer Places under direct sunlight Places with extremely high humidity or subject to corrosive gas...

Страница 107: ...ounding temperature is 10 C 50 F or below and the length of time you can use the battery pack becomes shorter In that case do one of the following to use the battery pack for a longer time Put the battery pack in a pocket to warm it up and insert it in your camcorder right before you start taking shots Use a large capacity battery pack NP FH70 NP FH100 optional Frequent use of the LCD screen or a ...

Страница 108: ...d to direct sunlight This damages the inside of the viewfinder or the LCD screen Anywhere very humid Operate your camcorder on DC 6 8 V 7 2 V battery pack or DC 8 4 V AC Adaptor For DC or AC operation use the accessories recommended in these operating instructions Do not let your camcorder get wet for example from rain or sea water If your camcorder gets wet it may malfunction Sometimes this malfu...

Страница 109: ...our LCD screen Do not exert excessive pressure on the LCD screen as it may cause damage If your camcorder is used in a cold place a residual image may appear on the LCD screen This is not a malfunction While using your camcorder the back of the LCD screen may heat up This is not a malfunction x To clean the LCD screen If fingerprints or dust make the LCD screen dirty it is recommended you use a so...

Страница 110: ...ause the camcorder to malfunction About care and storage of the lens Wipe the surface of the lens clean with a soft cloth in the following instances When there are fingerprints on the lens surface In hot or humid locations When the lens is exposed to salty air such as at the seaside Store in a well ventilated location subject to little dirt or dust To prevent mold periodically clean the lens as de...

Страница 111: ...t the lens fully into the eyecup block On charging the pre installed rechargeable battery Your camcorder has a pre installed rechargeable battery to retain the date time and other settings even when the POWER switch is set to OFF CHG The pre installed rechargeable battery is always charged while your camcorder is connected to the wall socket via the AC Adaptor or while the battery pack is attached...

Страница 112: ...00 pixels Lens Carl Zeiss Vario Tessar DCR DVD106E DVD108E DVD109E DVD608E Optical 40 Digital 80 2 000 DCR DVD306E DVD308E DVD708E Optical 25 Digital 50 2 000 Filter diameter 30mm 1 3 16 in Focal length DCR DVD106E DVD108E DVD109E DVD608E F 1 8 4 1 f 1 9 76 0mm 3 32 3 in When converted to a 35 mm still camera For movies 36 1 440mm 1 7 16 56 3 4 in For still images 36 1 440mm 1 7 16 56 3 4 in DCR D...

Страница 113: ...C to 60 C 4 F to 140 F Dimensions Approx 54 5 89 130 5 mm 2 1 4 3 5 8 5 1 4 in w h d including the projecting parts 54 5 89 130 5 mm 2 1 4 3 5 8 5 1 4 in w h d including the projecting parts with supplied battery pack NP FH40 attached Mass Approx DCR DVD106E DVD108E DVD109E DVD608E 390 g 13 oz main unit only 440 g 15 oz including the NP FH40 rechargeable battery pack and disc DCR DVD306E DVD308E D...

Страница 114: ...108 Specifications Continued Operating temperature 0 C to 40 C 32 F to 104 F Type Li ion Design and specifications are subject to change without notice ...

Страница 115: ...IS EXPRESSLY PROHIBITED WITHOUT A LICENSE UNDER APPLICABLE PATENTS IN THE MPEG 2 PATENT PORTFOLIO WHICH LICENSE IS AVAILABLE FROM MPEG LA L L C 250 STEELE STREET SUITE 300 DENVER COLORADO 80206 C Library Expat zlib and libjpeg software are provided in your camcorder We provide this software based on license agreements with their owners of copyright Based on requests by the owners of copyright of t...

Страница 116: ...ment lever 25 E Eyecup 104 F Viewfinder 25 G Movie Still mode lamps 23 H Battery pack 20 I START STOP button 29 33 J NIGHTSHOT PLUS switch 35 K CHG charge lamp 20 L DC IN jack 20 M Grip belt 32 N Tripod receptacle Attach the tripod optional the length of the screw must be less than 5 5 mm 7 32 in to the tripod receptacle using a tripod screw O BATT battery release lever 20 ...

Страница 117: ...ccessory When you are recording movies with an external flash optional connected to the accessory shoe turn off the power of the external flash to prevent charging noise being recorded When an external microphone optional is connected it takes precedence over the internal microphone p 34 B ACCESS lamp Disc 26 C Disc cover OPEN switch 26 D Disc cover 26 EInternal microphone 34 An Active Interface S...

Страница 118: ...n 29 H BACK LIGHT button 35 I Speaker Playback sounds come out from the speaker For how to adjust the volume see page 38 J Access lamp Memory Stick Duo 27 K USB jack 53 DCR DVD106E DVD109E DVD306E output only L RESET button Initializes all the settings including the setting of the date and time M DISP BATT INFO button 21 N WIDE SELECT button 35 DCR DVD106E DVD108E DVD109E DVD608E DCR DVD306E DVD30...

Страница 119: ...fore using the Remote Commander PointtheRemoteCommandertowardstheremote sensor to operate your camcorder p 111 When no commands have been sent from the Remote Commander in a certain period the orange frame disappears When you press any of b B v V or ENTER again the frame appears at the position where it was displayed last You cannot select some buttons on the LCD screen using b B v V To change the...

Страница 120: ... Disc type 12 G Recording format 12 Appears for DVD RW only H OPTION button 18 71 I VIEW IMAGES button 30 37 J 5 1ch surround recording 34 K Quality FINE STD 64 L Image size 64 M Appears while a still image is being saved N Recording folder z Tips As the number of still images recorded in Memory Stick Duo increases new folders are automatically created to store them Recording movies SP Recording s...

Страница 121: ...s Next button 30 38 H Scene number I OPTION button 18 71 J Video operation buttons 30 38 K 5 1ch surround recording 34 L Image size 64 M Current still image number Total number of recorded still images N Slide show button 39 O Previous Next button 31 38 P Data file name Q VISUAL INDEX button 30 37 R Playback folder Viewing movies SP Viewing still images Continued ...

Страница 122: ...another device etc SUB T DATE p 63 Indicators when you made changes Indicator Meaning 5 1ch surround recording playback 34 Self timer recording 77 MICREF LEVEL low 77 Flash 65 77 WIDE SELECT 62 WIDE SELECT 35 Indicator Meaning Fader 76 LCD backlight off 25 Indicator Meaning NightShot plus 35 Super NightShot plus 76 Color Slow Shutter 76 Slide show set 39 SP Upper left Upper right Bottom Center Pic...

Страница 123: ...k on a device compatible with the disc created on your camcorder x MPEG MPEG stands for Moving Picture Experts Group the group of standards for the coding image compression of video movie and audio There are MPEG1 and MPEG2 formats Your camcorder records movies with SD standard definition image quality in MPEG2 format x Thumbnail Reduced size images which enable you to view many images at the same...

Страница 124: ...uo 47 DEMO MODE 70 DIGITAL ZOOM 63 Disc 26 98 Disc cover OPEN switch 26 DISC INFO 55 Disc remaining 63 DISC SELECT GUIDE 56 DISP OUTPUT 69 DISPLAY 66 Display indicators 114 DIVIDE Original 48 Playlist 51 Dolby Digital 5 1 Creator 34 117 Double sided disc 98 Dubbing 52 DVD drive 55 DVD menu 45 DVD R 13 DVD RW 13 DVD R DL 13 DVD RW 13 D EFFECT Digital effect 77 91 E Easy Handycam 29 EDIT 48 EXPOSURE...

Страница 125: ...list Creating 49 Playback 50 PORTRAIT 75 Pre installed rechargeable battery 105 Preparation 20 Print 53 Q QUALITY 64 R REC MODE Recording mode 62 Recording 29 32 Recording format 12 Recording time 12 21 REDEYE REDUC 65 REMAINING 63 Remaining battery 21 114 115 Remote Commander 113 REMOTE CTRL 70 RESET button 112 S SCENE SELECTION 74 90 Self diagnosis display 92 SELF TIMER 77 SEPIA 77 SETTINGS cate...

Страница 126: ...7 VIEW IMAGES SET 65 Viewfinder 25 Viewing 30 VISUAL INDEX 30 37 117 VOLUME 38 67 Volume label 56 VR mode 12 117 W Warning indicators 92 Warning messages 93 WHITE BAL White balance 75 91 WHITE FADER 76 Wide angle 34 WIDE SELECT 62 88 Windows 78 World time difference 97 Write protect tab 100 Z Zoom 34 ...

Страница 127: ...Revision History Reverse DCR DVD106E DVD108 DVD108E DVD109E DVD608 DVD608E_L1 Ver 1 0 Date 2007 01 History Official Release Contents S M Rev issued 985217341 pdf ...

Отзывы: