background image

A

d

v

a

n

ced

 Settin

g

s a
nd A

d

justm

e

nt
s

85

GB

You can set 2 kinds of playback restrictions for 
the desired disc.
• Custom Parental Control 

You can set playback restrictions so that the 
system will not play inappropriate discs.

• Parental Control 

Playback of some DVD VIDEOs can be 
limited according to a predetermined level 
such as the age of the users. Scenes may be 
blocked or replaced with different scenes.

The same password is used for both Custom 
Parental Control and Parental Control.

Preventing playback of 
specific discs [CUSTOM 
PARENTAL CONTROL]

You can set the same Custom Parental Control 
password for up to 40 discs. When you set the 
41st-disc, the first disc is canceled.

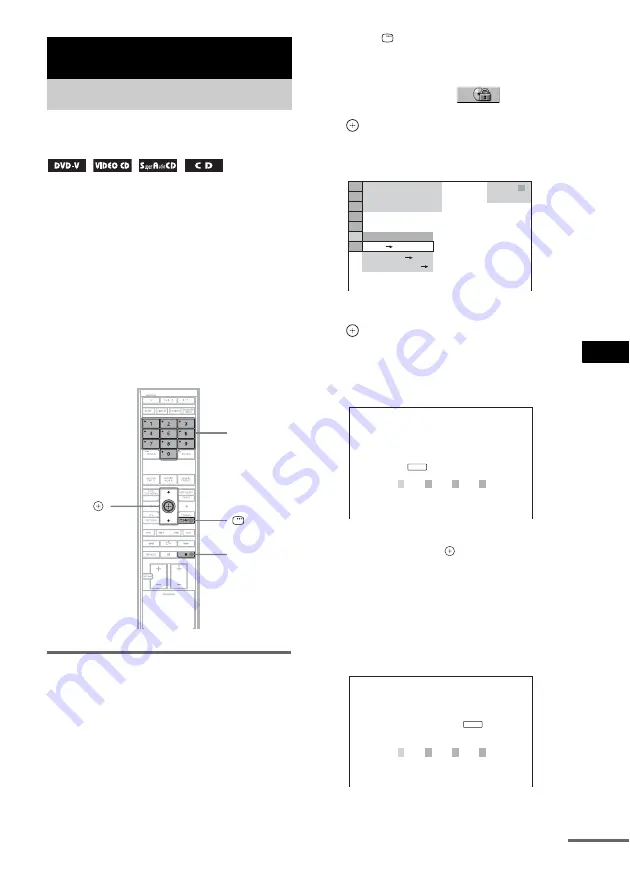
1

Insert the disc you want to lock.

If the disc is playing, press 

x

 to stop 

playback.

2

Press 

 DISPLAY while the system is 

in stop mode.

The Control Menu appears.

3

Press 

X

/

x

 to select 


[PARENTAL CONTROL], then press 

.

The options for [PARENTAL CONTROL] 
appear.

4

Press 

X

/

x

 to select [ON 

t

], then press 

.

x

If you have not entered a password

The display for registering a new password 
appears.

Enter a 4-digit password using the number 
buttons, then press 

.

The display for confirming the password 
appears.

x

When you have already registered a 

password

The display for entering the password 
appears.

Advanced Settings and Adjustments

Locking Discs

(CUSTOM PARENTAL CONTROL, 
PARENTAL CONTROL)


x

X

/

x

,


DISPLAY

Number 
buttons

OFF

PASSWORD

PLAYER

ON

DVD VIDEO

T       1 : 3 2 : 5 5

1 8 ( 3 4 )

1 2 ( 2 7 )

PARENTAL CONTROL

Enter a new 4-digit password, 

then press

         .

ENTER

PARENTAL CONTROL

Enter password, then press

         .

ENTER

continued

Содержание DAV-LF1H

Страница 1: ...Sony Corporation Printed in Malaysia 1 http www sony net 2 687 406 23 1 2006 Sony Corporation DVD Home Theatre System Operating Instructions ...

Страница 2: ... countries with separate collection systems This symbol on the product or on its packaging indicates that this product shall not be treated as household waste Instead it shall be handed over to the applicable collection point for the recycling of electrical and electronic equipment By ensuring this product is disposed of correctly you will help prevent potential negative consequences for the envir...

Страница 3: ... a Title Chapter Track Scene etc 51 Searching by Scene 52 Picture Navigation Resuming Playback from the Point Where You Stopped the Disc 53 Resume Play Creating Your Own Program 54 Program Play Playing in Random Order 56 Shuffle Play Playing Repeatedly 57 Repeat Play Using the DVD s Menu 58 Changing the Sound 58 Selecting ORIGINAL or PLAY LIST on a DVD R DVD RW 60 Changing the Display Mode 61 INFO...

Страница 4: ... 88 AUTO CALIBRATION Using the Setup Display 91 Setting the Display or Sound Track Language 92 LANGUAGE SETUP Settings for the Display 93 SCREEN SETUP Custom Settings 96 CUSTOM SETUP Settings for the Speakers 98 SPEAKER SETUP Returning to the Default Settings 101 Additional Information Precautions 102 Notes about the Discs 103 Troubleshooting 103 Self diagnosis Function 107 When letters numbers ap...

Страница 5: ...DVD VIDEO and the CD logos are trademarks About This Manual Symbol Meaning Functions available for DVD VIDEOs DVD Rs DVD RWs in video mode and DVD Rs DVD RWs Functions available for DVD Rs DVD RWs in VR Video Recording mode Functions available for VIDEO CDs including Super VCDs or CD Rs CD RWs in video CD format or Super VCD format Functions available for Super Audio CDs Functions available for mu...

Страница 6: ...o convert an 8 cm disc to standard size A disc with paper or stickers on it A disc that has the adhesive of cellophane tape or a sticker still left on it Notes about CD R CD RW DVD R DVD RW DVD R DVD RW In some cases CD R CD RW DVD R DVD RW DVD R DVD RW cannot be played on this system due to the recording quality or physical condition of the disc or the characteristics of the recording device and ...

Страница 7: ...o CD Super Audio CD is a new high quality audio disc standard where music is recorded in the DSD Direct Stream Digital format conventional CDs are recorded in the PCM format The DSD format using a sampling frequency 64 times higher than that of a conventional CD and with 1 bit quantization achieves both a wide frequency range and a wide dynamic range across the audible frequency range and so provi...

Страница 8: ...and VIDEO CDs according to the disc contents the software producers designed some playback features may not be available Also refer to the instructions supplied with the DVDs or VIDEO CDs Copyrights This product incorporates copyright protection technology that is protected by U S patents and other intellectual property rights Use of this copyright protection technology must be authorized by Macro...

Страница 9: ... sensor on the control unit Note Do not leave the remote in an extremely hot or humid place Do not use a new battery with an old one Do not drop any foreign object into the remote casing particularly when replacing the batteries Do not expose the remote sensor to direct light from the sun or lighting apparatus Doing so may cause a malfunction If you do not intend to use the remote for an extended ...

Страница 10: ...ts illustrated below Tip You can install the control unit on a wall using an optional kit not supplied 1 Hook the studs of the control unit on the keyslots of the control unit stand then secure the control unit with the screw Step 1 Assembling the System Control unit 1 Control unit stand 1 Control unit stand cover 1 Screw black small 1 Control unit Control unit stand SYSTEM CONTROL cord Hook the S...

Страница 11: ...trol unit stand cover to the control unit stand Snap the control unit stand cover onto the control unit stand Control unit stand cover Control unit stand Draw the SYSTEM CONTROL cord through the opening of the control unit stand cover continued ...

Страница 12: ...peaker terminal or the bare wire of another speaker cord such as shown below Note Be sure to match the speaker cord to the appropriate terminal on the components 3 to 3 and to If the cords are reversed the sound will lack bass and may be distorted To assemble the center speaker Use the parts illustrated below Tip You can install the center speaker on a wall using an optional kit not supplied Cente...

Страница 13: ...y adjusting the position of the screws Center speaker Screws silver large 2 Adjust the length of the speaker cord before securing m Center speaker base Adjuster Speaker cord green Draw out the speaker cord through the slit on the center speaker base Insert the projections of the adjuster into the holes of the center speaker Gray Black Screws 12 continued ...

Страница 14: ...criminate between the speakers see the label on the rear of each speaker Front speaker L left front speaker White label Front speaker R right front speaker Red label Surround speaker R right surround speaker Gray label 2 Surround speaker L left surround speaker Blue label 3 When unpacking the speaker adaptor cover is attached to the speaker adaptor Tip You can install the front speakers and the su...

Страница 15: ...to the base and secure the base with screws for all speakers Do not remove the screw that is attached to the post The screw is to prevent the speaker from slipping IR receiver Front speaker L White label Front speaker R Red label Surround speaker R Gray label Speaker system cord White Red Surround speaker L Blue label Base Post Post cover upper part Screws black large 3 Bottom of the base Cord cla...

Страница 16: ...ker L Connect the connector of the speaker cord to the speaker Screws Speaker adaptor Post Hook upper part Post cover Screws Loosen but do not remove the screws before attaching About the height of the speaker The height of the speaker top is A 390 mm A Between the top of the speaker adaptor and top of the base Lowest position A 570 mm Speaker top 960 mm Highest position A 910 mm Speaker top 1 300...

Страница 17: ...ds are drawn smoothly For the next procedure of the surround speaker L skip to step 7 Speaker cord Post Speaker system cord Fold back the speaker cord about 100 mm and twist together After drawing through untwist and straighten out the speaker cord Post Speaker system cord Hook the speaker cord and speaker system cord in the cord clamp Bottom of the base continued ...

Страница 18: ...speaker Fold back the speaker cord about 100 mm and twist together After drawing through untwist and straighten out the speaker cord Post About the speaker cords Use the speaker cord as follows Front speaker L White Front speaker R Red Surround speaker R Use the speaker cord that is connected to the surround speaker L in step 4 Bottom of the base Rear of the speaker Speaker cord Gray Black ...

Страница 19: ... s between the hooks of the speaker adaptor and between the slit of the post 8 Secure the speaker with the screws for all speakers Speaker cord Hooks Do not get caught the cord s in the hooks Speaker system cord surround speaker L only Adjust the length of the cord s Slit Speaker adaptor Rear of the speaker Speaker adaptor Screws silver small 2 continued ...

Страница 20: ...or until it clicks and attach the post cover for all speakers Note Do not insert the speaker adaptor cover at a slant Insert the speaker adaptor cover straight down so that the lower part is fixed Speaker adaptor cover Rear of the speaker Speaker adaptor Post cover Correct Incorrect ...

Страница 21: ... the System SA TSLF1H DIR R3 CENTER INPEDANCE USE 4 FRONT L FRONT R FM 75 COAXIAL AM VIDEO IN Y PB CB PR CR VIDEO IN VIDEO 1 COMPONENT VIDEO OUT DIR T1 VIDEO 2 SPEAKER EURO AV OUTPUT TO TV SYSTEM CONTROL 4 AM loop antenna aerial Subwoofer 6 AC power cord mains lead 4 FM wire antenna aerial 2 Front speaker L 2 Center speaker Surround speaker R Surround speaker L 6 AC power cord mains lead 5 IR tran...

Страница 22: ...Connect the system connector of the control unit to the SYSTEM CONTROL jack of the subwoofer Insert the plug of the SYSTEM CONTROL cord then secure the screws of the plug Slits Subwoofer CENTER INPEDANCE USE 4 FRONT L FRONT R FM 75 COAXIAL AM VIDEO IN Y PB CB PR CR VIDEO IN VIDEO 1 COMPONENT VIDEO OUT DIR T1 VIDEO 2 SPEAKER EURO AV OUTPUT TO TV SYSTEM CONTROL Subwoofer SYSTEM CONTROL cord Control ...

Страница 23: ... 3 Connecting the AC adaptor Connect the speaker system cord of the surround speaker L to the SA TSLF1H jack of the AC adaptor CENTER INPEDANCE USE 4 FRONT L FRONT R FM 75 COAXIAL AM VIDEO IN Y PB CB PR CR VIDEO IN VIDEO 1 COMPONENT VIDEO OUT DIR T1 VIDEO 2 SPEAKER EURO AV OUTPUT TO TV SYSTEM CONTROL Subwoofer Speaker cords Bottom of the subwoofer Center speaker Front speaker R Front speaker L SA ...

Страница 24: ...Do not place the AM loop antenna aerial near the system or other AV equipment as noise may result Tip Adjust the direction of the AM loop antenna aerial for best AM broadcast sound 4 Make sure the AM loop antenna aerial is connected firmly by pulling softly To connect the FM wire antenna aerial Connect the FM wire antenna aerial to the FM 75 ΩCOAXIAL jack Note Be sure to fully extend the FM wire a...

Страница 25: ...of the subwoofer and the AC adaptor to a wall outlet mains connect the front and center speakers to the subwoofer and surround speaker R to the surround speaker L page 21 Install this system so that the power cord can be unplugged from the wall socket immediately in the event of trouble Outdoor FM antenna aerial System CENTER INPEDANCE USE 4 FRONT L FRONT R FM 75 COAXIAL AM VIDEO IN Y PB CB PR CR ...

Страница 26: ...V T OUTPUT TO TV jack on the system By connecting the system and the TV with the SCART EURO AV cord the system sends the image to the TV and the TV sends TV sound to the system You can enjoy TV sound from the speakers of the system Step 3 Connecting the TV CENTER INPEDANCE USE 4 FRONT L FRONT R FM 75 COAXIAL AM VIDEO IN Y PB CB PR CR VIDEO IN VIDEO 1 COMPONENT VIDEO OUT DIR T1 VIDEO 2 SPEAKER EURO...

Страница 27: ...irty Very humid Subject to vibrations Subject to direct sunlight Use caution when placing the speakers and or speaker stands not supplied that are attached with the speakers on a specially treated waxed oiled polished etc floor as staining or discoloration may result When cleaning use a soft cloth such as a cleaning cloth for glasses Do not use any type of abrasive pad scouring powder or solvent s...

Страница 28: ...he IR receiver of the surround speaker L to face each other Adjust the position until the IR status indicator turns green Tip The IR transmitter is movable for easy reorientation You can install the IR transmitter on a wall for better positioning For details see page 33 Note Make sure that there is no obstruction such as a person or object between the IR transmitter and the IR receiver of the surr...

Страница 29: ...Display for selecting the language used in the on screen display appears 5 Press X x to select a language The system displays the menu and subtitles in the selected language 6 Press The Setup Display for selecting the aspect ratio of the TV to be connected appears 7 Press X x to select the setting that matches your TV type x If you have a wide screen TV or a 4 3 standard TV with a wide screen mode...

Страница 30: ...on mic so that the FRONT side of it is pointed toward the front speakers 12Press X x to select YES then press AUTO CALIBRATION starts Be quiet during the measurement Note Loud test sound is output when AUTO CALIBRATION starts You cannot turn the volume down Give consideration to children and neighbor Avoid being in the measurement area and making noise during the measurement which takes about 1 mi...

Страница 31: ...ers reset the speaker settings See Calibrating the Appropriate Settings Automatically page 88 If you want to change any of the settings see Using the Setup Display page 91 For details on AUTO CALIBRATION and the error messages of AUTO CALIBRATION see Calibrating the Appropriate Settings Automatically page 88 To recall the Quick Setup display 1 Press DISPLAY when the system is in stop mode The Cont...

Страница 32: ...he stand so that both delta marks on the IR receiver and stand are aligned To connect the IR receiver Connect the cord of the IR receiver to the DIR R3 jack of the AC adaptor Note When you connect the IR receiver to the AC adaptor the IR receiver is activated and the IR receiver of the surround speaker L is not activated automatically When using the IR receiver install it following the guidelines ...

Страница 33: ... screws 30 mm apart 3 Hang the IR transmitter via hole on the bottom of the stand on the screw Make sure that the IR transmitter does not move after installation Tip You can store the cords in the troughs in the bottom of the stand Note Use screws suitable for the material and strength of the wall Do not install the IR transmitter to a wall of low strength Sony is not liable for any damage or acci...

Страница 34: ...ceiver stand and hang it via hole on the rear side of the IR receiver on the screw Make sure that the IR receiver does not move after installation Tip When reattaching the IR receiver stand to the IR receiver attach the stand so that both delta marks on the IR receiver and stand are aligned page 32 4 mm 5 7 mm IR receiver IR receiver stand ...

Страница 35: ...of HDMI Licensing LLC To connect to a TV with the COMPONENT VIDEO IN jacks Connect a component video cord not supplied To use the COMPONENT VIDEO OUT jacks Y PB CB PR CR instead of the video jacks your TV monitor must be equipped with via COMPONENT VIDEO IN jacks Y PB CB PR CR If your TV accepts progressive format signals you must use this connection and set the output channel of the system to pro...

Страница 36: ...ital picture and sound through the HDMI OUT high definition multimedia interface out jack Note that Super Audio CD sound is not output from the HDMI OUT high definition multimedia interface out jack 1 Remove the control unit stand cover and the HDMI jack cover from the control unit 2 Connect the HDMI cord Control unit stand cover HDMI jack cover Hook the HDMI cord in the clamp on the control unit ...

Страница 37: ...igital visual interface adaptor not supplied The DVI digital visual interface jack will not accept any audio signals Furthermore you cannot connect the HDMI OUT high definition multimedia interface out jack to DVI digital visual interface jacks that are not HDCP high bandwidth digital content protection compliant e g DVI digital visual interface jacks on PC displays Control unit stand cover Draw t...

Страница 38: ...an accept both the digital and analog signals Digital signals have priority over analog signals If the digital signal ceases the analog signal will be processed after 2 seconds Tip When connecting the digital optical cord insert the connector until it clicks OPTICAL DIGITAL OUT VIDEO 1 VIDEO 2 VIDEO 2 TV VIDEO 1 AUDIO IN AUDIO IN DIGITAL IN OPTOCAL L R DIGITAL IN DIGITAL IN COAXIAL COAXIAL ECM AC1...

Страница 39: ...AXIAL DIGITAL OUT VIDEO 1 VIDEO 2 VIDEO 2 TV VIDEO 1 AUDIO IN AUDIO IN DIGITAL IN OPTOCAL L R DIGITAL IN DIGITAL IN COAXIAL COAXIAL ECM AC1 CENTER INPEDANCE USE 4 FRONT L FRONT R FM 75 COAXIAL AM VIDEO IN Y PB CB PR CR VIDEO IN VIDEO 1 COMPONENT VIDEO OUT DIR T1 VIDEO 2 SPEAKER EURO AV OUTPUT TO TV SYSTEM CONTROL VCR digital satellite receiver or PlayStation 2 etc To the digital coaxial output jac...

Страница 40: ...cord be sure to match the color coded sleeves to the appropriate jacks on the components If you connect a digital satellite receiver with an DIGITAL OUT COAXIAL jack The digital satellite receiver can be connected to the VIDEO 1 or 2 DIGITAL IN COAXIAL jack instead of the VIDEO 1 or 2 AUDIO IN jacks of the system The system can accept both the digital and analog signals Digital signals have priori...

Страница 41: ...nd the system is ready for loading the disc 4 Load a disc Push the disc into the disc slot until the disc is pulled in automatically Basic Operations Playing Discs 1 Z 1 H Disc slot FUNCTION VOLUME x Soft touch buttons indicators N x FUNCTION VOLUME These buttons function when the soft touch button indicators are lit When any soft touch button is touched the indicators light up then touch the desi...

Страница 42: ...be used except for DivX video files DVD VIDEOs DVD RWs DVD Rs DVD RWs DVD Rs only The button can be used except for DivX video files Note You may not be able to use the Instant Replay or Instant Advance function with some scenes To Press Stop x on the remote or x soft touch button on the control unit Pause X Resume play after pause X or H Go to the next chapter track or scene except for JPEG Go ba...

Страница 43: ...g connection and VIDEO 1 or 2 DIGITAL IN COAXIAL jack digital connection at the same time the digital connection takes priority When you connect the TV to the TV DIGITAL IN OPTICAL jack digital connection the digital connection takes priority over the analog connection EURO AV connection Changing the input level of the sound from connected components You can change the input sensitivity of the AUD...

Страница 44: ...to select a setting The default setting is underlined ON attenuates the input level Set this if distortion occurs during listening OFF normal input level Set this if the input level is low 5 Press 6 Press AMP MENU The AMP menu turns off ...

Страница 45: ... TV sound or stereo sound of a 2 channel source from the 6 speakers select the Pro Logic II Movie or Pro Logic II Music sound field For details of sound field see page 47 Note When you use both the VIDEO 1 or 2 AUDIO IN jacks analog connection and VIDEO 1 or 2 DIGITAL IN COAXIAL jack digital connection at the same time the digital connection takes priority When you connect the TV to the TV DIGITAL...

Страница 46: ...pears in the front panel display The default setting is underlined Auto selects the mode automatically to produce the sound effect depending on the disc Movie provides the sound for movies Music provides the sound for music Tip When the movie or music mode is selected MOVIE or MUSIC is displayed in the front panel display Selecting the Movie or Music Mode MOVIE MUSIC ...

Страница 47: ...rom multiple speakers Note The sound is not output from multiple speakers depending on the source Outputting 2 channel sources like CDs by 5 1channel x Dolby Pro Logic II MOVIE MUSIC Dolby Pro Logic II produces five full bandwidth output channels from 2 channel sources This is done using an advanced high purity matrix surround decoder that extracts the spatial properties of the original recording ...

Страница 48: ...ion in your listening room by shifting the sound of the front speakers into the screen Cinema Studio Reverberation Reproduces the reverberations peculiar to a movie theater Cinema Studio EX is the integrated mode which operates these elements simultaneously Note The virtual speaker effect may cause increased noise in the playback signal When listening with sound fields that employ virtual speakers...

Страница 49: ...il Bass Level or Treble Level appears in the front panel display Bass Level adjusts the bass level 6 6 1 increments Treble Level adjusts the treble level 6 6 1 increments 2 Press X x to adjust The adjusted value appears in the front panel display 3 Press Adjusting the Bass and Treble Level BASS TREBLE X x ...

Страница 50: ...return to the normal playback speed press H Each time you press m or M during Slow motion Play the playback speed changes Two speeds are available With each press the indication changes as follows Playback direction 2 y 1 Opposite direction DVD VIDEO DVD RW only 2 y 1 Playing one frame at a time Freeze Frame except for Super Audio CD CD MP3 and JPEG When the system is in the pause mode press C STE...

Страница 51: ...APTER TIME TEXT Select TIME TEXT to search for a starting point by inputting the time code x When playing a VIDEO CD Super VCD without PBC Playback TRACK INDEX x When playing a VIDEO CD Super VCD with PBC Playback SCENE x When playing a Super Audio CD TRACK INDEX x When playing a CD TRACK x When playing a DATA CD MP3 audio ALBUM TRACK x When playing a DATA CD JPEG file ALBUM FILE x When playing a ...

Страница 52: ...minutes and 20 seconds after the beginning just enter 2 10 20 Tip When the Control Menu display is turned off you can search for a chapter DVD VIDEO DVD RW track VIDEO CD Super Audio CD CD or file DATA CD DATA DVD DivX video by pressing the number buttons and Note You cannot search for a scene on a DVD RW DVD R using the time code You can divide the screen into 9 subscreens and find the desired sc...

Страница 53: ...top the disc the system remembers the point where you pressed x and Resume appears in the front panel display As long as you do not remove the disc Resume Play will work even if the system enters standby mode by pressing 1 1 While playing a disc press x to stop playback Resume appears in the front panel display If Resume does not appear Resume Play is not available 2 Press H The system starts play...

Страница 54: ...ly the same point The point where you stopped playing may be cleared when you eject the disc the system enters standby mode DATA CD DATA DVD only you change or reset the settings on the Setup Display you change the function by pressing FUNCTION you disconnect the AC power cord mains lead For DVD Rs DVD RWs in VR mode VIDEO CDs CDs Super Audio CDs DATA CDs and DATA DVDs the system remembers the res...

Страница 55: ... is turned off To change or cancel a program 1 Follow steps 1 to 3 of Creating Your Own Program 2 Select the program number of the track you want to change or cancel using X x If you want to delete the track from the program press CLEAR 3 Follow Step 5 for new programming To cancel a program select under T then press To cancel all of the tracks in the programmed order 1 Follow steps 1 to 3 of Crea...

Страница 56: ...d ON shuffles tracks selected in Program Play x When playing a DATA CD except for DivX or DATA DVD except for DivX ON shuffles MP3 audio tracks in the album on the current disc When no album is selected the first album will play in random order Note A track already played is also selected in random order 4 Press Shuffle Play starts To return to normal play Press CLEAR or select OFF in Step 3 To tu...

Страница 57: ...epeats the current track x When playing a DATA CD or DATA DVD OFF does not play repeatedly DISC repeats all of the albums on the disc ALBUM repeats the current album TRACK MP3 audio tracks only repeats the current track FILE DivX video files only repeats the current file 4 Press The item is selected To return to normal play press CLEAR or select OFF in Step 3 To turn off the Control Menu Press DIS...

Страница 58: ...ge 3 Press When playing a DVD VIDEO or DATA CD DATA DVD DivX video files recorded in multiple audio formats PCM Dolby Digital MPEG audio or DTS you can change the audio format If the DVD VIDEO is recorded with multilingual tracks you can also change the language With VIDEO CDs CDs DATA CDs or DATA DVDs you can select the sound from the right or left channel and listen to the sound of the selected ...

Страница 59: ...ontained on the disc The format is shown in the display x When playing a Super VCD The default setting is underlined 1 STEREO the stereo sound of the audio track 1 1 1 L the sound of the left channel of the audio track 1 monaural 1 2 R the sound of the right channel of the audio track 1 monaural 2 STEREO the stereo sound of the audio track 2 2 1 L the sound of the left channel of the audio track 2...

Страница 60: ...ound audio signals LFE Low Frequency Effect signal Some DVD Rs DVD RWs in VR Video Recording mode have two types of titles for playback originally recorded titles ORIGINAL and titles that can be created on recordable DVD players for editing PLAY LIST You can select the type of title to be played 1 Press DISPLAY when the system is in stop mode The Control Menu appears 2 Press X x to select ORIGINAL...

Страница 61: ...en press or c 3 Press X x to select a setting The default setting is underlined DETAIL displays information fully such as the kind of disc track number repeat mode information radio frequency etc for the selected function For details of the displayed information see Front Panel Display page 115 STANDARD displays information such as the kind of disc track number etc for the selected function more b...

Страница 62: ...playing a VIDEO CD without PBC functions Super Audio CD or CD 1 Playing time and number of the current track 2 Remaining time and number of the current track 3 Playing time of the disc 4 Remaining time of the disc 5 Disc name 6 Track and index VIDEO CD only When playing a DATA CD MP3 audio or DATA DVD MP3 audio 1 Playing time and number of the current track 2 Track file name Tip When playing VIDEO...

Страница 63: ...urrent file Note Only alphabetical letters and numbers can be displayed Depending on the type of disc being played the system can only display a limited number of characters Also depending on the disc not all text characters will be displayed Checking the play information of the disc To check DVD Super Audio CD CD text Press DISPLAY repeatedly in Step 2 to display text recorded on the DVD Super Au...

Страница 64: ... Industries Association JEITA Tip Date information is DD MM YYYY DD Day MM Month YYYY Year Date information differs depending on the area If various angles multi angles for a scene are recorded on a DVD VIDEO you can change the viewing angle Press ANGLE during playback Each time you press ANGLE the angle changes Note Depending on the DVD VIDEO you may not be able to change the angle even if multi ...

Страница 65: ... has an AVI or DIVX extension and contains subtitle information within the same file When the sound does not match the pictures on the screen you can adjust the delay between the picture and sound 1 Press AMP MENU 2 Press X x repeatedly until A V SYNC appears in the front panel display then press or c 3 Press X x to select a setting The default setting is underlined OFF does not adjust SHORT adjus...

Страница 66: ...layback area Note You cannot change the playback area during playback Selecting a playback layer when playing a hybrid Super Audio CD Some Super Audio CDs consist of an HD layer and a CD layer You can select the playback layer you want to listen to Press SA CD CD when the system is in stop mode Each time you press the button an HD layer or a CD layer is alternately selected When playing a CD layer...

Страница 67: ...format or video CD format are recorded in the first session only the first session will be played back Note The system cannot play some DATA CDs DATA DVDs created in the Packet Write format MP3 audio track or JPEG image file that the system can play The system can play the MP3 audio tracks or JPEG image files which have the extension MP3 MP3 audio track or JPG JPEG JPEG image file which conform to...

Страница 68: ...layback Note Playback order may differ from the illustration depending on the software you use to create the DATA CD or DATA DVD or if there are more than 200 albums and 300 files in each album The system can recognize up to 200 albums and will not play any albums beyond the 200th The system may take longer time to playback when progressing to the following album or jump to other album Some type o...

Страница 69: ...lay Press O RETURN To turn off the display Press DVD MENU Selecting a JPEG image file or album 1 Load a DATA CD or DATA DVD The system starts playing from the first album 2 Press DVD MENU The albums recorded on the DATA CD or DATA DVD appear When an album is being played its title is shaded 3 Press X x to select an album x When selecting an album Press H to start playing the selected album x When ...

Страница 70: ...o normal view To stop playback Press x Tip A scroll box is displayed at the right side of the screen To display the additional image files select the bottom image and press x To return to the previous image select the top image and press X You can play a slide show with sound by first placing both MP3 and JPEG files in the same album on a DATA CD or DATA DVD When you play back the DATA CD or DATA ...

Страница 71: ...not work when AUDIO MP3 is selected If you play large MP3 track data and JPEG image data at the same time the sound may skip It is recommended that you set the MP3 bit rate to 128 kbps or lower when creating the file If the sound still skips then reduce the size of the JPEG file Specifying the slide show duration JPEG only When you play JPEG image files using slide show you can specify the duratio...

Страница 72: ... Video Files DivX is a video file compression technology developed by DivX Inc This product is an official DivX Certified product You can play DATA CDs and DATA DVDs that contain DivX video files DATA CDs and DATA DVDs that the system can play Playback of DATA CDs CD ROMs CD Rs CD RWs and DATA DVDs DVD ROMs DVD Rs DVD RWs DVD Rs DVD RWs on this system is subject to certain conditions With DATA CDs...

Страница 73: ...kip or not match the pictures on the screen The system cannot play some DivX video files that are longer than 3 hours Depending on the DivX video file the picture may pause or be unclear In which case it is recommended that you create the file at a lower bit rate If the sound is still noisy MP3 is the recommended audio format Note however this system does not conform to WMA Windows Media Audio for...

Страница 74: ... many times as the preset number The following occurrences are counted when the system is turned off when another file is played when the disc tray is opened With PBC Playback Control functions you can enjoy simple interactive operations search functions and other such operations PBC playback allows you to play VIDEO CDs interactively by following the menu on the TV screen 1 Start playing a VIDEO ...

Страница 75: ...CT in the instructions supplied with the disc In this case press H Tip To play without using PBC press or the number buttons while the system is stopped to select a track then press H or The system starts continuous play You cannot play still pictures such as a menu To return to PBC playback press x twice then press H ...

Страница 76: ...program appear in the front panel display 3 Press TUNER MENU 4 Press X x repeatedly until Memory appears in the front panel display 5 Press A preset number appears in the front panel display 6 Press X x to select the preset number you want 7 Press The station is stored 8 Press TUNER MENU 9 Repeat 1 to 8 to store other stations To change the preset number Restart from Step 1 Tuner Functions Presett...

Страница 77: ...en to For example to input 98 00MHz press the number buttons in the following order 9 t 8 t 0 t 0 3 Press Tip If an FM program is noisy press FM MODE so that MONO appears in the front panel display There will be no stereo effect but the reception will improve Press the button again to restore the stereo effect Or press TUNER MENU and select FM Mode by pressing X x then press Press X x to select MO...

Страница 78: ...dcasting service that allows radio stations to send additional information along with the regular program signal This tuner offers convenient RDS features such as station name display RDS is available only for FM stations Note RDS may not work properly if the station you are tuned to is not transmitting the RDS signal properly or if the signal strength is weak Not all FM stations provide RDS servi...

Страница 79: ...te TV CH RETURN TV VOL TV MENU TOOLS TV VIDEO Number buttons TV TV 1 TV mode indicator Manufacturer Code number SONY 501 default 502 ADMIRAL 510 535 542 AIWA 501 536 539 AKAI 503 AOC 503 BCLL HOWELL 535 542 BROKSONIC 503 CROSLEX 518 CURTIS MATHES 503 551 566 567 DAEWOO 503 504 505 506 507 515 DAYTRON 517 EMERSON 503 517 FISHER 508 545 FUJITSU 528 FUNAI 548 GENERAL ELECTRIC 503 509 510 GOLDSTAR LG ...

Страница 80: ...DECH 503 514 WARDS 503 517 566 ZENITH 542 543 567 Manufacturer Code number SONY 802 821 822 823 824 825 865 AMSTRAD 845 846 BSKYB 862 GRUNDING 859 860 HAMLIN REGAL 836 837 838 839 840 HUMAX 846 847 JERROLD 830 831 JERROLD GI 806 807 808 809 810 811 812 813 814 MOTOROLA 807 819 NOKIA 851 853 854 864 OAK 841 842 843 PACE 848 849 850 852 862 863 864 PANASONIC 816 826 833 834 835 855 PHILIPS 830 831 8...

Страница 81: ...ou successfully set the TV s input source code the TV button flashes twice slowly If the setting is unsuccessful the TV button flashes 5 times quickly Set your TV s input to the input you used to connect the system For details see the instructions of your TV Using the THEATRE SYNC Function TV CH BASS TREBLE TV VIDEO Number buttons CLEAR TV THEATRE SYNC SOUND FIELD MOVIE MUSIC By pressing Number TV...

Страница 82: ...tion may not work Install the system near the TV Keep the remote pointed in the direction of the TV and this system while the TV button is flashing Keep the remote pointed in the direction of the TV and this system while entering the code You can enjoy multiplex broadcast sound when the system receive the Dolby Digital multiplex broadcast signal Press AUDIO Press AUDIO repeatedly until the signal ...

Страница 83: ...g to music You can preset the time in 10 minutes decrements Press SLEEP Each time you press this button the minutes display the remaining time changes as follows When you set timer c appears in the front panel display To check the remaining time Press SLEEP once To change the remaining time Press SLEEP repeatedly to select the desired time To cancel the Sleep Timer function Press SLEEP repeatedly ...

Страница 84: ...display Press DIMMER Each time you press DIMMER the brightness of the front panel changes as follows Changing the Brightness of the Front Panel Display DIMMER With the cover opened t Dimmer off off r Dimmer 1 Medium brightness r Dimmer 2 Minimum brightness ...

Страница 85: ...sert the disc you want to lock If the disc is playing press x to stop playback 2 Press DISPLAY while the system is in stop mode The Control Menu appears 3 Press X x to select PARENTAL CONTROL then press The options for PARENTAL CONTROL appear 4 Press X x to select ON t then press x If you have not entered a password The display for registering a new password appears Enter a 4 digit password using ...

Страница 86: ...TROL display asks you for your password then press The display will ask you to enter a new 4 digit password Limiting playback for children PARENTAL CONTROL DVD VIDEO only Playback of some DVD VIDEOs can be limited according to a predetermined level such as the age of the users The PARENTAL CONTROL function allows you to set a playback limitation level 1 Press DISPLAY while the system is in stop mo...

Страница 87: ...s complete The lower the value the stricter the limitation To turn off the Parental Control function Set LEVEL to OFF in Step 8 To play a disc for which Parental Control is set 1 Insert the disc and press H The display for entering your password appears 2 Enter your 4 digit password using the number buttons then press The system starts playback Tip If you forget your password remove the disc and r...

Страница 88: ...en press The options for PARENTAL CONTROL appear 3 Press X x to select PASSWORD t then press The display for entering the password appears 4 Enter your 4 digit password using the number buttons then press 5 Enter a new 4 digit password using the number buttons then press 6 To confirm your password re enter it using the number buttons then press If you make a mistake entering your password Press C ...

Страница 89: ...BRATION display appears 6 Press X x to select YES then press to start AUTO CALIBRATION Be quiet during the measurement Note Avoid being in the measurement area and making noise during the measurement about 1 minute to avoid measurement failure During the measurement test signals are output from the speakers Reflections from walls or the floor may affect measurements When you install the surround s...

Страница 90: ...NTER SUBWOOFER SURROUND L SURROUND R If OK unplug calibration mic and select YES YES 4 8m 0 0dB 4 8m 0 0dB 4 8m 1 0dB 4 8m 4 0dB 3 0m 2 0dB 3 0m 2 0dB Measurement complete NO Check speaker connection Retry YES Measurement failure NO Error message Symptoms and remedies Check calibration mic connection No channel sound can be detected Check that the calibration mic is connected properly If the calib...

Страница 91: ...Press X x to select the setup item from the displayed list LANGUAGE SETUP SCREEN SETUP CUSTOM SETUP or SPEAKER SETUP Then press The Setup item is selected Example SCREEN SETUP 5 Select an item using X x then press The options for the selected item appear Example TV TYPE Using the Setup Display X x DISPLAY 1 2 2 7 QUICK QUICK RESET DVD VIDEO BNR 1 8 3 4 CUSTOM T 0 0 0 0 2 LANGUAGE SETUP MENU AUDIO ...

Страница 92: ...itle recorded on the DVD VIDEO When you select AUDIO FOLLOW the language for the subtitles changes according to the language you selected for the sound track Tip If you select OTHERS t in MENU AUDIO and SUBTITLE select and enter a language code from Language Code List page 113 using the number buttons Note When you select a language in MENU AUDIO or SUBTITLE that is not recorded on the DVD VIDEO o...

Страница 93: ... the video signals that are suitable for the TV When the HDMI indicator on the front panel lights up images from the S VIDEO OUT jack is enlarged vertically Except when 720 480p is selected x YCBCR RGB HDMI Selects the type of HDMI signal output from HDMI OUT jack Note If the playback picture becomes distorted set YCBCR to RGB If the HDMI OUT jack is connected to equipment with a DVI jack RGB sign...

Страница 94: ... TYPE in SCREEN SETUP to 16 9 page 93 Adjust to watch 4 3 aspect ratio progressive signals If you can change the aspect ratio on your progressive format compatible TV change the setting on your TV not the system Note that this setting is effective only for HDMI connection or progressive signals output from the COMPONENT VIDEO OUT jacks Note This setting is effective only when PROGRE AUTO PROGRESSI...

Страница 95: ... that the picture will not be clear or no picture will appear if you select these settings when either of the above conditions are not met x PROGRE VIDEO PROGRESSIVE VIDEO Select this setting when your TV accepts progressive signals and the TV is connected to the COMPONENT VIDEO OUT jacks and you want to fix the conversion method to PROGRESSIVE VIDEO for video based software Select this if the ima...

Страница 96: ...hey are output in the interlace format Use this to set up playback related and other settings Select CUSTOM SETUP in the Setup Display To use the display see Using the Setup Display page 91 The default settings are underlined x PAUSE MODE DVD VIDEO DVD RW only Selects the picture in pause mode x TRACK SELECTION DVD VIDEO only Gives the sound track which contains the highest number of channels prio...

Страница 97: ...d TV with the HDMI cord and AUTO or PCM is selected AUDIO DRC A V SYNC BASS TREBLE MOVIE MUSIC and sound field are not applied to the sound that is output from the TV x DivX Displays the registration code for this system For more information go to http www divx com on the Internet ON Stores the resume settings in memory for up to 40 discs OFF Does not store the resume settings in memory Playback r...

Страница 98: ... Be sure to change the value in the Setup Display when you move the speakers When you perform the Quick Setup page 29 the default settings are changed x DISTANCE SURROUND The default distance setting for the speakers in relation to the listening position is shown below When you set the distance using the Quick Setup page 29 the settings is automatically displayed Settings for the Speakers SPEAKER ...

Страница 99: ...LUME touch panel button on the control unit x TEST TONE The speakers will emit a test tone to adjust LEVEL FRONT and LEVEL SURROUND Adjusting the speaker level by using the test tone L R 3 0 m appears when you set SURROUND to YES in the CONNECTION setting Surround speaker distance from the listening position can be set in 0 2 meter increments from 0 0 to 7 0 meters L R 0 0 dB Set this between 15 0...

Страница 100: ...adjustments 9 Press X x repeatedly to select TEST TONE then press 10Press X x repeatedly to select OFF then press Note When you adjust the speaker settings the sound cuts off for a moment The test tone signals are not output from the HDMI OUT jack Placing the surround speaker L in the R position Depending on the location of the wall outlet mains you can also place the surround speaker L with the I...

Страница 101: ...setting the system as it takes a few seconds to complete Note When you turn the system on after resetting and no disc is in the control unit the guide message appears on the TV screen To perform the Quick Setup page 29 press to return to normal screen press CLEAR Returning the sound field settings or radio settings to the default 1 Press 1 to turn on the system 2 While pressing x press FUNCTION an...

Страница 102: ... you don t the disc may be damaged If anything falls into the cabinet unplug the unit and have it checked by qualified personnel before operating it any further On adjusting volume Do not turn up the volume while listening to a section with very low level inputs or no audio signals If you do the speakers may be damaged when a peak level section is suddenly played On cleaning Clean the cabinet pane...

Страница 103: ... Power The power is not turned on Check that the AC power cords mains leads of the subwoofer and the AC adaptor is connected securely The 1 indicator on the control unit flashes Press 1 to turn off the system and check the following items Are the and speaker cords short circuited Are you using only the specified speakers Is anything blocking the ventilation holes of the system After checking the a...

Страница 104: ...atio on the disc is fixed Color irregularity occurs on the TV screen All speakers in this system are magnetically shielded to prevent magnetic leakage However some leakage may occur as a high strength magnet is employed If this happens check the following items If the speakers are used with a CRT based TV or projector install the speakers at least 0 3 m 1 0 ft from the TV set If the color irregula...

Страница 105: ...in a place exposed to direct sunlight or strong light such as an incandescent lamp Clean the surface of the IR transmitter and IR receiver of the surround speaker L Operation Radio stations cannot be tuned in Check that the antenna aerial is connected securely Adjust the antenna aerial or connect an external antenna aerial if necessary The signal strength of the stations is too weak when tuning in...

Страница 106: ...tem can only display numbers and letters of the alphabets Other characters are displayed as A disc does not start playing from the beginning Program Play Shuffle Play or Repeat Play has been selected Press CLEAR to cancel these functions before playing a disc Resume Play has been selected During stop press x on the control unit or the remote and then start playback page 53 The title DVD or PBC men...

Страница 107: ...s appears on the screen or the front panel display In this case check the following table When displaying the version number on the screen When you turn on the system the version number VER X XX X is a number may appear on the screen Although this is not a malfunction and for Sony service use only normal system operation will not be possible Turn off the system and then turn on the system again to...

Страница 108: ...Hz AM tuner section Tuning range 531 1 602 kHz with the interval set at 9 kHz Antenna aerial AM loop antenna aerial Intermediate frequency 450 kHz Video section Outputs EURO AV VIDEO 1 Vp p 75 ohms R G B 0 7 Vp p 75 ohms COMPONENT Y 1 Vp p 75 ohms PB CB PR CR 0 7 Vp p 75 ohms Inputs VIDEO 1 1 Vp p 75 ohms VIDEO 2 1 Vp p 75 ohms Speakers Front Speaker system Closed magnetically shielded Speaker uni...

Страница 109: ...40 V AC 50 60 Hz Power consumption 45 W Dimensions approx 219 44 82 mm w h d Mass approx 0 7 kg Design and specifications are subject to change without notice Unpacking Control unit 1 Speakers 5 Subwoofer 1 AC adaptor 1 AM loop antenna aerial 1 FM wire antenna aerial 1 Speaker cords 5 m 2 3 5 m 1 10 m 1 Remote Commander remote 1 R6 size AA batteries 2 Calibration mic 1 Posts 4 Bases 4 Speaker adap...

Страница 110: ... frequency band allocated by the IEC International Electronic Committee and JEITA Japan Electronics and Information Technology Industries Association for hi fi audio transmission applications See Fig 1 DivX Digital video technology created by DivX Inc Videos encoded with DivX technology are among the highest quality with a relatively small file size Dolby Digital This movie theater sound format is...

Страница 111: ...n Video mode have the same format as a DVD VIDEO while discs created in VR Video Recording mode allow the contents to be programmed or edited DVD RW A DVD RW plus RW is a recordable and rewritable disc DVD RWs use a recording format that is comparable to the DVD VIDEO format File A JPEG image or a DivX video on a DATA CD DATA DVD File is an exclusive definition for this system A single file consis...

Страница 112: ... system or DVD disc according to the sales region Each region code is shown on the system as well as on the disc packaging The system can play discs that match its region code The system can also play discs with the mark Even when the region code is not shown on the DVD the region limit may still apply Scene On a VIDEO CD with PBC playback control functions the menu screens moving pictures and sti...

Страница 113: ...1347 Maori 1349 Macedonian 1350 Malayalam 1352 Mongolian 1353 Moldavian 1356 Marathi 1357 Malay 1358 Maltese 1363 Burmese 1365 Nauru 1369 Nepali 1376 Dutch 1379 Norwegian 1393 Occitan 1403 Afan Oromo 1408 Oriya 1417 Punjabi 1428 Polish 1435 Pashto Pushto 1436 Portuguese 1463 Quechua 1481 Rhaeto Romance 1482 Kirundi 1483 Romanian 1489 Russian 1491 Kinyarwanda 1495 Sanskrit 1498 Sindhi 1501 Sangho 1...

Страница 114: ...5 C 1 standby indicator 41 D DOLBY DIGITAL indicator E DTS indicator F DOLBY PRO LOGIC II indicator G D C S indicator H remote sensor 9 I 1 on standby 41 J Disc slot 41 K Z eject DISC indicator 41 L HDMI OUT jack 35 M Soft touch buttons N x FUNCTION VOLUME 41 When you press the soft touch buttons qd the soft touch indicators 1 light up Index to Parts and Controls ...

Страница 115: ...puts the progressive signals page 95 Lights up when the sleep timer is set page 83 Lights up when the HDMI OUT jack is correctly connected to HDCP high bandwidth digital content protection compliant device with HDMI or DVI digital visual interface input page 35 SA CD 20 MULTI PBC MUSIC REP1 TRK 28 11 Playing status Current track number Playing time remaining time Current mode Lights up when the MO...

Страница 116: ...08 00MHz Monaural Stereo effect page 77 Lights up when the sleep timer is set page 83 Lights up when a station is received Current band and preset number Current station Lights up during the Auto tuning page 77 CD 1 23 45 Playing status Playing disc Playing time CD REP1 No Audio Playing status Current mode Playing disc ...

Страница 117: ...J COMPONENT VIDEO OUT jacks 35 K DIR T1 jack 21 L SPEAKER jacks 21 M SYSTEM CONTROL jack 21 N EURO AV T OUTPUT TO TV jack 35 O FM 75Ω COAXIAL jack 21 VIDEO 1 VIDEO 2 VIDEO 2 TV VIDEO 1 AUDIO IN AUDIO IN DIGITAL IN OPTOCAL L R DIGITAL IN DIGITAL IN COAXIAL COAXIAL ECM AC1 CENTER INPEDANCE USE 4 FRONT L FRONT R FM 75 COAXIAL AM VIDEO IN Y PB CB PR CR VIDEO IN VIDEO 1 COMPONENT VIDEO OUT DIR T1 VIDEO...

Страница 118: ...THEATRE SYNC 82 Z TV VIDEO 80 wj ENTER1 29 43 51 76 85 wk BASS TREBLE 49 wl DVD MENU 58 TOOLS3 80 e DISPLAY 31 51 85 120 TV MENU3 80 ea H play 2 41 53 es x stop 42 53 85 ed X pause 42 ef FUNCTION 2 41 43 76 TV CH 3 80 81 eg SUBTITLE 65 eh ANGLE 64 ej SA CD CD 66 ek NIGHT 83 el AMP MENU 43 100 124 r TUNER MENU 76 1 The ENTER wj button is the same function as the ENTER 0 button 2 The 5 H and FUNCTIO...

Страница 119: ...Additional Information 119GB AC adaptor A SA TSLF1H jack 23 B DIR R3 jack 32 C POWER indicator 28 D POWER 28 Surround speaker L A IR receiver 28 B IR status indicator 28 SA TSLF1H DIR R3 ...

Страница 120: ...ntrol Menu display The Control Menu display 1 and 2 will show different items depending on the disc type For details about each item see the pages in parentheses Example Control Menu display 1 when playing a DVD VIDEO Guide to the Control Menu Display DISPLAY Control Menu display 1 m Control Menu display 2 appears for certain discs only m Control Menu display off ...

Страница 121: ...n Relevant Disc Type TITLE page 51 SCENE page 51 TRACK page 51 Selects the title scene or track to be played CHAPTER page 51 INDEX page 51 Selects the chapter or index to be played INDEX page 51 Displays the index and selects the index to be played TRACK page 51 Selects the track to be played ORIGINAL PLAY LIST page 60 Selects the type of titles DVD RW DVD R to be played the ORIGINAL one or an edi...

Страница 122: ...dom order REPEAT page 57 Plays the entire disc all titles all tracks all albums repeatedly or one title chapter track album repeatedly PARENTAL CONTROL page 85 Sets to prohibit playback on this system SETUP page 91 QUICK Setup page 29 Use Quick Setup to choose the desired language of the on screen display the aspect ratio of the TV choose YES or NO to start the AUTO CALIBRATION CUSTOM Setup In add...

Страница 123: ...FULL NORMAL HDMI RESOLUTION 720 480p AUTO 1280 720p 1920 1080i YCBCR RGB HDMI YCBCR RGB LINE VIDEO RGB LANGUAGE SETUP OSD MENU SUBTITLE AUDIO SPEAKER SETUP CONNECTION FRONT CENTER SURROUND YES YES NONE YES SUBWOOFER YES LEVEL FRONT L CENTER 15 0 dB 10 0 dB TEST TONE OFF ON R 15 0 dB 10 0 dB NONE SUBWOOFER LEVEL SURROUND L 15 0 dB 10 0 dB R 15 0 dB 10 0 dB 15 0 dB 10 0 dB Select the language you wa...

Страница 124: ... AMP MENU on the remote The default settings are underlined ATTENUATE may not appear depending on the selected function AMP Menu List AMP menu SL SR REVERSE OFF ON ATTENUATE ON OFF INFORMATION MODE DETAIL STANDARD A V SYNC OFF SHORT LONG SIMPLE ...

Страница 125: ...verse 50 FILE 51 File 111 Film based software 111 Freeze Frame 50 Front panel display 62 115 H Handling discs 103 HDMI HDMI RESOLUTION 93 YCBCR RGB HDMI 93 HDMI high definition multimedia interface 36 111 I INDEX 51 INFORMATION MODE 61 Installing the IR Devices on a wall 33 Instant Advance 42 Instant Replay 42 INTERLACE 95 INTERVAL 71 IR transmitter 28 33 J JPEG 67 68 L Language Code List 113 LANG...

Страница 126: ...1 Setup Display 91 123 Shuffle Play 56 SL SR REVERSE 100 SLEEP 83 Slide Show 70 Slow motion Play 50 Soft touch button 41 Sound Field 47 SPEAKER SETUP 98 CONNECTION 98 DISTANCE 98 LEVEL 99 SUBTITLE 65 92 Super Audio CD 7 66 112 T TEST TONE 99 THEATRE SYNC 81 TIME TEXT 52 TITLE 51 Title 112 TRACK 51 Track 112 TRACK SELECTION 96 TREBLE 49 Troubleshooting 103 TV Hookup 35 TV TYPE 93 U Unpacking 109 Us...

Страница 127: ......

Отзывы: