background image

DSC-RX10_L2

2-1

2. REPAIR  PARTS  LIST

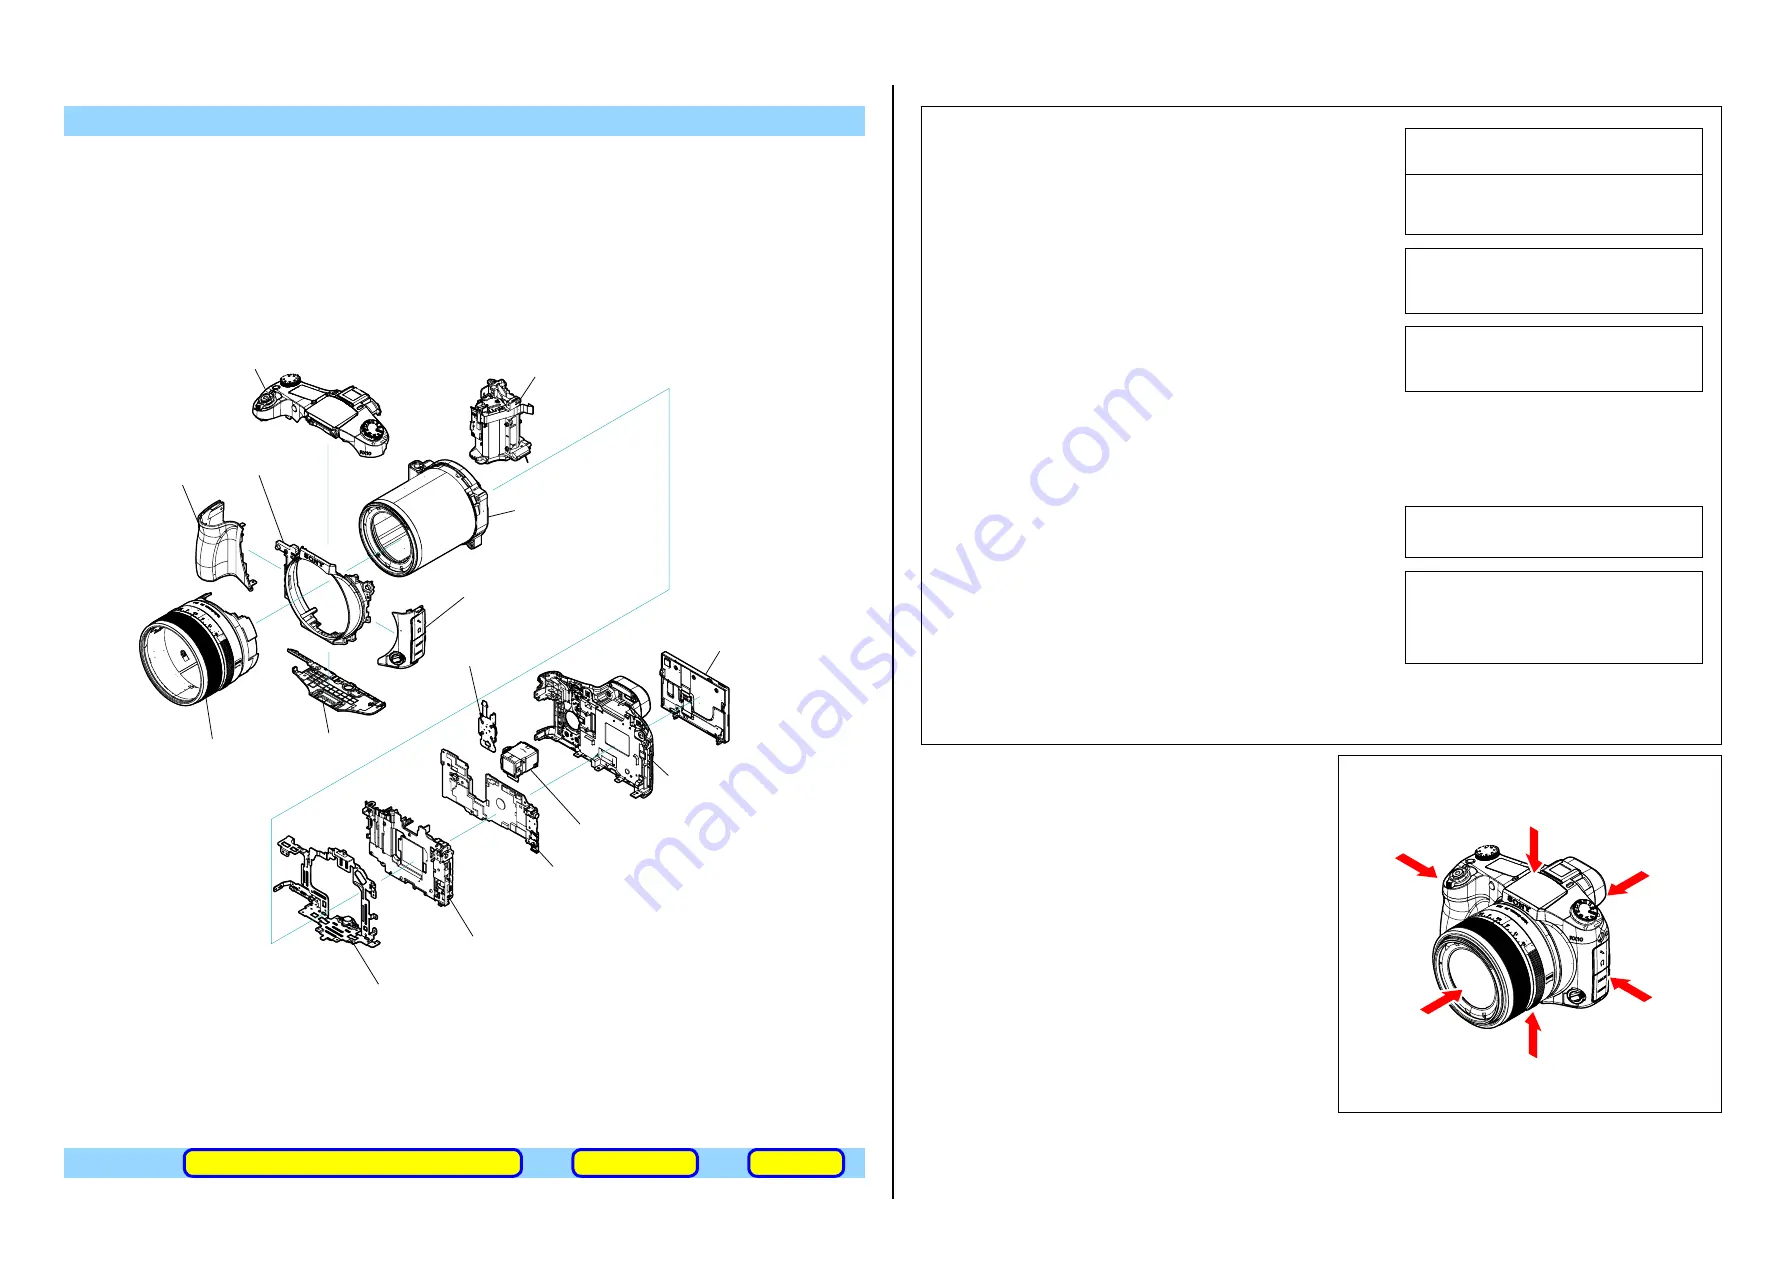
Follow the disassembly in the numerical order given.

IDENTIFYING  PARTS

Link

ACCESSORIES

DISCHARGING OF THE CHARGING CAPACITOR

ASSEMBLY

• WF-1002 Board

• CD-847 Flexible Board

• BT-2009 Flexible Board

• CN-1029 Flexible Board

• CN-1026 Flexible Board

• RL-1026 Flexible Board

• MI-2000 Flexible Board

• AF-2001 Flexible Board

• FL-2006 Flexible Board

• TP-1001 Board

3

 LCD BLOCK ASSY

2

 Cabinet Rear Block

6

 SY-1027 Board

9

 SY Holder Assy

5

 Control Switch 
 Block (BK77900)

q;

 Main Frame

qs

 BT Holder Block

7

 Cabinet Upper Block

8

 Grip (Front)

qg

 Cabinet (Front)

qa

 RL-1014 Board

qf

 Lens Ring Block 

qd

 Side Cover Block Assy

1

 Cabinet Bottom

4

 VF Unit Assy

• FR-1009 Flexible Board

• FC-1002 Flexible Board

(ENGLISH)

NOTE:
•  -XX, -X mean standardized parts, so they may have some differences from the 

original one.

•  Items marked “

*

” are not stocked since they are seldom required for routine service. 

Some delay should be anticipated when ordering these items.

•  The mechanical parts with no reference number in the exploded views are not 

supplied.

•  Due to standardization, replacements in the parts list may be different from the 

parts specified in the diagrams or the components used on the set.

• CAPACITORS:
 uF: 

μ

F

• COILS
 uH: 

μ

H

• RESISTORS
  All resistors are in ohms.
  METAL: metal-film resistor
  METAL OXIDE: Metal Oxide-film resistor
 F: 

nonflammable

• SEMICONDUCTORS
  In each case, u: 

μ

, for example:

 uA...: 

μ

A... , uPA... , 

μ

PA... ,

 uPB... 

μ

PB... , 

μ

PC... , 

μ

PC... ,

 uPD..., 

μ

PD...

The components identified by mark 

0

 or dotted line with 

mark 

0

 are critical for safety.

Replace only with part number specified.
Les composants identifiés par une marque 

0

 sont 

critiques pour la sécurité.
Ne les remplacer que par une pièce portant le numéro 
spécifié.

CAUTION

Danger of explosion if battery is incorrectly replaced.
Replace only with the same or equivalent type.
Dispose of used batteries according to the instructions.

注意

如果电池更换不当会有爆炸危险。
只能用同样类型或等效类型的电池来更换。
务必按照说明处置用完的电池。

•  Color Indication of Appearance Parts
 Example:
 

(SILVER) : Cabinet’s Color


(Silver)  : Parts Color

(JAPANESE)

【使用上の注意】 

•  ここに記載されている部品は,  補修用部品であるため,  回路図及びセットに付い

ている部品と異なる場合があります。

•  -XX, -Xは標準化部品のため, セットに付いている部品と異なる場合があります。
• 

*

印の部品は常備在庫しておりません。

•  コンデンサの単位でuFはμFを示します。
•  抵抗の単位Ωは省略してあります。
  金  被:金属被膜抵抗。
  サンキン:酸化金属被膜抵抗。
•   インダクタの単位でuHはμHを示します。
•   半導体の名称でuA..., uPA..., uPB..., uPC..., uPD...等はそれぞれμA..., μPA..., μPB..., 

μPC..., μPD...を示します。

0

印の部品,または

0

印付の点線で囲まれた部品は,

安全性を維持するために,重要な部品です。
従って交換時は,必ず指定の部品を使用してください。

注意

電池の交換は、正しく行わないと破裂する恐れがあり
ます。
電池を交換する場合には必ず同じ型名の電池又は同等
品と交換してください。
使用済み電池は、取扱指示に従って処分してください。

•  外装部品色表示
 

例:


(SILVER) :セットの色を表す。


(Silver)  :部品の色を表す。

• Abbreviation
  CH 

: Chinese model

  CND  : Canadian model
  HK 

: Hong Kong model

  J 

: Japanese model

  KR 

: Korea model

 RU  : 

Russian 

model

  TW   : Taiwan model

View Position

Right View

Left View

Front View

Bottom View

Top View

Back View

Содержание Cyber-shot DSC-RX10

Страница 1: ... History Contents S M Rev issued 1 0 2013 11 Official Release 2013K08 1 2013 11 ENGLISH 1 1 PRECAUTION ON REPLACING THE SY 1027 BOARD 1 2 NOTES ON REPLACING THE LENS 1 3 NOTES ON REMOVING INSTALLING THE IMAGER BOARD CD 847 FLEXIBLE BOARD 1 4 CHECKING THE Wi Fi FUNCTION 1 5 SELF DIAGNOSIS FUNCTION 1 6 PROCESS AFTER FIXING FLASH ERROR 1 7 ORNAMENTAL PLATE REPLACING METHOD 1 8 3 GROUP BLOCK ASSY REPL...

Страница 2: ...cted Setup manual Access method Infrastructure Mode NFC NFC Forum Type 3 Tag compliant AC Adaptor AC UB10 UB10B UB10C UB10D Power requirements AC 100 V to 240 V 50 Hz 60 Hz 70 mA Output voltage DC 5 V 0 5 A Operating temperature 0 C to 40 C 32 F to 104 F Storage temperature 20 C to 60 C 4 F to 140 F Dimensions Approx 50 mm 22 mm 54 mm 2 inches 7 8 inches 2 1 4 inches W H D Rechargeable Battery Pac...

Страница 3: ...lem perform the following safety checks before releasing the set to the customer 1 Check the area of your repair for unsoldered or poorly soldered connections Check the entire board surface for solder splashes and bridges 2 Check the interboard wiring to ensure that no wires are pinched or contact high wattage resistors 3 Look for unauthorized replacement parts particularly transistors that were i...

Страница 4: ...e downloaded Adjust Manual 3 Start the Adjust Manual and execute Wireless LAN check on the ADJUST tab 4 Perform the following operations for the unit to initialize MENU Reset Network Set OK 5 Perform the following operations for the unit to display MAC address MENU Disp MAC Address 6 Confirm that the displayed MAC address has been updated Applicable parts SY 1027 BOARD COMPLETE SERVICE WF 1002 BOA...

Страница 5: ...ck the size of the built in three Gate Boards If the thickness of a Gate Board is not 0 20 discard the Gate Board Prepare three Gate Boards B t 0 2 Sony Part No 4 410 540 01 and install them to the new lens 0 20 1 4 CHECKING THE Wi Fi FUNCTION Perform the following procedure to check the Wi Fi function Required equipment Windows personal computer with Wi Fi interface 1 Turn on the power of the uni...

Страница 6: ... 1027 board E 6 1 1 0 Zoom operations fault Cannot initialize zoom lens Retry turn the power on by the power switch Check the zoom reset sensor signal of lens block pin ej of CN3101 on the SY 1027 board when zooming is performed when the zoom button is operated If it is OK check the zoom motor drive IC IC3104 on the SY 1027 board E 6 1 3 0 Reset position detection error on the stepper iris initial...

Страница 7: ...き込んだ後に出荷されています 新品の補修用基板にはこれらのIDが書き込まれていないため 基板交換後にIDを入力する必要があります 補修用基板に交換した後はAdjust StationからAdjust Manualを起動し PRODUCT ID USB SERIAL No INPUT を実行させてIDを入 力してください Note 新しく プロダク トIDを入力すると 必ずしも基板交換前のIDと同じIDになるとは限りません 新しいIDと元のIDが違う場合にはお客様がユーザー登録さ れているIDと相違が出てしまう可能性があります MAC アドレスの更新 Wi Fi 搭載基板を交換した時 またはメイン IC CPU が搭載されている基板を交換した場合 IC の固有番号 MAC アドレス を取り 込み直す必要があります 下記の作業を実施して IC の固有番号 MAC アドレス を取り込み直してくだ...

Страница 8: ... 読み取ったデータは 交換終了後の調整時に使用します Adjust manualのADJUSTタブにある Lens data carryよりLOADを実施してください QRコード 1 3 イメージャ基板 CD 847フレキシブル基板 の取り外し 取り付け時の注意 CD 847フレキシブル基板 イメージャ は レンズに取り付ける際 あおり板によりあおり調整されています CD 847フレキシブル基板を取り外すときは 下記の事に注意して作業してください 1 レンズを交換しない作業の場合 例 分解清掃する場合 CD 847フレキシブル基板 イメージャ を交換する場合など 組み込まれているあおり板 3箇所 のサイズを確認 記録し 失くさないように保管する 組立時には あおり板を必ず元通りの位置に取り付ける 0 xx サイズ 注意 あおり板を紛失しないように注意してください あおり板を紛失してしまった...

Страница 9: ...能なワイヤレスネットワークとして 本機が検出されることを確認する 5 さらに接続可能なことを確認したい場合には本機とパソコンを接続後 コントロールパネルの ネットワークとインターネット ワイヤレスネットワークの管理 からネットワーク接続リストを開くと リストに本機が表示される 1 5 自己診断機能 1 5 1 自己診断機能について 本機の動作に不具合が生じたとき 自己診断機能が働き LCD 画面に どう処置したらよいか判断できる表示を行います 自 己診断機能については取扱説明書にも掲載されて います 1 5 2 自己診断表示 本機の動作に不具合が生じたとき LCD画面にアルファベッ トと4桁の数字が表示され 3 2Hzで点滅します この5文字の 表示によって対応者分類および不具合の生じたブロックの分 類 不具合の詳細コードを示します 0 0 C 2 3 対応者分類 1 5 3 自己診断コー...

Страница 10: ...ICの異常 手振れ補正用IC SY 1027基板IC3104 を点検または交換す る E 6 2 1 0 レンズ初期化異常 手振れ補正用IC SY 1027基板IC3104 を点検または交換す る E 6 2 1 1 レンズオーバーヒート PITCH 光学手振れ補正ブロックのホール素子 PITCH SY 1027基 板CN3101 5 7ピン を点検する 異常なければPITCH角速度センサ SY 1027基板SE3100 周 辺の回路を点検する E 6 2 1 2 レンズオーバーヒート YAW 光学手振れ補正ブロックのホール素子 YAW SY 1027基板 CN3101 9 qaピン を点検する 異常なければYAW角速度センサ SY 1027基板SE3100 周辺 の回路を点検する E 6 2 2 0 サーミスタの異常 光 学 手 振 れ 補 正 ブ ロ ッ ク の 温 度 セ ン サ S...

Страница 11: ...l the Ornamental Plate matching the cutout with the projection on the Filter Frame 1 Group Ornamental Plate Tapes 1 Group Ornamental Plate Tape Ornamental Plate Filter Frame Projection Cutout 1 8 3 GROUP BLOCK ASSY REPLACING METHOD Removal 1 Remove the three screws to detach the Zoom Gear Assy Zoom Gear Assy 2 Fully turn the gear of the Cam Tube counterclockwise 3 Remove the 1 Group Lens Frame Blo...

Страница 12: ... Lens Frame Block Assy Iris 3 4 Group Lens Frame Block Assy 4 Fully turn the Cam Tube clockwise and temporarily install the Zoom Gear Assy Cam tube Zoom Gear Assy 5 Remove the FG Retainer 6 Remove the Zoom Gear Assy Hooks FG Retainer Rib Rib Rib Zoom Gear Assy 7 Remove the four screws and pull the Flexible Board out of the hole of the Rear Tube Mirror Block Assy 8 Remove the Rear Tube Mirror Block...

Страница 13: ...me Block Assy Claw Claw 3 4 Group Lens Frame Block Assy Iris Unit Installation 1 Install the Iris Unit to the 3 4 Group Lens Frame Block Assy by locking the two claws and tightening a screw Claw Claw 3 4 Group Lens Frame Block Assy Iris Unit 2 Install the Straight Tube Block Assy to the Cam Tube and set the mark on the Straight Tube Block Assy at the position shown below Cam Tube Straight Tube Blo...

Страница 14: ...Assy Rib Rib 7 Install the Thrust Plate 8 Pull the Flexible Board out of the hole of the Rear Tube Mirror Block Assy and install the Rear Tube Mirror Block Assy with four screws Thrust Plate Flexible Board Hook Rear Tube Mirror Block Assy 9 Fully turn the Cam tube counterclockwise 10 Install the 2 Group Lens Frame Block Assy 11 Install the 1 Group Lens Frame Block Assy and fully turn the gear of t...

Страница 15: ...sistors are in ohms METAL metal film resistor METAL OXIDE Metal Oxide film resistor F nonflammable SEMICONDUCTORS In each case u μ for example uA μA uPA μPA uPB μPB μPC μPC uPD μPD The components identified by mark 0 or dotted line with mark 0 are critical for safety Replace only with part number specified Les composants identifiés par une marque 0 sont critiques pour la sécurité Ne les remplacer ...

Страница 16: ...1 Fig 2 Fig 3 OK The flexible board was plugged in straight and completely NG The flexible board was plugged in crooked NG The flexible board was not plugged in completely Flexible Board Flexible Board Connector Connector Reference line Flexible Board Connector Connector Flexible Board Reference line Connector Connector Flexible Board Flexible Board Reference line Fig 1 Fig 2 Fig 3 When opening th...

Страница 17: ...ow Preparing the Short Jig To preparing the short jig a small clip is attached to each end of a resistor of 1 kΩ 1 W 1 215 869 11 Wrap insulating tape fully around the leads of the resistor to prevent electrical shock 1 kΩ 1 W Wrap insulating tape 1 kΩ 1 W Wrap insulating tape Part code 1 215 869 11 C901 C902 R 1 kΩ 1 W Note High voltage cautions Discharging the Capacitor Short circuit between two...

Страница 18: ...1 1 118 124 11 ELECT 67uF 315V C902 1 116 488 11 ELECT 47 5uF 315V LCD902 8 753 379 22 ECX333AA 1 1 2 635 562 11 SCREW M1 7 2 2 635 562 31 SCREW M1 7 12 3 080 204 21 SCREW TAPPING P2 1 Remove in numerical order 1 to 9 in the left figure 2 The meaning of the symbol in left figure is as follows Be careful when you remove it X Solder DISASSEMBLY Screw 1 M1 7 X 2 5 Black 2 635 562 11 2 5 1 7 2 M1 7 X ...

Страница 19: ... 1 5 5 2 1 Back View Left View Right View Front View Screw 1 M1 7 X 2 5 Black 2 635 562 11 2 5 1 7 2 M1 7 X 4 0 Black 2 635 562 31 4 0 1 7 5 M1 7 X 3 5 Tapping Black 3 080 204 01 3 5 1 7 A B B A Claw Claw Claw Claw 57 56 53 55 58 58 59 59 60 52 51 61 54 2 2 BT1000 ANT901 Note 2 SP901 Note 3 2 1 1 1 5 5 5 3 3 4 1 2 Upper Cabinet Section See page 2 8 Front Cabinet Section 1 See page 2 6 BT1000 LITHI...

Страница 20: ... A t 0 14 4 410 539 61 SPACER PLATE A t 0 16 4 410 539 81 SPACER PLATE A t 0 18 4 410 540 01 SPACER PLATE B t 0 20 4 410 540 21 SPACER PLATE B t 0 22 4 410 540 41 SPACER PLATE B t 0 24 Note 2 When this part is removed adjustment is required For the adjustment method refer to Adjustment items after replacing parts in the Note tab of the Adjust manual Note 2 この部品を取り外したときは調整が必要です 調整方法についてはAdjust manu...

Страница 21: ...9 01 HOLDER JK 160 4 478 914 01 SHAFT JK LID 161 4 478 913 01 LID USB 162 4 478 912 01 LID MICROPHONE 163 A 1973 241 A COVER SIDE BLOCK ASSY 164 A 1973 076 A FR 1009 FLEXIBLE BOARD COMPLETE 165 4 478 911 01 CABINET FRONT 63720 166 4 488 347 01 SHEET FR FLEXIBLE BT901 1 780 858 11 TERMINAL BOARD BATTERY 2 2 635 562 31 SCREW M1 7 5 3 080 204 01 SCREW TAPPING P2 12 3 080 204 21 SCREW TAPPING P2 Screw...

Страница 22: ... M1 4 NEW TRUSTAR P2 Note Note 1 Refer to Assembly 5 Notes on assembling the Sheet Drop Protection A when assembling Note 1 組立時は Assembly 5 Notes on assembling the Sheet Drop Protection A を参照してく ださい Hooks A A B B C C D D ns ns ST Block Section See page 2 9 12 Note 1 12 12 12 1 5 5 26 202 204 207 201 206 205 Note 2 203 LCD903 Screw 1 M1 7 X 2 5 Black 2 635 562 11 2 5 1 7 5 M1 7 X 3 5 Tapping Black ...

Страница 23: ...2001 FLEXIBLE BOARD COMPLETE 252 A 1992 173 A MI 2000 FLEXIBLE BOARD COMPLETE SERVICE 253 A 1992 171 A ST BLOCK ASSY SERVICE 2 2 635 562 31 SCREW M1 7 12 3 080 204 21 SCREW TAPPING P2 A A ns ns ns ns ns ns ns ns ns ns 251 252 253 2 2 12 Screw 2 M1 7 X 4 0 Black 2 635 562 31 4 0 1 7 12 M1 7 X 5 0 Tapping Black 3 080 204 21 1 7 5 0 ...

Страница 24: ...ed Discard the screw removed once in servicing Instead use a new screw Note 1 このねじは再利用することができません サービス対応時に 一 度でも外した場合は新品のねじと交換してく ださい Screw 196 M1 4 X 2 0 Black 4 178 124 01 2 0 1 4 239 M1 4 X 1 4 Red 4 287 435 11 1 4 1 4 Claws Claws Claws 301 239 Note 1 239 Note 1 196 Note 1 239 Note 1 ns ns ns ns LCD901 Note 3 ns ns ns 302 306 308 303 Size 12 0 x 5 0 mm 304 307 309 305 Note 2 Note 2 Do not reuse ...

Страница 25: ...te 2 When this part is removed adjustment is required For the adjustment method refer to Adjustment items after replacing parts in the Note tab of the Adjust manual Note 2 この部品を取り外したときは調整が必要です 調整方法についてはAdjust manual の NoteタブにあるAdjust ment items after replacing parts を参照してください Screw 5 0 1 7 174 M1 7 X 5 0 Tapping Black 3 713 791 35 306 M1 4 X 4 0 Tapping Black 4 300 106 01 1 4 4 0 352 351 353 353 3...

Страница 26: ... 11 Instruction Manual SIMPLIFIED CHINESE 909 4 477 083 11 Instruction Manual ENGLISH 909 4 477 083 21 Instruction Manual ENGLISH FRENCH SPANISH 909 4 477 083 31 Instruction Manual ENGLISH RUSSIAN UKRAINIAN 909 4 477 083 41 Instruction Manual ENGLISH FRENCH ITALIAN SPANISH PORTUGUESE GERMAN DUTCH POLISH CZECH HUNGARIAN SLOVAK SWEDISH FINNISH NORWEGIAN DANISH 909 4 477 083 51 Instruction Manual ENG...

Страница 27: ...heet LCD 710 to the LC cabinet rear 710 Pass the LCD s Flexible Board through the LC cabinet rear 710 and push the entire LCD evenly together with the adhesive sheet LCD 710 for five seconds Check the following There shall be no gap of the panel There shall be no problem with the LCD after power on Assembly 4 Notes on assembling the SY Holder Assy Claw SY Holder Assy Assembly 5 Notes on assembling...

Страница 28: ...ip 2 Double click Setup msi 3 The installation window appears Click Next Adjust manual installation starts 4 The widow to choose the destination folder of the Adjust manual program appears Click Next 5 When Adjust manual is installed normally the confirmation window appears Click Close The installer is closed JAPANESE これらの機種で調整を行なうには アジャストマニュアルとアジャストステーションが必要です アジャストマニュアルとアジャストステーションのインストール方法詳細は H...

Отзывы: