background image

22

Before connecting your camera to your personal computer, install the USB driver to 
the computer. The USB driver is contained together with application software for 
viewing images on a CD-ROM which is supplied with your camera. 

For Windows 98 users

Note

Be sure to insert a “Memory Stick” into your camera before installing the USB driver. 
Otherwise, you will be unable to install the USB driver.

For Macintosh users

Installing the USB driver

1

Turn on your personal computer and allow Windows 98 to load.

2

Insert the supplied CD-ROM in the CD-ROM drive of your personal 
computer.

3

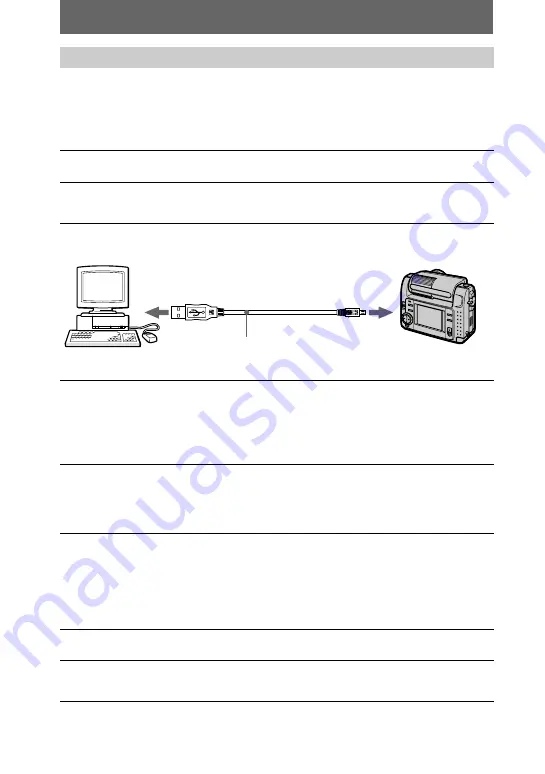
Connect the USB jack on your camera with the USB connector on 
your personal computer using the supplied USB cable.

4

Insert a “Memory Stick” into your camera, connect the AC power 
adaptor/charger and turn on your camera.

“PC MODE” appears on the LCD screen of your camera and the camera is set 
to communication standby mode. Your personal computer recognizes the 
camera, and the Windows 98 Add Hardware Wizard starts.

5

Follow the on-screen messages to specify the CD-ROM drive and 
install the USB driver.

The Add Hardware Wizard starts twice because two different USB drivers are 
installed. Be sure to allow the installation to complete without interrupting it.

1

Turn on your personal computer and allow the Mac OS to load.

2

Insert the supplied CD-ROM in the CD-ROM drive of your personal 
computer.

to the USB connector 

Personal computer

USB cable

Push in until the 
connector clicks 
into place 

to the USB jack

Содержание Cyber-shot DSC-F55V

Страница 1: ...3 062 820 12 1 Digital Still Camera Operating Instructions Before operating the unit please read this manual thoroughly and retain it for future reference DSC F55V 2000 Sony Corporation ...

Страница 2: ...s and inability to record images this may render the Memory Stick unusable or image data breakdown damage or loss may occur LCD screen and lens The LCD screen is manufactured using high precision technology However there may be some tiny black points and or bright points red blue or green in color that constantly appear on the LCD screen These points are normal in the manufacturing process and do ...

Страница 3: ...etting the distance to the subject 38 Using the PROGRAM AE function 38 Adjusting the exposure EXPOSURE 39 Adjusting the white balance WHITE BALANCE 40 Recording the date and time on the still image DATE TIME 40 Enjoying picture effects P EFFECT 41 B Various playback Playing back six images at once INDEX 42 Enlarging a part of the still image Zoom and trimming 43 Rotating a still image ROTATE 44 Pl...

Страница 4: ... recording F Lens G Tripod receptacle bottom surface Use a tripod with a screw length of less than 6 5 mm You will be unable to firmly secure the camera to tripods having longer screws and may damage the camera H OPEN BATT switch I Slot cover for AC power adaptor charger 9 J VOLUME button PROGRAM AE ADJ button K A V OUT jack 45 Audio output is monaural L DIGITAL I O USB jack 22 23 M Battery cover ...

Страница 5: ...n 38 E Control button F DISPLAY button G POWER switch POWER lamp H LCD screen I MODE selector 26 J T digital zoom button W digital zoom button K Speaker L Hook for the wrist strap M Memory Stick eject button N Access lamp 12 O Memory Stick cover qs 1 2 3 5 4 6 7 8 0 qa 9 qd qg qf Attaching the lens cap supplied and the wrist strap supplied Lens cap Wrist strap Lens cap strap ...

Страница 6: ...nfoLITHIUM battery pack S series InfoLITHIUM S series battery packs have the mark InfoLITHIUM is a trademark of Sony Corporation 1 Connect the AC power adaptor charger and the mains 2 Insert the battery pack in the direction of the v mark Slide the battery pack in the direction of the arrow The CHARGE lamp lights up when charging begins When the CHARGE lamp goes off normal charge is completed For ...

Страница 7: ...ou use a normally charged battery pack Notes The battery life and number of images will be decreased if you use your camera at low temperatures use the flash or repeatedly turn the power on off The capacity of the Memory Stick is limited The above figures are a guide when you continuously record play back while replacing the Memory Stick If sufficient battery remaining time is indicated but the po...

Страница 8: ...of use and the operating environment Auto power off function If you do not operate the camera for about three minutes during recording the camera turns off automatically to prevent wearing down the battery To use the camera again slide the POWER switch to turn on the camera again 1 Open the battery cover Open the cover while sliding the OPEN switch in the direction of the arrow 2 Install the batte...

Страница 9: ...close the cover When inserting the cable open the slot cover for AC power adaptor charger and be careful not to pinch the cable 3 Connect the other end of the DC connecting cable to the AC power adaptor charger 4 Connect the mains lead to the AC power adaptor charger and then to a mains AC VF10 AC power adaptor charger supplied DK 115 DC connecting cable supplied Mains lead Slot cover for AC power...

Страница 10: ...e CLOCK SET screen appears whenever you turn on your camera for recording 1 Slide the POWER switch downward to turn on the power The POWER lamp lights up 2 Press v on the control button The menu bar appears on the LCD screen 3 Select SETUP with B on the control button then press the center z Control button ...

Страница 11: ...M D Y month day year or D M Y day month year 6 Select the year month day hour or minute item you want to set with b B on the control button The item to be set is indicated with v V 7 Set the numeric value with v V on the control button then press the center z to enter it After entering the number v V moves to the next item If you selected D M Y in step 5 set the time on a 24 hour cycle 8 Select EN...

Страница 12: ...mp is lit up You cannot record or edit images on a Memory Stick if the erasure prevention switch is set to the LOCK position 1 Open the Memory Stick cover Open the cover while sliding it in the direction of the arrow 2 Insert the Memory Stick Insert the Memory Stick with the B mark facing toward the Memory Stick compartment as illustrated 3 Close the Memory Stick cover Removing the Memory Stick Ac...

Страница 13: ...ding a bright subject the LCD screen color may change after AE lock but this does not affect the recorded image 1 Set the MODE selector to STILL 2 Press and hold the shutter button halfway down and check the image While the AE lock indicator z green is flashing the image freezes momentarily but is not yet recorded When the camera finishes the automatic adjustments the AE lock indicator z lights up...

Страница 14: ...r z and then selecting OK with v V on the control button and pressing the center z This camera has a digital zoom function Digital zoom enlarges the image by digital processing You can enlarge the image by pressing T and it returns to normal size by pressing W Notes The maximum digital zoom scaling fixes by 3 times The image displayed on the LCD screen is degraded than the one recorded on the Memo...

Страница 15: ...r function the subject is recorded about 10 seconds after you press the shutter button Select self timer indicator on the LCD screen with v V b B on the control button then press the center z The self timer indicator appears on the LCD screen and about 10 seconds after you press the shutter button the subject is recorded The self timer lamp flashes after you press the shutter button until the shut...

Страница 16: ...flash does not strobe You can change the brightness of the flash FLASH LEVEL in the menu settings page 31 Notes The recommended shooting distance using the built in flash is 0 3 m to 2 5 m Auto red eye reduction may not produce the desired red eye reduction effects depending on individual differences the distance to the subject if the subject does not see the pre strobe or other conditions In addi...

Страница 17: ...n fully down REC appears on the LCD screen and the image and sound are recorded on the Memory Stick If you press the shutter button momentarily The image and sound are recorded for five seconds You can change the recording time to 10 or 15 seconds with REC TIME SET in the menu settings page 30 If you hold the shutter button down The image and sound are recorded while the shutter button is held dow...

Страница 18: ... turn on off the indicators on the LCD screen See page 62 for a detailed description of the indicators 1 Set the MODE selector to PLAY The last recorded image still or moving appears on the LCD screen 2 Press v on the control button to display the menu bar on the LCD screen 3 Select the desired still image with the control button Press v V b B on the control button to select b B on the LCD screen ...

Страница 19: ... Select the desired moving image with the control button Moving images are displayed one size smaller than still images Press v V b B on the control button to select b B on the LCD screen then press b B on the control button b To display the preceding image B To display the next image 4 Select B playback on the LCD screen with v V b B on the control button then press the center z The moving image ...

Страница 20: ... center z during playback playback is paused Moving images recorded with the image of 320 HQ The images are displayed over the entire screen in steps 3 and 4 Press VOLUME to adjust the volume Press DISPLAY to turn on off the indicators on the LCD screen See page 62 for a detailed description of the indicators Adjusting the volume LCD screen indicators during moving image playback ...

Страница 21: ... Windows 98SE CPU MMX Pentium 200 MHz or faster The USB connector must be provided as standard ActiveMovie Player DirectShow must be installed to play back moving pictures Recommended Macintosh environment Macintosh computer with the Mac OS 8 5 1 8 6 9 0 standard installation However note that the update to Mac OS 9 0 should be used for the following models iMac with the Mac OS 8 6 standard instal...

Страница 22: ...n your personal computer using the supplied USB cable 4 Insert a Memory Stick into your camera connect the AC power adaptor charger and turn on your camera PC MODE appears on the LCD screen of your camera and the camera is set to communication standby mode Your personal computer recognizes the camera and the Windows 98 Add Hardware Wizard starts 5 Follow the on screen messages to specify the CD RO...

Страница 23: ... on the power of your personal computer and allow Windows 98 to load 2 Connect one end of the USB cable to the USB jack on the camera and the other end to the USB connector on your personal computer 3 Insert a Memory Stick into your camera and connect the AC power adaptor charger to your camera and then to the mains 4 Turn on the power of your camera PC MODE appears on the LCD screen of the camera...

Страница 24: ...ndows and ActiveMovie DirectShow are either registered trademarks or trademarks of Microsoft Corporation in the United States and or other countries Macintosh and Mac OS QuickTime are trademarks of Apple Computer Inc All other product names mentioned herein may be the trademarks or registered trademarks of their respective companies Furthermore and are not mentioned in each case in this manual 6 S...

Страница 25: ... in VOICE mode and its corresponding image file Folder File Meaning 100msdcf DSC0ssss JPG Still image file recorded normally Still image file recorded in E MAIL mode page 35 Still image file recorded in TIFF mode page 37 Still image file recorded in VOICE mode page 36 TXT0ssss GIF Still image file recorded in TEXT mode page 36 Imcif100 DSC0ssss JPG Small size image file recorded in E MAIL mode pag...

Страница 26: ...lay back and edit images Set the selector as follows before starting to operate your camera How to use the control button The control button is used to select the indicators images and menus appearing on the LCD screen of your camera The operation methods that are frequently used for Advanced operations are described below PLAY STILL MOVIE PLAY To play back or edit images STILL To record still ima...

Страница 27: ...uttons menu bar on the LCD screen Selecting items and images on the LCD screen 1 Press v V b B on the control button to select the item you want to set or the image you want to display The color of the selected item or the border of the selected image changes from blue to yellow 2 Press the center z to enter the item Repeat steps 1 and 2 to execute each function Press v to display the menu bar on ...

Страница 28: ...n the control button to display the menu bar The menu bar appears as follows according to the setting of the MODE selector 2 Select the desired item with v V b B on the control button then press the center z The color of the selected item changes from blue to yellow and when you press the center z the modes that can be set for that item are displayed 3 Select the desired mode with v V b B on the c...

Страница 29: ...41 MOVIE STILL DATE TIME DAY TIME DATE xOFF Sets whether to insert the date and time into the image page 40 STILL Item Setting Description MODE selector FORMAT OK Formats a Memory Stick Note that when formatting is performed all data recorded on the Memory Stick including protected images is erased MOVIE STILL PLAY CANCEL Cancels formatting of a Memory Stick POS SENSOR ON Plays back images recorde...

Страница 30: ...s an audio file with still image in addition to the JPEG file E MAIL Records a small size 320 240 JPEG file in addition to the selected image size xNORMAL Records a JPEG file in the selected image size REC TIME SET 15 sec 10 sec x5 sec Adjusts the recording time for moving images MOVIE ROTATE in single mode only Rotates the still image PLAY SLIDE SHOW in single mode only INTERVAL Sets the slide sh...

Страница 31: ...NCE IN DOOR OUT DOOR HOLD xAUTO Sets the white balance page 40 MOVIE STILL FLASH LEVEL HIGH Makes the flash level higher than normal STILL xNORMAL Normal setting LOW Makes the flash level lower than normal EXPOSURE 2 0 EV to 2 0 EV Adjusts the exposure MOVIE STILL Item Setting Description MODE selector COPY OK Copies an image page 48 PLAY CANCEL Cancels copying of the image RESIZE in single mode o...

Страница 32: ...AY PAL Sets the video output signal to PAL mode European countries etc LANGUAGE xENGLISH Displays the menu items in English MOVIE STILL PLAY JPN Displays the menu items in Japanese CLOCK SET Sets the date and time page 10 MOVIE STILL PLAY BEEP SHUTTER Turns off the beep only The shutter sound is heard when you press the shutter button MOVIE STILL PLAY xON Turns on the beep shutter sound when you p...

Страница 33: ...Before performing advanced operations 33 3 RETURN Returns to PLAY single mode Displayed only in PLAY single mode Displayed only in PLAY INDEX mode ...

Страница 34: ...creen as a mirror image but the recorded image is the same as the actual subject 1 3 2 Image appearing on the LCD screen Recorded image Setting the image size IMAGE SIZE 1 Set the MODE selector to MOVIE or STILL 2 Select FILE and then IMAGE SIZE from the menu 3 Select the desired image size Still image sizes 2240 1680 1856 1392 1856 3 2 1280 960 640 480 The image is recorded in 3 2 size to match t...

Страница 35: ...ox 85 15 sec 160 112 Approx 345 60 sec Recording still images for e mail E MAIL E MAIL mode records a small size 320 240 image at the same time as a still image Small size images are convenient for e mail transmission etc 1 Set the MODE selector to STILL 2 Select FILE REC MODE and then E MAIL from the menu 3 Record the image The number of images that you can record on a Memory Stick 8 MB in E MAIL...

Страница 36: ...pprox 4 1856 1392 Approx 5 1856 3 2 Approx 5 1280 960 Approx 11 640 480 Approx 56 1 2 3 Recording text documents TEXT Text is recorded in black and white GIF format to provide a clearer image 1 Set the MODE selector to STILL 2 Select FILE REC MODE and then TEXT from the menu 3 Record the image The number of images that you can record on a Memory Stick 8 MB in TEXT mode To return to normal recordin...

Страница 37: ...lected Writing data takes more time than in normal recording The supplied Memory Stick 8 MB does not have sufficient capacity to record some image sizes Image size Number of images 1856 1392 Approx 1 1856 3 2 Approx 1 1 2 3 Recording images in macro 1 Set the MODE selector to MOVIE or STILL 2 Select macro focus from the menu 3 Press z of the control button repeatedly and select auto macro You can ...

Страница 38: ...d should be used as a reference 1 2 3 Using the PROGRAM AE function 1 Set the MODE selector to MOVIE or STILL 2 Press PROGRAM AE repeatedly to select the desired PROGRAM AE mode Aperture priority mode Makes the subject stand out against an unclear background or makes both the subject and the background stand out clearly Press repeatedly to select an aperture value in 7 steps from F2 8 to F8 Shutte...

Страница 39: ...n you use the flash in the following modes Twilight mode Twilight plus mode Landscape mode You cannot use the PROGRAM AE function when REC MODE is set to TEXT If the setting is not appropriate in aperture priority mode and shutter priority mode the setting value indicator on the LCD screen flashes when you press the shutter button halfway down In this case reset the value If you set a slow shutter...

Страница 40: ...ed subject or background AUTO No indicator Adjusts the white balance automatically To reactivate auto adjustment Select AUTO in step 3 Note Select AUTO when recording under fluorescent lighting 1 2 3 Recording the date and time on the still image DATE TIME 1 Set the MODE selector to STILL 2 Select EFFECT and then DATE TIME from the menu 3 Select the date and time setting DAY TIME The date hour and...

Страница 41: ...FFECT from the menu 3 Select the desired mode SOLARIZE The light contrast is clearer and the picture looks like an illustration B W The picture is monochrome black and white SEPIA The picture is colored like an old picture NEG ART The color and brightness of the picture are reversed To cancel picture effect Select OFF in step 3 1 2 3 ...

Страница 42: ...rk Protect mark TEXT Text mark TIFF TIFF mark No mark Normal recording no settings 1 2 This shows the position of the currently displayed images relative to all the recorded images To display the next previous index screen Select v V at the lower left of the LCD screen To return to normal playback single image Select the desired image with the control button Select 3 RETURN Note You cannot display...

Страница 43: ...turn to the normal size Zoom out with W until the zoom scaling indicator 1 1 disappears from the screen or simply press z To record an enlarged image trimming 1Enlarge the image 2Press the shutter button The image is recorded at 640 480 size then the display returns to the image display before enlargement 1 2 4 T W Notes You cannot trim images recorded in TEXT mode or uncompressed images The maxim...

Страница 44: ...e 1 2 3 4 Playing back the images in order SLIDE SHOW This function is useful for checking the recorded images or for presentations etc 1 Set the MODE selector to PLAY 2 Select FILE and then SLIDE SHOW from the menu Set the following items INTERVAL 1 min one minute 30 sec 30 seconds 10 sec 10 seconds 5 sec 5 seconds 3 sec 3 seconds REPEAT ON Plays back images in a continuous loop until RETURN is s...

Страница 45: ...connecting cable to the A V OUT jack of your camera and to the audio video input jacks of the TV If your TV has stereo type audio input jacks connect the audio plug of the A V connecting cable to the Lch jack 2 Turn on the TV then start playback on your camera The playback image appears on the TV screen Note You cannot use a TV that has an antenna aerial connector only to A V OUT jack Set the TV V...

Страница 46: ...tor to PLAY then display the INDEX screen 2 Select FILE PROTECT and then ALL or SELECT from the menu 3 When you select ALL Select ON All the images recorded in Memory Stick are protected When you select SELECT Select all the images to protect with the control button then select ENTER In single mode In INDEX mode 1 1 2 3 The selected images are protected To release protection If you selected ALL in...

Страница 47: ...en ALL or SELECT from the menu 3 When you select ALL Select ENTER All unprotected images are deleted When you select SELECT Select all the images to delete with the control button then select ENTER In single mode In INDEX mode 1 1 2 3 The delete indicator appears on the selected images and these images are deleted To cancel deleting Select CANCEL in step 3 Note If there are files on the Memory Sti...

Страница 48: ...size to a large size the picture quality deteriorates The original image is retained even after resizing The resized image is recorded as the newest file 1 1 2 3 Copying images COPY You can copy images to another Memory Stick 1 Set the MODE selector to PLAY then display the image to copy 2 Select TOOL COPY and then OK from the menu MEMORY STICK ACCESS appears 3 When CHANGE MEMORY STICK appears eje...

Страница 49: ...ppears When copying is completed COMPLETE appears To end copying select EXIT To copy the image to another Memory Stick Select CONTINUE and repeat steps 5 and 6 To cancel copying part way Change the MODE selector setting or turn off the power In INDEX mode 1 1 2 3 4 Notes You cannot copy uncompressed images You cannot copy images that are bigger than 5 MB at once If NOT ENOUGH MEMORY appears or fla...

Страница 50: ...n display the INDEX screen 2 Select FILE PRINT MARK and then SELECT from the menu 3 Select the images to mark with the control button In single mode In INDEX mode 1 1 2 3 4 4 Select ENTER of the selected images change from green to white To unmark selected print marks Select the images to unmark in step 3 with the control button then select ENTER To unmark all the print marks Select FILE PRINT MAR...

Страница 51: ...condensation When bringing the camera from a cold place to a warm place seal the camera in a plastic bag and allow it to adapt to conditions at the new location over a period of time about an hour If moisture condensation occurs Turn off the camera and wait about an hour for the moisture to evaporate Note that if you attempt to record with moisture remaining inside the lens you will be unable to r...

Страница 52: ...tery pack and leave the camera for 24 hours or more with the POWER switch set to OFF On Memory Sticks Memory Stick is a new compact portable and versatile IC recording medium with a data capacity that exceeds a floppy disk Memory Stick is specially designed for exchanging and sharing digital data among Memory Stick compatible products Because it is removable Memory Stick can also be used for exter...

Страница 53: ...le The color system of the TV must be the same as that of your digital still camera TV color systems differ from country to country Check the following list NTSC system countries Bahama Islands Bolivia Canada Central America Chile Columbia Ecuador Jamaica Japan Korea Mexico Peru Surinam Taiwan the Philippines the U S A Venezuela etc PAL system countries Australia Austria Belgium China Denmark Finl...

Страница 54: ...ng properly tDisconnect and then reconnect all power sources after one minute Then turn the power on by sliding the POWER switch downward and check that the camera works properly Your camera cannot record images The MODE selector is set to PLAY tSet it to MOVIE or STILL pages 13 17 No Memory Stick has been inserted into your camera tInsert a Memory Stick page 12 The write protect tab on the Memory...

Страница 55: ...appening tThis is not a malfunction The battery life is short You are recording playing back images under extremely cold temperatures The battery pack is not charged enough tCharge the battery pack fully The battery pack is dead tReplace the battery pack with a new one page 8 The battery remaining indicator is incorrect You have used the camera for a long time in an extremely hot or an extremely c...

Страница 56: ... do not operate the camera for about three minutes while the power is on the camera turns off automatically to prevent wearing down the battery tTurn on the camera The battery is discharged tReplace it with a charged battery The image does not appear on the TV screen The video output signal setting of your camera is incorrect tChange the setting page 32 A file error occurs when you play back a fil...

Страница 57: ...le is not connected firmly tDisconnect the USB cable and connect it again firmly Make sure that PC MODE is displayed on the LCD screen page 22 The USB connectors on your personal computer are connected to other equipment besides the keyboard the mouse and your camera tDisconnect the USB cables except for the ones connected to the keyboard the mouse and your camera page 21 Symptom Cause and or Solu...

Страница 58: ... of the Memory Stick is full and you cannot record or copy images NO FILE No image has been recorded on the Memory Stick FILE ERROR An error occurred while playing back the image FILE PROTECT The image is protected against erasure for InfoLITHIUM battery only The battery is not the InfoLITHIUM type NOT ENOUGH MEMORY The images you want to copy are too big to copy with your camera DIRECTORY ERROR A...

Страница 59: ...l authorized Sony service facility First three digits Cause and or Corrective Action C 32 ss There is trouble with your camera s hardware tTurn the power off and on again C 13 ss An unformatted Memory Stick is inserted tFormat the Memory Stick page 29 The inserted Memory Stick cannot be used with your camera or is damaged tInsert a new Memory Stick page 12 E 61 ss E 91 ss A camera malfunction that...

Страница 60: ...ature 0 C to 40 C Storage temperature 20 C to 60 C Maximum dimensions Approx 103 79 48 mm w h d Mass Approx 300 g including battery pack NP FS11 Memory Stick lens cap etc Built in microphone Electret condenser microphone Built in speaker Dynamic speaker AC VF10 AC power adaptor charger Power requirements 100 to 240 V AC 50 60 Hz Rated output voltage DC OUT DC 4 2 V 1 8 A in operating mode Battery ...

Страница 61: ... focus lock indicator H Recording mode indicator I Image size indicator J Self diagnosis function recording time indicator K Number of recorded images L Remaining memory capacity indicator M Moving image VOICE recording time indicator N Self timer indicator O Spot light metering indicator P Focus macro mode indicator Q Menu bar and guide menu They appear by pressing v on the control button and dis...

Страница 62: ...nd guide menu A VOL Volume indicator B Playback pause buttons B during pause X during playback C Fast forward rewind buttons D Recording mode indicator E Image size indicator F Image number number of stored images in Memory Stick G Remaining memory capacity indicator H Counter I Playback image J Play bar K Menu bar and guide menu When playing back still images 60 When playing back moving images S ...

Страница 63: ... Moisture condensation 51 Moving images playing back 19 recording 17 MPEG 17 N Normal charge 6 NTSC system 53 Number of images that you can record by image size 35 in E MAIL mode 35 in TEXT mode 36 in TIFF mode 37 in VOICE mode 36 P P EFFECT 41 PAL system 53 Playing back moving images 19 still images 18 Playing back six images at once 42 Power supply AC power adaptor 9 battery pack 6 Preventing ac...

Страница 64: ...Sony Corporation Printed in Japan ...

Отзывы: