background image

14

GB

Timer

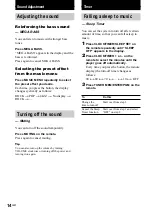
Falling asleep to music

— Sleep Timer

You can set the system to turn off after certain
amount of time, so that you can fall asleep to
music.

1

Press CLOCK/TIMER/SLEEP SET on
the remote repeatedly until “SLEEP
OFF” appears in the display.

2

Press CLOCK/TIMER + or – on the
remote to select the minutes until the
player goes off automatically.

Every time you press the button, the minute
display (the turn-off time) changes as
follows:

90 

y

 80 

y

 70  

y

 … 

y

 10 

y

 OFF

3

Press TUNER MEM/ENTER/PGM on the
remote.

To

Change the
time to turn off

Cancel the Sleep
Timer function

Do this

Start over from step 1.

Start over from step 1 and select
“OFF” on step 2.

Sound Adjustment

Adjusting the sound

Reinforcing the bass sound

— MEGA BASS

You can listen to music with stronger bass
tones.

Press MEGA BASS.

“MEGA BASS” appears in the display and the
bass is reinforced.

Press again to cancel MEGA BASS.

Selecting the preset effect
from the music menu

Press MUSIC MENU repeatedly to select
the preset effect you desire.

Each time you press the button, the display
changes cyclically as follows:

ROCK 

t

 POP 

t

 JAZZ 

No display 

t

ROCK 

...

Turning off the sound

— Muting

You can turn off the sound temporarily.

Press MUTING on the remote.

Press again to cancel muting.

Tip

You can also turn up the volume by turning
VOLUME clockwise or turning off the power and
turning it on again.

Содержание CMT-EP303 - Micro Hi Fi Component System

Страница 1: ...al numbers are located on the bottom of the unit Record the serial number in the space provided below Refer to them whenever you call upon your Sony dealer regarding this product Model No _______________ Serial No _______________ 4 239 335 12 2 CMT EP303 CMT EP305 2002 Sony Corporation ...

Страница 2: ...an be determined by turning the equipment off and on the user is encouraged to try to correct the interference by one or more of the following measures Reorient or relocate the receiving antenna Increase the separation between the equipment and receiver Connect the equipment into an outlet on a circuit different from that to which the receiver is connected Consult the dealer or an experienced radi...

Страница 3: ...acks Program Play 9 Tuner Presetting radio stations 10 Listening to the radio Preset Tuning 11 Manual Tuning 11 Tape Loading a tape 12 Playing a tape 12 Recording to a tape CD Synchro Recording Recording Manually 13 Sound Adjustment Adjusting the sound MEGA BASS 14 Turning off the sound Muting 14 Timer Falling asleep to music Sleep Timer 14 Waking up to music Daily Timer 15 Display Using the CD di...

Страница 4: ...re mentioned in the text Illustration number r MUSIC MENU 9 14 R R Name of button part Reference page ALPHABETICAL ORDER A P Cassette compartment qd 12 CD 4 8 9 13 Display Window 5 8 9 10 ENTER PGM w 8 9 10 14 MEGA BASS 8 14 MUSIC MENU 9 14 PHONES jack ws PRESET qs 10 11 BUTTON DESCRIPTIONS 1 power wh 6 CD m M go back go forward wd 8 9 u play pause wf 8 9 Z PUSH OPEN CLOSE 7 8 x stop wg 8 9 TAPE M...

Страница 5: ...TIMER SLEEP SET 1 7 14 15 MEGA BASS qs 14 MUSIC MENU qa 14 MUTING q 14 PRESET qf 10 11 R Z REPEAT 6 8 SHUFFLE 5 8 TAPE qk 12 TIMER ON OFF 2 15 TUNER BAND 4 10 11 13 TUNER MEM ENTER PGM 7 7 9 10 14 15 TUNING 8 10 11 TUNING qd 10 11 VOL volume 9 BUTTON DESCRIPTIONS m rewind M fast forward qg 8 go back go forward qg 8 9 u play pause qh 8 9 1 power 3 6 x stop qj 8 9 12 ...

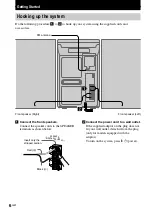
Страница 6: ...procedure 1 to 2 to hook up your system using the supplied cords and accessories Front speaker Right Front speaker Left 2 Connect the power cord to a wall outlet If the supplied adaptor on the plug does not fit your wall outlet detach it from the plug only for models equipped with the adaptor To turn on the system press 1 power FM antenna Red 3 Insert only the stripped portion Black ...

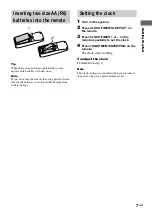
Страница 7: ...me remove the batteries to avoid possible damage from battery leakage Setting the clock 1 Turn on the system 2 Press CLOCK TIMER SLEEP SET on the remote 3 Press CLOCK TIMER or on the remote repeatedly to set the clock 4 Press TUNER MEM ENTER PGM on the remote The clock starts working To adjust the clock Perform from step 2 Note The clock settings are canceled when you disconnect the power cord or ...

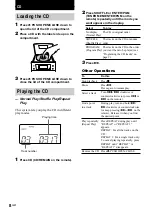
Страница 8: ...To Stop playback Pause Select a track Find a point in a track Play repeatedly Repeat Play Remove the CD To play The CD in original order The tracks on the CD in random order The tracks on the CD in the order you want them to be played see Programing the CD tracks on page 9 Do this Press x Press u Press again to resume play Turn clockwise or counterclockwise or press or on the remote During play tu...

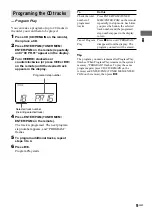
Страница 9: ...tional tracks repeat steps 3 to 4 6 Press u Program Play starts Programed step number To Check the total number of programed tracks Cancel Program Play Tip The program you made remains after Program Play finishes When Program Play remains in the system s memory PROGRAM flashes To play the same program again press CD CD REMAIN on the remote and ENTER PGM TUNER MEM ENTER PGM on the remote then press...

Страница 10: ...tune in any of those stations simply by selecting the corresponding preset number There are two ways to store the station presets To Automatically tune all of the stations that can be received in your area and then store them manually Manually tune and store the radio frequency of your favourite stations Setting presets through automatic tuning 1 Press TUNER TUNER BAND on the remote repeatedly to ...

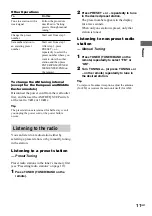
Страница 11: ...ry first see Presetting radio stations on page 10 1 Press TUNER TUNER BAND on the remote 2 Press PRESET or repeatedly to tune in the desired preset station The preset number appears in the display for a few seconds When only one station is preset only that station is tuned Listening to non preset radio station Manual Tuning 1 Press TUNER TUNER BAND on the remote repeatedly to select FM or AM 2 Tur...

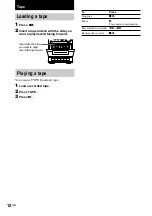
Страница 12: ...play record facing forward Playing a tape You can use TYPE I normal tape 1 Load a recorded tape 2 Press TAPE 3 Press N Insert with the side you want to play record facing forward Press xZ X Press again to resume play m or M xZ To Stop play Pause Fast forward or rewind Remove the cassette ...

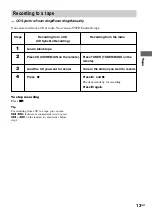
Страница 13: ... on the remote Tune in the station you want to record Press X and z The deck stands by for recording PressX again Recording to a tape CD Synchro Recording Recording Manually You can record from a CD or radio You can use TYPE I normal tape To stop recording Press xZ Tip For recording from a CD to a tape you can turn clockwise or counterclockwise or press or on the remote to select tracks before ste...

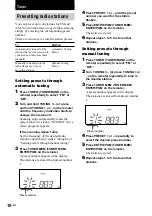
Страница 14: ...s Start over from step 1 Start over from step 1 and select OFF on step 2 Sound Adjustment Adjusting the sound Reinforcing the bass sound MEGA BASS You can listen to music with stronger bass tones Press MEGA BASS MEGA BASS appears in the display and the bass is reinforced Press again to cancel MEGA BASS Selecting the preset effect from the music menu Press MUSIC MENU repeatedly to select the preset...

Страница 15: ...k using CLOCK TIMER or on the remote 5 Press TUNER MEM ENTER PGM on the remote 6 Press CLOCK TIMER SLEEP SET on the remote repeatedly until OFF 0 00 appears in the display 7 Set the time to stop playback using CLOCK TIMER or on the remote 8 Press TUNER MEM ENTER PGM on the remote 9 Press CD REMAIN or TUNER BAND on the remote depending on the sound source you want to play 10Turn off the power and p...

Страница 16: ...t the clock and timer settings again The clock setting radio presetting timer is canceled The power cord is disconnected or a power failure occurs longer than half a day Redo the following Setting the clock on page 7 Presetting radio stations on page 10 If you have set the timer also redo Waking up to music on page 15 There is no sound Turn VOLUME clockwise and hold The headphones are connected In...

Страница 17: ...the CD and leave the system turned on for about an hour until the moisture evaporates Tape Deck The tape does not record No tape in the cassette compartment The tab has been removed from the cassette The tape has reeled to the end The tape does not record nor play or there is a decrease in sound level The heads are dirty Clean them see Cleaning the tape heads on page 19 The record playback heads a...

Страница 18: ...ical with the voltage of your local power supply On safety The unit is not disconnected from the AC power source mains as long as it is connected to the wall outlet even if the unit itself has been turned off Unplug the system from the wall outlet mains if it is not to be used for an extended period of time To disconnect the cord mains lead pull it out by the plug Never pull the cord itself Should...

Страница 19: ...e the tape heads and the metal parts that have contact with the tape every 20 to 30 hours of use with a separately sold demagnetizing cassette For details refer to the instructions of the demagnetizing cassette Specifications Amplifier section AUDIO POWER SPECIFICATIONS U S A model only POWER OUTPUT AND TOTAL HARMONIC DISTORTION with 4 Ω loads both channels driven from 120 10 000 Hz rates 6 W per ...

Страница 20: ...ith the interval set at 10 kHz Antenna Built in ferrite bar antenna Intermediate frequency 450 kHz Speaker Speaker system Bass reflex type Speaker units Full range 10 cm cone type Nominal impedance 4 Ω Dimensions w h d Approx 145 237 170 mm Mass Approx 1 3 kg net per speaker Specifications continued General Power requirements North American model 120 V AC 60 Hz European model 230 V AC 50 60 Hz Aus...

Отзывы: