background image

15

D

Zusatzinformationen

Zusatzinformationen

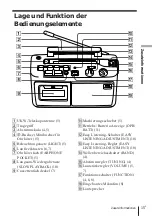
Lage und Funktion der
Bedienungselemente

1

UKW-Teleskopantenne (5)

2

Tragegriff

3

Abstimmskala (4, 5)

4

@

-Buchse (Minibuchse für

Ohrhörer) (5)

5

Beleuchtungstaste (LIGHT) (5)

6

Laufwerktasten (6, 7)

7

Ohrhörerfach (EARPHONE
POCKET) (5)

8

Langsam-Wiedergabetaste
(SLOW PLAYBACK) (10)

9

Cassettenfachdeckel (7)

0

Markierungsschieber (5)

Betriebs/Batterie-Anzeige (OPR/
BATT) (11)

!™

Easy Listening-Schalter (EASY
LISTENING ADJUSTMENT) (10)

Easy Listening-Regler (EASY
LISTENING ADJUSTMENT) (10)

Wellenbereichsschalter (BAND)
(4)

!∞

Abstimmregler (TUNING) (4)

Lautstärkeregler (VOLUME) (5,
7)

Funktionsschalter (FUNCTION)
(4, 6, 8)

!•

Eingebautes Mikrofon (8)

Lautsprecher

1

8

4
5
6
7

9


!™


!∞


!•

3

2

Содержание CFM-A50

Страница 1: ...3 858 994 13 1 Radio Cassette Corder 1997 by Sony Corporation CFM A50 Operating Instructions page 2EN Bedienungsanleitung Seite 2D EN D ...

Страница 2: ...d at the top panel When you turn on the player the OPR BATT indicator lights up Notice for customers in the United Kingdom A moulded plug complying with BS 1363 is fitted to this equipment for your safety and convenience Should the fuse in the plug supplied need to be replaced same rating fuse approved by ASTA or BSI to BS 1362 i e marked with 2 or mark must be used If the plug supplied with this ...

Страница 3: ...Recording on a tape Table of contents Useful Functions 10 Easy listening adjustment 10 Slow playback Setting Up 11 Choosing the power sources Additional Information 12 Precautions 13 Troubleshooting 14 Maintenance 14 Specifications 15 Location and function of controls 16 Index EN ...

Страница 4: ...Hz 88 91 94 97 100 103 106 LW LW STATION Listening to the radio Connect the supplied AC power cord see page 11 1 Set FUNCTION to RADIO 2 Set BAND to FM MW or LW The dial scale switches to the band you have chosen 3 Turn TUNING to tune in a radio station FUNCTION RADIO BAND MW LW FM TUNING 1 2 3 Dial scale Basic Operations ...

Страница 5: ...isten by the earphone connect the earphone to the earphone jack There is a earphone box on the left side of this equipment You may keep the supplied earphone in this box For FM For MW or LW To mark the broadcast station you often listen to If you set the marker to the frequency you often listen to you can easily tune in to this frequency after listening to other stations Using the light If the dia...

Страница 6: ...page 11 1 Set FUNCTION to TAPE RADIO OFF 2 Press p6 STOP EJECT to open the tape compartment and insert a recorded tape Use TYPE I normal tape only Close the compartment 3 Press 9 PLAY With the side you want to play facing forward 1 3 2 FUNCTION TAPE RADIO OFF STOP EJECT PLAY ...

Страница 7: ...rewind the tape Pause playback Press P PAUSE Press the button again to resume play after pause Eject the cassette Press p6 STOP EJECT For the side facing forward Tip When a cassette is inserted the cassette sensor button Ø TAPE IN comes out You can touch the cassette compartment lid to find out if the cassette is inserted or not VOLUME P PAUSE p6 STOP EJECT 0 FF REW Cassette sensor button ...

Страница 8: ...o record To record from the radio set FUNCTION to RADIO set BAND to FM MW or LW and tune in the station you want see page 4 To record from the built in microphone set FUNCTION to TAPE RADIO OFF 3 Press REC to start recording 9 PLAY is depressed automatically Recording on a tape With the side you want to record on facing forward STOP EJECT 2 3 1 FUNCTION TAPE RADIO OFF FUNCTION RADIO REC Built in m...

Страница 9: ...ss Switch at the rear to the position that most decreases the noise For the best results use the AC power as a power source for recording Notes If the SLOW PLAYBACK button is pressed during recording the tape speed will not change and recording will stay at normal speed You cannot listen through the earphone when recording from the built in microphone To Press Stop recording p6 STOP EJECT Pause re...

Страница 10: ...ENING ADJUSTMENT switch to OFF to cancel Easy Listening How the easy listening adjustment works Sounds could be distinguished by their frequencies When you have recorded voices of three people mixed together for example you will be able to hear the voice of a certain person better by emphasizing the frequency range matching to the tone of his her voice UsefulFunctions PERSON A PERSON B PERSON C PE...

Страница 11: ...d AC power cord to the AC IN socket located at the rear of the player and the other end to the mains Using the player on batteries Insert four R20 size D batteries not supplied into the battery compartment To use the player on batteries disconnect the AC power cord from the player When to replace batteries Replace the batteries when the OPR BATT indicator dims or when the player stops operating Re...

Страница 12: ...et The ventilation holes must be unobstructed for the player to operate properly and prolong the life of its components If the player is left in a car parked in the sun be sure to choose a location in the car where the player will not be subjected to the direct rays of the sun Since a strong magnet is used for the speakers keep personal credit cards using magnetic coding or spring wound watches aw...

Страница 13: ...ith new ones if they are weak Adjust the volume Unplug the earphone when listening through speakers Replace all the batteries with new ones if they are weak Move the player away from the TV If you are listening to an FM program near the TV with an indoor antenna move the player away from the TV Close the cassette compartment securely Make sure the safety tab on the cassette is in place Clean the e...

Страница 14: ...phone 1 Design and specifications are subject to change without notice Cleaning the tape heads and tape path Wipe the heads the pinch roller and the capstan with a cleaning swab slightly moistened with cleaning fluid or alcohol after every 10 hours of operation for optimum playback and recording quality To make the best possible recording however we recommend that you clean all surfaces over which...

Страница 15: ...GHT Dial scale light button 5 6 Tape operation buttons 6 7 7 EARPHONE POCKET box 5 8 SLOW PLAYBACK button 10 9 Cassette compartment lid 7 0 Frequency marker 5 OPR BATT indicator 11 EASY LISTENING ADJUSTMENT switch 10 EASY LISTENING ADJUSTMENT control 10 BAND switch 4 TUNING control 4 VOLUME control 5 7 FUNCTION switch 4 6 8 Built in microphone 8 ª Speaker 1 º 8 4 5 6 7 9 ª 3 2 ...

Страница 16: ...nd tape path 14 D Demagnetizing the tape heads 14 R Recording on a tape 8 S Setting up 11 Slow playback 10 T U V W X Y Z Troubleshooting 13 E F G H Easy listening adjustment 10 I J K Improving broadcast reception 5 L M N O Listening to the radio 4 P Q Playing a tape 6 Additional Information 16EN ...

Страница 17: ......

Страница 18: ...e nicht geöffnet werden Überlassen Sie Wartungsarbeiten stets nur einem Fachmann Stellen Sie das Gerät nicht in einen geschlossenen Schrank ein Bücherregal usw Um Feuergefahr und die Gefahr eines elektrischen Schlags zu vermeiden stellen Sie keine Gefäße mit Flüssigkeiten darin wie z B Vasen auf das Gerät Der FUNCTION Schalter befindet sich oben am Gerät Bei eingeschaltetem Gerät leuchtet die OPR ...

Страница 19: ... 10 Einstellung der Easy Listening Funktion 10 Langsam Wiedergabe Vorbereitung 11 Stromquellen Inhaltsverzeichnis Zusatzinformationen 12 Zur besonderen Beachtung 13 Störungsüberprüfung 14 Wartung 14 Technische Daten 15 Lage und Funktion der Bedienungselemente Rückwärtige Umschlagseite Stichwortverzeichnis D ...

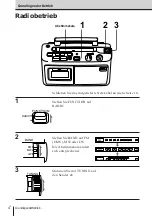
Страница 20: ... 97 100 103 106 LW LW STATION Radiobetrieb Schließen Sie das mitgelieferte Netzkabel an siehe Seite 11 1 Stellen Sie FUNCTION auf RADIO 2 Stellen Sie BAND auf FM UKW MW oder LW Die Abstimmskala ändert sich entsprechend 3 Stimmen Sie mit TUNING auf den Sender ab FUNCTION RADIO BAND MW LW FM TUNING 1 2 3 Abstimmskala Grundlegender Betrieb ...

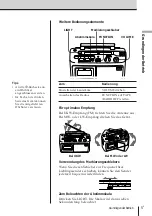
Страница 21: ...g drehen Sie das Gerät Tips An die Buchse kann ein Ohrhörer angeschlossen werden Im Fach an der linken Seite des Geräts können Sie die mitgelieferten Ohrhörer verstauen Bei UKW Bei MW oder LW Verwendung des Markierungsschiebers Wenn Sie diesen Schieber zur Frequenz Ihres Lieblingssenders schieben können Sie den Sender jederzeit bequem wiederfinden Zum Beleuchten der Abstimmskala Drücken Sie LIGHT ...

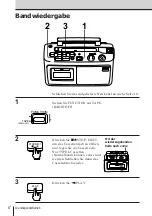
Страница 22: ...ON auf TAPE RADIO OFF 2 Drücken Sie p6 STOP EJECT um das Cassettenfach zu öffnen und legen Sie die Cassette ein Nur TYPE I Cassetten Normalband können verwendet werden Schließen Sie dann das Cassettenfach wieder 3 Drücken Sie 9 PLAY Mit der wiederzugebenden Seite nach vorne 1 3 2 FUNCTION TAPE RADIO OFF STOP EJECT PLAY ...

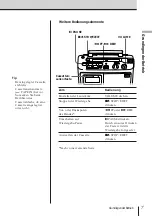
Страница 23: ... drücken Umschalten auf P PAUSE drücken Wiedergabe Pause Durch erneutes Drücken der Taste wird die Wiedergabe fortgesetzt Auswerfen der Cassette p6 STOP EJECT drücken Nach vorne weisende Seite Tip Bei eingelegter Cassette steht die Cassettensensortaste Ø TAPE IN hervor So merken Sie beim Berühren des Cassettenfachs ob eine Cassette eingelegt ist oder nicht VOLUME P PAUSE p6 STOP EJECT 0 FF REW Cas...

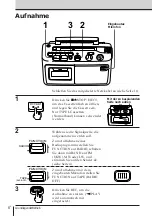
Страница 24: ...n werden soll Zum Aufnehmen eines Radioprogramms stellen Sie FUNCTION auf RADIO schalten Sie dann mit BAND auf FM UKW MW oder LW und stimmen Sie auf den Sender ab siehe Seite 4 Zum Aufnehmen mit dem eingebauten Mikrofon stellen Sie FUNCTION auf TAPE RADIO OFF 3 Drücken Sie REC um die Aufnahme zu starten 9 PLAY wird automatisch mit eingerastet Aufnahme Mit der zu bespielenden Seite nach außen STOP ...

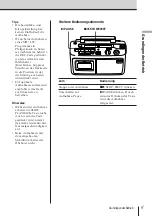
Страница 25: ... Position in der die Störung am besten unterdrückt wird Für optimale Aufnahmeresultate wird empfohlen das Gerät am Stromnetz zu betreiben Hinweise Während der Aufnahme arbeitet die SLOW PLAYBACK Taste nicht Auch wenn die Taste gedrückt wird nimmt das Gerät weiterhin mit Normalgeschwindigkeit auf Beim Aufnehmen mit dem eingebauten Mikrofon arbeitet der Ohrhörer nicht Zum Bedienung Stoppen der Aufna...

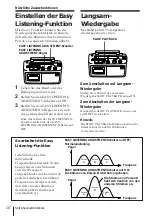
Страница 26: ... den EASY LISTENING ADJUSTMENT Regler so ein daß der gewünschte Effekt erzielt wird Zum Abschalten der EASY LISTENING Funktion stellen Sie den EASY LISTENING ADJUSTMENT Schalter auf OFF So arbeitet die Easy Listening Funktion Jede Stimme hat ihre individuelle Frequenzcharakteristik Wenn beispielsweise die Stimmen von drei Personen aufgezeichnet sind kann durch gezieltes Anheben bestimmter Frequenz...

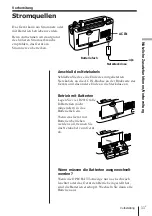
Страница 27: ...kabels an die AC IN Buchse an der Rückseite des Geräts und das andere Ende an die Steckdose an Betrieb mit Batterien Legen Sie vier R20 Größe D Batterien nicht mitgeliefert in das Batteriefach ein Wenn das Gerät mit Batterien betrieben werden soll trennen Sie das Netzkabel vom Gerät ab Wann müssen die Batterien ausgewechselt werden Wenn die OPR BATT Anzeige nur noch schwach leuchtet oder das Gerät...

Страница 28: ...tabile Unterlage Achten Sie darauf daß mindestens 10 mm seitlich vom Gerät frei bleiben damit die Ventilationsöffnungen nicht blockiert werden Nur dann ist ein einwandfreier Betrieb und eine lange Lebensdauer der Bauteile gewährleistet Wenn das Gerät in einem in der Sonne geparkten Wagen zurückgelassen wird stellen Sie es an einen schattigen Platz Da die Lautsprecher mit starken Magneten arbeiten ...

Страница 29: ...en Bei Wiedergabe über Lautsprecher den Ohrhörer abtrennen Wenn die Batterien erschöpft sind alle Batterien auswechseln Das Gerät weiter von einem Fernseher entfernt aufstellen Wenn mit dem Radio ein UKW Programm empfangen wird und der Fernseher mit Zimmerantenne arbeitet entfernen Sie das Gerät weiter vom Fernseher Das Cassettenfach richtig schließen Sicherstellen daß die Löschschutzlamelle der C...

Страница 30: ...tsreiniger angefeuchteten Tuch Scheuerschwämme Scheuerpulver und Lösungsmittel wie Alkohol oder Benzin dürfen nicht verwendet werden Technische Daten Radioteil Empfangsbereich FM UKW 87 6 107 MHz MW 531 1 602 kHz LW 153 279 kHz Antennen FM UKW Teleskopantenne MW LW eingebaute Ferritstabantenne Cassettenteil Aufnahmesystem 2 Spuren 1 Kanal Mono Umspulzeit ca 120 s mit Sony Cassette C 60 Frequenzgan...

Страница 31: ...örerfach EARPHONE POCKET 5 8 Langsam Wiedergabetaste SLOW PLAYBACK 10 9 Cassettenfachdeckel 7 0 Markierungsschieber 5 Betriebs Batterie Anzeige OPR BATT 11 Easy Listening Schalter EASY LISTENING ADJUSTMENT 10 Easy Listening Regler EASY LISTENING ADJUSTMENT 10 Wellenbereichsschalter BAND 4 Abstimmregler TUNING 4 Lautstärkeregler VOLUME 5 7 Funktionsschalter FUNCTION 4 6 8 Eingebautes Mikrofon 8 ª L...

Страница 32: ...terien 11 E F G H I J K Easy Listening Funktion 10 Entmagnetisieren der Tonköpfe 14 S T U Störungsüberprüfungen 13 Stromquellen 11 V W X Y Z Vorbereitung 11 L M N Langsam Wiedergabe 10 O P Q Optimaler Radioempfang 5 R Radiobetrieb 4 Reinigung Gehäuse 14 Tonköpfe und Bandpfad 14 ...

Отзывы: