background image

9

Step 2: Connect digital audio devices

You can connect audio devices that support digital audio output, 
such as an AV receiver for home entertainment use.

Hint

When connecting a digital audio device to the system, go to 

 (Settings) 


 (Sound Settings) 

 "Audio Output Settings", and then adjust the settings 

as necessary for the audio device.

Audio output on the PS3™ system

The supported channels may vary depending on the output 
connector to be used.

PS3™ system output connectors

Channels that can be used for output

2 Ch.

5.1 Ch.

7.1 Ch.

AV MULTI OUT connector

DIGITAL OUT (OPTICAL) 
connector

HDMI OUT connector

 *

*  A device compatible with Linear PCM 7.1 Ch. is required to output 7.1 Ch. 

audio from the HDMI OUT connector.

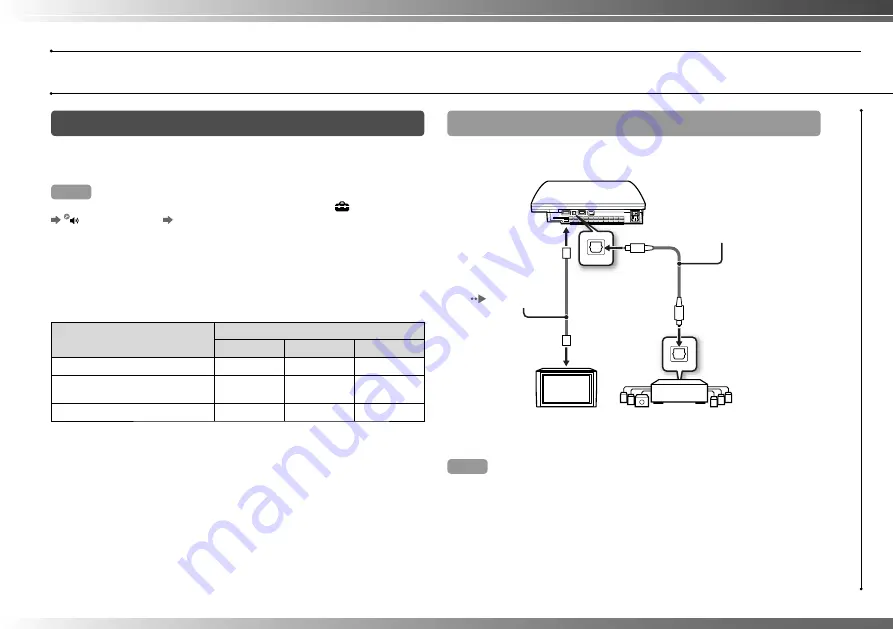
Connecting with an optical digital cable

Audio will be output from the optical digital cable. Video will be output 
from the video output cable.

Optical digital cable for 
audio (sold separately)

Digital audio device 
such as an AV receiver

TV

Video output cable 
for the TV in use 
(

 page 7)

Hint

Normally, audio cannot be output simultaneously from multiple output 
connectors. For example, if your PS3™ system is connected to a TV via an 
HDMI cable and to an audio device via an optical digital cable and "Digital Out 
(Optical)" is set under "Audio Output Settings", audio will no longer be output 
from the TV and will only be output from the audio device.

Getting started

Setting up the PS3™ system

Содержание CECHK02

Страница 1: ...Quick Reference 3 452 923 41 1 CECHJ02 CECHJ03 ...

Страница 2: ...iends Chatting and exchanging messages PLAYSTATION Network Using PLAYSTATION Network services Network Connecting to the Internet Game Playing games Video Playing video Music Playing music Photo Displaying images Settings Adjusting PS3 system settings Users Selecting users to log in to the PS3 system Check that you have all of the following items If any items are missing contact the appropriate Pla...

Страница 3: ...s the button to confirm the selected item button Displays the options menu control panel Icons Options menu Selecting an icon and pressing the button will display the options menu Pressing the button during content playback will display the control panel Control panel button Cancels an operation Directional buttons Used to select on screen categories items button Confirms the selected item PS butt...

Страница 4: ... the internal components such as the lens may cause the system to malfunction Hint The system can be set in a horizontal or vertical position Set as shown in the diagram at right when setting in the vertical position Caution Do not use the system in a closed cabinet or other locations where heat may build up Doing so may cause the system to overheat and may lead to fire injury or malfunction If th...

Страница 5: ...button button Right stick R3 button Port indicators START button PS button The L3 and R3 buttons function when the sticks are pressed Hints For details on the Wireless Controller see Using the Wireless Controller page 17 The SIXAXIS wireless controller that is supplied with this system is not equipped with a vibration function Getting started Part names ...

Страница 6: ...esults in high quality video with minimal flickering 2 The video output setting on the system will display as Standard PAL HD High Definition SD Standard Definition Video mode 1 1080p 1080i 720p 576p 576i 2 Aspect ratio 16 9 16 9 16 9 16 9 4 3 16 9 4 3 Screens showing the difference in resolution HD screen SD screen Procedure flow for setting up the system m Step 3 Connect an Ethernet Cable Page 1...

Страница 7: ...ponent AV Cable sold separately Component VIDEO IN connector Y L R PR CR PB CB COMPONENT VIDEO IN AUDIO IN 1080p 1080i 720p 576p 576i S VIDEO Cable sold separately S VIDEO IN connector S VIDEO L AUDIO R 576i AV Cable supplied VIDEO IN connector composite VIDEO L AUDIO R 576i AV Cable supplied Euro AV Connector Plug supplied with the system sold in the UK only Euro AV connector SCART 576i 1 Dependi...

Страница 8: ...re quality TV HDMI IN connector HDMI Cable sold separately HDMI OUT connector Connecting with other types of cables Connect cables other than the HDMI Cable to the AV MULTI OUT connector on the system TV Euro AV Connector SCART AV Cable supplied AV MULTI OUT connector Euro AV Connector Plug supplied with the system sold in the UK only Example When using the supplied AV Cable Hint If you change the...

Страница 9: ...ctor A device compatible with Linear PCM 7 1 Ch is required to output 7 1 Ch audio from the HDMI OUT connector Connecting with an optical digital cable Audio will be output from the optical digital cable Video will be output from the video output cable Optical digital cable for audio sold separately Digital audio device such as an AV receiver TV Video output cable for the TV in use page 7 Hint Nor...

Страница 10: ... Doing so may cause sound distortions or produce abnormal sounds Step 3 Connect an Ethernet Cable Using a commercially available Ethernet cable you can connect the system to the Internet For details on network settings see Adjusting network settings page 24 Caution The system supports 10BASE T 100BASE TX and 1000BASE T networks Do not connect a standard telephone line or other types of cords or ca...

Страница 11: ...C Power Cord supplied To the electrical outlet Some regions and countries may use a different electrical outlet plug from the one illustrated Step 5 Perform initial setup of the system software After turning on the system perform initial setup 1 Turn on the TV 2 Turn on the MAIN POWER switch MAIN POWER switch The power indicator turns solid red to indicate that the system has entered standby mode ...

Страница 12: ...e selected automatically if you follow the on screen instructions When connecting over a wireless LAN follow the instructions starting with step 4 under Setting up the Internet connection page 26 to set up the connection After the settings have been completed the Home Menu page 3 will be displayed on the TV screen Hints When using an HDMI cable to connect the system to the TV a screen for changing...

Страница 13: ... menu select Settings Display Settings Video Output Settings and then press the button 2 Select the input connector page 7 in use on the TV and then press the button If you select HDMI you will have the option to choose Automatic or Custom on the next screen In most cases select Automatic and video output settings will be completed automatically If you select AV MULTI SCART you must choose the typ...

Страница 14: ...be displayed 6 Confirm the settings select Yes and then press the button Depending on the connector selected in step 2 and the resolutions selected in step 5 this screen may not be displayed 7 Select the type of TV and then press the button If you selected Standard PAL or 576p in step 5 a screen for selecting the TV screen size will be displayed Adjust the setting to match the TV in use If you sel...

Страница 15: ...ext screen In most cases select Automatic If using a cable other than an HDMI cable to output audio from the TV select Audio Input Connector SCART AV MULTI If using an optical digital cable to output audio select Digital Out Optical and choose the output format on the next screen 10Confirm the settings and then press the button The audio output settings will be saved on the system Hint You can adj...

Страница 16: ... PS button Using the system button Power indicator status Solid green System turned on Flashing green System turning off Solid red System off in standby mode Off MAIN POWER switch off Turning off the system Touch the power button for two seconds or longer 1 Touch the power button Power button Power indicator Notice Do not use the main power switch on the system rear to turn off a system that is no...

Страница 17: ...a controller number Each time you turn on the system a number must be assigned to the controller Press the PS button All of the port indicators flash When the controller has been assigned a number the port indicators for the assigned number turn solid red 1 2 3 4 1 2 3 4 m You can connect up to 7 controllers at one time The controller number is shown by the number above the port indicators For num...

Страница 18: ...flash slowly and charging begins When charging has completed the port indicators stop flashing Hints The controller can be used while charging Charge in an environment where the temperature range is between 10 C 30 C Charging may not be as effective when performed in other environments Battery charge level If you press and hold down the PS button for more than one second you can check the battery ...

Страница 19: ...ton Ejecting a disc Eject indicator Eject button Stop playback and then touch the eject button Hint For instructions on how to quit games see Playing games page 21 Notices Discs that are not compatible with the system cannot be played For details refer to the Safety and Support document To play commercially available BD video software in some cases the encryption key may need to be renewed The enc...

Страница 20: ...ats that can be played or viewed File formats that can be played or viewed on this system include ATRAC MP3 AAC JPEG and MPEG 4 For the latest information refer to the online user s guide page 29 Hints Only files that are playable or viewable on the PS3 system are displayed in the column for the compatible category Example Image data is displayed in the Photo category Depending on the storage medi...

Страница 21: ... from the screen that is displayed Hint Use the following methods when playing software titles that specify the controller mode and controller port to use Press the PS button on the Wireless Controller select Controller Settings Switch Analog Mode and then select the appropriate mode With some software the mode is switched automatically Press the PS button on the Wireless Controller select Control...

Страница 22: ... slot MEMORY CARD slots Internal slots Notice This system does not support playback of PlayStation 2 format software Even if you create an internal memory card for PlayStation 2 format software you will not be able to use it to play games Step 1 Create an internal memory card 1 Select Memory Card Utility PS PS2 under Game in the Home Menu and then press the button 2 Select New Internal Memory Card...

Страница 23: ...der Game in the Home Menu and then press the button 2 Connect the Memory Card Adaptor to the system and then insert the Memory Card The icon for Memory Card PS or Memory Card PS2 is displayed 3 Select the saved data that you want to copy and then press the button 4 Select Copy and then press the button Follow the on screen instructions to complete the operation Hints This system can perform copy o...

Страница 24: ...vices to be connected to one Internet line A router is necessary if a PC and a PS3 system will be connected to the Internet at the same time using one Internet connection Preparing the required items The following items are required for a wired connection to the Internet A broadband Internet connection A network gateway device such as an ADSL modem A commercially available Ethernet cable Setting u...

Страница 25: ... supplied by your Internet service provider to set the required items Network Adjusting network settings Using a wireless connection wireless LAN feature equipped models only The following instructions explain how to connect to the Internet using a wireless connection Example of a wireless network configuration The network configuration and connection method may vary depending on the equipment in ...

Страница 26: ...ect to the Internet Depending on the access point in use you may need the MAC address for your system when connecting to the Internet You can find the MAC address for the system by going to Settings System Settings System Information Setting up the Internet connection Internet connection settings vary according to the network environment and the devices in use The following procedure describes a t...

Страница 27: ...een instructions The required settings will be completed automatically For information on access points that support automatic setup contact the access point manufacturers 6 Select the access point that you want to use and then press the button An SSID is a code or a name that is assigned to the access point If you do not know which SSID to use or if the SSID is not displayed contact the person wh...

Страница 28: ... set the required items 8 Select the security settings as necessary and then press the button Security settings vary depending on the access point in use To determine which settings to use contact the person who set up or maintains the access point 9 Enter the encryption key and then press the button The encryption key field will display an asterisk for each character you enter If you do not know ...

Страница 29: ... the menu Viewing the user s guide You can use the Internet browser to view the online user s guide for the PS3 system Select Online Instruction Manuals under Network in the Home Menu and then press the button PLAYSTATION 3 system user s guide In some regions you may select Automatic Setup by Access Point The guide can also be viewed using your PC s Web browser Creating a PLAYSTATION Network accou...

Страница 30: ...king the system software version You can check system version information by selecting Settings System Settings System Information The current version is displayed in the System Software field Update methods You can perform an update in any of the ways described below Network update You can update by downloading the update data from the Internet The latest update is automatically downloaded Select...

Страница 31: ...tal control levels of both the PS3 system and the content determine whether the content can be played Example If the parental control level of the system is set to 7 content with a level from 1 to 7 can be played on the system For further information about Parental Control Levels and corresponding age groups visit www playstation com or refer to software manual Other security settings You can set ...

Страница 32: ...nput mode and other conditions Keys Explanation Inserts a line break Moves the cursor Deletes the character to the left of the cursor Inserts a space Switches the input mode Confirms characters that have been typed and exits the keyboard Switches to the mini size keyboard Inserts a symbol or emoticon Switches the type of characters to be input Keyboard Using the on screen keyboard 11 ...

Страница 33: ...try are the supported system languages You can set the system language by going to Settings System Settings System Language Example If System Language is set to Français you can enter text in French Emoticons can be entered only when creating a message under Friends Using an external keyboard You can enter characters using a commercially available USB keyboard or Bluetooth compatible keyboard Whil...

Страница 34: ......

Страница 35: ......

Страница 36: ... Also PS3 and are trademarks of the same company XMB and xross media bar are trademarks of Sony Corporation and Sony Computer Entertainment Inc SONY and are registered trademarks of Sony Corporation Also ATRAC is a registered trademark or trademark of the same company Blu ray Disc is a trademark HDMI the HDMI logo and High Definition Multimedia Interface are trademarks or registered trademarks of ...

Отзывы: