background image

4

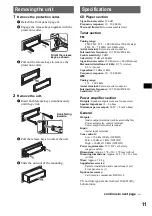
Getting Started

Resetting the unit

Before operating the unit for the first time, or 
after replacing the car battery or changing the 
connections, you must reset the unit.
Detach the front panel and press the RESET 
button with a pointed object, such as a ballpoint 
pen.

Note
Pressing the RESET button will erase the clock setting 
and some stored contents.

Setting the clock

The clock uses a 24-hour digital indication.

1

Press and hold 

(SEL)

.

The setup display appears.

2

Press 

(SEL)

 repeatedly until “CLOCK-

ADJ” appears.

3

Press 

(DSPL)

.

The hour indication flashes.

4

Press the /– button to set the 
hour and minute.

To move the digital indication, press 

(DSPL)

.

5

Press 

(SEL)

.

The clock starts and the next setup display 
appears.

6

Press and hold 

(SEL)

.

The setup is complete.

To display the clock, press 

(DSPL)

. Press 

(DSPL)

 again to return to the previous display.

With the card remote commander
In step 4, to set the hour and minute, press 

M

 or 

m

.

DEMO mode

When the unit is turned off, the clock is 
displayed first, then demonstration (DEMO) 
mode starts the demonstration display.

To cancel the DEMO mode, set “DEMO-OFF” 
in setup (page 7) while the unit is turned off.

Detaching the front panel

You can detach the front panel of this unit to 
prevent theft.

Caution alarm

If you turn the ignition switch to the OFF 
position without detaching the front panel, the 
caution alarm will sound for a few seconds.
The alarm will only sound if the built-in 
amplifier is used.

1

Press 

(OFF)

.

The unit is turned off.

2

Press 

, then pull it off towards you.

Notes
• Do not drop or put excessive pressure on the front 

panel and display window.

• Do not subject the front panel to heat/high 

temperature or moisture. Avoid leaving it in a parked 
car or on a dashboard/rear tray.

Tip
When carrying the front panel, use the supplied front 
panel case.

Attaching the front panel

Engage part 

A

 of the front panel with part 

B

 of 

the unit, as illustrated, and push the left side into 
position until it clicks.

Note
Do not put anything on the inner surface of the front 
panel.

RESET 
button

(OFF)

B

A

Содержание CDX-S2250EE

Страница 1: ...ации CDX S2270EE CDX S2250EE For installation and connections see the supplied installation connections manual Перед установкой и подсоединениями прочитайте прилагаемую инструкцию по установке и подсоединению 2005 Sony Corporation GB RU FM AM Compact Disc Player ...

Страница 2: ...d hold OFF on the unit until the display disappears Otherwise the display does not turn off and this causes battery drain This label is located on the bottom of the chassis Disposal of Old Electrical Electronic Equipment Applicable in the European Union and other European countries with separate collection systems This symbol on the product or on its packaging indicates that this product shall not...

Страница 3: ...cally BTM 6 Storing manually 6 Receiving the stored stations 6 Tuning automatically 6 Other functions Changing the sound settings 7 Adjusting the sound characteristics BAL FAD SUB 7 Adjusting the equalizer curve EQ3 7 Adjusting setup items SET 7 Using optional remote commander 8 Card remote commander RM X114 8 Additional Information Precautions 9 Notes on discs 9 About MP3 files 9 About ATRAC CD 1...

Страница 4: ...ess M or m DEMO mode When the unit is turned off the clock is displayed first then demonstration DEMO mode starts the demonstration display To cancel the DEMO mode set DEMO OFF in setup page 7 while the unit is turned off Detaching the front panel You can detach the front panel of this unit to prevent theft Caution alarm If you turn the ignition switch to the OFF position without detaching the fro...

Страница 5: ... press skip tracks continuously press then press again within about 1 second and hold fast forward reverse a track press and hold k front panel release button 4 l DSPL display DIM dimmer button 4 To change display items press change the display brightness press and hold m SENS button To improve weak reception LOCAL MONO n RESET button located behind the front panel 4 o Number buttons Radio To rece...

Страница 6: ...M1 or AM2 2 Press and hold BTM until BTM flashes The unit stores stations in order of frequency on the number buttons A beep sounds when the setting is stored FM3 tuning range is 65 to 74 MHz at 30KHz step Storing manually 1 While receiving the station that you want to store press and hold a number button 1 to 6 until MEM appears The number button indication appears in the display Note If you try ...

Страница 7: ...djust the equalizer curve To restore the factory set equalizer curve press and hold SEL before the setting is complete After 3 seconds the setting is complete and the display returns to normal play reception mode With the card remote commander In step 3 to adjust the selected item press M or m Adjusting setup items SET 1 Press and hold SEL The setup display appears 2 Press SEL repeatedly until the...

Страница 8: ...rted to activate the unit first Replacing the lithium battery Under normal conditions the battery will last approximately 1 year The service life may be shorter depending on the conditions of use When the battery becomes weak the range of the card remote commander becomes shorter Replace the battery with a new CR2025 lithium battery Use of any other battery may present a risk of fire or explosion ...

Страница 9: ...ble cleaning cloth Wipe each disc from the centre out Do not use solvents such as benzine thinner commercially available cleaners or antistatic spray intended for analogue discs Notes on CD R CD RW discs Some CD Rs CD RWs depending on the equipment used for its recording or the condition of the disc may not play on this unit You cannot play a CD R a CD RW that is not finalized Music discs encoded ...

Страница 10: ...cStage 2 0 or later or SonicStage Simple Burner The maximum number of folders groups 255 files tracks 999 The characters for a folder file name and text information written by SonicStage is displayed For details on ATRAC CD see the SonicStage or SonicStage Simple Burner manual Note Be sure to create the ATRAC CD using authorized software such as SonicStage 2 0 or later or SonicStage Simple Burner ...

Страница 11: ...reo 0 3 mono Separation 35 dB at 1 kHz Frequency response 30 15 000 Hz AM Tuning range 531 1 602 kHz Aerial terminal External aerial connector Intermediate frequency 10 7 MHz 450 kHz Sensitivity 30 µV Power amplifier section Outputs Speaker outputs sure seal connectors Speaker impedance 4 8 ohms Maximum power output 50 W 4 at 4 ohms General Outputs Audio outputs terminal sub rear switchable Power ...

Страница 12: ...yer 3 audio coding technology and patents licensed from Fraunhofer IIS and Thomson Stored stations and correct time are erased The fuse has blown Makes noise when the position of the ignition key is switched The leads are not matched correctly with the car s accessory power connector The display disappears from does not appear in the display window The dimmer is set DIM ON page 7 The display disap...

Страница 13: ... weak t Press SENS to set the monaural reception mode to MONO ON An FM programme broadcast in stereo is heard in monaural The unit is in monaural reception mode tPress SENS until MONO OFF appears ERROR The disc is dirty or inserted upside down t Clean or insert the disc correctly The disc cannot play because of some problem t Insert another disc FAILURE The speaker amplifier connection is incorrec...

Страница 14: ...адиопрограмм Можно хранить в памяти до 6 станций в каждом диапазоне FM1 FM2 FM3 AM1 и AM2 Функция BTM Память оптимальной настройки устройство выбирает радиостанции с наиболее сильным сигналом и сохраняет их в памяти Диск с CD TEXT это компакт диск CD DA содержащий такую информацию как название диска имя исполнителя и названия композиций SonicStage и ее логотип являются товарными знаками корпорации...

Страница 15: ...ние вручную 7 Прием радиостанций сохраненных в памяти 8 Автоматическая настройка 8 Другие функции Изменение настроек звука 8 Подстройка характеристик звука BAL FAD SUB 8 Настройка кривой эквалайзера EQ3 8 Настройка параметров установки SET 9 Использование дополнительного пульта управления 10 Пульт дистанционного управления RM X114 10 Дополнительная информация Меры предосторожности 11 Примечания от...

Страница 16: ...дикации дисплея При использовании пульта дистанционного управления Для установки значений часа и минут в шаге 4 нажмите кнопку M или m Режим DEMO При выключении устройства сначала отобразится индикация времени а затем на дисплее появится демонстрационное изображение режим демонстрации DEMO Для отмены режима DEMO выключите устройство и выберите в установках стр 9 параметр DEMO OFF Снятие передней п...

Страница 17: ...ередней панели Прикрепите часть A передней панели к части B устройства как показано на рисунке и установите левую сторону на место до щелчка Примечание Не ставьте ничего на внутреннюю поверхность передней панели B A ...

Страница 18: ...зиции нажмите непрерывный пропуск композиций нажмите затем нажмите еще раз примерно через 1 секунду и удерживайте нажатой перемещение вперед назад при воспроизведении композиции нажмите и удерживайте k Кнопка для снятия передней панели 4 l Кнопка DSPL дисплей DIM диммер 4 Смена индикаций на дисплее нажмите изменение яркости дисплея нажмите и удерживайте m Кнопка SENS Улучшение качества приема слаб...

Страница 19: ...никновения аварийной ситуации при настройке на радиостанции во время управления автомобилем используйте функцию памяти оптимальной настройки BTM Автоматическое сохранение BTM Память оптимальной настройки 1 Нажимайте кнопку SOURCE пока не появится индикация TUNER Чтобы изменить диапазон нажимайте кнопку MODE Можно выбрать следующие диапазоны FM1 FM2 FM3 AM1 или AM2 2 Нажмите и удерживайте кнопку BT...

Страница 20: ...те кнопку SEL пока не появится индикация BAL FAD или SUB Индикация будет меняться следующим образом LOW НИЗКИЕ 1 t MID СРЕДНИЕ 1 t HI ВЫСОКИЕ 1 t BAL баланс левого правого каналов t FAD баланс передних задних громкоговорителей t SUB уровень громкости низкочастотного громкоговорителя 2 1 Когда активизирована функция эквалайзера EQ3 стр 8 2 Когда для аудиовыхода установлено значение SUB стр 9 ATT от...

Страница 21: ...я приема Примечание Для разных источников и параметров возможно отображаемые элементы будут отличаться При использовании пульта дистанционного управления Чтобы выбрать параметр в шаге 3 нажмите кнопку или Можно установить следующие параметры дополнительные сведения см на указанной странице руководства z указывает значения по умолчанию 1 Когда устройство выключено 2 Когда для аудиовыхода установлен...

Страница 22: ...правления невозможно будет управлять устройством пока на нем не будет нажата кнопка SOURCE или вставлен диск для его включения Замена литиевой батарейки При нормальных условиях эксплуатации срок действия батарейки составляет приблизительно 1 год срок службы может быть меньше в зависимости от условий эксплуатации Когда батарейка разряжается дальность действия пульта дистанционного управления уменьш...

Страница 23: ...езультате использования таких дисков могут возникнуть следующие неполадки не удается извлечь диск так как отклеился ярлык или наклейка что привело к затору в механизме извлечения диска не удается правильно прочесть аудиоданные например скачки при воспроизведении или отсутствие воспроизведения из за того что ярлык или наклейка деформировались от тепла что привело к перекосу диска Диски нестандартно...

Страница 24: ...скоростью передачи в битах VBR оставшееся время воспроизведения может отображаться неточно Если диск записан в формате Multi Session будет распознан формат только первой композиции первой сессии и будут воспроизводиться композиции только этого формата все другие форматы воспроизводиться не будут Форматы имею следующий приоритет CD DA ATRAC CD и MP3 Если первая композиция записана в формате CD DA т...

Страница 25: ...удет работать надлежащим образом из за загрязнения контактов служащих для соединения передней панели с устройством Во избежание этого отсоедините переднюю панель стр 4 и протрите контакты ватным тампоном смоченным в спирте Не прикладывайте излишних усилий В противном случае можно повредить контакты панель стр 4 и протрите контакты ватным тампоном смоченным в спирте Не прикладывайте излишних усилий...

Страница 26: ...LOD высокие 10 дБ при 10 кГц XPLOD Требования к источнику питания автомобильный аккумулятор 12 В пост тока отрицательное заземление Размеры прибл 178 50 178 мм ш в г Монтажные размеры прибл 182 53 161 мм ш в г Масса прибл 1 2 кг Входящие в комплект принадлежности детали для установки и подключений 1 комплект футляр для передней панели 1 Дополнительные принадлежности пульт дистанционного управления...

Страница 27: ...и файлы MP3 Данные на диске не соответствуют формату MP3 и версии стр 12 Для начала воспроизведения файлов MP3 требуется больше времени чем для других файлов Может потребоваться больше времени до начала воспроизведения следующих дисков диск записанный с использованием сложной разветвленной структуры папок диск записанный в формате Multi Session диск на который можно добавлять данные Компакт диск A...

Страница 28: ...танций tНажимайте кнопку SENS пока не появится индикация MONO OFF ERROR Компакт диск загрязнен или вставлен нижней стороной вверх tПочистите или правильно вставьте компакт диск Компакт диск не воспроизводится по какой то причине tВставьте другой компакт диск FAILURE Неправильное подключение громкоговорителя усилителя tДля проверки подключения см прилагаемое руководство по установке подключению L S...

Отзывы: