background image

4

CDX-S2250V/S2250S/S2250

2-348-467-71 (1)

G:\SONY\07 CDX\0324\0324 CDX-S2250V nouhin\0324 CDX-S2250V\0324 CDX-
S2250V\2348467711\234846771CDXS2250VEUR\01GB02CD-EUR.fm

masterpage:Left

Getting Started

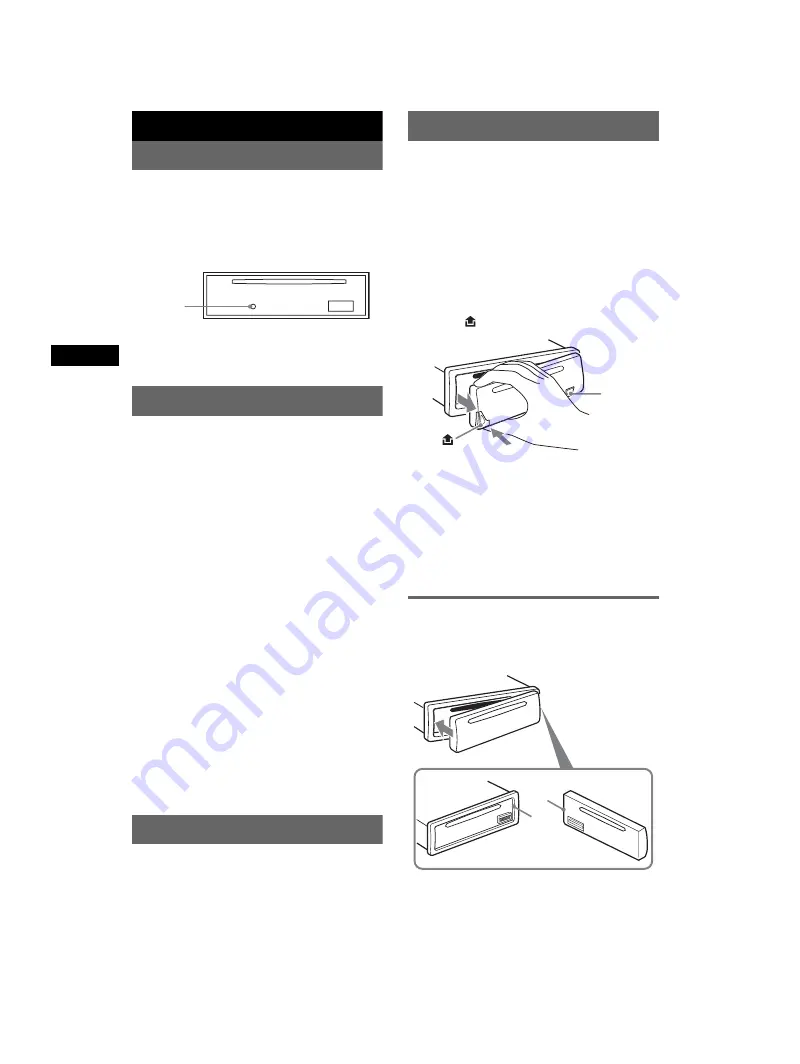
Resetting the unit

Before operating the unit for the first time, or 
after replacing the car battery or changing the 
connections, you must reset the unit.
Detach the front panel and press the RESET 
button with a pointed object, such as a ballpoint 
pen.

Note
Pressing the RESET button will erase the clock setting 
and some stored contents.

Setting the clock

The clock uses a 24-hour digital indication.

1

Press and hold 

(SEL)

.

The setup display appears.

2

Press 

(SEL)

 repeatedly until “CLOCK-

ADJ” appears.

3

Press 

(DSPL)

.

The hour indication flashes.

4

Press the /– button to set the 
hour and minute.

To move the digital indication, press 

(DSPL)

.

5

Press 

(SEL)

.

The clock starts and the next setup display 
appears.

6

Press and hold 

(SEL)

.

The setup is complete.

To display the clock, press 

(DSPL)

. Press 

(DSPL)

 again to return to the previous display.

Tip
You can set the clock automatically with the RDS 
feature (page 8).

With the card remote commander
In step 2 and 4, to select the item or setting, press 

M


or 

m

. In step 4, to move the digital indication, press 

<


or 

,

.

DEMO mode

When the unit is turned off, the clock is 
displayed first, then demonstration (DEMO) 
mode starts the demonstration display.

To cancel the DEMO mode, set “DEMO-OFF” 
in setup (page 9) while the unit is turned off.

Detaching the front panel

You can detach the front panel of this unit to 
prevent theft.

Caution alarm

If you turn the ignition switch to the OFF 
position without detaching the front panel, the 
caution alarm will sound for a few seconds.
The alarm will only sound if the built-in 
amplifier is used.

1

Press 

(OFF)

.

The unit is turned off.

2

Press 

, then pull it off towards you.

Notes
• Do not drop or put excessive pressure on the front 

panel and display window.

• Do not subject the front panel to heat/high 

temperature or moisture. Avoid leaving it in a parked 
car or on a dashboard/rear tray.

Tip
When carrying the front panel, use the supplied front 
panel case.

Attaching the front panel

Engage part 

A

 of the front panel with part 

B

 of 

the unit, as illustrated, and push the left side into 
position until it clicks.

Note
Do not put anything on the inner surface of the front 
panel.

RESET 
button

(OFF)

B

A

Содержание CDX-S2250

Страница 1: ...xions consulter le manuel d installation raccordement fourni Per l installazione e i collegamenti fare riferimento al manuale di istruzioni per l installazione e i collegamenti in dotazione Zie voor het monteren en aansluiten van het apparaat de bijgeleverde handleiding Installatie en aansluitingen CDX S2250V CDX S2250S CDX S2250 CDX S2250V S2250S S2250 2 348 467 71 1 Operating Instructions Bedien...

Страница 2: ... FM1 FM2 FM3 MW and LW BTM Best Tuning Memory function the unit selects strong signal stations and stores them RDS services You can use FM station with Radio Data System RDS A CD TEXT disc is a CD DA that includes information such as disc artist and track name SonicStage and its logo are trademarks of Sony Corporation ATRAC ATRAC3 ATRAC3plus and their logos are trademarks of Sony Corporation Type ...

Страница 3: ...eiving stations 6 Storing automatically BTM 6 Storing manually 6 Receiving the stored stations 6 Tuning automatically 6 RDS 7 Overview 7 Setting AF and TA TP 7 Selecting PTY 8 Setting CT 8 Other functions Changing the sound settings 8 Adjusting the sound characteristics BAL FAD SUB 8 Adjusting the equalizer curve EQ3 8 Adjusting setup items SET 9 Using optional remote commander 9 Card remote comma...

Страница 4: ... the RDS feature page 8 With the card remote commander In step 2 and 4 to select the item or setting press M or m In step 4 to move the digital indication press or DEMO mode When the unit is turned off the clock is displayed first then demonstration DEMO mode starts the demonstration display To cancel the DEMO mode set DEMO OFF in setup page 9 while the unit is turned off Detaching the front panel...

Страница 5: ...tions automatically press find a station manually press and hold CD To skip tracks press skip tracks continuously press then press again within about 1 second and hold fast forward reverse a track press and hold k front panel release button 4 l DSPL display DIM dimmer button 4 6 7 To change display items press change the display brightness press and hold m SENS BTM button 6 To improve weak recepti...

Страница 6: ...emory BTM to prevent an accident Storing automatically BTM 1 Press SOURCE repeatedly until TUNER appears To change the band press MODE repeatedly You can select from FM1 FM2 FM3 MW or LW 2 Press and hold BTM until BTM flashes The unit stores stations in order of frequency on the number buttons A beep sounds when the setting is stored Storing manually 1 While receiving the station that you want to ...

Страница 7: ...etting If you preset manually you can preset both RDS and non RDS stations with the AF TA setting for each 1 Set AF TA then store the station with BTM or manually Presetting the volume of traffic announcements You can preset the volume level of the traffic announcements so as to not miss hearing them 1 Press the volume button repeatedly to adjust the volume level 2 Press and hold AF TA until TA ap...

Страница 8: ... t MID 1 t HI 1 t BAL left right t FAD front rear t SUB subwoofer volume 2 1 When EQ3 is activated page 8 2 When the audio output is set to SUB page 9 ATT is displayed at the lowest setting and can be adjusted up to 20 steps 2 Press the volume button repeatedly to adjust the selected item After 3 seconds the setting is complete and the display returns to normal play reception mode Note Adjust with...

Страница 9: ...ttons on the card remote commander control the same functions as those on this unit The following buttons on the card remote commander have also different buttons functions from the unit SEEK buttons To control radio CD the same as SEEK on the unit For details of other operations see With the card remote commander on each pages SOUND button The same as SEL on the unit M m DISC PRESET buttons To co...

Страница 10: ...erve the correct polarity when installing the battery Do not hold the battery with metallic tweezers otherwise a short circuit may occur Rotary commander RM X4S CDX S2250V only Attaching the label Attach the indication label depending on how you mount the rotary commander Location of controls The corresponding buttons on the rotary commander control the same functions as those on this unit The fol...

Страница 11: ...yback due to heat shrinking of a sticker or label causing a disc to warp Discs with non standard shapes e g heart square star cannot be played on this unit Attempting to do so may damage the unit Do not use such discs You cannot play 8 cm CDs Before playing clean the discs with a commercially available cleaning cloth Wipe each disc from the centre out Do not use solvents such as benzine thinner co...

Страница 12: ...which is compressed to ATRAC3 or ATRAC3plus format using authorized software such as SonicStage 2 0 or later or SonicStage Simple Burner The maximum number of folders groups 255 files tracks 999 The characters for a folder file name and text information written by SonicStage is displayed For details on ATRAC CD see the SonicStage or SonicStage Simple Burner manual Note Be sure to create the ATRAC ...

Страница 13: ...o 69 dB mono Harmonic distortion at 1 kHz 0 5 stereo 0 3 mono Separation 35 dB at 1 kHz Frequency response 30 15 000 Hz MW LW Tuning range MW 531 1 602 kHz LW 153 279 kHz Aerial terminal External aerial connector Intermediate frequency 10 7 MHz 450 kHz Sensitivity MW 30 µV LW 40 µV Power amplifier section Outputs Speaker outputs sure seal connectors Speaker impedance 4 8 ohms Maximum power output ...

Страница 14: ...cting lead or battery has been disconnected The power connecting lead is not connected properly Stored stations and correct time are erased The fuse has blown Makes noise when the position of the ignition key is switched The leads are not matched correctly with the car s accessory power connector The display disappears from does not appear in the display window The dimmer is set DIM ON page 9 The ...

Страница 15: ...ts after a few seconds of listening The station is non TP or has weak signal t Deactivate TA page 7 No traffic announcements Activate TA page 7 The station does not broadcast any traffic announcements despite being TP tTune in another station PTY displays The current station is not an RDS station RDS data has not been received The station does not specify the programme type ERROR The disc is dirty...

Страница 16: ...ft If these solutions do not help improve the situation consult your nearest Sony dealer If you take the unit to be repaired because of CD playback trouble bring the disc that was used at the time the problem began or During fast forward or reverse you have reached the beginning or the end of the disc and you cannot go any further The character cannot be displayed with the unit ...

Страница 17: ...CDX S2250V S2250S S2250 2 348 467 71 1 masterpage None G SONY 07 CDX 0324 0324 CDX S2250V nouhin 0324 CDX S2250V 0324 CDX S2250V 2348467711 234846771CDXS2250VEUR 01GB02CD EUR fm ...

Страница 18: ...ten Signalen aus und speichert diese RDS Funktionen Sie können die RDS Dienste von UKW Sendern nutzen die RDS Signale Radio Data System ausstrahlen Eine CD mit CD TEXT ist eine CD DA die Informationen wie den Namen der CD den Namen des Interpreten und die Namen der Titel enthält SonicStage und das entsprechende Logo sind Markenzeichen der Sony Corporation ATRAC ATRAC3 ATRAC3plus und die entspreche...

Страница 19: ...ichern von Sendern 7 Einstellen gespeicherter Sender 7 Automatisches Einstellen von Sendern 8 RDS 8 Übersicht 8 Einstellen von AF und TA TP 8 Auswählen des Programmtyps PTY 9 Einstellen der Uhrzeit CT 9 Weitere Funktionen Wechseln der Klangeinstellungen 10 Einstellen der Klangeigenschaften BAL FAD SUB 10 Einstellen der Equalizer Kurve EQ3 10 Einstellen von Konfigurationsoptionen SET 10 Verwenden d...

Страница 20: ...zuschalten Tipp Mithilfe der RDS Funktion können Sie die Uhr auch automatisch einstellen lassen Seite 9 Mit der Kartenfernbedienung Drücken Sie in Schritt 2 und 4 die Taste M bzw m um die Option bzw die Einstellung auszuwählen Drücken Sie in Schritt 4 die Taste oder um zur jeweils nächsten Ziffer in der Digitalanzeige zu wechseln DEMO Modus Wenn das Gerät ausgeschaltet wird erscheint zunächst die ...

Страница 21: ...2250V nouhin 0324 CDX S2250V 0324 CDX S2250V 2348467711 234846771CDXS2250VEUR 02DE02CD EUR fm masterpage Right Anbringen der Frontplatte Setzen Sie Teil A der Frontplatte wie abgebildet an Teil B am Gerät an und drücken Sie dann die linke Seite hinein bis sie mit einem Klicken einrastet Hinweis Legen Sie auf der Innenseite der Frontplatte nichts ab B A 02DE 00COV EUR book Page 5 Thursday March 24 ...

Страница 22: ...r Titel hintereinander drücken dann innerhalb von 1 Sekunde erneut drücken und gedrückt halten bzw Vorwärts Rückwärtssuchen in einem Titel gedrückt halten k Taste Lösen der Frontplatte 4 l Taste DSPL Anzeige DIM Dimmer 4 7 8 Wechseln der angezeigten Informationen drücken bzw Ändern der Helligkeit im Display gedrückt halten m Taste SENS BTM 7 Verbessern des Empfangs LOCAL MONO drücken bzw Starten d...

Страница 23: ...t Sender einstellen sollten Sie die BTM Funktion Best Tuning Memory Speicherbelegungsautomatik verwenden Andernfalls besteht Unfallgefahr Automatisches Speichern von Sendern BTM 1 Drücken Sie SOURCE so oft bis TUNER erscheint Zum Wechseln des Frequenzbereichs drücken Sie mehrmals MODE Sie können zwischen FM1 UKW1 FM2 UKW2 FM3 UKW3 MW und LW wählen 2 Halten Sie BTM gedrückt bis BTM blinkt Das Gerät...

Страница 24: ...ät stehen folgende RDS Funktionen automatisch zur Verfügung Hinweise Je nach Land bzw Region stehen möglicherweise nicht alle RDS Funktionen zur Verfügung Die RDS Funktion arbeitet möglicherweise nicht wenn die Sendesignale zu schwach sind oder wenn der eingestellte Sender keine RDS Daten ausstrahlt Einstellen von AF und TA TP 1 Drücken Sie AF TA so oft bis die gewünschte Einstellung angezeigt wir...

Страница 25: ...tannien Mithilfe dieser Funktion können Sie andere Lokalsender auswählen auch wenn diese zuvor nicht unter einer Stationstaste gespeichert wurden 1 Drücken Sie während des UKW Empfangs eine Stationstaste 1 bis 6 unter der ein Lokalsender gespeichert ist 2 Drücken Sie innerhalb von 5 Sekunden erneut die Stationstaste des Lokalsenders Wiederholen Sie diesen Vorgang bis das Gerät den Lokalsender empf...

Страница 26: ... oder HI erscheint 3 Stellen Sie mit der Lautstärketaste die ausgewählte Option ein Die Lautstärke lässt sich in Schritten von 1 dB auf einen Wert zwischen 10 dB und 10 dB einstellen Gehen Sie wie in Schritt 2 und 3 vor wenn Sie weitere Frequenzbereiche der Equalizer Kurve einstellen wollen Wenn Sie die werkseitig eingestellte Equalizer Kurve wiederherstellen wollen halten Sie SEL gedrückt bevor d...

Страница 27: ...inzelheiten zu weiteren Funktionen finden Sie unter Mit der Kartenfernbedienung auf den entsprechenden Seiten Bei diesem Gerät nicht verfügbar Hinweis Wenn Sie das Gerät ausschalten und die Anzeige ausgeblendet ist können Sie es nicht mit der Kartenfernbedienung bedienen Drücken Sie zunächst SOURCE am Gerät oder legen Sie eine CD ein um das Gerät zu aktivieren BEEP Zum Einstellen von BEEP ON z ode...

Страница 28: ...ente Die entsprechenden Tasten auf dem Joystick haben dieselbe Funktion wie die Tasten an diesem Gerät Bei den folgenden Bedienelementen am Joystick ist ein anderes Vorgehen erforderlich als mit den Tasten am Gerät Regler PRESET Auswählen gespeicherter Sender drücken und drehen Regler VOL Entspricht der Lautstärketaste am Gerät drehen Regler SEEK AMS Entspricht SEEK am Gerät drehen oder drehen und...

Страница 29: ...Feuchtigkeit verdunstet ist So bewahren Sie die hohe Tonqualität Achten Sie darauf keine Säfte oder andere zuckerhaltige Getränke auf das Gerät oder die CDs zu verschütten Hinweise zu CDs Berühren Sie nicht die Oberfläche von CDs damit diese nicht verschmutzt werden Fassen Sie CDs nur am Rand an Bewahren Sie CDs in ihrer Hülle oder in den CD Magazinen auf wenn sie nicht abgespielt werden Schützen ...

Страница 30: ...rmatstandard zum Komprimieren von Musikdateien Hierbei werden Audio CD Daten auf etwa 1 10 ihrer ursprünglichen Größe komprimiert Das Gerät ist mit dem Format ISO 9660 Stufe 1 Stufe 2 dem erweiterten Joliet bzw Romeo Format ID3 Tags der Version 1 0 1 1 2 2 2 3 und 2 4 sowie dem Multisession Format kompatibel Höchstzahl an Ordnern Gruppen 150 einschließlich Stammordner und leere Ordner MP3 Dateien ...

Страница 31: ...0 oder höher bzw SonicStage Simple Burner 1 0 oder 1 1 Hierbei handelt es sich um Software die mit Sony Network Produkten geliefert wird Sollten an Ihrem Gerät Probleme auftreten oder sollten Sie Fragen haben auf die in dieser Anleitung nicht eingegangen wird wenden Sie sich bitte an Ihren Sony Händler Wartung Austauschen der Sicherung Wenn Sie eine Sicherung austauschen achten Sie darauf eine Ers...

Страница 32: ...nung 35 dB bei 1 kHz Frequenzgang 30 15 000 Hz MW LW Empfangsbereich MW 531 1 602 kHz LW 153 279 kHz Antennenanschluss Anschluss für Außenantenne Zwischenfrequenz 10 7 MHz 450 kHz Empfindlichkeit MW 30 µV LW 40 µV Endverstärker Ausgänge Lautsprecherausgänge versiegelte Anschlüsse Lautsprecherimpedanz 4 8 Ohm Maximale Ausgangsleistung 50 W 4 an 4 Ohm Allgemeines Ausgänge Audioausgangsanschluss Tief...

Страница 33: ...en nicht den integrierten Verstärker Der Speicherinhalt wurde gelöscht Die Taste RESET wurde gedrückt tSpeichern Sie die Einstellungen erneut Das Stromversorgungskabel wurde gelöst oder die Verbindung zur Batterie besteht nicht mehr Das Stromversorgungskabel ist nicht richtig angeschlossen Gespeicherte Sender und die korrekte Uhrzeit werden gelöscht Die Sicherung ist durchgebrannt Störgeräusche si...

Страница 34: ...rend des UKW Empfangs blinkt die Anzeige ST Stellen Sie die Frequenz genau ein Das Sendesignal ist zu schwach t Drücken Sie SENS um den monauralen Empfangsmodus auf MONO ON einzustellen Eine UKW Stereosendung ist nur monaural zu hören Das Gerät ist in den monauralen Empfangsmodus geschaltet t Drücken Sie SENS so oft bis MONO OFF erscheint RDS Der Sendersuchlauf SEEK startet nach ein paar Sekunden ...

Страница 35: ...uppen bzw CD Namen NO TP Das Gerät sucht weiter nach verfügbaren Verkehrsfunksendern OFFSET Es liegt möglicherweise eine interne Fehlfunktion vor t Überprüfen Sie die Kabelverbindungen Wenn die Fehleranzeige weiterhin im Display angezeigt wird wenden Sie sich an einen Sony Händler READ Das Gerät liest gerade alle Titel und Gruppeninformation von der CD ein t Bitte warten Sie bis das Einlesen abges...

Страница 36: ...rds l appareil sélectionne les stations émettant des signaux forts et les mémorise Services RDS Vous pouvez utiliser une station FM disposant du système RDS Radio Data System Un disque CD TEXT est un CD DA contenant des informations telles que le nom du disque le nom de l artiste et le nom des plages SonicStage et son logo sont des marques commerciales de Sony Corporation ATRAC ATRAC3 ATRAC3plus e...

Страница 37: ...Réception des stations mémorisées 7 Recherche automatique des fréquences 8 Fonction RDS 8 Aperçu 8 Réglages AF et TA TP 8 Sélection PTY 9 Réglage de CT 9 Autres fonctions Modification des réglages du son 10 Réglage des caractéristiques du son BAL FAD SUB 10 Réglage de la courbe de l égaliseur EQ3 10 Réglage des paramètres de configuration SET 10 Utilisation de la télécommande en option 11 Mini tél...

Страница 38: ... de nouveau sur DSPL pour revenir à l écran précédent Conseil Vous pouvez régler l horloge automatiquement au moyen de la fonction RDS page 9 Avec la mini télécommande A l étape 2 et 4 pour sélectionner l option ou le réglage appuyez sur M ou m A l étape 4 pour déplacer l indication numérique appuyez sur ou Mode DEMO Lorsque l appareil est mis hors tension l horloge s affiche en premier puis un éc...

Страница 39: ...2250V nouhin 0324 CDX S2250V 0324 CDX S2250V 2348467711 234846771CDXS2250VEUR 03FR02CD EUR fm masterpage Right Installation de la façade Fixez la partie A de la façade sur la partie B de l appareil tel qu illustré puis poussez sur le côté gauche jusqu au déclic indiquant qu il est en position Remarque Ne posez rien sur la face interne de la façade B A 03FR 00COV EUR book Page 5 Thursday March 24 2...

Страница 40: ...i d environ 1 seconde et en la maintenant enfoncée d avancer rapidement ou de reculer dans une plage en appuyant et en maintenant la touche enfoncée k Touche déverrouillage de la façade 4 l Touche DSPL affichage DIM régulateur de luminosité 4 7 8 Permet de modifier les rubriques d affichage en appuyant et de modifier la luminosité de l affichage en appuyant et en maintenant la touche enfoncée m To...

Страница 41: ...tion des stations Attention Pour syntoniser des stations pendant que vous conduisez utilisez la fonction de mémorisation des meilleurs accords BTM afin d éviter les accidents Mémorisation automatique BTM 1 Appuyez plusieurs fois sur SOURCE jusqu à ce que l indication TUNER apparaisse Appuyez plusieurs fois sur MODE pour changer de bande Vous pouvez sélectionner FM1 FM2 FM3 MW PO ou LW GO 2 Appuyez...

Страница 42: ...le pays ou la région où vous vous trouvez il est possible que les services RDS ne soient pas tous disponibles La fonction RDS ne fonctionne pas correctement si le signal de retransmission est faible ou si la station syntonisée ne transmet pas de données RDS Réglages AF et TA TP 1 Appuyez plusieurs fois sur AF TA jusqu à ce que le réglage souhaité apparaisse Mémorisation des stations RDS avec les r...

Страница 43: ... numériques 1 En réception FM appuyez sur une touche numérique 1 à 6 sur laquelle une station locale est mémorisée 2 Dans les 5 secondes qui suivent appuyez de nouveau sur la touche numérique de la station locale Répétez cette procédure jusqu à ce que vous captiez la station locale souhaitée Sélection PTY 1 Appuyez sur PTY en cours de réception FM Le nom du type d émission diffusé apparaît si la s...

Страница 44: ...sur SEL jusqu à ce que l indication LOW MID ou HI apparaisse 3 Appuyez plusieurs fois sur la touche de volume pour régler le paramètre sélectionné Le niveau de volume peut être réglé par incréments de 1 dB de 10 dB à 10 dB Répétez les étapes 2 et 3 pour régler la courbe de l égaliseur Pour restaurer la courbe par défaut de l égaliseur appuyez sur la touche SEL et maintenez la enfoncée avant la fin...

Страница 45: ...s sur les autres opérations reportez vous à la section Avec la mini télécommande de chaque page Non disponible pour cet appareil Remarque Si vous désactivez l appareil et que l affichage est désactivé il ne peut plus être utilisé avec la mini télécommande sauf si la touche SOURCE de l appareil est enfoncée ou si un disque est inséré dans le lecteur pour l activer SUB REAR 1 Pour changer la sortie ...

Страница 46: ... Apposez l étiquette d indication en fonction de la position de montage du satellite de commande Emplacement des commandes Les touches du satellite de commande correspondantes commandent les mêmes fonctions que celles de cet appareil Les commandes suivantes du satellite de commande sont utilisées différemment de celles de l appareil Commande PRESET Permet de sélectionner des stations présélectionn...

Страница 47: ... mécanisme d éjection erreurs de lecture des données audio p ex sauts de lecture ou aucune lecture provoquées par une déformation du disque suite au rétrécissement de l étiquette ou de l autocollant sous l effet de la chaleur Les disques de forme non standard p ex en forme de cœur de carré ou d étoile ne peuvent pas être lus avec cet appareil Vous risquez d endommager votre appareil si vous essaye...

Страница 48: ... Format ATRAC3plus La norme ATRAC3 Adaptive Transform Acoustic Coding3 est une technologie de compression des données audio Il comprime les données CD audio à environ 1 10 de leur taille initiale ATRAC3plus qui est un format étendu de ATRAC3 comprime les données CD audio à environ 1 20 de leur taille initiale L appareil accepte le format ATRAC3 et ATRAC3plus CD ATRAC Les CD ATRAC sont enregistrés ...

Страница 49: ...aire l appareil 3Faites glisser l appareil en dehors de son support Spécifications Lecteur CD Rapport signal bruit 120 dB Réponse en fréquence 10 à 20 000 Hz Pleurage et scintillement en dessous du seuil mesurable Radio FM Plage de syntonisation 87 5 à 108 0 MHz Borne de l antenne connecteur d antenne externe Fréquence intermédiaire 10 7 MHz 450 kHz Sensibilité utile 9 dBf Sélectivité 75 dB à 400 ...

Страница 50: ...pas L antenne électrique ne dispose pas d un boîtier de relais Brevets américains et internationaux sous licence de Dolby Laboratories Aucun son Le volume est trop faible La fonction ATT est activée ou la fonction ATT téléphone lorsque le câble d interface d un téléphone embarqué est raccordé au fil ATT est activée La position de la commande d équilibre avant arrière FAD n est pas réglée sur un sy...

Страница 51: ...e antenne FM MW PO LW GO intégrée dans la vitre arrière latérale Vérifiez le raccordement de l antenne du véhicule L antenne automatique ne se déploie pas tVérifiez le raccordement du câble de commande de l antenne électrique Vérifiez la fréquence Impossible de capter une présélection Enregistrez la fréquence correcte dans la mémoire Le signal capté est trop faible Le réglage automatique des stati...

Страница 52: ... commence à rechercher une autre fréquence avec les mêmes données d identification de programme PI l indication PI SEEK apparaît NO ID3 Les informations de l étiquette ID3 ne sont pas écrites dans le fichier MP3 NO INFO Les informations textuelles ne sont pas écrites dans le fichier ATRAC3 ATRAC3plus NO MUSIC Le disque n est pas un fichier audio t Insérez un CD audio NO NAME Aucun nom de plage gro...

Страница 53: ... S2250 2 348 467 71 1 masterpage None G SONY 07 CDX 0324 0324 CDX S2250V nouhin 0324 CDX S2250V 0324 CDX S2250V 2348467711 234846771CDXS2250VEUR 03FR02CD EUR fm 03FR 00COV EUR book Page 19 Thursday March 24 2005 5 50 PM ...

Страница 54: ...arecchio seleziona le stazioni con il segnale più potente e le memorizza Servizi RDS È possibile utilizzare la stazione FM con RDS Radio Data System sistema dati radio Un disco CD TEXT è un CD DA che include informazioni quali titolo del disco nome dell artista e titolo del brano SonicStage e il relativo logo sono marchi di fabbrica di Sony Corporation ATRAC ATRAC3 ATRAC3plus e i rispettivi loghi ...

Страница 55: ...zioni memorizzate 7 Sintonizzazione automatica 8 RDS 8 Panoramica 8 Impostazione dei modi AF e TA TP 8 Selezione del tipo di programma PTY 9 Impostazione dell ora CT 9 Altre funzioni Modifica delle impostazioni dell audio 10 Regolazione delle caratteristiche dell audio BAL FAD SUB 10 Regolazione della curva dell equalizzatore EQ3 10 Regolazione delle voci di impostazione SET 10 Uso del telecomando...

Страница 56: ... Suggerimento È possibile regolare l orologio automaticamente tramite la funzione RDS page 9 Con il telecomando a scheda Ai punti 2 e 4 per selezionare la voce o l impostazione premere M o m Al punto 4 per passare da una cifra all altra dell indicazione digitale premere o Modo DEMO Quando l apparecchio viene spento viene visualizzato innanzitutto l orologio quindi il modo di dimostrazione DEMO att...

Страница 57: ... S2250V 0324 CDX S2250V 2348467711 234846771CDXS2250VEUR 04IT02CD EUR fm masterpage Right Installazione del pannello anteriore Posizionare la sezione A del pannello anteriore sulla sezione B dell apparecchio come illustrato quindi premere il lato sinistro fino a farlo scattare in posizione Nota Non collocare alcun oggetto sulla superficie interna del pannello anteriore B A 04IT 00COV EUR book Page...

Страница 58: ...in modo continuo premere quindi premere di nuovo entro 1 secondo e tenere premuto per fare avanzare o fare retrocedere rapidamente un brano tenere premuto k Tasto rilascio pannello anteriore 4 l Tasto DSPL display DIM attenuatore di luminosità 4 7 8 Per modificare le voci del display premere per modificare la luminosità del display tenere premuto m Tasto SENS BTM 7 Per migliorare la ricezione LOCA...

Страница 59: ... Attenzione Per la sintonizzazione delle stazioni durante la guida utilizzare la funzione BTM Best Tuning Memory memorizzazione automatica delle emittenti con sintonia migliore per evitare incidenti Memorizzazione automatica BTM 1 Premere più volte SOURCE fino a visualizzare TUNER Per modificare la banda premere più volte MODE È possibile selezionare FM1 FM2 FM3 MW o LW 2 Tenere premuto BTM fino a...

Страница 60: ...mere DSPL Servizi RDS Il presente apparecchio fornisce i servizi RDS in modo automatico come segue Note È possibile che non tutte le funzioni RDS siano disponibili a seconda del paese della regione La funzione RDS non è disponibile quando il segnale è troppo debole o se la stazione sintonizzata non trasmette dati RDS Impostazione dei modi AF e TA TP 1 Premere più volte AF TA fino a visualizzare l ...

Страница 61: ...r il Regno Unito Questa funzione consente di selezionare altre stazioni locali della stessa area anche se non sono memorizzate in corrispondenza dei tasti numerici 1 Durante la ricezione FM premere un tasto numerico da 1 a 6 in corrispondenza del quale è memorizzata una stazione locale 2 Entro 5 secondi premere nuovamente il tasto numerico della stazione locale Ripetere questa procedura fino alla ...

Страница 62: ...nata Il livello del volume può essere regolato in incrementi da 1 dB da 10 dB a 10 dB Ripetere i punti 2 e 3 per regolare la curva dell equalizzatore Per ripristinare la curva dell equalizzatore predefinita tenere premuto SEL prima del completamento dell impostazione Dopo 3 secondi l impostazione è completata e il display torna al modo di riproduzione ricezione normale Con il telecomando a scheda ...

Страница 63: ... meno che non venga premuto SOURCE sull apparecchio o inserito un disco per accendere l apparecchio stesso Sostituzione della batteria al litio In condizioni normali la batteria dura circa 1 anno Il ciclo di vita può risultare più breve in funzione delle condizioni di utilizzo Quando la batteria si scarica il raggio d azione del telecomando a scheda risulta ridotto Sostituire la batteria con una b...

Страница 64: ...i differenti sull apparecchio Comando PRESET Per selezionare le stazioni preselezionate premere e ruotare Comando VOL Stessa funzione del tasto volume dell apparecchio ruotare Comando SEEK AMS Stessa funzione del tasto SEEK dell apparecchio ruotare oppure ruotare e mantenere in posizione Modifica della direzione operativa La direzione operativa dei comandi è impostata in fabbrica come illustrato d...

Страница 65: ...desivo causano l inceppamento del meccanismo di espulsione Impossibilità di leggere correttamente i dati audio ad esempio la riproduzione salta oppure è impossibile riprodurre poiché il restringimento dovuto al calore dell etichetta o dell adesivo ha provocato la deformazione del disco Non riprodurre dischi dalla forma irregolare ad esempio a forma di cuore quadrato o stella con questo apparecchio...

Страница 66: ...mazioni su CD ATRAC Formato ATRAC3plus ATRAC3 l acronimo di Adaptive Transform Acoustic Coding3 è una tecnologia di compressione audio che consente di comprimere i dati audio di un CD fino a circa 1 10 delle dimensioni originali ATRAC3plus un formato esteso di ATRAC3 comprime i dati di un CD audio fino a circa 1 20 delle dimensioni originali Il presente apparecchio accetta entrambi i formati ATRAC...

Страница 67: ...ilascio per rimuovere la cornice di protezione 2 Rimuovere l apparecchio 1Inserire contemporaneamente entrambe le chiavi di rilascio fino a farle scattare in posizione 2Estrarre le chiavi di rilascio per sbloccare l apparecchio 3Rimuovere l apparecchio dalla struttura facendolo scorrere Caratteristiche tecniche Lettore CD Rapporto segnale rumore 120 dB Risposta in frequenza 10 20 000 Hz Wow e flut...

Страница 68: ...gli Stati Uniti d America e di altri Paesi concessi su licenza dai Dolby Laboratories Generali L apparecchio non riceve alimentazione Verificare il collegamento Se i collegamenti sono corretti controllare il fusibile Se l apparecchio viene spento e il display scompare non è possibile utilizzarlo mediante il telecomando tAccendere l apparecchio L antenna elettrica non si estende L antenna elettrica...

Страница 69: ...a sul vetro posteriore laterale Verificare il collegamento dell antenna dell auto L antenna dell auto non si estende tVerificare il collegamento del cavo di controllo dell antenna elettrica Verificare la frequenza Non è possibile effettuare la sintonizzazione preselezionata Memorizzare la frequenza corretta Il segnale di trasmissione è eccessivamente debole La sintonizzazione automatica non funzio...

Страница 70: ...vo programma viene visualizzata l indicazione PI SEEK NO ID3 Nel file MP3 non sono presenti informazioni tag ID3 NO INFO Nel file ATRAC3 ATRAC3plus non sono presenti informazioni di testo NO MUSIC Il disco inserito non è un file musicale t Inserire un CD audio NO NAME Il brano non contiene il nome del brano gruppo disco NO TP L apparecchio continua la ricerca di stazioni TP disponibili OFFSET Potr...

Страница 71: ... S2250 2 348 467 71 1 masterpage None G SONY 07 CDX 0324 0324 CDX S2250V nouhin 0324 CDX S2250V 0324 CDX S2250V 2348467711 234846771CDXS2250VEUR 04IT02CD EUR fm 04IT 00COV EUR book Page 19 Thursday March 24 2005 5 52 PM ...

Страница 72: ...ng Memory functie met het apparaat worden zenders met sterke signalen geselecteerd en opgeslagen RDS diensten U kunt FM zenders met RDS Radio Data System gebruiken Een CD TEXT disc is een CD DA die informatie bevat zoals discnaam artiestennaam en tracknamen SonicStage en het bijbehorende logo zijn handelsmerken van Sony Corporation ATRAC ATRAC3 ATRAC3plus en de bijbehorende logo s zijn handelsmerk...

Страница 73: ...tisch opslaan BTM 7 Handmatig opslaan 7 Opgeslagen zenders ontvangen 7 Automatisch afstemmen 7 RDS 8 Overzicht 8 AF en TA TP instellen 8 PTY selecteren 9 CT instellen 9 Andere functies De geluidsinstellingen wijzigen 10 De geluidskenmerken wijzigen BAL FAD SUB 10 De equalizercurve aanpassen EQ3 10 Instelitems aanpassen SET 10 Optionele afstandsbediening gebruiken 11 Kaartafstandsbediening RM X114 ...

Страница 74: ...op DSPL Druk nogmaals op DSPL om terug te keren naar het vorige display Tip U kunt de klok automatisch instellen met de RDS functie page 9 Met de kaartafstandsbediening Druk in stap 2 en 4 op M of m om het item of de instelling te selecteren Druk in stap 4 op of om de digitale aanduiding te verplaatsen DEMO stand Wanneer u het apparaat uitschakelt wordt eerst de klok weergegeven Vervolgens wordt d...

Страница 75: ...Y 07 CDX 0324 0324 CDX S2250V nouhin 0324 CDX S2250V 0324 CDX S2250V 2348467711 234846771CDXS2250VEUR 05NL02CD EUR fm masterpage Right Het voorpaneel bevestigen Bevestig deel A van het voorpaneel op deel B van het apparaat zoals in de afbeelding wordt weergegeven en druk op de linkerkant van het voorpaneel tot dit vastklikt Opmerking Plaats niets op de binnenkant van het voorpaneel B A ...

Страница 76: ...an indrukken tracks blijven overslaan indrukken vervolgens binnen 1 seconde nogmaals indrukken en vasthouden een track snel vooruit terugspoelen ingedrukt houden k voorpaneel losmaken toets 4 l DSPL display DIM dimmer toets 4 7 8 Displayitems wijzigen indrukken de helderheid van het display wijzigen ingedrukt houden m SENS BTM toets 7 Slechte ontvangst verbeteren LOCAL MONO indrukken de BTM functi...

Страница 77: ...rs opslaan en ontvangen Let op Als u afstemt op zenders tijdens het rijden moet u de BTM functie Best Tuning Memory gebruiken om ongevallen te vermijden Automatisch opslaan BTM 1 Druk herhaaldelijk op SOURCE tot TUNER wordt weergegeven Druk herhaaldelijk op MODE om de band te wijzigen U kunt FM1 FM2 FM3 MW of LW selecteren 2 Houd BTM ingedrukt tot BTM knippert Het apparaat slaat de zenders in de v...

Страница 78: ...k is of als de zender waarop u hebt afgestemd geen RDS gegevens verzendt AF en TA TP instellen 1 Druk herhaaldelijk op AF TA tot de gewenste instelling wordt weergegeven RDS zenders met de AF en TA instelling opslaan U kunt RDS zenders vooraf instellen met de AF en TA instelling Als u de BTM functie gebruikt worden alleen RDS zenders met dezelfde AF TA instelling opgeslagen Als u handmatig vooraf ...

Страница 79: ...de cijfertoetsen 1 Druk tijdens FM ontvangst op een cijfertoets 1 tot en met 6 waaronder een lokale zender is opgeslagen 2 Druk binnen 5 seconden nogmaals op de cijfertoets van de lokale zender Herhaal dit tot de lokale zender wordt ontvangen PTY selecteren 1 Druk op PTY tijdens FM ontvangst De naam van het huidige programmatype verschijnt als de zender PTY gegevens uitzendt 2 Druk herhaaldelijk o...

Страница 80: ... het geselecteerde item aan te passen Het volume kan worden aangepast in stappen van 1 dB van 10 dB tot 10 dB Herhaal stap 2 en 3 om de equalizercurve aan te passen Als u de fabrieksinstelling voor de equalizercurve wilt herstellen houdt u SEL ingedrukt voordat het instellen is voltooid Na 3 seconden is het instellen voltooid en keert het display terug naar de weergave ontvangststand Met de kaarta...

Страница 81: ...play verdwijnt kan het apparaat niet worden bediend met de kaartafstandsbediening tenzij op SOURCE op het apparaat wordt gedrukt of er een disc wordt geplaatst om het apparaat eerst te activeren De lithiumbatterij vervangen In normale omstandigheden gaat de batterij ongeveer 1 jaar mee Afhankelijk van de gebruiksomstandigheden kan de levensduur korter zijn Wanneer de batterij verzwakt wordt het be...

Страница 82: ...raaien VOL regelaar Deze regelaar heeft dezelfde functie als de volume toets op het apparaat draaien SEEK AMS regelaar Deze regelaar heeft dezelfde functie als SEEK op het apparaat draaien of draaien en vasthouden De werkingsrichting wijzigen De werkingsrichting van de bedieningselementen is in de fabriek ingesteld zoals hieronder wordt aangegeven Als u de bedieningssatelliet rechts op de stuurkol...

Страница 83: ...oordat de sticker onder invloed van de warmte krimpt en de disc kromtrekt Discs met afwijkende vormen bijvoorbeeld hart vierkant ster kunnen niet met dit apparaat worden afgespeeld Als u dit toch probeert kan het apparaat worden beschadigd Gebruik dergelijke discs niet U kunt geen 8 cm CD s afspelen Maak een disc voor het afspelen altijd schoon met een in de handel verkrijgbare doek Veeg de disc v...

Страница 84: ...CD zijn audio CD gegevens opgenomen die zijn gecomprimeerd tot ATRAC3 of ATRAC3plus indeling met geautoriseerde software zoals SonicStage 2 0 of hoger of SonicStage Simple Burner Maximumaantal mappen groepen 255 bestanden tracks 999 De tekens voor een map bestandsnaam en de tekstinformatie van SonicStage worden weergegeven Raadpleeg de handleiding van SonicStage of SonicStage Simple Burner voor me...

Страница 85: ...aal ruis afstand 67 dB stereo 69 dB mono Harmonische vervorming bij 1 kHz 0 5 stereo 0 3 mono Scheiding 35 dB bij 1 kHz Frequentiebereik 30 15 000 Hz MW LW Afstembereik MW 531 1 602 kHz LW 153 279 kHz Antenne aansluiting Aansluiting voor externe antenne Tussenfrequentie 10 7 MHz 450 kHz Gevoeligheid MW 30 µV LW 40 µV Versterker Uitgangen Luidsprekeruitgangen sure seal Luidsprekerimpedantie 4 8 ohm...

Страница 86: ... op in het geheugen De voedingskabel of de accu is losgekoppeld De voedingskabel is niet goed aangesloten Opgeslagen zenders en tijd zijn gewist De zekering is doorgebrand Maakt geluid wanneer de positie van de contactsleutel wordt ingeschakeld De kabels zijn niet goed verbonden met de hulpvoedingsaansluiting van de auto Het display verdwijnt van verschijnt niet in het weergavevenster De dimmer is...

Страница 87: ...egeven RDS SEEK begint na enkele seconden weergave De zender is geen TP zender of heeft een zwak signaal t Schakel TA uit page 8 Geen verkeersinformatie Schakel TA in page 8 De zender is een TP zender maar zendt toch geen verkeersinformatie uit tStem af op een andere zender PTY geeft weer De huidige zender is geen RDS zender Geen RDS gegevens ontvangen De zender geeft het programmatype niet door E...

Страница 88: ...zijnde Sony handelaar raadplegen Als u het apparaat ter reparatie wegbrengt omdat een CD niet goed wordt afgespeeld kunt u het beste de disc meenemen waarmee het probleem is begonnen RESET Het apparaat werkt niet wegens een probleem t Druk op de RESET toets page 4 of Tijdens het snel vooruit of terugspoelen hebt u het begin of het einde van de disc bereikt en kunt u niet verder Het teken kan niet ...

Страница 89: ...CDX S2250V S2250S S2250 2 348 467 71 1 masterpage None G SONY 07 CDX 0324 0324 CDX S2250V nouhin 0324 CDX S2250V 0324 CDX S2250V 2348467711 234846771CDXS2250VEUR 05NL02CD EUR fm ...

Страница 90: ...CDX S2250V S2250S S2250 2 348 467 71 1 masterpage None G SONY 07 CDX 0324 0324 CDX S2250V nouhin 0324 CDX S2250V 0324 CDX S2250V 2348467711 234846771CDXS2250VEUR 05NL02CD EUR fm ...

Страница 91: ...CDX S2250V S2250S S2250 2 348 467 71 1 masterpage None G SONY 07 CDX 0324 0324 CDX S2250V nouhin 0324 CDX S2250V 0324 CDX S2250V 2348467711 234846771CDXS2250VEUR 05NL02CD EUR fm ...

Страница 92: ... Fahrzeug aufbewahren möchten Bitte bewahren Sie den Geräte Pass an einem sicheren Ort auf Er kann im Falle eines Diebstahls zur ldentifikation lhres Eigentums dienen caraudio Geräte Pass Dieser Geräte Pass dient als Eigentumsnachweis für Ihr caraudio Gerät im Falle eines Diebstahls Wir empfehlen den Geräte Pass nicht im Fahrzeug aufzubewahren um Missbrauch zu verhindern Modellbezeichnung sCDX S22...

Отзывы: