background image

20

CD-R/CD-RW 光盘的注意事项

某些 CD-R/CD-RW(视用于录制的设备或光盘情
况而定)可能无法在装置上播放。

您无法播放未最终化的 CD-R/CD-RW。

采用版权保护技术编码的音乐光盘

本产品是专为播放符合 Compact Disc (CD)标 
准光盘而设计。
近来,许多唱片公司都推出各种采用版权保护技
术编码的音乐光盘。请注意,这些光盘中可能会
有不符合 CD 标准的光盘,并且可能无法使用本
产品播放。

关于 MP3/WMA 文件

MP3 表示 MPEG-1 Audio Layer-3,是一项音乐文  
件压缩格式标准。此格式将音频 CD 数据压缩到
原大小的 1/10 左右。
WMA 表示 Windows Media Audio,为另一项音乐    
文件压缩格式标准。此格式将音频 CD 数据压缩
到原大小的 1/22

*

 左右。

*

仅适用于 64 kbps

本机与 ISO 9660 level 1/level 2 格式、
Joliet/Romeo 扩展格式和 Multi Session 兼
容。

最大数量:

文件夹 (专辑):150 (包括根文件夹和空文

件夹)。

光盘中含有的 MP3/WMA 文件 (曲目)和文件

夹:300 (如果文件夹 / 文件名称包含许多字
符,该数量可能小于 300)。

文 件夹 / 文件 名称 的可 显 示字 符数 为 32

(Joliet)或 64 (Romeo)。

ID3 标记 1.0、1.1、2.2、2.3 和 2.4 版仅   

应用于 MP3。 ID3 标记为 15/30 个字符 (1.0 
和 1.1 版),或 63/126 个字符(2.2、2.3 和 
2.4 版)。 WMA 标记为 63 个字符数。

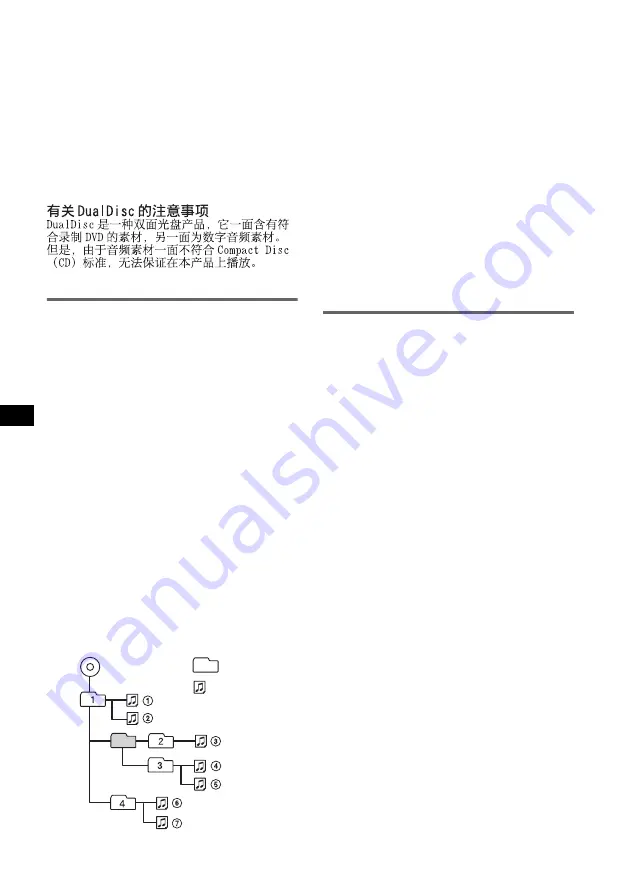
MP3/WMA 文件的播放顺序

注意

命名 MP3/WMA 文件时,必须在文件名称后面加上文件
扩展名 “.mp3”/ “.wma”。

在 VBR (可变比特率)MP3/WMA 文件播放过程中或快
进 / 后退过程中,已播放时间可能不会精确显示。

当光盘是以 Multi Session 录制时,只有第一个区段 
格式的第一个曲目被识别并播放(任何其他格式被跳
过)。 格式的优先顺序为 CD-DA、ATRAC CD 和 MP3/  
WMA。
- 当第一个曲目为 CD-DA 时,只播放第一个区段的 

CD-DA。

- 当第一个曲目不是 CD-DA 时,会播放 ATRAC CD 或 

MP3/WMA 的区段。 如果光盘中没有这些格式的数 
据,则显示 “NO Music”。

MP3 的注意事项

在本机上使用之前,必须最终化光盘。

如果播放如 320 kbps 高比特率 MP3,则声音可能会断 
断续续。

WMA 的注意事项

无损压缩做成的文件不可播放。

有版权保护的文件不可播放。

关于 ATRAC CD

ATRAC3plus 格式

ATRAC3 表示 Adaptive Transform Acoustic 
Coding3,是音频压缩技术。 此格式将音频 CD
数据压缩到原大小的 1/10 左右。 ATRAC3plus
是 ATRAC3 的扩充格式,将音频 CD 数据压缩到
原大小的 1/20 左右。 本机接受 ATRAC3 和
ATRAC3plus 格式。

ATRAC CD

ATRAC CD是录制的音频CD数据,使用SonicStage 
2.0 或更新版本,或 SonicStage Simple Burner  
等许可软件压缩成 ATRAC3 或 ATRAC3plus 格式。

最大数量:

文件夹 (群组):255

文件 (曲目):999

显示文件夹 / 文件名称字符和由 SonicStage 写
入的文本信息。

关于 ATRAC CD 的详细信息,请参阅 SonicStage 
或 SonicStage Simple Burner 的说明书。

注意

必须使用 SonicStage 2.0 或更新版本,或 SonicStage 
Simple Burner 1.0 或 1.1 等许可软件制作 ATRAC CD。

如果您对装置有疑问或问题,而本说明书中未提
及,请向附近的 Sony 经销商咨询。

文件夹 

(专辑)

MP3/WMA 文件

(曲目)

MP3/WMA

Содержание CDX-GT800D

Страница 1: ...ones 2006 Sony Corporation 2 663 780 31 2 GB ES CS CDX GT800D To cancel the demonstration DEMO display see page 16 Para cancelar la pantalla de demostración DEMO consulte la página 18 FM MW LW Compact Disc Player Autoestéreo para disco compacto ...

Страница 2: ...th this unit A CD TEXT disc is a CD DA that includes information such as disc artist and track name SonicStage and its logo are trademarks of Sony Corporation ATRAC ATRAC3 ATRAC3plus and their logos are trademarks of Sony Corporation Type of discs Label on the disc CD DA MP3 WMA ATRAC CD Warning if your car s ignition has no ACC position After turning the ignition off be sure to press and hold OFF...

Страница 3: ...ting AF and TA TP 10 Selecting PTY 10 Setting CT 11 Enjoying your best sound X DSP HDEQ 11 DSO 3D 12 Intelligent Time Alignment I TA 12 BBE MP 12 Selecting to taste SOUND 13 Optimizing your sound Sound MENU 13 HDEQ Tuning 13 DSO 3D Tuning 14 I TA Tuning 14 BBE MP 14 Precisely adjusting your sound 15 Other functions Changing the sound settings 16 Adjusting the sound characteristics Balance Fader Su...

Страница 4: ...al indication press ENTER 5 After setting the minute press ENTER The clock starts With the card remote commander In steps 2 to 4 press M or m instead of the SEEK control dial in step 4 press or instead of ENTER Tip You can set the clock automatically with the RDS feature page 11 Detaching the front panel You can detach the front panel of this unit to prevent theft Caution alarm If you turn the ign...

Страница 5: ...ed 2 Press Z to close the front panel Note The front panel slides up automatically after 15 seconds of the front panel sliding down Adjusting the angle of the front panel 1 Press and hold ANGLE repeatedly until the front panel is angled accordingly The front panel can be set to 3 positions To return the front panel to its default position press and hold ANGLE repeatedly until the front panel is re...

Страница 6: ...EEK control dial ENTER button To select items rotate complete a setting press CD To skip tracks or album groups press ENTER repeatedly to select or ALBM GROUP then rotate the SEEK control dial until the desired track or album group appears Radio To tune in stations press ENTER repeatedly to select SEEK MANUAL or PRESET then rotate the SEEK control dial until the desired station appears G MENU butt...

Страница 7: ...ttons CD To skip tracks press skip tracks continuously press then press again within about 1 second and hold fast forward reverse a track press and hold Radio To tune in stations automatically press find a station manually press and hold qk DSPL display PTY Programme Type button 8 10 To change display items to select PTY in RDS ql VOL volume button To adjust volume w ATT attenuate button To attenu...

Страница 8: ...nt Storing automatically BTM 1 Press SOURCE repeatedly until TUNER appears To change the band press MODE repeatedly You can select from FM1 FM2 FM3 MW or LW 2 Press MENU 3 Rotate the SEEK control dial until RECEIVE MODE then press ENTER 4 Rotate the SEEK control dial until BTM appears then press ENTER The unit stores stations in order of frequency on the number buttons A beep sounds when the setti...

Страница 9: ...ect the normal play mode by pressing IMAGE repeatedly page 7 A Radio band B TP TA AF 1 C Clock D Preset number E Frequency 2 Programme Service name RDS data 1 When Information All is set TP lights up while TP is received TA AF lights up while TA AF is on When TA is received TA flashes in D 2 While receiving the RDS station RDS is displayed on the left of the frequency indication RDS services This ...

Страница 10: ...1 to 6 on which a local station is stored 2 Within 5 seconds press again a number button of the local station Repeat this procedure until the local station is received Selecting PTY 1 Press MENU during FM reception 2 Rotate the SEEK control dial until PTY appears then press ENTER The current programme type name appears if the station is transmitting PTY data 3 Rotate the SEEK control dial until th...

Страница 11: ...aste SOUND page 13 For more precise adjustment see Optimizing your sound Sound MENU page 13 and Precisely adjusting your sound page 15 Notes X DSP sound is achieved using four channels consisting of two front speakers and two rear speakers If you use only front speakers or rear speakers the effect will be as pronounced The degree of effect will depend on your vehicle type and its speakers HDEQ The...

Страница 12: ...rom each speaker The unit can simulate a natural sound field with the feeling of being in the centre of it wherever you sit in the car Tip See I TA Tuning page 14 for fine adjusting the sound for your car Adjustment between each speaker and your listening position can be done in 2 cm increments BBE MP BBE MP improves digitally compressed sound on all sources page 2 14 Item Effect STD Front door sp...

Страница 13: ...emote commander In steps 2 and 4 press M or m to adjust the selected item HDEQ Tuning The equalizer curve is precisely adjustable for frequency and volume level Tuning consists of 4 channels Front L R and Rear L R 1 Select SOUND t HDEQ in MENU mode 2 Select Custom1 Custom2 or Custom3 to store 3 Select the equalizer curve you wish to adjust In your chosen Custom setting the equalizer curve can be a...

Страница 14: ...ct SOUND t I TA t Smart Mode in MENU mode 2 Select the preset mode which you wish to set up 3 Adjust precisely the position 4 Press ENTER to complete Pro mode This mode is for those who wish to be more creative in shaping the sound Measure the distance between your listening position and each speaker You will need to input these distances for the correct delay s to be applied 1 Select SOUND t I TA...

Страница 15: ...r curve Refined Vocal 2 Adjust the FADER setting to R fully then adjust the rear left and right speakers based on the preset equalizer curve Refined Vocal 3 Return the FADER setting to the centre Start Advance setting I TA Pro mode HDEQ Finish Enter the distance value measured following the I TA Pro mode procedure then save Step1 Adjust the distance value of opposite speaker leaving the distance v...

Страница 16: ...mode Note Displayed items will differ depending on the source and setting With the card remote commander In steps 2 and 3 press M or m instead of the SEEK control dial in steps 2 3 and 4 press or instead of ENTER The following items can be set follow the page reference for details z indicates the default settings SETUP DISPLAY Clock Adjust page 4 CT Clock Time To set on or off z page 9 11 Beep To ...

Страница 17: ... reception mode off z to hear stereo broadcast in stereo on to hear stereo broadcasts in monaural Regional 2 To set off or on z page 10 BTM page 8 HDEQ page 13 DSO 3D page 14 I TA page 14 Front HPF High Pass Filter To select the front speaker cut off frequency off z 63Hz 78Hz 100Hz 125Hz or 160Hz Rear HPF High Pass Filter To select the rear speaker cut off frequency off z 63Hz 78Hz 100Hz 125Hz or ...

Страница 18: ...nit If the changer or other device is not connected to the terminal the unit allows you to listen to the portable device on your car speakers Note When connecting a portable device be sure BUS CONTROL IN is not connected If a device is connected to BUS CONTROL IN AUX cannot be selected with SOURCE Tip When connecting both a portable device and a changer use the optional AUX IN selector Selecting a...

Страница 19: ...es and display of the unit Should this occur the unit will not operate properly In such a case remove the disc and wait for about an hour until the moisture has evaporated To maintain high sound quality Be careful not to splash juice or other soft drinks onto the unit or discs Notes on discs To keep a disc clean do not touch its surface Handle the disc by its edge Keep your discs in their cases or...

Страница 20: ...s Playback order of MP3 WMA files Notes When naming an MP3 file WMA file be sure to add the file extension mp3 wma to the file name During playback of a VBR variable bit rate MP3 WMA file or fast forward reverse elapsed playing time may not display accurately When the disc is recorded in Multi Session only the first track of the first session format is recognized and played any other format is ski...

Страница 21: ...eezers otherwise a short circuit may occur Fuse replacement When replacing the fuse be sure to use one matching the amperage rating stated on the original fuse If the fuse blows check the power connection and replace the fuse If the fuse blows again after replacement there may be an internal malfunction In such a case consult your nearest Sony dealer Cleaning the connectors The unit may not functi...

Страница 22: ...l relay control terminal Power amplifier control terminal Inputs Telephone ATT control terminal Illumination control terminal BUS control input terminal BUS audio input AUX IN terminal Remote controller input terminal Aerial input terminal Loudness 8 dB at 100 Hz 0 dB at 10 kHz Power requirements 12 V DC car battery negative earth Dimensions Approx 178 50 188 mm w h d Mounting dimensions Approx 18...

Страница 23: ...s used for printing the carton Packaging cushions do not use polystyrene foam The display disappears from does not appear in the display window The dimmer is set Dimmer on page 17 The angle of the front panel is not proper tAdjust the angle of the front panel by pressing and hold ANGLE page 7 The display disappears if you press and hold OFF tPress and hold OFF on the unit until the display appears...

Страница 24: ...e station is non TP or has weak signal tDeactivate TA page 10 No traffic announcements Activate TA page 10 The station does not broadcast any traffic announcements despite being TP tTune in another station PTY displays The current station is not an RDS station RDS data has not been received The station does not specify the programme type Blank 1 Tracks have not been recorded on the MD 2 tPlay an M...

Страница 25: ...on If the error indication remains on in the display consult your nearest Sony dealer Read The unit is reading all track and album group information on the disc tWait until reading is complete and playback starts automatically Depending on the disc structure it may take more than a minute Push Reset The CD unit and CD MD changer cannot be operated because of some problem tPress the RESET button pa...

Страница 26: ... y los dispositivos portátiles opcionales de Sony Un disco CD TEXT es un CD DA que incluye información como el nombre del disco del artista y de la pista SonicStage y su logotipo son marcas comerciales de Sony Corporation ATRAC ATRAC3 ATRAC3plus y sus respectivos logotipos son marcas comerciales de Sony Corporation Tipo de discos Etiqueta del disco CD DA MP3 WMA CD de ATRAC Advertencia si el encen...

Страница 27: ... de AF y TA TP 10 Selección de PTY 11 Ajuste de CT 11 Disfrute del mejor sonido X DSP HDEQ 12 DSO 3D 12 Alineación de tiempo inteligente I TA 13 BBE MP 13 Selección personalizada SOUND 13 Optimización del sonido Sound MENU 13 Sintonización HDEQ 14 Sintonización DSO 3D 14 Sintonización I TA 14 BBE MP 15 Ajuste preciso del sonido 16 Otras funciones Cambio de los ajustes de sonido 17 Ajuste de las ca...

Страница 28: ...n digital presione ENTER 5 Una vez ajustados los minutos presione ENTER El reloj se pone en funcionamiento Con el control remoto de tarjeta En los pasos del 2 al 4 presione M o m en lugar del selector de control SEEK en el paso 4 presione o en lugar de ENTER Sugerencia Puede ajustar automáticamente el reloj con la función RDS página 11 Extracción del panel frontal Puede extraer el panel frontal de...

Страница 29: ...l disco 2 Presione Z para cerrar el panel frontal Nota El panel frontal se desliza hacia arriba automáticamente 15 segundos después de deslizarse hacia abajo Ajuste del ángulo del panel frontal 1 Mantenga presionado ANGLE varias veces hasta que se ajuste el ángulo del panel frontal El panel frontal puede ajustarse en 3 posiciones Para colocar el panel frontal en la posición predeterminada mantenga...

Страница 30: ... Para insertar el disco F Selector de control SEEK botón ENTER Para seleccionar elementos girar activar un ajuste presionar CD Para omitir pistas o álbumes grupos presione ENTER varias veces para seleccionar o ALBM GROUP y a continuación gire el selector de control SEEK hasta que aparezca la pista o álbum grupo deseado Radio Para sintonizar emisoras presione ENTER varias veces para seleccionar SEE...

Страница 31: ... omitir pistas presionar para omitir pistas de forma continua presionar y volver a presionar dentro de 1 segundo y mantener para avanzar o retroceder una pista rápidamente mantener presionado Radio Para sintonizar emisoras de forma automática presionar para localizar una emisora de forma manual mantener presionado qk Botón DSPL pantalla PTY Tipo de programa 8 11 Para cambiar los elementos en panta...

Страница 32: ... de tarjeta para desplazar los elementos de pantalla C presione SCRL en el control remoto de tarjeta o active el desplazamiento automático página 18 Sugerencia Los elementos que se muestran variarán en función del tipo de disco el formato de grabación y los ajustes Si desea conocer más detalles acerca de los archivos MP3 WMA consulte la página 21 sobre CD de ATRAC consulte la página 22 Reproducció...

Страница 33: ... emisoras almacenadas 1 Seleccione la banda y a continuación presione un botón numérico de 1 a 6 Sugerencia Otro método de recepción de las emisoras almacenadas es presionar ENTER varias veces hasta que aparezca PRESET y a continuación girar el selector de control SEEK hasta que aparezca el número de memorización que desee Sintonización automática 1 Seleccione la banda presione ENTER hasta que apa...

Страница 34: ...da emisora 1 Ajuste AF TA y a continuación almacene la emisora manualmente o con BTM Memorización del volumen de los anuncios de tráfico Para no perderse los anuncios de tráfico a causa del volumen puede memorizarlo 1 Gire el selector de control de volumen para ajustar el nivel de volumen 2 Mantenga presionado AF TA hasta que aparezca TA Vol Recepción de anuncios de emergencia Si tiene activado AF...

Страница 35: ...rama seleccionado Con el control remoto de tarjeta En los pasos 1 y 2 presione PTY en lugar de MENU en el paso 3 presione M o m en lugar del selector de control SEEK Tipos de programas Nota No puede utilizar esta función en los países o regiones en los que no se disponga de datos PTY Ajuste de CT 1 Ajuste CT on en SETUP página 17 Notas La función CT puede que no funcione aunque se reciba una emiso...

Страница 36: ...fecto producido dependerá del tipo de automóvil y de los altavoces HDEQ El ecualizador independiente de 13 bandas y cuatro canales le permite adaptar la música a su propio gusto Sugerencia Para una personalización más precisa consulte Sintonización HDEQ página 14 DSO 3D DSO 3D es una tecnología de sonido virtual 3D que reduce los problemas de los altavoces de baja calidad Crea un espacio de sonido...

Страница 37: ...juste El ajuste finalizará transcurridos unos 3 segundos Con el control remoto de tarjeta En el paso 2 presione o para ajustar de forma precisa la sintonización HDEQ DSO 3D e I TA Para obtener más información consulte la página 13 y 14 Optimización del sonido Sound MENU Puede optimizar de forma precisa la configuración de HDEQ DSO 3D y I TA a su gusto y de acuerdo con el interior de su automóvil u...

Страница 38: ...en el paso 4 para restaurar el ajuste predeterminado plano Con el control remoto de tarjeta En el punto 1 del paso 5 presione o para ajustar la frecuencia en el paso 2 presione M o m para ajustar el nivel Sintonización DSO 3D Puede ajustar la altura anchura y profundidad del espacio de sonido virtual a su gusto 1 Seleccione SOUND t DSO 3D en el modo MENU 2 Para el almacenamiento seleccione Custom1...

Страница 39: ...l altavoz y la de escucha Cada clic en el selector de control SEEK representa 2 cm Si presiona M o m en el control remoto de tarjeta el ajuste cambiará a intervalos de 2 cm y si lo mantiene presionado a intervalos 10 cm 5 Confirme su configuración utilizando la pantalla de confirmación y guarde el valor introducido Custom1 Custom2 y Custom3 aparecen con el icono de un lápiz una vez almacenados por...

Страница 40: ...la curva de ecualizador predefinida Refined Vocal 2 Ajuste completamente FADER en R y a continuación ajuste los altavoces posterior izquierdo y derecho en función de la curva de ecualizador predefinida Refined Vocal 3 Vuelva a colocar el ajuste FADER en el centro Inicio Ajuste avanzado Modo I TA Pro HDEQ Listo Introduzca el valor de distancia medido según el procedimiento del modo I TA Pro y guárd...

Страница 41: ...DE y SOUND y LIST y PTY 3 Gire el selector de control SEEK hasta que aparezca el elemento de ajuste deseado y a continuación presione ENTER La indicación digital se desplaza hacia el lado derecho selección de ajuste 4 Gire el selector de control SEEK para seleccionar el ajuste y a continuación presione ENTER El ajuste finalizó 5 Presione MENU La pantalla vuelve al modo de reproducción recepción no...

Страница 42: ...azarlo on para desplazarlo Local Modo de búsqueda local off z para sintonizar con una recepción normal on para sintonizar únicamente las emisoras con una señal más intensa Mono Modo monoaural 2 Seleccione el modo de recepción monoaural para mejorar una recepción de FM de mala calidad off z para escuchar emisiones estéreo en estéreo on para escuchar emisiones estéreo en monoaural Regional 2 Para aj...

Страница 43: ...de la lista cuando haya conectado un cambiado de CD con capacidad para CD TEXT o un cambiador de MD Si asigna un nombre al disco el nombre aparece en la lista 1 Durante la reproducción presione MENU 2 Gire el selector de control SEEK hasta que aparezca LIST y a continuación presione ENTER Aparece el número o el nombre del disco 3 Gire el selector de control SEEK hasta que aparezca el disco deseado...

Страница 44: ...iones del apartado Ajuste de elementos de menú MENU página 17 El nivel de entrada puede ajustarse de 6 dB a 6 dB Mando rotatorio RM X4S Colocación de la etiqueta Coloque la etiqueta de indicación según el modo en que instale el mando rotatorio Ubicación de los controles Los botones correspondientes en el mando rotatorio controlan las mismas funciones que los de esta unidad o del control remoto de ...

Страница 45: ...ueden reproducir discos compactos de 8 cm Antes de reproducir discos límpielos con un paño de limpieza disponible en el mercado Hágalo desde el centro hacia los bordes No utilice disolventes como bencina diluyentes productos de limpieza comerciales ni aerosoles antiestáticos para discos analógicos Notas sobre los discos CD R CD RW Según el estado del disco o el equipo utilizado para su grabación e...

Страница 46: ...n pérdidas No es posible reproducir archivos protegidos por derechos de autor Acerca de los CD de ATRAC Formato ATRAC3plus ATRAC3 que significa Adaptive Transform Acoustic Coding3 es una tecnología de compresión de audio Comprime los datos de CD de audio a aproximadamente 1 10 de su tamaño original ATRAC3plus un formato extendido de ATRAC3 comprime los datos de CD de audio a aproximadamente 1 20 d...

Страница 47: ...ción extraiga el panel frontal página 4 y limpie los conectores con un hisopo de algodón humedecido en alcohol No aplique demasiada fuerza ya que podría dañar los conectores Notas Por razones de seguridad apague el motor antes de limpiar los conectores y extraiga la llave del interruptor de encendido No toque nunca los conectores directamente con los dedos ni con ningún dispositivo metálico Extrac...

Страница 48: ... Control remoto de tarjeta RM X154 Componentes de instalación y conexiones 1 juego Equipo y accesorios opcionales Mando rotatorio RM X4S Cable BUS suministrado con un cable con terminales RCA RC 61 1 m RC 62 2 m Cambiador de CD 10 discos CDX 757MX CDX 656X Cambiador de MD 6 discos MDX 66XLP Selector de fuente XA C30 Selector AUX IN XA 300 Es posible que su distribuidor no comercialice algunos de l...

Страница 49: ...ustes no se guardarán aunque aparezca el icono del lápiz Las imágenes cambian automáticamente En modo Auto Image imagen automática no se puede visualizar la imagen seleccionada tPara visualizar únicamente la imagen seleccionada ajuste Auto Image off página 18 No se visualiza ningún elemento de la pantalla tAjuste Information All página 18 Reproducción de CD MD No es posible insertar el disco Ya ha...

Страница 50: ...isora RDS No se han recibido los datos RDS La emisora no especifica el tipo de programa Blank 1 No hay pistas grabadas en el MD 2 tReproduzca un MD que tenga pistas grabadas Error 1 El disco está sucio o se insertó al revés 2 tLímpielo o insértelo en forma correcta Se insertó un disco vacío El disco no se reproduce debido a algún problema tInserte otro disco Failure La conexión de los altavoces y ...

Страница 51: ...idor Sony más cercano Read La unidad está leyendo toda la información de álbumes y de grupos del disco tEspere hasta que finalice la lectura y se inicie la reproducción automáticamente Es posible que demore más de un minuto en función de la estructura del disco Push Reset La unidad de CD y el cambiador de CD MD no pueden utilizarse debido a algún problema tPresione el botón RESET página 4 o Durant...

Страница 52: ... BTM 最佳调谐记忆功能 本机选择信号 强的电台并储存 RDS 服务 您可以使用带有收音机数据系统 RDS 的 FM 电台 声音调整 X DSP Sony 的新声音引擎 通过数字信号处理产 生出理想的车内声场 图像设定 您可以在装置上设定各种显示图像 空间发生器 在播放音乐时创建生动的屏幕 图案 选购装置操作 除了用本机进行播放之外 您还可以控制选 购的 CD MD 换碟机和选购的 Sony 便携式设 备 CD TEXT 光盘是含有光盘 艺术家或曲目名称等信息 的 CD DA SonicStage 及其标志是 Sony Corporation 的商标 ATRAC ATRAC3 ATRAC3plus 及它们的标志 是 Sony Corporation 的商标 光盘类型 光盘上的标签 CD DA MP3 WMA ATRAC CD ...

Страница 53: ...概述 9 设定 AF 和 TA TP 10 选择 PTY 10 设定 CT 10 欣赏最佳声音 X DSP HDEQ 11 DSO 3D 11 智能时间校正 I TA 12 BBE MP 12 选择以享受 SOUND 12 最优化声音 Sound MENU 12 HDEQ 调谐 13 DSO 3D 调谐 13 I TA 调谐 13 BBE MP 14 精确调整声音 15 其他功能 更改声音设定 16 调整声音特性 平衡 音量衰减 超低音扬声器 16 调整菜单项目 MENU 16 使用选购设备 17 CD MD 换碟机 17 辅助音频设备 18 旋转式遥控器 RM X4S 18 附加信息 使用前注意事项 19 光盘注意事项 19 关于 MP3 WMA 文件 20 关于 ATRAC CD 20 保养 21 取出本机 21 规格 22 故障排除 22 出错显示 信息 24 转换表 25 ...

Страница 54: ... 旋转 SEEK 控制拨盘直至出现 Clock Adjust 然后按 ENTER 出现时钟调整显示 4 旋转 SEEK 控制拨盘 设定小时和分钟 若要移动数字指示 按 ENTER 5 设定分钟后 按 ENTER 时钟开始走时 用卡片式遥控器操作 在步骤 2 至 4 中 按 M 或 m 代替旋转 SEEK 控制拨盘 在步骤 4 中 按 或 代替按 ENTER 提示 您可以用 RDS 功能自动设定时钟 第 10 页 拆卸前面板 您可以拆下本机的前面板以防止本机被盗 警报 若您未拆除前面板即把点火开关旋转至 OFF 档 警报器将发出数秒钟的警报声 只有使用内置放大器时警报器才会发出警报 声 1 按 OFF 本机关闭 2 按 前面板左侧释放 3 将前面板滑向左侧 然后朝您身体方向轻 轻拉出前面板 注意 切勿摔落或猛按前面板及显示窗 切勿使前面板受热 高温或受潮 避免将前面板遗留 在停放的车中或仪表...

Страница 55: ...1 按 Z 前面板自动滑下 2 插入光盘 标签面朝上 前面板自动向上滑 然后自动开始播放 退出光盘 1 按 Z 前面板自动滑下 然后光盘被退出 2 按 Z 关闭前面板 注意 前面板滑下 15 秒钟后会自动向上滑 调整前面板的角度 1 反复按住 ANGLE 直至前面板角度适合 前面板可以设定至 3 个位置 若要将前面板返回至默认位置 则反复按住 ANGLE 直至前面板返回其默认位置 提示 前面板滑下 要插入光盘 后 将再次自动返回至您 设定的位置 您设定的前面板角度储存在本机中 关闭点火开关 时 前面板角度返回至默认位置 然后打开点火开关 前面板转变为您设定的角度 B A ANGLE ...

Страница 56: ...定 按 CD 跳过曲目或群组 反复按 ENTER 选择 或 ALBM GROUP 然后旋转 SEEK 控制拨盘 直至出现想要的曲目或专 辑 群组 收音机 调入电台 反复按 ENTER 选择 SEEK MANUAL 或 PRESET 然后旋转 SEEK 控制拨盘 直至出现想要的电台 G MENU 按钮 进入菜单 MODE SEEK VOL IMAGE MENU ANGLE OFF REP SHUF PAUSE 6 SOURCE AF TA 1 2 5 3 4 PUSH SOUND PUSH ENTER CDX GT800D 1 2 3 4 6 5 7 8 9 qa q qs qd qf qg OFF DSPL PTY REP SHUF MENU LIST SCRL SOURCE SOUND MODE PAUSE 1 3 2 4 6 5 ATT VOL ENTER q wa 7 1 2 qh ...

Страница 57: ...t 频谱分析模式 1 5 t 空间发生器模式 t 墙纸模式 1 3 t 正常播放 接收模式 卡片式遥控器上的以下按钮与装置上的按钮 功能不同 qh ENTER 按钮 完成设定 qj SEEK 按钮 CD 跳过曲目 按 连续跳过曲目 按 然 后约在 1 秒钟内再按住 快进 后退一首 曲目 按住 收音机 自动调入电台 按 手动寻找电台 按 住 qk DSPL 显示 PTY 节目类型 按钮 8 10 改变显示项目 选择 RDS 中的 PTY ql VOL 音量 按钮 调整音量 w ATT 降低 按钮 降低声音 若要取消 则再按一次 wa SOUND 按钮 选择声音项目 ws LIST 按钮 9 18 列表 wd M m 按钮 选择预设电台 跳过群组 按 连续跳 过群组 按住 wf SCRL 滚动 按钮 8 滚动显示项目 1 连接了 CD MD 换碟机时 2 连接了 MD 换碟机时 3 在本机上播...

Страница 58: ...le off 收音机 储存并接收电台 警告 当在驾车过程中要调谐电台时 须使用最佳 调谐记忆功能 BTM 以免发生事故 自动储存 BTM 1 反复按 SOURCE 直至显示 TUNER 若要改变波段 则反复按 MODE 您可 以从 FM1 FM2 FM3 MW 或 LW 中选择 2 按 MENU 3 旋转 SEEK 控制拨盘直至出现 RECEIVE MODE 然后按 ENTER 4 旋转 SEEK 控制拨盘直至出现 BTM 然后 按 ENTER 本机将各电台按其频率顺序储存在数字按 钮上 当设定存储完毕时 本机发出一声提示音 用卡片式遥控器操作 在步骤 3 和 4 中 按 M 或 m 代替旋转 SEEK 控制拨盘 手动储存 1 接收您要储存的电台时 按住一个数字按 钮 1 至 6 不放 直至出现 MEM 数字按钮指示会在显示屏上出现 注意 若您试图在同一个数字按钮上储存另一个电台 则以前 ...

Страница 59: ...NTER RDS 概述 具有无线电数据系统 RDS 服务的 FM 电台 将常规无线电电台信号连同听不见的数字信 息一起发送 显示项目 例如 当您反复按 IMAGE 选择正常播放模 式时 第 7 页 A 无线电波段 B TP TA AF 1 C 时钟 D 预设编号 E 频率 2 节目服务名称 RDS 数据 1 设定了信息 All 时 接收到 TP 时 TP 亮起 打开 TA AF 时 TA AF 亮起 接收到 TA 时 TA 在 D 处闪烁 2 正在接收 RDS 电台时 频率指示的左侧显示 RDS RDS 服务 本机自动提供以下 RDS 服务 注意 视国家 地区而定 不是所有 RDS 功能均有效 如果信号强度太弱 或者如果您调入的电台不发送 RDS 数据 则 RDS 将不起作用 AF 选择频率 选择并重调网络中信号最强的电台 使用 此功能 您可以在长途驾驶中连续收听相同 的节目 而无需手动重...

Страница 60: ...如果电台正在传送 PTY 数据 则显示当前 节目类型名称 3 旋转 SEEK 控制拨盘直至出现想要的节目类 型 4 按 ENTER 本机开始搜索正在广播所选节目类型的电 台 用卡片式遥控器操作 在步骤 1 和 2 中 按 PTY 代替按 MENU 在步骤 3 中 按 M 或 m 代替旋转 SEEK 控制拨盘 节目类型 注意 您无法在 PTY 数据无效的国家 地区使用此功能 设定 CT 1 在 SETUP 中设定 CT on 第 16 页 注意 即使正在接收 RDS 电台 CT 功能也可能无效 通过 CT 功能设定的时间与实际时间可能有差异 选择 以 AF on 启动 AF 并关闭 TA TA on 启动 TA 并关闭 AF AF TA on 同时启动 AF 和 TA AF TA off 同时关闭 AF 和 TA News 新闻 Current Affairs 当前事 件 Informati...

Страница 61: ...页 注意 X DSP 声音使用四个声道而实现 包括两个前置扬声 器和两个后置扬声器 如果您只使用前置扬声器或后 置扬声器 效果会很明显 效果的强弱视车辆类型和扬声器而定 HDEQ 独立的四声道 13 段均衡器能让您将音乐改编 成您最爱的风格 提示 请参阅 HDEQ调谐 第13页 进行更精确地自定义 DSO 3D DSO 3D 是一种虚拟 3D 声音技术 可以减轻不 良扬声器的问题 它在扬声器和听者之间产 生一种三维 高度 宽度和深度 的虚拟音 场 虚拟扬声器图 提示 请参阅 DSO 3D 调谐 第 13 页 进行更精确地自 定义 预设 效果 Xplod 增强声音的整体力度 Refined Vocal 预先丰富并增强歌唱声 Over Drive 产生嘹亮欢快的声音 Virtual Sub 产生低沉浑厚的低音 Natural Cruise 增强被道路噪音弄模糊的声 音 Rear Drive 增...

Страница 62: ...TA t Balance t Fader t Sub Woofer 2 旋转音量控制拨盘以选择设定 约 3 秒钟后 设定完成 用卡片式遥控器操作 在步骤 2 中 按 或 精确调谐 HDEQ DSO 3D 和 I TA 关于更多信息 请参阅第 12 和 13 页 最优化声音 Sound MENU 您可以使用声音 MENU 并根据车内环境 将 HDEQ DSO 3D 和 I TA 的设定精确最优化至符 合您的品味 也请参阅 精确调整声音 第 15 页 也可以调节 BBE MP 菜单方法是每 个功能所共有的 了解以下操作步骤 然后继 续操作每个功能 1 播放过程中 按 MENU 2 旋转 SEEK 控制拨盘直至出现 SOUND 3 按 ENTER 4 旋转 SEEK 控制拨盘选择一个项目 然后按 ENTER 5 重复步骤 4 调节其他项目 6 按 MENU 设定完成 用卡片式遥控器操作 在步骤 ...

Страница 63: ...被应用 提示 选择步骤 4 中的 Reset 可恢复默认设定 flat 用卡片式遥控器操作 在步骤 5 的 1 中 按 或 调节频率 在步骤 2 中 按 M 或 m 调节电平 DSO 3D 调谐 可以调节虚拟音场的高 宽和深以符合您的 品味 1 在 MENU 模式中选择 SOUND t DSO 3D 2 选择 Custom1 Custom2 或 Custom3 来储存 3 选择 STD Wide 或 Deep 在您所选的自定义设定中 可调节预设 然后如 Custom1 t Custom1 所示出现铅笔图标 4 选择 3 种参数模式中的任一种来调整 Elevation Width 或 Depth 5 在 1 至 8 之间调整位置 6 使用确认画面确认您的设定 并保存设定 值 7 重复步骤 3至 6 直至设定完所有3 种参数模 式 注意 只有在步骤 3 中选择预设后才会出现铅笔图标 但是 直至...

Страница 64: ...择扬声器位置 4 输入扬声器位置和聆听位置之间的距离 SEEK 控制拨盘的一声喀嗒声表示 2 cm 在 卡片式遥控器上 按 M 或 m 以 2 cm 的距离 改变 按住不放以 10 cm 的距离改变 5 使用确认画面确认您的设定 并保存设定 值 储存后 Custom1 Custom2 和 Custom3 和铅笔图标一起出现 例如 Custom1 6 重复步骤 3 至 5 直至设定完所有扬声器的位 置 注意 直到在步骤 5 中保存调整后该调整才会被应用 提示 在步骤 3 中选择 Initialize 可恢复默认值 请参阅 cm 和 inch 的等值转换表 第 25 页 BBE MP 1 在 MENU 模式中选择 SOUND t BBE MP 2 选择 ON 3 按 ENTER 完成设定 ...

Страница 65: ...扬声器设定 3 将 FADER 设定完全调节至 R 然后 调节后置扬声器的距离值 后置左 右扬声器设定 4 将 FADER 设定返回到中间 然后 通过调整后置扬声器的距离值来 调整前后之间的的平衡 前 后扬声器设定 1 将 FADER 设定完全调整至 F 然后 根据预设均衡曲线 Refined Vocal 调整前置左右扬声器 2 将 FADER 设定完全调整至 R 然后 根据预设均衡曲线 Refined Vocal 调整后置左右扬声器 3 将 FADER 设定返回到中间 开始 高级设定 I TA 专业模式 HDEQ 完成 输入按照 I TA 专业模式操作步骤测出的距离值 然后保存 步骤 1 调整对面扬声器的距离值 保持最近的 扬声器的距离值不变 步骤 2 增加一个扬声器的距离值 使声音定位 更靠近该扬声器 例如 若在左前座位聆听声音 将扬声器的距离 值调远 这时指右扬声器 若要将声音定位移...

Страница 66: ... 用卡片式遥控器操作 在步骤 2 和 3 中 按 M 或 m 代替旋转 SEEK 控制拨盘 在步骤 2 3 和 4 中 按 或 代替按 ENTER 可以设定以下项目 详细说明请参阅参考 页 z 表示默认设定 SETUP DISPLAY RECEIVE MODE Clock Adjust 第 4 页 CT 时钟时间 设定 on 或 off z 第 9 10 页 Beep 设定 on z 或 off RM 旋转式控制器 改变旋转式控制器的操作方向 NORM z 在工厂设定位置处使用旋 转式控制器 REV 当您将旋转式控制器安装在汽车 方向盘轴的右侧 AUX Audio 1 将 AUX 音源显示转换为 on z 或 off 第 18 页 Auto Image 自动图像模式自动逐步 每 10 秒钟 通过 显示图像 off 不自动改变图像 SA 反复逐步通过频谱分析器模式的 显示图像 Movie 反...

Страница 67: ...ional 2 设定 off 或 on z 第 10 页 BTM 第 8 页 HDEQ 第 13 页 DSO 3D 第 13 页 I TA 第 13 页 Front HPF 高通滤波器 选择前置扬声器截止频率 off z 63Hz 78Hz 100Hz 125Hz 或 160Hz Rear HPF 高通滤波器 选择后置扬声器截止频率 off z 63Hz 78Hz 100Hz 125Hz 或 160Hz LPF 低通滤波器 选择超低音扬声器截止频率 off z 63Hz 78Hz 100Hz 125Hz 或 160Hz BBE MP 第 2 页 Loudness 能让您以低音量清楚聆听 on 增强低音和高音 off z 不增强低音和高音 AUX Level 调整每个所连接的辅助设备的音量 此设定 无需调整音源间的音量 第 18 页 使用收音机或 CD MD 换碟机时 显示电台频 率 或显示...

Страница 68: ... 按 LIST 反复按 M 或 m 直至出现想 要的光盘 然后按 ENTER 辅助音频设备 您可以将选购的 Sony 便携式设备连接至本机 的 BUS AUDIO IN AUX IN 端子 如果换碟机或 其他设备没有连接在这个端子上 则本机能 让您在汽车扬声器上收听该便携式设备 注意 连接便携式设备时 请勿连接 BUS CONTROL IN 如果 有设备连接在 BUS CONTROL IN 则无法用 SOURCE 选 择 AUX 提示 同时连接便携式设备和换碟机时 请使用选购的 AUX IN 选择器 选择辅助设备 1 反复按 SOURCE 直至出现 AUX 由便携式设备本身进行操作 调整音量电平 必须在播放之前调整每个连接的音频设备的 音量 1 调低装置上的音量 2 反复按 SOURCE 直至出现 AUX 3 以适中的音量下开始播放便携式音频设 备 4 在本机上设定通常的收听音量 5 按照...

Страница 69: ... 本机的透镜和显示屏 内会产生湿气凝结 一旦如此 本机将无法正常 运行 此时 请将光盘取出 并等待约一小时 直至湿气蒸发 为保持高质量声音 请随时注意 切勿将果汁或其他饮料溅在本机或 光盘上 光盘注意事项 为保持光盘清洁 切勿接触其表面 拿光盘时 请持其边缘 不使用时请将光盘装入光盘盒或光盘匣 切勿使光盘受到热源 高温的影响 避免将光 盘遗留在停放的车中或仪表盘 后托架上 切勿贴标签 或使用带有黏性墨水 残留物的 光盘 这类光盘在使用时会停止转动 从而造 成故障或损坏光盘 切勿使用任何贴有标签或贴纸的光盘 使用此类光盘可能会引起如下故障 不能退出光盘 由于标签或贴纸剥落并卡住 弹出装置 不能正确读取音频数据 例如 跳跃播放或 不播放 由于热源使贴纸或标签皱缩造成 光盘弯曲 本机不能播放非标准形状的光盘 例如 心 形 正方形 星形 若试图播放此类光盘 则 可能会损坏本机 切勿使用此类光盘 您...

Страница 70: ...文件 扩展名 mp3 wma 在 VBR 可变比特率 MP3 WMA 文件播放过程中或快 进 后退过程中 已播放时间可能不会精确显示 当光盘是以 Multi Session 录制时 只有第一个区段 格式的第一个曲目被识别并播放 任何其他格式被跳 过 格式的优先顺序为 CD DA ATRAC CD 和 MP3 WMA 当第一个曲目为 CD DA 时 只播放第一个区段的 CD DA 当第一个曲目不是 CD DA 时 会播放 ATRAC CD 或 MP3 WMA 的区段 如果光盘中没有这些格式的数 据 则显示 NO Music MP3 的注意事项 在本机上使用之前 必须最终化光盘 如果播放如 320 kbps 高比特率 MP3 则声音可能会断 断续续 WMA 的注意事项 无损压缩做成的文件不可播放 有版权保护的文件不可播放 关于 ATRAC CD ATRAC3plus 格式 ATRAC3 表示 ...

Страница 71: ...换保险丝 更换保险丝时 必须确保所使 用的保险丝与原保险丝的额 定安培数相同 如果保险丝烧 断 请检查电源连接并更换保 险丝 如果保险丝更换后又被 烧断 则可能是内部 故障 此时 请向附近的 Sony 经销 商咨询 清洁连接器 如果本机与前面板之前的连接器不干净 则本机 可能会运作不正常 为防止这种情况发生 请卸 下前面板 第 4 页 然后用蘸有酒精的棉签清 洁连接器 切勿施加太大的力量 否则 可能会 损坏连接器 注意 为了安全起见 在清洁连接器之前 应关闭引擎并从 点火开关上拔下钥匙 千万不要用手指或任何金属工具直接接触连接器 取出本机 1 拆卸保护环 1拆卸前面板 第 4 页 2将开锁钥匙与保护环接合 3拉出开锁钥匙以拆下保护环 2 取出装置 1将两把开锁钥匙同时插入 直至听到喀 嗒声 2拉出开锁钥匙 使装置脱离原位 3将本机从安装位置滑出 1 2 c 极面朝上 保险丝 10A 主机 ...

Страница 72: ... 端子 遥控器输入端子 天线输入端子 响度 100 Hz 时为 8 dB 10 kHz 时为 0 dB 电源要求 12 V DC 汽车电瓶 负接地 尺寸 约 178 50 188 mm 宽 高 深 安装尺寸 约 182 53 162 mm 宽 高 深 质量 约 1 6 kg 附件 卡片式遥控器 RM X154 安装和连接用配件 1 套 选购的附件 设备 旋转式控制器 RM X4S BUS 电缆 附带一根 RCA 针导线 RC 61 1 m RC 62 2 m CD 换碟机 10 碟式 CDX 757MX CDX 656X MD 换碟机 6 碟式 MDX 66XLP 音源选择器 XA C30 AUX IN 选择器 XA 300 您的经销商可能不提供以上列出的部分附件 关于详细信息 请询问经销商 注意 本机不能连接至与 Sony BUS 系统兼容的数字前置放大 器或均衡器 设计和规格若有变更 ...

Страница 73: ...ion 录制的光盘 能增加数据的光盘 无法播放 ATRAC CD 光盘不是通过 SonicStage 或 SonicStage Simple Burner 等许可软件制作的 无法播放群组里不包含的曲目 显示项目不滚动 对于有许多字符的光盘 可能无法滚动显示 Auto Scroll 设定为关闭 t请设定为 Auto Scroll on 第 16 页 或 按卡片式遥控器上的 SCRL 跳音 安装不正确 t以小于45 的角度将装置安装在汽车坚固位置 光盘有缺陷或脏了 操作按钮无效 光盘不退出 按 RESET 按钮 第 4 页 当同时连接选购的 MGS X1 和 MD 换碟机时 音源显 示中不出现 MS 或 MD 本机将 MGS X1 识别为一台 MD 装置 t按 SOURCE 直至出现 MS 或 MD 然 后反复按 MODE 无线电接收 无法接收电台 有噪音干扰 请将电动天线控制导线 蓝色 或附...

Страница 74: ... NO Album Name 曲目中未写入专辑名称 NO Disc CD MD 换碟机内未插入光盘 t将光盘插入换碟机 NO Disc Name 曲目中未写入光盘名称 NO Group Name 曲目中未写入群组名称 NO ID3 Tag MP3 文件中未写入 ID3 标记信息 NO Information WMA ATRAC3 ATRAC3plus 文件中未写入文本信息 NO Magazine 光盘匣未插入 CD 换碟机 t将光盘匣插入换碟机 NO Music 此光盘不是音乐文件 t将音乐 CD 插入本机或可播放 MP3 的换碟机中 NO TP 本机将继续搜索有效的 TP 电台 NO Track Name 曲目中未写入曲目名称 Not Read 本机未读取光盘信息 t装入光盘 然后在列表中选择此光盘 Not Ready MD 换碟机的盖子被打开或没有正确插入 MD t关上盖子或正确插入 ...

Страница 75: ...0 190 200 210 220 230 240 250 260 270 280 290 300 310 320 330 340 350 360 370 380 390 400 157 5 153 5 149 6 145 7 141 7 137 8 133 9 129 9 126 0 122 0 118 1 114 2 110 2 106 3 102 4 98 4 94 5 90 6 86 6 82 7 78 7 74 8 70 9 66 9 63 0 59 1 55 1 51 2 47 2 43 3 39 4 35 4 31 5 27 6 23 6 19 7 15 7 11 8 7 9 3 9 ...

Страница 76: ...Sony Corporation Printed in Thailand ...

Отзывы: