background image

10

Adjusting setup items — SET

1

Press and hold the select button.

The setup display appears.

2

Press the select button repeatedly 
until the desired item appears.

3

Rotate the control dial to select the 
setting (example “ON” or “OFF”).

4

Press and hold the select button.

The setup is complete and the display returns 
to normal play/reception mode.

Note

Displayed items will differ, depending on the source 
and setting.

The following items can be set (follow the page 
reference for details):

z

” indicates the default settings.

Using optional equipment

Auxiliary audio equipment

By connecting an optional portable audio device 
to the AUX input jack (stereo mini jack) on the 
unit and then simply selecting the source, you 
can listen on your car speakers. The volume level 
is adjustable for any difference between the unit 
and the portable audio device. Follow the 
procedure below:

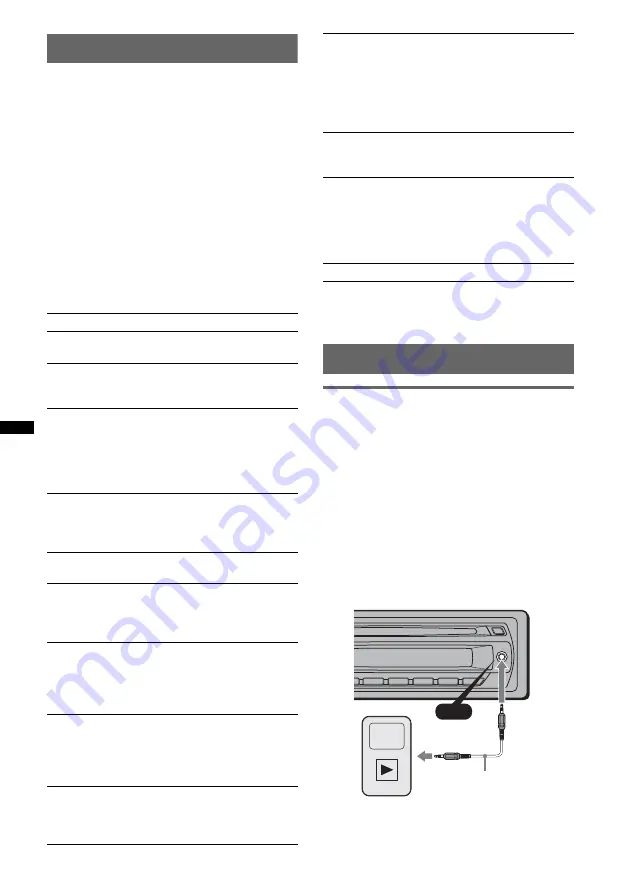
Connecting the portable audio 
device

1

Turn off the portable audio device.

2

Turn down the volume on the unit.

3

Connect to the unit.

*

Be sure to use a straight type plug.

CLOCK-ADJ 

(Clock Adjust) (page 4)

BEEP

To set “BEEP-ON” (

z

) or “BEEP-OFF.”

AUX-A

*

1

 (AUX Audio)

To turn the AUX source display “AUX-A-ON” 
(

z

) or “AUX-A-OFF” (page 10).

A.OFF

 (Auto Off)

To shut off automatically after a desired time 
when the unit is turned off,
– “A.OFF-NO” (

z

), “A.OFF-30S (Seconds),” 

“A.OFF-30M (Minutes)” or “A.OFF-60M 
(Minutes).”

SUB/REAR

*

1

To switch the audio output.

– “SUB-OUT”  (

z

): to output to a subwoofer.

– “REAR-OUT”: to output to a power amplifier.

DEMO

 (Demonstration)

To set “DEMO-ON” (

z

) or “DEMO-OFF.”

DIM

 (Dimmer)

To change the brightness of the display.
– “DIM-ON”: to dim the display.
– “DIM-OFF” (

z

): to deactivate the dimmer.

M.DSPL

 (Motion Display)

To select the Motion Display mode.
– “M.DSPL-ON” (

z

): to show moving patterns.

– “M.DSPL-OFF”: to deactivate Motion 

Display.

A.SCRL

 (Auto Scroll)

To scroll long displayed item automatically 
when the album/track is changed.
– “A.SCRL-ON” (

z

): to scroll.

– “A.SCRL-OFF”: to not scroll.

LOCAL

 (Local Seek Mode)

– “LOCAL-ON”: to only tune into stations with 

stronger signals.

– “LOCAL-OFF” (

z

): to tune normal reception.

MONO

*

2

 (Monaural Mode)

To improve poor FM reception, select monaural 
reception mode.
– “MONO-ON”: to hear stereo broadcast in 

monaural.

– “MONO-OFF” (

z

): to hear stereo broadcast in 

stereo.

LPF

*

3

 (Low Pass Filter)

To select the subwoofer cut-off frequency: “LPF 
OFF” (

z

), “LPF125Hz” or “LPF 78Hz.”

LOUD

 (Loudness)

To allow you to listen clearly at low volume 
levels.
– “LOUD-ON”: to reinforce bass and treble.
– “LOUD-OFF” (

z

): to not reinforce bass and 

treble.

BTM

 (page 8)

*1

When the unit is turned off.

*2

When FM is received.

*3

When the audio output is set to “SUB.”

AUX

Connecting cord

(not supplied)

Содержание CDX GT23W - Radio / CD

Страница 1: ...the space provided below Refer to these numbers whenever you call upon your Sony dealer regarding this product Model No CDX GT23W Serial No To cancel the demonstration DEMO display see page 10 Pour annuler l affichage de démonstration DEMO reportez vous à la page 10 Para cancelar la pantalla de demostración DEMO consulte la página 10 FR US 3 878 427 11 1 CDX GT23W ES FM AM Compact Disc Player ...

Страница 2: ...e or more of the following measures Reorient or relocate the receiving antenna Increase the separation between the equipment and receiver Connect the equipment into an outlet on a circuit different from that to which the receiver is connected Consult the dealer or an experienced radio TV technician for help You are cautioned that any changes or modifications not expressly approved in this manual c...

Страница 3: ... 8 Receiving the stored stations 8 Tuning automatically 9 Other functions Changing the sound settings 9 Adjusting the sound characteristics BAL FAD SUB 9 Customizing the equalizer curve EQ3 9 Adjusting setup items SET 10 Using optional equipment 10 Auxiliary audio equipment 10 Additional Information Precautions 11 Notes on discs 11 Playback order of MP3 WMA files 12 About MP3 files 12 About WMA fi...

Страница 4: ...CLOCK ADJ appears 3 Press SEEK The hour indication flashes 4 Rotate the control dial to set the hour and minute To move the digital indication press SEEK 5 After setting the minute press the select button The setup is complete and the clock starts To display the clock press DSPL Press DSPL again to return to the previous display Detaching the front panel You can detach the front panel of this unit...

Страница 5: ...g the front panel Engage part A of the front panel with part B of the unit as illustrated and push the left side into position until it clicks Note Do not put anything on the inner surface of the front panel B A ...

Страница 6: ...L EDGE CRUISE SPACE GRAVITY CUSTOM or OFF C Control dial select button page 9 To adjust volume rotate select setup items press and rotate D SOURCE button To power on change the source Radio CD AUX E Disc slot Insert the disc label side up playback starts F Display window G AUX input jack page 10 To connect a portable audio device H Z eject button To eject the disc SEEK SCRL SEEK PAUSE ALBUM REP SH...

Страница 7: ...ward a track press and hold Radio To tune in stations automatically press find a station manually press and hold L MODE button page 8 To select the radio band FM AM M BTM button page 8 To start the BTM function press and hold N Number buttons CD 1 2 ALBUM during MP3 WMA playback To skip albums press skip albums continuously press and hold 3 REP page 8 4 SHUF page 8 6 PAUSE To pause playback To can...

Страница 8: ... BTM 1 Press SOURCE repeatedly until TUNER appears To change the band press MODE repeatedly You can select from FM1 FM2 FM3 AM1 or AM2 2 Press and hold BTM until BTM flashes The unit stores stations in order of frequency on the number buttons A beep sounds when the setting is stored Storing manually 1 While receiving the station that you want to store press and hold a number button 1 to 6 until ME...

Страница 9: ...ge 9 2 When the audio output is set to SUB page 10 ATT is displayed at the lowest setting and can be adjusted up to 21 steps 3 When AUX source is activated page 10 2 Rotate the control dial to adjust the selected item After 5 seconds the setting is complete and the display returns to normal play reception mode Customizing the equalizer curve EQ3 CUSTOM of EQ3 allows you to make your own equalizer ...

Страница 10: ... OFF Auto Off To shut off automatically after a desired time when the unit is turned off A OFF NO z A OFF 30S Seconds A OFF 30M Minutes or A OFF 60M Minutes SUB REAR 1 To switch the audio output SUB OUT z to output to a subwoofer REAR OUT to output to a power amplifier DEMO Demonstration To set DEMO ON z or DEMO OFF DIM Dimmer To change the brightness of the display DIM ON to dim the display DIM O...

Страница 11: ...the moisture has evaporated To maintain high sound quality Be careful not to splash juice or other soft drinks onto the unit or discs Notes on discs To keep a disc clean do not touch its surface Handle the disc by its edge Keep your discs in their cases or disc magazines when not in use Do not subject discs to heat high temperature Avoid leaving them in a parked car or on a dashboard rear tray Do ...

Страница 12: ...e aware that among those discs there are some that do not conform to the CD standard and may not be playable by this product Playback order of MP3 WMA files About MP3 files MP3 which stands for MPEG 1 Audio Layer 3 is a music file compression format standard It compresses audio CD data to approximately 1 10 of its original size ID3 tag versions 1 0 1 1 2 2 2 3 and 2 4 apply to MP3 only ID3 tag is ...

Страница 13: ...the front panel page 4 and clean the connectors with a cotton swab Do not apply too much force Otherwise the connectors may be damaged Notes For safety turn off the ignition before cleaning the connectors and remove the key from the ignition switch Never touch the connectors directly with your fingers or with any metal device Removing the unit 1 Remove the protection collar 1Detach the front panel...

Страница 14: ...nter with your unit Before going through the checklist below check the connection and operating procedures CEA2006 Standard Power Output 16 Watts RMS 4 at 4 Ohms 1 THD N SN Ratio 82 dBA reference 1 Watt into 4 Ohms General No power is being supplied to the unit Check the connection If everything is in order check the fuse The power antenna aerial does not extend The power antenna aerial does not h...

Страница 15: ...n the rear side glass Check the connection of the car antenna aerial The auto antenna aerial will not go up tCheck the connection of the power antenna aerial control lead Check the frequency Preset tuning is not possible Store the correct frequency in the memory The broadcast signal is too weak Automatic tuning is not possible Setting of the local seek mode is not correct tTuning stops too frequen...

Страница 16: ...If you take the unit to be repaired because of CD playback trouble bring the disc that was used at the time the problem began or During reverse or fast forward you have reached the beginning or the end of the disc and you cannot go any further The character cannot be displayed with the unit ...

Страница 17: ......

Страница 18: ...nction arrêt automatique appuyez sur la touche OFF et maintenez la enfoncée jusqu à ce que l affichage disparaisse chaque fois que vous coupez le contact En ce qui concerne l installation et les connexions consulter le manuel d installation raccordement fourni L utilisation d instruments optiques avec ce produit augmente les risques pour les yeux ATTENTION Microsoft Windows Media et le logo Window...

Страница 19: ... Syntonisation automatique 9 Autres fonctions Changement des réglages du son 9 Réglage des caractéristiques du son BAL FAD SUB 9 Personnalisation de la courbe de l égaliseur EQ3 9 Réglage des paramètres de configuration SET 10 Utilisation d un équipement en option 11 Appareil audio auxiliaire 11 Informations complémentaires Précautions 11 Remarques sur les disques 11 Ordre de lecture des fichiers ...

Страница 20: ...ures 1 Appuyez sur la touche de sélection et maintenez la enfoncée L écran de configuration apparaît 2 Appuyez plusieurs fois sur la touche de sélection jusqu à ce que CLOCK ADJ apparaisse 3 Appuyez sur SEEK L indication des heures clignote 4 Tournez la molette de réglage pour régler l heure et les minutes Appuyez sur SEEK pour déplacer l indication numérique 5 Appuyez sur la touche de sélection a...

Страница 21: ...tures élevées ou à l humidité Évitez de la laisser dans un véhicule en stationnement sur le tableau de bord ou la plage arrière Installation de la façade Insérez la partie A de la façade dans la partie B de l appareil tel qu illustré puis poussez sur le côté gauche jusqu au déclic de mise en place Remarque Ne posez rien sur la face interne de la façade B A ...

Страница 22: ...GRAVITY CUSTOM ou OFF C Molette de réglage touche de sélection page 9 Permet de régler le niveau de volume tournez de sélectionner les paramètres de réglage appuyez et tournez D Touche SOURCE Permet de mettre l appareil sous tension de changer la source Radio CD AUX E Fente d insertion des disques Insérez le disque côté imprimé vers le haut la lecture démarre F Fenêtre d affichage G Prise d entrée...

Страница 23: ...t d effectuer une syntonisation automatique appuyez de rechercher une station manuellement appuyez sur la touche et maintenez la enfoncée L Touche MODE page 8 Permet de sélectionner la bande radio FM AM M Touche BTM page 8 Permet de démarrer la fonction BTM appuyez sur la touche et maintenez la enfoncée N Touches numériques CD 1 2 ALBUM lecture de fichiers MP3 WMA Permettent de sauter des albums a...

Страница 24: ...ez plusieurs fois sur SOURCE jusqu à ce que l indication TUNER apparaisse Pour changer de bande appuyez plusieurs fois sur MODE Vous pouvez sélectionner FM1 FM2 FM3 AM1 ou AM2 2 Appuyez sur la touche BTM et maintenez la enfoncée jusqu à ce que BTM clignote L appareil enregistre les stations sur les touches numériques dans l ordre des fréquences Un bip retentit lorsque le réglage est mémorisé Mémor...

Страница 25: ... t MID 1 t HI 1 t BAL gauche droite t FAD avant arrière t SUB volume du caisson de graves 2 t AUX 3 1 Lorsque EQ3 est activé page 9 2 Lorsque la sortie audio est réglée à SUB page 10 ATT s affiche au réglage minimal et peut être réglé suivant 21 incréments 3 Lorsque la source AUX est activée page 11 2 Tournez la molette de réglage pour régler le paramètre sélectionné Le réglage est terminé après 5...

Страница 26: ...ter la sortie audio SUB OUT z pour émettre vers un caisson de graves REAR OUT pour émettre vers un amplificateur de puissance DEMO Démonstration Pour régler DEMO ON z ou DEMO OFF DIM Régulateur de luminosité Pour modifier la luminosité de l affichage DIM ON pour réduire la luminosité de la fenêtre d affichage DIM OFF z pour désactiver le régulateur de luminosité M DSPL Affichage animé Pour sélecti...

Страница 27: ...sation Par temps de pluie ou dans des régions très humides de l humidité peut se condenser à l intérieur des lentilles et dans la fenêtre d affichage de l appareil Si cela se produit l appareil ne fonctionne pas correctement Dans ce cas retirez le disque et attendez environ une heure que l humidité se soit évaporée Pour conserver un son de haute qualité Veillez à ne pas renverser de jus de fruit o...

Страница 28: ...re session est lu Lorsque la première plage n est pas un CD DA la session MP3 WMA est lue Si le disque ne contient aucune donnée dans ces formats NO MUSIC s affiche Disques de musique encodés à l aide d une technologie de protection des droits d auteur Cet appareil est conçu pour la lecture des disques conformes à la norme Compact Disc CD Dernièrement certaines maisons de disques ont lancé sur le ...

Страница 29: ... saute vérifiez le branchement de l alimentation et remplacez le Si le nouveau fusible saute également il est possible que l appareil soit défectueux Dans ce cas consultez votre détaillant Sony le plus proche Nettoyage des connecteurs L appareil peut ne pas fonctionner correctement si les connecteurs entre l appareil et la façade sont encrassés Pour éviter cette situation retirez la façade page 4 ...

Страница 30: ... de contrôles suivante vous aidera à remédier aux problèmes que vous pourriez rencontrer avec cet appareil Avant de passer en revue la liste de contrôles ci dessous vérifiez les procédures de raccordement et d utilisation Licence de la technologie de codage audio MPEG Layer 3 et des brevets obtenue de Fraunhofer IIS et Thomson Généralités L appareil n est pas alimenté Vérifiez le raccordement Si t...

Страница 31: ...Le son saute L installation est incorrecte tInstallez l appareil suivant un angle de moins de 45 dans un endroit stable de la voiture Le disque est défectueux ou sale Le disque ne s éjecte pas Appuyez sur Z éjection page 6 Réception radio Impossible de capter des stations Le son comporte des parasites Raccordez un câble de commande d antenne électrique bleu ou un câble d alimentation d accessoires...

Страница 32: ...te de plage n est écrit dans la plage OFFSET Il est possible qu il y ait un problème de fonctionnement tVérifiez le raccordement Si le message d erreur reste affiché contactez votre détaillant Sony le plus proche PUSH EJT Impossible d éjecter le disque tAppuyez sur Z éjection page 6 READ L appareil lit toutes les informations de plage et d album sur le disque tAttendez que la lecture soit terminée...

Страница 33: ......

Страница 34: ...vita que se agote la batería Si no ajusta la función de desconexión automática mantenga presionado OFF hasta que se apague la pantalla cada vez que apague el motor Para obtener información sobre la instalación y las conexiones consulte el manual de instalación conexiones suministrado Microsoft Windows Media y el logotipo de Windows son marcas comerciales o marcas comerciales registradas de Microso...

Страница 35: ...almacenadas 8 Sintonización automática 9 Otras funciones Cambio de los ajustes de sonido 9 Ajuste de las características del sonido BAL FAD SUB 9 Personalización de la curva de ecualizador EQ3 9 Definición de los elementos de configuración SET 10 Uso de un equipo opcional 11 Equipo auxiliar de audio 11 Información complementaria Precauciones 11 Notas sobre los discos 11 Orden de reproducción de lo...

Страница 36: ...a presionado el botón de selección Aparecerá la pantalla de ajustes 2 Presione el botón de selección varias veces hasta que aparezca CLOCK ADJ 3 Presione SEEK La indicación de la hora parpadea 4 Gire el selector de control para ajustar la hora y los minutos Para mover la indicación digital presione SEEK 5 Una vez ajustados los minutos presione el botón de selección El ajuste se completa y el reloj...

Страница 37: ... o excesiva humedad Evite dejarlo en un automóvil estacionado o sobre el tablero o la bandeja trasera Colocación del panel frontal Fije la parte A del panel frontal en la parte B de la unidad tal como muestra la ilustración y presione el lado izquierdo hasta que encaje Nota No coloque ningún objeto sobre la superficie interior del panel frontal B A ...

Страница 38: ...AVITY CUSTOM u OFF C Selector de control botón de selección página 9 Para ajustar el volumen girar para seleccionar elementos de configuración presionar y girar D Botón SOURCE Para encender o cambiar la fuente del dispositivo Radio CD AUX E Ranura del disco Inserte el disco con la etiqueta mirando hacia arriba y se iniciará la reproducción F Visualizador G Toma de entrada AUX página 11 Para conect...

Страница 39: ...io Para sintonizar emisoras en forma automática presionar para localizar una emisora en forma manual mantener presionado L Botón MODE página 8 Para seleccionar la banda de radio FM AM M Botón BTM página 8 Para iniciar la función BTM mantener presionado N Botones numéricos CD 1 2 ALBUM durante la reproducción de archivos MP3 WMA Para omitir álbumes presionar para omitir álbumes en forma continua ma...

Страница 40: ...utomático BTM 1 Presione SOURCE varias veces hasta que aparezca TUNER Para cambiar de banda presione MODE varias veces Puede seleccionar entre FM1 FM2 FM3 AM1 y AM2 2 Mantenga presionado BTM hasta que BTM parpadee La unidad almacena las emisoras en el orden de frecuencia en los botones numéricos La unidad emite un pitido al almacenar el ajuste Almacenamiento manual 1 Mientras recibe la emisora que...

Страница 41: ...I 1 t BAL izquierdo derecho t FAD frontal posterior t SUB volumen del altavoz potenciador de graves 2 t AUX 3 1 Si está activado EQ3 página 9 2 Cuando la salida de audio se ajusta en SUB página 10 ATT aparece con el ajuste más bajo y puede ajustarse hasta con 21 intervalos 3 Si está activada la fuente AUX página 11 2 Gire el selector de control para ajustar el elemento seleccionado Después de 5 se...

Страница 42: ...minutos SUB REAR 1 Para cambiar la salida de audio SUB OUT z para que la salida se realice a través de un altavoz potenciador de graves REAR OUT para que la salida se realice a través de un amplificador de potencia DEMO Demostración Para ajustar DEMO ON z o DEMO OFF DIM Atenuador Para cambiar el brillo de la pantalla DIM ON para atenuar la pantalla DIM OFF z para desactivar el atenuador M DSPL Des...

Страница 43: ...funcionamiento Condensación de humedad En días lluviosos o en zonas muy húmedas es posible que se condense humedad en el interior de las lentes y la pantalla de la unidad Si esto ocurre la unidad no funcionará de forma correcta En tal caso extraiga el disco y espere una hora aproximadamente hasta que se haya evaporado la humedad Para mantener una alta calidad de sonido Asegúrese de no derramar jug...

Страница 44: ...ción de los derechos de autor Este producto se diseñó para reproducir discos que cumplen con el estándar Compact Disc CD Recientemente algunas compañías discográficas comercializan discos de música codificados con tecnologías de protección de derechos de autor Tenga en cuenta que entre estos discos algunos no cumplen con el estándar CD por lo que no podrán reproducirse con este producto Orden de r...

Страница 45: ... de funcionamiento interno En tal caso consulte con el distribuidor Sony más cercano Limpieza de los conectores Es posible que la unidad no funcione correctamente si los conectores entre ésta y el panel frontal están sucios Para evitar esta situación extraiga el panel frontal página 4 y limpie los conectores con un hisopo de algodón No aplique demasiada fuerza ya que podría dañar los conectores No...

Страница 46: ...problemas que puedan producirse con la unidad Antes de consultarla revise los procedimientos de conexión y de funcionamiento Tecnología de codificación de audio MPEG Layer 3 y patentes bajo licencia de Fraunhofer IIS y Thomson Generales La unidad no recibe alimentación Revise la conexión Si todo está en orden compruebe el fusible La antena motorizada no se extiende La antena motorizada no dispone ...

Страница 47: ...de radio No es posible recibir las emisoras Hay ruidos que obstaculizan el sonido Conecte un cable de control de antena motorizada azul o un cable de fuente de alimentación auxiliar rojo al cable de fuente de alimentación del amplificador de antena del automóvil sólo cuando el automóvil tenga una antena de FM AM integrada en el cristal posterior o lateral Compruebe la conexión de la antena del aut...

Страница 48: ...ista pista en la pista OFFSET Es posible que se haya producido una falla interna tRevise la conexión Si el indicador de error permanece en pantalla póngase en contacto con el distribuidor Sony más cercano PUSH EJT No es posible expulsar el disco tPresione Z expulsar página 6 READ La unidad está leyendo toda la información de pistas y de álbumes del disco tEspere hasta que finalice la lectura y se ...

Страница 49: ......

Страница 50: ......

Страница 51: ......

Страница 52: ...in China http www sony net If you have any questions problems regarding this product try the following 1 Read Troubleshooting in these Operating Instructions 2 Please contact U S A only Call 1 800 222 7669 URL http www SONY com ...

Отзывы: