background image

4

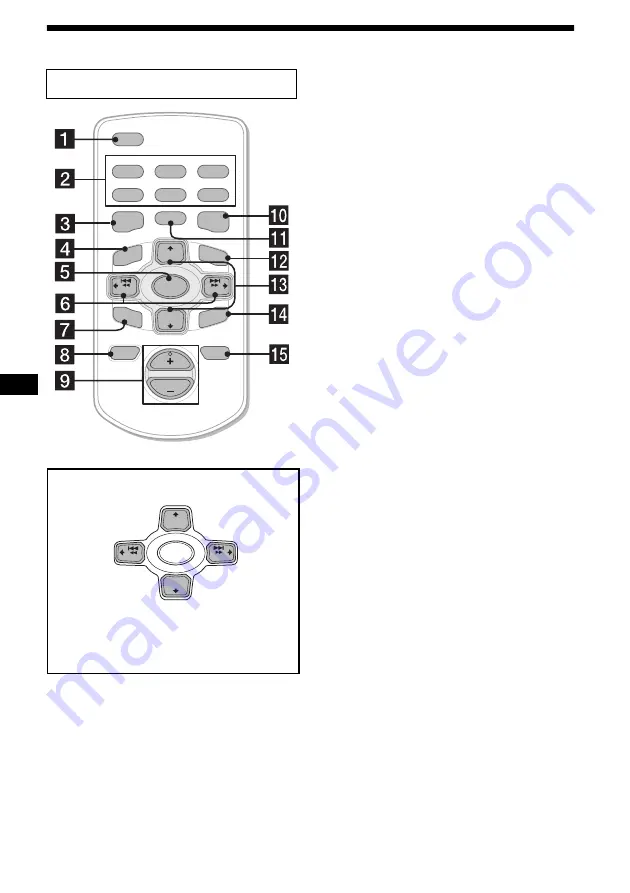
Ubicación de los controles

Consulte las páginas indicadas para obtener 
información detallada.

a

Botón DSPL (cambio del modo de 
indicación)  
12, 14, 21

b

Botones numéricos

Radio:
Para almacenar emisoras y recibir emisoras 
almacenadas.
CD/MD:

(1)

:

 REP  13

(2)

:

 SHUF  13

c

Botón DSO  23

d

Botón MENU

Para mostrar los menús.

e

Botón SOURCE (Encendido/Radio/
CD/MD

*

1

/AUX

*

2

)

Para seleccionar la fuente.

f

Botones SEEK/AMS (

<

/

,

)

Para omitir pistas, avanzar o retroceder 
rápidamente una pista, sintonizar emisoras 
en forma automática, buscar una emisora en 
forma manual y seleccionar una 
configuración.

g

Botón SOUND  20

h

Botón OFF (detener/apagar)  11, 24

i

Botones VOL (+/–)

Para subir o bajar el volumen.

j

Botón EQ7  22

Control remoto de tarjeta RM-X118A

DISC 

ATT

OFF

REP

PTY

SHUF

DSPL

1

4

MODE

2

5

3

6

SOURCE

DISC 

+

SEEK

+

SEEK

SOUND

ENTER

MENU

LIST

CAT

EQ7

DSO

VOL

DISC 

SOURCE

DISC 

+

SEEK

+

SEEK

En el modo de menú, el botón o botones que 
pueden seleccionarse de estos cuatro se indican 
con “ 

v

” en la pantalla.

(SEEK)

 (

<

):

para 
seleccionar 
hacia la 
izquierda


(DISC)

 (

M

):

para seleccionar hacia arriba

(DISC)

 (

m

):

para seleccionar hacia abajo


(SEEK)

 (

,

):

para 
seleccionar 
hacia la 
derecha

Содержание CDX-FW700 - Fm/am Compact Disc Player

Страница 1: ...efer to these numbers whenever you call upon your Sony dealer regarding this product Model No CDX FW700 Serial No CDX FW700 For installation and connections see the supplied installation connections manual En ce qui concerne l installation et les connexions consulter le manuel d installation raccordement fourni 2004 Sony Corporation 3 263 380 21 1 US ES FM AM Compact Disc Player ...

Страница 2: ...erference to radio communications However there is no guarantee that interference will not occur in a particular installation If this equipment does cause harmful interference to radio or television reception which can be determined by turning the equipment off and on the user is encouraged to try to correct the interference by one or more of the following measures Reorient or relocate the receivi...

Страница 3: ...utomatically Best Tuning Memory BTM 15 Receiving the stored stations 16 Storing only the desired stations 16 Storing station names Station Memo 17 Tuning in a station through a list List up 18 Other Functions Using the rotary commander 18 Adjusting the sound characteristics 20 Quickly attenuating the sound 20 Changing the sound and display settings Menu 21 Setting the equalizer EQ7 22 Setting the ...

Страница 4: ...rse a track tune in stations automatically find a station manually select a setting g SOUND button 20 h OFF Stop Power off button 11 24 i VOL buttons To turn up or down the volume j EQ7 button 22 Card remote commander RM X118A DISC ATT OFF REP PTY SHUF DSPL 1 4 MODE 2 5 3 6 SOURCE DISC SEEK SEEK SOUND ENTER MENU LIST CAT EQ7 DSO VOL DISC SOURCE DISC SEEK SEEK In menu mode the currently selectable ...

Страница 5: ...P3 file is played Note If the display disappears by pressing OFF it cannot be operated with the card remote commander unless SOURCE on the unit is pressed or a disc is inserted to activate the unit first Tip For details on how to replace the battery see Replacing the lithium battery on page 25 Selecting a disc and album Disc and album can be skipped using the DISC ALBUM M m buttons With optional u...

Страница 6: ...a Receptor for the card remote commander qd OFF Stop Power off button qf EQ7 button qg RESET button located on the front side of the unit behind the front panel 8 qh SOURCE button qj Number buttons qk DSPL display mode change button ql IMAGE button 23 Warning when installing in a car without an ACC accessory position on the ignition switch After turning off the ignition be sure to press and hold O...

Страница 7: ...soft drinks onto the unit or discs Notes on discs To keep a disc clean do not touch its surface Handle the disc by its edge Keep your discs in their cases or disc magazines when not in use Do not subject discs to heat high temperature Avoid leaving them in a parked car or on a dashboard rear tray Do not attach labels or use discs with sticky ink residue Such discs may stop spinning when used causi...

Страница 8: ...sc is not for audio use Some CD Rs CD RWs depending on the equipment used for its recording or the condition of the disc may not play on this unit You cannot play a CD R CD RW that is not finalized A process necessary for a recorded CD R CD RW disc to be played on the audio CD player Getting Started Resetting the unit Before operating the unit for the first time or after replacing the car battery ...

Страница 9: ...ar battery drain 2 Press OPEN then slide the front panel to the right and gently pull out the left end of the front panel Notes If you detach the panel while the unit is still turned on the power will turn off automatically to prevent the speakers from being damaged Do not drop or put excessive pressure on the front panel and its display window Do not subject the front panel to heat high temperatu...

Страница 10: ...urns to normal play mode Tip When Clock mode is set to on the time is displayed page 21 CD Player CD MD Unit optional In addition to playing a CD with this unit you can also control external CD MP3 playable CD MD units If you connect optional MP3 playable CD units eg MP3 CD changer you can play MP3 files compressed audio files tracks with quality of sound Playing a disc With this unit 1 Press OPEN...

Страница 11: ...ess SOURCE to select MD or MS If your desired MD unit appears in the source display it starts to play If MS or another MD unit appears in the source display press MODE to select your desired MD unit to start playback Notes when connecting MP3 playable CD unit s If a disc with no MP3 files tracks is inserted NO Music appears in the display and playback of the next disc starts Before playing a track...

Страница 12: ...s connected and MP3 file is played 5 Available only when an optional MD unit with the MDLP function is connected and an MDLP disc is played Notes Some characters cannot be displayed Characters and signs which cannot be displayed appear as s For some CD TEXT discs or ID3 tags with very many characters information may not scroll This unit cannot display the artist name for each track of a CD TEXT di...

Страница 13: ...ay the tracks in the current album in random order SHUF Disc to play the tracks in the current disc in random order SHUF Changer 2 to play the tracks in the current optional CD MD changer in random order SHUF All 3 to play all the tracks in all the connected CD MD units including this unit in random order 1 Available only when an optional CD unit with the MP3 file control function is connected and...

Страница 14: ...l CDs on a unit without the CUSTOM FILE function if that unit is connected along with a CD unit that has the function The Disc Memo will be stored in the memory of the CD unit with the CUSTOM FILE function Viewing the Disc Memo As a display item the Disc Memo always takes priority over any original CD TEXT information Tip To find out about other items that can be displayed see page 12 Erasing the ...

Страница 15: ...c Memo Radio The unit can store up to 6 stations per band FM1 FM2 FM3 AM1 and AM2 Caution When tuning in stations while driving use Best Tuning Memory to prevent accidents Storing stations automatically Best Tuning Memory BTM The unit selects the stations with the strongest signals within the selected band and stores them in the order of their frequency 1 Press SOURCE repeatedly to select the radi...

Страница 16: ... see Changing the sound and display settings on page 21 The sound improves but becomes monaural ST disappears Note If interference occurs this unit will automatically narrow the reception frequency to eliminate noise IF Auto function In such cases some FM stereo broadcasts may become monaural while in the stereo reception mode Tips To always hear FM stereo broadcasts in stereo you can change the I...

Страница 17: ...enter the entire name 5 Press ENTER The unit returns to normal radio reception mode Tips Simply overwrite or enter to correct or erase a character There is another way to start storing station names Press LIST CAT for 2 seconds instead of performing steps 2 and 3 You can also complete the operation by pressing LIST CAT for 2 seconds instead of step 5 Erasing the station name 1 During radio recepti...

Страница 18: ...ry commander optional Using the rotary commander First attach the appropriate label depending on how you want to mount the rotary commander The rotary commander works by pressing buttons and or rotating controls By pressing buttons Press To SOURCE Change the source Radio CD MD 1 AUX 2 Power on MODE Change operation Radio band CD unit 1 MD unit 1 ATT Attenuate the sound OFF 3 Stop playback or radio...

Страница 19: ...minal of the unit When you connect a Sony portable device and CD MD unit s at the same time use the AUX IN selecteor 3 If your car has no ACC accessory position on the ignition key switch after turning off the ignition be sure to press and hold OFF until the display disappears 4 Available only when an optional CD unit with the MP3 file control function is connected and MP3 file is played SEEK AMS ...

Страница 20: ... BALANCE left right t FADER front rear t SUB subwoofer volume 2 Adjust the level of a selected item by pressing or After 3 seconds the display returns to the normal play mode Note Adjust within 3 seconds after selecting the item Tips When adjusting with the unit press SOUND repeatedly and then rotate the volume control dial When adjusting with the rotary commander press SOUND repeatedly and then r...

Страница 21: ...o to dim the display only when you turn the lights on Select on to dim the display Select off to deactivate the Dimmer A Scroll Auto Scroll Select on to scroll automatically displayed names exceeding 12 characters When the Auto scroll function is set to off and the disc album track is changed the disc album track name or ID3 tag does not scroll Sound EQ7 Tune page 22 to adjust the equalizer curve ...

Страница 22: ...s to the normal play mode Adjusting the equalizer curve 1 Press MENU 2 Press M or m repeatedly until EQ7 Tune appears then press ENTER 3 Press or to select the desired equalizer curve then press ENTER Each time you press or the item changes 4 Select the desired frequency and level 1Press or to select the desired frequency Each time you press or the frequency changes as follows 62Hz y 157Hz y 396Hz...

Страница 23: ...If FM broadcasts are difficult to hear set DSO to OFF Selecting the display mode and display image You can select from 3 different display modes You can also select various display images in Wallpaper mode 1 5 Spectrum analyzer mode 1 5 and Movie mode 1 3 Note The default setting of Auto Image mode is A IMG All After a few seconds of releasing IMAGE the unit returns to Auto Image mode If you want ...

Страница 24: ...e unit s AUX IN external audio input terminal on this unit is also used as the BUS AUDIO IN audio input terminal You can listen to the sound from your car speakers by connecting optional Sony portable devices Note If you connect an optional Sony CD MD unit you cannot connect any portable devices and AUX will not appear in the display as a source When you connect a Sony portable device and CD MD un...

Страница 25: ...on before cleaning the connectors and remove the key from the ignition switch Never touch the connectors directly with your fingers or with any metal device Replacing the lithium battery Under normal conditions batteries will last approximately 1 year The service life may be shorter depending on the conditions of use When the battery becomes weak the range of the card remote commander becomes shor...

Страница 26: ... keys together with the protection collar 3Pull out the release keys to remove the protection collar 2 Remove the unit 1Insert both release keys together until they click 2Pull the release keys to unseat the unit 3Slide the unit out of the mounting Orient the release key correctly Face the hook inwards ...

Страница 27: ...udio input or AUX IN terminal Remote controller input terminal Antenna input terminal Tone controls Bass 10 dB at 62 Hz Treble 10 dB at 16 kHz Loudness 8 dB at 100 Hz 2 dB at 10 kHz Power requirements 12 V DC car battery negative ground Dimensions Approx 178 50 178 mm 71 8 2 71 8 in w h d Mounting dimensions Approx 182 53 161 mm 71 4 21 8 63 8 in w h d Mass Approx 1 3 kg 2 lb 14 oz Supplied access...

Страница 28: ...he connectors on page 25 Stored stations and correct time are erased The fuse has blown Makes noise when the ignition key is in the ON ACC or OFF position The leads are not matched correctly with the car s accessory power connector No power is being supplied to the unit Check the connection If everything is in order check the fuse The car does not have an ACC position tPress SOURCE or insert a dis...

Страница 29: ... The wide mode is selected tSet the IF mode to IF Auto page 21 Error displays For this unit and optional CD MD changers The following indications will flash for about 5 seconds and an alarm sound will be heard Blank 1 No tracks have been recorded on an MD 2 tPlay an MD with recorded tracks on it Error 1 A CD is dirty or inserted upside down 2 t Clean or insert the CD correctly A CD MD cannot play ...

Страница 30: ...ona solamente con productos Sony 2 Un disco CD TEXT es un CD de audio que incluye información como el nombre del disco el nombre del artista y los nombres de las pistas Esta información está grabada en el disco El logotipo XM Ready indica que este producto controlará un módulo de sintonizador Sony XM se vende por separado Si desea obtener detalles sobre el módulo de sintonizador XM póngase en cont...

Страница 31: ...o de emisoras Memoria de la mejor sintonía BTM 15 Recepción de las emisoras almacenadas 16 Almacenamiento únicamente de las emisoras deseadas 16 Almacenamiento de nombres de emisoras Memorando de emisoras 17 Sintonización de emisoras mediante una lista Listado 18 Otras funciones Uso del mando rotatorio 18 Ajuste de las características del sonido 20 Atenuación rápida del sonido 20 Cambio de la conf...

Страница 32: ...ista sintonizar emisoras en forma automática buscar una emisora en forma manual y seleccionar una configuración g Botón SOUND 20 h Botón OFF detener apagar 11 24 i Botones VOL Para subir o bajar el volumen j Botón EQ7 22 Control remoto de tarjeta RM X118A DISC ATT OFF REP PTY SHUF DSPL 1 4 MODE 2 5 3 6 SOURCE DISC SEEK SEEK SOUND ENTER MENU LIST CAT EQ7 DSO VOL DISC SOURCE DISC SEEK SEEK En el mod...

Страница 33: ...tilizarse con el control remoto de tarjeta a menos que se presione SOURCE en la unidad o que se inserte un disco para que dicha unidad se active primero Sugerencia Para obtener información detallada sobre cómo cambiar la pila consulte Sustitución de la pila de litio en la página 25 Selección de un disco y un álbum Utilice los botones DISC ALBUM M m para omitir el disco y el álbum Con una unidad op...

Страница 34: ...N 9 10 11 qa Receptor del control remoto de tarjeta qd Botón OFF detener apagar qf Botón EQ7 qg Botón RESET ubicado en la parte frontal de la unidad detrás del panel frontal 8 qh Botón SOURCE qj Botones numéricos qk Botón DSPL cambio del modo de indicación ql Botón IMAGE 23 Advertencia sobre la instalación en un automóvil sin opción ACC accesorio en el interruptor de encendido Después de apagar el...

Страница 35: ...antener los discos limpios no toque su superficie Tómelos por los bordes Guarde los discos en sus cajas o en los cargadores de discos cuando no los use No someta los discos al calor ni a temperaturas altas Evite dejarlos en un automóvil estacionado o sobre el tablero o la bandeja trasera No adhiera etiquetas ni utilice discos con residuos o tinta pegajosos Esto puede hacer que los discos se dañen ...

Страница 36: ...que el disco no es para uso de audio Según el estado del disco o el equipo utilizado para su grabación es posible que algunos discos CD R CD RW no puedan reproducirse en esta unidad No es posible reproducir un disco CD R o un CD RW que no esté finalizado Proceso necesario para reproducir en el reproductor de CD de audio discos CD R o CD RW grabados Procedimientos iniciales Restauración de la unida...

Страница 37: ...ste la batería del auto 2 Presione OPEN deslice el panel frontal hacia la derecha y tire suavemente de su extremo izquierdo Notas Si extrae el panel con la unidad encendida la alimentación se desactiva automáticamente para evitar que los altavoces se dañen No deje caer el panel frontal ni su pantalla Tampoco ejerza excesiva presión sobre éstos No someta el panel frontal al calor ni a temperaturas ...

Страница 38: ... el modo Clock esta ajustado en on se mostrara la hora página 21 Reproductor de CD Unidad de CD MD opcional Además de reproducir un CD con esta unidad también puede controlar unidades externas de CD CD con capacidad para reproducir MP3 o MD Si conecta unidades opcionales de CD con capacidad para reproducir MP3 como un cambiador de CD MP3 podrá reproducir archivos MP3 que son archivos pistas de aud...

Страница 39: ...S Si la unidad MD deseada aparece como fuente en la pantalla se inicia su reproducción Si en la pantalla aparece MS u otra unidad MD como fuente presione MODE para seleccionar la unidad MD deseada e iniciar la reproducción Notas sobre la conexión de unidades de CD con capacidad para reproducir MP3 Si inserta un disco sin archivos MP3 pistas aparece NO Music en la pantalla y se inicia la reproducci...

Страница 40: ...Disponible solamente cuando se conecta una unidad MD opcional con la función MDLP y se reproduce un disco MDLP Notas Algunos caracteres no pueden mostrarse Los caracteres y signos que no se pueden mostrar aparecen como s Con algunos discos CD TEXT o indicaciones ID3 que contienen muchos caracteres es posible que la información no se desplace Esta unidad no puede mostrar el nombre del artista de ca...

Страница 41: ...tas del álbum en orden aleatorio SHUF Disc para reproducir las pistas del disco en orden aleatorio SHUF Changer 2 para reproducir las pistas del cambiador opcional de CD MD en orden aleatorio SHUF All 3 para reproducir todas las pistas de todas las unidades de CD MD conectadas incluida esta unidad en orden aleatorio 1 Disponible únicamente cuando se conecta una unidad opcional de CD con la función...

Страница 42: ...ndos en lugar de seguir los pasos 2 y 3 También puede finalizar la operación presionando LIST CAT durante 2 segundos en vez del paso 5 Podrá etiquetar discos compactos en una unidad sin la función CUSTOM FILE si la unidad está conectada junto con una unidad de CD que tenga dicha función El memorando de discos se almacenará en la memoria de la unidad de CD con la función CUSTOM FILE Vista en pantal...

Страница 43: ...co deseado 3 Presione ENTER para reproducir el disco Nota No es posible ver ciertas letras excepto las letras almacenadas en el memorando del disco Radio La unidad puede almacenar hasta 6 emisoras por banda FM1 FM2 FM3 AM1 y AM2 Precaución Para sintonizar emisoras mientras maneja utilice la función Memoria de la mejor sintonía para evitar accidentes Almacenamiento automático de emisoras Memoria de...

Страница 44: ...e Cambio de la configuración del sonido y la pantalla en la página 21 El sonido mejora aunque es monoaural ST desaparece Nota Si se producen interferencias esta unidad reducirá automáticamente la frecuencia de recepción para eliminar el ruido función IF Auto En tales casos es posible que algunas emisiones de FM en estéreo se escuchen en monoaural mientras se encuentra en el modo de recepción estér...

Страница 45: ... 2 para ingresar el nombre completo 5 Presione ENTER La unidad vuelve al modo normal de recepción de radio Sugerencias Para corregir o borrar un carácter simplemente sobrescríbalo o introduzca Existe otro método para comenzar a almacenar nombres de emisoras Presione LIST CAT durante 2 segundos en lugar de seguir los pasos 2 y 3 También puede finalizar la operación presionando LIST CAT durante 2 se...

Страница 46: ...otatorio opcional Uso del mando rotatorio En primer lugar adhiera la etiqueta apropiada según cómo desee montar el mando rotatorio El mando rotatorio funciona al presionar los botones o girar los controles Presionando botones Presione Para SOURCE Cambiar la fuente Radio CD MD 1 AUX 2 Encendido MODE Cambiar el funcionamiento Banda de radio unidad de CD 1 unidad de MD 1 ATT Atenuar el sonido OFF 3 D...

Страница 47: ...positivo portátil de Sony y una unidad de CD MD simultáneamente utilice el selector AUX IN 3 Si su automóvil no tiene la opción ACC accesorio en el interruptor de encendido después de apagar la llave de encendido recuerde presionar y mantener presionado OFF hasta que se apague la pantalla 4 Disponible únicamente cuando se conecta una unidad opcional de CD con la función de control de archivos MP3 ...

Страница 48: ...zquierdo derecho t FADER frontal posterior t SUB volumen del altavoz potenciador de graves 2 Para ajustar el nivel de un elemento seleccionado presione o Transcurridos 3 segundos la pantalla vuelve al modo de reproducción normal Nota Realice el ajuste antes de que transcurran 3 segundos después de seleccionar el elemento Sugerencias Al realizar el ajuste con la unidad presione SOUND varias veces y...

Страница 49: ... encender las luces Seleccione on para que la pantalla se atenúe Seleccione off para desactivar el atenuador A Scroll desplazamiento automático Seleccione on para que se desplacen en forma automática los nombres mostrados de más de 12 caracteres Si la functión A Scroll desplazamiento automático está en off y se cambia el disco álbum pista no se desplazará el nombre ni la indicación ID3 Sound sonid...

Страница 50: ...ormal Ajuste de la curva de ecualizador 1 Presione MENU 2 Presione M o m varias veces hasta que aparezca EQ7 Tune y a continuación presione ENTER 3 Presione o para seleccionar la curva de ecualizador que desee y a continuación presione ENTER Cada vez que presione o el elemento cambiará 4 Seleccione la frecuencia y el nivel que desee 1Presione o para seleccionar la frecuencia que desee Cada vez que...

Страница 51: ... en OFF Selección de la imagen y el modo de pantalla Es posible seleccionar 3 modos de pantalla distintos También es posible seleccionar diversas imágenes en pantalla en el modo de Papel de fondo 1 5 Analizador de espectros 1 5 y Película 1 3 Nota La configuración predeterminada del modo de Imagen automática es A IMG All Transcurridos unos segundos después de soltar IMAGE la unidad regresa al modo...

Страница 52: ...lla página 21 Conexión de equipos auxiliares de audio El terminal AUX IN entrada de audio externo de la unidad también se usa como terminal BUS AUDIO IN entrada de audio Puede escuchar el sonido desde los altavoces del automóvil si conecta los dispositivos portátiles opcionales de Sony Nota Si conecta una unidad CD MD Sony opcional no podrá conectar ningún dispositivo portátil y AUX no aparecerá e...

Страница 53: ...to antes de limpiar los conectores y extraiga la llave del interruptor de encendido No toque nunca los conectores directamente con los dedos ni con ningún dispositivo metálico Sustitución de la pila de litio En condiciones normales las pilas duran aproximadamente 1 año La duración puede ser menor en función de las condiciones de uso Cuando la pila se debilita el alcance del control remoto de tarje...

Страница 54: ...3Tire de las llaves de liberación para extraer el marco de protección 2 Extraiga la unidad 1Inserte las dos llaves de liberación a la vez hasta que oiga un clic 2Tire de las llaves de liberación para extraer la unidad 3Deslice la unidad para extraerla de la montura Oriente la llave de liberación en la dirección correcta Coloque el gancho hacia adentro ...

Страница 55: ...zada Terminal de control del amplificador de potencia Entradas Terminal de control ATT para teléfono Terminal de control de iluminación Terminal de entrada de control BUS Entrada de audio BUS o terminal AUX IN Terminal de entrada de control remoto Terminal de entrada de antena Controles de tono Graves 10 dB a 62 Hz Agudos 10 dB a 16 kHz Sonoridad 8 dB a 100 Hz 2 dB a 10 kHz Requisitos de alimentac...

Страница 56: ...detallada consulte Limpieza de los conectores en la página 25 Las emisoras almacenadas y la hora correcta se borraron El fusible se fundió Se escucha ruido cuando el interruptor de encendido se encuentra en la posición ON ACC u OFF Los cables no coinciden correctamente con el conector de alimentación auxiliar del automóvil La unidad no recibe alimentación Verifique la conexión Si todo está en orde...

Страница 57: ...o de recepción monoaural página 21 Se producen interferencias durante la recepción de FM Está seleccionado el modo de ampliación tAjuste el modo IF en IF Auto página 21 Indicaciones de error Para esta unidad y cambiadores opcionales de CD MD Las siguientes indicaciones parpadean durante unos 5 segundos y se escucha una alarma Blank 1 No hay pistas grabadas en el MD 2 t Reproduzca un MD que tenga p...

Страница 58: ... el distribuidor Sony más cercano Offset Es posible que se haya producido una falla interna tVerifique la conexión Si el indicador de error permanece en la pantalla póngase en contacto con el distribuidor Sony más cercano Push Reset La unidad de CD MD no puede utilizarse debido a algún problema tPresione el botón RESET de la unidad Mensajes Local Seek El modo de búsqueda local está activado durant...

Страница 59: ......

Страница 60: ...orea Lead free solder is used for soldering certain parts Halogenated flame retardants are not used in the certain printed wiring boards Halogenated flame retardants are not used in cabinets Paper is used for the packaging cushions ...

Отзывы: