background image

10

Tip

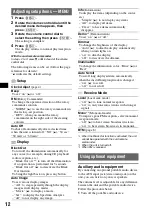
Displayed items will differ, depending on the recorded 
format and settings. For details on MP3/WMA/AAC, 
see page 16; A
TRAC, see page 16.

Note

The display differs depending on the Mass Storage 
Class type USB device, and ATRAC Audio Device.

Listening to music on a Mass 
Storage Class type audio device

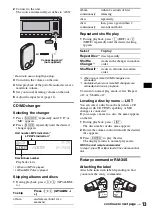
Repeat and shuffle play

1

During playback, press 

(1)

 (REP) or 

(2)


(SHUF) repeatedly until the desired setting 
appears.

To return to normal play mode, select “Repeat 
off” or “Shuffle off”.

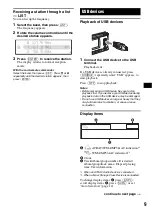
Locating an album by name — LIST

1

During playback, press 

(LIST)

.

2

Rotate the volume control dial until the desired 
album appears.

3

Press 

(ENTER)

 to play the album.

The display returns to normal play mode.

Listening to music on “Walkman”  
(ATRAC Audio Device)

1

During playback, press 

(MODE)


repeatedly until the desired setting 
appears.

The item changes as follows:

Album Mode


t


Artist Mode


t


Playlist 

Mode

*

*

If no playlist exists on ATRAC Audio Device, “Playlist 
Mode” does not appear.

Repeat and shuffle play

1

During playback, press 

(1)

 (REP) or 

(2)


(SHUF) repeatedly until the desired setting 
appears.

To return to normal play mode, select “Repeat 
off” or “Shuffle off. ”

Locating an album/artist/playlist by 
name — LIST

1

During playback, press 

(MODE)

 repeatedly 

until the desired album/artist/playlist appears.

2

Press 

(LIST)

.

The selected mode list appears.

3

Rotate the volume control dial until the desired 
album/artist/playlist appears.

4

Press 

(ENTER)

 to play the album/artist/

playlist.
The display returns to normal play mode.

Select

To play

Repeat Track

track repeatedly.

Repeat Album

album repeatedly.

Shuffle Album

album in random order.

Shuffle Device

device in random order.

Select

To play

Repeat Track

track repeatedly.

Repeat Album

album repeatedly.

Repeat Artist

artist repeatedly.

Repeat Playlist

playlist repeatedly.

Shuffle Album

album in random order.

Shuffle Artist

artist in random order.

Shuffle Playlist

playlist in random order.

Shuffle Device

device in random order.

Содержание cdx CDX-GT860U

Страница 1: ...erating Instructions Manual de instrucciones 2 898 878 21 1 GB ES CS CDX GT860U To cancel the demonstration Demo display see page 12 Para cancelar la pantalla de demostración Demo consulte la página 15 FM AM Compact Disc Player ...

Страница 2: ... the supplied installation connections manual This label is located on the bottom of the chassis R Manufactured under license from BBE Sound Inc Licensed by BBE Sound Inc under one or more of the following US patents 5510752 5736897 BBE and BBE symbol are registered trademarks of BBE Sound Inc BBE MP Minimized Polynomial Non Linear Saturation Process improves digitally compressed sound such as MP3...

Страница 3: ... a station through a list LIST 9 USB devices Playback of USB devices 9 Display items 9 Listening to music on a Mass Storage Class type audio device 10 Listening to music on Walkman ATRAC Audio Device 10 Other functions Changing the sound settings 11 Adjusting the sound characteristics 11 Customizing the equalizer curve EQ3 Tune 11 Adjusting setup items MENU 12 Using optional equipment 12 Auxiliary...

Страница 4: ...ny support website page 21 Portable audio device An AUX input jack on the front of the unit allows connection of a portable audio device analog connection CD MD changers CD MD changers can be connected to the SONY BUS at the rear of the unit A CD TEXT disc is a CD DA that includes information such as disc artist and track name Getting Started Resetting the unit Before operating the unit for the fi...

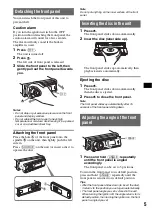
Страница 5: ... anything on the inner surface of the front panel Inserting the disc in the unit 1 Press Z The front panel slides down automatically 2 Insert the disc label side up The front panel slides up automatically then playback starts automatically Ejecting the disc 1 Press Z The front panel slides down automatically then the disc is ejected 2 Press Z to close the front panel Note The front panel slides up...

Страница 6: ...and hold B MODE button 8 10 13 To select the radio band FM AM select the unit 3 select the play mode 4 C Volume control dial To adjust volume SOUND button To enter sound setting ENTER button To apply a menu setting D Receptor for the card remote commander E MENU button To enter menu F IMAGE button To select the display image Movie mode 1 3 t Spectrum analyzer mode 1 5 t Wall paper mode 1 3 t norma...

Страница 7: ... and hold fast forward reverse a track press and hold Radio To tune in stations automatically press find a station manually press and hold wd VOL volume button To adjust volume wf ATT attenuate button To attenuate the sound To cancel press again wg SOUND button To enter sound setting wh M m buttons To select preset stations skip groups press skip groups continuously press and hold wj Number button...

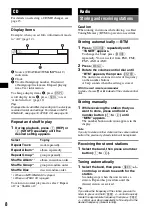
Страница 8: ...ontrol dial until BTM appears then press ENTER The unit stores stations in order of frequency on the number buttons A beep sounds when the setting is stored With the card remote commander In steps 3 press M or m instead of the volume control dial Storing manually 1 While receiving the station that you want to store press and hold a number button 1 to 6 until MEM appears The number button indicatio...

Страница 9: ...cted press SOURCE repeatedly until USB appears to start playback Press OFF to stop playback Notes Before removing a USB device be sure to stop playback first If you remove your USB device during playback data in the USB device may be damaged Do not use USB devices so large or heavy that they may fall down due to vibration or cause a loose connection Display items A ATRAC WMA MP3 AAC indication 1 W...

Страница 10: ...ylist Mode If no playlist exists on ATRAC Audio Device Playlist Mode does not appear Repeat and shuffle play 1 During playback press 1 REP or 2 SHUF repeatedly until the desired setting appears To return to normal play mode select Repeat off or Shuffle off Locating an album artist playlist by name LIST 1 During playback press MODE repeatedly until the desired album artist playlist appears 2 Press ...

Страница 11: ...ess SEEK up Selectable frequency in each range LOW 60 Hz or 100 Hz MID 500 Hz or 1 0 kHz HI 10 0 kHz or 12 5 kHz 7 Rotate the volume control dial to adjust the equalizer curve The volume level is adjustable in 1 dB steps from 10 dB to 10 dB 8 Press ENTER Repeat steps 5 to 8 to adjust other frequency ranges 9 Press SEEK down The display returns to normal play reception mode To restore the factory s...

Страница 12: ...llumination automatically for any source for example during CD playback radio reception etc Black Out on 1 to turn off the illumination if no operation is performed for 5 seconds Black Out off z to deactivate the Black Out function To bring the light back on press any button Auto Image To set various display images All to step repeatedly through the display images in all display modes Movie z to d...

Страница 13: ...ou can select a disc from the list when a CD changer with CD TEXT capability or MD changer is connected If you assign a name to a disc the name appears on the list 1 During playback press LIST The disc number or disc name appears 2 Rotate the volume control dial until the desired disc appears 3 Press ENTER to play the disc The display returns to normal play mode With the card remote commander In s...

Страница 14: ...this occur the unit will not operate properly In such a case remove the disc and wait for about an hour until the moisture has evaporated To maintain high sound quality Be careful not to splash juice or other soft drinks onto the unit or discs Notes on discs To keep a disc clean do not touch its surface Handle the disc by its edge Keep your discs in their cases or disc magazines when not in use Do...

Страница 15: ... with copyright protection technologies are marketed by some record companies Please be aware that among those discs there are some that do not conform to the CD standard and may not be playable by this product About USB devices Mass Storage Class and ATRAC Audio Device type USB devices compliant with the USB standard can be used However this unit cannot recognize USB devices via a USB HUB and is ...

Страница 16: ...otected file is not supported About ATRAC files ATRAC3plus format ATRAC3 which stands for Adaptive Transform Acoustic Coding3 is audio compression technology It compresses audio CD data to approximately 1 10 of its original size ATRAC3plus which is an extended format of ATRAC3 compresses the audio CD data to approximately 1 20 of its original size The unit accepts both ATRAC3 and ATRAC3plus format...

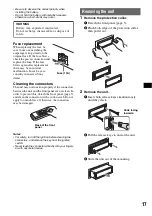
Страница 17: ...order to prevent this detach the front panel page 5 and clean the connectors with a cotton swab Do not apply too much force Otherwise the connectors may be damaged Notes For safety turn off the ignition before cleaning the connectors and remove the key from the ignition switch Never touch the connectors directly with your fingers or with any metal device Removing the unit 1 Remove the protection c...

Страница 18: ...ive ground earth Dimensions Approx 178 50 190 mm 7 1 8 2 7 1 2 in w h d Mounting dimensions Approx 182 53 163 mm 7 1 4 2 1 8 6 1 2 in w h d Mass Approx 1 6 kg 3 lb 9 oz Supplied accessories Card remote commander RM X156 USB cap Parts for installation and connections 1 set Optional accessories equipment Rotary commander RM X4S BUS cable supplied with an RCA pin cord RC 61 1 m RC 62 2 m CD changer 1...

Страница 19: ...hting card remote commander operation is not possible page 12 Make sure the insulation film has been removed page 4 DSO does not function Depending on the type of car interior or type of music DSO may not have a desirable effect The images change automatically In Auto Image mode the selected image cannot be displayed tTo display selected image only set to Auto Image off page 12 Any display items d...

Страница 20: ...re to stop playback first for data protection The sound is intermittent The sound may be intermittent at a high bit rate of more than 320 kbps Blank Disc 1 Tracks have not been recorded on the MD 2 tPlay an MD with recorded tracks Checking The unit is confirming the connection of a USB device tWait until confirming the connection is finished Error 1 The disc is dirty or inserted upside down 2 tCle...

Страница 21: ...s that the USB device is out of order or an unsupported device is connected Push Reset The CD unit and CD MD changer cannot be operated because of some problem tPress the RESET button page 4 Read The unit is reading all track and album group information on the disc USB device tWait until reading is complete and playback starts automatically Depending on the disc USB device structure it may take mo...

Страница 22: ... sobre la instalación y las conexiones consulte el manual de instalación conexiones suministrado Esta etiqueta está situada en la parte inferior del chasis R Fabricado bajo licencia de BBE Sound Inc Licenciado por BBE Sound Inc bajo el número USP5510752 y 5736897 BBE y el símbolo de BBE son marcas comerciales registradas de BBE Sound Inc El proceso BBE MP saturación no lineal polinomial reducida a...

Страница 23: ...ispositivos USB Reproducción mediante dispositivos USB 12 Elementos de la pantalla 12 Audición en un dispositivo de audio de almacenamiento masivo 12 Escucha de música en un Walkman dispositivo de audio ATRAC 13 Otras funciones Cambio de los ajustes de sonido 14 Ajuste de las características de sonido 14 Personalización de la curva de ecualizador EQ3 Tune 14 Ajuste de los elementos de configuració...

Страница 24: ...a posición baja en la puerta BBE MP mejora el sonido comprimido digitalmente como en el caso de archivos MP3 Configuración de imagen Es posible establecer que se muestren distintas imágenes en la unidad Funcionamiento de una unidad opcional Es posible conectar y operar varias clases de dispositivos de audio desde la unidad Dispositivo USB es posible conectar al terminal USB frontal un dispositivo ...

Страница 25: ...emoto de tarjeta por primera vez retire la película aislante Ajuste del reloj El reloj emplea una indicación digital de 12 horas 1 Presione MENU 2 Gire el selector de control de volumen hasta que aparezca Clock Adjust y a continuación presione ENTER Aparece la pantalla de ajuste del reloj 3 Gire el selector de control de volumen para ajustar la hora y los minutos Para mover la indicación digital p...

Страница 26: ... 3 Deslice el panel frontal hacia la izquierda y a continuación tire de éste hacia usted Notas No deje caer ni ejerza excesiva presión sobre el panel frontal y el visualizador No someta el panel frontal al calor ni a temperaturas altas o excesiva humedad Evite dejarlo en un automóvil estacionado o sobre el tablero o la bandeja posterior Colocación del panel frontal Coloque el orificio A del panel ...

Страница 27: ...e del ángulo del panel frontal 1 Mantenga presionado ANGLE varias veces hasta que se ajuste el ángulo del panel frontal El panel frontal puede ajustarse en 3 posiciones Para colocar el panel frontal en la posición predeterminada mantenga presionado ANGLE varias veces hasta que éste se sitúe en la posición predeterminada Sugerencias Cuando el panel frontal se desliza hacia abajo para insertar el di...

Страница 28: ...ar la unidad 3 seleccionar el modo de reproducción 4 C Selector de control de volumen Para ajustar el volumen Botón SOUND Para seleccionar los ajustes de sonido Botón ENTER Para aplicar un ajuste del menú D Receptor del control remoto de tarjeta E Botón MENU Para entrar en el menú F Botón IMAGE Para seleccionar la imagen de la pantalla Modo de película de 1 a 3 t Modo de analizador de espectro de ...

Страница 29: ...olumen Para ajustar el volumen wf Botón ATT atenuación Para atenuar el sonido Para cancelar esta función vuelva a presionarlo wg Botón SOUND Para introducir los ajustes de sonido wh Botones M m Para seleccionar emisoras almacenadas en memoria omitir grupos presionar para omitir grupos continuamente mantener presionado wj Botones numéricos CD MD 1 USB 2 1 REP 10 12 16 2 SHUF 10 12 16 6 PAUSE 8 Para...

Страница 30: ...ón del tipo de disco el formato de grabación y los ajustes Si desea obtener más información acerca de los archivos MP3 WMA AAC consulte la página 19 para CD de ATRAC consulte la página 20 Reproducción repetida y aleatoria 1 Durante la reproducción presione 1 REP o 2 SHUF varias veces hasta que aparezca el ajuste deseado 1 Cuando se reproduce un archivo MP3 WMA AAC 2 Cuando se reproduce un CD de AT...

Страница 31: ... de las emisoras almacenadas 1 Seleccione la banda y a continuación presione un botón numérico de 1 a 6 Sintonización automática 1 Seleccione la banda y a continuación presione el selector de control SEEK hacia arriba o hacia abajo para buscar la emisora La búsqueda se detiene cuando la unidad recibe una emisora Repita este procedimiento hasta recibir la emisora deseada Sugerencia Si conoce la fre...

Страница 32: ...a cambiar los elementos de la pantalla C presione DSPL para desplazarlos presione SCRL o ajuste Auto Scroll on página 15 Sugerencia Los elementos que se muestran variarán en función del formato de grabación y los ajustes Si desea obtener más información acerca de los archivos MP3 WMA AAC consulte la página 19 para ATRAC consulte la página 20 Nota La visualización variará en función del dispositivo...

Страница 33: ... el nombre LIST 1 Durante la reproducción presione MODE varias veces hasta que aparezca el álbum artista o lista de reproducción deseado 2 Presione LIST Aparecerá la lista seleccionada 3 Gire el selector de control de volumen hasta que aparezca el álbum artista o lista de reproducción deseado 4 Presione ENTER para reproducir el álbum artista o lista de reproducción La pantalla vuelve al modo de re...

Страница 34: ...re el selector de control de volumen para seleccionar el rango de frecuencias que desee entre LOW MID o HI y a continuación presione ENTER 6 Gire el selector de control de volumen para seleccionar la frecuencia central que desea ajustar y a continuación presione SEEK hacia arriba Frecuencias que se pueden seleccionar en cada rango LOW 60 Hz o 100 Hz MID 500 Hz o 1 0 kHz HI 10 0 kHz o 12 5 kHz 7 Gi...

Страница 35: ...tar la alimentación automáticamente una vez transcurrido un período de tiempo deseado cuando la unidad está apagada NO z 30 sec 30 min o 60 min Black Out Para apagar automáticamente la iluminación de cualquier fuente por ejemplo durante la reproducción de CD recepción de radio etc Black Out on 1 para que se desactive la pantalla si no se realiza ninguna acción durante 5 segundos Black Out off z pa...

Страница 36: ...e la reproducción presione 1 REP o 2 SHUF varias veces hasta que aparezca el ajuste deseado 1 Si se conectaron uno o más cambiadores de CD MD 2 Disponible si se conectaron dos o más cambiadores de MD y uno se encuentra en modo de reproducción Mono 3 Modo monoaural Para mejorar una recepción de FM defectuosa seleccione el modo de recepción monoaural off z para escuchar las emisiones estéreo en esté...

Страница 37: ...instale el mando rotatorio Ubicación de los controles Los botones correspondientes en el mando rotatorio controlan las mismas funciones que los de esta unidad La operación de los controles siguientes del mando rotatorio es distinta que en la unidad Control PRESET DISC Funciona de igual manera que GP ALBM en la unidad presionar y girar Control VOL volumen Funciona de igual manera que el selector de...

Страница 38: ... de discos No es posible reproducir discos compactos de 8 cm Antes de reproducir los discos límpielos con un paño de limpieza disponible en el mercado Hágalo desde el centro hacia los bordes No utilice disolventes como bencina diluyentes productos de limpieza comerciales ni aerosoles antiestáticos para discos analógicos Notas sobre los discos CD R CD RW Según el estado del disco o el equipo utiliz...

Страница 39: ...gnifica MPEG 1 Audio Layer 3 es un formato estandarizado que permite comprimir archivos de música Comprime los datos de CD de audio a aproximadamente 1 10 de su tamaño original Las versiones 1 0 1 1 2 2 2 3 y 2 4 del indicador ID3 se aplican solamente al formato MP3 El indicador ID3 puede tener de 15 30 caracteres versiones 1 0 y 1 1 o de 63 126 caracteres versiones 2 2 2 3 y 2 4 Al asignar un nom...

Страница 40: ...arpeta o archivo y la información de texto grabada por SonicStage Para obtener más información sobre CD de ATRAC y dispositivos de audio ATRAC consulte el manual de SonicStage Notas Asegúrese de crear los archivos de ATRAC a través del software autorizado como por ejemplo SonicStage Los archivos ATRAC no se pueden reproducir en dispositivos USB diferentes de los dispositivos de audio ATRAC Si dese...

Страница 41: ...la unidad 3Deslice la unidad para extraerla del marco Especificaciones Sección del reproductor de CD Relación señal ruido 120 dB Respuesta de frecuencia de 10 a 20 000 Hz Fluctuación y trémolo inferior al límite medible Sección del sintonizador FM Rango de sintonización de 87 5 a 108 0 MHz a intervalos de 50 kHz de 87 5 a 107 9 MHz a intervalos de 200 kHz Intervalo de sintonización de FM 50 kHz 20...

Страница 42: ...sea compatible con el sistema BUS de Sony El diseño y las especificaciones están sujetos a cambios sin previo aviso Solución de problemas La siguiente lista de comprobación le ayudará a solucionar los problemas que puedan producirse con la unidad Antes de consultarla revise los procedimientos de conexión y de funcionamiento Patentes de los EE UU y otros países usados con licencia de Dolby Laborato...

Страница 43: ... insertó a la fuerza al revés o en forma incorrecta No se inicia la reproducción El disco es defectuoso o está sucio Los discos CD R CD RW no son para audio página 18 El formato del disco y la versión del archivo no son compatibles con esta unidad para obtener más información consulte la página 4 y 18 Presione Z para extraer el disco Los archivos MP3 WMA AAC tardan más tiempo en reproducirse que l...

Страница 44: ... El disco está sucio o se insertó al revés 2 tLímpielo o insértelo correctamente Se insertó un disco vacío El disco no se reproduce debido a algún problema tInserte otro disco El dispositivo USB no ha sido reconocido automáticamente tConéctelo nuevamente Presione Z para extraer el disco Failure La conexión de los altavoces y amplificadores es incorrecta tConsulte el manual de instalación de este m...

Страница 45: ...ue hay un dispositivo incompatible conectado Push Reset La unidad de CD y el cambiador de CD MD no pueden utilizarse debido a algún problema tPresione el botón RESET página 5 Read La unidad está leyendo toda la información de grupos y álbumes del disco o del dispositivo USB tEspere hasta que finalice la lectura y se inicie la reproducción automáticamente Es posible que demore más de un minuto en f...

Страница 46: ...RAC ATRAC AD SonicStage 及其标 志是 Sony Corporation 的商标 WALKMAN 和 WALKMAN 标志是 Sony Corporation 的注册商标 您的汽车引擎没有 ACC 位置时的警告 必须设定自动断电功能 第 12 页 本机在关机后会在设定的时间内完全并自 动切断电源 以防止电池消耗 如果您未设定自动断电功能 则在每次关闭 引擎时按住 OFF 直至显示画面消失 ...

Страница 47: ...台 8 自动调谐 8 通过列表接收电台 LIST 9 USB 设备 播放 USB 设备 9 显示项目 9 听 Mass Storage Class 型音频设备中的 音乐 10 听 Walkman ATRAC 音频设备 中的 音乐 10 其他功能 更改声音设定 11 调整声音特性 11 自定义均衡曲线 EQ3 调谐 11 调整设定项目 MENU 12 使用选购设备 13 辅助音频设备 13 CD MD 换碟机 13 旋转式遥控器 RM X4S 14 附加信息 使用前注意事项 14 光盘注意事项 14 关于 USB 设备 15 MP3 WMA AAC 文件的播放顺序 15 关于 MP3 文件 15 关于 WMA 文件 15 关于 AAC 文件 16 关于 ATRAC 文件 16 保养 16 取出本机 17 规格 17 故障排除 18 出错显示 信息 19 ...

Страница 48: ... 作 USB 设备 Mass Storage Class USB 设备 或 Walkman ATRAC 音频设备 可与前 面的 USB 端子连接 关于可以使用设备的 详细信息 请参阅关于 USB 设备 第 15 页 或 Sony 支持网站 第 20 页 便携式音频设备 本机前面的 AUX 输入插 孔可连接便携式音频设备 模拟连接 CD MD 换碟机 本机背面的 SONY BUS 可以 连接 CD MD 换碟机 CD TEXT 光盘是含有光盘 艺术家或曲目名称等信息 的 CD DA 入门指南 重设本机 在第一次使用本机前 或更换汽车电瓶或改 变连接后 必须重设本机 拆卸前面板 并用带尖头的物体 如圆珠笔 等 按 RESET 按钮 注意 按 RESET 按钮 将消除时钟设定和某些已储存的内容 准备卡片式遥控器 第一次使用卡片式遥控器之前 请先抽出绝 缘薄膜 设定时钟 时钟采用 12 小时制数字...

Страница 49: ...架上 安装前面板 将前面板上的孔 A 放在本机的轴 B 上 然 后将左侧轻轻推入 按本机上的 SOURCE 或插入光盘 开始 操作本机 注意 切勿在前面板内表面放任何东西 将光盘插入本机 1 按 Z 前面板自动滑下 2 插入光盘 标签面朝上 前面板自动向上滑 然后自动开始播放 退出光盘 1 按 Z 前面板自动滑下 然后光盘被退出 2 按 Z 关闭前面板 注意 前面板滑下 15 秒钟后会自动向上滑 调整前面板的角度 1 反复按住 ANGLE 直至前面板角度适 合 前面板可以设定至 3 个位置 若要将前面板返回至默认位置 则反复按住 ANGLE 直至前面板返回其默认位置 提示 前面板滑下 要插入光盘 后 将再次自动返回至 您设定的位置 您设定的前面板角度储存在本机中 关闭点火开关 时 前面板角度返回至默认位置 然后打开点火开 关 前面板转变为您设定的角度 OFF B A ANGLE ANGLE...

Страница 50: ...UND 按钮 输入声音设定 ENTER 按钮 应用菜单设定 D 卡片式遥控器接收器 E MENU 按钮 进入菜单 F IMAGE 按钮 选择显示图像 动画模式 1 3 t 频谱分析模式 1 5 t 墙纸模式 1 3 t 正常播放 接收模式 G RESET 按钮 位于前面板后面 4 H 光盘槽 5 插入光盘 I 显示窗 MODE MENU DSPL SCRL OFF REP SHUF PAUSE BBE MP GP ALBM LIST IMAGE SOURCE SEEK SEEK PUSH SOUND ENTER ANGLE 1 2 3 4 5 6 AUX CDX GT860U 1 2 3 5 4 6 7 8 9 q qa qs qd qfqg qj qk ql w qh OFF DSPL REP SHUF MENU SCRL SOURCE SOUND MODE PAUSE 1 3 2 4 ...

Страница 51: ...缘薄膜 第 4 页 wa ENTER 按钮 完成设定 ws SEEK 按钮 CD 跳过曲目 按 连续跳过曲目 按 然 后在 1 秒钟内再次按下并按住不放 快 进 后退一个曲目 按住 无线电 自动调入电台 按 手动搜台 按住 wd VOL 音量 按钮 调整音量 wf ATT 降低 按钮 降低声音 若要取消 则再按一次 wg SOUND 按钮 输入声音设定 wh M m 按钮 选择预设电台 跳过群组 按 连续跳 过群组 按住 wj 数字按钮 CD MD 1 USB 2 1 REP 8 10 13 2 SHUF 8 10 13 6 PAUSE 8 暂停播放 若要取消 则再按一次 无线电 接收已储存的电台 按 储存电台 按 住 1 连接了 MD 换碟机时 2 连接了 USB 设备时 3 连接了 CD MD 换碟机时 4 连接了 ATRAC 音频设备时 5 播放 ATRAC 时 6 播放 MP3 W...

Страница 52: ...使用最佳 调谐记忆 BTM 以免发生事故 自动储存 BTM 1 反复按 SOURCE 直至出现 TUNER 若要改变波段 则反复按 MODE 您可 以从 FM1 FM2 FM3 AM1 或 AM2 中选择 2 按 MENU 3 旋转音量控制拨盘直至出现 BTM 然后 按 ENTER 本机将各电台按其频率顺序储存在数字按 钮上 当设定存储完毕时 本机发出一声提示 音 用卡片式遥控器操作 在步骤 3 中 按 M 或 m 代替音量控制拨盘 手动储存 1 接收您要储存的电台时 按住一个数字按 钮 1 至 6 不放 直至出现 MEM 数字按钮指示会在显示屏上出现 注意 若您试图在同一个数字按钮上储存另一个电台 则以前 存入的电台将被替换 收听已储存的电台 1 选择波段 然后按一个数字按钮 1 至 6 自动调谐 1 选择波段 然后向上或向下按 SEEK 控制器搜索电台 当本机接收到一个电台时 扫描即停...

Страница 53: ... 按 OFF 停止播放 注意 移除USB设备之前 必须首先停止播放 如果在播放过 程中移除 USB 设备 则 USB 设备中的数据可能损坏 切勿使用较大或较重的 USB 设备 否则可能由于振动 掉落 或造成连接松脱 显示项目 A ATRAC WMA MP3 AAC 指示 1 WMA MP3 AAC 指示 2 B 时钟 C 曲目 专辑 群组编号 光盘 艺术家 专辑 群组 曲目名称 已播放时间 文本信息 1 连接了 ATRAC 音频设备时 2 连接了 Mass Storage Class 设备时 若要更改显示项目 C 按 DSPL 若要滚 动显示项目 C 按 SCRL 或设定 Auto Scroll on 第 12 页 提示 显示的项目视录制格式和设定而异 关于 MP3 WMA AAC 的详细信息 请参阅第 15 页 关于 ATRAC 请参阅第 16 页 注意 根据不同的 Mass Stora...

Страница 54: ...ist Mode 重复和随机播放 1 播放过程中 反复按 1 REP 或 2 SHUF 直至出现所需设定 若要返回正常播放模式 则选择 Repeat off 或 Shuffle off 通过名称找出专辑 艺术家 播放列表 LIST 1 在播放过程中 反复按 MODE 直至出 现想要的专辑 艺术家 播放列表 2 按 LIST 出现所选的模式列表 3 旋转音量控制拨盘直至出现想要的专辑 艺 术家 播放列表 4 按 ENTER 播放此专辑 艺术家 播放列 表 显示返回正常播放模式 选择 播放 Repeat Track 重复播放曲目 Repeat Album 重复播放专辑 Shuffle Album 以随机顺序播放专辑 Shuffle Device 以随机顺序播放设备 选择 播放 Repeat Track 重复播放曲目 Repeat Album 重复播放专辑 Repeat Artist 重复播放某...

Страница 55: ...每个范围的可选择频率 LOW 60 Hz 或 100 Hz MID 500 Hz 或 1 0 kHz HI 10 0 kHz 或 12 5 kHz 7 转动音量控制拨盘 调整均衡器曲线 音量电平以 1 dB 为单位 从 10 dB 至 10 dB 进行调整 8 按 ENTER 重复步骤 5 至 8 调节其他频率范围 9 向下按 SEEK 显示返回正常播放 接收模式 若要恢复均衡器曲线出厂设定 则在步骤 4 中选择 EQ3 Mode Initialize 和 Yes 提示 其他均衡器类型也可调整 用卡片式遥控器操作 在步骤 2 至 7 中 按 M 或 m 代替音量控制拨盘 在步 骤 3 6 和 9 中 按 或 代替按 SEEK EQ3 parametric 选择均衡器类型 Xplod Vocal Edge Cruise Space Gravity Custom 或 off z DSO 选择 ...

Страница 56: ...播放源 例如 在播放 CD 接收无 线电等 都自动关闭照明 Black Out on 1 如果 5 秒钟未进行操 作则将关闭照明 Black Out off z 停用关闭照明功 能 若要开启背光 则按任何按钮 Auto Image 设定各种显示图像 All 反复逐步通过所有显示模式中的 显示图像 Movie z 显示动画 SA 显示频谱分析仪 off 不显示任何图像 Info 信息 显示项目 视音源等而定 Simple z 不显示任何项目 All 显示所有项目 Clear 显示项目自动消失 Demo 2 演示 设定 on z 或 off Dimmer 改变显示屏亮度 Auto z 打开汽车照明时 显示屏 自动变暗 on 显示屏变暗 off 关闭调光器 Illumination 改变照明颜色 Blue z 或 Red Auto Scroll 更改了光盘 专辑 群组 曲目时 自动滚 动显示较长...

Страница 57: ...按 1 REP 或 2 SHUF 直至出现所需设定 1 连接了一台或多台 CD MD 换碟机时 2 当连接了两台或多台 MD 换碟机且一台正在播放时有 效 若要返回正常播放模式 则选择 Repeat off 或 Shuffle off 通过名称找出光盘 LIST 当连接了具有 CD TEXT 功能的 CD 换碟机或连 接了 MD 换碟机时 您可以从列表中选择光 盘 如果您对光盘指定一个名称 则此名称将出 现在列表中 1 在播放过程中 按 LIST 出现光盘编号或光盘名称 2 旋转音量控制拨盘直至出现想要的光盘 3 按 ENTER 播放此光盘 显示返回正常播放模式 用卡片式遥控器操作 在步骤 2 中 按 M 或 m 代替音量控制拨盘 AUX AUX 连接线 不附送 光盘 专辑编号 装置编号 MP3 指示 1 LP2 LP4 指示 2 跳过 按 3 4 GP ALBM 专辑 并释放 按住片刻 ...

Страница 58: ... 屏内会产生湿气凝结 一旦如此 本机将无法 正常运行 此时 请将光盘取出 并等待约一 小时 直至湿气蒸发 保持高质量声音 请随时注意 切勿将果汁或其他软饮料溅在本 机或光盘上 光盘注意事项 为保持光盘清洁 切勿接触其表面 拿光盘时 请持其边缘 不使用时请将光盘装入光盘盒或光盘匣 切勿使光盘受到热源 高温的影响 避免将光 盘遗留在停放的车中或仪表盘 后托架上 切勿贴标签 或使用带有黏性墨水 残留物的 光盘 这类光盘在使用时可能会停止转动 从 而造成故障或毁坏光盘 切勿使用任何贴有标签或贴纸的光盘 使用此类光盘可能会引起如下故障 不能退出光盘 由于标签或贴纸剥落并卡住 弹出装置 不能正确读取音频数据 例如 跳跃播放或 不播放 由于热源使贴纸或标签皱缩造成 光盘翘曲 本机不能播放非标准形状的光盘 例如 心 形 正方形 星形 若试图播放此类光盘 则可能会损坏本机 切勿使用此类光盘 您无法播放 8 ...

Страница 59: ...请访问 Sony 支持网站 第 20 页 相应代码根据设备类型而不相同 Mass Storage Class MP3 WMA AAC ATRAC 音频设备 ATRAC MP3 WMA AAC 无法播放除 ATRAC 以外的 DRM 数字版权管理 文件 可以显示的数据如下 Mass Storage Class 文件夹 专辑 512 文件 曲目 65535 ATRAC 音频设备 ATRAC MP3 WMA AAC 专辑 艺术家 播放列表 65535 曲目 65535 关于 USB 设备注意事项 使用电缆线时 请使用随 USB 设备附送的电缆线进行 连接 切勿使用较大或较重的 USB 设备 否则可能干扰驾驶 操作 切勿将 USB 设备遗留在停放的车内 否则可能引起故 障 视记录的数据量而定 可能需要一定时间才开始播 放 建议备份 USB 设备中的数据 MP3 WMA AAC 文件的播放顺序 关于...

Страница 60: ... 专辑 艺术家 播放列表的最大数量为65535 曲目的最大数量为 65535 显示文件夹 文件名称字符和由 SonicStage 写 入的文本信息 关于 ATRAC CD 和 ATRAC 音频设备的详细说明 请参阅 SonicStage 手册 注意 必须使用 SonicStage 等授权软件创建 ATRAC 文件 除 ATRAC 音频设备以外 ATRAC 文件无法在其他 USB 设 备上播放 如果您对本机有疑问或问题 而本说明书中未 提及 请向附近的 Sony 经销商咨询 保养 更换卡片式遥控器的锂电池 一般情况下 电池能维持大约一年时间 使用 寿命可能会变短 这取决于电池的使用状况 当电池的电力变弱时 卡片式遥控器的操控范 围将变小 请更换一枚新的 CR2025 锂电池 使 用其他电池可能会引起火灾或爆炸的危险 锂电池的注意事项 锂电池应放在儿童不易触及的地方 万一误吞了电 池 请立即就...

Страница 61: ...立体声 0 3 单声道 分离度 1 kHz 时 35 dB 频率响应 30 15000 Hz AM 调谐范围 531 1602 kHz 以 9 kHz 为一级 530 1710 kHz 以 10 kHz 为一级 AM 调谐间隔 9 kHz 10 kHz 可切换 天线端子 外接天线连接器 中频 10 7 MHz 450 kHz 灵敏度 30 µV USB 播放机部分 接口 USB 全速 最大电流 500 mA 功率放大器部分 输出 扬声器输出 可靠的绝缘连接器 扬声器阻抗 4 8 Ω 最大功率输出 52 W 4 4 Ω时 常规 输出 音频输出端子 前 后 超低音输出端子 单声道 电动天线继电器控制端子 功率放大器控制端子 输入 电话 ATT 控制端子 照明控制端子 BUS 控制输入端子 BUS 音频输入端子 遥控器输入端子 天线输入端子 AUX 输入插孔 立体声迷你插孔 音调控制 低 60 ...

Страница 62: ...已被消除 已按过 RESET 按钮 t再将设定存入内存中 电源导线或电池已断开连接 电源导线未被正确连接 储存的电台及正确时间被消除 保险丝已熔断 切换引擎位置时产生噪音 导线与汽车附件电源连接器未正确匹配 显示从显示窗口消失或不出现在显示窗口中 调光器设定为 Dimmer on 第 12 页 前面板角度不正确 t按住 ANGLE 调整前面板角度 第 5 页 如果按住 OFF 则显示消失 t按住本机上的 OFF 直至出现显示 连接器脏了 第 16 页 自动断电功能无法操作 本机开启 关闭本机后自动断电功能启动 t关闭本机 本机正在工作时显示消失 关闭照明功能设定为开启状态 第 12 页 无法操作卡片式遥控器 如果开启了关闭照明功能 无照明 则卡片式 遥控器操作将无效 第 12 页 确保绝缘薄膜已经抽出 第 4 页 DSO 无法运作 根据汽车内部类型或音乐类型 DSO 功能不一定能 得到满意...

Страница 63: ...目 本机无法通过 USB HUB 识别 USB 设备 并且与具 有 HUB 功能的设备不兼容 无法播放项目 播放音乐文件受到数字版权管理 DRM 技术保护 第 15 页 只能播放非 Mass Storage Class USB 设备中的项 目 如果 USB 设备不工作 请重新连接 发出提示音 在播放过程中 USB 设备连接断开 t断开 USB 设备连接之前必须先停止播放 以保护 数据 声音断断续续 当比特率超过 320 kbps 时 声音可能断断续续 Blank Disc 1 MD 上没有录制曲目 2 t播放录制有曲目的 MD Checking 本机正在确认 USB 设备连接 t请稍等 直至确认连接结束 Error 1 光盘脏了或上下装反了 2 t将光盘擦拭干净或正确插入光盘 插入了空白光盘 由于某些原因 光盘无法播放 t插入另一盘光盘 未自动识别出 USB 设备 t请重新连接 按 Z 取...

Страница 64: ...目中未写入曲目名称 Not Read 本机未读取光盘信息 t装入光盘 然后在列表中选择此光盘 Not Ready MD 换碟机的盖子被打开或没有正确插入 MD t关上盖子或正确插入 MD Not Supported 不支持 USB 不支持所连接的 USB 设备 t请连接 Mass Storage Class 的 USB 设备 第 15 页 Offset 可能发生内部故障 t检查连接 如果此出错指示仍然显示在显示屏 中 请向您附近的 Sony 经销商咨询 Over Load USB 设备过载 t断开 USB 设备连接 然后按 SOURCE 更改音 源 t表示 USB 设备故障 或连接了不支持的设备 Push Reset 由于某些原因 CD 装置和 CD MD 换碟机无法操作 t按 RESET 按钮 第 4 页 Read 本机正在读取光盘 USB 设备上所有曲目和专辑 群组信息 t请等待至读取...

Отзывы: