

3
SECTION 1
GENERAL
This section is extracted
from instruction manual.
7
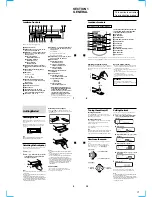
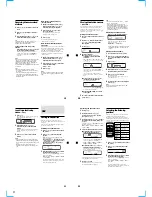
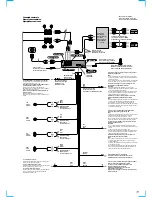
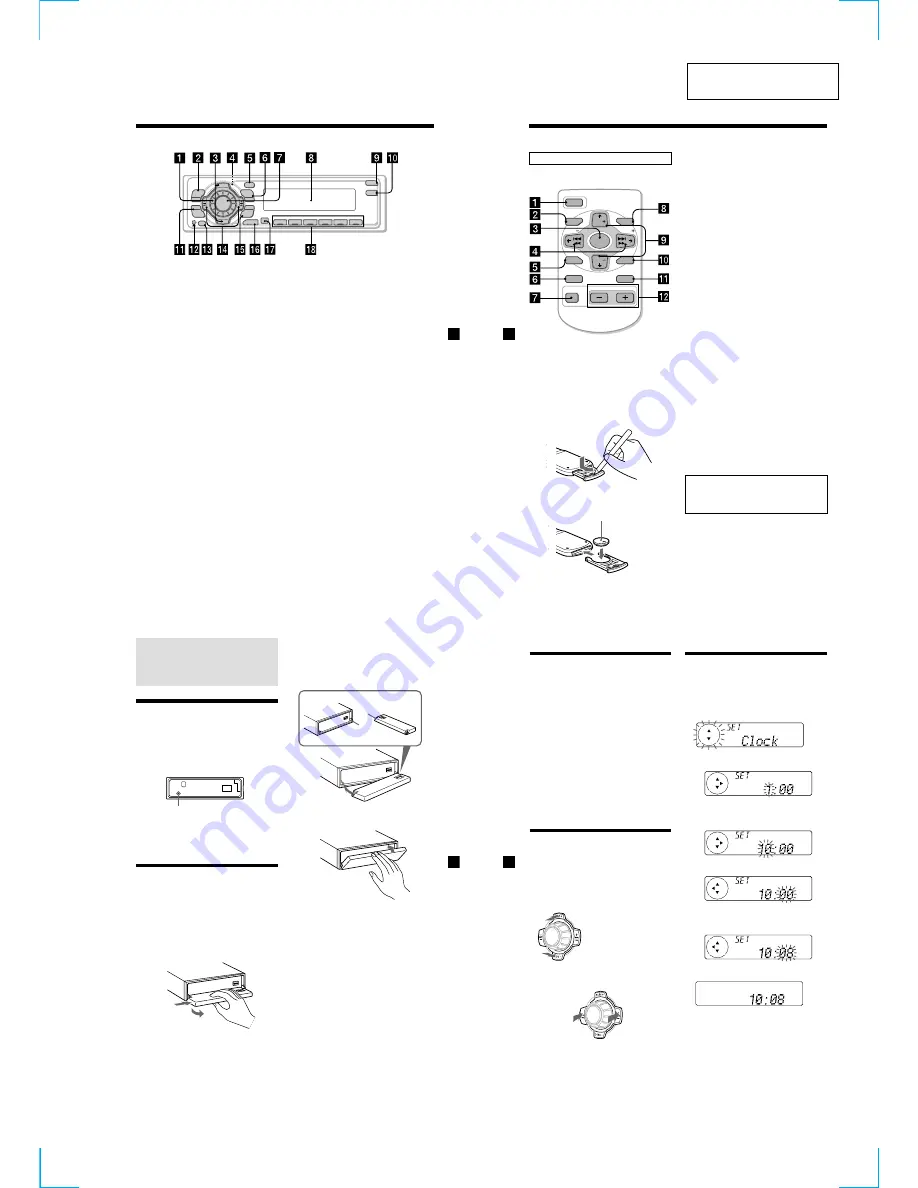
Location of controls
Refer to the pages listed for details.
1
Volume control dial
2
MENU button 10, 13, 15, 16, 17, 18, 19,
20, 22, 24, 25, 26, 29, 30, 32
3
DISC/PRST +/– (cursor up/down) button
10, 13, 15, 16, 17, 18, 19, 20, 21, 22, 24,
25, 26, 29, 30, 32
During radio reception:
Preset stations select 19
During CD/MD playback:
Disc change 13, 16
During TV reception:
Channel select 30
4
Z
(eject) button (located on the front
side of the unit behind the front panel)
11, 12
5
DSPL (display mode change) button
12, 13, 15, 20
6
LIST button
Station Memo
20
Disc Memo
15
List-up
16, 21, 31
7
SOURCE (Tuner/CD/MD/TV) button
10, 11, 12, 13, 16, 18, 19, 21, 22, 23, 24,
25, 26, 30, 32
8
Display window
9
OPEN button 9, 11, 12, 33
0
DSO button 23
qa
SOUND button 21, 22, 23, 24, 25
qs
Reset button (located on the front side
of the unit behind the front panel) 9
qd
OFF button
*
9, 10, 11, 12
qf
SEEK/AMS –/+ (cursor left/right) button
10, 13, 15, 17, 19, 20, 21, 22, 23, 24, 25,
26, 29, 30, 32
Seek
18, 19
Automatic Music Sensor
13
Manual Search
13, 19
qg
ENTER button 10, 13, 15, 16, 17, 18, 19,
20, 21, 22, 24, 25, 26, 29, 30, 32
qh
MODE button
During radio reception:
BAND select 18, 19
During CD or MD playback:
CD/MD unit select 12, 16
During TV reception:
TV1/TV2 select 30
qj
Receptor for the card remote
commander
qk
Number buttons
During radio reception:
Preset number select 18, 19
During CD/MD playback:
(1)
REP 14
(2)
SHUF 14
During TV reception:
Preset number select 30
*
Warning when installing in a car
without ACC (accessory) position
on the ignition key switch
Be sure to press
(OFF)
on the unit for
two seconds to turn off the clock
display after turning off the engine.
When you press
(OFF)
only
momentarily, the clock display does not
turn off and this causes battery wear.
CDX-C8050X/MDX-C8500X
D I SC
+
PR
S
T
+
-
D IS C
–
PR
ST
- -
LIST
DSPL
OFF
ENTER
MENU
SOUND
1
2
3
4
5
6
SOURCE
-SEEK/AMS
REP
SHUF
OPEN
MODE
DSO
8
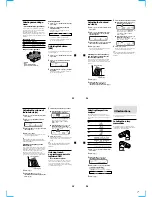
Location of controls
Card remote commander RM-X91
Replacing the lithium battery
When the battery becomes weak, the range of
the card remote commander becomes shorter.
Replace the battery with a new CR2025 lithium
battery.
Notes on lithium battery
•Keep the lithium battery out of the reach of
children. Should the battery be swallowed,
immediately consult a doctor.
•Wipe the battery with a dry cloth to assure a
good contact.
•Be sure to observe the correct polarity when
installing the battery.
•Do not hold the battery with metallic
tweezers, otherwise a short-circuit may
occur.
WARNING
Battery may explode if mistreated.
Do not recharge, disassemble, or dispose of
in fire.
The corresponding buttons of the card
remote commander control the same
functions as those on this unit.
1
OFF button
2
MENU button
3
SOURCE button
4
SEEK/AMS (cursor
<
/
,
) buttons
5
SOUND button
6
DSPL button
7
ATT button
8
LIST button
9
DISC/PRST (cursor
M
/
m
) buttons
0
ENTER button
qa
MODE button
qs
VOL buttons
OFF
SEEK
SEEK
OPEN/CLOSE
MENU
LIST
SOUND
ENTER
DSPL
MODE
VOL
ATT
DISC
DISC
SOURCE
x
+ side up
A unit turned off by pressing
(OFF)
for two seconds cannot be operated with the card remote
commander unless
(SOURCE)
on the unit is pressed or a disc is inserted to activate the unit first.
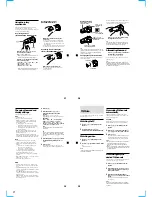
9
Attaching the front panel
Place the hole
A
in the front panel onto the
spindle
B
on the unit as illustrated, then push
the left side in.
Notes
• Be careful not to attach the front panel upside
down.
• Do not press the front panel too hard against the
unit when attaching it.
• Do not press too hard or put excessive pressure
on the display window of the front panel.
• Do not expose the front panel to direct sunlight
or heat sources such as hot air ducts, and do not
leave it in a humid place. Never leave it on the
dashboard of a car parked in direct sunlight or
where there may be a considerable rise in
temperature.
Caution alarm
If you turn the car ignition off without
removing the front panel, the caution alarm
will beep for a few seconds.
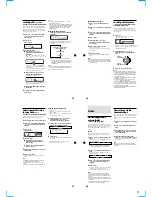
Getting Started
Resetting the unit
Before operating the unit for the first time or
after replacing the car battery, you must reset
the unit.
Remove the front panel and press the reset
button with a pointed object, such as a ball-
point pen.
Note
Pressing the reset button will erase the clock
setting and some memorized functions.
Detaching the front panel
You can detach the front panel of this unit to
protect the unit from being stolen.
1
Press
(OFF)
.
2
Press
(OPEN)
, then slide the front panel
to the right side, and pull out the left
side of the front panel.
Notes
• Do not put anything on the inner surface of the
front panel.
• Be sure not to drop the panel when detaching it
from the unit.
• If you detach the panel while the unit is still
turned on, the power will turn off automatically
to prevent the speakers from being damaged.
• When carrying the front panel with you, use the
supplied front panel case.
Reset button
1
2
x
A
B
10
Turning the unit on/off
Turning on the unit
Press
(SOURCE)
or insert a disc in the unit.
For details on operation, refer to page 11 (CD/
MD) and page 18 (Radio).
Turning off the unit
Press
(OFF)
to stop CD/MD playback or FM/
AM reception (the key illumination and
display remains on.)
Press
(OFF)
for two seconds to completely
turn off the unit.
Note
If your car has no ACC position on the ignition key
switch, be sure to turn the unit off by pressing
(OFF)
for two seconds to avoid car battery wear.
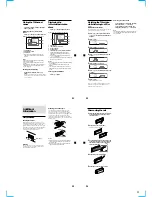
How to use the menu
This unit is operated by selecting items from a
menu.
To select, first enter the menu mode and
choose up/down (+/– of
(DISC/PRST)
), or
choose left/right (–/+ of
(SEEK/AMS)
).
(DISC/PRST)
(+) : To select upwards
(–) : To select downwards
(SEEK/AMS)
(+) : To select
rightwards
(–) : To select
leftwards
SOURCE
SOURCE
Setting the clock
The clock uses a 12-hour digital indication.
Example: To set the clock to 10:08
1
Press
(MENU)
, then press either side of
(DISC/PRST)
repeatedly until “Clock”
appears.
1
Press
(ENTER)
.
The hour indication flashes.
2
Press either side of
(DISC/PRST)
to set
the hour.
3
Press (+) side of
(SEEK/AMS)
.
The minute indication flashes.
4
Press either side of
(DISC/PRST)
to set
the minute.
2
Press
(ENTER)
.
The clock starts.
After the clock setting is completed, the
display returns to normal playback mode.
Note
In the initial setting, the clock indication appears
while the unit is turned off.
When you select the “on” setting of the “D.Info”
item (page 29), you can see the clock indication in
the upper part of the display while you are
enjoying any source.
Содержание CDX-C8050X - Fm/am Compact Disc Player
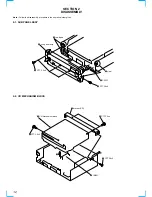
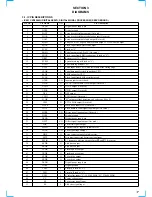
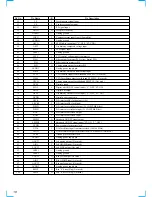
Страница 30: ...30 30 3 6 PRINTED WIRING BOARDS CD MECHANISM SECTION CDX C8050X ...
Страница 31: ...31 31 Ref No Location IC1 C 1 IC5 C 6 IC7 F 2 IC501 F 5 Q101 B 2 Semiconductor Location CDX C8050X Page 35 ...
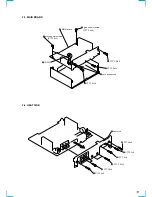
Страница 42: ...42 42 SUB CD BOARD SUB CD BOARD 3 16 PRINTED WIRING BOARD SUB CD SECTION Page 44 Page 35 CDX C8050X ...


