background image

7

Memorising only the
desired stations

You can store up to 6 stations on each band (a
total of 18 for FM I, FM II, and FM III, and 6 for
AM) in the order of your choice.

1

Press 

(SOURCE)

 repeatedly to select the

tuner.

2

Press 

(MODE)

 repeatedly to select the

band.

3

Press and hold either side of 

(SEEK/AMS)

to tune in the station that you want to
store on the number button.

4

Press and hold the desired number
button (

(1)

 to 

(6)

) until “MEM” appears.

The number button indication appears in
the display.

Note

If you try to store another station on the same
number button, the previously stored station will
be erased.

Receiving the memorised
stations

1

Press 

(SOURCE)

 repeatedly to select the

tuner.

2

Press 

(MODE)

 repeatedly to select the

band.

3

Press the number button (

(1)

 to 

(6)

) on

which the desired station is stored.

If you cannot tune in a preset
station

Press either side of 

(SEEK/AMS)

 to search

for the station (automatic tuning).

Scanning stops when the unit receives a
station. Press either side of 

(SEEK/AMS)

repeatedly until the desired station is
received.

Note

If the automatic tuning stops too frequently, press

(SENS/BTM)

 repeatedly until “LOCAL” (local seek

mode) is displayed. Only the stations with
relatively strong signals will be tuned in.

Tip

If you know the frequency of the station you want
to listen to, press and hold either side of

(SEEK/AMS)

 until the desired frequency appears

(manual tuning).

If FM stereo reception is poor

— Monaural Mode

Press 

(SENS/BTM)

 repeatedly until

“MONO” appears.

The sound improves, but becomes
monaural (“STEREO” disappears).

To return to normal mode, press again until
“MONO” disappears.

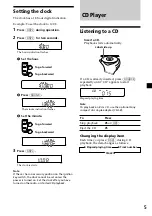
Changing the display item

Each time you press 

(DSPL)

, the item changes

as follows:

Frequency 

˜

 Clock

Содержание CDX-3700

Страница 1: ...structions Manual de instrucciones ˇ œfi CT GB ES CDX 3700 For installation and connections see the supplied installation connections manual Con respecto a la instalación y las conexiónes consulte el manual de Instalación conexiones suministrado ƒw ufi A ƒw B u U C ...

Страница 2: ... a CD 5 Playing a CD in various modes 6 Radio Memorising stations automatically Best Tuning Memory BTM 6 Memorising only the desired stations 7 Receiving the memorised stations 7 Other Functions Adjusting the sound characteristics 8 Enjoy bass and treble even at low volume Loudness Function 8 Cancel the beep sound 8 Attenuating the sound 8 Additional Information Precautions 9 Maintenance 10 Dismou...

Страница 3: ...ttenuate button 8 9 RELEASE front panel release button 4 10 0 SOUND button 5 8 Reset button located on the front side of the unit hidden by the front panel 4 During radio reception Number buttons 7 During CD playback 1 REPEAT button 6 2 SHUF button 6 DSPL display mode change time set button 5 7 OFF button 4 Frequency select switch located on the bottom of the unit See Frequency select switch in th...

Страница 4: ...rect sunlight or where there may be a considerable rise in temperature Caution alarm If you turn the ignition key switch to the OFF position without removing the front panel the caution alarm will beep for a few seconds a b Reset button OFF RELEASE Getting Started Resetting the unit Before operating the unit for the first time or after replacing the car battery you must reset the unit Remove the f...

Страница 5: ...d on Set the clock after you have turned on the radio or started CD playback To go forward To go backward To go forward To go backward Elapsed playing time CD Player Listening to a CD Insert a CD Playback starts automatically If a CD is already inserted press SOURCE repeatedly until CD appears to start playback Note To play back an 8 cm CD use the optional Sony compact disc single adapter CSA 8 To...

Страница 6: ...number is indicated in the display the unit starts storing stations from the one currently displayed If a CD is not in the unit only the tuner band appears even if you press SOURCE To locate succeeding tracks To locate preceding tracks To search backward To search forward Locating a specific track Automatic Music Sensor AMS During playback press either side of SEEK AMS for each track you want to s...

Страница 7: ...r button 1 to 6 on which the desired station is stored If you cannot tune in a preset station Press either side of SEEK AMS to search for the station automatic tuning Scanning stops when the unit receives a station Press either side of SEEK AMS repeatedly until the desired station is received Note If the automatic tuning stops too frequently press SENS BTM repeatedly until LOCAL local seek mode is...

Страница 8: ...s Bass and treble will be reinforced To return to normal mode press again until LOUD disappears Cancel the beep sound Press 6 while pressing SOUND To obtain the beep sound again press these buttons again Note If you connect an optional power amplifier and do not use the built in amplifier the beep sound will be deactivated Attenuating the sound Press ATT ATT on lights up To restore the previous vo...

Страница 9: ...ptimum sound handle the disc by its edge To keep the disc clean do not touch the surface Do not stick paper or tape on the labelled surface Do not expose the discs to direct sunlight or heat sources such as hot air ducts or leave them in a car parked in direct sunlight where there can be a considerable rise in temperature inside the car Before playing clean the discs with an optional cleaning clot...

Страница 10: ... open the front panel by pressing RELEASE then detach it and clean the connectors with a cotton swab dipped in alcohol Do not apply too much force Otherwise the connectors may be damaged Main unit Back of the front panel Notes For safety turn off the engine before cleaning the connectors and remove the key from the ignition switch Never touch the connectors directly with your fingers or any metal ...

Страница 11: ...uning interval 9 kHz 10 kHz switchable 531 1 602 kHz at 9 kHz step 530 1 710 kHz at 10 kHz step Aerial terminal External aerial connector Intermediate frequency 10 7 MHz 450 kHz Sensitivity 30 µV Power amplifier section Outputs Speaker outputs sure seal connectors Speaker impedance 4 8 ohms Maximum power output 40 W 4 at 4 ohms General Outputs Line output Power amplifier control lead Power aerial ...

Страница 12: ...nit is installed at an angle of more than 60 The unit is not installed in a sturdy part of the car Problem CD cannot be loaded Play does not begin CD is automatically ejected CD will not eject The operation buttons do not function The sound skips due to vibration CD playback Problem Preset tuning is not possible Automatic tuning is not possible The STEREO indication flashes Cause Solution Memorise...

Страница 13: ...r 6 Cause A CD is dirty or inserted upside down The CD player cannot be operated because of some problem If the above mentioned solutions do not help improve the situation consult your nearest Sony dealer Error displays The following indications will flash for about five seconds ...

Страница 14: ...ción de un disco compacto en diversos modos 6 Radio Memorización automática de emisoras Función de memorización de la mejor sintonía BTM 6 Memorización de las emisoras deseadas 7 Recepción de emisoras memorizadas 7 Otras funciones Ajuste de las características de sonido 8 Buena calidad de graves y agudos incluso con un volumen bajo Función de sonoridad 8 Cancelación de los pitidos 8 Atenuación del...

Страница 15: ... Consulte las páginas indicadas para obtener más información 1 Botón MODE selección de banda 6 7 2 Botón SOURCE selección de fuente 5 6 7 3 Botón control de volumen graves agudos izquierdo derecho delantero trasero 5 8 4 Visor 5 Control SEEK AMS búsqueda sensor de música automático búsqueda manual 6 7 6 Botón 6 expulsión 5 7 Botón SENS BTM función de ajuste de sensibilidad memorización de la mejor...

Страница 16: ...e un considerable aumento de temperatura Alarma de precaución Sigiraelinterruptordelallavedeencendidoa laposiciónOFFsinhaberextraídoelpanel frontal laalarmadeprecauciónemitirápitidos duranteunossegundos Procedimientos iniciales Restauración de la unidad Antesdeutilizarlaunidadporprimeravezo despuésdesustituirlabateríadelautomóvil esnecesariorestaurardichaunidad Extraigaelpanelfrontalypulseelbotónd...

Страница 17: ...rpadea Lado de la etiqueta hacia arriba Reproductor de discos compactos Reproducción de un disco compacto Inserte el CD Lareproducciónseiniciaautomáticamente Si ya hay un CD insertado pulse SOURCE variasveceshastaqueaparezca CD para iniciarlareproducción Nota Si desea reproducir un CD de 8 cm utilice el adaptador sencillo de discos compactos opcional Sony CSA 8 Para Pulse Detenerlareproducción 6 o...

Страница 18: ... partir de dicho número Si no hay ningún CD en la unidad sólo aparece la banda del sintonizador aunque pulse SOURCE Localización de una parte específica de un tema Búsqueda manual Durante la reproducción pulse y mantenga pulsado cualquier lado de SEEK AMS durante unos dos segundos Suéltelo cuando encuentre la parte que desee Nota Si o aparece en el visor significa que ha llegado al principio o al ...

Страница 19: ... que esté almacenada la emisora deseada Si no puede sintonizar una emisora programada Pulse cualquier lado de SEEK AMS para buscar la emisora sintonización automática Laexploraciónsedetienecuandolaunidad recibeunaemisora Pulsecualquierladode SEEK AMS variasveceshastarecibirla emisoradeseada Nota Si la sintonización automática se detiene con demasiada frecuencia pulse SENS BTM varias veces hasta qu...

Страница 20: ...descargarlabatería la indicacióndehoranosemuestracuandose estáinicializandolaunidad Otras funciones Ajuste de las características de sonido Esposibleajustarlosgraves losagudos el balanceyelequilibrioentrelosaltavoces Esposiblealmacenarlosnivelesdegravesy agudosdeformaindependienteparacada fuente 1 Pulse SOUND varias veces para seleccionar el elemento que desee ajustar BAS graves n TRE agudos n BAL...

Страница 21: ...opcional de Sony CSA 8 para evitar que el reproductor de CD se dañe Información complementaria Precauciones Si aparca el automóvil bajo la luz solar directa y se produce un considerable aumento de temperatura en su interior deje que la unidad se enfríe antes de utilizarla Si la unidad no recibe alimentación compruebe las conexiones en primer lugar Si todo está en orden examine el fusible Si los al...

Страница 22: ...ELEASE a continuación sepárelo y limpie los conectores con un bastoncillo humedecido en alcohol No aplique demasiada presión ya que los conectores podrían dañarse Notas Por su seguridad apague el motor antes de limpiar los conectores y saque la llave de encendido No toque nunca los conectores directamente con los dedos o con cualquier dispositivo metálico Fusible 10 A Unidad principal Parte poster...

Страница 23: ... 9 kHz 10 kHz conmutable 531 1 602 kHz intervalo de 9 kHz 530 1 710 kHz intervalo de 10 kHz Terminal de antena Conector para antena exterior Frecuencia intermedia 10 7 MHz 450 kHz Sensibilidad 30 µV Sección del amplificador de potencia Salidas Salidas de altavoz conectores herméticos seguros Impedancia de altavoz 4 8 ohmios Salida máxima de potencia 40 W 4 a 4 ohmios Generales Salidas Salida de lí...

Страница 24: ...ón de CD Causa Solución Ya se ha cargado otro CD Se ha forzado el CD al introducirlo al revés Disco sucio La temperatura ambiente es superior a 50 C Pulse el botón 6 durante dos segundos Pulse el botón de restauración Ha instalado la unidad en un ángulo superior a los 60 No ha instalado la unidad en una parte segura del automóvil Problema No es posible cargar un CD No se inicia la reproducción El ...

Страница 25: ...pie el CD o insértelo correctamente Pulse el botón de restauración o 6 Indicación Causa El CD está sucio o se ha insertado al revés El reproductor de CD no funciona debido a algún problema Si el problema no se soluciona con las sugerencias anteriormente enumeradas póngase en contacto con el proveedor Sony más próximo ...

Страница 26: ...Sony Corporation Printed in Japan I 3 866 876 12 1 ...

Отзывы: