background image

12

EN

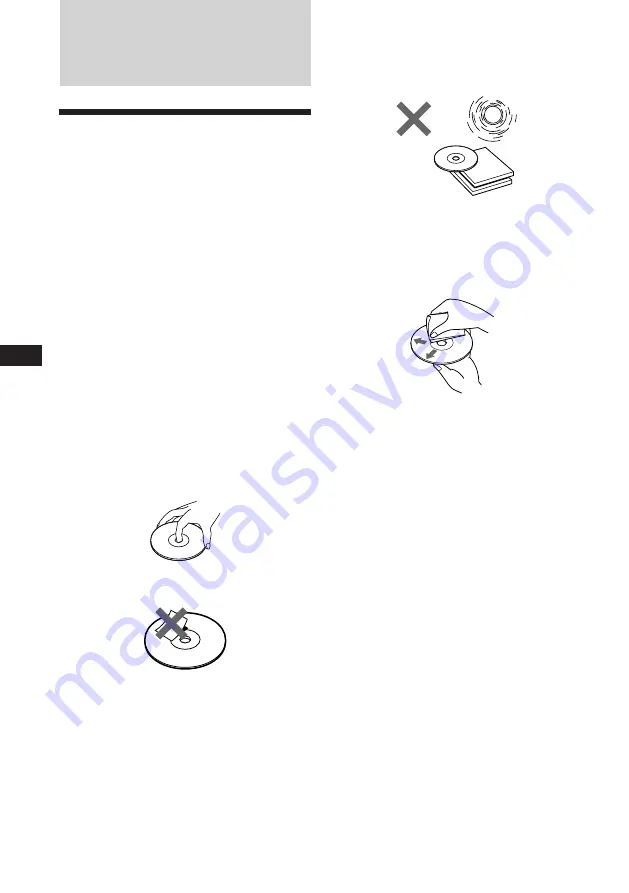
Do not expose the discs to direct sunlight or
heat sources such as hot air-ducts, or leave
them in a car parked in direct sunlight where
there can be a considerable rise in the
temperature inside the car.

Before playing, clean the discs with an optional
cleaning cloth. Wipe each disc from the centre
out.
Do not use solvents such as benzine, thinner,
commercially available cleaners or antistatic
spray intended for analog discs.

Notes on moisture condensation

On a rainy day or in a very damp area,
moisture may condense on the lenses inside
the CD player. Should this occur, the unit will
not operate properly. In this case, remove the
disc  and wait for about an hour until the
moisture evaporates.

When you play 8 cm CDs

Use the optional Sony compact disc single
adapter (CSA-8) to protect the CD player from
being damaged.

Additional
Information

Precautions

• If your car was parked in direct sunlight

resulting in a considerable rise in
temperature inside the car, allow the unit to
cool off before operating it.

• If no power is being supplied to the unit,

check the connections first. If everything is in
order, check the fuse.

• If no sound comes from the speakers of a

two-speaker system, set the fader control to
the centre position.

• If your car is equipped with a power aerial,

note that it will extend automatically while
the unit is operating.

If you have any questions or problems
concerning your unit that are not covered in
this manual, please consult your nearest Sony
dealer.

Notes on handling CDs

A dirty or defective disc may cause sound
dropouts while playing. To enjoy optimum
sound, handle the disc as follows.
Handle the disc by its edge. To keep the disc
clean, do not touch the surface.

Do not stick paper or tape on the labeled
surface.

Содержание CDX-3180

Страница 1: ...DX 3180 For installation and connections see the supplied installation connections manual Para obtener información sobre la instalación y las conexiónes consulte el manual de instalación conexiones suministrado Para a instalação e as ligações consulte o manual de instalação ligações fornecido Vi hänvisar till det medföljande häftet angående montering anslutningar ...

Страница 2: ...2 EN Welcome Thank you for purchasing the Sony Compact Disc Player This unit lets you enjoy a variety of features You can use an optional rotary commander RM X4S ...

Страница 3: ...st Tuning Memory BTM 7 Memorizing only the desired stations 8 Receiving the memorized stations 8 Other Functions Using the rotary commander 9 Adjusting the sound characteristics 10 Changing the sound and beep tone 11 Turning on the clock display Power Select Function 11 Additional Information Precautions 12 Maintenance 13 Dismounting the unit 13 Attaching the label to the rotary commander 14 Speci...

Страница 4: ...isplay window 7 DSPL display mode change time set button 6 8 8 6 eject button 6 9 BTM SENS Best Tuning Memory sensitivity adjust button 7 8 º RELEASE front panel release button 5 13 Reset button located on the front side of the unit hidden by the front panel 5 OFF button 5 6 During radio reception Number buttons 8 During CD playback 1 REPEAT button 7 2 SHUF button 7 D BASS dial 11 RELEASE REPEAT S...

Страница 5: ...ess RELEASE to detach the panel while the unit is still on the unit will turn off automatically to prevent the speakers from being damaged When you carry the front panel with you put it in the supplied front panel case Attaching the front panel Align part A of the front panel to part B of the unit as illustrated and push until it clicks Notes Be sure not to attach the front panel upside down Do no...

Страница 6: ...DSPL momentarily The clock is activated Note If the car has no accessory position on the ignition key switch the clock cannot be set unless the power is turn on Set the clock after you have turned on the radio or started CD playback CD Player Listening to a CD Simply insert the CD Playback starts automatically If a CD is already inserted press SOURCE repeatedly until CD appears Note To play back a...

Страница 7: ...cate succeeding tracks To locate preceding tracks SEEK AMS Radio Memorizing stations automatically Best Tuning Memory BTM This function selects from the currently received band the stations with the strongest signals and memorizes them in order of their frequency PREVENTING ACCIDENTS When tuning in while driving use the automatic tuning instead of manual tuning 1 Press SOURCE repeatedly to select ...

Страница 8: ... the desired station is stored If you cannot tune in a preset station Push the SEEK AMS control up or down momentarily to search for the station automatic tuning Scanning stops when the unit receives a station Push the SEEK AMS control up or down repeatedly until the desired station is received Note If the automatic tuning stops too frequently press BTM SENS momentarily until LCL appears in the di...

Страница 9: ...s the operation in the following ways Tuner FM I n FM II n FM III n MW n LW By rotating the control the SEEK AMS control Rotate the control momentarily and release it to Locate a specific track on a disc Rotate and hold the control until you locate the specific point in a track then release it to start playback Tune in stations automatically Rotate and hold the control to tune in a specific statio...

Страница 10: ... column you can reverse the operative direction Press SOUND for two seconds while pushing the VOL control Adjusting the sound characteristics You can adjust bass treble balance and fader Each source can store the bass and treble level independently 1 Select the item you want to adjust by pressing SOUND repeatedly VOL volume n BAS bass n TRE treble n BAL left right n FAD front rear 2 Adjust the sel...

Страница 11: ... available during CD playback Adjusting the bass curve Turn the D BASS dial to adjust the bass level 1 2 or 3 D BASS appears in the display During CD playback DIGITAL D BASS appears in the display To cancel turn the dial to the OFF position Note If the bass sound becomes distorted adjust the D bass dial or volume control Attenuating the beep tone Press 6 while pressing SOUND To obtain the beep ton...

Страница 12: ...ter CSA 8 to protect the CD player from being damaged Additional Information Precautions If your car was parked in direct sunlight resulting in a considerable rise in temperature inside the car allow the unit to cool off before operating it If no power is being supplied to the unit check the connections first If everything is in order check the fuse If no sound comes from the speakers of a two spe...

Страница 13: ... rating exceeding the one supplied with the unit as this could damage the unit Cleaning the connectors The unit may not function properly if the connectors between the unit and the front panel are not clean To prevent this open the front panel by pressing RELEASE then detach it and clean the connectors with a cotton swab dipped in alcohol Do not apply too much force Otherwise the connectors may be...

Страница 14: ...rotary commander RM X4S Several labels are supplied with the rotary commander Attach the label that matches the functions of this unit and the mounting position of the rotary commander After you mount the rotary commander attach the label in the illustration below SOUND DSPL MODE SOUND DSPL MODE ...

Страница 15: ...ecifications CD player section System Compact disc digital audio system Signal to noise ratio 90 dB Frequency response 10 20 000 Hz Wow and flutter Below measurable limit Tuner section FM Tuning range 87 5 108 0 MHz Antenna terminal External aerial connector Intermediate frequency 10 7 MHz Usable sensitivity 11 dBf Selectivity 75 dB at 400 kHz Signal to noise ratio 60 dB stereo 65 dB mono Harmonic...

Страница 16: ...bient temperature is more than 50 C Press 6 for two seconds Press the reset button The unit is installed at an angle of more than 60 The unit is not installed in a sturdy part of the car Problem CD cannot be loaded Play does not begin CD is automatically ejected CD will not eject The operation buttons do not function The sound skips due to vibration CD playback Problem Preset tuning is not possibl...

Страница 17: ...A CD is dirty or inserted upside down The CD player cannot be operated because of some problem If the above mentioned solutions do not help improve the situation consult your nearest Sony dealer Error displays The following indications will flash for about five seconds Additional Information ...

Страница 18: ... 2 Bienvenido Enhorabuena por la adquisición del reproductor de discos compactos Sony Esta unidad le permitirá disfrutar de una serie de funciones Podrá usar un mando a distancia rotativo RM X4S opcional ...

Страница 19: ...jor sintonía BTM 7 Memorización de las emisoras deseadas 8 Recepción de emisoras memorizadas 8 Otras funciones Uso del mando a distancia rotativo 9 Ajuste de las características de sonido 10 Cambio de los ajustes de sonido y tono del pitido 11 Activación de la indicación del reloj Función de selección de alimentación 11 Información complementaria Precauciones 12 Mantenimiento 13 Desmontaje de la u...

Страница 20: ...1 Control SEEK AMS búsqueda sensor de música automático búsqueda manual 7 8 2 Botón MODE selección de banda 7 8 3 Botón SOURCE selección de fuente 6 7 8 4 Dial control de volumen graves agudos izquierdo derecho delantero trasero 6 10 5 Botón SOUND 6 10 11 6 Visor 7 Botón DSPL cambio de visualización ajuste de la hora 6 8 8 Botón 6 expulsión 6 9 Botón BTM SENS función de memorización de la mejor si...

Страница 21: ...encendido a la posición OFF sin haber extraído el panel frontal la alarma de precaución emitirá pitidos durante unos segundos Si conecta un amplificador opcional de potencia y no utiliza el incorporado los pitidos se desactivarán Procedimientos iniciales Restauración de la unidad Antes de utilizar la unidad por primera vez o después de sustituir la batería del automóvil es necesario restaurar dich...

Страница 22: ... alimentación Ajústelo una vez encendida la radio o bien durante la reproducción del CD Con el lado de la etiqueta hacia arriba Para retroceder Para avanzar Los dígitos de los minutos parpadean El dígito de la hora parpadea Reproductor de discos compactos Reproducción de un CD Basta con insertar el CD La reproducción se iniciará de forma automática Si ya hay un CD insertado pulse SOURCE varias vec...

Страница 23: ...rás Para buscar hacia delante SEEK AMS Procedimientos iniciales Reproductor de discos compactos Radio Para localizar temas anteriores Para localizar temas posteriores SEEK AMS Radio Memorización automática de emisoras Función de memorización de la mejor sintonía BTM Esta función selecciona de la banda actualmente recibida las emisoras de señal más intensa y las memoriza según el orden de su frecue...

Страница 24: ...bir Si no puede sintonizar una emisora programada Desplace momentáneamente el control SEEK AMS hacia arriba o abajo para buscar la emisora sintonización automática La exploración se detiene al recibirse una emisora Desplace el control SEEK AMS hacia arriba o abajo varias veces hasta recibir la emisora que desee Nota Si la sintonización automática se detiene con demasiada frecuencia pulse BTM SENS ...

Страница 25: ...e forma Sintonizador FM I n FM II n FM III n MW n LW SOURCE MODE Mediante el giro del control SEEK AMS Gire el control momentáneamente y suéltelo para Localizar un tema específico de un disco Gire y mantenga girado el control hasta localizar el punto específico de un tema y a continuación suéltelo para iniciar la reproducción Sintonizar emisoras automáticamente Gire y mantenga girado el control pa...

Страница 26: ...o entre altavoces Cada fuente puede almacenar el nivel de graves y agudos por separado 1 Pulse SOUND varias veces para seleccionar el elemento que desee ajustar VOL volumen n BAS graves n TRE agudos n BAL izquierdo derecho n FAD delantero trasero 2 Gire el dial para ajustar el elemento seleccionado Realice el ajuste en un intervalo de tres segundos después de la selección Transcurridos tres segund...

Страница 27: ...le escuchar la línea de graves con mayor nitidez aunque el sonido vocal se encuentre al mismo nivel Igualmente es posible enfatizar y ajustar los graves fácilmente con el dial D BASS Este efecto es similar al obtenido cuando se utiliza un sistema opcional de altavoces potenciadores de graves Además la función D bass digital crea graves incluso más intensos y nítidos que la función D bass analógica...

Страница 28: ... que el reproductor de discos compactos se dañe Información complementaria Precauciones Si aparca el automóvil bajo la luz solar directa y se produce un considerable aumento de temperatura en su interior deje que la unidad se enfríe antes de utilizarla Si la unidad no recibe alimentación compruebe las conexiones en primer lugar Si todo está en orden examine el fusible Si los altavoces no emiten so...

Страница 29: ...s conectores La unidad puede no funcionar correctamente si los conectores de la misma y del panel frontal están sucios Con el fin de evitarlo abra el panel frontal pulsando RELEASE a continuación sepárelo y limpie los conectores con un bastoncillo humedecido en alcohol No aplique demasiada presión ya que los conectores podrían dañarse Fusible 10 A Unidad principal Parte posterior del panel frontal...

Страница 30: ...RM X4S Con el mando rotativo se suministra una serie de etiquetas Adhiera la etiqueta que corresponda a las funciones de esta unidad y a la posición de montaje del mando a distancia rotativo Después de montar el mando a distancia rotativo adhiera la etiqueta como se muestra en la ilustración siguiente SOUND DSPL MODE SOUND DSPL MODE ...

Страница 31: ...0 µV MW 35 µV Sección del amplificador de potencia Salidas Salidas de altavoz conectores herméticos seguros Impedancia de altavoz 4 8 ohmios Salida máxima de potencia 40 W 4 a 4 ohmios Generales Salidas Salida de línea 2 Cable de control de relé de antena motorizada Cable de control de amplificador de potencia Cable de control de atenuación para teléfono Controles de tono Graves 10 dB a 100 Hz Agu...

Страница 32: ...do un amplificador opcional de potencia y no utiliza el incorporado Los pitidos están atenuados página 11 Reproducción de CD Causa Solución Ya se ha cargado otro CD Se ha forzado el CD al introducirlo al revés El disco está sucio La temperatura ambiente es superior a 50 C Pulse 6 durante dos segundos Pulse el botón de restauración Ha instalado la unidad en un ángulo superior a los 60 No ha instala...

Страница 33: ...insértelo correctamente Pulse el botón de restauración o 6 Indicación Causa El CD está sucio o se ha insertado al revés El reproductor de CD no funciona debido a algún problema Si el problema no se soluciona con las sugerencias anteriormente enumeradas póngase en contacto con el proveedor Sony más próximo Información complementaria ...

Страница 34: ... Bem vindo Obrigado por ter adquirido o Leitor de discos compactos da Sony Este aparelho está equipado com uma vasta gama de funções que podem ser controladas através de um comando rotativo RM X4S opcional ...

Страница 35: ...7 Memorização apenas das estações pretendidas 8 Recepção das estações memorizadas 8 Outras funções Utilização do telecomando rotativo 9 Regulação das características de som 10 Alterar o som e a tonalidade do sinal sonoro 11 Ligar o visor do relógio Função Power Select Selecção de alimentação 11 Informação adicional Precauções 12 Manutenção 13 Desmontagem do aparelho 13 Colar a etiqueta no comando ...

Страница 36: ...la DSPL alteração do modo de indicação do visor acerto da hora 6 8 8 Tecla 6 ejectar 6 9 Tecla BTM SENS regulação da sensibilidade da Memória da melhor sintonia 7 8 º Tecla RELEASE libertação do painel frontal 5 13 Tecla de reincialização localizada na parte da frente do aparelho e escondida pelo painel frontal 5 Tecla OFF 5 6 Durante a recepção de rádio Teclas numéricas 8 Durante a reprodução de ...

Страница 37: ...om o aparelho ligado este desliga se automaticamente para não provocar danos nos altifalantes Se quiser levar o painel frontal consigo coloque o na caixa para transporte fornecida Colocar o painel frontal Encaixe a parte A do painel frontal na parte B como mostra a figura Depois faça pressão até ouvir um estalido Notas Quando colocar o painel frontal no aparelho certifique se de que o mesmo se enc...

Страница 38: ... o relógio depois de ligar o rádio ou iniciar a reprodução de CD Leitor de CDs Ouvir um CD Introduza um CD A reprodução inicia se automaticamente Se já tiver introduzido um CD carregue várias vezes em SOURCE até que a indicação CD apareça no visor Nota Para reproduzir um CD de 8 cm utilize o adaptador opcional para discos compactos da Sony CSA 8 Para Carregue em Parar a reprodução 6 ou OFF Ejectar...

Страница 39: ...Rádio Memorização automática de estações Memória da melhor sintonia BTM O aparelho selecciona as estações com os sinais mais fortes e memoriza as por ordem de frequências Cuidado Quando quiser sintonizar uma estação durante a condução utilize a memória da melhor sintonia para evitar acidentes 1 Carregue várias vezes em SOURCE para seleccionar o sintonizador Sempre que carregar em SOURCE a fonte mu...

Страница 40: ... dois segundos até conseguir sintonizá la sintonização manual Se a recepção FM estéreo for deficiente Modo Mono Carregue levemente em BTM SENS até que a indicação MONO apareça no visor A qualidade melhora mas o som passa a mono a indicação ST desaparece Para voltar ao modo normal volte a carregar até que desapareça a indicação MONO Alterar os elementos no visor Quando carrega em DSPL os elementos ...

Страница 41: ...r FM I n FM II n FM III n MW n LW SOURCE MODE Rodar o controlo controlo SEEK AMS Rode o controlo durante um momento e depois liberte o para Localizar uma faixa específica num disco Rode e segure o controlo até localizar o ponto específico numa faixa e depois liberte o para iniciar a reprodução Sintonizar as estações automaticamente Rode e segure o controlo até sintonizar a estação pretendida Se ro...

Страница 42: ...ação a tecla volta a funcionar como tecla de controlo do volume OFF Rode o controlo VOL para regular o volume Carregue em ATT para reduzir o som ao mínimo Carregue em OFF para desligar o aparelho Para aumentar Para diminuir Outras operações Alteração da direcção de funcionamento A direcção de funcionamento dos controlos vem definida de fábrica como se mostra na ilustração abaixo Se tiver que monta...

Страница 43: ... no visor Durante a reprodução do CD a indicação DIGITAL D BASS aparece no visor Para cancelar rode o anel para a posição OFF Nota Se o som dos graves ficar distorcido regule o botão D bass ou o controlo do volume Cortar o som do sinal sonoro Carregue em 6 ao mesmo tempo que carrega em SOUND Para voltar a ouvir o sinal sonoro volte a carregar nestas teclas Nota Se ligar um amplificador de potência...

Страница 44: ...ny CSA 8 para proteger o leitor de CD de possíveis danos Informação adicional Precauções Se o seu automóvel estiver estacionado ao sol fazendo com que a temperatura no seu interior aumente consideravelmente deixe o aparelho arrefecer antes de utilizá lo Se o aparelho não estiver a receber corrente verifique primeiro as ligações Se estiver tudo em ordem verifique o fusível Se o sistema de 2 altifal...

Страница 45: ...eza dos conectores Se os conectores entre o aparelho e o painel frontal estiverem sujos o aparelho pode não funcionar correctamente Para evitar esta situação abra o painel frontal carregando em RELEASE retire o e limpe os conectores com um cotonete humedecido em álcool Não faça muita pressão para não danificar os conectores Unidade principal Parte posterior do painel frontal Fusível 10 A Desmontag...

Страница 46: ...tativo opcional RM X4S Com o comando rotativo são fornecidas diversas etiquetas Cole a etiqueta correspondente às funções do aparelho e à posição de montagem no comando rotativo Depois de montar o comando roativo cole a etiqueta mostrada na figura abaixo SOUND DSPL MODE SOUND DSPL MODE ...

Страница 47: ... Sensibilidade MW 30 µV LW 35 µV Secção do amplificador de potência Saídas Saídas dos altifalantes conectores vedantes Impedância dos altifalantes 4 8 ohms Saída de potência máxima 40 W 4 a 4 ohms Geral Saídas Saídas de linha 2 Fio de controlo do relé da antena eléctrica Fio de controlo do amplificador de potência Fio de controlo ATT do telefone Controlos de som Graves 10 dB a 100 Hz Agudos 10 dB ...

Страница 48: ...ia opcional a LINE OUT e não está a utilizar o amplificador incorporado O sinal sonoro está desactivado página 11 Problema Impossível introduzir o CD A leitura não se inicia O CD é ejectado automaticamente O CD não é ejectado As teclas de funcionamento não funcionam Há cortes de som por causa das vibrações Causa Solução Já existe um CD introduzido O CD foi introduzido ao contrário CD sujo A temper...

Страница 49: ...CD está sujo ou foi introduzido ao contrário Impossível utilizar o leitor de CD devido a um problema Solução Limpe ou introduza o CD correctamente Carregue na tecla de reinicialização Se as soluções acima mencionadas não o ajudarem a resolver o problema contacte o agente Sony mais próximo Informação adicional ...

Страница 50: ...2 S Välkommen Vi gratulerar dig till köpet av Sony CD spelare Vridkontrollen RM X4S ger dig tillgång till en mängd olika funktioner på CD spelaren ...

Страница 51: ...analer automatiskt BTM funktionen BTM 7 Lagra endast de önskade kanalerna 8 Motta de lagrade kanalerna 8 Övriga funktioner Använda vridkontrollen 9 Ljudjustering 10 Ändra ljud och pipljud 11 Aktivera klockvisningen Power Select funktionen 11 Ytterligare information Säkerhetsföreskrifter 12 Underhåll 13 Demontera enheten 13 Fästa etiketten på vridkontrollen 14 Tekniska data 15 Felsökning 16 ...

Страница 52: ...pp att byta visningsläge tidsinställning 6 8 8 6 Utmatningsknapp EJECT 6 9 BTM SENS knapp frekvenskänslighet SENS lagring i minnet 7 8 º RELEASE knapp ta bort frontpanelen 5 13 Återställningsknappen sitter på framsidan på enheten och döljs av frontpanelen 5 OFF knappen 5 6 Under radiomottagning Snabbvalsknappar 8 Under uppspelning av kassettband 1 REPEAT knappen 7 2 SHUF knappen 7 D BASS ratt 11 R...

Страница 53: ... drastiskt Varningslarm Om du vrider tändlåset till läge OFF utan att ta bort frontpanelen kommer varningslarmet att ljuda under några sekunder Varningssignalen avaktiveras om du inte använder den inbyggda förstärkaren utan ansluter en annan förstärkare tillval Komma igång Återställa enheten Innan du använder enheten för första gången eller när du har bytt bilbatteri måste du återställa enheten Tr...

Страница 54: ...ar blinkar Siffrorna för minuter blinkar Ställa klockan Klockan visar en 24 timmars digital tidsangivelse Exempel Ställ in klocka på 10 08 1 Tryck på OFF eller DSPL medan radion är på När omkopplaren POWER SELECT är i läge ON tryck på OFF Om den är i läge OFF tryck på DSPL 2 Tryck på DSPL i två sekunder 1 Ställ in siffrorna för timmar 2 Tryck lätt på SOUND 3 Ställ in siffrorna för minuter 3 Tryck ...

Страница 55: ...åt Söka framåt Radio Lagra kanaler automatiskt BTM funktionen BTM Den här funktionen väljer från de aktuella kanalerna med de starkaste signalerna och lagrar dem efter frekvens Varning För att undvika olyckor bör du använda BTM funktionen om du tar in en kanal under körning 1 Tryck på SOURCE flera gånger för att välja önskad radiokanal Varje gång du trycker på SOURCE växlas källorna på följande sä...

Страница 56: ... 6 som den önskade kanalen lagrats på Om du inte kan ställa in en förinställd kanal Tryck lätt på valfri sida av SEEK AMS när du vill söka efter kanalen automatisk sökning Sökningen avbryts när en kanal har mottagits Tryck på valfri sida av SEEK AMS flera gånger tills önskad kanal har mottagits Observera Om den automatiska sökningen avbryts för ofta trycker du på BTM SENS tills LCL tänds i teckenf...

Страница 57: ...sätt Tuner FM I n FM II n FM III n MW n LW Radio Övriga funktioner MODE SOURCE Genom att vrida kontrollen SEEK AMS kontrollen Vrid kontrollen helt kort och släpp upp den för att Hitta ett visst spår på en skiva Vrid och håll kontrollen nere tills du hittar den önskade punkten i spåret och släpp sedan upp kontrollen för att starta uppspelningen Ta in kanaler automatiskt Vrid och håll kontrollen för...

Страница 58: ... det att du har valt egenskap Efter tre sekunder fungerar knappen som volymknapp igen OFF Övriga funktioner Byta styrriktning Kontrollens styrriktning är fabriksinställd enligt bilden nedan Om du monterar vridkontrollen på höger sida av ratten kan du växla styrriktning för kontrollerna Tryck på SOUND under två sekunder medan du trycker på VOL reglaget Tryck på OFF för att stänga av enheten Vrid ko...

Страница 59: ...bryt genom att vrida ratten till OFF läge Observera Om basljudet förvrängs justera basljudet via D BASS ratten eller volymknappen Dämpa ljudsignalen Tryck på 6 samtidigt som du trycker på SOUND Du får tillbaka ljudsignalen genom att trycka på samma knappar igen Observera Varningssignalen avaktiveras om du inte använder den inbyggda förstärkaren utan ansluter en annan förstärkare tillval Frekvens H...

Страница 60: ...innan du använder den Kontrollera anslutningarna först om ingen ström tillförs enheten Kontrollera säkringen om allt i övrigt är i sin ordning Om inget ljud kommer från högtalarna i 2 högtalarsystemet ställer du uttoningskontrollen i mittenläget Om bilen har en motorantenn fälls den automatiskt ut medan enheten är igång Om du har några frågor eller problem som rör CD spelaren och som inte tas upp ...

Страница 61: ...tningarna Enheten fungerar inte ordentligt om anslutningarna mellan enheten och frontpanelen är smutsiga Om du vill hindra detta öppnar du frontpanelen genom att trycka på RELEASE och tar sedan bort den och rengör anslutningen med en bomullstopp doppad i alkohol Ta inte i för mycket Annars kan anslutningarna skadas Huvudenheten Baksidan på frontpanelen Säkring 10 A Ytterligare information Demonter...

Страница 62: ... med vridkontrollen RM X4S Flera olika etiketter medföljer vridkontrollen Fäst den etikett som överensstämmer med funktionen på enheten och på avsedd plats på vridkontrollen Fäst etiketten enligt bilden när vridkontrollen monterats SOUND DSPL MODE SOUND DSPL MODE ...

Страница 63: ...ålles CD spelaren System Digitalt ljudsystem för CD Signalbrusförhållande 90 dB Frekvensgång 10 20 000 Hz Svaj och fladder Under mätbar gräns Tunern FM Tuningintervall 87 5 108 MHz Antennterminal Extern antennanslutning Mellanfrekvens 10 7 MHz Känslighet 11 dBf Selektivitet 75 dB vid 400 kHz Signalbrusförhållande 60 dB stereo 65 dB mono Harmonisk förvrängning vid 1 kHz 1 0 stereo 0 5 mono Separati...

Страница 64: ...Ljudsignalen är dämpad sid 11 Orsak Åtgärd Det ligger redan en CD skiva i skivfacket CD skivan har med våld skjutits in upp och ned i skivfacket CD skivan är dammig Den omgivande temperaturen överstiger 50 C Tryck på 6 i två sekunder Tryck på återställningsknappen Enheten har installerats i en vinkel över 60 Enheten har inte installerats på en stabil plats i bilen Problem CD skivan dras inte in i ...

Страница 65: ...orrekt Tryck på återställningsknappen eller 6 Orsak En CD är smutsig eller har satts in upp och ned CD spelaren fungerar inte pga av något problem Teckenfönster Om ovannämnda lösningar inte hjälper dig att förbättra situationen ta kontakt med din närmaste Sony återförsäljare Ytterligare information ...

Страница 66: ...18 S ...

Страница 67: ...19 S ...

Страница 68: ...Sony Corporation Printed in Thailand ...

Отзывы: