background image

6

 GB

KLV-22/26/32BX350_22/26/32CX350_40/46BX450_40CX450_32BX35A

4-411-978-

14

(1)

Safety information

WARNING

Batteries must not be exposed to excessive  
heat such as sunshine, fire or the like.

Installation/Set-up

Install and use the TV set in accordance with 
the instructions below in order to avoid any 
risk of fire, electrical shock or damage and/or 
injuries.

Installation

• The TV set should be installed near an 

easily accessible AC power outlet.

• Place the TV set on a stable, level surface 

to avoid it from falling down and cause 
personal injury or damage to the TV.

• Only qualified service personnel should 

carry out wall installations.

• For safety reasons, it is strongly 

recommended that you use Sony 
accessories, including:
– KLV-46BX450/40BX450/40CX450/

32BX350/32BX35A/32CX350: 
Wall-mount bracket SU-WL50B

– KLV-26CX350/26BX350/22CX350/

22BX350: 
Wall-mount bracket SU-WL100

• Be sure to use the screws supplied with 

the Wall-mount bracket when attaching 
the mounting hooks to the TV set. The 
supplied screws are designed so that they 
are 8 mm to 12 mm in length when 
measured from the attaching surface of 
the mounting hook.
The diameter and length of the screws 
differ depending on the Wall-mount 
bracket model.
Use of screws other than those supplied 
may result in internal damage to the TV 
set or cause it to fall, etc.

Transporting

• Before transporting the TV set, 

disconnect all cables.

• Two or more people are needed to 

transport a large TV set.

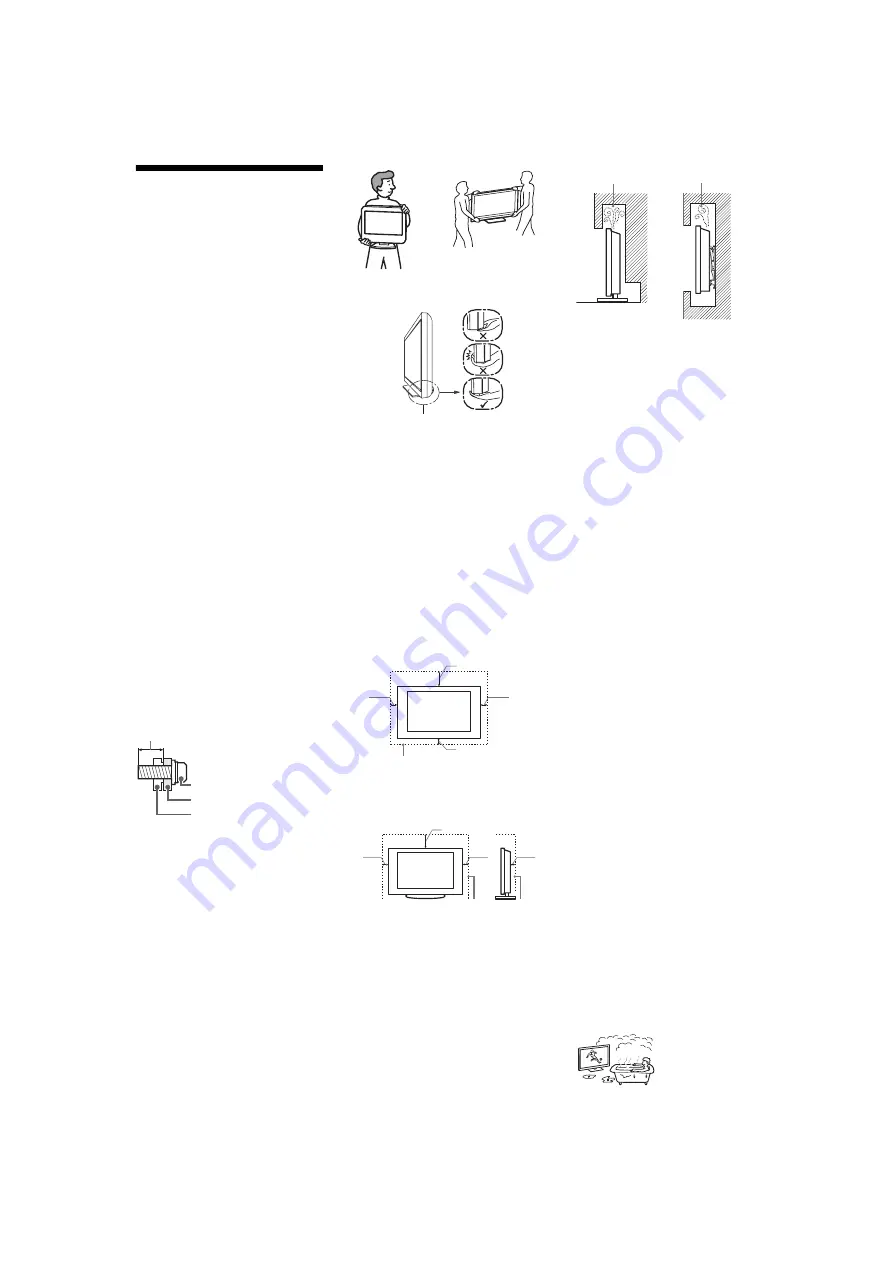
• When transporting the TV set by hand, 

hold it as shown below. Do not put stress 
on the LCD panel and the frame around 
the screen.

• When lifting or moving the TV set, hold it 

firmly from the bottom.

• When transporting the TV set, do not 

subject it to jolts or excessive vibration.

• When transporting the TV set for repairs 

or when moving, pack it using the original 
carton and packing material.

Ventilation

• Never cover the ventilation holes or insert 

anything in the cabinet.

• Leave space around the TV set as shown 

below.

• It is strongly recommended that you use a 

Sony wall-mount bracket in order to 
provide adequate air-circulation.

Installed on the wall

Installed with stand

• To ensure proper ventilation and prevent 

the collection of dirt or dust:
– Do not lay the TV set flat, install 

upside down, backwards, or sideways.

– Do not place the TV set on a shelf, rug, 

bed or in a closet.

– Do not cover the TV set with a cloth, 

such as curtains, or items such as 
newspapers, etc.

– Do not install the TV set as shown 

below.

AC power cord

Handle the AC power cord and outlet as 
follows in order to avoid any risk of fire, 
electrical shock or damage and/or injuries:
– The shape of AC power plug, which is 

supplied with the TV set, varies 
depending on the regions.

– Use only Sony supplied AC power cords, 

not those of other brands.

– Insert the plug fully into the AC power 

outlet.

– Operate the TV set on a 110-240 V AC 

supply only.

– When wiring cables, be sure to unplug the 

AC power cord for your safety and take 
care not to catch your feet on the cables.

– Disconnect the AC power cord from the 

AC power outlet before working on or 
moving the TV set.

– Keep the AC power cord away from heat 

sources.

– Unplug the AC power plug and clean it 

regularly. If the plug is covered with dust 
and it picks up moisture, its insulation may 
deteriorate, which could result in a fire. 

Notes

• Do not use the supplied AC power cord on 

any other equipment.

• Do not pinch, bend, or twist the AC power 

cord excessively. The core conductors 
may be exposed or broken.

• Do not modify the AC power cord.
• Do not put anything heavy on the AC 

power cord.

• Do not pull on the AC power cord itself 

when disconnecting the AC power cord.

• Do not connect too many appliances to 

the same AC power outlet.

• Do not use a poor fitting AC power outlet.

Prohibited Usage

Do not install/use the TV set in locations, 
environments or situations such as those 
listed below, or the TV set may malfunction 
and cause a fire, electrical shock, damage 
and/or injuries.

Location:

• Outdoors (in direct sunlight), at the 

seashore, on a ship or other vessel, inside 
a vehicle, in medical institutions, unstable 
locations, near water, rain, moisture or 
smoke.

• If the TV is placed in the changing room 

of a public bath or hot spring, the TV may 
be damaged by airborne sulfur, etc.

Screw (supplied with the 
Wall-mount bracket)

Mounting Hook
Hook attachment on rear of 
TV set

Min. ~ 26 TV: 6.5 ~ 10mm
32 TV ~ Max.: 8 ~ 12mm

KLV-26/22CX350/
KLV-26/22BX350

KLV-46/40BX450/
KLV-40CX450/
KLV-32BX350/
KLV-32CX350/
KLV-32BX35A

Be sure to hold the bottom of the panel, 
not the front part.

30 cm

10 cm

10 cm

10 cm

Leave at least this space around 
the set.

30 cm

10 cm

10 cm

6 cm

Leave at least this space around the 
set.

Air circulation is blocked.

Wall

Wall

Содержание Bravia KLV-22BX350

Страница 1: ...2 26 32CX350_40 46BX450_40CX450_32BX35A 4 411 978 14 1 LCD TV Operating Instructions Start up Guide Operating the TV Using Optional Equipment Using Menu Functions Additional Information KLV 46BX450 KLV 40BX450 KLV 40CX450 KLV 32BX35A KLV 32BX350 KLV 32CX350 KLV 26BX350 KLV 26CX350 KLV 22BX350 KLV 22CX350 ...

Страница 2: ...sal service provider or the store where you made the purchase You may contact our company s toll free number in India for assistance The Euro South Africa converter plug should be fitted as follows 1 Insert the power supply or CEE7 plug in to the converter plug 2 Use an appropriate screwdriver to attach the screw tightly without damaging the screw head 3 TEST Grip the converter plug and pull the V...

Страница 3: ...ng optional equipment 11 Viewing pictures from the connected equipment 12 Viewing Twin Picture and PIP Picture in Picture 12 Using Menu Functions Navigating through menus 13 Using Photo Frame Mode KLV 40CX450 KLV 32 26 22CX350 only 13 Using the Favourites 13 Playing back photo music video via USB 14 Listening to the FM Radio 17 Using BRAVIA Sync with Control for HDMI 18 Settings adjustment 19 Pict...

Страница 4: ...the screen to direct illumination or sunlight Place the TV with its screen facing down on a level and stable surface covered with a thick and soft cloth Hold the Table Top Stand with one hand to avoid it dropping when attaching If using an electric screwdriver set the tightening torque at approximately 1 5 N m 15 kgf cm Ensure the AC power cord is away from screw holes during stand installation to...

Страница 5: ...or PROG to select a TV channel 3 Press 2 to adjust the volume Detaching the stand from the TV Do not remove the stand for any reason other than to wall mount the TV Place the TV with its screen facing down on a level and stable surface covered with a thick and soft cloth Hold the Table Top Stand with one hand to avoid it dropping when detaching The shapes of AC power plug and AC power outlet diffe...

Страница 6: ...e down backwards or sideways Do not place the TV set on a shelf rug bed or in a closet Do not cover the TV set with a cloth such as curtains or items such as newspapers etc Do not install the TV set as shown below AC power cord Handle the AC power cord and outlet as follows in order to avoid any risk of fire electrical shock or damage and or injuries The shape of AC power plug which is supplied wi...

Страница 7: ...oor light or during long period of time strains your eyes When using headphones adjust the volume so as to avoid excessive levels as hearing damage may result LCD Screen Although the LCD screen is made with high precision technology and 99 99 or more of the pixels are effective black dots may appear or bright points of light red blue or green may appear constantly on the LCD screen This is a struc...

Страница 8: ...tches to a TV display when displaying external input 7 Twin Picture PIP page 12 8 Number buttons Selects channels For channel numbers 10 and above enter the next digit quickly page 23 In Text mode Enters the three digit page number to select the page 9 Text Press repeatedly to display text information Text t Text over the TV picture mix mode t No Text exit the Text service q Adjust Volume 2 qa Mut...

Страница 9: ...mic sound Game Delivers the best picture and sound quality for fullest game playing enjoyment Graphics Delivers clearer detailed pictures to reduce fatigue for prolonged viewing Sports Delivers realistic picture with surround sound like in a stadium w Wide Mode Changes the picture size Press repeatedly to select the desired wide mode wa PROG CH Selects the next or previous channel In Text mode Sel...

Страница 10: ...ives IR signals from the remote Do not put anything over the sensor doing so may affect its function 7 Picture Off Timer indicator Lights up in green when you select Picture Off page 27 Lights up in amber when you set the timer page 25 or Photo Frame Mode page 13 Photo Frame Mode KLV 40CX450 KLV 32 26 22CX350 only 8 1 Standby indicator Lights up in red when the TV is in standby mode 9 Power indica...

Страница 11: ...cting optional equipment You can connect a wide range of optional equipment to your TV Digital still camera PC HDMI output Home theatre system Blu ray Disc player Video game equipment DVD player with component output Camcorder PC DVD player VCR S VHS Hi8 DVC camcorder DVD player with HDMI output Camcorder USB storage media Headphones ...

Страница 12: ...to set up this communication If the equipment has a DVI jack connect the DVI jack to the HDMI IN 1 jack through a DVI HDMI adaptor interface not supplied and connect the equipment s audio out jack to the PC HDMI 1 AUDIO IN jack in the PC IN jacks The HDMI jacks can support PC timing in HDMI PC mode See page 22 for supported PC input signal Be sure to use only an authorized HDMI cable bearing the H...

Страница 13: ...ist Press RETURN to return to the previous screen Add a current channel or external input to the Favourite list Press F f to select Add to Favourites then press Favourite channels and external inputs can also be added using the OPTIONS button on the remote When you run the Auto Tuning only the Programme channels in your Favourites list will be cleared When you continue to add items beyond the 10th...

Страница 14: ...peration of Photo Music Video You can operate the connected USB device by the TV remote z If a video file has subtitles they can be displayed by pressing the green button during DivX playback To use playback options Press the coloured buttons to display a list that contains shortcuts to some setting menus The listed options vary depending on the current input and content Photo Slideshow Effect Sel...

Страница 15: ...PTIONS while a photo is displayed then press F f to select Slideshow and press To stop a slideshow Select Stop Slideshow from Options menu While the TV is accessing the data on the USB device observe the following Do not turn off the TV or connected USB device Do not disconnect the USB cable Do not remove the USB device The data on the USB device may be damaged Sony will not be held liable for any...

Страница 16: ...Extension Container Video Codec Audio Codec avi divx AVI DivX 3 11 4 x 5 1 PCM MPEG1 Layer1 2 MP3 Dolby Digital 2ch WMA v8 XviD MPEG1 MPEG2 MP H 264 BP MP HP MPEG 4 SP ASP wmv asf ASF WMV v9 MP3 WMA v8 Divx 3 11 XviD MPEG 4 SP ASP VC 1 mp4 mov 3gp MP4 H 264 BP MP HP MPEG1 Layer1 2 MP3 MPEG 4 SP ASP H 263 mkv MKV H 264 BP MP HP PCM MPEG1 Layer1 2 MP3 Dolby Digital 2ch WMA v8 MPEG 4 SP ASP WMV v9 Di...

Страница 17: ...te to directly select the desired preset FM radio station Listen to non preset stations 1 Access to FM Radio mode 2 Press F f to manually search for the desired FM radio station It will search and stop when found the next available station You can also tune FM frequency for the desired FM radio station by pressing G g The available radio frequency is only for temporary listening pleasure and canno...

Страница 18: ...he input to the connected equipment when the equipment starts to play If you turn on a connected audio system while the TV is on the sound output switches from the TV speaker to the audio system Adjusts the volume 2 and mutes the sound of a connected audio system You can operate the connected Sony equipment that has the BRAVIA Sync logo by the TV remote Possible operations with BRAVIA Sync buttons...

Страница 19: ...rpens or softens the picture Colour Temperature Adjusts the whiteness of the picture Cool Gives the white colours a blue tint Neutral Gives the white colours a neutral tint Warm Gives the white colours a red tint Warm is not available when Picture Mode is set to Vivid Noise Reduction Reduces the picture noise snowy picture in a weak broadcast signal MPEG Noise Reduction Reduces the picture noise i...

Страница 20: ... Adjusting higher frequency will affect higher pitched sound and adjusting lower frequency will affect lower pitched sound Balance Emphasises left or right speaker balance Intelligent Volume Minimizes the difference in volume level between all programmes and adverts e g adverts tend to be louder than programmes Volume Offset Adjusts the volume level of the current input relative to other inputs Su...

Страница 21: ...gs through your audio system HDMI DVI Audio Source only in HDMI 1 input mode Switches the audio signal for HDMI input when a DVI device is connected Select from Auto HDMI Audio and PC Audio Screen Wide Mode For details about wide mode see page 9 Auto Wide Automatically changes the wide mode according to the input signal from an external equipment To keep your setting select Off z Even if Auto Wide...

Страница 22: ...ustment may not work well with certain input signals In such cases manually adjust Phase Pitch Horizontal Shift and Vertical Shift Phase Adjusts the phase when the screen flickers Pitch Adjusts the pitch when the picture has unwanted vertical stripes Horizontal Shift Adjusts the horizontal position of the picture Vertical Shift Adjusts the vertical position of the picture Signals Horizontal Pixel ...

Страница 23: ... until the name is completed then press Manual Programme Preset Before selecting Label AFT Audio Filter Skip Colour System press PROG to select the programme number with the channel You cannot select a programme number that is set to Skip page 24 Programme TV System Frequency Presets programme channels manually 1 Select Programme then press 2 Press F f to select the programme number you want to ma...

Страница 24: ... to search the FM radio stations Searching stops automatically when a station is tuned in If the station has a noisy sound you may be able to improve the sound quality by pressing G g Press to store the FM radio station You may edit the FM radio station label Press F f to select alphanumeric characters for the label then press Repeat steps 1 to 2 to preset other FM radio stations To enable this fe...

Страница 25: ...on Selects the time period 1 h 2 h 4 h or 24 h after which the TV automatically switches to standby mode First day of the week Set Sunday or Monday as the first day of the week on the calendar USB Auto Start Automatically enters the thumbnail view of the last played Photo Music Video when the TV is turned on and a USB device is connected to the USB port then turned on Sleep Timer KLV 46 40BX450 KL...

Страница 26: ...hether or not to link the operations of the TV and the connected equipment that is compatible with Control for HDMI When set to On the following functions are available If the specific Sony equipment that is compatible with Control for HDMI is connected this setting is applied to the connected equipment automatically when the Control for HDMI is set to On using the TV Auto Devices Off When this is...

Страница 27: ...actory settings After completing this process the initial set up screen is displayed Be sure not to turn the TV off during this period it takes about 30 seconds or press any buttons Eco Reset Resets the current Eco settings to the default values Power Saving Reduces power consumption of the TV by adjusting the backlight When you select Picture Off the picture is switched off and the Picture Off in...

Страница 28: ...nt Bracket the space between the wall and the TV will be 6 cm Use this space to route cables to the TV See page 6 for installed with stand Unit mm Sufficient expertise is required for installing these products especially to determine the strength of the wall for withstanding the TV s weight Be sure to entrust the attachment of these products to the wall to Sony dealers or licensed contractors and ...

Страница 29: ...2 675 137 479 151 KLV 40BX450 KLV 40CX450 980 601 175 479 151 KLV 32BX350 KLV 32CX350 KLV 32BX35A 790 497 200 454 149 Screw and hook locations diagram table SU WL50B Screen centre point b b a c a c Model name Screw location Hook location SU WL50B SU WL50B KLV 46BX450 KLV 40BX450 KLV 40CX450 d i b KLV 32BX350 KLV 32CX350 KLV 32BX35A e h c SU WL100 KLV 26CX350 KLV 26BX350 a KLV 22CX350 KLV 22BX350 b...

Страница 30: ...nction Picture contours are distorted Change the current setting of Cinema Drive to other settings page 19 No colour on programmes Select Reset page 19 No picture from the connected equipment Turn the connected equipment on Check the cable connection Press repeatedly to select the desired input Correctly insert the USB device Make sure that the USB device has been properly formatted Operations are...

Страница 31: ...rmats 1080p 1080i 720p 576p 576i 480p 480i Y 1 Vp p 75 ohms 0 3V negative sync PB CB 0 7 Vp p 75 ohms PR CR 0 7 Vp p 75 ohms 2 Video input phono jack COMPONENT IN Audio input phono jack 1 Video input phono jack 1 Audio input phono jack HDMI IN 1 2 Video 1080 24p 1080p 1080i 720p 576p 576i 480p 480i Audio Two channel linear PCM 32 44 1 and 48 kHz 16 20 and 24 bits Dolby Digital Analogue audio input...

Страница 32: ...out stand kg 13 2 17 3 Optional accessories Wall Mount Bracket SU WL50B Model name KLV 32CX350 KLV 32BX350 KLV 32BX35A Power and others Power requirements 110 240 V AC 50 60 Hz Screen size measured diagonally inches 32 cm Approx 80 0 Display resolution 1 366 pixels horizontal 768 lines vertical Power consumption Indicated on the rear of the TV Dimensions Approx w h d with stand mm 790 534 193 with...

Отзывы: